HP LaserJet 8150 Printer series Skrócona instrukcja obsługi
- Kategoria
- Wielofunkcyjne
- Typ
- Skrócona instrukcja obsługi
Niniejsza instrukcja jest również odpowiednia dla

copyright © 2000
Hewlett-Packard Company
getting started guide
píručka pro zahájení práce
alapvet tudnivalók
kézikönyve
poradnik czynnoci
wstpnych
« »
başlangıç kılavuzu
hp LaserJet 8150
C4265-90905
*C4265-90905*
*C4265-90905*


English
HP LaserJet 8150, 8150 N,
8150 DN, 8150 HN, and
8150 MFP Printers
Getting Started Guide ________

Hewlett-Packard Company
11311 Chinden Boulevard
Boise, Idaho 83714 U.S.A.
© Copyright Hewlett-Packard
Company 2000
All Rights Reserved.
Reproduction, adaptation, or
translation without prior written
permission is prohibited, except
as allowed under the copyright
laws.
Publication number
C4265-90905
First Edition, October 2000
Warranty
The information contained in
this document is subject to
change without notice.
Hewlett-Packard makes no
warranty of any kind with
respect to this information.
HEWLETT-PACKARD
SPECIFICALLY DISCLAIMS
THE IMPLIED WARRANTY OF
MERCHANTABILITY AND
FITNESS FOR A PARTICULAR
PURPOSE.
Hewlett-Packard shall not be
liable for any direct, indirect,
incidental, consequential, or
other damage alleged in
connection with the furnishing or
use of this information.
Trademark Credits
Acrobat is a trademark of Adobe
Systems Incorporated.
PostScript is a trademark of
Adobe Systems Incorporated
which may be registered in
certain jurisdictions.
Arial, Monotype, and Times
New Roman, are U.S. registered
trademarks of the Monotype
Corporation.
CompuServe is a U.S.
trademark of CompuServe, Inc.
Helvetica, Palatino, Times, and
Times Roman are trademarks of
Linotype AG and/or its
subsidiaries in the U.S. and
other countries.
Microsoft, MS Windows,
Windows and Windows NT are
U.S. registered trademarks of
Microsoft Corporation.
TrueType is a U.S. trademark of
Apple Computer, Inc.
E
NERGY
S
TA R
is a U.S.
registered service mark of the
U.S. EPA.

EN
Contents iii
English
Contents
Installation Checklist . . . . . . . . . . . . . . . . . . . . . . . . . . . . . . . . . . . .7
Step 1 Prepare Printer Location. . . . . . . . . . . . . . . . . . . . . . . .8
Step 2 Check Package Contents . . . . . . . . . . . . . . . . . . . . . .10
Step 3 Remove Internal Packaging . . . . . . . . . . . . . . . . . . . .11
Step 4 Locate Printer Parts . . . . . . . . . . . . . . . . . . . . . . . . . .12
Step 5 Install Accessories . . . . . . . . . . . . . . . . . . . . . . . . . . .13
Step 6 Install Toner Cartridge. . . . . . . . . . . . . . . . . . . . . . . . .14
Step 7 Load Trays 2 and 3. . . . . . . . . . . . . . . . . . . . . . . . . . .16
Step 8 Load Tray 1 (Optional) . . . . . . . . . . . . . . . . . . . . . . . .18
Step 9 Attach Power Cord . . . . . . . . . . . . . . . . . . . . . . . . . . .20
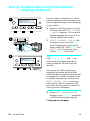
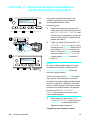
Step 10 Install or Change the Control Panel
Overlay (Optional) . . . . . . . . . . . . . . . . . . . . . . . . . . . . . .21
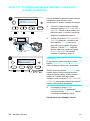
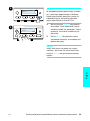
Step 11 Configure the Control Panel Display
Language (Optional). . . . . . . . . . . . . . . . . . . . . . . . . . . . .22
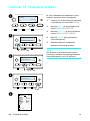
Step 12 Test the Printer . . . . . . . . . . . . . . . . . . . . . . . . . . . . .24
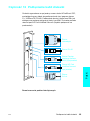
Step 13 Connect Printer Cables. . . . . . . . . . . . . . . . . . . . . . .25
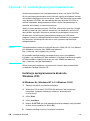
Step 14 Install Printing Software . . . . . . . . . . . . . . . . . . . . . .28
Step 15 Verify Printer Setup. . . . . . . . . . . . . . . . . . . . . . . . . .31
FCC Regulations. . . . . . . . . . . . . . . . . . . . . . . . . . . . . . . . . . . . . .32

iv Contents
EN

EN
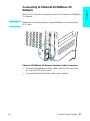
5
English
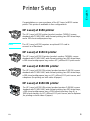
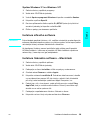
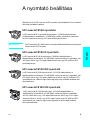
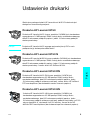
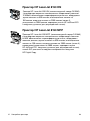
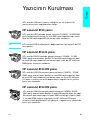
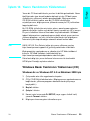
Printer Setup
Congratulations on your purchase of the HP LaserJet 8150 series
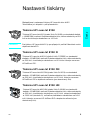
printer! This printer is available in five configurations:
HP LaserJet 8150 printer
The HP LaserJet 8150 printer (product number C4265A) comes
standard with 32 MB RAM, wide format printing, two 500-sheet trays,
and a 100-sheet multipurpose tray.
Note The HP LaserJet 8150 requires an optional EIO card to
connect to a Macintosh.
HP LaserJet 8150 N printer
The HP LaserJet 8150 N printer (product number C4266A) comes
standard with 32 MB RAM, wide format printing, two 500-sheet trays,
a 100-sheet multipurpose tray, and an HP JetDirect EIO print server.
HP LaserJet 8150 DN printer
The HP LaserJet 8150 DN printer (product number C4267A) comes
standard with 32 MB RAM, wide format printing, two 500-sheet trays,
a 100-sheet multipurpose tray, an HP JetDirect EIO print server, and
a duplexer (for printing on both sides of paper).
HP LaserJet 8150 HN printer
The HP LaserJet 8150 HN printer (product number C4269A) comes
standard with 32 MB RAM, wide format printing, two 500-sheet trays,
a 100-sheet multipurpose tray, a 2000-sheet input tray (tray 4), a
3000-sheet stacker, an HP JetDirect EIO print server, and a duplexer
(for printing on both sides of paper).

6 Printer Setup
EN
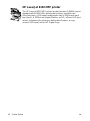
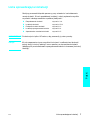
HP LaserJet 8150 MFP printer
The HP LaserJet 8150 MFP printer (product number C4268A) comes
standard with 64 MB RAM, wide format printing, hard disk, two
500-sheet trays, a 100-sheet multipurpose tray, a 2000-sheet input
tray (tray 4), a 3000-sheet Stapler/Stacker, an HP JetDirect EIO print
server, a duplexer (for printing on both sides of paper), a copy
connect EIO board, and an HP Digital Copy.

EN
Installation Checklist 7
English
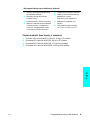
Installation Checklist
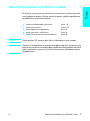
This guide will help you set up and install the new printer. For proper
installation, please complete each section in order:
WARNING! The printer is heavy. HP recommends that four people move it.
Note To learn about all the features and capabilities of the printer, see the
printer user guide and the help menus in the printer drivers (available
after you install the printing software and online user guide).
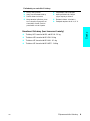
●
Unpack the printer steps 1-4
●
Install the printer steps 5-12
●
Connect the printer cables step 13
●
Install printing software step 14
●
Verify printer setup step 15

8 Printer Setup
EN
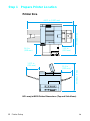
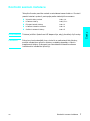
Step 1 Prepare Printer Location
Printer Size
HP LaserJet 8150 Printer Dimensions (Top and Side Views)
35 in (889 mm)
46.75 in (1187 mm)
11.5 in
(292 mm)
14.5 in
(368 mm)
13.75 in
(350 mm)
11.5 in
(292 mm)
29.5 in (749 mm)

EN
Prepare Printer Location 9
English
Printer Weight (without toner cartridge)
●
HP LaserJet 8150 and 8150 N printers: 51 kg (112 lbs)
●
HP LaserJet 8150 DN printer: 54 kg (120 lbs)
●
HP LaserJet 8150 HN printer: 113 kg (249 lbs)
●
HP LaserJet 8150 MFP printer: 136 kg (300 lbs)
Location requirements for the printer
●
A sturdy, level surface for
placement
● Space allowance around the
printer
●
A well ventilated room
●
No exposure to direct sunlight
or chemicals, including
ammonia-based cleaning
solutions
●
Adequate power supply
●
A stable environment—no
abrupt temperature or humidity
changes
●
Relative humidity 20% to 80%
●
Room temperature 50° to 91° F
(10° to 32.5° C)

10 Printer Setup
EN
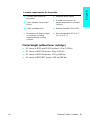
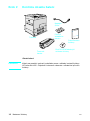
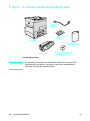
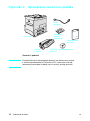
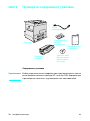
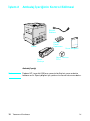
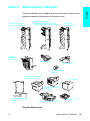
Step 2 Check Package Contents
Package Contents
Note A printer parallel interface cable is only included with the
HP LaserJet 8150 base printer. See the printer user guide for
ordering information.
Power Cord
Printer Software
CD-ROM
Toner
Cartridge
Control
Panel
Overlay
Printer
Documentation
Printer

EN
Remove Internal Packaging 11
English
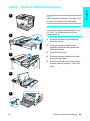
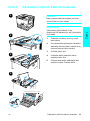
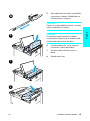
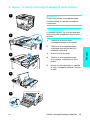
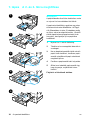
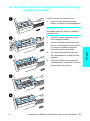
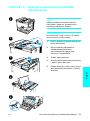
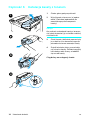
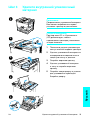
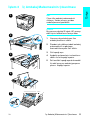
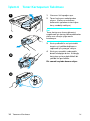
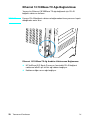
Step 3 Remove Internal Packaging
Note
Save all packing material. You may need
to repack the printer at a later date.
WARNING!
This printer weighs approximately 51 kg
(112 lbs). HP recommends that four
people move it.
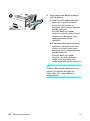
1 Remove all external packing tape
from the printer.
2 Remove packing material from
standard output bin and protective
film from display.
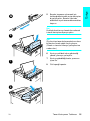
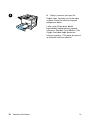
3 Open the top cover.
4 Remove packing material and tape
and close top cover.
5 Open the left-side door and remove
the two packing spacers. Close the
door.
1
2
3
4
5

12 Printer Setup
EN
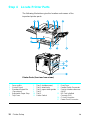
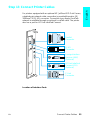
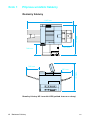
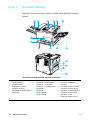
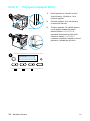
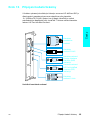
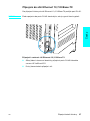
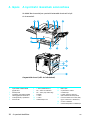
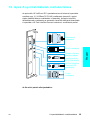
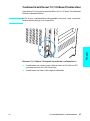
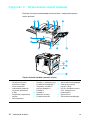
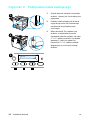
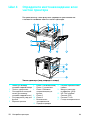
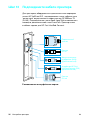
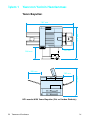
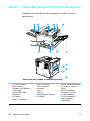
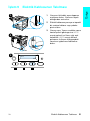
Step 4 Locate Printer Parts
The following illustrations give the location and names of the
important printer parts.
Printer Parts (front and rear views)
1
2
3
4
5
Face-up Bin
Control Panel
Standard Output Bin
(Face-down)
Adjustable Paper Stop
Top Cover
6
7
8
9
10
11
Tray 1 (multipurpose)
Tray 1 extensions
Tray 1 paper width guides
Tray 2
Tray 3
Power Switch
12
13
14
15
16
17
Front Door
Parallel Cable Connector
Foreign Interface Harness
(AUX)
HP Fast InfraRed
Connect (FIR)
C-Link Connector
Power Cord Connector

EN
Install Accessories 13
English
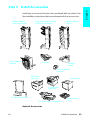
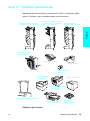
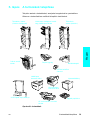
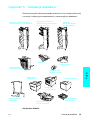
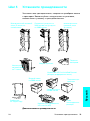
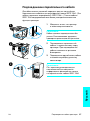
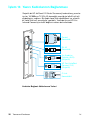
Step 5 Install Accessories
Install any accessories that you have purchased with the printer. Use
the installation instructions that are packaged with the accessories.
Optional Accessories
Duplexer
Envelope
Feeder
Printer Stand
2 x 500-sheet
Input Tray
2000-sheet
Input Tray
Multibin Mailbox
(8-Bin)
Multibin Mailbox
(5-Bin with Stapler)
HP Fast InfraRed
Connect
3000-sheet Stapler/Stacker
or 3000-sheet Stacker
7-bin Tabletop
Mailbox
Custom Paper
Tr a y
HP LaserJet MFP Upgrade Kit
HP Digital Copy Stand

14 Printer Setup
EN
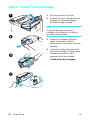
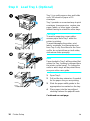
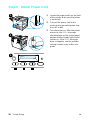
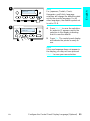
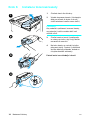
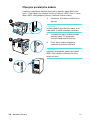
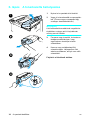
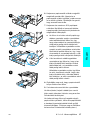
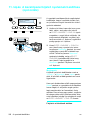
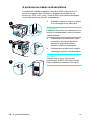
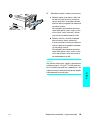
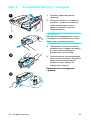
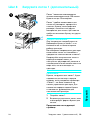
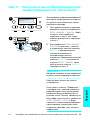
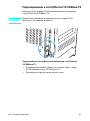
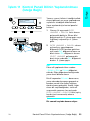
Step 6 Install Toner Cartridge
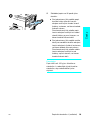
1 Open the printer’s top cover.
2 Remove the toner cartridge from its
packaging. (Save packaging for
possible cartridge storage.)
Note
To prevent damage to the toner
cartridge, do not expose it to light for
more than a few minutes.
3 Rotate the cartridge and gently
shake it from side to side to
distribute the toner evenly inside the
cartridge.
4 Locate the sealing tape tab on the
end of the cartridge. Carefully bend
the tab back and forth until it
separates from the cartridge.
Continued on the next page.
1

EN
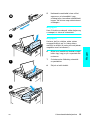
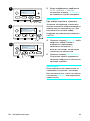
Install Toner Cartridge 15
English
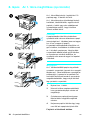
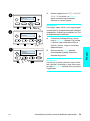
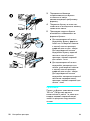
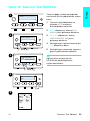
5 Firmly pull the tab straight out from
the cartridge to remove the entire
length of tape. Avoid touching any
black toner on the tape.
Note
If the tab separates from the tape, grasp
the tape and pull it out of the cartridge.
Note
If toner gets on your clothing, wipe it off
with a dry cloth and wash clothing in cold
water. (Hot water sets toner into fabric.)
6 Position the cartridge as shown with
the arrow pointing into the printer.
7 Slide the cartridge into the printer as
far as it will go.
8 Close the top cover.
7
6
8

16 Printer Setup
EN
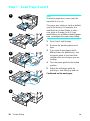
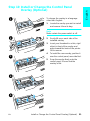
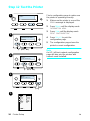
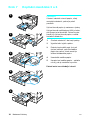
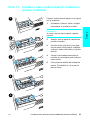
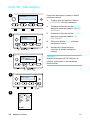
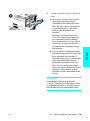
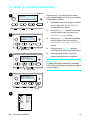
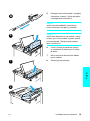
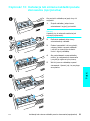
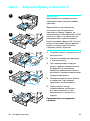
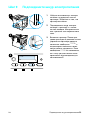
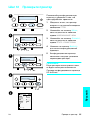
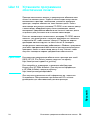
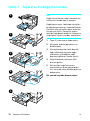
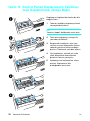
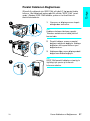
Step 7 Load Trays 2 and 3
Note
To avoid a paper jam, never open the
tray while it is in use.
The paper size setting is set to a default
size at the factory. For example, the
default for the United States is letter-
size, while in Europe it is A4. If you
would like to use a different default paper
size, reconfigure the paper tray setting.
1 Open Tray 2 until it stops.
2 Remove the packing spacer and
tape.
3 If you wish to load paper that is
different than the default size, turn
the paper guide to the mark that
indicates the size of paper you are
loading.
4 Turn the paper guide to the locked
position.
5 Adjust the left paper guide by
pushing in, then lifting up and out.
Continued on the next page.
1
2
3
4
5

EN
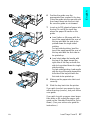
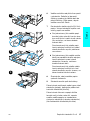
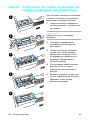
Load Trays 2 and 3 17
English
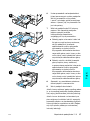
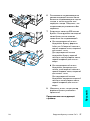
6 Position the guide over the
appropriate lines marked in the tray.
Press the guide into the rear slot and
then lower down into the front slot.
Be sure the guide is not skewed.
7 Insert up to 500 sheets of paper into
the tray. Do not fill the input tray
above the paper fill marks on the
guide.
a Load Letter or A4 paper with the
top of the page toward the rear of
the tray and with the side-to-be-
printed down for single-sided
printing.
For two-sided printing, load the
top of the page toward the rear of
the tray and with the first side-to-
be-printed up.
b Load short-edge fed media with
the top of the page toward the
right side of the tray and with the
side-to-be-printed down for single-
sided printing.
For two-sided printing, load media
with the top of the page toward the
left side of the tray and with the
first side-to-be-printed up.
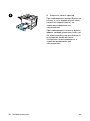
8 Make sure the paper size tab is set
correctly.
9 Slide the tray back into the printer.
If you wish to select your paper by type
rather than tray (source), see your online
user guide.
If you wish to print on paper sizes larger
than letter or A4, adjust the paper stop
guide on the Standard Output Bin (Face-
down). (See your online user guide for
instructions.)
6
7
8
9

18 Printer Setup
EN
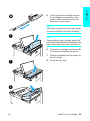
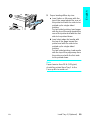
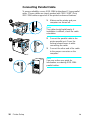
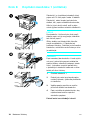
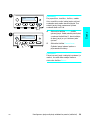
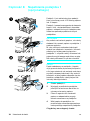
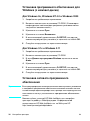
Step 8 Load Tray 1 (Optional)
Tray 1 is a multi-purpose tray and holds
up to 100 sheets of paper or 10
envelopes.
Tray 1 provides a convenient way to print
envelopes, transparencies, custom-size
paper, labels, or other types of media
without having to unload the other trays.
CAUTION
To avoid a paper jam, never add or
remove paper from Tray 1 while the
printer is printing.
To avoid damaging the printer, print
labels, envelopes, and transparencies
from Tray 1 only. Send them to the Face-
up Bin, do not print them on both sides,
and remove them promptly.
Note
Paper loaded in Tray 1 will be printed first
unless the Tray 1 setting is changed from
the printer control panel. To change the
order in which trays will be printed from,
see your online user guide.
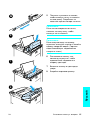
1 Open Tray 1.
2 Pull out the tray extension, if needed
for the paper size you are printing.
3 Slide the paper width guides to the
appropriate size marked on the tray.
4 Place paper into the tray without
stacking it above the paperfill mark.
Continued on next page.
Strona się ładuje...
Strona się ładuje...
Strona się ładuje...
Strona się ładuje...
Strona się ładuje...
Strona się ładuje...
Strona się ładuje...
Strona się ładuje...
Strona się ładuje...
Strona się ładuje...
Strona się ładuje...
Strona się ładuje...
Strona się ładuje...
Strona się ładuje...
Strona się ładuje...
Strona się ładuje...
Strona się ładuje...
Strona się ładuje...
Strona się ładuje...
Strona się ładuje...
Strona się ładuje...
Strona się ładuje...
Strona się ładuje...
Strona się ładuje...
Strona się ładuje...
Strona się ładuje...
Strona się ładuje...
Strona się ładuje...
Strona się ładuje...
Strona się ładuje...
Strona się ładuje...
Strona się ładuje...
Strona się ładuje...
Strona się ładuje...
Strona się ładuje...
Strona się ładuje...
Strona się ładuje...
Strona się ładuje...
Strona się ładuje...
Strona się ładuje...
Strona się ładuje...
Strona się ładuje...
Strona się ładuje...
Strona się ładuje...
Strona się ładuje...
Strona się ładuje...
Strona się ładuje...
Strona się ładuje...
Strona się ładuje...
Strona się ładuje...
Strona się ładuje...
Strona się ładuje...
Strona się ładuje...
Strona się ładuje...
Strona się ładuje...
Strona się ładuje...
Strona się ładuje...
Strona się ładuje...
Strona się ładuje...
Strona się ładuje...
Strona się ładuje...
Strona się ładuje...
Strona się ładuje...
Strona się ładuje...
Strona się ładuje...
Strona się ładuje...
Strona się ładuje...
Strona się ładuje...
Strona się ładuje...
Strona się ładuje...
Strona się ładuje...
Strona się ładuje...
Strona się ładuje...
Strona się ładuje...
Strona się ładuje...
Strona się ładuje...
Strona się ładuje...
Strona się ładuje...
Strona się ładuje...
Strona się ładuje...
Strona się ładuje...
Strona się ładuje...
Strona się ładuje...
Strona się ładuje...
Strona się ładuje...
Strona się ładuje...
Strona się ładuje...
Strona się ładuje...
Strona się ładuje...
Strona się ładuje...
Strona się ładuje...
Strona się ładuje...
Strona się ładuje...
Strona się ładuje...
Strona się ładuje...
Strona się ładuje...
Strona się ładuje...
Strona się ładuje...
Strona się ładuje...
Strona się ładuje...
Strona się ładuje...
Strona się ładuje...
Strona się ładuje...
Strona się ładuje...
Strona się ładuje...
Strona się ładuje...
Strona się ładuje...
Strona się ładuje...
Strona się ładuje...
Strona się ładuje...
Strona się ładuje...
Strona się ładuje...
Strona się ładuje...
Strona się ładuje...
Strona się ładuje...
Strona się ładuje...
Strona się ładuje...
Strona się ładuje...
Strona się ładuje...
Strona się ładuje...
Strona się ładuje...
Strona się ładuje...
Strona się ładuje...
Strona się ładuje...
Strona się ładuje...
Strona się ładuje...
Strona się ładuje...
Strona się ładuje...
Strona się ładuje...
Strona się ładuje...
Strona się ładuje...
Strona się ładuje...
Strona się ładuje...
Strona się ładuje...
Strona się ładuje...
Strona się ładuje...
Strona się ładuje...
Strona się ładuje...
Strona się ładuje...
Strona się ładuje...
Strona się ładuje...
Strona się ładuje...
Strona się ładuje...
Strona się ładuje...
Strona się ładuje...
Strona się ładuje...
Strona się ładuje...
Strona się ładuje...
Strona się ładuje...
Strona się ładuje...
Strona się ładuje...
Strona się ładuje...
Strona się ładuje...
Strona się ładuje...
Strona się ładuje...
Strona się ładuje...
Strona się ładuje...
Strona się ładuje...
Strona się ładuje...
Strona się ładuje...
Strona się ładuje...
Strona się ładuje...
Strona się ładuje...
Strona się ładuje...
Strona się ładuje...
Strona się ładuje...
Strona się ładuje...
Strona się ładuje...
Strona się ładuje...
Strona się ładuje...
Strona się ładuje...
Strona się ładuje...
Strona się ładuje...
Strona się ładuje...
Strona się ładuje...
Strona się ładuje...
Strona się ładuje...
Strona się ładuje...
Strona się ładuje...
Strona się ładuje...
-
 1
1
-
 2
2
-
 3
3
-
 4
4
-
 5
5
-
 6
6
-
 7
7
-
 8
8
-
 9
9
-
 10
10
-
 11
11
-
 12
12
-
 13
13
-
 14
14
-
 15
15
-
 16
16
-
 17
17
-
 18
18
-
 19
19
-
 20
20
-
 21
21
-
 22
22
-
 23
23
-
 24
24
-
 25
25
-
 26
26
-
 27
27
-
 28
28
-
 29
29
-
 30
30
-
 31
31
-
 32
32
-
 33
33
-
 34
34
-
 35
35
-
 36
36
-
 37
37
-
 38
38
-
 39
39
-
 40
40
-
 41
41
-
 42
42
-
 43
43
-
 44
44
-
 45
45
-
 46
46
-
 47
47
-
 48
48
-
 49
49
-
 50
50
-
 51
51
-
 52
52
-
 53
53
-
 54
54
-
 55
55
-
 56
56
-
 57
57
-
 58
58
-
 59
59
-
 60
60
-
 61
61
-
 62
62
-
 63
63
-
 64
64
-
 65
65
-
 66
66
-
 67
67
-
 68
68
-
 69
69
-
 70
70
-
 71
71
-
 72
72
-
 73
73
-
 74
74
-
 75
75
-
 76
76
-
 77
77
-
 78
78
-
 79
79
-
 80
80
-
 81
81
-
 82
82
-
 83
83
-
 84
84
-
 85
85
-
 86
86
-
 87
87
-
 88
88
-
 89
89
-
 90
90
-
 91
91
-
 92
92
-
 93
93
-
 94
94
-
 95
95
-
 96
96
-
 97
97
-
 98
98
-
 99
99
-
 100
100
-
 101
101
-
 102
102
-
 103
103
-
 104
104
-
 105
105
-
 106
106
-
 107
107
-
 108
108
-
 109
109
-
 110
110
-
 111
111
-
 112
112
-
 113
113
-
 114
114
-
 115
115
-
 116
116
-
 117
117
-
 118
118
-
 119
119
-
 120
120
-
 121
121
-
 122
122
-
 123
123
-
 124
124
-
 125
125
-
 126
126
-
 127
127
-
 128
128
-
 129
129
-
 130
130
-
 131
131
-
 132
132
-
 133
133
-
 134
134
-
 135
135
-
 136
136
-
 137
137
-
 138
138
-
 139
139
-
 140
140
-
 141
141
-
 142
142
-
 143
143
-
 144
144
-
 145
145
-
 146
146
-
 147
147
-
 148
148
-
 149
149
-
 150
150
-
 151
151
-
 152
152
-
 153
153
-
 154
154
-
 155
155
-
 156
156
-
 157
157
-
 158
158
-
 159
159
-
 160
160
-
 161
161
-
 162
162
-
 163
163
-
 164
164
-
 165
165
-
 166
166
-
 167
167
-
 168
168
-
 169
169
-
 170
170
-
 171
171
-
 172
172
-
 173
173
-
 174
174
-
 175
175
-
 176
176
-
 177
177
-
 178
178
-
 179
179
-
 180
180
-
 181
181
-
 182
182
-
 183
183
-
 184
184
-
 185
185
-
 186
186
-
 187
187
-
 188
188
-
 189
189
-
 190
190
-
 191
191
-
 192
192
-
 193
193
-
 194
194
-
 195
195
-
 196
196
-
 197
197
-
 198
198
-
 199
199
-
 200
200


HP LaserJet 8150 Printer series Skrócona instrukcja obsługi
- Kategoria
- Wielofunkcyjne
- Typ
- Skrócona instrukcja obsługi
- Niniejsza instrukcja jest również odpowiednia dla
w innych językach
Powiązane artykuły
-
HP LaserJet 9000 Printer series Skrócona instrukcja obsługi
-
HP LaserJet 8150 Multifunction Printer series instrukcja
-
-
HP (Hewlett-Packard) 4200L Instrukcja obsługi
-
-
HP LaserJet 2300 Printer series Skrócona instrukcja obsługi
-
HP LaserJet 4200 Printer series instrukcja
-
HP LaserJet 4100 Multifunction Printer series Skrócona instrukcja obsługi
-
-
HP LaserJet 9050 Printer series Skrócona instrukcja obsługi
