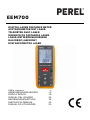
Perel EEM700 Instrukcja obsługi
- Kategoria
- Stroboskopy
- Typ
- Instrukcja obsługi

EEM700
DIGITAL LASER DISTANCE METER
AFSTANDSMETER MET LASER
TÉLÉMÈTRE AVEC LASER
MEDIDOR DE DISTANCIA LASER
LASER-ENTFERNUNGSMESSER
DALMIERZ LASEROWY
DISTANCIÓMETRO LASER
USER MANUAL 3
GEBRUIKERSHANDLEIDING 10
MODE D'EMPLOI 18
MANUAL DEL USUARIO 26
BEDIENUNGSANLEITUNG 34
INSTRUKCJA OBSŁUGI 42
MANUAL DO UTILIZADOR 50

EEM700
V. 01 – 07/05/2015 2 ©Velleman nv

EEM700
V. 01 – 07/05/2015 3 ©Velleman nv
USER MANUAL
1. Introduction
To all residents of the European Union
Important environmental information about this product
This symbol on the device or the package indicates that disposal
of the device after its lifecycle could harm the environment. Do
not dispose of the unit (or batteries) as unsorted municipal waste;
it should be taken to a specialized company for recycling. This
device should be returned to your distributor or to a local
recycling service. Respect the local environmental rules.
If in doubt, contact your local waste disposal authorities.
Thank you for choosing Velleman! Please read the manual thoroughly before
bringing this device into service. If the device was damaged in transit, do
not install or use it and contact your dealer.
2. Safety Instructions
Warning! Visible laser radiation. Do not stare into the beam as
eye damage may occur. This device contains a class 2 laser.
Output power does not exceed 1 mW, wavelength 650 nm.
Never point the laser beam at a person or animal. Never point the
laser beam at reflective surfaces. Never look at the laser beam
using an optical instrument, such as binoculars or a microscope.
Keep this device away from children and unauthorized users.
Keep this device away from rain, moisture, splashing and dripping
liquids. Never put objects filled with liquids on top of or close to
the device.
3. General Guidelines
Refer to the Velleman® Service and Quality Warranty on the last pages
of this manual.
Keep this device away from dust and extreme temperatures.
Protect this device from shocks and abuse. Avoid brute force when
operating the device.
Familiarise yourself with the functions of the device before actually
using it.
All modifications of the device are forbidden for safety reasons. Damage
caused by user modifications to the device is not covered by the
warranty.

EEM700
V. 01 – 07/05/2015 4 ©Velleman nv
Only use the device for its intended purpose. Using the device in an
unauthorised way will void the warranty.
Damage caused by disregard of certain guidelines in this manual is not
covered by the warranty and the dealer will not accept responsibility for
any ensuing defects or problems.
Do not switch the device on immediately after it has been exposed to
changes in temperature. Protect the device against damage by leaving
it switched off until it has reached room temperature.
Readings may be affected if the unit is operated within a radio
frequency electromagnetic field, but the performance of the instrument
will not be permanently affected.
Use the original packaging if the device is to be transported.
Keep this manual for future reference.
4. Features
large LCD with backlight
choice between metric and imperial units
calculate surface and volume
indirect measurements using 2 or 3 measuring points
add up and subtract functions
last 10 measurements are retained in memory
very large measuring range (60 m) and very high precision (± 1.5 mm)
automatic / manual switch-off
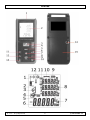
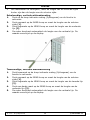
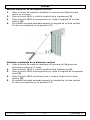
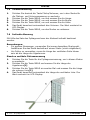
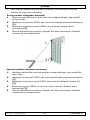
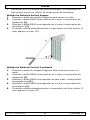
5. Overview
Refer to the illustrations on page 2 of this manual.
1
IR sensor
9
off button/delete
2
LCD display
10
storage
3
measurement
11
area/volume
4
spirit level
12
increase
5
unit selection
13
benchmark
6
Pythagorean measurement
14
tripod socket
7
backlight
15
battery compartment
8
decrease
Display
1
laser emission
7
measurement unit
2
measurement
8
auxiliary display
3
indirect measurement
9
battery level
4
area/volume
10
hardware fault
5
stored data
11
MIN/MAX value
6
reading
12
error

EEM700
V. 01 – 07/05/2015 5 ©Velleman nv
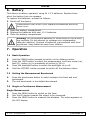
6. Battery
This device is battery-operated, using 2x 1.5 V batteries. Replace them
when the battery-low icon appears.
To replace the batteries, proceed as follows:
1. Switch off the device.
A malfunction may occur if you replace the batteries while the
device is on.
2. Open the battery compartment.
3. Replace the batteries with new 1.5 V batteries.
4. Close the battery compartment.
Warning: Do not puncture batteries or throw them in fire as they
may explode. Do not attempt to recharge non-rechargeable
batteries (alkaline). Dispose of batteries in accordance with local
regulations. Keep batteries away from children.
7. Operation
7.1 Basic Operation
1. Hold the MEAS button pressed to switch on the distance meter.
2. Press the UNIT button to select the measurement unit from meter (m),
feet (ft), inches (in) to sixteenths of inches (x/16 in).
3. Press the backlight button to switch the backlight on or off.
4. Hold the OFF/DEL button pressed to switch off the distance meter.
7.2 Setting the Measurement Benchmark
1. Press the benchmark button to switch between the front and end
benchmark.
2. The end benchmark is the default benchmark.
7.3 Single or Continuous Measurement
Single Measurement
1. Press the MEAS button to switch on the laser.
2. Aim the IR sensor towards the object to be measured.
3. Press the MEAS button to measure the distance. The value appears on
the LCD display.

EEM700
V. 01 – 07/05/2015 6 ©Velleman nv
Continuous Measurement
1. Hold the MEAS button pressed to enter the continuous measuring
mode.
2. Aim the IR sensor towards the object to be measured.
3. The current, minimum and maximum values appear on the LCD
display.
4. Press the MEAS button again to exit the continuous measuring mode.
7.4 Area Measurement
1. Press the area/volume button to enter the area-measuring mode.
2. Press the MEAS button and measure the length.
3. Press the MEAS button and measure the width.
4. The meter automatically calculates the area. The value appears on the
LCD display.
5. Press the MEAS button to exit the mode.
7.5 Volume Measurement
1. Press the area/volume button twice to enter the volume-measuring
mode.
2. Press the MEAS button and measure the length.
3. Press the MEAS button and measure the width.
4. Press the MEAS button and measure the height.
5. The meter automatically calculates the volume. The value appears on
the LCD display.
6. Press the MEAS button to exit the mode.
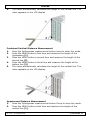
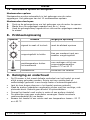
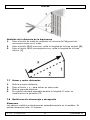
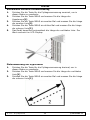
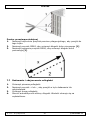
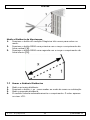
7.6 Indirect Measurement
The indirect measurement consists of measuring a distance using the
Pythagorean Theorem.
Remarks:
For accurate measurements, distances must be measured from the
exact same starting point. Therefore, it is advisable to fix the meter on
a tripod (not included).
To avoid measurement errors from the meter, the length of the vertical
side must be shorter than the length of the hypotenuse.
Simple Vertical Distance Measurement
1. Press the Pythagorean measurement button to enter the mode.
2. Press the MEAS button a first time and measure the length of the
hypotenuse [1].
3. Press the MEAS button a second time and measure the length of the
bottom line [2].

EEM700
V. 01 – 07/05/2015 7 ©Velleman nv
4. The meter automatically calculates the length of the vertical line. The
value appears on the LCD display.
Combined Vertical Distance Measurement
1. Press the Pythagorean measurement button twice to enter the mode.
2. Press the MEAS button a first time and measure the length of the
hypotenuse [1].
3. Press the MEAS button a second time and measure the length of the
second line [2].
4. Press the MEAS button a third time and measure the length of the
bottom line [3].
5. The meter automatically calculates the length of the vertical line. The
value appears on the LCD display.
Hypotenuse Distance Measurement
1. Press the Pythagorean measurement button thrice to enter the mode.
2. Press the MEAS button a first time and measure the length of the
vertical line [1].

EEM700
V. 01 – 07/05/2015 8 ©Velleman nv
3. Press the MEAS button a second time and measure the length of the
bottom line [2].
7.7 Adding and Subtracting Distances
1. Measure your first distance.
2. Press the + or – button to enter the adding or subtracting mode.
3. Measure your second distance.
4. The meter automatically calculates the length. The value appears on
the LCD display.
7.8 Storing and Browsing Measurements
Storing
Measured values will automatically be stored in the meter’s memory. The
memory can store up to 10 measurement values.
Browsing
1. Press the storage button to enter the meter’s memory.
2. Browse through the stored values with the + or – button.
3. Hold the storage button pressed to delete all previously stored values.
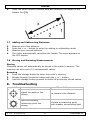
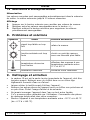
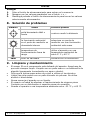
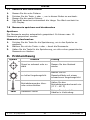
8. Troubleshooting
symbol
cause
possible solution
signal too weak or too
strong
re-measure the distance
light surrounding
measuring point too
strong
choose a measuring point
with weaker surrounding light

EEM700
V. 01 – 07/05/2015 9 ©Velleman nv
working temperature out
of range
carry out measurements
when the ambient
temperature between 0° C
and 40° C
2800
hardware failure
contact your local dealer
9. Cleaning and Maintenance
The IR sensor is the most delicate part of the device and it shall be kept
clean at all times. To do this, only use a soft cloth or cotton bud with a
little water or medical alcohol.
Allow the lens to fully dry before using the device.
Wipe the other parts of the device regularly with a moist, lint-free cloth.
Do not use alcohol or solvents.
Do not submerge the device in water or any other liquid.
There are no user-serviceable parts. Contact your dealer for spare parts
if necessary.
The device shall be stored between –20° C and +65° C (–4° F to
+149° F).
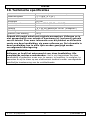
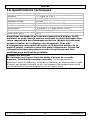
10. Technical Specifications
range
0.05 ~ 60 m (0.16 ft ~ 196.8 ft)
accuracy
± 1.5 mm (± 0.05")
laser
< 1 mW class 2
wavelength
650 nm
operating temperature
0° C ~ 40° C (32° F ~ 104° F)
IP rating
54
power supply
2 x 1.5V AA batteries LR06C (incl.)
dimensions
119 x 53 x 26 mm
weight (with battery)
140 g
Use this device with original accessories only. Velleman nv cannot
be held responsible in the event of damage or injury resulting from
(incorrect) use of this device. For more info concerning this product
and the latest version of this manual, please visit our website
www.velleman.eu. The information in this manual is subject to
change without prior notice.
© COPYRIGHT NOTICE
The copyright to this manual is owned by Velleman nv. All
worldwide rights reserved. No part of this manual may be copied,
reproduced, translated or reduced to any electronic medium or otherwise
without the prior written consent of the copyright holder.

EEM700
V. 01 – 07/05/2015 10 ©Velleman nv
GEBRUIKERSHANDLEIDING
1. Inleiding
Aan alle burgers van de Europese Unie
Belangrijke milieu-informatie betreffende dit product
Dit symbool op het toestel of de verpakking geeft aan dat, als het
na zijn levenscyclus wordt weggeworpen, dit toestel schade kan
toebrengen aan het milieu. Gooi dit toestel (en eventuele
batterijen) niet bij het gewone huishoudelijke afval; het moet bij
een gespecialiseerd bedrijf terechtkomen voor recyclage. U moet
dit toestel naar uw dealer of naar een lokaal recyclagepunt
brengen. Respecteer de plaatselijke milieuwetgeving.
Hebt u vragen, contacteer dan de plaatselijke autoriteiten
betreffende de verwijdering.
Dank u voor uw aankoop! Lees deze handleiding grondig voor u het toestel
in gebruik neemt. Werd het toestel beschadigd tijdens het transport,
installeer het dan niet en raadpleeg uw dealer.
2. Veiligheidsinstructies
Waarschuwing! Zichtbare laserstraal. Kijk niet in de laserstraal
om oogletsels te voorkomen. Dit toestel is een laserproduct
klasse 2.
Uitgangsvermogen < 1 mW, golflengte 650 nm.
Richt de laserstraal nooit op personen of dieren. Richt de
laserstraal nooit op reflecterende oppervlakken. Bekijk een
laserstraal nooit met een optisch instrument, zoals een verrekijker
of een microscoop.
Houd dit toestel buiten het bereik van kinderen en onbevoegden.
Bescherm het toestel tegen regen, vochtigheid en opspattende
vloeistoffen. Plaats nooit objecten gevuld met vloeistof op of naast
het toestel.
3. Algemene richtlijnen
Raadpleeg de Velleman® service- en kwaliteitsgarantie achteraan deze
handleiding.
Bescherm het toestel tegen stof en extreme temperaturen.
Bescherm tegen schokken. Vermijd brute kracht tijdens de bediening
van het toestel.
Leer eerst de functies van het toestel kennen voor u het gaat
gebruiken.

EEM700
V. 01 – 07/05/2015 11 ©Velleman nv
Om veiligheidsredenen mag u geen wijzigingen aanbrengen. Schade
door wijzigingen die de gebruiker heeft aangebracht aan het toestel valt
niet onder de garantie.
Gebruik het toestel enkel waarvoor het gemaakt is. De garantie vervalt
automatisch bij ongeoorloofd gebruik.
De garantie geldt niet voor schade door het negeren van bepaalde
richtlijnen in deze handleiding en uw dealer zal de verantwoordelijkheid
afwijzen voor defecten of problemen die hier rechtstreeks verband mee
houden.
Zet u het toestel best niet aan onmiddellijk nadat het werd blootgesteld
aan temperatuurschommelingen. Om beschadiging te vermijden, moet
u wachten tot het toestel de kamertemperatuur heeft bereikt.
Elektromagnetische velden en radiofrequenties kunnen de uitlezing
beïnvloeden. De werking van het toestel zal echter niet permanent
verstoord worden.
Gebruik de oorspronkelijke verpakking wanneer u het toestel vervoert.
Bewaar deze handleiding voor verdere raadpleging.
4. Eigenschappen
groot lcd-scherm met achtergrondverlichting
keuze tussen metrische en Anglo-Amerikaanse maateenheden
berekent oppervlakte en volume
indirecte metingen aan de hand van 2 of 3 meetpunten
optel- en aftrekfuncties
de laatste 10 metingen blijven bewaard in het geheugen
zeer groot bereik (60 m) en zeer grote precisie (± 1,5 mm)
automatische / manuele uitschakeling
5. Omschrijving
Raadpleeg de afbeeldingen op pagina 2 van deze handleiding.
1
IR-sensor
9
uitschakelen/wissen
2
LCD-display
10
geheugen
3
meting
11
oppervlakte/volume
4
waterpas
12
optelfunctie
5
meeteenheid
13
referentiewaarde
6
Pythagoras-functie
14
statiefaansluiting
7
achtergrondverlichting
15
batterijvak
8
aftrekfunctie

EEM700
V. 01 – 07/05/2015 12 ©Velleman nv
Display
1
laser ingeschakeld
7
meeteenheid
2
meten
8
subdisplay
3
indirecte meting
9
batterijniveau
4
oppervlakte/volume
10
hardwarefout
5
opgeslagen meetwaarde
11
MIN/MAX-waarde
6
uitlezing
12
foutsymbool
6. Batterij
Dit toestel functioneert met 2 x 1.5 V-batterijen. Vervang de batterijen
wanneer de lege batterij-indicator verschijnt.
Om de batterijen te vervangen, gaat u als volgt te werk:
1. Schakel het toestel uit.
Bij het vervangen van de batterij van een ingeschakeld toestel,
kunnen zich storingen voordoen.
2. Open het batterijvak.
3. Vervang de batterijen door nieuwe 1.5 V-batterijen
4. Sluit het batterijvak.
Waarschuwing: U mag batterijen nooit doorboren of in het vuur
gooien (explosiegevaar). Herlaad geen alkalinebatterijen. Gooi
batterijen weg volgens de plaatselijke milieuwetgeving. Houd de
batterijen buiten het bereik van kinderen.
7. Gebruik
7.1 Basisgebruik
1. Houd de MEAS-knop ingedrukt om de afstandsmeter in te schakelen.
2. Houd de UNIT-knop ingedrukt om de meeteenheid te selecteren (m =
meter, ft = feet, in = inches en x/16n = zestiende van een inch).
3. Druk op de knop voor achtergrondverlichting, om de
achtergrondverlichting in- of uit te schakelen.
4. Houd de knop OFF/DELL ingedrukt om de afstandsmeter uit te
schakelen.
7.2 De referentiewaarde instellen
1. Druk op de referentieknop om te schakelen tussen het referentiepunt
aan de voor- en achterkant.
2. Standaard is de achterkant van het toestel vastgelegd als het
referentiepunt.

EEM700
V. 01 – 07/05/2015 13 ©Velleman nv
7.3 Enkelvoudige of continue meting
Enkelvoudige meting
1. Druk op de MEAS-knop om de laser in te schakelen.
2. Richt de IR-sensor naar het te meten voorwerp.
3. Druk op de MEAS-knop om de afstand te meten. De waarde verschijnt
op de display.
Continue meting
1. Houd de MAES-knop ingedrukt om de continue meetmodus te
activeren.
2. Richt de IR-sensor naar het te meten voorwerp.
3. De huidige, minimum- en maximumwaarden verschijnen op de display.
4. Druk nogmaals op de MEAS-knop om de continue meetmodus te
verlaten.
7.4 Oppervlaktemeting
1. Druk op de knop oppervlakte/volume, om de oppervlakte te
berekenen.
2. Druk op de MEAS-knop en meet de lengte.
3. Druk op de MEAS-knop en meet de breedte.
4. De meter berekent de oppervlakte. De waarde verschijnt op de
display.
5. Druk op de MEAS-knop, om de modus te verlaten.
7.5 Volumemeting
1. Druk tweemaal op de knop oppervlakte en volume meten, om het
volume te berekenen.
2. Druk op de MEAS-knop en meet de lengte.
3. Druk op de MEAS-knop en meet de breedte.
4. Druk op de MEAS-knop en meet de hoogte.
5. De meter berekent automatisch het volume. De waarde verschijnt op
de display.
6. Druk op de MEAS-knop om de modus te verlaten.
7.6 Indirecte meting
Indirecte meting bestaat uit het meten van een afstand met behulp van de
stelling van Pythagoras.
Opmerkingen:
Voor een nauwkeurige meting, moeten de afstanden vanaf hetzelfde
meetpunt gemeten worden. Daarom is het beter om de meter op een
statief (niet meegelev.) te bevestigen.

EEM700
V. 01 – 07/05/2015 14 ©Velleman nv
Om meetfouten te vermijden, moet de lengte van de verticale zijde
korter zijn dan de lengte van de schuine zijde.
Enkelvoudige, verticale afstandsmeting
1. Druk op de knop indirecte meting (Pythagoras) om de functie te
activeren.
2. Druk eenmaal op de MAES-knop en meet de lengte van de schuine
zijde [1].
3. Druk nogmaals op de MEAS-knop en meet de lengte van de onderste
lijn [2].
4. De meter berekent automatisch de lengte van de verticale lijn. De
waarde verschijnt op de display.
Tweevoudige, verticale afstandsmeting
1. Druk tweemaal op de knop indirecte meting (Pythagoras) om de
functie te activeren.
2. Druk eenmaal op de MEAS-knop en meet de lengte van de schuine
zijde [1].
3. Druk nogmaals op de MEAS-knop en meet de lengte van de tweede lijn
[2].
4. Druk een derde maal op de MEAS-knop en meet de lengte van de
onderste lijn [3].
5. De meter berekent automatisch de lengte van de verticale lijn. De
waarde verschijnt op de display.

EEM700
V. 01 – 07/05/2015 15 ©Velleman nv
De lengte van de schuine zijde meten
1. Druk driemaal op de knop indirecte meting (Pythagoras) om de functie
te activeren.
2. Druk eenmaal op de MEAS-knop en meet de lengte van de verticale
lijn [1].
3. Druk nogmaals op de MEAS-knop en meet de lengte van de onderste
lijn [2].
7.7 Afstanden optellen en aftrekken
1. Meet de eerste afstand.
2. Druk op de +/- knop om de optel-/aftrekfunctie te activeren.
3. Meet de tweede afstand.
4. De meter berekent automatisch de lengte. De waarde verschijnt op de
display.

EEM700
V. 01 – 07/05/2015 16 ©Velleman nv
7.8 Meetwaarden opslaan en weergeven
Meetwaarden opslaan
Meetwaarden worden automatisch in het geheugen van de meter
opgeslagen. Het geheugen kan tot 10 meetwaarden opslaan.
Meetwaarden doorlopen
1. Druk op de geheugenknop om het geheugen van de meter te openen.
2. Blader door de opgeslagen waarden met de +/- knop.
3. Houd de geheugenknop ingedrukt om alle eerder opgeslagen waarden
te wissen.
8. Probleemoplossing
symbool
oorzaak
mogelijke oplossing
signaal te zwak of te sterk
meet de afstand opnieuw
omgevingslicht te helder
kies een meetpunt met een
zwakker omgevingslicht
werktemperatuur buiten
het meetbereik
voer metingen uit bij een
omgevingstemperatuur
tussen 0 °C en 40 °C
2800
hardwarefout
contacteer uw verdeler
9. Reiniging en onderhoud
De IR-sensor is het meest delicate onderdeel van het toestel en moet
altijd proper gehouden worden. Reinig met een zachte doek of
wattenstaafje gedrenkt in een beetje water of ontsmettingsalcohol.
Laat de lens drogen alvorens u het toestel opnieuw gebruikt.
Maak de andere onderdelen regelmatig schoon met een vochtige, niet-
pluizende doek. Gebruik geen alcohol of oplosmiddelen.
Dompel het toestel nooit onder in water of een andere vloeistof.
De gebruiker mag geen onderdelen vervangen. Bestel eventuele
reserveonderdelen bij uw dealer.
Bewaar het toestel in een ruimte met een temperatuur tussen –20 °C
en +65 °C.

EEM700
V. 01 – 07/05/2015 17 ©Velleman nv
10. Technische specificaties
bereik
0.05 ~ 60 m (0.16 ft ~ 196.8 ft)
nauwkeurigheid
± 1.5 mm (± 0.05")
laser
< 1 mW klasse 2
golflengte
650 nm
werktemperatuur
0° C ~ 40° C (32 °F ~ 104 °F)
IP-norm
54
voeding
2 x 1.5V AA-batterijen LR06C (meegelev.)
afmetingen
119 x 53 x 26 mm
gewicht (met batterij)
140 g
Gebruik dit toestel enkel met originele accessoires. Velleman nv is
niet aansprakelijk voor schade of kwetsuren bij (verkeerd) gebruik
van dit toestel. Voor meer informatie over dit product en de laatste
versie van deze handleiding, zie www.velleman.eu. De informatie in
deze handleiding kan te allen tijde worden gewijzigd zonder
voorafgaande kennisgeving.
© AUTEURSRECHT
Velleman nv heeft het auteursrecht voor deze handleiding. Alle
wereldwijde rechten voorbehouden. Het is niet toegestaan om deze
handleiding of gedeelten ervan over te nemen, te kopiëren, te vertalen, te
bewerken en op te slaan op een elektronisch medium zonder voorafgaande
schriftelijke toestemming van de rechthebbende.

EEM700
V. 01 – 07/05/2015 18 ©Velleman nv
MODE D'EMPLOI
1. Introduction
Aux résidents de l'Union européenne
Informations environnementales importantes concernant ce produit
Ce symbole sur l'appareil ou l'emballage indique que l’élimination
d’un appareil en fin de vie peut polluer l'environnement. Ne pas
jeter un appareil électrique ou électronique (et des piles
éventuelles) parmi les déchets municipaux non sujets au tri
sélectif ; une déchetterie traitera l’appareil en question. Renvoyer
l'appareil à votre fournisseur ou à un service de recyclage local. Il
convient de respecter la réglementation locale relative à la protection de
l’environnement.
En cas de questions, contacter les autorités locales pour élimination.
Nous vous remercions de votre achat ; Lire attentivement le présent mode
d'emploi avant la mise en service de l’appareil. Si l’appareil a été
endommagé pendant le transport, ne pas l’installer et consulter votre
revendeur.
2. Consignes de sécurité
Avertissement ! Rayonnement laser visible. Ne pas regarder
dans le faisceau afin d’éviter des lésions oculaires. Appareil à laser
de classe 2.
Puissance de sortie < 1 mW, longueur d’onde 650 nm.
Ne jamais diriger le faisceau laser sur des personnes ou des
animaux. Ne jamais diriger le faisceau laser sur des surfaces
réfléchissantes. Ne jamais regarder dans le faisceau laser avec un
instrument optique (jumelles ou un microscope).
Garder l'appareil hors de la portée des enfants et des personnes
non autorisées.
Protéger cet appareil de la pluie, de l’humidité et des projections
d’eau. Ne jamais placer d’objets contenant du liquide sur ou près
de l’appareil.
3. Directives générales
Se référer à la garantie de service et de qualité Velleman® en fin de ce
mode d'emploi.
Protéger cet appareil contre la poussière et les températures extrêmes.
Protéger l’appareil des chocs et de l'abus. Traiter l'appareil avec
circonspection pendant l’opération.
Se familiariser avec le fonctionnement de l'appareil avant de l'utiliser.

EEM700
V. 01 – 07/05/2015 19 ©Velleman nv
Toute modification est interdite pour des raisons de sécurité. Les
dommages occasionnés par des modifications par le client ne tombent
pas sous la garantie.
N’utiliser l'appareil qu’à sa fonction prévue. Un usage impropre annule
d'office la garantie.
La garantie ne s’applique pas aux dommages survenus en négligeant
certaines directives de ce mode d'emploi et votre revendeur déclinera
toute responsabilité pour les problèmes et les défauts qui en résultent.
Ne pas brancher immédiatement l’appareil après exposition à des
variations de température. Afin d’éviter des dommages, attendre
jusqu’à ce que l’appareil ait atteint la température ambiante.
Les fréquences radio et les champs électromagnétiques peuvent
influencer les valeurs affichées. Cependant, le fonctionnement ne sera
pas perturbé de manière permanente.
Transporter l’appareil dans son emballage originel.
Garder ce mode d'emploi pour toute référence ultérieure.
4. Caractéristiques
afficheur LCD grand format rétroéclairé
choix entre unités de mesure métrique/anglo-saxonnes
calcul d'aire et de volume
mesure indirecte avec 2 ou 3 points de mesure
fonctions d'addition et de soustraction
mémorisation des 10 dernières valeurs mesurées
large plage de mesure (60 m) et haute précision (± 1,5 mm)
extinction manuelle / automatique
5. Description
Se référer aux illustrations en page 2 de ce mode d'emploi.
1
capteur IR
9
éteindre/effacer
2
afficheur LCD
10
mémoire
3
mesure
11
aire/volume
4
niveau à bulle
12
fonction d'addition
5
bouton de sélection
d’unité
13
référence de mesure
6
fonction Pythagore
14
connexion pour trépied
7
rétroéclairage
15
compartiment à piles
8
fonction de soustraction

EEM700
V. 01 – 07/05/2015 20 ©Velleman nv
Afficheur
1
laser activé
7
unité de mesure
2
mesure
8
affichage auxiliaire
3
mesure indirecte
9
indicateur de pile
4
aire/volume
10
défaillance matérielle
5
valeurs sauvegardées
11
valeur MIN/MAX
6
affichage
12
erreur
6. La pile
Cet appareil fonctionne avec 2 piles de 1.5 V. Remplacer les piles lorsque
l'indicateur de pile faible s'affiche.
Pour remplacer les piles, procéder comme suit :
1. Éteindre l'appareil.
Il est possible que des valeurs incorrectes s'affichent en
remplaçant les piles d'un appareil allumé.
2. Ouvrir le compartiment à piles.
3. Remplacer les piles par 2 piles neuves de 1.5 V.
4. Fermer le compartiment à piles.
Avertissement : Ne jamais perforer les piles et ne pas les jeter
au feu (danger d’explosion). Ne jamais recharger des piles
alcalines. Se débarrasser des piles en respectant la
réglementation locale relative à la protection de l’environnement.
Garder les piles hors de la portée des enfants.
7. Emploi
7.1 Fonctionnement de base
1. Maintenir enfoncé le bouton MEAS pour allumer le télémètre.
2. Appuyer sur le bouton unité pour sélectionner l'unité de mesure (m =
meter, ft = feet, in = inches, x/16 in = seizièmes de pouce).
3. Enfoncer le bouton de rétroéclairage pour allumer ou éteindre le
rétroéclairage.
4. Maintenir enfoncé le bouton OFF/DEL pour éteindre le télémètre.
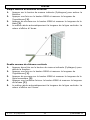
7.2 Régler la valeur de référence
1. Appuyer sur le bouton de référence pour commuter entre le point de
référence sur le devant et le dos de l'appareil.
2. Par défaut, le point de référence est situé au dos de l'appareil.
Strona się ładuje...
Strona się ładuje...
Strona się ładuje...
Strona się ładuje...
Strona się ładuje...
Strona się ładuje...
Strona się ładuje...
Strona się ładuje...
Strona się ładuje...
Strona się ładuje...
Strona się ładuje...
Strona się ładuje...
Strona się ładuje...
Strona się ładuje...
Strona się ładuje...
Strona się ładuje...
Strona się ładuje...
Strona się ładuje...
Strona się ładuje...
Strona się ładuje...
Strona się ładuje...
Strona się ładuje...
Strona się ładuje...
Strona się ładuje...
Strona się ładuje...
Strona się ładuje...
Strona się ładuje...
Strona się ładuje...
Strona się ładuje...
Strona się ładuje...
Strona się ładuje...
Strona się ładuje...
Strona się ładuje...
Strona się ładuje...
Strona się ładuje...
Strona się ładuje...
Strona się ładuje...
Strona się ładuje...
Strona się ładuje...
Strona się ładuje...
Strona się ładuje...
-
 1
1
-
 2
2
-
 3
3
-
 4
4
-
 5
5
-
 6
6
-
 7
7
-
 8
8
-
 9
9
-
 10
10
-
 11
11
-
 12
12
-
 13
13
-
 14
14
-
 15
15
-
 16
16
-
 17
17
-
 18
18
-
 19
19
-
 20
20
-
 21
21
-
 22
22
-
 23
23
-
 24
24
-
 25
25
-
 26
26
-
 27
27
-
 28
28
-
 29
29
-
 30
30
-
 31
31
-
 32
32
-
 33
33
-
 34
34
-
 35
35
-
 36
36
-
 37
37
-
 38
38
-
 39
39
-
 40
40
-
 41
41
-
 42
42
-
 43
43
-
 44
44
-
 45
45
-
 46
46
-
 47
47
-
 48
48
-
 49
49
-
 50
50
-
 51
51
-
 52
52
-
 53
53
-
 54
54
-
 55
55
-
 56
56
-
 57
57
-
 58
58
-
 59
59
-
 60
60
-
 61
61


Perel EEM700 Instrukcja obsługi
- Kategoria
- Stroboskopy
- Typ
- Instrukcja obsługi
w innych językach
- español: Perel EEM700 Manual de usuario
- Deutsch: Perel EEM700 Benutzerhandbuch
- português: Perel EEM700 Manual do usuário
- français: Perel EEM700 Manuel utilisateur
- Nederlands: Perel EEM700 Handleiding
Powiązane artykuły
Inne dokumenty
-
Parkside PLEM 50 B2 Operation and Safety Notes
-
Parkside 322438 1901 Operation and Safety Notes
-
 Tooland TM81017 Instrukcja obsługi
-
Velleman DEM200 Instrukcja obsługi
-
-
 Powerfix Profi KH 2927-1 Operating Instructions Manual
-
-
PeakTech P 2801 Instrukcja obsługi
-
-
Beta 1693M Instrukcja obsługi

