Overmax Activecam 3.3 Instrukcja obsługi
- Kategoria
- Rejestratory jazdy
- Typ
- Instrukcja obsługi


Activecam 3.3
User Manual
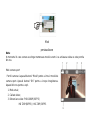
Before using, please read the user manual carefully.

All the contents of the manual are subject to change without prior notice.
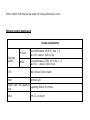
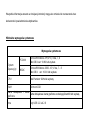
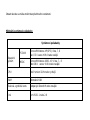
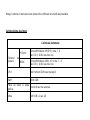
Minimum system requirements
System requirements
Operating
system
PCCAM
Microsoft Windows XP(SP3), Vista, 7, 8
Mac OS X version: 10.8.0 or up
MSDC
Microsoft Windows 2000,XP, Vista, 7,8
Mac OS X version: 10.0.0 or up
CPU Intel Pentium 1GHz or faster
RAM Minimum 1GB
Sound card and graphics
card
Supporting DirectX 8 or higher.
Other USB 1.1 or 2.0 port

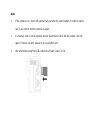
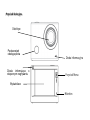
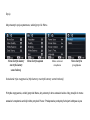
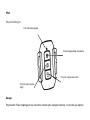
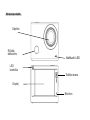
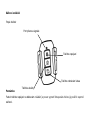
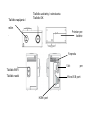
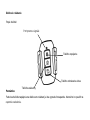
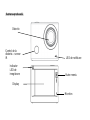
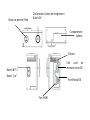
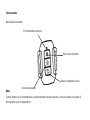
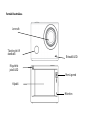
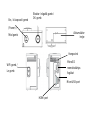
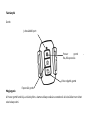
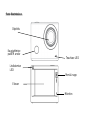
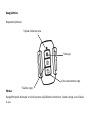
Product illustration
Menu button
Display
Lens
Remote control
IR sensor
Notification LED
Recording
LED indicator
Microphon

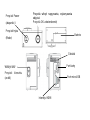
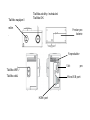
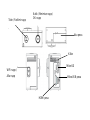
WiFi button /
Down button
HDMI port
Power / Mode button
.
Battery
compartment
MicroSD memory
Shutter / recording button /
OK button
MicroUSB port
Speaker

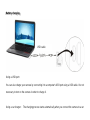
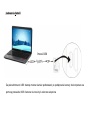
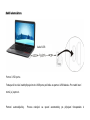
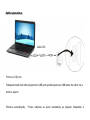
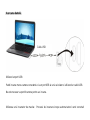
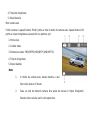
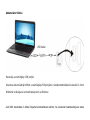
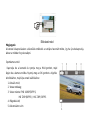
Battery charging
Using a USB port:
You can also charge your camera by connecting it to a computer's USB port using a USB cable. It is not
necessary to turn on the camera in order to charge it.
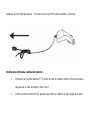
Using a car charger: The charging process starts automatically when you connect the camera to a car
USB cable

charger. It is not necessary to turn on the camera in order to charge it.
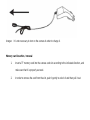
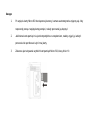
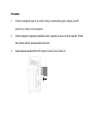
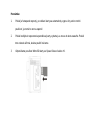
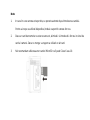
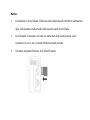
Memory card insertion / removal
1. Insert a TF memory card into the camera card slot according to the indicated direction, and
make sure that it is properly secured.
2. In order to remove the card from the slot, push it gently to unlock it and then pull it out.

Note:
1. If the camera is on, it turns off automatically just after the card insertion. In order to start to
use it, you need to turn the camera on again.
2. If a memory card is not recognized, remove it and then insert it into the camera card slot
again. If it does not work, please try to use another card.
3. We recommend using MicroSD cards with a Speed Class 6 or 10.

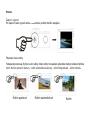
Operations
Turning on / off
Press and hold the Power button to turn the device on / off.
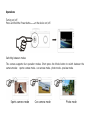
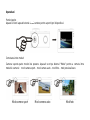
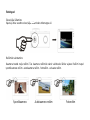
Switching between modes
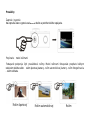
The camera supports four operation modes. Short press the Mode button to switch between the
camera modes: sports camera mode - car camera mode - photo mode - preview mode.
Sports camera mode
Car camera mode
Photo mode

Note:
The moment the camera turns off it remembers the current mode and activates it once turned on
again.
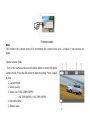
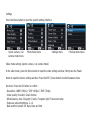
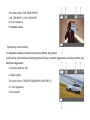
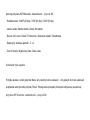
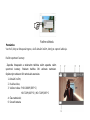
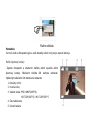
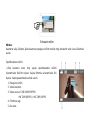
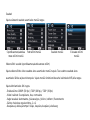
Sports camera mode
Turn on the camera and press the Mode button to enter the sports
camera mode. Press the OK button to start recording. Press it again
to stop.
1. Current mode;
2. Video quality;
3. Video size: FHD 1080P(30FPS)
HD 720P(60FPS) / HD 720P(30FPS
4. Recording time;
5. Battery level.
Preview mode

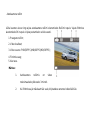
Car camera mode
Turn on the camera and press the Mode button to enter the car
camera mode. Press the OK button to start recording. Press it
again to stop.
1. Current mode;
2. Video quality;
3. Video size: FHD(30FPS)/HD(60FPS)/HD(30FPS);
4. Recording time;
5. Battery level.
Note:
1. In the car camera mode the maximum length of a video file is 3 minutes.
2. If a memory card runs out of space during recording, the oldest video file is
overwritten.

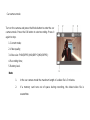
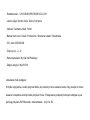
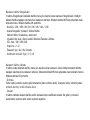
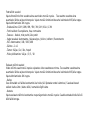
Photo mode
Turn on the camera and press the Mode button to enter the photo
mode. Press the OK button to take a photo.
1. Current mode;
2. Photo size: 3M/5M/8M/10M/12M;
3. Photo quality;
4. Number of photos you can take before the memory card runs out
of space;
5. Battery level.
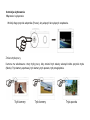
Preview mode
Turn on the camera and press the Mode button to enter the preview
mode.
Then, select a desirable mode:
- CAR - in order to see the videos recorded in the car
camera mode;
- VIDEO - in order to see the videos recorded in the sports
camera mode;
- JPG - in order to browse pictures;

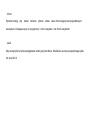
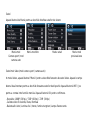
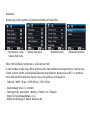
Settings
Press the Menu button to open the system settings interface.
Video mode settings (sports camera / car camera mode)
In the video mode, press the Menu button to open the video settings window. Short press the Power
button to open the device settings window. Press the WiFi / Down button to switch between menu
functions. Press the OK button to confirm.
- Resolution: 1080P (30 fps) / 720P (60 fps) / 720P (30 fps)
- Video quality: Excellent, Good, Normal
- White balance: Auto / Daylight / Cloudy / Tungsten light / Fluorescent lamp
- Exposure: adjust brightness -2~+2
- Date and time stamp: Off, Date, Date and time
Sports camera / car
camera mode menu
Photo mode menu
Settings menu
Preview mode menu

Photo mode settings
In the photo mode, press the Menu button to open the photo settings window. Short press the Power
button to open the device settings window. Press the WiFi / Down button to switch between menu
functions. Press the OK button to confirm.
- Resolution: 12M / 10M / 8M / 5M / 3M / 2M / VGA / 1.3M
- Photo quality: Excellent, Good, Normal
- Sharpness: - Centre, Multiple points, Single point
- White balance: Auto / Daylight / Cloudy / Tungsten light / Fluorescent lamp
- ISO: Auto / 100 / 200 / 400
- Exposure: -2~+2
- Self timer: Off / 2s / 10s / Double
- Continuous shooting: Off / 3 / 5 / 10
Preview mode settings
In the video mode, press the Menu button to open the video settings window. Short press the Power
button to open the device settings window. Press the WiFi / Down button to switch between menu
functions. Press the OK button to confirm.
- Protect
The tool allows you to prevent a file from being deleted (or to stop the protection). Available options:
protect one / protect all / unprotect all
- Delete
In the preview mode press the Menu button to show the tab with "Delete" button. You can choose to
delete the selected file or all files at once.

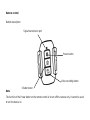
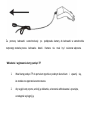
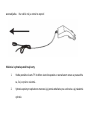
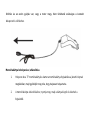
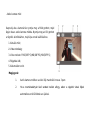
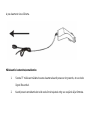
Remote control
Buttons description
Note:
The function of the Power button on the remote control is to turn off the camera only. It cannot be used
to turn the device on.
Power button
Video recording button
Shutter button
Signal transmission port

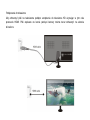
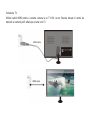
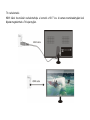
TV connection
Use the HDMI cable to connect the camera to a HD TV. Now, the files stored in the camera's memory
card can be displayed on a TV screen.

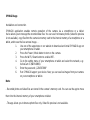
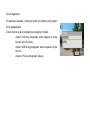
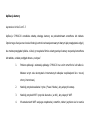
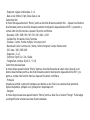
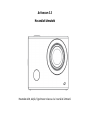
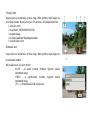
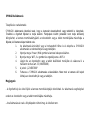
SYMAGIX app
Installation and connection
SYMAGIX application enables remote operation of the camera via a smartphone or a tablet.
It also allows you to manage the recorded data files. You can use it to browse photos (video file preview
is not available), copy files from the camera's memory card to the internal memory of a smartphone or a
tablet, and to see the live camera image. -
1. Use one of the app stores or our website to download and install SYMAGIX app on
your smartphone or tablet.
2. Press the Power / Mode button to turn on the camera.
3. Press the WiFi / Down button to enable WiFi.
4. Go to the setting menu of your smartphone or tablet and select the network, e.g.:
ActiveCam 3.3(WDV6000).
5. Enter the password: „1234567890”
6. Run SYMAGIX app on your device. Now, you can see live images from your camera
on your smartphone or tablet.
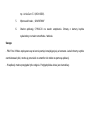
Note:
- Recorded photo and video files are stored in the camera's memory card. You can use the app to move
them into the internal memory of your smartphone or tablet.
- The app allows you to browse photo files only. Video file preview is not available.

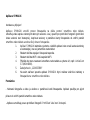
Activecam 3.3
User Manual
Instrukcja użytkownika
Przed rozpoczęciem korzystania z urządzenia prosimy
o uważne przeczytanie instrukcji obsługi.

Wszystkie informacje zawarte w niniejszej instrukcji mogą ulec zmianie lub rozszerzeniu bez
konieczności powiadomienia użytkownika
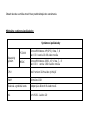
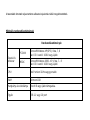
Minimalne wymagania systemowe
Wymagania systemowe
System
Operacyjny
PCCAM
Microsoft Windows XP(SP3), Vista, 7, 8
Mac OS X ver: 10.8.0 lub wyższa
MSDC
Microsoft Windows 2000,XP, Vista, 7,8
Mac OS X ver: 10.0.0 lub wyższa
CPU Intel Pentium 1GHz lub wyższy
RAM Minimum 1GB
Karta dźwiękowa i karta
graficzna
Karta dźwiękowa i karta graficzna z obsługą DirectX8 lub wyższą.
Inne Poty USB 1.1 lub 2.0

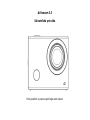
Przyciski funkcyjne
Przycisk Menu
Wyświetlacz
Obiektyw
Podczerwień
obsługa pilota
Dioda informacyjna
Dioda informująca o
włączonym nagrywaniu
Mikrofon
Strona się ładuje...
Strona się ładuje...
Strona się ładuje...
Strona się ładuje...
Strona się ładuje...
Strona się ładuje...
Strona się ładuje...
Strona się ładuje...
Strona się ładuje...
Strona się ładuje...
Strona się ładuje...
Strona się ładuje...
Strona się ładuje...
Strona się ładuje...
Strona się ładuje...
Strona się ładuje...
Strona się ładuje...
Strona się ładuje...
Strona się ładuje...
Strona się ładuje...
Strona się ładuje...
Strona się ładuje...
Strona się ładuje...
Strona się ładuje...
Strona się ładuje...
Strona się ładuje...
Strona się ładuje...
Strona się ładuje...
Strona się ładuje...
Strona się ładuje...
Strona się ładuje...
Strona się ładuje...
Strona się ładuje...
Strona się ładuje...
Strona się ładuje...
Strona się ładuje...
Strona się ładuje...
Strona się ładuje...
Strona się ładuje...
Strona się ładuje...
Strona się ładuje...
Strona się ładuje...
Strona się ładuje...
Strona się ładuje...
Strona się ładuje...
Strona się ładuje...
Strona się ładuje...
Strona się ładuje...
Strona się ładuje...
Strona się ładuje...
Strona się ładuje...
Strona się ładuje...
Strona się ładuje...
Strona się ładuje...
Strona się ładuje...
Strona się ładuje...
Strona się ładuje...
Strona się ładuje...
Strona się ładuje...
Strona się ładuje...
Strona się ładuje...
Strona się ładuje...
Strona się ładuje...
Strona się ładuje...
Strona się ładuje...
Strona się ładuje...
Strona się ładuje...
Strona się ładuje...
Strona się ładuje...
Strona się ładuje...
Strona się ładuje...
Strona się ładuje...
Strona się ładuje...
Strona się ładuje...
Strona się ładuje...
Strona się ładuje...
Strona się ładuje...
Strona się ładuje...
Strona się ładuje...
Strona się ładuje...
Strona się ładuje...
Strona się ładuje...
Strona się ładuje...
Strona się ładuje...
Strona się ładuje...
Strona się ładuje...
Strona się ładuje...
Strona się ładuje...
Strona się ładuje...
Strona się ładuje...
Strona się ładuje...
Strona się ładuje...
Strona się ładuje...
Strona się ładuje...
Strona się ładuje...
Strona się ładuje...
Strona się ładuje...
Strona się ładuje...
Strona się ładuje...
-
 1
1
-
 2
2
-
 3
3
-
 4
4
-
 5
5
-
 6
6
-
 7
7
-
 8
8
-
 9
9
-
 10
10
-
 11
11
-
 12
12
-
 13
13
-
 14
14
-
 15
15
-
 16
16
-
 17
17
-
 18
18
-
 19
19
-
 20
20
-
 21
21
-
 22
22
-
 23
23
-
 24
24
-
 25
25
-
 26
26
-
 27
27
-
 28
28
-
 29
29
-
 30
30
-
 31
31
-
 32
32
-
 33
33
-
 34
34
-
 35
35
-
 36
36
-
 37
37
-
 38
38
-
 39
39
-
 40
40
-
 41
41
-
 42
42
-
 43
43
-
 44
44
-
 45
45
-
 46
46
-
 47
47
-
 48
48
-
 49
49
-
 50
50
-
 51
51
-
 52
52
-
 53
53
-
 54
54
-
 55
55
-
 56
56
-
 57
57
-
 58
58
-
 59
59
-
 60
60
-
 61
61
-
 62
62
-
 63
63
-
 64
64
-
 65
65
-
 66
66
-
 67
67
-
 68
68
-
 69
69
-
 70
70
-
 71
71
-
 72
72
-
 73
73
-
 74
74
-
 75
75
-
 76
76
-
 77
77
-
 78
78
-
 79
79
-
 80
80
-
 81
81
-
 82
82
-
 83
83
-
 84
84
-
 85
85
-
 86
86
-
 87
87
-
 88
88
-
 89
89
-
 90
90
-
 91
91
-
 92
92
-
 93
93
-
 94
94
-
 95
95
-
 96
96
-
 97
97
-
 98
98
-
 99
99
-
 100
100
-
 101
101
-
 102
102
-
 103
103
-
 104
104
-
 105
105
-
 106
106
-
 107
107
-
 108
108
-
 109
109
-
 110
110
-
 111
111
-
 112
112
-
 113
113
-
 114
114
-
 115
115
-
 116
116
-
 117
117
-
 118
118
-
 119
119


Overmax Activecam 3.3 Instrukcja obsługi
- Kategoria
- Rejestratory jazdy
- Typ
- Instrukcja obsługi
w innych językach
- eesti: Overmax Activecam 3.3 Omaniku manuaal
- slovenčina: Overmax Activecam 3.3 Návod na obsluhu
Powiązane artykuły
-
Overmax Camroad 2.3 Instrukcja obsługi
-
Overmax Activecam 4.0 Instrukcja obsługi
-
-
-
-
-
-
-
-