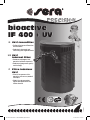
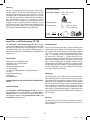
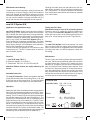
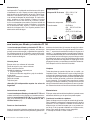
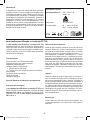
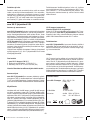
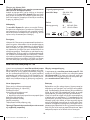
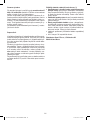
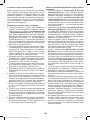
Sera bioactive IF 400 + UV Information For Use
- Typ
- Information For Use

40/04INT44/08INT
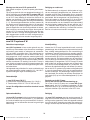
D
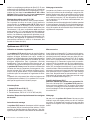
UV-C-Innenlter
•
Entfernt Keime und Parasiten
ohne Chemie
•
Reduziert schonend und
nachhaltig den Algenbewuchs
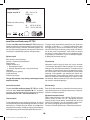
US
UV-C
Internal lter
•
Removes pathogens and
parasites without chemicals
•
Reduces algae growth gently
and lastingly
F
Filtre intérieur
UV-C
•
Elimine les germes et les
parasites sans aucun produit
chimique
•
Réduit la croissance des
algues durablement et en
toute sécurité
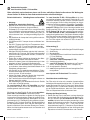
bioactive
IF 400 + UV
bioactive
IF 400 + UV
sera bioactive IF 400 + UV Innenfilter_D-P.indd 2 29.08.2014 11:27:25

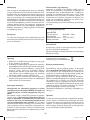
2
bioactive IF 400 + UV
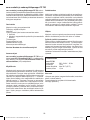
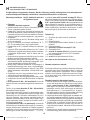
12
®
11.2
1.9
1.8
1.7
1.1
1.10
1.4 1.5
1.5
1.4
1.11
1.3
1.6
sera bioactive IF 400 + UV Innenfilter_D-P.indd 3 29.08.2014 11:27:28

3
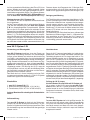
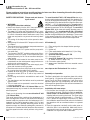
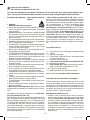
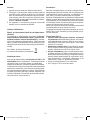
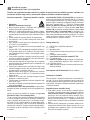
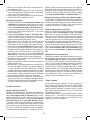
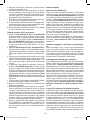
2.3
2
2.1 2.2
3
3.1 3.2 3.3
sera bioactive IF 400 + UV Innenfilter_D-P.indd 4 29.08.2014 11:27:34

4
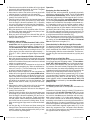
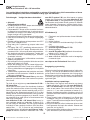
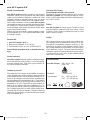
4.4
3.4
4.1
3.5
4.5
4.6
c
l
i
c
k
4.2 4.3
4
sera bioactive IF 400 + UV Innenfilter_D-P.indd 5 29.08.2014 11:27:41

5
bioactive IF 400 + UV
12
®
Produkt ähnlich Abbildung
Technische Änderungen und Irrtum vorbehalten
product may not be exactly as illustrated
Subject to technical alterations and errors
produit semblable à l’image
Sousréservedemodicationstechniquesetd’erreurs
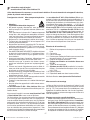
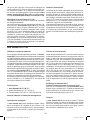
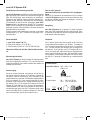
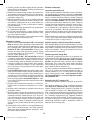
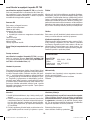
6.2
6.3 6.4
6.5
6.6
6.8
6.7
6.1
65 5.1
5.3
5.2
5.4
sera bioactive IF 400 + UV Innenfilter_D-P.indd 6 29.08.2014 11:27:42

bioactive IF 400 + UV
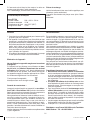
D UV-C-Innenlter 7
US UV-Cinternallter 12
F FiltreintérieurUV-C 17
NL UV-C-binnenlter 22
I FiltrointernoUV-C 27
E FiltrointeriorUV-C 32
P FiltrointeriorUV-C 37
S UV-Cinnerlter 42
FI UV-Csisäsuodatin 47
DK UV-Cinterntlter 52
TR UV-Cdahililtre 57
GR UV-C εσωτερικό φίλτρο 61
SI UV-Cnotranjilter 67
HR UV-Cunutarnjilter 72
CZ UV-C-vnitřníltr 77
H UV-Cbelsőszűrő 82
PL FiltrwewnętrznyzlampąUV-C 87
RUS Внутренний фильтр с УФ 92
6
sera bioactive IF 400 + UV Innenfilter.indd 7 07.11.2014 12:49:32

7
Sicherheitshinweise Unbedingt lesen und beachten!
• Achtung:
Gefährliche ultraviolette Strahlung!
• Niemals ohne Schutz direkt in die eingeschaltete UV-
C-Speziallampe schauen. (Augenschäden!)
• Die sera UV-C-Lampe darf nur im vorschriftsmäßig
und vollständig zusammengebauten Zustand be-
trieben werden. Jede andere Verwendung kann zu
sehr schweren Haut- und Augenschädigungen füh-
ren!
• Das Gehäuse der Lampe darf nicht geöffnet oder be-
schädigt werden.
• UV-Geräte und UV-C-Lampen immer von Kindern fern-
halten!
• Das UV-C-System darf nicht bei Temperaturen ober-
halb von 35 °C (95 °F) und Frost betrieben werden.
• Das UV-C-System und die Pumpe nicht ohne Was-
serdurchuss betreiben!
• Häuges EIN/AUS-Schalten reduziert die Lebenser-
wartung der UV-C-Lampe. Die Einheit sollte dauerhaft
über 24 Stunden/Tag betrieben werden, um beste Re-
sultate zu erzielen.
• Ziehen Sie vor allen Arbeiten am Aquarium den Netz-
stecker aller im Wasser bendlichen Geräte.
• Achten Sie darauf, dass die Netzspannung mit den
Angaben auf dem Typenschild übereinstimmt.
• Bilden Sie mit dem Netzkabel eine Tropfschlaufe, um
zu verhindern, dass entlang des Kabels Wasser in die
Steckdose gelangen kann.
• Alle Geräte nur mit zwischengeschaltetem Fehler-
stromschutzschalter RCD bzw. FI mit einem Auslöse-
strom von max. 30 mA betreiben.
• Achten Sie darauf, dass der Stecker der eingeschal-
teten Geräte jederzeit frei zugänglich ist.
• Der Transformator und das Vorschaltgerät müssen vor
Wasser geschützt werden.
• Bei Beschädigung der Netzkabel dürfen die Geräte
nicht mehr verwendet werden.
Der und seine
Komponenten dürfen nur für den beschriebenen Ver-
wendungszweck benutzt werden.
Wir freuen uns, dass Sie sich für den neuen sera bioac-
tive IF 400 + UV entschieden haben.
Dieser neuartige Innenlter verbindet die Vorzüge eines
im Aquarium untergebrachten Filters mit großem Filter-
volumen für die leistungsfähige Bioltration mit einer
gleichzeitigen UV-C-Behandlung des gelterten Aquari-
enwassers. UV-C ist harte Strahlung, die teilsterilisierend
auf das Aquarienwasser wirkt und den Keimdruck im
Aquarium reduziert. Ganz ohne den Einsatz von Chemie-
kalien wird das Aquarienwasser auch von Parasiten und
deren Larven befreit.
Der ist im Inne-
ren modular aufgebaut und besitzt 6 Filterkörbe (5.1), die
individuell bestückt werden können. Daneben lässt er
sich mit wenigen Griffen höchst individuell an die ge-
wünschte Funktion anpassen (Schnelllter, Speziallter,
… – 5.3, 5.4). Die mitgelieferte sera Filter- und Förder-
pumpe FP 750 lässt sich in ihrer Leistung einstellen und
pumpt maximal 750 l/h. Mit ihr verbunden ist das sera
UV-C-System 5 W, das keine weitere Pumpe benötigt.
Der ist energie-
sparend und geräuscharm. Das ltrierte Wasser verlässt
den Filter durch einen exiblen Strömungsverteiler. Da-
von protieren die Strömungsbedingungen im Aquari-
um. Der Filter eignet sich sowohl für Süß- als auch für
Meerwasseraquarien.
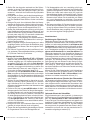
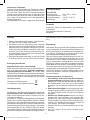
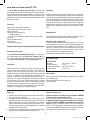
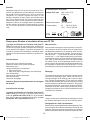
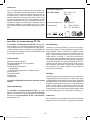
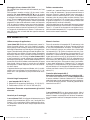
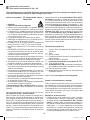
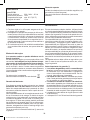
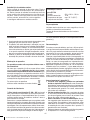
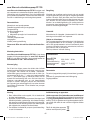
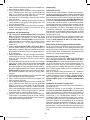
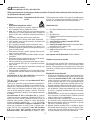
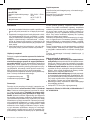
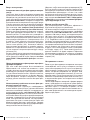
Lieferumfang (1)
1.1 Filtergehäuse mit schlitzförmigen Einlauföffnungen
1.2 Abdeckung
1.3 Montageleiste
1.4 Filtermedia-Körbe mit seitlichem Verschlussdeckel
(1.5) zur Befüllung
1.6 Zentrale Halteplatten
1.7 sera Filter- und Förderpumpe FP 750
1.8 Verbindungsschlauch
1.9 sera UV-C-System 5 W (bestehend aus Transfor-
mator, Vorschaltgerät und UV-C-Lampe 5 W)
1.10 Anschlussstück (Auslauf)
1.11 sera Strömungsverteiler mit zwei beweglichen Strö-
mungsdüsen
sera siporax mini Professional Filtermedium
Inbetriebnahme und Montage
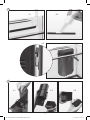
Der Filter wird mit einer mit normalem Aquariensilikon
befestigten Montageleiste (siehe Abb. 1.3) auf der Glas-
wand des Aquariums xiert. Er liegt durch diese Art der
Befestigung nicht nur dauerhaft, sondern auch so dicht
an der Aquarienscheibe an, dass kein Fisch zwischen
Filter und Aquarienscheibe schwimmen kann.
Montage bei Neueinrichtung
1. Setzen Sie den Filter in das leere, trockene Aquarium
ein und legen Sie die Abdeckung auf das Becken. Prü-
fen Sie, wie hoch der sera bioactive IF 400 + UV In-
inklusive Deckel montiert werden kann, ohne
gegen die Abdeckung zu stoßen. Der obere Rand des
Filters soll, wenn möglich, ca. 1 – 2 cm unter der Be-
ckenoberkante liegen (2.1). Markieren Sie die Monta-
geäche der Montageleiste auf der Außenseite des
Aquariums mit einem Folienschreiber oder Fettstift.
Gebrauchsinformation
Bitte vollständig und aufmerksam lesen und für den zukünftigen Bedarf aufbewahren. Bei Weitergabe
dieses Gerätes an Dritte ist diese Gebrauchsinformation mit auszuhändigen.
sera bioactive IF 400 + UV Innenfilter neu.indd 7 21.08.2014 15:43:46

2. Stellen Sie das Aquarium senkrecht auf die Seiten-
scheibe, an der der Filter angebracht werden soll. Ach-
ten Sie darauf, dass der Untergrund eben, glatt und
sauber ist – eventuell eine Decke oder Styroporplatte
unterlegen.
3. Reinigen Sie die Fläche, auf die die Montageleiste ge-
klebt werden soll, großzügig mit Spiritus bzw. Alko-
hol. Die Glasäche muss sauber, trocken und fettfrei
sein.
4. Reinigen Sie auch die zu klebende Seite der Monta-
geleiste mit Spiritus bzw. Alkohol (nicht mit Aceton!).
5. Tragen Sie Aquariensilikon gleichmäßig auf die dafür
vorgesehenen Zonen der Montageleiste auf (2.2).
6. Kleben Sie die Montageleiste vorsichtig auf die gerei-
nigte Glasäche (entsprechend Ihrer Markierung), und
drücken Sie sie fest. Achten Sie darauf, dass der Win-
kel nach oben zeigt (2.3). Ein eventuell entstehender
Klebstoffwulst muss sofort entfernt werden.
7. Während der Trocknungszeit des Aquariensilikons
(24 Stunden) lassen Sie das Glasbecken in seiner ge-
kippten Position stehen.
8. Nach 24 Stunden bringen Sie das Aquarium in seine
endgültige Position und reinigen die Glasächen sorg-
fältig mit reichlich Wasser, aber ohne jegliche Reini-
gungsmittel.
9. Nun können Sie den Körper des Innenlters mit sei-
ner geplanten Filtermaterialbestückung einhängen
(2.3) und den Deckel (4.3) aufsetzen.
Montage bei Umrüstung
1. Messen Sie den sera bioactive IF 400 + UV Innen-
lter und die zur Montage vorgesehene Aquarien-
scheibe sorgfältig aus, um Anpassungsprobleme zu
vermeiden. Prüfen Sie, wie hoch der sera bioactive
IF 400 + UV Innenlter inklusive Deckel montiert wer-
den kann, ohne gegen die Abdeckung zu stoßen. Der
obere Rand des Filters soll, wenn möglich, ca. 1 –
2 cm unter der Beckenoberkante liegen (2.1).
2. Sie halten nun den sera bioactive IF 400 + UV Innen-
lter von außen an die Aquarienscheibe und ermitteln
die Klebeäche für die Montageleiste. Markieren Sie
die Klebeäche von außen mit einem Folienschreiber
oder Fettstift.
3. Senken Sie den Wasserstand im Aquarium so weit,
dass die markierte Fläche vollständig im Trockenen
liegt. Kalkulieren Sie 5 cm Reserve mit ein. Vor dem
Absenken des Wasserstandes ist der Netzstecker des
Heizers zu ziehen.
4. Entfernen Sie jetzt mit sera pH/KH-minus die Kalk-
ablagerungen auf der Fläche, auf die die Montageleis-
te geklebt werden soll, und reinigen Sie sie sorgfältig
mit reinem Alkohol (nicht mit Aceton!). Benutzen Sie
für beide Reinigungsschritte Papier von einer Küchen-
rolle o. ä. Es ist darauf zu achten, dass möglichst we-
nig sera pH/KH-minus bzw. Alkohol in das Aquari-
um läuft. Die Glasäche muss anschließend sauber,
trocken und fettfrei sein.
5. Reinigen Sie auch die zu klebende Seite der Monta-
geleiste mit reinem Alkohol (nicht mit Aceton!).
6. Tragen Sie den Spezialkleber gleichmäßig auf die da-
für vorgesehenen Zonen der Montageleiste auf.
7. Die Montageleiste wird nun vorsichtig auf die ge-
reinigte Glasäche (entsprechend Ihrer Markierung)
geklebt und angedrückt. Achten Sie darauf, dass der
Winkel der Leiste nach oben zeigt (2.3) und kein
überschüssiger Kleber ins Aquarium tropft. Fixieren
Sie die Montageleiste mit kunststoffbeschichteten
Klammern bzw. stützen Sie sie zusätzlich mit Stäben
ab, um ein Abrutschen zu verhindern. Ein eventuell
entstehender Klebstoffwulst muss sofort entfernt wer-
den.
8. Sie lassen den Kleber 24 Stunden trocknen und ent-
fernen dann die Klammern bzw. die Stäbe. Die Abde-
ckung ist während dieser Zeit zu entfernen. Reinigen
Sie die Glasächen dann sorgfältig mit reichlich Was-
ser, aber ohne jegliche Reinigungsmittel.
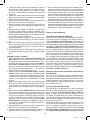
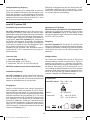
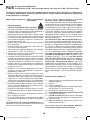
Inbetriebnahme
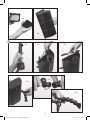
Bestückung der Filterkörbe (3):
Bestücken Sie den Filter mit mechanischen, chemisch-
physikalisch absorbierenden oder biologischen Filter-
medien. Im Lieferumfang enthalten ist sera siporax mini
Professional, das aufgrund seiner funktionalen und ide-
alen Beschaffenheit Raum für eine besonders hohe Dich-
te an Filterbakterien ermöglicht. Zur Aktivierung von sera
siporax mini Professional dient sera lter biostart. Die
Filterkörbe lassen sich über die seitliche Klappe mit
Filtermedien befüllen. Je nach Größe des verwendeten
Filtermediums kann es sinnvoll sein, das Filtermedium
in einem Filterbeutel und dann in einem Filterkorb unter-
zubringen. Zur Befüllung halten Sie den Filterkorb zur
Seite geneigt fest und nehmen Sie den Deckel (3.3) ab.
Füllen Sie das Filtermaterial ein und drücken Sie den De-
ckel wieder an. Füllen Sie die Körbe nicht übervoll, da
sonst das Schließen und Öffnen des Deckels schwierig
sein könnte (3.4).
Klicken Sie die Körbe übereinander in die Halteschiene
(3.2), mittels derer Sie die Körbe einfach in das Gehäu-
se des sera bioactive IF 400 + UV Innenlters hinein-
schieben und wieder herausziehen können (3.1).
Allgemeiner Hinweis zur Filtration über Filtermedien:
Um einerseits möglichst efzient zu ltern und anderer-
seits möglichst lange Standzeiten des Filters zu errei-
chen, bietet es sich an, mechanische Filtermedien in den
oberen Körben unterzubringen und die biologisch wirk-
samen darunter. Die Filtermedien, die sich zuerst zuset-
zen, können so am schnellsten und einfachsten entnom-
men werden.
Optionaler Einsatz als Schnelllter
Es gibt Anwendungen in der Aquaristik, in denen es um
die Eliminierung von großen Mengen an Schwebstoffen
geht. Der sera bioactive IF 400 + UV Innenlter kann
in dem Fall ohne Filterkörbe eingesetzt und anstelle von
bestückten Filterkörben beispielsweise mit Filterwatte
betrieben werden. Ist dies der Fall, tritt das Wasser
bevorzugt durch die gesamte Seite des Filters in die Fil-
terkammern und kann dort von dem mechanischen Fil-
termedium aufgefangen werden (5.3).
8
sera bioactive IF 400 + UV Innenfilter neu.indd 8 13.08.2014 13:06:42

Auf eine symmetrische Bestückung des Filters (5.2) ist zu
achten. Werden weniger als 6 Körbe eingesetzt, sollten
es 2 oder 4 Stück sein, die gegenüberliegend in den Fil-
terschächten angeordnet werden. Die gesamte Wasser-
bewegung im sera bioactive IF 400 + UV Innenlter wird
über die sera Filter- und Förderpumpe FP 750 erzeugt.
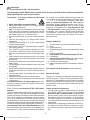
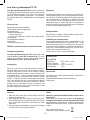
Montage des sera UV-C-Systems 5 W
Zu Details sei hier auf die separate Gebrauchsinforma-
tion hingewiesen.
Auf der Pumpe bendet sich ein aufgesteckter Schlauch
(1.8), der die Verbindung mit dem sera UV-C-System
5 W zur darunterliegenden Pumpe herstellt. Stecken
Sie nun die UV-C-Lampe darauf und verbinden Sie den
Auslass über den Adapter für den Auslauf (1.10) mit dem
sera Strömungsverteiler mit zwei beweglichen Strömungs-
düsen (1.11). Die Strömungsdüsen lassen sich entspre-
chend der Situation mit den Aufbauten im Aquarium durch
Biegen (4.4) ausrichten. Bei Überdehnung trennen sich
die Segmente des Strömungsverteilers voneinander, las-
sen sich aber wieder einfach zusammendrücken (4.5).
Genauso lassen sich Segmente des Y-förmigen Strö-
mungsverteilers auf einer Seite entnehmen und nach
Bedarf an der gegenüberliegenden Seite einfügen (4.6).
Reinigung und Wartung
Die Filterkörbe sind so ausgestattet, dass Wasser im Fal-
le einer Verstopfung an ihnen vorbeiießen kann. Wenn
Filtermedien verbraucht bzw. zugesetzt sind und ausge-
tauscht werden müssen, muss zunächst die Antriebs-
pumpe ausgeschaltet werden. Nach Abnehmen der
Abdeckung (1.2) zieht man die Körbe anhand der Halte-
schiene (3.1) heraus und kann diese einzeln und nach
Bedarf entnehmen.
Die Säuberung der Einlaufschlitze kann während des
Betriebes von außen erfolgen. Nach 9 – 12 Monaten Be-
trieb empfehlen wir den Tausch der UV-C-Lampe, da
diese als Leuchtmittel an Wirksamkeit verloren hat und
routinemäßig getauscht werden sollte.
9
sera UV-C-System 5 W
Verwendung und Einsatzgebiet
sera UV-C-Systeme beseitigen ohne den Einsatz von
Chemikalien zuverlässig alle Arten von Schwebealgen
(trübes, grünes Wasser) und reduzieren die Vermehrung
von Faden- und anderen Algen. Auch Krankheitskeime
und bakterielle Wassertrübungen werden nachhaltig be-
seitigt. Gerade im Meerwasser, wo der Einsatz von Che-
mikalien sehr bedenklich ist, kann mit dem sera UV-C-
System der Verkeimung des Aquarienwassers wirksam
vorgebeugt werden. Die Wirkung der UV-C-Lampe ist
rein physikalisch und nur auf das durchießende Was-
ser beschränkt, so dass die Bewohner und die Filteror-
ganismen keinen Schaden nehmen.
Das Gerät darf nur in fester Verbindung mit einer Strö-
mungspumpe betrieben werden (4.1). Das UV-C-System
besitzt kein eigenes Zirkulationssystem.
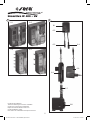
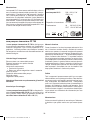
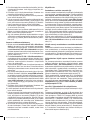
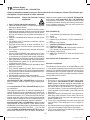
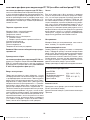
Einzelteilliste
1. sera UV-C-Lampe 5 W (6.5)
2. Elektronisches Vorschaltgerät, 12 V 6 W (6.1)
3. Transformator, 230 V AC 12 V AC 650 mA (6.6)
Achtung! Beachten Sie unbedingt die Sicherheitshin -
weise.
Aufbauanleitung
Das sera UV-C-System ist direkt mit der Strömungs-
pumpe (6.8) und dem Auslauf des Innenlters (1.10) ver
-
bunden und bildet die letzte Stufe des Innenlters. Über
die Auslassöffnung des Innenlters ießt das gereinigte
Wasser zurück.
Inbetriebnahme
Bevor die UV-C-Lampe eingeschaltet wird, sollte sicher-
ge stellt sein, dass die Lampe mit Wasser umströmt bzw.
voll ständig eingetaucht ist. Die Lampe darf nicht im Tro-
ckenen betrieben werden, um ein Überhitzen zu vermei-
den. Die UV-C-Lampe (6.5) ist nur mit dem mitgelieferten
Transformator (6.6) und dem Vorschaltgerät (6.1) zu betrei-
ben. Der schwarze Stecker des Transformators (6.6) wird
an die schwarze Buchse (6.4) des Vorschaltgerätes (6.1)
angeschlossen. Die UV-C-Lampe (6.5) wird über den blau-
en Stecker mit der blauen Buchse (6.3) des Vorschaltgerä-
tes (6.1) verbunden. Erst wenn alle Steckverbindungen mit-
einander verbunden sind und das UV-C-System im Wasser
eingetaucht ist, darf der Transformator (6.6) mit der Span-
nungsquelle verbunden werden. Die Anschlüsse dürfen
nicht vertauscht werden. Der Betrieb der Lampe wird durch
die rote Diode (6.2) auf dem Vorschaltgerät (6.1) angezeigt.
Prüfung der UV-C-Lampe
Vorsicht! Setzen Sie eine Brille mit UV-Schutz auf.
Um zu sehen, ob die UV-C-Lampe des sera UV-C-Sys-
tems leuchtet, das UV-C-System einschalten. Bei bren-
nender Lampe ist an der Auslauföffnung ein bläuliches
Schimmern zu erkennen. Vermeiden Sie es, direkt in das
UV-C-Licht zu schauen.
Reinigung
Das sera UV-C-System darf nicht geöffnet werden. Es
darf auch nicht mit spitzen oder harten Gegenständen
im Inneren des Gehäuses herumgestochert werden. Ist
das Gerät verstopft und lässt sich nicht durch Ausspü-
len mit Wasser reinigen, sollte die Lampe mit Gehäuse
ausgetauscht werden.
sera bioactive IF 400 + UV Innenfilter neu.indd 9 26.08.2014 12:20:41

10
sera Filter- und Förderpumpe FP 750
Die sera Filter- und Förderpumpe FP 750 überzeugt
durch ihre kompakte und robuste Bauweise sowie ihren
geringen Energieverbrauch und Regelbarkeit. Die hohe
Umwälzleistung sorgt für konstante Bedingungen im
Aquarium und trägt so zur Stabilisierung des biologischen
Systems bei.
Einzelteilliste
Motorblock mit Pumpenkammer
Halteplatte mit vier Saughaltern
Schlauchstutzen
Laufeinheit bestehend aus
• Gummilager
• Rotor mit Magnetläufer und Keramikachse
Dichtring
Pumpenkammerdeckel
Einlaufgitter
Drehregelkappe
Achtung! Beachten Sie unbedingt die Sicherheitshin-
weise!
Aufbauanleitung
Die sera Filter- und Förderpumpe FP 750 ist durch ei-
nen Schlauch mit der Einlauföffnung des sera UV-C-
Systems 5 W (4.1) verbunden und wird mit diesem in
den mittleren Schacht des sera bioactive IF 400 + UV
Innenlters eingesetzt (4.2).
Inbetriebnahme
Bevor Sie die Pumpe einschalten, sorgen Sie dafür, dass
kein direkter oder indirekter leitender Kontakt zu Perso-
nen besteht. Mit dem Einstecken des Steckers beginnt
die Pumpe zu laufen. Drehen Sie die Kappe (6.8) in Rich-
tung “–”, verringert sich der Durchsatz durch die Pum-
pe, drehen Sie in Richtung “+”, steigert sich der Durch-
satz bis zur maximalen Förderleistung. Die Pumpe ist für
einen Dauerbetrieb ausgelegt, darf jedoch nicht trocken
laufen, da der Motorblock mit Wasser gekühlt und die
Keramikachse mit Wasser geschmiert wird. Kommt nach
wenigen Sekunden kein Wasser, Pumpe wieder abschal-
ten und kontrollieren, ob nichts verstopft ist. Erst dann
die Pumpe wieder einschalten.
Reinigung
Alle Teile können mit einer Bürste und einem Neutralrei-
niger gereinigt werden. Achten Sie darauf, dass kein Rei-
nigungsmittel in das Aquarium gelangt. Spülen Sie alle
gereinigten Teile sorgfältig mit sauberem Leitungswas-
ser ab, bevor Sie die Pumpe wieder zusammensetzen
und im Aquarium in Betrieb nehmen. Sollte die Pumpe
stark verkalkt sein, können Sie die Laufeinheit und den
Motorblock in Entkalkungslösung für Edelstahlteile ein-
legen. Bitte beachten Sie die Gebrauchsinformation für
den Entkalker.
Wartung
Der Motorblock ist zur elektrischen Isolierung in Kunst-
stoff eingegossen und kann aus diesem Grund nicht re-
pariert werden.
Wartung
Die UV-C-Lampe sollte nach etwa einem Jahr ausge-
tauscht werden. Zuerst alle stromführenden Teile von
der Spannungsversorgung trennen. Das UV-C-System
zusammen mit der Pumpe aus dem Aquarium (4.1) neh-
men. Die Lampeneinheit vom Schlauch lösen. Schlauch
ggf. austauschen. Neue UV-C-Lampe auf neuen
Schlauch 12/16 mm aufsetzen und mit Kabelbinder be-
festigen. Pumpe in gleicher Weise befestigen. Lampe
und Pumpe wieder in die Kammer des Innenlters ein-
bauen und den Auslauf der UV-C-Lampe wieder auf die
Rückseite der Wasserauslauföffnung aufsetzen.
Technische Daten
sera UV-C-Lampe 220 – 240 V, 5 W
IPX8 (1 m)
Vorschaltgerät 12 V 6 W UVPL
Transformator IN 230 V AC 50 Hz
OUT 12 V AC 650 mA
1 m
IPX8
sera bioactive IF 400 + UV Innenfilter neu.indd 10 26.08.2014 12:20:42

11
Wechsel der Laufeinheit:
Nehmen Sie das Einlaufgitter der Pumpe vom Motor-
block ab. Drehen Sie den Pumpenkammerdeckel um ca.
90° nach links. Ziehen Sie den Pumpenkammerdeckel
gerade aus dem Motorblock heraus, so dass die Achse
nicht brechen kann. Bleibt die Achse im Motorblock ste-
cken, diese erst herausziehen, bevor der Magnetläufer
herausgezogen wird.
Der Zusammenbau erfolgt in umgekehrter Reihenfolge.
Technische Daten
sera FP 750
Netzspannung 220 – 240 V ~ 50 Hz
Leistungsaufnahme 12 W
Wassertemperatur max. 35 °C (95 °F)
Kabellänge 1,8 m
Ersatzteile
Laufeinheit (Rotor mit Magnetläufer, Keramikachse,
Gummilager)
Pumpenkammerdeckel mit Dichtring
Saughalter
Warnung
1. Kinder müssen beaufsichtigt werden, um sicherzustel-
len, dass sie nicht mit dem Gerät spielen.
2. Das Gerät ist nicht zur Verwendung durch Personen
(inklusive Kindern) mit eingeschränkten körperlichen,
Wahrnehmungs- oder geistigen Fähigkeiten, oder feh-
lender Erfahrung und Wissen vorgesehen, außer wenn
sie durch eine für ihre Sicherheit verantwortliche Per-
son beaufsichtigt oder bezüglich des Gebrauchs des
Gerätes angeleitet werden.
3. Wenn das Netzkabel beschädigt ist, darf die Pumpe
nicht länger benutzt, sondern muss entsorgt werden.
Entsorgung des Gerätes:
Altgeräte dürfen nicht in den Hausmüll!
Sollte das Gerät einmal nicht mehr benutzt werden kön-
nen, so ist jeder Verbraucher gesetzlich verpichtet,
Altgeräte getrennt vom Hausmüll z. B. bei einer Sam-
melstelle seiner Gemeinde/seines Stadtteils abzugeben.
Damit wird gewährleistet, dass die Altgeräte fachgerecht
verwertet und negative Auswirkungen auf die Umwelt
vermieden werden.
Deswegen sind Elektrogeräte
mit folgendem Symbol gekennzeichnet:
Herstellergarantie:
Bei Beachtung der Gebrauchsinformation arbeitet der
sera bioactive IF 400 + UV Innenlter zuverlässig. Wir
haften für die Fehlerfreiheit unserer Produkte für 2 Jah-
re ab dem Kaufdatum.
Wir haften für vollständige Mängelfreiheit bei Übergabe.
Sollten durch bestimmungsgemäßen Gebrauch übliche
Abnutzungs- oder Verbrauchserscheinungen auftreten,
stellt dies keinen Mangel dar. In diesem Fall sind auch die
Gewährleistungsansprüche ausgeschlossen. Dies bezieht
sich insbesondere auf die Laufeinheit (Rotor mit Achse).
Durch diese Garantie werden selbstverständlich keinerlei
gesetzliche Ansprüche beschränkt oder eingeschränkt.
Bitte beachten Sie die Zusatzinformationen zur Garan-
tie (*).
Empfehlung:
Bitte wenden Sie sich für jeden Fall eines Mangels zunächst
an den Fachhändler, bei dem Sie das Gerät erworben ha-
ben. Er kann beurteilen, ob tatsächlich ein Garantiefall vor-
liegt. Bei einer Zusendung an uns müssen wir Ihnen etwa-
ige unnötigerweise anfallende Kosten belasten.
Jegliche Haftung wegen Vertragsverletzung ist auf Vor-
satz und grobe Fahrlässigkeit beschränkt. Nur für die
Verletzung von Leben, Körper und Gesundheit, bei Ver-
letzung wesentlicher Vertragspichten und bei einer
zwingenden Haftung nach dem Produkthaftungsgesetz
haftet sera auch bei leichter Fahrlässigkeit. In diesem
Fall ist die Haftung dem Umfang nach auf den Ersatz der
vertragstypisch vorhersehbaren Schäden begrenzt.
Die Pumpen dürfen nur im Süß- und Meerwasser benutzt
werden. Bei Betrieb in ätzenden Flüssigkeiten etc. er-
lischt die Garantie.
Zusatzinformationen zur Garantie (*):
• Verschlissene, zerbrochene oder durch Kalk fest-
gefressene Rotoren sind direkte Folge von Wartungs-
mangel bzw. unsachgemäßer Behandlung. Diese und
alle Folgeschäden sind nicht durch die Garantie
abgedeckt. Oft sind solche Schäden nicht reparier-
bar.
• Gebrochene Rotorügel sind auf angesaugte Stein-
chen oder andere größere harte Partikel zurückzufüh-
ren. Diese Schäden werden nicht durch die Garantie
abgedeckt.
• Schäden am Zuleitungskabel werden aus Sicher-
heitsgründen vom Hersteller nicht repariert (Be-
gründung: Ins Kabel eingedrungene Feuchtigkeit führt
häug zu späterer Korrosion und Kurzschluss im Mo-
torblock.). Ein Austausch des kompletten Kabels ist
nicht möglich. Das Gerät ist stillzulegen.
• Schäden aller Art am Zuleitungskabel sind kein Ga-
rantiefall.
• Die UV-C-Lampe 5 W ist von der Garantie ausge-
schlossen.
sera bioactive IF 400 + UV Innenfilter neu.indd 11 26.08.2014 12:20:42

12
SAFETY PRECAUTIONS Please read and observe
by all means!
• WARNING:
Dangerous ultraviolet radiation!
• Never look directly into the UV-C lamp without pro-
tection when it is operating (eye damage!).
• The sera UV-C lamp may be operated only in com-
pletely assembled condition (please refer to directions
for use for information about readiness to use). Every
other use may lead to very severe skin and eye dam-
age!
• The casing of the lamp must not be opened or dam-
aged.
• Always keep UV units and UV-C lamps out of the reach
of children!
• The unit must not be operated at temperatures above
35°C (95°F) or in case of frost.
• Never operate the UV-C system and the pump with-
out water ow!
• Too frequent “ON/OFF” switching reduces the life ex-
pectancy of the UV-C lamp. The unit should be oper-
ated permanently for 24 h/d as to achieve best pos-
sible results.
• All electrical units located in the water must be dis
-
connected from the mains/power supply before con-
ducting work at the aquarium.
• Make sure that the voltage of the mains supply com-
plies with the data on the type plate.
• Bend the mains cord into a drip loop as to prevent wa-
ter running along the cable into the socket.
• Operate all units only with an inserted fault current
protection switch (RCD or FI with a trip current of
30 mA).
• Ensure plug and outlet is accessible to reach at all
times.
• The transformer and the ballast must be protected
against water.
• The unit must not be operated in case the electrical
cords are damaged.
The and its
components may only be used for the described oper-
ational purpose.
Thank you for choosing the new sera bioactive IF 400
+ UV .
This novel internal lter combines the advantages of a
lter with large lter volume for the powerful bio ltration
located inside the aquarium with a simultaneous UV-C
treatment of the ltered aquarium water. UV-C is hard
radiation that has a partially sterilizing effect on the
aquarium water and reduces pathogenic pressure in
the aquarium. Parasites and their larvae are also removed
from the aquarium water entirely without using chemi-
cals.
The has an in-
ternal modular design and includes 6 lter baskets (5.1)
that can be equipped individually. Also, it can be individ-
ually adjusted to the desired function (fast ow lter, spe-
cial lter, … – 5.3, 5.4) with a few turns. The performance
of the included can be
adjusted to maximum 750 l/h (198 US gph). The sera UV-C
System 5 W, which does not require an other pump, is
connected to it. The sera bioactive IF 400 + UV internal
is energy saving and quiet. The ltered water leaves
the lter through a exible current distributor. The currents
in the aquarium benet of this feature. The lter is both
suitable for freshwater as well as marine aquariums.
Kit includes (1)
1.1 Filter casing with slot shaped intake openings
1.2 Cover
1.3 Holder rail
1.4 Filter media basket with lateral lid (1.5) for lling
1.6 Central holder plates
1.7
1.8 Connection hose
1.9 sera UV-C System 5 W (consisting of transform-
er, ballast and UV-C lamp 5 W)
1.10 Connection piece (outlet)
1.11 sera current distributor with two movable current
nozzles
sera siporax mini Professional lter medium
Assembly and operation
The lter is attached to the aquarium glass with a hold-
er rail (see g. 1.3) glued on with common aquarium sil-
icone. Due to this kind of attaching, it will cling to the
aquarium glass not only permanently, but also so close
to the aquarium glass that no sh can swim between the
lter and the aquarium glass.
Installation with new setups
1. Put the lter into the empty, dry aquarium and place
the hood on the tank. Check how high the sera bio-
active IF 400 + UV including lid can be
installed without touching the hood. The upper edge
of the lter should be approximately 1 – 2 cm (0.4 –
0.8 in.) below the upper edge of the tank (2.1). Mark
the installation area of the holder rail on the outside of
the aquarium with an overhead marker or a grease
pencil.
2. Place the aquarium vertically on the side pane on
which the lter is to be attached. Make sure the un-
derground is even, smooth and clean – possibly place
a blanket or a Styrofoam slab underneath.
Information for use
this information for use is also to be handed over.
sera bioactive IF 400 + UV Innenfilter neu.indd 12 21.08.2014 15:43:47

13
3. Clean the area onto which the holder rail is to be glued
generously with rubbing alcohol, or alcohol. The glass
area must be clean, dry and fat free.
4. Also clean the side of the holder rail to be glued with
rubbing alcohol, or alcohol (not with acetone!).
5. Evenly distribute aquarium silicone to the assigned
zones of the holder rail (2.2).
6. Carefully glue the holder rail to the cleaned glass zone
(according to your mark), and press it on rmly. Make
sure the angle is directed upwards (2.3). A possibly
occurring glue bulge must be removed immediately.
7. Leave the aquarium in its tilted position while the
aquarium silicone dries (24 hours).
8. Bring the aquarium in its nal position after 24 hours
and clean the glass areas carefully with plenty of wa-
ter, but without any detergents.
9. Now you can t the body of the internal lter with its
desired lter material equipped as desired (2.3) and
then put the lid (4.3) on.
Installation when retting
1. Carefully measure the sera bioactive IF 400 + UV in-
ternal lter and the aquarium pane intended for in-
stallation, as to avoid tting problems. Check how high
the sera bioactive IF 400 + UV internal lter includ-
ing lid can be installed without touching the hood. The
upper edge of the lter should be approximately 1 –
2 cm (0.4 – 0.8 in.) below the upper edge of the tank
(2.1).
2. Now hold the sera bioactive IF 400 + UV internal l-
ter to the aquarium glass from the outside and locate
the gluing area for the holder rail. Mark the installation
area on the outside of the aquarium with an overhead
marker or a grease pencil.
3. Lower the water level in the aquarium so far that the
marked area is completely dry. Allow an additional re-
serve of 5 cm (2 in.). Pull the mains plug of the heat-
er before lowering the water level.
4. Now remove the lime deposits on the area where the
holder rail is to be glued on using sera pH/KH-minus,
and clean it carefully with pure alcohol (not with ace-
tone!). Use kitchen roll paper or the like for both clean-
ing steps. Make sure that as little sera pH/KH-minus
and alcohol as possible runs into the aquarium. The
glass surface must be clean, dry and fat free after-
wards.
5. Also clean the side of the holder rail to be glued with
rubbing alcohol, or alcohol (not with acetone!).
6. Evenly distribute aquarium silicone to the assigned
zones of the holder rail.
7. Carefully glue the holder rail to the cleaned glass zone
(according to your mark), and press it on rmly. Make
sure the angle is directed upwards (2.3) and no ex-
cess glue drips into the aquarium. Fixate the holder
rail with plastic coated clamps and additionally sup-
port it with bars as to prevent it sliding down. A pos-
sibly occurring glue bulge must be removed immedi-
ately.
8. Let the glue dry for 24 hours and then remove the
clamps or bars. Remove the hood while doing so. Then
carefully clean the glass surfaces with plenty of wa-
ter, but without any detergents.
Operation
Equipping the lter baskets (3):
Equip the lter with mechanical, chemically-physically
absorbing or biological lter media. The kit includes sera
siporax mini Professional, which allows space for a
particularly high density of lter bacteria due to its func-
tional and ideal properties. sera lter biostart serves
for activating sera siporax mini Professional. The lter
baskets can be lled with lter media via the lateral cov-
er. Depending on the size of the lter medium used it
may be advisable to place the lter medium in a lter
media bag and then in a lter basket. Hold the lter bas-
ket tilted to the side for lling, and remove the cover (3.3).
Fill in the lter material and push the cover back on. Do
not overll the baskets, as closing and opening the cov-
er might become difcult otherwise (3.4).
Click the baskets one above the other (3.2) into the hold-
er rail, which allows you to simply push the baskets into
the casing of the sera bioactive IF 400 + UV internal
lter and pull them out again (3.1).
General advice for ltration through lter media:
For achieving ltration as efciently as possible as well
as operating time as long as possible, it is advisable to
place mechanical lter media in the upper baskets and
the biologically effective ones underneath. The lter me-
dia that clog rst can then be removed very quickly and
easily.
Optional use as a fast ow lter
There are aquarium applications concerning the elimina-
tion of large amounts of oating matter. The sera bioac-
tive IF 400 + UV internal lter may in this case be oper-
ated without lter baskets, and you can operate it with,
for instance, lter wool instead of equipped lter baskets.
If this is the case, the water will preferably enter the lter
chambers through the entire side of the lter and can be
taken up by the mechanical lter medium there (5.3).
Make sure to equip the lter symmetrically (5.2). In case
you use less than 6 baskets, it should be 2 or 4 of them
placed facing each other in the lter ducts. The entire
water agitation within the sera bioactive IF 400 + UV
internal lter is achieved by the sera lter and feed
pump FP 750.
Installing the sera UV-C System 5 W
For details, please refer to the separate information for
use.
Located on the pump, there is a hose (1.8) pushed on
that connects the sera UV-C System 5 W to the pump
underneath. Now push the UV-C lamp on and connect
the outlet to the sera current distributor with two mov-
able current nozzles (1.11) via the outlet adapter (1.10).
The current nozzles can be directed by bending (4.4)
according to the situation concerning the decoration in-
side the aquarium. In case of overstretching, the current
distributor segments will separate from each other, but
can be pushed back together again easily (4.5). In the
same way, segments of the Y shaped current distribu-
tor can also be removed from one side and inserted to
the opposite side as required (4.6).
sera bioactive IF 400 + UV Innenfilter neu.indd 13 21.08.2014 15:43:47

14
sera UV-C System 5 W
Application and application range
sera UV-C Systems reliably remove all kinds of oating
algae (cloudy, green water) and reduce the multiplica-
tion of thread and other algae without using chemicals.
Pathogens and cloudy water caused by bacteria are also
removed. Especially in marine water, where using chem-
icals is very critical, the sera UV-C System allows ef-
fective prevention of pathogen multiplication. The effect
of the UV-C lamp is strictly physical and restricted to the
water owing through, so inhabitants of the aquarium
and the lter organisms are not harmed.
The unit must only be operated in rm connection with
a feed pump (4.1). The UV-C System does not have an
own circulation system.
Parts list
1. sera UV-C lamp 5 W (6.5)
2. Electronic ballast, 12 V 6 W (6.1)
3. Transformer, 230 V AC 12 V AC 650 mA (6.6)
Attention! Please observe the safety advice by all
means.
Assembly instruction
The sera UV-C System is directly connected to the feed
pump (6.8) and the outlet of the internal lter (1.10), and
is the last step of the internal lter. The puried water
ows back via the outlet opening of the internal lter.
Operation
Make sure that water circulates around the lamp and the
lamp is fully immersed before switching on the UV-C lamp.
The lamp must not be operated dry, as to prevent over-
heating. The UV-C lamp (6.5) must only be operated with
the included transformer (6.6) and the ballast (6.1). The
black plug of the transformer (6.6) is connected to the
black connector (6.4) of the ballast (6.1). The UV-C lamp
(6.5) is connected to the blue connector (6.3) of the bal-
last (6.1) via the blue plug. The transformer (6.6) may be
connected to the power source only after all connections
are made and the UV-C system is immersed in water. The
connectors must not be interchanged. Lamp operation is
indicated by the red diode (6.2) on the ballast (6.1).
Testing the UV-C lamp
Attention! Be sure to wear UV-C protection glasses!
Switch on the UV-C system for checking whether the
UV-C lamp of the sera UV-C System is working. A dim
bluish light can be seen at the outlet opening when the
lamp is on. Avoid looking into the UV-C light directly.
Cleaning
The sera UV-C System must not be opened. You must
also not poke inside the casing with pointed or hard
items. In case the unit is clogged and cannot be cleaned
by rinsing with water, you should replace the lamp with
the casing.
Maintenance
The UV-C lamp should be replaced after approximately
one year. Disconnect all electrical parts and units from
the mains supply rst. Take the UV-C system out of the
aquarium (4.1) together with the pump. Disconnect the
lamp unit from the hose. Replace hose if required. Push
the new UV-C lamp onto a new 12/16 mm hose and se-
cure with cable strap. Connect the pump in the same
way. Reinstall lamp and pump into the chamber of the
internal lter and connect the outlet of the UV-C lamp to
the back side of the water outlet opening again.
Technical Data
sera UV-C lamp 220 – 240 V, 5 W
IPX8 (1 m / 3.3 ft.)
Ballast 12 V 6 W UVPL
Transformer IN 230 V AC 50 Hz
OUT 12 V AC 650 mA
Maintenance and cleaning
The lter baskets are equipped in a way that allows wa-
ter owing by in case of clogging. When lter media are
used up or clogged, and need to be replaced, you must
rst switch off the feed pump. After removing the lid (1.2)
you can pull the baskets out along the holder rail (3.1)
so you can remove them separately and as required.
Cleaning the intake slots can take place from the out-
side during operation. We recommend replacing the
UV-C lamp after 9 – 12 months of operation, as this lamp
then has become less effective and should be replaced
on a routine basis.
IPX8
1 m (3.3 ft.)
sera bioactive IF 400 + UV Innenfilter neu.indd 14 26.08.2014 12:20:43

15
sera lter and feed pump FP 750
The sera lter and feed pump FP 750 convinces with
its compact and robust construction as well as low en-
ergy consumption and its adjustability. The high water
agitation performance ensures constant conditions in an
aquarium and thus contributes to the stabilization of the
biological system.
Parts list
Motor block with pump chamber
Holder plate with four suction cups
Hose connector
Running unit consisting of
• Rubber bearing
• Rotor with magnetic impeller and ceramic shaft
Seal ring
Pump chamber cover
Intake grid
Rotary adjusting cap
Attention! Please observe the safety advice by all means.
Assembly instruction
The sera lter and feed pump FP 750 is connected to
the intake opening of the sera UV-C System 5 W (4.1)
by a hose, and is inserted with it into the central duct of
the sera bioactive IF 400 + UV internal lter (4.2).
Operation
Make sure there is no direct or indirect conducting con-
tact to persons before switching on the pump. The pump
begins to run upon plugging in the plug. The water ow
through the pump will be reduced when turning the cap
(6.8) in “–” direction. The water ow will rise up to the
maximum feed performance when turning the cap in “+”
direction. The pump is designed for permanent opera-
tion but must not run dry, as the motor block is cooled
by water and the ceramic shaft is lubricated by water.
Turn the pump off again and check whether nothing is
clogged if no water is delivered after a few seconds.
Switch the pump back on only afterwards.
Cleaning
All parts can be cleaned with a brush and a neutral de-
tergent. Make sure no detergent gets into the aquarium.
Carefully rinse all cleaned parts with clean tap water be-
fore reassembling the pump and putting it back in oper-
ation in the aquarium. You can immerse the running unit
and the motor block in a descaler solution for stainless
steel parts if the pump is severely lime encrusted. Please
adhere to the information for use of the descaler solu-
tion.
Maintenance
The motor block is embedded in plastic material for elec-
tric isolation and therefore cannot be repaired.
Replacing the running unit:
Take the pump intake grid off the motor block. Turn the
pump chamber cover to the left by approximately 90°.
Pull the pump chamber cover straightly out of the mo-
tor block, making sure the shaft cannot break. In case
the shaft remains stuck in the motor block, pull it out rst
before pulling out the magnetic impeller.
Reassembly takes place in reverse order.
Technical Data
sera FP 750
Voltage 220 – 240 V ~ 50 Hz
Power uptake 12 W
Water temperature up to 35°C (95°F)
Cable length 1.8 m (6 ft.)
Spare parts
Running unit (rotor with magnetic impeller, ceramic shaft,
rubber bearings)
Pump chamber cover with seal ring
Suction holder
Warning
1. Children should be supervised to ensure that they do
not play with the appliance.
2. This appliance is not intended for use by persons (in-
cluding children) with reduced physical, sensory or
mental capacities, or lack of experience and knowl-
edge, unless they have been given supervision or in-
struction concerning use of the appliance by a person
responsible for their safety.
3. If the supply cord is damaged, the pump is not longer
allowed to be used and should be discarded.
Disposal of the unit:
Waste electrical and electronic equipment (WEEE)
must not get into domestic waste!
If ever the unit cannot be used anymore, the consumer
is legally obliged to hand in waste electrical and elec-
tronic equipment (WEEE) separately from domestic
waste, e.g. at a collection point of his community/his
district. This ensures that waste electrical and electron-
ic equipment (WEEE) is expertly processed and that neg-
ative effects to the environment are avoided.
sera bioactive IF 400 + UV Innenfilter neu.indd 15 26.08.2014 12:20:43

16
Therefore electrical and electronic
equipment bears the following symbol:
Manufacturer warranty:
When following the directions for use, the sera bioac-
tive IF 400 + UV internal lter will perform reliably. We
are liable for the freedom from faults of our products for
2 years beginning with the purchase date.
We are liable for complete awlessness at delivery.
Should usual wear and tear occur by use as intended by
us, this is not considered a defect. Warranty claims are
also excluded in this case. This particularly refers to the
running unit (rotor with shaft). Legal claims are of course
not reduced or limited by this warranty.
Please note the additional warranty information (*).
Recommendation:
In every case of a defect, please rst consult the spe-
cialized retailer where you purchased the unit. He will be
able to judge whether it is actually a warranty case. In
case of sending the unit to us we will unnecessarily have
to charge you for occurring costs.
Any liability because of contract breach is limited to in-
tent or gross negligence. sera will be liable in case of
slight negligence only in case of injuries to life, body and
health, in case of essential contractual obligations and
with binding liability according to the product liability
code. In that case, the extent of liability is limited to the
replacement of contractually typically foreseeable dam-
ages.
The pumps may only be used in fresh and marine water.
Warranty will be void in case of operation in corrosive
liquids etc.
Important warranty addendum (*):
• Impeller units that are worn, broken or stuck due
to lime deposits are a direct consequence of insuf-
cient maintenance or improper treatment. These and
all subsequent damages are not covered by the war-
ranty. Often, these damages cannot be repaired.
• Broken rotor wings are caused by gravel or other
larger, hard particles that have been sucked into the
unit. These damages are not covered by warranty.
• Damage to the power/mains cord, will not be re-
paired by the manufacturer due to safety reasons.
(Reason: Moisture that has gotten into the cable of-
ten leads to corrosion and short-circuits in the motor
later on.) Replacing the complete cable is not possi-
ble. The pump must be discarded.
• Any damages of the cable are excluded from warran-
ty.
• The UV-C lamp 5 W is excluded from warranty.
sera bioactive IF 400 + UV Innenfilter neu.indd 16 13.08.2014 13:06:43

17
Consignes de sécurité A lire et respecter impérative-
ment !
• Attention :
rayonnement ultraviolet dangereux !
• Ne jamais regarder directement, sans protection,
dans la lampe UV-C spéciale allumée (lésions ocu-
laires !)
• Faire fonctionner la lampe UV-C sera uniquement
lorsqu’elle a été entièrement assemblée conformé-
ment aux instructions. Toute autre utilisation peut pro-
voquer de graves lésions cutanées et oculaires !
• Ne pas ouvrir ni endommager le boîtier de la lampe.
• Toujours tenir les appareils UV et les lampes UV-C
hors de portée des enfants !
• Ne pas faire fonctionner le système UV-C à des tem-
pératures supérieures à 35°C (95°F) et en cas de gel.
• Ne pas faire fonctionner le système UV-C ni la pompe
sans circulation d’eau !
• Des MISES EN MARCHE/ARRETS répétés réduisent
la durée de vie de la lampe UV-C. L’unité devrait fonc-
tionner en continu 24 h/24 h pour garantir les meil-
leurs résultats.
• Avant tout travail dans l’aquarium, débranchez tous
les appareils électriques se trouvant dans l’eau !
• Assurez-vous que la tension du réseau corres -
ponde aux indications gurant sur la plaque signalé-
tique.
• Formez une boucle d’égouttement avec le câble ré-
seau pour éviter que de l’eau ne pénètre dans la prise
de courant en coulant le long du câble.
• Ne faire fonctionner l’ensemble des appareils qu’avec
un disjoncteur RCD ou FI avec un courant de dé-
clenche ment de max. 30 mA.
• Veillez à ce que le connecteur des appareils branchés
soit toujours librement accessible.
• Protéger le transformateur et le ballast électronique
de l’eau.
• Ne plus utiliser les appareils si le câble réseau est en-
dommagé.
Le et ses
composantes doivent uniquement être utilisés pour l’uti-
lisation décrite.
Vous venez d’acquérir le nouveau sera bioactive IF 400
et nous vous en félicitons.
Ce ltre intérieur d’un nouveau genre allie les avantages
d’un ltre logé dans l’aquarium, avec un important vo-
lume de médias ltrants possible pour une bio-ltration
performante, à un traitement simultané aux UV-C de l’eau
d’aquarium ltrée. Les UV-C, au rayonnement puissant
ont une action partiellement stérilisante sur l’eau d’aqua-
rium et réduisent les germes dans l’aquarium. L’eau
d’aquarium est également débarrassée des parasites et
de leurs larves sans aucun produit chimique.
Le est mo-
dulable à l’intérieur et possède 6 paniers de ltration (5.1)
qui peuvent être remplis individuellement. Par ailleurs, il
s’adapte très facilement et individuellement à la fonc -
tion désirée (ltre rapide, ltre spécial, … – 5.3, 5.4). La
puissance de la
d’eau sera FP 750 fournie est réglable et elle pompe au
maximum 750 l/h. Le système sera UV-C 5 W est relié
à cette pompe et ne nécessite pas d’autre pompe. Le
est écono-
mique en énergie et silencieux. L’eau ltrée quitte le ltre
à travers un répartiteur exible, ce qui améliore égale-
ment les conditions de circulation d’eau dans l’aqua-
rium. Le ltre est approprié à la fois pour les aquariums
d’eau douce et les aquariums d’eau de mer.
Etendue de la fourniture (1)
1.1 Boîtier de la pompe avec fentes pour aspiration de
l’eau
1.2 Couvercle
1.3 Rail de montage
1.4 Paniers pour médias de ltration avec couvercle de
fermeture latéral (1.5) pour remplissage
1.6 Plaques de maintien centrales
1.7
FP 750
1.8 Tuyau de raccordement
1.9 Système sera UV-C 5 W (constitué d’un transfor-
mateur, d’un ballast électronique et de la lampe
UV-C 5 W)
1.10 Raccord (sortie)
1.11 Répartiteur sera avec deux buses mobiles
Média de ltration sera siporax mini Professional
Mise en service et montage
Le ltre est xé sur la vitre de l’aquarium à l’aide d’un rail
de montage xé avec du silicone pour aquarium normal
(voir g. 1.3). Ceci permet de le xer durablement, mais
également de manière étanche à la vitre de l’aquarium,
empêchant ainsi les poissons de nager entre le ltre et la
vitre de l’aquarium.
Montage en cas de nouvelle installation
1. Mettez le ltre dans l’aquarium vide, sec et posez le cou-
vercle sur le bac. Vériez à quelle hauteur le sera bioac-
, couvercle compris, peut
être monté sans cogner contre le couvercle. Le bord su-
périeur du ltre devrait se trouver, si possible, environ 1 à
2 cm en dessous du bord supérieur du bac (2.1). Marquez
la surface de montage du rail de montage à l’extérieur
de l’aquarium à l’aide d’un feutre ou d’un crayon gras.
Information mode d’emploi
joindre le présent mode d’emploi.
sera bioactive IF 400 + UV Innenfilter neu.indd 17 25.08.2014 07:40:31

18
2. Posez l’aquarium à la verticale sur la vitre latérale
sur laquelle le ltre sera installé. Veillez à ce que le
support soit plat, lisse et propre – utilisez, le cas
échéant, une couverture ou une plaque de polysty-
rène.
3. Nettoyez généreusement la surface sur laquelle le rail
de montage sera collé avec de l’alcool à brûler ou un
autre alcool. La surface vitrée doit être propre, sèche
et non grasse.
4. Nettoyez également la face à coller du rail de mon-
tage avec de l’alcool à brûler ou un autre alcool (pas
avec de l’acétone !).
5. Appliquez du silicone pour aquarium uniformément
sur le rail de montage, aux endroits prévus à cet effet
(2.2).
6. Collez avec précaution le rail de montage sur la sur-
face vitrée nettoyée (suivant vos marquages) et ap-
puyez fort. Veillez à ce que l’équerre soit tournée vers
le haut (2.3). Enlevez immédiatement les éventuels ex-
cédents de colle.
7. Laissez le bac en verre en position basculée pendant
le temps de séchage du silicone pour aquarium
(24 heures).
8. Au bout de 24 heures, mettez l’aquarium dans sa po-
sition nale et nettoyez soigneusement les surfaces
vitrées avec beaucoup d’eau, mais sans aucun pro-
duit de nettoyage.
9. Vous pouvez à présent accrocher le corps du ltre in-
térieur rempli avec les matériaux de ltration prévus
(2.3) et poser le couvercle (4.3).
Montage en cas de transformation
1. Mesurez soigneusement le sera bioactive IF 400 +
ltre intérieur UV et la vitre prévue pour le montage
pour éviter tout problème d’adaptation. Vériez à
quelle hauteur le sera bioactive IF 400 + ltre inté-
rieur UV, couvercle compris, peut être monté sans
cogner contre le couvercle. Le bord supérieur du ltre
devrait se trouver, si possible, environ 1 à 2 cm en
dessous du bord supérieur du bac (2.1).
2. Tenez à présent le sera bioactive IF 400 + ltre in-
térieur UV de l’extérieur contre la vitre de l’aquarium
et déterminez la surface de collage du rail de mon-
tage. Marquez cette surface de l’extérieur à l’aide d’un
feutre ou d’un crayon gras.
3. Abaissez le niveau d’eau dans l’aquarium jusqu’à ce
que la surface marquée soit entièrement au sec. Ajou-
tez 5 cm de réserve. Débranchez le thermoplongeur
avant d’abaisser le niveau d’eau.
4. Enlevez les dépôts de calcaire sur la surface sur la-
quelle le rail de montage sera collé avec sera pH/KH-
moins et nettoyez-la soigneusement avec de l’alcool
pur (pas avec de l’acétone !). Utilisez de l’essuie-tout
pour les deux étapes de nettoyage. Veiller à ne pas
faire couler trop de sera pH/KH-moins et d’alcool
dans l’aquarium. La surface vitrée doit ensuite être
propre, sèche et non grasse.
5. Nettoyez également la face à coller du rail de mon-
tage avec de l’alcool pur (pas avec de l’acétone !).
6. Appliquez la colle spéciale uniformément sur le rail de
montage, aux endroits prévus à cet effet.
7. Collez à présent avec précaution le rail de montage
sur la surface vitrée nettoyée (suivant vos marquages)
et appuyez fort. Veillez à ce que l’équerre du rail soit
tournée vers le haut (2.3) et à ce que la colle ne goutte
pas dans l’aquarium. Maintenez le rail de montage
avec des pinces revêtues de matière synthétique ou
étayez-le avec des baguettes pour éviter qu’il ne
glisse. Enlevez immédiatement les éventuels excé-
dents de colle.
8. Laissez la colle sécher 24 heures, puis enlevez les
pinces ou les baguettes. Enlever le couvercle pendant
tout ce temps. Puis nettoyez soigneusement les sur-
faces vitrées avec beaucoup d’eau, mais sans aucun
produit de nettoyage.
Mise en service
Remplissage des paniers (3) :
Garnissez le ltre de médias de ltration mécaniques,
à absorption chimico-physique ou biologiques. La four-
niture inclut sera siporax mini Professional qui, grâce
à sa fonctionnalité et à ses caractéristiques idéales,
offre de la place pour une très forte densité de bactéries
de ltration. sera lter biostart sert à activer sera
siporax mini Professional. Le remplissage des paniers
s’effectue par le clapet latéral. En fonction de la taille
du média de ltration utilisé, il peut être judicieux de
mettre le média de ltration dans un sachet avant de
l’insérer dans un panier. Pour le remplissage, tenez
le panier en le penchant de côté et retirez le couvercle
(3.3). Placez le matériau de ltration et remettez le cou-
vercle. Ne remplissez pas trop les paniers, ceci pourrait
rendre difcile l’ouverture et la fermeture du couvercle
(3.4).
Superposez les paniers et encliquetez-les dans le rail
de maintien (3.2) grâce auquel les paniers peuvent
être facilement glissés dans le boîtier du sera bioactive
IF 400 + ltre intérieur UV et de nouveau retirés
(3.1).
Information générale sur la ltration à travers des
médias de ltration :
Pour garantir d’une part une ltration efcace et d’autre
part une durée de vie élevée du ltre, il est recomman-
dé de placer les médias de ltration mécaniques dans
les paniers supérieurs et les biologiques en dessous.
Les médias de ltration qui s’encrassent en premier
peuvent ainsi être retirés plus rapidement et plus facile-
ment.
Usage optionnel en tant que ltre rapide
En aquariophilie, certaines applications concernent l’éli-
mination de grosses quantités de matières en suspen-
sion. Dans ce cas, le sera bioactive IF 400 + ltre
intérieur UV peut être utilisé sans paniers de ltration et
avec, par exemple, de la ouate de ltration à la place des
paniers de ltration remplis. Si ceci est le cas, l’eau entre
à travers toute la face du ltre dans les compartiments
de ltration d’où elle peut être captée par le média de
ltration mécanique (5.3).
sera bioactive IF 400 + UV Innenfilter neu.indd 18 25.08.2014 07:40:31

19
Veiller à un remplissage symétrique du ltre (5.2). Si vous
utilisez moins de 6 paniers, prenez-en 2 ou 4 placés les
uns en face des autres dans les compartiments. La cir-
culation de l’eau dans le sera bioactive IF 400 + ltre
intérieur UV est entièrement assurée par la pompe pour
ltration et circulation d’eau sera FP 750.
Montage du système sera UV-C 5 W
Pour les détails, se reporter au mode d’emploi séparé.
Sur la pompe se trouve un tuyau (1.8) qui assure le
raccordement du système sera UV-C 5 W avec la
pompe se trouvant en dessous. Placez la lampe UV-C
dessus et raccordez la sortie à l’aide de l’adaptateur pour
l’écoulement (1.10) avec le répartiteur sera avec deux
buses mobiles (1.11). Les buses peuvent être réglées en
les pliant, en fonction de la situation (4.4). En cas de dis-
tension, les différents segments du répartiteur se sé-
parent, mais peuvent être facilement réassemblés (4.5).
De même, les segments du répartiteur en forme de Y
peuvent être enlevés d’un côté et, si nécessaire, être
montés de l’autre côté (4.6).
Nettoyage et entretien
Les paniers de ltration sont conçus de telle sorte que
l’eau coule à côté en cas de colmatage. Lorsque les mé-
dias de ltration sont usés ou encrassés et qu’ils doivent
être remplacés, commencer par couper la pompe. Après
avoir retiré le couvercle (1.2), tirer les paniers à l’aide du
rail de maintien (3.1) et les sortir individuellement, sui-
vant les besoins.
Les fentes peuvent être nettoyées de l’extérieur pendant
le fonctionnement. Après 9 à 12 mois de fonctionnement,
nous conseillons de remplacer la lampe UV-C étant don-
né qu’elle a perdu de son efcacité et qu’elle devrait être
régulièrement remplacée.
Système sera UV-C 5 W
Utilisation et domaine d’application
Les systèmes UV-C sera éliminent de manière fiable et
sans l’intervention de produits chimiques toutes les
espèces d’algues flottantes (eau verte, trouble) et
réduisent la multiplication des algues filamenteuses et
autres. Les agents pathogènes et turbidités de l’eau
d’origine bactérienne sont également éliminés
durablement. C’est en particulier dans l’eau de mer, où
l’utilisation de produits chimiques est très risquée, que
le système UV-C sera permet de prévenir efcacement
l’invasion de l’eau de l’aquarium par des germes. L’ac-
tion de la lampe UV-C est purement physique et se li-
mite à l’eau qui passe devant, ce qui la rend totalement
inoffensive pour les occupants et organismes de ltra-
tion.
L’appareil doit uniquement être utilisé en liaison avec
une pompe de circulation (4.1). Le système UV-C ne pos-
sède pas de système de circulation propre.
Liste des pièces
1. Lampe UV-C sera 5 W (6.5)
2. Ballast électronique, 12 V 6 W (6.1)
3. Transformateur, 230 V AC 12 V AC 650 mA (6.6)
Attention ! Respectez impérativement les consignes
de sécurité.
Instructions de montage
Le système UV-C sera est directement relié à la pompe
de circulation (6.8) et à la sortie du ltre intérieur (1.10) et
constitue la dernière étape du ltre intérieur. L’eau net-
toyée reue par l’ouverture d’écoulement du ltre intérieur.
Mise en service
Avant d’allumer la lampe UV-C, s’assurer qu’elle est en-
tourée d’eau et/ou qu’elle est entièrement immergée. Ne
pas faire fonctionner la lampe à sec pour éviter une sur-
chauffe. Faire fonctionner la lampe UV-C (6.5) unique-
ment avec le transformateur fourni (6.6) et le ballast
électronique (6.1). Raccorder la prise noire du transfor-
mateur (6.6) au connecteur noir (6.4) du ballast électro-
nique (6.1). La lampe UV-C (6.5) est raccordée à la prise
bleue (6.3) du ballast électronique (6.1) par le biais du
connecteur bleu. Relier le transformateur (6.6) à la source
de tension u niquement lorsque tous les raccordements
sont effectués et que le système UV-C a été immergé
dans l’eau. Ne pas inverser les raccordements. Le fonc-
tionnement de la lampe est indiqué par la diode rouge
(6.2) sur le ballast électronique (6.1).
Contrôle de la lampe UV-C
Attention ! Mettez des lunettes avec protection UV.
Pour voir si la lampe UV-C du système UV-C sera fonc-
tionne, mettre le système UV-C en marche. Si la lampe
fonctionne, on aperçoit une lueur bleuâtre dans l’ouver-
ture d’écoulement. Evitez de regarder directement dans
la lumière UV-C.
Nettoyage
Ne pas ouvrir le système UV-C sera. Ne pas non plus
intervenir avec des objets pointus ou durs à l’intérieur
du boîtier. Si l’appareil est bouché et ne peut pas être
nettoyé en le rinçant à l’eau, remplacer la lampe avec le
boîtier.
sera bioactive IF 400 + UV Innenfilter neu.indd 19 28.08.2014 10:35:28

20
La pompe pour ltration et circulation d’eau sera FP
750 sait convaincre par sa construction compacte et
robuste ainsi que par sa faible consommation d’énergie
et sa capacité de réglage. La grande puissance de
circulation garantit des conditions constantes dans
l’aquarium et contribue ainsi à stabiliser le système bio-
logique.
Liste des pièces
Bloc-moteur avec chambre de pompe
Plaque de support avec quatre ventouses
Raccord de tuyau
Unité d’entraînement, comprenant
• Palier caoutchouc
• Rotor avec induit magnétique et axe céramique
Joint d’étanchéité
Couvercle de chambre de pompe
Grille de trop-plein
Capuchon de réglage
Attention ! Respectez impérativement les consignes
de sécurité !
Instructions de montage
La pompe pour ltration et circulation d’eau sera FP
750 est reliée par un tuyau à l’ouverture pour arrivée
d’eau du système sera UV-C 5 W (4.1) et est installée
avec celui-ci dans le compartiment du milieu du sera
bioactive IF 400 + ltre intérieur UV (4.2).
Mise en service
Avant de mettre la pompe en marche, assurez-vous qu’au-
cune personne ne soit en contact direct ou indirect avec
des éléments conducteurs. La pompe se met à fonction-
ner dès son branchement au secteur. Tournez le capu-
chon (6.8) vers « – » pour réduire le débit de la pompe,
tournez vers « + » pour réguler le débit jusqu’au maximum.
La pompe est conçue pour fonctionner en régime perma-
nent, mais ne doit pas tourner à sec car le bloc-moteur
est refroidi à l’eau, et l’axe céramique lubrié à l’eau. En
cas de coupure de l’eau durant quelques secondes, arrê-
tez la pompe et vériez que rien n’est bouché. Ce n’est
qu’ensuite que vous pourrez remettre la pompe en marche.
Nettoyage
Toutes les pièces peuvent se nettoyer à la brosse et avec
un produit de nettoyage neutre. Veillez à ce que le pro-
duit de nettoyage ne se mélange pas à l’eau de l’aqua-
rium. Rincez soigneusement à l’eau claire du robinet
toutes les pièces nettoyées avant de remonter la pompe
et de la remettre en service dans l’aquarium. Si la pompe
est fortement entartrée, vous pouvez plonger l’unité d’en-
traînement et le bloc-moteur dans une solution de dé-
tartrage pour pièces en inox. Veuillez respecter la notice
d’utilisation du détartrant.
Entretien
Le bloc-moteur est surmoulé dans du plastique en vue de
son isolation électrique et ne peut de ce fait être réparé.
Changement de l’unité d’entraînement :
Retirez du bloc-moteur la grille de trop-plein de la pompe. Tour-
nez le couvercle de la chambre de pompe d’environ 90° vers
la gauche. Retirez le couvercle de la chambre en l’extrayant
du bloc-moteur sans dévier de manière à ne pas briser l’axe.
Entretien
Remplacer la lampe UV-C au bout d’un an environ. Com-
mencer par débrancher tous les éléments conducteurs
de courant. Sortir le système UV-C avec la pompe de
l’aquarium (4.1). Enlever la lampe du tuyau. Le cas
échéant, remplacer le tuyau. Placer une nouvelle lampe
UV-C sur le nouveau tuyau 12/16 mm et xer avec une
attache pour câble. Fixer la pompe de la même manière.
Remonter la lampe et la pompe dans le compartiment
du ltre intérieur et remettre l’écoulement de la lampe
UV-C sur la face arrière de l’ouverture d’écoulement de
l’eau.
Caractéristiques techniques
Lampe UV-C sera 220 – 240 V, 5 W
IPX8 (1 m)
Ballast électronique 12 V 6 W UVPL
Transformateur IN 230 V AC 50 Hz
OUT 12 V AC 650 mA
Pompe pour ltration et circulation d’eau sera FP 750
1 m
IPX8
sera bioactive IF 400 + UV Innenfilter neu.indd 20 28.08.2014 10:35:29
Strona się ładuje...
Strona się ładuje...
Strona się ładuje...
Strona się ładuje...
Strona się ładuje...
Strona się ładuje...
Strona się ładuje...
Strona się ładuje...
Strona się ładuje...
Strona się ładuje...
Strona się ładuje...
Strona się ładuje...
Strona się ładuje...
Strona się ładuje...
Strona się ładuje...
Strona się ładuje...
Strona się ładuje...
Strona się ładuje...
Strona się ładuje...
Strona się ładuje...
Strona się ładuje...
Strona się ładuje...
Strona się ładuje...
Strona się ładuje...
Strona się ładuje...
Strona się ładuje...
Strona się ładuje...
Strona się ładuje...
Strona się ładuje...
Strona się ładuje...
Strona się ładuje...
Strona się ładuje...
Strona się ładuje...
Strona się ładuje...
Strona się ładuje...
Strona się ładuje...
Strona się ładuje...
Strona się ładuje...
Strona się ładuje...
Strona się ładuje...
Strona się ładuje...
Strona się ładuje...
Strona się ładuje...
Strona się ładuje...
Strona się ładuje...
Strona się ładuje...
Strona się ładuje...
Strona się ładuje...
Strona się ładuje...
Strona się ładuje...
Strona się ładuje...
Strona się ładuje...
Strona się ładuje...
Strona się ładuje...
Strona się ładuje...
Strona się ładuje...
Strona się ładuje...
Strona się ładuje...
Strona się ładuje...
Strona się ładuje...
Strona się ładuje...
Strona się ładuje...
Strona się ładuje...
Strona się ładuje...
Strona się ładuje...
Strona się ładuje...
Strona się ładuje...
Strona się ładuje...
Strona się ładuje...
Strona się ładuje...
Strona się ładuje...
Strona się ładuje...
Strona się ładuje...
Strona się ładuje...
Strona się ładuje...
Strona się ładuje...
Strona się ładuje...
Strona się ładuje...
-
 1
1
-
 2
2
-
 3
3
-
 4
4
-
 5
5
-
 6
6
-
 7
7
-
 8
8
-
 9
9
-
 10
10
-
 11
11
-
 12
12
-
 13
13
-
 14
14
-
 15
15
-
 16
16
-
 17
17
-
 18
18
-
 19
19
-
 20
20
-
 21
21
-
 22
22
-
 23
23
-
 24
24
-
 25
25
-
 26
26
-
 27
27
-
 28
28
-
 29
29
-
 30
30
-
 31
31
-
 32
32
-
 33
33
-
 34
34
-
 35
35
-
 36
36
-
 37
37
-
 38
38
-
 39
39
-
 40
40
-
 41
41
-
 42
42
-
 43
43
-
 44
44
-
 45
45
-
 46
46
-
 47
47
-
 48
48
-
 49
49
-
 50
50
-
 51
51
-
 52
52
-
 53
53
-
 54
54
-
 55
55
-
 56
56
-
 57
57
-
 58
58
-
 59
59
-
 60
60
-
 61
61
-
 62
62
-
 63
63
-
 64
64
-
 65
65
-
 66
66
-
 67
67
-
 68
68
-
 69
69
-
 70
70
-
 71
71
-
 72
72
-
 73
73
-
 74
74
-
 75
75
-
 76
76
-
 77
77
-
 78
78
-
 79
79
-
 80
80
-
 81
81
-
 82
82
-
 83
83
-
 84
84
-
 85
85
-
 86
86
-
 87
87
-
 88
88
-
 89
89
-
 90
90
-
 91
91
-
 92
92
-
 93
93
-
 94
94
-
 95
95
-
 96
96
-
 97
97
-
 98
98


Sera bioactive IF 400 + UV Information For Use
- Typ
- Information For Use
w innych językach
- čeština: Sera bioactive IF 400 + UV
- español: Sera bioactive IF 400 + UV
- svenska: Sera bioactive IF 400 + UV
- português: Sera bioactive IF 400 + UV
- français: Sera bioactive IF 400 + UV
- Türkçe: Sera bioactive IF 400 + UV
- English: Sera bioactive IF 400 + UV
- dansk: Sera bioactive IF 400 + UV
- русский: Sera bioactive IF 400 + UV
- suomi: Sera bioactive IF 400 + UV
- Nederlands: Sera bioactive IF 400 + UV
Powiązane artykuły
-
Sera filter and feed pumps FP Information For Use
-
-
-
-
-
-
-
-
-
Inne dokumenty
-
Ferplast Cayman 110 Scenic Instrukcja obsługi
-
Ferplast Cayman 40 Classic Instrukcja obsługi
-
 AQUA SZUT TURBO 550 Instrukcja obsługi
-
 AQUA SZUT JUNIOR N Instrukcja obsługi
-
-
-
EHEIM biopower 200 Instrukcja obsługi
-
EHEIM 2006 Instrukcja obsługi
-
 Hydor Koralia 3200/850 Instrukcja obsługi
-
EHEIM aquaball 60 Instrukcja obsługi


