
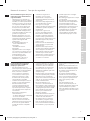
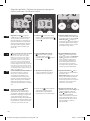
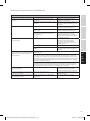
BREAD MAKER FRESH BREAD PATISSIER MODEL EBM8000
EN • FR • IT • ES • PT • SV • NL • FI • NO • RU • SK • CS • HR • PL • RO • HU
ELX14261_IFU_Baguette_bakmaskin_ELX_16lang.indd 1 3/4/2011 12:34:47 PM

GB Instruction book ...............3–11
Bread/dough programme chart,
Troubleshooting, Recipes .......12–20
Before using the machine for the
rst time, please read the safety
advice on page 4 carefully.
F Manuel d'utilisation ........3–11
Tableau des programmes de pré-
paration des pains / pâtes, Gestion
des pannes, Recettes .................21–29
Avant d'utiliser l'appareil pour la
première fois, veuillez lire attentive-
ment les consignes de sécurité
en page4.
I Libretto di istruzioni .......3–11
Tabella dei programmi per pane/
pasta, Ricerca ed eliminazione dei
guasti, Ricette .................................30–38
Prima di utilizzare l'apparecchio
per la prima volta, leggere attenta-
mente le norme di sicurezza a
pagina 5.
E Folleto de instrucciones 3–11
Tabla del programa de pan/masa,
Solución de problemas,
Recetas ...............................................39–47
Antes de utilizar la máquina por
primera vez, lea detenidamente las
recomendaciones de seguridad
de la página 5.
P Manual de instruções .49–57
Tabela de programas para pão/
massa, Resolução de problemas,
Receitas ..............................................58–66
Antes de utilizar o máquina de
fazer pão pela primeira vez, leia
com atenção o aviso de segurança
na página 50.
S Bruksanvisning ................49–57
Programschema för bröd/deg,
Felsökning, Recept ......................67–75
Läs säkerhetsanvisningarna på
sidan 50 noga innan du använder
maskinen för första gången.
NL Gebruiksaanwijzing .....49–57
Programmaoverzicht voor brood/
deeg, Problemen oplossen,
Recepten ..........................................76–84
Lees voordat u het apparaat voor
de eerste keer gebruikt het veilig-
heidsadvies op pagina 51 zorgvul-
dig door.
FI Käyttöohjeet .....................49–57
Leipä- ja taikinaohjelmat,
Vianetsintä, Reseptit ...................85–93
Ennen kuin käytät laitetta
ensimmäisen kerran, lue sivun 51
turvallisuusohjeet huolellisesti.
N Bruksanvisning .............95–103
Programmeringstabell for
brød/deig, Feilsøking,
Oppskrifter ................................. 104–112
Før du bruker maskinen for første
gang, ber vi deg lese sikkerhets-
rådene på side 96 nøye.
RU Инструкция ...................95–103
Таблица программ хлеб-тесто,
Устранение неполадок,
Рецепты ......................................113–121
Перед первым применением
устройства внимательно прочт-
ите раздел о мерах предосторож-
ности на странице 96.
SK Návod na používanie .95–103
Tabuľka programov prípravy chle-
ba/cesta, Odstraňovanie porúch,
Recepty ........................................ 122–130
Pred prvým použitím prístroja
si dôkladne prečítajte bezpeč-
nostné informácie na strane 97.
CZ Návod k použití ...........95–103
Tabulka programů, Řešení potíží',
Recepty ........................................ 131–139
Před prvním použitím domácí
pekárny si pečlivě přečtěte
bezpečnostní pokyny na straně 97.
HR Knjižica s uputama .141–149
Tablica programa za
kruh/tijesto, Rješavanje problema,
Recepti ......................................... 150–158
Prije prve upotrebe pažljivo
pročitajte sigurnosne savjete na 142.
stranici.
PL Instrukcja obsługi .... 141–149
Tabela programów do pieczenia
chleba/przygotowywania ciasta,
Rozwiązywanie podstawowych
problemów, Przepisy ........... 160–168
Przed pierwszym użyciem urządze-
nia, prosimy dokładnie przeczytać
instrukcje dotyczące bezpieczeństwa
zamieszczone na stronie 142.
RO Manual de instrucţiuni
de folosire în limba
română .......................... 141–149
Schemă program pâine/aluat,
Remedierea problemelor de
funcţionare, Reţete ................ 170–178
Înainte de a utiliza maşina pentru
prima oară, vă rugăm să citiţi cu
atenţie recomandările pentru
utilizarea în siguranţă de la pagina
143.
HU Használati
útmutató ..................... 141–149
Kenyér, tészta programkártya,
Üzemzavarok, Reţete ........... 180–188
A gép használata előtt először,
kérjük, olvassa el a biztonsági
tanácsot, a 143 oldalon alaposan.
ELX14261_IFU_Baguette_bakmaskin_ELX_16lang.indd 2 3/4/2011 12:34:47 PM

3
GB
f
I
E
P
S
NL
fI
N
RU
SK
CZ
HR
PL
RO
HU
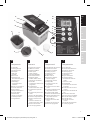
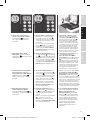
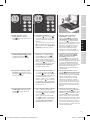
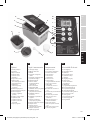
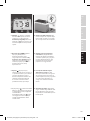
A
B
C
D
E
f
G
E
f
H
G
N
L
O
M
P
Q
S
R
T
U
I
J
K
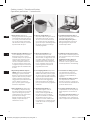
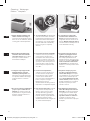
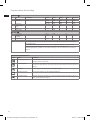
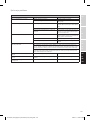
GB f I E
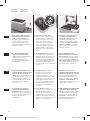
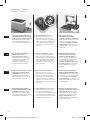
A. Lid handle
B. Viewing window
C. Heating element
D. Bread pan
E. Cake pan
F. Kneader
G. Drive shaft
H. Measuring cup
I. Dual measuring spoon
J. Control panel
K. LCD display
L. Programme status
indicators
M. Crust colour indicators
N. Loaf size indicators
O. Pan indicators
P. Delayed Start buttons
Q. Loaf size button
R. Menu button
S. Crust colour button
T. Start/Stop button
U. Programme list
Components
A. Poignée du couvercle
B. Hublot de contrôle
C. Élément chauant
D. Moule à pain
E. Moule à gâteau
F. Pale auto-rabattable
G. Axe d'entraînement
H. Récipient gradué
I. Double cuillère doseur
J. Panneau de commande
K. Écran LCD
L. Indicateurs de l'avancée du
programme
M. Indicateurs du
brunissement de la croûte
N. Indicateurs du poids du
pain
O. Indicateur de présence du
moule
P. Boutons de départ diéré
Q. Sélection du poids du pain
R. Bouton de sélection du
menu
S. Sélection du niveau de
brunissement de la croûte
T. Bouton marche/arrêt
U. Liste des programmes
Éléments
A. Impugnatura del coperchio
B. Finestra di controllo
C. Elemento riscaldante
D. Stampo per pane
E. Stampo per dolci
F. Impastatrice
G. Albero motore
H. Bicchierino graduato
I. Misurino doppio
J. Pannello di controllo
K. Display LCD
L. Indicatori di stato del
programma
M. Indicatori del colore della
crosta
N. Indicatori delle dimensioni
del prodotto da forno
O. Indicatori degli stampi
P. Pulsanti del ritardo di avvio
Q. Pulsante delle dimensioni
del prodotto da forno
R. Pulsante Menu
S. Pulsante del colore della
crosta
T. Pulsante di avvio/arresto
U. Elenco dei programmi
Componenti
A. Asa de la tapa
B. Ventana de visualización
C. Elemento calentador
D. Molde para pan
E. Molde para tartas
F. Amasadora
G. Eje de transmisión
H. Taza de medición
I. Cucharilla de medición
doble
J. Panel de control
K. Pantalla LCD
L. Indicadores de estado del
programa
M. Indicadores de color de la
corteza
N. Indicadores de tamaño del
pan
O. Indicadores del molde
P. Botones de inicio aplazado
Q. Botón de tamaño del pan
R. Botón de menú
S. Botón de color de la
corteza
T. Botón de marcha/parada
U. Lista de programas
Componentes
ELX14261_IFU_Baguette_bakmaskin_ELX_16lang.indd 3 3/4/2011 12:34:48 PM

4
GB
I
f
E
Read the following instruction
carefully before using machine for the
rst time.
• This appliance is not intended for use
by persons (including children) with
reduced physical, sensory or mental
capabilities, or lack of experience
and knowledge, unless they have
been given supervision or instruction
concerning use of the appliance by a
person responsible for their safety.
• Children should be supervised to
ensure that they do not play with the
appliance.
• The appliance may only be connected
to a power supply whose voltage
and frequency comply with the
specications on the rating plate!
• Never use or pick up the appliance if
– the supply cord is damaged,
– the housing is damaged.”
• The appliance must only be connected
to an earthed socket. If necessary an
extension cable suitable for 10 A can
be used.
• If the appliance or the supply cord
is damaged, it must be replaced by
the manufacturer, its service agent or
similarly qualied person, in order to
avoid hazard.
• Always place the appliance on a at,
level surface.
• The mains plug must be withdrawn
each time after use, before cleaning
and maintenance.
• The appliance and accessories become
hot during operation. Use only
designated handles and knobs. Always
use oven gloves to remove the hot
bread pan. Allow to cool down before
cleaning or storage.
• The mains cable must not come into
contact with any hot parts of the
appliance.
• Never obstruct the air vents and
ensure adequate ventilation around
the appliance during operation. Failing
to do so could damage the appliance
and result in hazard.
• Never touch any moving parts with
your hand or any tools while the
appliance is plugged in.
• Do not immerse the appliance in
water or any other liquid.
• Do not exceed the maximum capacity
stated in the example recipes for the
respective baking pans, as this could
damage the appliance and result in
hazard.
• This appliance is intended for
domestic use only. The manufacturer
cannot accept any liability for possible
damage caused by improper or
incorrect use.
Safety advice /
Avant d'utiliser l'appareil pour la
première fois, il est impératif de
lire attentivement les instructions
suivantes.
• Cet appareil n'est pas destiné à
être utilisé par des personnes (y
compris des enfants) dont les
capacités physiques, sensorielles ou
mentales sont diminuées, ou qui ne
disposent pas des connaissances
ou de l'expérience nécessaires, à
moins qu'elles n'aient été formées
ou encadrées pour l'utilisation
de cet appareil par une personne
responsable de leur sécurité.
• Les enfants doivent être surveillés,
pour éviter qu'ils ne jouent avec cet
appareil.
• L'appareil doit être branché sur un
réseau électrique correspondant
à la tension et à la fréquence
d'alimentation indiquées sur la plaque
signalétique.
• Ne jamais utiliser ou prendre l'appareil
si
– le cordon d'alimentation est
endommagé,
– le boîtier est endommagé.
• L'appareil doit être raccordé à la terre.
Si nécessaire, il est possible d'utiliser
une rallonge compatible 10A.
• Si l'appareil ou le cordon
d'alimentation est endommagé, il
doit être remplacé par le fabricant,
l'un de ses réparateurs ou toute autre
personne dûment qualiée, an
d'éviter tout danger.
• Toujours placer l'appareil sur une
surface plane et horizontale.
• Débrancher l'appareil avant de
le nettoyer ou de procéder à son
entretien.
• Pendant le fonctionnement, l'appareil
et les accessoires sont chauds. Utiliser
exclusivement les poignées et les
boutons indiqués. Toujours utiliser des
maniques pour retirer le moule à pain
chaud. Laisser l'appareil refroidir avant
de le nettoyer ou de le ranger.
• Le cordon d'alimentation ne doit
jamais entrer en contact avec les
parties chaudes de l'appareil.
• Ne pas faire obstruction aux grilles
d'aération et s'assurer que l'appareil
dispose d'une ventilation susante
lorsqu'il fonctionne. Le non-respect
de cette consigne peut endommager
l'appareil et entraîner un danger.
• Ne jamais toucher les pièces mobiles
à mains nues ou à l'aide d'un outil
lorsque l'appareil est branché.
• Ne pas plonger l'appareil dans l'eau ni
dans aucun autre liquide.
• Ne pas dépasser la capacité maximale
indiquée dans les exemples de
recettes des diérents moules; cela
pourrait endommager l'appareil et
entraîner un danger.
• Cet appareil est exclusivement destiné
à un usage domestique. Le fabricant
décline toute responsabilité en cas de
dommages résultant d'une utilisation
incorrecte de l'appareil.
Consignes de sécurité
ELX14261_IFU_Baguette_bakmaskin_ELX_16lang.indd 4 3/4/2011 12:34:48 PM

5
GB
f
I
E
P
S
NL
fI
N
RU
SK
CZ
HR
PL
RO
HU
I
E
Prima di utilizzare l'apparecchio per la
prima volta, leggere attentamente le
seguenti istruzioni.
• L'apparecchio non è destinato ad
essere utilizzato da persone, compresi
i bambini, con ridotte capacità siche,
mentali o sensoriali o con esperienza
e/o competenze insucienti, a meno
che non siano sotto la supervisione
di una persona responsabile della
loro sicurezza o non vengano da essa
istruite sull'utilizzo dell'apparecchio.
• Sorvegliare i bambini per evitare che
giochino con l'apparecchio.
• Collegare l'apparecchio solo a una
fonte di alimentazione con tensione
e frequenza conformi alle speciche
riportate sulla targhetta delle
caratteristiche.
• Non utilizzare l'apparecchio se:
- il cavo di alimentazione è
danneggiato,
- il rivestimento esterno è
danneggiato.
• L'apparecchio deve essere collegato
solo a una presa con messa a terra. Se
necessario, è possibile utilizzare una
prolunga adatta per 10/A.
• In caso di danneggiamento
dell'apparecchio o del cavo di
alimentazione, ottenerne la
sostituzione rivolgendosi al
produttore, a un suo agente
dell'assistenza o a una persona
egualmente qualicata, in modo da
evitare rischi.
• Posizionare sempre l'apparecchio su
una supercie piana e regolare.
• Dopo ogni uso, scollegare
l'apparecchio dalla rete elettrica prima
di eettuare operazioni di pulizia e
manutenzione.
• L'apparecchio e gli accessori
possono surriscaldarsi durante il
funzionamento. Utilizzare solo le
maniglie e le manopole designate.
Indossare sempre i guanti da forno
per rimuovere lo stampo caldo. Lasciar
rareddare l'apparecchio prima di
pulirlo o riporlo.
• Evitare che il cavo di alimentazione
entri in contatto con le parti calde
dell'apparecchio.
• Evitare di ostruire le prese d'aria e
assicurare una ventilazione adeguata
attorno all'apparecchio durante il
funzionamento. Il mancato rispetto
di tali misure può causare danni
all'apparecchio e risultare pericoloso.
• Non toccare le parti in movimento
con le mani o con utensili
quando l'apparecchio è collegato
all'alimentazione.
• Non immergere l'apparecchio in acqua
o in altri liquidi.
• Non superare la capacità massima
indicata nelle ricette esemplicative
dei rispettivi stampi di cottura
poiché ciò potrebbe causare danni
all'apparecchio e risultare pericoloso.
• Questo apparecchio è progettato
esclusivamente per uso domestico.
Il produttore declina qualsiasi
responsabilità per eventuali danni
causati dall'uso improprio o errato.
Norme di sicurezza /
Lea detenidamente las siguientes
instrucciones antes de utilizar la
máquina por primera vez.
• Este electrodoméstico no está
indicado para que lo utilicen personas
(incluidos niños) con discapacidades
físicas, sensoriales o mentales o
que no cuenten con experiencia
o conocimientos, a menos que lo
hagan bajo supervisión o según
las instrucciones de una persona
responsable de su seguridad.
• Se deberá controlar que los niños no
jueguen con este electrodoméstico.
• Este electrodoméstico debe
conectarse exclusivamente a una
fuente de alimentación eléctrica
cuya tensión y frecuencia se ajusten
a las especicaciones de la placa de
características.
• Nunca utilice ni manipule el
electrodoméstico si
– el cable de alimentación está dañado
– la carcasa está dañada
• El electrodoméstico solamente
deberá conectarse a una toma de
alimentación eléctrica puesta a tierra.
De ser necesario, puede utilizarse
un cable de extensión compatible
para 10 A.
• Si el electrodoméstico o el cable de
alimentación no están en perfectas
condiciones, deben ser sustituidos
por el fabricante, por su servicio de
asistencia técnica o por personal
debidamente cualicado, para evitar
cualquier peligro.
• Coloque siempre el electrodoméstico
sobre una supercie plana y nivelada.
• Debe desconectar el enchufe del
aparato de la red eléctrica después de
cada uso, así como antes de limpiarlo y
realizar el mantenimiento.
• Este electrodoméstico y sus
accesorios se calientan durante el
funcionamiento. Utilice solamente las
asas y mandos especicados. Póngase
siempre guantes para horno cuando
retire el molde para pan caliente.
Espere a que se enfríe antes de
limpiarlo o guardarlo.
• El cable de alimentación eléctrica no
debe entrar en contacto con piezas
calientes del electrodoméstico.
• No obstruya nunca los conductos
de ventilación y asegúrese de que
haya una ventilación adecuada en
torno al electrodoméstico durante el
funcionamiento, ya que esto puede
provocar daños en el aparato y resultar
peligroso.
• Nunca toque las piezas móviles con
la mano ni con ninguna herramienta
mientras esté enchufada la máquina.
• No sumerja el electrodoméstico en
agua u otro líquido.
• No supere la capacidad máxima
indicada en las recetas de ejemplo
de los correspondientes moldes para
horno, ya que esto puede provocar
daños en el aparato y resultar
peligroso.
• Este electrodoméstico está
previsto exclusivamente para uso
doméstico. El fabricante declina toda
responsabilidad por los posibles
daños que pudiesen producirse como
consecuencia de su uso inadecuado o
incorrecto.
Consejo de seguridad
ELX14261_IFU_Baguette_bakmaskin_ELX_16lang.indd 5 3/4/2011 12:34:48 PM

6
GB
f
I
E
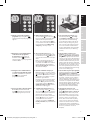
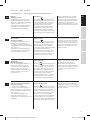
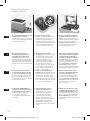
1. Before rst use. Remove all
packaging and labels. Mounting of the
lid: hold lid with upper part of hinge
in a vertical position. Slide down into
slots on the lower part of the hinge.
Lift out bread or cake pan, clean and
dry. Put kneader into place.
2. Measure of ingredients (it is
important to follow the given order of
ingredients in the recipe, see page
18–20). For best result, make sure to
use accurate amounts of ingredients
given in the recipes. Add all ingredients
into bread or cake pan according to
selected programme.
3. a. Put the bread pan into place in
baking compartment, push down until
locked in position. Close lid.
b. Put the cake pan into place in
baking compartment and close lid.
During startup, the cake pan will
automatically be xed.
Getting started /
1. Avant la première utilisation. Retirez
tous les emballages et les étiquettes.
Montage du couvercle: tenez le
couvercle de façon à ce que la partie
supérieure de la charnière soit à la
verticale. Faites-la glisser dans les
encoches de la partie inférieure de
la charnière. Retirez le moule à pain
ou à gâteau, nettoyez-le et séchez-le.
Installez la pale auto-rabattable dans
le moule.
2. Mesure des ingrédients (il est
important de respecter l'ordre
d'incorporation des ingrédients fourni
dans la recette, voir page27–29). Pour
un résultat optimal, assurez-vous de
respecter précisément les quantités
indiquées dans la recette. Incorporez
tous les ingrédients dans le moule
à pain ou à gâteau en fonction du
programme sélectionné.
3. a. Mettez le moule à pain en place
dans la cavité et enfoncez-le jusqu'à ce
qu'il soit maintenu en position. Fermez
le couvercle.
b. Mettez le moule à gâteau en
place dans la cavité et fermez le
couvercle. Le moule à gâteau est xé
automatiquement lors du démarrage.
Première utilisation
1. Operazioni preliminari al primo
utilizzo. Rimuovere completamente
l’imballaggio e qualsiasi etichetta.
Montare il coperchio tenendo la parte
superiore della cerniera in posizione
verticale. Introdurre negli appositi
alloggiamenti la parte inferiore della
cerniera. Estrarre lo stampo per
pane o per dolci, pulire e asciugare.
Posizionare l’impastatrice.
2. Dosi degli ingredienti. È importante
aggiungere gli ingredienti nell'ordine
indicato nelle ricette (vedere a pagina
36–38). Per ottenere i migliori risultati,
seguire scrupolosamente le indicazioni
relative alle dosi degli ingredienti
riportate nelle ricette. Aggiungere
tutti gli ingredienti nello stampo per
pane o per dolci in base al programma
selezionato.
3. a. Posizionare lo stampo per pane
nel compartimento di cottura e
spingerlo verso il basso no a farlo
scattare in posizione. Chiudere il
coperchio.
b. Posizionare lo stampo per dolci
nel compartimento di cottura e
chiudere il coperchio. Lo stampo per
dolci viene ssato automaticamente in
posizione durante l'avvio.
Operazioni preliminari /
1. Antes del primer uso. Retire todos
los embalajes y etiquetas. Montaje
de la tapa: Sujete la tapa con la parte
superior de la bisagra en posición
vertical Encájela en las ranuras de la
parte inferior de la bisagra.
Extraiga el molde para pan o tartas,
límpielo y séquelo. Coloque la
amasadora en su sitio.
2. Medida de ingredientes (es
importante seguir el orden de
ingredientes indicado en la
receta, consulte la página 45–47).
Para obtener el mejor resultado,
asegúrese de utilizar las cantidades
de ingredientes precisas que se
indican en las recetas. Añada todos
los ingredientes en el molde para pan
o tartas de acuerdo con el programa
seleccionado.
3. a. Coloque el molde para pan en el
compartimento de cocción y empuje
hasta encajarlo en su sitio. Cierre la
tapa.
b. Coloque el molde para tartas en el
compartimento de cocción y cierre la
tapa. Durante el inicio, el molde para
tartas se sujetará de forma automática.
Introducción
ELX14261_IFU_Baguette_bakmaskin_ELX_16lang.indd 6 3/4/2011 12:34:49 PM

7
GB
f
I
E
P
S
NL
fI
N
RU
SK
CZ
HR
PL
RO
HU
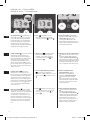
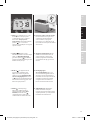
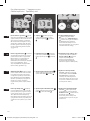
4. Plug in cord and choose baking
programme by pressing Menu
repeatedly until required programme
appears.
5. When using bread pan: Step 1 –
choose loaf size
and crust colour
by pressing buttons repeatedly until
indicators show required choices.
Step 2 – press and hold “Start“
for
2-3 seconds. An alert will sound before
the programme starts. When using
cake pan, go directly to step 2.
6. 1) To pause the programme, press
the start/stop button
. 2) To stop
or cancel the programme, press the
stop button for 1 sec. When baking
cycle is nished, unplug cord. Lift out
bread or cake pan using oven gloves,
turn out onto a plate and leave bread
to cool for at least 30 minutes before
slicing it. Immediately clean bread pan
and kneader after use (see Cleaning
section).
4. Branchez le cordon d'alimentation
et sélectionnez le programme
de préparation en appuyant sur
le bouton de menu
à plusieurs
reprises jusqu'à ce que le programme
souhaité s'a che.
5. Avec le moule à pain: Étape1 – sé-
lectionnez le poids du pain
et le bru-
nissement de la croûte
en appuyant
sur les boutons de sélection correspon-
dants.
Étape2 – maintenez enfoncé le bou-
ton “marche/arrêt“
pendant 2 à
3secondes. Une alerte sonore retentit
avant le démarrage du programme.
Avec le moule à gâteau, commencez
directement à l'étape2.
6. 1) Pour mettre en pause le pro-
gramme, appuyez sur le bouton Start/
Stop
. 2) Pour arrêter ou annuler le
programme, appuyez le bouton Start/
Stop 1s. Lorsque le cycle de préparation
est terminé, débranchez le cordon d'ali-
mentation. Retirez le moule à pain ou à
gâteau à l'aide de maniques, démoulez
la préparation sur une assiette et laissez-
la refroidir au moins 30minutes avant
de la découper. Nettoyez le moule et le
pétrisseur immédiatement après usage
(voir la section Nettoyage).
4. Collegare il cavo di alimentazione
e scegliere il programma di cottura
premendo ripetutamente il pulsante
Menu
no a visualizzare il
programma desiderato.
5. Quando si utilizza lo stampo per
pane: Passaggio 1: scegliere le dimen-
sioni del pane
e il colore della crosta
premendo ripetutamente i relativi
pulsanti no a visualizzare le opzioni
desiderate sugli indicatori.
Passaggio 2: tenere premuto il pulsan-
te di avvio
per 2-3 secondi. Prima
dell'avvio del programma viene emes-
so un segnale acustico. Quando si
utilizza lo stampo per dolci, andare
direttamente al passaggio 2.
6. 1) Per mettere in pausa il programma,
premere il pulsante di avvio/arresto
.
2) Per interrompere o annullare il
programma, tenere premuto il pulsante
STOP per 1 secondo. Al termine del ciclo
di cottura, scollegare il cavo di alimen-
tazione. Estrarre lo stampo per pane o
per dolci utilizzando dei guanti da forno,
rovesciarlo su un piatto e lasciar ra red-
dare il prodotto da forno per almeno 30
minuti prima di a ettarlo. Pulire lo stam-
po e l'impastatrice immediatamente
dopo l'uso (vedere la sezione Pulizia).
4. Conecte el cable y elija el programa
de cocción pulsando el botón de
menú
repetidas veces hasta que
aparezca el programa que necesita.
5. Si utiliza un molde para pan: Paso
1: elija el tamaño del pan
y el color
de la corteza
pulsando los botones
varias veces hasta que los indicadores
muestren las opciones elegidas.
Paso 2: pulse, sin soltarlo, el botón de
marcha
durante 2 o 3 segundos.
Sonará una alerta antes de que
comience el programa. Si utiliza un
molde para tartas, vaya directamente
al paso 2.
6. 1) Para hacer una pausa en el
programa, pulse el botón de marcha/
parada
. 2) Para parar o cancelar el
programa, pulse el botón de parada.
Una vez nalizado el ciclo de cocción,
desconecte el cable. Extraiga el molde
para pan o tartas con guantes para
horno, déle la vuelta sobre un plato y
espere a que se enfríe el pan durante
al menos 30 minutos antes de cortarlo
en rebanadas. Limpie de inmediato el
molde para pan y la amasadora después
de su uso (consulte la sección de
limpieza).
ELX14261_IFU_Baguette_bakmaskin_ELX_16lang.indd 7 3/4/2011 12:35:15 PM

8
GB
f
I
E
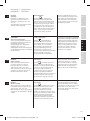
The delayed start enables delay of
bread making process up to 12 hours
(cannot be used with the Super Rapid
programme and is not recommended
for use with dough, jam or gluten free
settings). Do not use delayed start if
using programme 8 to 16 and perishable
ingredients (milk, eggs, yeast, etc).
1. Press
repeatedly to choose
desired programme, followed by
selecting crust colour
and size .
2. Press Timer button
repeatedly
until desired delay time is displayed.
Timer button
will decrease
set delay time (bread maker will
automatically include baking process
time based on what time you have set
the bread to be nished).
Delayed start /
Le départ di éré permet de retarder
le démarrage de la préparation du
pain dans un délai de 12h maximum
(option indisponible avec le programme
Pain rapide et déconseillée avec les
programmes Pâte, Con ture et Sans
gluten). L'option départ di éré ne doit
pas être utilisée avec les programmes 8 à
16 ou avec des denrées périssables (lait,
œufs, levure, etc.).
1. Appuyez sur
à plusieurs reprises
pour sélectionner le programme
souhaité; sélectionnez ensuite le
brunissement de la croûte
et le
poids du pain
.
2. Appuyez sur le bouton du minuteur
à plusieurs reprises, jusqu'à ce que
le délai de départ di éré souhaité
s'a che. Le bouton du minuteur
permet de réduire le délai (la machine
à pain tient automatiquement compte
du temps de préparation pour que le
pain soit prêt à l'heure sélectionnée).
Départ di éré
Il ritardo di avvio consente di
ritardare no a un massimo di 12 ore
l'avvio del processo di pani cazione. Non
può essere utilizzato con il programma
super rapido e non è consigliato con le
impostazioni per prodotti senza glutine,
pasta di pane e marmellate. Non utilizzare
il ritardo di avvio con i programmi da 8
a 16 e con ingredienti deperibili (latte,
uova, lievito ecc.).
1. Premere ripetutamente il pulsante
per scegliere il programma
desiderato, quindi selezionare il colore
della crosta con
e le dimensioni con
.
2. Premere ripetutamente il
pulsante del timer
no a
visualizzare il tempo di ritardo
desiderato. Il pulsante del timer
permette di ridurre il ritardo
impostato (l'apparecchio aggiunge
automaticamente il tempo di cottura
necessario in base all'orario di ne
cottura impostato).
Ritardo di avvio /
El inicio aplazado permite aplazar
el proceso de cocción del pan hasta un
máximo de 12 horas (no se puede utilizar
con el programa superrápido y no se
recomienda su uso con las posiciones
de masa, mermelada o sin gluten). No
utilice el inicio aplazado si está usando los
programas de 8 a 16 y con ingredientes
perecederos (leche, huevos, levadura,
etc.).
1. Pulse
repetidas veces para elegir
el programa que desee, y seleccione
luego el color de la corteza
y el
tamaño
.
2. Pulse el botón de temporizador
varias veces hasta que aparezca
el tiempo de aplazamiento que
desee. El botón de temporizador
reducirá el tiempo de aplazamiento
establecido (la pani cadora incluirá
automáticamente el tiempo del
proceso de cocción basándose en el
tiempo que haya establecido para
nalizar la elaboración del pan).
Inicio aplazado
ELX14261_IFU_Baguette_bakmaskin_ELX_16lang.indd 8 3/4/2011 12:35:41 PM

9
GB
f
I
E
P
S
NL
fI
N
RU
SK
CZ
HR
PL
RO
HU
3. Press . The machine turns on, colon
will ash and timer will start to count
down. Resetting time delay is carried
out by rst pressing
until screen
goes back to default setting. Then
reset time.
4. Power interruption protection.
In case of power failure or if unit
is unplugged during operation,
programme will continue if power is
re-established within 8 minutes.
3. Appuyez sur
. La machine se
met en marche, les deux points de
l’a chage se mettent à clignoter et
le minuteur commence le compte à
rebours. Pour remettre le minuteur à
zéro, appuyez d’abord sur
jusqu’à
ce que l’écran revienne au réglage par
défaut. Ensuite, réglez à nouveau le
temps.
4. Protection contre les coupures de
courant. En cas de coupure de courant
ou si l'appareil est débranché en cours
de fonctionnement, le programme
reprend là où il s'était interrompu à
condition que le courant soit rétabli
dans un délai de 8minutes.
3. Premere
. L’apparecchio si accende,
i due punti lampeggiano e ha inizio
il conto alla rovescia del timer. Per
impostare il ritardo di avvio è
necessario premere il tasto
nché
sul display non vengono visualizzate
le impostazioni prede nite. Quindi
impostare l’orario di avvio desiderato.
4. Protezione da interruzioni di
corrente. In caso di interruzione
di corrente o di scollegamento
del cavo di alimentazione durante
il funzionamento, il programma
riprenderà se l'alimentazione viene
ripristinata entro 8 minuti.
3. Pulse
. El aparato se enciende,
los dos puntos parpadearán y
el temporizador comenzará la
cuenta atrás. El restablecimiento
del aplazamiento se realiza
pulsando primero
hasta que la
pantalla vuelve a la con guración
predeterminada. Después, restablezca
la hora.
4. Protección contra las interrupciones
de energía eléctrica. En caso de fallo
eléctrico o si la unidad se desconecta
durante el funcionamiento, el
programa continuará si se reestablece
la electricidad en un tiempo de 8
minutos.
ELX14261_IFU_Baguette_bakmaskin_ELX_16lang.indd 9 3/4/2011 12:35:54 PM

10
GB
GB
f
f
I
I
E
E
1. Always unplug bread maker and
allow to cool before cleaning. Do
not immerse the bread maker body in
water. Do not use dishwasher, abrasive
scouring pads or metal implements.
2. To remove kneader, lift o . If kneader
cannot be removed after 10 minutes,
hold shaft from underneath pan and
twist back and forth until kneader is
released. Clean, rinse and dry. (When
the blade folds down automatically
from a 30° angle it is completely
cleaned.)
3. To clean bread or cake pan. Do
not immerse the outside base of
the pan, just partially ll with warm
soapy water. Leave to soak for 5 to 10
minutes. Outside and inside surfaces
are cleaned with a soft damp cloth. Lid
can be lifted o for cleaning.
Cleaning /
1. Débranchez systématiquement
la machine et laissez-la refroidir
avant de la nettoyer. Ne pas utiliser
de tampons à récurer abrasifs ni
d'instruments métalliques.
2. Pour retirer la pale auto-rabattable,
soulevez-la. Si vous ne parvenez pas
à retirer la pale 10 minutes après
l'interruption de la machine, mainte-
nez l'axe sous le moule et exercer un
mouvement de va-et-vient jusqu'à ce
que la pale se libère. Nettoyez, rincez
et séchez la pale. La pale est parfai-
tement nettoyée lorsqu'elle se rabat
sans e ort.
3. Pour nettoyer le moule à pain ou
à gâteau, ne plongez pas sa base
extérieure dans l'eau, il vous su t
de le remplir partiellement d'eau
chaude savonneuse. Laissez l'eau agir
pendant 5 à 10minutes. Nettoyez les
surfaces extérieures et intérieures
de la machine avec un chi on doux
humide. Le couvercle peut être retiré si
nécessaire.
Nettoyage
1. Scollegare sempre l'apparecchio
dall'alimentazione e lasciarlo
ra reddare prima di pulirlo. Non
immergere il corpo dell'apparecchio
in acqua. Non utilizzare lavastoviglie,
spugnette abrasive o utensili di
metallo.
2. Per rimuovere l'impastatrice,
sollevarla. Se dopo 10 minuti non è
possibile rimuovere l'impastatrice,
tenere l'albero da sotto lo stampo
e ruotare avanti e indietro no a
provocare il rilascio dell'impastatrice.
Lavare, sciacquare e asciugare.
Quando la lama si ripiega
automaticamente da un angolo di 30°
l'impastatrice è completamente pulita.
3. Per pulire lo stampo per pane o
per dolci, non immergere la base
esterna dello stampo, ma riempirla
solo parzialmente con acqua saponata
calda. Lasciare in ammollo per 5-10
minuti. Per la pulizia delle super ci
esterne e interne, utilizzare un panno
morbido inumidito. Per le operazioni
di pulizia il coperchio può essere
sollevato e rimosso.
Pulizia /
1. Desconecte siempre la pani cadora
y espere a que se enfríe antes de
limpiarla. No sumerja el cuerpo de
la pani cadora en el agua. No utilice
lavaplatos, estropajos abrasivos ni
utensilios de metal.
2. Para extraer la amasadora, levántela.
Si no pueda sacarla después de 10
minutos, sujete el eje por la parte
de abajo del molde, y gire atrás y
adelante hasta liberar la amasadora.
Límpiela, aclárela y séquela. (Cuando
la cuchilla se pliega hacia abajo
automáticamente desde un ángulo de
30°, estará totalmente limpia.)
3. Para limpiar el molde para pan o
tartas. No sumerja la base exterior
del molde, sólo llénela parcialmente
con agua jabonosa caliente. Déjela
a remojo entre 5 y 10 minutos. Las
super cies exteriores e interiores
se limpian con un paño suave y
húmedo. Se puede retirar la tapa para
la limpieza.
Limpieza
ELX14261_IFU_Baguette_bakmaskin_ELX_16lang.indd 10 3/4/2011 12:35:56 PM

11
GB
f
I
E
P
S
NL
fI
N
RU
SK
CZ
HR
PL
RO
HU
GB
f
I
E
Disposal
Packaging materials
The packaging materials are environ-
mentally friendly and can be recycled.
The plastic components are identied by
markings, e.g. >PE<, >PS<, etc.
Please dispose the packaging materials
in the appropriate container at the
community waste disposal facilities.
Old appliance
The symbol
on the product or on
its packaging indicates that this product
may not be treated as household waste.
Instead it shall be handed over to the
applicable collection point for the
recycling of electrical and electronic
equipment. By ensuring this product
is disposed of correctly, you will help
prevent potential negative consequences
for the environment and human health,
which could otherwise be caused by
inappropriate waste handling of this
product. For more detailed information
about recycling of this product, please
contact your local city oce, your
household waste disposal service or the
shop where you purchased the product.
Disposal /
Mise au rebut
Matériaux d'emballage
Les matériaux d'emballage sont sans
danger pour l'environnement et
recyclables. Les éléments en plastique
sont identiés par des marquages comme
>PE<, >PS<, etc.
Veuillez jeter les emballages dans les
conteneurs appropriés de votre centre
local de traitement des déchets.
Appareils usagés
Le symbole
sur le produit ou sur
son emballage indique qu'il ne doit pas
être jeté avec les ordures ménagères.
Il doit de préférence être coné à un
centre de recyclage adapté au traitement
des équipements électriques et
électroniques. En vous assurant que ce
produit est recyclé correctement, vous
contribuerez à éviter les conséquences
néfastes pour l'environnement et la
santé que pourrait avoir une mauvaise
gestion de ce produit en n de vie. Pour
plus d'informations sur le recyclage de
ce produit, contactez votre centre local,
votre service de traitement des ordures
ménagères, ou le magasin qui vous a
vendu ce produit.
Mise au rebut
Smaltimento
Materiali di imballaggio
I materiali di imballaggio utilizzati sono
ecologici e riciclabili. I componenti
in plastica sono contrassegnati dalle
indicazioni >PE<, >PS<, e così via.
Smaltire i materiali di imballaggio negli
appositi contenitori presso le isole
ecologiche locali.
Apparecchio usato
Il simbolo
riportato sull'apparecchio
o sulla sua confezione indica che questo
prodotto non può essere considerato
un normale riuto domestico, ma che
deve invece essere smaltito presso un
apposito punto di raccolta specializzato
nel riciclaggio di apparecchiature
elettriche ed elettroniche. Lo scrupoloso
rispetto delle disposizioni in materia
di smaltimento delle apparecchiature
elettriche ed elettroniche contribuisce
alla salvaguardia dell'ambiente e
alla tutela della salute. Per ulteriori
informazioni sul riciclaggio contattare il
proprio comune di residenza, la discarica
o il negozio dove è stato acquistato il
prodotto.
Smaltimento /
Cómo desechar el electrodoméstico
Materiales de embalaje
Los materiales de embalaje son
respetuosos con el medio ambiente y
pueden reciclarse. Los componentes de
plástico se identican con marcas como
>PE<, >PS<, etc.
Tire el material de embalaje en los
contenedores pertinentes en las
instalaciones de recogida de basura de su
comunidad.
Electrodoméstico antiguo
El símbolo
incluido en el producto
o en su envase indica que este producto
no debe ser tratado como un residuo
doméstico. Debe llevarse hasta un punto
de recogida para el reciclaje de equipos
eléctricos y electrónicos. El vertido
correcto del producto evitará perjudicar
al medio ambiente y a la salud. Para
obtener información más detallada acerca
del reciclaje de este producto, consulte
al departamento correspondiente de
su municipio, al servicio de recogida de
residuos domésticos o a la tienda donde
adquirió el producto.
Cómo desechar el electrodoméstico
ELX14261_IFU_Baguette_bakmaskin_ELX_16lang.indd 11 3/4/2011 12:35:56 PM

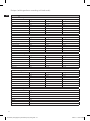
12
GB
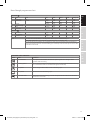
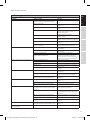
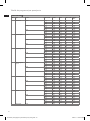
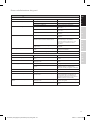
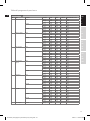
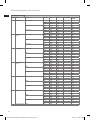
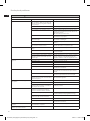
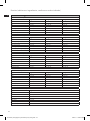
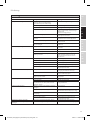
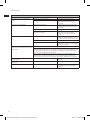
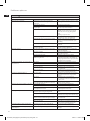
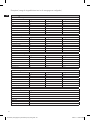
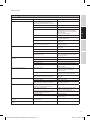
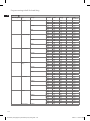
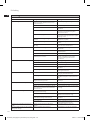
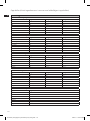
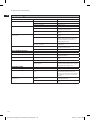
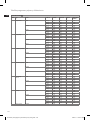
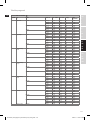
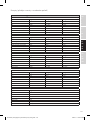
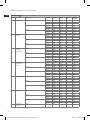
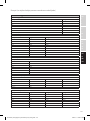
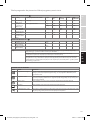
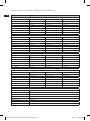
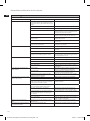
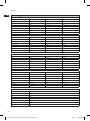
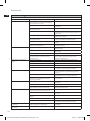
Bread/dough programme chart
BREAD PAN
Index Type Crust Size Total Extras Warm Delay max
1 White Bread Light 500g 02:57 02:37 60 12:00
750g 03:00 02:40 60 12:00
1.0kg 03:03 02:43 60 12:00
Medium 500g 03:05 02:45 60 12:00
750g 03:10 02:50 60 12:00
1.0kg 03:15 02:55 60 12:00
Dark 500g 03:20 03:00 60 12:00
750g 03:25 03:05 60 12:00
1.0kg 03:30 03:10 60 12:00
2 White Rapid Light 500g 02:32 02:12 60 12:00
750g 02:35 02:15 60 12:00
1.0kg 02:38 02:18 60 12:00
Medium 500g 02:40 02:20 60 12:00
750g 02:45 02:25 60 12:00
1.0kg 02:50 02:30 60 12:00
Dark 500g 02:55 02:35 60 12:00
750g 03:00 02:40 60 12:00
1.0kg 03:05 02:45 60 12:00
3 Whole Wheat
Bread
Light 500g 04:15 03:31 60 12:00
750g 04:19 03:35 60 12:00
1.0kg 04:23 03:39 60 12:00
Medium 500g 04:20 03:36 60 12:00
750g 04:25 03:41 60 12:00
1.0kg 04:30 03:46 60 12:00
Dark 500g 04:29 03:45 60 12:00
750g 04:35 03:51 60 12:00
1.0kg 04:39 03:55 60 12:00
4 Whole Wheat
Rapid
Light 500g 02:29 02:10 60 12:00
750g 02:33 02:14 60 12:00
1.0kg 02:37 02:18 60 12:00
Medium 500g 02:34 02:15 60 12:00
750g 02:39 02:20 60 12:00
1.0kg 02:44 02:25 60 12:00
Dark 500g 02:43 02:24 60 12:00
750g 02:49 02:30 60 12:00
1.0kg 02:53 02:34 60 12:00
5 French Bread Light 500g 03:12 02:53 60 12:00
750g 03:23 03:04 60 12:00
1.0kg 03:34 03:15 60 12:00
Medium 500g 03:32 03:13 60 12:00
750g 03:36 03:17 60 12:00
1.0kg 03:40 03:21 60 12:00
Dark 500g 03:35 03:16 60 12:00
750g 03:42 03:23 60 12:00
1.0kg 03:44 03:25 60 12:00
6 Brioche Light 500g 03:17 02:57 60 12:00
750g 03:19 02:59 60 12:00
1.0kg 03:21 03:01 60 12:00
Medium 500g 03:19 02:59 60 12:00
750g 03:22 03:02 60 12:00
1.0kg 03:25 03:05 60 12:00
Dark 500g 03:23 03:03 60 12:00
750g 03:26 03:06 60 12:00
1.0kg 03:29 03:09 60 12:00
7 Super Rapid Medium 750g 00:58 – 60 –
ELX14261_IFU_Baguette_bakmaskin_ELX_16lang.indd 12 3/4/2011 12:35:57 PM

13
GB
f
I
E
P
S
NL
fI
N
RU
SK
CZ
HR
PL
RO
HU
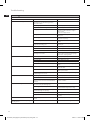
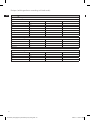
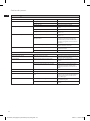
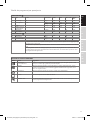
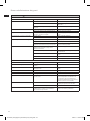
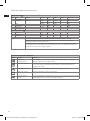
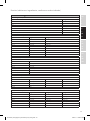
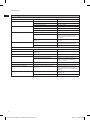
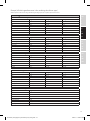
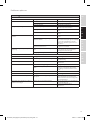
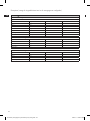
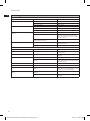
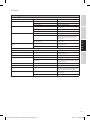
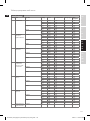
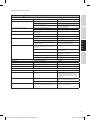
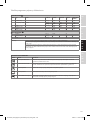
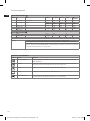
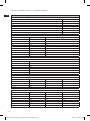
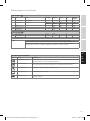
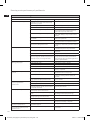
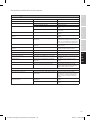
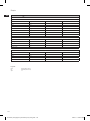
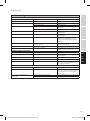
Bread/dough programme chart
BREAD PAN
Index Type Crust Size Total Extras Warm Delay max
8 Cake 500gr N/A 500g 01:22 – 22 12:00
9 Gluten Free Medium 750g 02:54 02:37 60 12:00
1.0kg 02:59 02:42 60 12:00
10 Dough – ≤1.0kg 01:30 01:14 – 12:00
11 Artisan Dough – – 05:15 04:39 – 12:00
12 Jam – ≤1.0kg 01:25 – 20 12:00
13 Extra Bake – – 10-90 – 60 –
CAKE PAN
14 Moelleux – 270g 01:28 – 22 –
15 Rice Pudding – 270g – 22 –
16 Custard – 270g – 22 –
Notes 1. An alert will sound (8 buzzes) to add ingredients if the recipe recommends doing so.
2. Extra Bake default time set is 10 minutes, and Max delay time is 90 minutes (1:30)
3. For the bread pan programmes (excl. programme 10 and 11), the bread maker will automatically go
into the keep warm mode at the end of the baking cycle. It will stay in this mode for up to 1 hour or until
the machine is turned o.
PROGRAMME STATUS INDICATOR
Symbol Name Explanation
Pre-heat feature Used only for the wholewheat, wholewheat rapid and gluten free settings to warm
ingredients before kneading.
Kneading symbol Indicates dough is in rst or second kneading stage or being knocked back between rising
cycles. A buzz will tell when to add additional ingredients manually.
Rise symbol Indicates dough is either in rst, second or third rising cycle.
Bake symbol Indicates loaf is in the nal baking cycle.
Keep warm mode Automatically starts when baking cycle ends. Keep warm mode continues for one hour or
until machine is turned o.
ELX14261_IFU_Baguette_bakmaskin_ELX_16lang.indd 13 3/4/2011 12:36:03 PM

14
GB
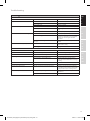
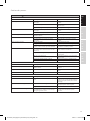
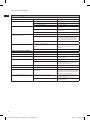
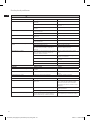
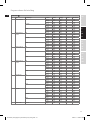
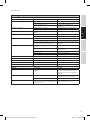
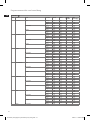
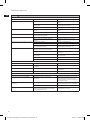
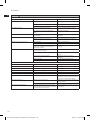
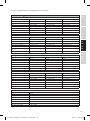
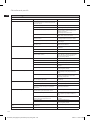
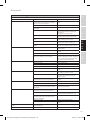
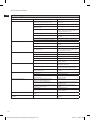
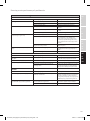
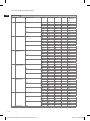
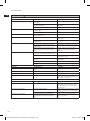
Troubleshooting
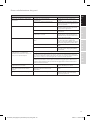
BREAD PAN
LOAF SIZE AND SHAPE
Problem Possible cause Solution
Bread does not rise enough Wholemeal breads will be lower than white
breads due to less glutenforming protein in
whole wheat our.
Normal situation, no solution.
Not enough liquid. Increase liquid by 15ml/3tsp.
Sugar omitted or not enough added. Assemble ingredients as listed in recipe.
Wrong type of our used. You may have used plain white our instead
of strong bread our which has a higher
gluten content.
Do not use all-purpose our.
Wrong type of yeast used. For best results use only fast action “easy
blend” yeast.
Not enough yeast added or too old. Measure amount recommended and check
expiry date on package.
Rapid bread cycle chosen. This cycle produces shorter loaves. This is
normal.
Yeast and sugar came into contact with each
other before kneading cycle.
Make sure they remain separate when added
to bread pan.
Flat loaf, no rising. Yeast omitted or too old. Assemble ingredients and check expiry date.
Liquid too hot. Check recipe for correct liquid temperature.
Too much salt added. Use amount recommended.
If using timer, yeast got wet before bread
making process started.
Place dry ingredients into corners of pan.
Protect yeast from liquids by making slight
well in centre of dry ingredients.
Top inated – mushroom-like in appearance. Too much yeast. Reduce yeast by 1/4tsp.
Too much sugar. Reduce sugar by 1tsp.
Too much our. Reduce our by 6 to 9tsp.
Not enough salt. Use amount of salt recommended in recipe.
Warm, humid weather. Reduce liquid by 15ml/3 tsp and yeast by
1/4tsp.
Top and sides cave in. Too much liquid. Reduce liquid by 15ml/3tsp next time or add
a little extra our.
Too much yeast. Use amount recommended in recipe or try a
quicker cycle next time.
High humidity and warm weather may have
caused dough to rise too fast.
Chill water or add milk straight from fridge.
Gnarly, knotted top – not smooth. Not enough liquid. Increase liquid by 15ml/3tsp.
Too much our. Measure our accurately.
Tops of loaves may not all be perfectly shaped,
however, this does not aect wonderful avour
of bread.
Make sure dough is made under the best
possible conditions.
Collapsed while baking. Machine was placed in a draught or may have
been knocked or jolted during rising.
Reposition bread maker.
Exceeding capacity of bread pan. Do not use more ingredients than
recommended for large loaf (max. 1Kg).
Not enough salt used or omitted (salt helps
prevent the dough over proving).
Use amount of salt recommended in recipe.
Too much yeast. Measure yeast accurately.
Warm, humid weather. Reduce liquid by 15ml/3tsp and reduce yeast
by 1/4tsp.
Loaves uneven, shorter on one end. Dough too dry and not allowed to rise evenly
in pan.
Increase liquid by 15ml/3 tsp.
Foldable blade does not stand up during
kneading process.
Blade was not cleaned very well. Clean the blade (see cleaning section).
ELX14261_IFU_Baguette_bakmaskin_ELX_16lang.indd 14 3/4/2011 12:36:05 PM

15
GB
f
I
E
P
S
NL
fI
N
RU
SK
CZ
HR
PL
RO
HU
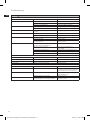
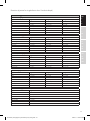
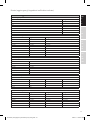
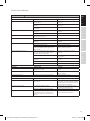
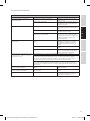
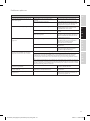
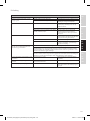
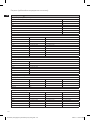
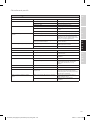
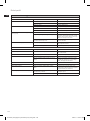
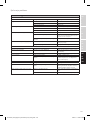
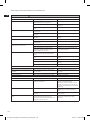
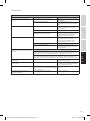
Troubleshooting
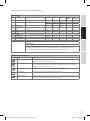
BREAD PAN
BREAD TEXTURE
Problem Possible cause Solution
Heavy dense texture Too much our. Measure accurately.
Not enough yeast. Measure accurately.
Not enough sugar. Measure accurately.
Open, course, holey texture. Salt omitted. Assemble ingredients as listed in recipe.
Too much yeast. Measure right amount of recommended
yeast.
Too much liquid. Reduce liquid by 15ml/3tsp.
Centre of loaf is raw, not baked enough. Too much liquid. Reduce liquid by 15ml/3tsp.
Power cut during operation. If power is cut during operation for more than
8 minutes you will need to remove unbaked
loaf from pan and start again with fresh
ingredients.
Quantities were too large and machine could
not cope.
Reduce amounts to maximum quantities
allowed.
Bread doesn’t slice well, very sticky. Sliced while too hot. Allow bread to cool on rack at least 30
minutes before slicing.
Not using proper knife. Use a good bread knife.
CRUST COLOUR AND THICKNESS
Problem Possible cause Solution
Dark crust colour/too thick DARK crust setting used. Use medium or light setting next time.
Loaf of bread is burnt. Bread maker malfunctioning. Refer to “Service and customer care” section.
Crust too light. Bread not baked long enough. Extend baking time.
No milk powder or fresh milk in recipe. Add 15ml/3tsp skimmed milk powder or
replace 50% of water with milk to encourage
browning.
PAN PROBLEMS
Problem Possible cause Solution
Kneader cannot be removed. Kneader is stuck due to dried dough remains. Add water to bread pan and allow kneader
to soak. Then you may need to twist kneader
slightly to remove it (see cleaning section).
Bread sticks to pan/dicult to shake out. Can happen over prolonged use. Lightly wipe the inside of bread pan with
vegetable oil.
Refer to “Service and customer care” section.
ELX14261_IFU_Baguette_bakmaskin_ELX_16lang.indd 15 3/4/2011 12:36:06 PM

16
GB
Troubleshooting
CAKE PAN
LOAF SIZE AND SHAPE
Problem Possible cause Solution
Cake does not rise enough. Eggs were not mixed to viscous material. Use egg breaking machine to mix eggs.
Sugar omitted or not enough added. Mix the ingredients as listed in recipe.
Wrong type of cake our used. Do not use all-purpose cake our.
Flat loaf, no rising. Eggs were not mixed even enough. Use egg breaking machine to mix eggs.
Required standard recipe was not used. Apply standard recipe.
Cake surface is cracked. Not correct amounts of sugar, salt, our and/
or liquid.
Check recipe ingredients.
Top and sides cave in. Too much liquid. Reduce liquid amount.
Eggs were not mixed even enough. Use egg breaking machine to mix eggs.
Gnarly, knotted top – not smooth Not enough liquid. Add more milk or water.
Too much cake our. Reduce cake our.
Tops of loaves may not all be perfectly shaped –
no eect on avour.
Make sure cake is made under the best
possible conditions.
Collapsed while baking. Machine was placed in a draught or may have
been knocked or jolted during rising.
Reposition cake.
Exceeding capacity of cake pan. Do not use more ingredients than
recommended.
Salt omitted or not enough used. Use amount of salt recommended in recipe.
Too much cake our. Measure the cake our accurately.
Warm, humid weather. Reduce liquid amount.
CRUST COLOUR AND THICKNESS
Problem Possible cause Solution
Dark crust colour/crust too thick. Cake was not removed immediately after baking. Remove immediately after baking.
Loaf of cake is burnt. Bread maker malfunctioning. See "Service and customer care" section.
Crust too light. Cake was not baked long enough. Extend baking time.
CAKE PAN
Problem Possible cause Solution
Kneader cannot be removed. Kneader is stuck due to dried dough remains. Add water to bread pan and allow kneader
to soak. Then you may need to twist kneader
slightly to remove it (see cleaning section).
Cake cannot be poured out. The blade was stuck in the cake. Wear gloves and rotate the fork by hand to
separate blade from cake.
The cake is sticking to the cake pan. Not enough cake oil.
Cake pan cannot be lifted up. Base for cake pan and bottom base coupling
may be deformed or some foreign body inside.
Carefully rotate cake pan in left and right
direction to loosen it.
ELX14261_IFU_Baguette_bakmaskin_ELX_16lang.indd 16 3/4/2011 12:36:07 PM

17
GB
f
I
E
P
S
NL
fI
N
RU
SK
CZ
HR
PL
RO
HU
Troubleshooting
MACHINE MECHANICS
Problem Possible cause Solution
Bread maker not operating/Kneader not
moving.
Pan not correctly located. Check the pan is locked in place.
Delay timer selected. Bread maker will not start until count down
reaches programme start time.
Ingredients not mixed. Did not start bread maker. After programming control panel, press start
button to turn bread maker on.
Pan not correctly locked in place. Check pan is in accurate position.
Forgot to put kneader in pan or blade did not
stand up.
Always make sure kneader is on shaft in the
bottom of the pan before adding ingredients.
Also make sure blade is completely clean.
Burning odour noted during operation. Ingredients spilled inside oven. Be careful not to spill ingredients when
adding to pan. Ingredients can burn on
heating unit and cause smoke.
Pan leaks. See “Service and Customer care” section.
Exceeding capacity of bread pan. Do not use more ingredients than
recommended in recipe and always measure
ingredients accurately.
Machine unplugged by mistake or power lost
during use. How can I save the bread?
If machine is in knead cycle, discard ingredients and start again.
If machine is in rise cycle, remove dough from bread pan, shape and place in greased 23 x
12.5cm/9 x 5 in. loaf tin, cover and allow to rise until doubled in size. Use bake only setting 13
or bake in pre-heated conventional oven at 200ºC/400ºF/Gas mark 6 for 30-35 minutes or until
golden brown.
If machine is in bake cycle, use bake only setting 13 or bake in pre-heated conventional oven at
200ºC/400ºF/Gas mark 6 and remove top rack. Carefully remove pan from machine and place on
bottom rack in oven. Bake until golden brown.
E:01 appears on display and machine cannot
be turned on.
Baking compartment too hot. Unplug and allow to cool down for 30
minutes.
H:HH & E:EE appears in display and machine
does not operate.
Bread machine is malfunctioning. Temperature
sensor error.
See “Service and Customer care” section.
E:00 appears on display during program 15 Baking compartment too cold Start program 13 (Bake) for 3-5 minutes
to warm up the machine and then restart
program 15.
ELX14261_IFU_Baguette_bakmaskin_ELX_16lang.indd 17 3/4/2011 12:36:07 PM

18
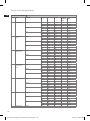
GB
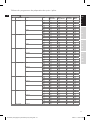
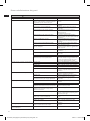
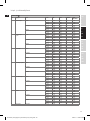
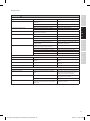
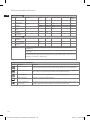
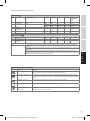
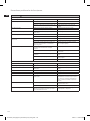
Recipes (add ingredients according to listed order)
BREAD PAN
WHITE BREAD – setting: 1 and 2
Ingredients 1 kg 750 g 500 g
Water 360 ml 310 ml 205 ml
Oil 2 tbsp 1 ½ tbsp 1 tbsp
Salt 2 tsp 1 ½ tsp 1 tsp
Sugar 3 tbsp 2 tbsp 1 ½ tbsp
Dried skimmed milk powder 2 tbsp 1 ½ tbsp 1 tbsp
White bread our 4 ½ cups 3 ¼ cups 2 ¼ cups
Dried yeast 2 tsp 1 ¾ tsp 1 + 1/3 tsp
WHOLE WHEAT BREAD – setting: 3 and 4
Ingredients 1 kg 750 g 500 g
Water 360 ml 310 ml 205 ml
Butter/Margarine 3 tbsp 2 tbsp 1 ½ tbsp
Salt 2 tsp 1 ½ tsp 1 tsp
Soft brown sugar 4 tbsp 3 tbsp 2 tbsp
Dried skimmed milk powder 3 tbsp 2 tbsp 1 ½ tbsp
Whole wheat bread our 4 1/3 cups 3 ¼ cups 2 cups
Dried yeast 2 ½ tsp 1 ½ tsp 1 tsp
FRENCH BREAD – setting: 5
Ingredients 1 kg 750 g 500 g
Water 330 ml 290 ml 165 ml
Olive oil 2 tbsp 1 tbsp 1 tbsp
Salt 1 ½ tsp 1 tsp ¾ tsp
Sugar 2 tbsp 1 ¼ tbsp 1 tbsp
White bread our 4 cups 3 ¼ cups 2 ¼ cups
Dried yeast 2 tsp 1 ½ tsp 1 ¼ tsp
BRIOCHE – setting: 6
Ingredients 1 kg 750 g 500 g
Water 310 ml 250 ml 155 ml
Oil 2 tbsp 1 tbsp 1 tbsp
Salt 2 tsp 1 ½ tsp 1 tsp
Sugar 2 tbsp 2 tbsp 1 tbsp
Dry milk 2 tbsp 1 ½ tbsp 1 tbsp
Bread our 4 ¼ cups 3 cups 2 ½ cups
Active dry yeast 3 tsp 1 tsp 1 tsp
SUPER RAPID – setting: 7
Ingredients 1 kg
Water 330 ml
Oil 2 tbsp
Salt 2 tsp
Sugar 2 tbsp
Dry milk 2 tbsp
Bread our 4 cups
Active dry yeast 2 tsp
ELX14261_IFU_Baguette_bakmaskin_ELX_16lang.indd 18 3/4/2011 12:36:08 PM

19
GB
f
I
E
P
S
NL
fI
N
RU
SK
CZ
HR
PL
RO
HU
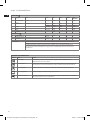
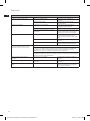
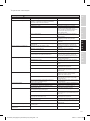
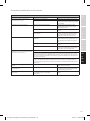
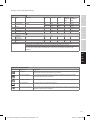
BREAD PAN
CAKE 500 g – setting: 8
Ingredients 500 g
Milk 1 cup
Butter 2 tsp
Eggs 2
Sugar ¼ tbsp
Essence ¾ tsp
Cake our ¾ cups
Baking yeast ½ tsp
GLUTEN FREE – setting: 9
Ingredients 1 kg 750 g
Water 310 ml 250 ml
Oil 3 tbsp 3 tbsp
Salt 1 ½ tsp 1 ½ tsp
Sugar 3 tbsp 3 tbsp
Eggs 3 2
Vinegar 1 tsp 1 tsp
Mix our 450 g 390 g
Xanthan gum 1 tbsp 1 tbsp
Dried yeast 1 ½ tsp 1 ½ tsp
DOUGH – setting: 10 and 11
Ingredients
Water 290 ml
Oil 2 tbsp
Salt 1 ½ tsp
Sugar 2 tbsp
Dried milk 1 ½ tbsp
White bread our 3 ½ cups
Dried yeast 1 ½ tsp
JAM – setting: 12
Ingredients
Water 2 tbsp
Lemon juice 2 tbsp
Sugar 2 tbsp
Jam 2 tbsp
Orange 500 g
EXTRA BAKE BREAD – setting: 13
Ingredients 1 kg 750 g 500 g
Water 310 ml 250 ml 155 ml
Oil 2 tbsp 2 tbsp 1 tbsp
Salt 2 tsp 1 ½ tsp 1 tsp
Sugar 2 tbsp 2 tbsp 1 tbsp
Dry milk 2 tbsp 1 ½ tbsp 1 tbsp
Bread our 4 ¼ cups 3 cups 2 ½ cups
Active dry yeast 3 tsp 2 tsp 1 tsp
Recipes (add ingredients according to listed order)
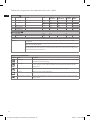
ELX14261_IFU_Baguette_bakmaskin_ELX_16lang.indd 19 3/4/2011 12:36:10 PM

20
f
Recipes (add ingredients according to listed order)
CAKE PAN
MOELLEUX – setting: 14
Ingredients
Butter 75 g
Lemon juice 100 ml
Sugar 50 g
Egg 1
Flour 190 g
Baking powder ½ tbsp
Bicarbonate soda ½ tsp
Salt 1 pinch
RICE PUDDING – setting: 15
Ingredients
Milk (fat 3%) 0.5 l
Round rice 90 g
Sugar 60 g
Vanilla bean ½
CUSTARD CAKE – setting: 16
Ingredients
Milk 400 ml
Sugar 30 g
Eggs 3
Vanilla beans
GB
ELX14261_IFU_Baguette_bakmaskin_ELX_16lang.indd 20 3/4/2011 12:36:11 PM
Strona się ładuje...
Strona się ładuje...
Strona się ładuje...
Strona się ładuje...
Strona się ładuje...
Strona się ładuje...
Strona się ładuje...
Strona się ładuje...
Strona się ładuje...
Strona się ładuje...
Strona się ładuje...
Strona się ładuje...
Strona się ładuje...
Strona się ładuje...
Strona się ładuje...
Strona się ładuje...
Strona się ładuje...
Strona się ładuje...
Strona się ładuje...
Strona się ładuje...
Strona się ładuje...
Strona się ładuje...
Strona się ładuje...
Strona się ładuje...
Strona się ładuje...
Strona się ładuje...
Strona się ładuje...
Strona się ładuje...
Strona się ładuje...
Strona się ładuje...
Strona się ładuje...
Strona się ładuje...
Strona się ładuje...
Strona się ładuje...
Strona się ładuje...
Strona się ładuje...
Strona się ładuje...
Strona się ładuje...
Strona się ładuje...
Strona się ładuje...
Strona się ładuje...
Strona się ładuje...
Strona się ładuje...
Strona się ładuje...
Strona się ładuje...
Strona się ładuje...
Strona się ładuje...
Strona się ładuje...
Strona się ładuje...
Strona się ładuje...
Strona się ładuje...
Strona się ładuje...
Strona się ładuje...
Strona się ładuje...
Strona się ładuje...
Strona się ładuje...
Strona się ładuje...
Strona się ładuje...
Strona się ładuje...
Strona się ładuje...
Strona się ładuje...
Strona się ładuje...
Strona się ładuje...
Strona się ładuje...
Strona się ładuje...
Strona się ładuje...
Strona się ładuje...
Strona się ładuje...
Strona się ładuje...
Strona się ładuje...
Strona się ładuje...
Strona się ładuje...
Strona się ładuje...
Strona się ładuje...
Strona się ładuje...
Strona się ładuje...
Strona się ładuje...
Strona się ładuje...
Strona się ładuje...
Strona się ładuje...
Strona się ładuje...
Strona się ładuje...
Strona się ładuje...
Strona się ładuje...
Strona się ładuje...
Strona się ładuje...
Strona się ładuje...
Strona się ładuje...
Strona się ładuje...
Strona się ładuje...
Strona się ładuje...
Strona się ładuje...
Strona się ładuje...
Strona się ładuje...
Strona się ładuje...
Strona się ładuje...
Strona się ładuje...
Strona się ładuje...
Strona się ładuje...
Strona się ładuje...
Strona się ładuje...
Strona się ładuje...
Strona się ładuje...
Strona się ładuje...
Strona się ładuje...
Strona się ładuje...
Strona się ładuje...
Strona się ładuje...
Strona się ładuje...
Strona się ładuje...
Strona się ładuje...
Strona się ładuje...
Strona się ładuje...
Strona się ładuje...
Strona się ładuje...
Strona się ładuje...
Strona się ładuje...
Strona się ładuje...
Strona się ładuje...
Strona się ładuje...
Strona się ładuje...
Strona się ładuje...
Strona się ładuje...
Strona się ładuje...
Strona się ładuje...
Strona się ładuje...
Strona się ładuje...
Strona się ładuje...
Strona się ładuje...
Strona się ładuje...
Strona się ładuje...
Strona się ładuje...
Strona się ładuje...
Strona się ładuje...
Strona się ładuje...
Strona się ładuje...
Strona się ładuje...
Strona się ładuje...
Strona się ładuje...
Strona się ładuje...
Strona się ładuje...
Strona się ładuje...
Strona się ładuje...
Strona się ładuje...
Strona się ładuje...
Strona się ładuje...
Strona się ładuje...
Strona się ładuje...
Strona się ładuje...
Strona się ładuje...
Strona się ładuje...
Strona się ładuje...
Strona się ładuje...
Strona się ładuje...
Strona się ładuje...
Strona się ładuje...
Strona się ładuje...
Strona się ładuje...
Strona się ładuje...
Strona się ładuje...
Strona się ładuje...
Strona się ładuje...
Strona się ładuje...
Strona się ładuje...
Strona się ładuje...
Strona się ładuje...
Strona się ładuje...
Strona się ładuje...
Strona się ładuje...
Strona się ładuje...
Strona się ładuje...
Strona się ładuje...
-
 1
1
-
 2
2
-
 3
3
-
 4
4
-
 5
5
-
 6
6
-
 7
7
-
 8
8
-
 9
9
-
 10
10
-
 11
11
-
 12
12
-
 13
13
-
 14
14
-
 15
15
-
 16
16
-
 17
17
-
 18
18
-
 19
19
-
 20
20
-
 21
21
-
 22
22
-
 23
23
-
 24
24
-
 25
25
-
 26
26
-
 27
27
-
 28
28
-
 29
29
-
 30
30
-
 31
31
-
 32
32
-
 33
33
-
 34
34
-
 35
35
-
 36
36
-
 37
37
-
 38
38
-
 39
39
-
 40
40
-
 41
41
-
 42
42
-
 43
43
-
 44
44
-
 45
45
-
 46
46
-
 47
47
-
 48
48
-
 49
49
-
 50
50
-
 51
51
-
 52
52
-
 53
53
-
 54
54
-
 55
55
-
 56
56
-
 57
57
-
 58
58
-
 59
59
-
 60
60
-
 61
61
-
 62
62
-
 63
63
-
 64
64
-
 65
65
-
 66
66
-
 67
67
-
 68
68
-
 69
69
-
 70
70
-
 71
71
-
 72
72
-
 73
73
-
 74
74
-
 75
75
-
 76
76
-
 77
77
-
 78
78
-
 79
79
-
 80
80
-
 81
81
-
 82
82
-
 83
83
-
 84
84
-
 85
85
-
 86
86
-
 87
87
-
 88
88
-
 89
89
-
 90
90
-
 91
91
-
 92
92
-
 93
93
-
 94
94
-
 95
95
-
 96
96
-
 97
97
-
 98
98
-
 99
99
-
 100
100
-
 101
101
-
 102
102
-
 103
103
-
 104
104
-
 105
105
-
 106
106
-
 107
107
-
 108
108
-
 109
109
-
 110
110
-
 111
111
-
 112
112
-
 113
113
-
 114
114
-
 115
115
-
 116
116
-
 117
117
-
 118
118
-
 119
119
-
 120
120
-
 121
121
-
 122
122
-
 123
123
-
 124
124
-
 125
125
-
 126
126
-
 127
127
-
 128
128
-
 129
129
-
 130
130
-
 131
131
-
 132
132
-
 133
133
-
 134
134
-
 135
135
-
 136
136
-
 137
137
-
 138
138
-
 139
139
-
 140
140
-
 141
141
-
 142
142
-
 143
143
-
 144
144
-
 145
145
-
 146
146
-
 147
147
-
 148
148
-
 149
149
-
 150
150
-
 151
151
-
 152
152
-
 153
153
-
 154
154
-
 155
155
-
 156
156
-
 157
157
-
 158
158
-
 159
159
-
 160
160
-
 161
161
-
 162
162
-
 163
163
-
 164
164
-
 165
165
-
 166
166
-
 167
167
-
 168
168
-
 169
169
-
 170
170
-
 171
171
-
 172
172
-
 173
173
-
 174
174
-
 175
175
-
 176
176
-
 177
177
-
 178
178
-
 179
179
-
 180
180
-
 181
181
-
 182
182
-
 183
183
-
 184
184
-
 185
185
-
 186
186
-
 187
187
-
 188
188
-
 189
189
-
 190
190
-
 191
191
-
 192
192


Electrolux EBM 8000EBM8000EBM8000 Instrukcja obsługi
- Typ
- Instrukcja obsługi
w innych językach
- čeština: Electrolux EBM 8000EBM8000EBM8000 Návod k obsluze
- español: Electrolux EBM 8000EBM8000EBM8000 El manual del propietario
- italiano: Electrolux EBM 8000EBM8000EBM8000 Manuale del proprietario
- slovenčina: Electrolux EBM 8000EBM8000EBM8000 Návod na obsluhu
- svenska: Electrolux EBM 8000EBM8000EBM8000 Bruksanvisning
- português: Electrolux EBM 8000EBM8000EBM8000 Manual do proprietário
- français: Electrolux EBM 8000EBM8000EBM8000 Le manuel du propriétaire
- English: Electrolux EBM 8000EBM8000EBM8000 Owner's manual
- русский: Electrolux EBM 8000EBM8000EBM8000 Инструкция по применению
- suomi: Electrolux EBM 8000EBM8000EBM8000 Omistajan opas
- Nederlands: Electrolux EBM 8000EBM8000EBM8000 de handleiding
- română: Electrolux EBM 8000EBM8000EBM8000 Manualul proprietarului
Inne dokumenty
-
Kenwood BM350 Instrukcja obsługi
-
-
Kenwood BM250 Instrukcja obsługi
-
Tristar BM-4585 Instrukcja obsługi
-
Unold 68425 Instrukcja obsługi
-
-
-
-
-