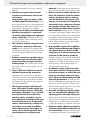
Parkside PTS 500 A1 Operation and Safety Notes
- Kategoria
- Elektronarzędzia
- Typ
- Operation and Safety Notes

IAN 103316
PLUNGE SAW PTS 500 A1
TAUCHSÄGE
Bedienungs- und Sicherheitshinweise
Originalbetriebsanleitung
PLUNGE SAW
Operation and Safety Notes
Translation of the original instructions
PIŁA WGŁĘBNA
Wskazówki dotyczące obsługi i bezpieczeństwa
Tłumaczenie oryginalnej instrukcji obsługi
PONORNÁ PILA
Pokyny pro obsluhu a bezpečnostní pokyny
Překlad originálního provozního návodu
PONORNÁ PÍLA
Pokyny pre obsluhu a bezpečnostné pokyny
Preklad originálneho návodu na obsluhu
MERÜLŐFŰRÉSZ
Kezelési és biztonsági utalások
Az originál használati utasítás fordítása

GB Operation and Safety Notes Page 5
PL Wskazówki dotyczące obsługi i bezpieczeństwa Strona 17
HU Kezelési és biztonsági utalások Oldal 31
CZ Pokyny pro obsluhu a bezpečnostní pokyny Strana 47
SK Pokyny pre obsluhu a bezpečnostné pokyny Strana 59
DE / AT / CH Bedienungs- und Sicherheitshinweise Seite 73
Before reading, unfold the page containing the illustrations and familiarise yourself with all functions of the
device.
Przed przeczytaniem proszę rozłożyć stronę z ilustracjami, a następnie proszę zapoznać się z wszystkimi
funk cjami urządzenia.
Olvasás előtt kattintson az ábrát tartalmazó oldalra és végezetül ismerje meg a készülék mindegyik
funk cióját.
Před čtením si otevřete stranu s obrázky a potom se seznamte se všemi funkcemi přístroje.
Pred čítaním si odklopte stranu s obrázkami a potom sa oboznámte so všetkými funkciami prístroja.
Klappen Sie vor dem Lesen die Seite mit den Abbildungen aus und machen Sie sich anschließend mit allen
Funktionen des Gerätes vertraut.

1
4
A
10 5611
D
18
17
16
9
F
7 7 a
11 a
3
6
E
19 20
2221
C
1413 11 a
2
B
8
15
12


5 GB
Introduction
Intended use ........................................................................................................................................ Page 6
Features ...............................................................................................................................................Page 6
Scope of delivery ................................................................................................................................Page 6
Technical Data ....................................................................................................................................Page 6
General power tool safety warnings
1. Work area safety............................................................................................................................Page 7
2. Electrical safety ............................................................................................................................... Page 7
3. Personal safety ................................................................................................................................Page 7
4. Power tool use and care ................................................................................................................Page 8
5. Service .............................................................................................................................................Page 8
Safety notices specific to the device
Safety notices specific to all saws ...................................................................................................... Page 8
Additional safety notices for all saws ................................................................................................Page 9
Safety notices specific to this saw ......................................................................................................Page 10
Safety notices for cutting-off machines ...............................................................................................Page 10
Additional safety notices for abrasive cutting ...................................................................................Page 11
Supplementary Instructions .................................................................................................................Page 12
Original accessories / tools ................................................................................................................Page 12
Safety notices for grinding tools .........................................................................................................Page 13
Start-up
Switching on and off ........................................................................................................................... Page 13
Releasing the plunge blocker .............................................................................................................Page 13
Preselect cutting depth ........................................................................................................................Page 13
Fitting the guide fence .........................................................................................................................Page 13
Handling the plunge saw ...................................................................................................................Page 13
Marking cutting length ........................................................................................................................Page 14
Marking cutting line ............................................................................................................................Page 14
Connecting the saw dust extraction ...................................................................................................Page 14
Replacing the saw blade .................................................................................................................... Page 14
Maintenance and Cleaning ..............................................................................................Page 14
Service ...............................................................................................................................................Page 14
Warranty .........................................................................................................................................Page 15
Disposal ............................................................................................................................................Page 15
Translation of the original declaration of conformity /
Manufacturer ............................................................................................................................... Page 16
Table of contents

6 GB
Introduction
Plunge saw PTS 500 A1
Introduction
Congratulations on your purchase. You have selected
a high quality product. The instructions for use are
a part of this product. They contain important infor-
mation about safety, use and disposal. Before using
the product, please familiarise yourself with all the
operating and safety instructions. Use the product
only as described and for the specified applications.
When passing this product on to others please be
sure to also include all of its documentation.
Intended use
The machine is primarily intended for lengthwise
and across cuts in plunge cut with solid support in
solid wood, chipboard, plywood, aluminium, tiles,
stone, plastic and lightweight construction materials.
Please keep in mind that the pre-fitted saw blade is
only suitable for cutting wood. Any other uses, and /
or modifications to the appliance, are deemed to
be
improper usage and may result in serious physical
injury. Not for commercial applications.
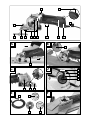
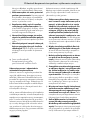
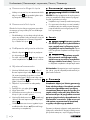
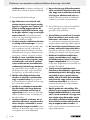
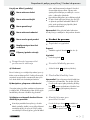
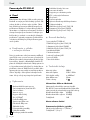
Features
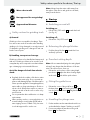
1
Mechanical plunge blocker
2
Power On / Control LED
3
Mains lead
4
Ventilation slits
5
Cover for brushes
6
ON /OFF switch
7
Pre-selector for cutting depth
7 a
Scale for cutting depth
8
Labelling cutting length
9
Base plate
10
Uptake parallel fence
11
Parallel fence
11 a
Screw for parallel fence
12
Window for cutting line
13
Spindle lock
14
Connection for dust extraction
15
Allen key
16
Saw blade
17
Clamping flange
18
Clamping screw and washer
19
Dust extractor hose
20
HW-Circular saw blade Z85 / 30
21
Diamond cutting disc Z85VR
22
HS Circular saw blade Z85 / 36
Scope of delivery
1 Plunge saw PTS 500 A1
1 HW Circular saw blade Z85 / 30
1 Diamond cutting disc Z85VR
1 HS Circular saw blade Z85 / 36
1 Parallel fence
1 Dust extractor hose
1 Allen key
1 Carry case
1 Set of operating instructions
Technical Data
Rated power: 500 W
Rated voltage: 230 V∼, 50 Hz
Idling speed: n
0
4500 min
-1
Max. cutting depth: 25 mm
Protection class: II /
Noise and vibration data:
Measurement for noise level, determined according
to EN 60745. The A-rated noise levels of the elec-
trical power tool are typically at:
Sound pressure level: 82 dB(A)
Sound power level: 93 dB(A)
Uncertainty K: 3 dB
Wear hearing protection!
Evaluated acceleration, typically:
Hand / arm vibration a
h
= 2.266 m / s
2
Uncertainty K = 1.5 m / s
2
The vibration level given in these
operating instructions has been measured in a pro-
cedure according to EN 60745 and can be used
for the comparison of appliances. The vibration
Introduction / General power tool safety warnings

7 GB
Introduction
Introduction / General power tool safety warnings
emission value specified can also serve as a prelim-
inary assessment of the exposure.
Different uses of the device give rise to different vi-
bration levels and in many cases they may exceed
the values given in these instructions. It is easy to un-
derestimate the vibration load if the electrical power
tool is used regularly in particular circumstances.
Note: If you wish to make an accurate assessment
of the vibration loads experienced during a particu-
lar period of work, you should also take into account
the intervening periods of time when the device is
switched off or is running but is not actually in use.
This can result in a much lower vibration load over
the whole of the work period.
General power tool
safety warnings
Read all safety
warnings and all instructions.
Failure to follow the warnings and in-
structions may result in electric shock, fire and / or
serious injury.
Save all warnings and instructions for
future reference.
The term “power tool” in the warnings refers to your
mains-operated (corded) power tool or battery-op-
erated (cordless) power tool.
1. Work area safety
a) Keep work area clean and well lit.
Cluttered or dark areas invite accidents.
b) D
o not operate power tools in explosive
atmospheres, such as in the presence
of flammable liquids, gases or dust.
Power tools create sparks which may ignite the
dust or fumes.
c) Keep children and bystanders away
while operating a power tool. Distractio
ns
can cause you to lose control.
2. Electrical safety
a) Power tool plugs must match the outlet.
Never modify the plug in any way. Do
not use any adapter plugs with earthed
(grounded) power tools. Unmodified plug
s
and matching outlets will reduce risk of electric
shock.
b) Avoid body contact with earthed or
grounded surfaces, such as pipes,
radiators, ranges and refrigerators.
There is an increased risk of electric shock if
your body is earthed or grounded.
c) Do not expose power tools to rain or
wet conditions. Water entering a power tool
will increase the risk of electric shock.
d) Do not abuse the cord. Never use the
cord for carrying, pulling or unplugging
the power tool. Keep cord away from
heat, oil, sharp edges or moving parts.
Damaged or entangled cords increase the risk
of electric shock.
e)
When operating a power tool outdo
ors,
use an extension cord suitable for out-
door use. Use of a cord suitable for outdoor
use reduces the risk of electric shock.
f) If operating a power tool in a damp
location is unavoidable, use a residual
current device (RCD) protected supply.
Use of an RCD reduces the risk of electric shock.
3. Personal safety
a) Stay alert, watch what you are doing
and use common sense when operat-
ing a power tool. Do not use a power
tool while you are tired or under the
influence of drugs, alcohol or medica-
tion. A moment of inattention while operating
power tools may result in serious personal injury.
b) Use personal protective equipment.
Always wear eye protection. Protective
equipment such as dust mask, non-skid safety
shoes, hard hat, or hearing protection used for
appropriate conditions will reduce personal in-
juries.

8 GB
General power tool safety warnings / Safety notices specific to the device
c) Prevent unintentional starting. Ensure
the switch is in the off-position before
connecting to power source and / or
battery pack, picking up or carrying
the tool. Carrying power tools with your fing
er
o
n the switch or energising power tools that hav
e
the switch on invites accidents.
d) Remove any adjusting key or wrench
before turning the power tool on. A
wrench or a key left attached to a rotating part
of the power tool may result in personal injury.
e) Do not overreach. Keep proper foot-
ing and balance at all times. This enables
better control of the power tool in unexpected
situations.
f) Dress properly. Do not wear loose
clothing or jewellery. Keep your hair,
clothing and gloves away from mov-
ing parts. Loose clothes, jewellery or long
hair can be caught in moving parts.
g) If devices are provided for the connec-
tion of dust extraction and collection
facilities, ensure these are connected
and properly used. Use of dust collection
can reduce dust-related hazards.
4. Power tool use and care
a) Do not force the power tool. Use the
correct power tool for your applica
tion.
The correct power tool will do the job better
and safer at the rate for which it was designed.
b) Do not use the power tool if the switch
does not turn it on and off. Any power
tool that cannot be controlled with the switch is
dangerous and must be repaired.
c) Disconnect the plug from the power
source and / or the battery pack from
the power tool before making any ad-
justments, changing accessories, or
storing power tools. Such preventive safety
measures reduce the risk of starting the power
tool accidentally.
d) Store idle power tools out of the reach
of children and do not allow persons
unfamiliar with the power tool or these
instructions to operate the power tool.
Power tools are dangerous in the hands of un-
trained users.
e) Maintain power tools. Check for mis-
alignment or binding of moving parts,
breakage of parts and any other con-
dition that may affect the power tool’s
operation. If damaged, have the power
tool repaired before use. Many accidents
are caused by poorly maintained power tools.
f) Keep cutting tools sharp and clean.
Properly maintained cutting tools with sharp
cutting edges are less likely to bind and are
easier to control.
g) Use the power tool, accessories and
tool bits etc. in accordance with these
instructions, taking into account the
working conditions and the work to
be performed. Use of the power tool for
operations different from those intended could
result in a hazardous situation.
5. Service
a) Have your power tool serviced by a
qualified repair person using only
iden-
tical replacement parts. This will ensure
that the safety of the power tool is maintained.
Safety notices specific
to the device
Safety notices specific to all saws
Sawing process
a)
DANGER! Keep your hands
out of the cutting area and
away from the saw blade.
Keep your second hand on the additional han-
dle or on the engine housing. If you hold the
saw with both hands, they cannot be injured
by the saw blade.
b) Do not reach underneath the work
piece. The guard will not protect you from the
saw blade under the work piece.
c) Adjust the cutting depth to the thickness
of the work piece. Less than the full width
Safety notices specific to the device

9 GB
General power tool safety warnings / Safety notices specific to the device
Safety notices specific to the device
of a tooth should be visible from under the
work piece.
d) Never hold the work piece with your
hand or lay it over a leg. Secure the
work piece on a stable fixture. It is im-
portant to fix the work piece safely, to minimise
the danger of contact with the body, jamming
of the saw blade or loss of control.
e) Only hold the power tool by the insu-
lated handles when undertaking work
where the tool may strike hidden elec-
tric lines. Contact with a live wire could cause
metal parts of the power tool to become live
and lead to electric shock.
f) When cutting along the way always
use a fence or a straight edge guide.
That improves the precision of the cut and mini-
mises the possibility that the saw blade jams.
g) Always use saw blades of the correct
size and with matching mounting hole
(e.g. star-shaped or round). Saw blades
not matching the attachments of the saw run
untrue and lead to loss of control.
h) Never use damaged or incorrect saw
blade washers or bolts. The saw blade
washers and screws were specifically developed
for your saw, for optimal performance and op-
erating safety.
Additional safety notices
for all saws
Kickback - causes and related safety notices
- Kickback is a sudden reaction if the saw blade
catches, jams or is misaligned and the uncon-
trolled saw lifts out of the work piece and in the
direction of the operator.;
- If the saw blade becomes caught or jammed in
the closing sawing gap, it seizes and the power
of the motor kicks the saw back toward the op-
erator.;
- If the saw blade is distorted or misaligned in
the saw gap, the teeth of the rear blade edge
can jam in the surface of the work piece, caus-
ing the saw blade to move out of the saw gap
and the saw to kick back toward the operator.
Kickback is the result of misuse or incorrect use of
the saw. It can be avoided by taking the in the fol-
lowing described precautions.
a) Hold the saw with both hands and
bring your arms into a position that
allows you to absorb the forces of the
kickback. Always stand to the side of
the saw blade, never bring the saw
blade into a line with your body. Dur-
ing a kickback the saw can jump backwards,
however, the operator can master the forces of
the kickback with suitable preventive measures.
b) Should the saw blade jam, or you stop
the work, switch the saw off and hold
it still in the work piece, until the saw
blade has come to a standstill. Never
attempt to remove the saw from the
work piece or to pull it backwards, as
long as the saw blade moves, as oth-
erwise a kickback could occur. Find out
and rectify the reason for the jamming of the
saw blade.
c) If you want to restart a saw that is
stuck in the work piece, centre the saw
blade in the saw gap and check that
the teeth are not stuck in the work piece
.
If the saw blade jams, it can move out of the work
piece or cause kickback if the saw is restarted.
d) Support big boards to reduce the risk
of a kickback due to a jamming saw
blade. Big boards can bend through due to
their own weight. Boards must be supported
at both ends, both near the saw gap as well
as near at the edge.
e) Do not use blunt or damaged saw
blades. Saw blades with blunt or misaligned
teeth cause greater friction, jamming of the bla
de
and kickback due to the saw gap being too tight.
f) Tighten the blade depth and blade an-
gle before making your cut. If the adjust-
ments change during cutting, the saw blade can
jam and cause a kickback.
g) Take particular care when cutting into
existing walls or other areas which
cannot be inspected. The saw blade can
jam when cutting into hidden objects, causing
kickback.

10 GB
Safety notices specific to the device
S
afety notices specific to this saw
Functionality of the lower guard
a) Before every use check that the safety
cover closes without problems. Do not
use the saw, if the safety cover does
not
move freely and does not close instan
tly.
Never stick or bind the safety cover, as
the saw blade would be exposed through
doing so. If the saw is dropped accidentally,
the safety cover can be bent. Ensure that the
safety cover moves freely and does not touch
either the saw blade or other parts.
b) Check condition and function of the
safety cover spring. If safety cover a
nd
spring do not work faultlessly, get the
saw serviced before using it. Damaged
parts, sticky deposits or masses of wood shavings
lead to delayed operation of the lower guard.
c) If you plunge cut at angles other than
right angles, secure the base plate of
the saw to prevent sliding sideways.
Lateral movement can lead to jamming of the
saw blade and therewith to kickback.
d) Do not put the saw done on the bench
or on the floor without covering the
saw
blade with the safety cover. An unpro
tected
running saw blade moves the saw against the
direction of the cut, and cuts everything that is in
the way. Please keep in mind that the saw runs
on.
Additional instructions:
Do not use grinding discs.
Only use saw blade diameters corresponding
with the markings on the saw.
When working with wood or materials creating
harmful dust, connect the device to a suitable
approved dust extraction system.
Wear a dust mask when cutting wood.
Only use the recommended saw blades.
Always wear ear protection.
Avoid the tips of the saw teeth overheating.
When cutting plastic, avoid melting the plastic.
Checking the guard
Pull the retraction lever for the guard all the way
back. The guard must move without sticking and
r
eturn to its original position after releasing the lever.
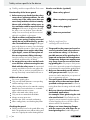
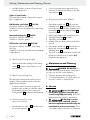
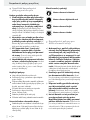
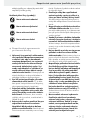
Circular saw blades (symbols)
Wear safety gloves!
Wear respiratory equipment!
Wear safety goggles!
Wear ear protection!
Safety notices for
cutting-off machines
a) The guard for the power tool must be
securely attached and adjusted to en-
sure maximum safety, i.e. the least
possible amount of the grinding disc is
exposed and pointed at the operator.
The operator and persons nearby must
stay away from the area of the rotat-
ing grinding disc. The purpose of the protec-
tive hood is to protect the operator from fragments
and unintentional contact with the grinding wheel.
b) Only use diamond-tip cut-off wheels
with your power tool. Simply because
accessories can be attached to your power tool
does not guarantee safe use.
c) The rated speed of the tool being used
must be at least the maximum speed
specified on the power tool. Accessories
turning faster than the rating can break and fly
about.
d) Only use abrasive wheels for the rec-
ommended applications.
For example: never grind using the side
of a cut-off wheel. Cut-off wheels are de-
signed to remove material using the edge the
of wheel. Applying force to the side of these
abrasive wheels can break them.
e) Always use intact clamping flanges
with the correct size and shape for se-
lected grinding disc. Suitable flanges will
Safety notices specific to the device

11 GB
Safety notices specific to the device
Safety notices specific to the device
support the grinding disc, thus reducing the risk
of the grinding disc breaking.
f) Do not use worn grinding discs from
larger power tools. Grinding discs for
larger
power tools are not designed for the higher
speeds of smaller power tools and may break.
g) The outside diameter and thickness of
the tool being used must correspond
with the specifications of the power
tool. Incorrectly sized tools cannot be ade-
quately shielded or controlled.
h) Grinding discs and flanges must pre-
cisely fit the grinding spindle of your
power tool. Tools which do not accurately
fit the grinding spindle of your power tool will
rotate unevenly, vibrate severely and can result
in loss of control.
i) Do not use damaged grinding discs.
Check the grinding discs for chips and
tears before every use. If the power
tool or the grinding disc is dropped,
check for damage or use an intact
grinding disc. If you have checked and
used the grinding disc, you and nearby
persons must stay away from the area
of the rotating grinding disc
and allow
the device to run at maximum speed
for a minute. Damaged grinding discs will
typically break during this test period.
j) Wear personal protective equipment.
Depending on the application, wear
full face protection, eye protection or
safety goggles. Where appropriate,
wear a dust mask, ear protection, pro-
tective gloves or a special apron to
deflect small grinding and material par-
ticles. Protect the eyes from foreign objects
flying about during various applications. Dust- or
respirator masks must filter out the dust creating
during use. Exposure to loud noise for extended
periods can result in hearing loss.
k) Be sure other persons keep a safe dis-
tance to your work area. Anybody
entering the work area must wear per-
sonal protective equipment. Fragments
of the work piece or of broken tools can fly
about and cause injuring, including outside
the immediate work area.
I) Only hold he device by the insulated
handles when performing work where
the tool used may strike hidden elec-
trical lines or the tool‘s mains cable.
Contact with a live wire can also charge metal
parts of the device, resulting in electric shock.
m) Keep the mains cable away from ro-
tating tools. Losing control of the device can
result in the mains cable being cut or caught,
pulling your hand or arm into the rotating tool.
n) Never put down the power tool before
the tool has come to a complete stop.
The rotating tool can come into contact with the
working surface, resulting in a loss of control
over the power tool.
o) Do not run the power tool whilst carry-
ing it. Clothing may get caught in the rotating
tool due to accidental contact and the tool pierce
your body.
p) Regularly clean the ventilation louvres
on the power tool. The motor fan will suck
dust into the housing, and a high accumulation
of metal dust can result in electrical hazards.
q) Do not use the power tool near flam-
mable materials. Sparks could ignite these
materials.
r) Do not use tools requiring liquid cool-
ants. Using water or other liquid coolants can
result in electric shock.
Additional safety notices for
abrasive cutting
Kickback and corresponding safety notices
Kickback is the sudden reaction due to the rotating
grinding disc catching or seizing. Catching or seiz-
ing will result in the rotating tool stopping abruptly.
This will accelerate an out of control power tool
against the rotation of the tool in the area area
where it seized.
If e.g. a grinding disc is caught or seized in a work
piece, the edge of the grinding disc which plunges
into the work piece can become tangled, causing
the grinding disc to break off or in kickback. The
grinding disc will then move toward or away from
the operator, depending on the direction of rotation

12 GB
Safety notices specific to the device
where it seized. This can also result in grinding discs
breaking.
Kickback is the result of misuse or incorrect use of
the power tool. It can be avoided by taking the
precautions described below.
a) Maintain a firm grip on the power tool
and position your body and arms to
allow you to brace yourself against
the force of kickback. Always use the
additional handle, if applicable, to
maintain the greatest possible control
over the force of kickback or moment
of reaction whilst running up. The oper-
ator can control kickback and reactive forces
through suitable precautions.
b) Never move your hands near rotating
tools. The tool can move across your hand
during kickback.
c) Avoid the area in front of and behind
the rotating cut-off wheel. Kickback will
move the power tool in the direction opposite the
rotation of the grinding disc where it is seized.
d) Proceed with particular care near cor-
ners, sharp edges, etc. Prevent the tool
from rebounding off the work piece a
nd
jamming. The rotating tool has a tendency
to jam with corner, sharp edges or if it reb
ounds.
This causes a loss of control or kickback.
e)
Do not use chain- or toothed saw blade
s
or segmented diamond discs with
grooves more than 10 mm wide. These
tools will cause kickback or loss of control over
the power tool.
f) Avoid the cut-off disc seizing or apply-
ing excessive contact pressure. Do not
make overly deep cuts. Overloading the
cut-off wheel will increase stress on the disc and
the tendency to twist or seize, thus the potential
of kickback or the abrasive wheel breaking.
g) If the cut-off wheel seizes or you sus-
pend work, switch off the device and
hold it still until the disc stops. Never
attempt to withdraw the running cut-
off wheel from the cut, as this may re-
sult in kickback. Determine and correct the
cause for the jam.
h) Do not restart the power tool so long
as it is in the work piece. Allow the
cut-off wheel to reach its maximum
speed before you carefully continue
cutting. The disc may otherwise get caught,
jump out of the work piece, or kick back.
i) Support boards or large work pieces
to minimise the risk of kickback due
to a jammed cut-off wheel. Large work
pieces can bend under their own weight. The
work piece must be supported at both sides of
the disc, both near the cut and near the edge.
j) Be particularly careful when making
“Pocket cuts“ into existing walls or
other areas which cannot be inspected.
The plunging cut-off wheel can cause kickback
when cutting gas or electrical lines, water pipes
or other objects.
Supplementary Instructions
Approved cut-off wheel designs:
Diamond-tipped, 85 mm disc diameter,
max. 1.8 mm disc thickness
Always wear a dust mask!
Always wear ear protection!
Original accessories / tools
Use only the accessories and attachments de-
tailed in the operating instructions, or those w
hich
are compatible with the device.
Cut-off wheel (symbols)
Wear ear protection!
Wear safety goggles!
Wear solid shoes!
Wear safety gloves!
Safety notices specific to the device / Start-up

13 GB
Safety notices specific to the device
Safety notices specific to the device / Start-up
Wear a dust mask!
Not approved for wet-grinding!
Approved tool diameter
Safety notices for grinding tools
a) General
Grinding tools are susceptible to breakage. There-
fore utmost care needs to be taken when handling
grinding tools. Using damaged or wrongly inserted
or clamped in grinding tools is dangerous and can
lead to severe injuries.
b) Handling, transport and storage
Grinding tools have to be handled and transported
with care. Grinding tools have to be stored in such
a way that they are not exposed to mechanical dam-
age or damaging environmental influences.
Avoid the danger of death from electric
shock:
R
egularly check the condition of the device, m
ains
cable and the mains plug. Do not operate ap-
pliances with damaged parts of that description.
Never open the appliance. Damaged appliances
,
mains cables or plugs main danger to life du
e to
electric shock. Always have repairs or parts ex-
changes carried out at the service centre or by
an electrician.
D
o not operate the device whilst moist or in dam
p
environments.
When working outdoors, connect the device to
a earth leakage circuit breaker (ELCB) with a
max. tripping current of 30 mA. Only use exten-
sion leads approved for outdoor use.
Note: Always keep the mains cable away from
the sphere of the device and guide it to the back,
away from the device.
Start-up
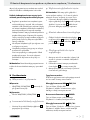
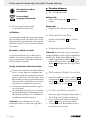
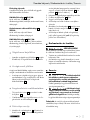
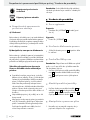
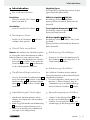
Switching on and off
Switching on:
Pull the ON / OFF switch
6
towards the back
(see Fig. A).
Switching off:
Release the ON / OFF switch
6
.
Releasing the plunge blocker
Push the plunge blocker
1
towards the front
and keep it pressed.
Preselect cutting depth
Note: We recommend adjusting the cutting depth
at least 2 mm deeper than the thickness of the ma-
terial. This will result in a clean cut.
Release the quick release of the cutting depth
pre-selector
7
, adjust the desired cutting depth
at the scale
7 a
and refit the quick release.
Fitting the guide fence
Release the screw of the guide fence
11 a
at
the base plate
9
and insert the guide fence
11
into the guide fence fixture
10
. Retighten these
screws
11 a
.
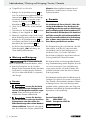
Handling the plunge saw
1. Put the machine onto the material and switch it on
as described in the chapter “Switching on and off”.
2. If necessary adjust the machine to the guide
fence
11
or a drawn line.

14 GB
Service / Warranty / Disposal
Start-up / Maintenance and Cleaning / Service
3. Hold the machine as shown in Figure A and
cut with light pressure.
Types of saw blades:
The saw blades included cover the most common
types of application.
HW Circular saw blade
20
Z85 / 30:
Description: ø 85 mm, 30 HW-teeth
Suitable for: Soft wood, hard wood, boards of any
type, plastics
Diamond cutting disc
21
Z85VR:
Description: ø 85 mm, without teeth
Suitable for: Ceramics, plastics
HS Circular saw blade
22
Z85 / 36:
Description: ø 85 mm, 36 teeth – tooth setting
left / right
Suitable for: Soft wood, soft metals such as aluminium,
copper, plastics
Marking cutting length
Orient yourself at the markings for the cutting
length
8
, in order to check where your cut
starts and ends.
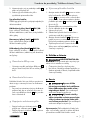
Marking cutting line
The cutting line viewing window allows precise
guidance of the machine along the cutting line
applied to the workpiece.
In order to achieve an exact cut, place the
machine on the workpiece so that the cutting
length labelling appears in the cutting line
viewing window
12
, as depicted in Illustration B.
Connecting the saw
dust extraction
Push the extraction air hose
19
onto the connec-
tion for dust extraction
14
.
Connect a vacuum device approved for the
extraction of sawdust and splinters to the dust
extraction hose
19
.
Replacing the saw blade
1. Operate the spindle lock
13
and loosen the
clamping screw
18
with the Allen key (to open
turn clockwise). Now lift off the clamping screw
and washer
18
and the clamping flange
17
(see also Fig.D).
2. Adjust cutting depth to the maximum position.
3. Swing the base plate
9
upwards.
4. Take off the saw blade.
5. Refitting of the saw blade is the reversal of the
removal.
6. Operate the spindle lock
13
(until it clicks into
place) and, using the Allen key, tighten the
clamping screw
18
.
The arrow on the saw blade must coincide with
the arrow for the direction of rotation
(marked on the appliance).
Maintenance and Cleaning
DANGER OF INJURY! Re-
move the mains plug from the mains socket before
you carry out any work on the appliance.
Clean the appliance after finishing work.
To clean the appliance, use a cloth and do not
use petrol, solvents or cleaning fluids.
Service
Have your appliance
repaired by qualified specialist per-
sonnel using OEM parts only. This ensures
that the safety of the device is maintained.
If the plug or mains
lead needs to be replaced, always
have the replacement carried out by the
manufacturer or its service centre. This en
-
sures that the safety of the device is maintained.

15 GB
Service / Warranty / Disposal
Start-up / Maintenance and Cleaning / Service
Note: Spare parts not listed (e.g. carbon brushes,
switches) can be ordered through our call centre.
Warranty
The warranty for this appliance is for 3
years from the date of purchase. The ap-
pliance has been manufactured with care
and meticulously examined before deliv-
ery. Please retain your receipt as proof
of purchase. In the event of a warranty
claim, please make contact by telephone
with our Service Department. Only in this
way can a post-free despatch for your
goods be assured.
The warranty covers only claims for material and
maufacturing defects, but not for transport damage,
for wearing parts or for damage to fragile compo-
nents, e.g. buttons or batteries. This product is for pri-
vate use only and is not intended for commercial use.
The warranty is void in the case of abusive and im-
proper handling, use of force and internal tampering
not carried out by our authorized service branch. Your
statutory rights are not restricted in any way by this
warranty.
The warranty period will not be extended by repairs
made unter warranty. This applies also to replaced
and repaired parts. Any damage and defects extant
on purchase must be reported immediately after
unpacking the appliance, at the latest, two days after
the purchase date. Repairs made after the expiration
of the warranty period are subject to payment.
GB
Service Great Britain
Tel.: 0871 5000 720
(0.10 GBP/Min.)
e-mail: kom[email protected]
IAN 103316
Disposal
The packaging is made of environmentally
friendly materials, which may be disposed
through your local recycling acilities.
Do not dispose of electrical power
tools with household waste!
According to European Directive 2012 / 19 / EU,
used electrical goods must be collected and recycled
in an environmentally friendly manner.
Contact your local refuse disposal authority for more
details of how to dispose of your worn out electrical
appliance.

16 GB
Spis zawartości
Translation of the original declaration of conformity / Manufacturer
Translation of the original
declaration of conformity /
Manufacturer
We, KOMPERNASS HANDELS GMBH, the person
responsible for documents: Mr Semi Uguzlu, BURG-
STRASSE 21, 44867 BOCHUM, GERMANY, hereby
declare that this product complies with the following
standards, normative documents and EU directives:
Directive on Machinery
(2006 / 42 / EC)
EU Low Voltage Directive
(2006 / 95 / EC)
Electromagnetic Compatibility
(2004 / 108 / EC)
RoHS Directive (2011 / 65 / EU)
Applicable harmonised standards
EN 60745-1/A11:2010
EN 60745-2-5:2010
EN 60745-2-22/A11:2013
EN 55014-1/A2:2011
EN 55014-2/A2:2008
EN 61000-3-2/A2:2009
EN 61000-3-3:2013
Type designation of the machine:
Plunge saw PTS 500 A1
Date of manufacture: 11–2014
Serial number: IAN 103316
Bochum, 30.11.2014
Semi Uguzlu
- Quality Manager -
We reserve the right to make technical modifications
in the course of product development.

17 PL
Spis zawartości
Instrukcja
Użycie zgodne z przeznaczeniem ................................................................................................. Strona 18
Wyposażenie ...................................................................................................................................Strona 18
Zawartość .........................................................................................................................................Strona 18
Dane techniczne ..............................................................................................................................Strona 18
Ogólne wskazówki bezpieczeństwa dla elektronarzędzi
1. Bezpieczeństwo miejsca pracy ..................................................................................................Strona 19
2. Bezpieczeństwo elektryczne .......................................................................................................Strona 19
3. Bezpieczeństwo osób .................................................................................................................Strona 20
4. Stosowanie i obchodzenie się z narzędziami elektrycznymi ................................................... Strona 20
5. Serwis ...........................................................................................................................................Strona 21
Wskazówki bezpieczeństwa podczas użytkowania urządzenia
Wskazówki bezpieczeństwa dla wszystkich pił ............................................................................Strona 21
Inne wskazówki bezpieczeństwa dla wszystkich pił .....................................................................Strona 22
Szczególne wskazówki bezpieczeństwa dotyczące niniejszej piły ............................................. Strona 22
Wskazówki bezpieczeństwa dla przecinarek ............................................................................... Strona 23
Inne wskazówki bezpieczeństwa dla przecinarek szlifierskich ....................................................Strona 25
Wskazówki uzupełniające ..............................................................................................................Strona 26
Oryginalne akcesoria / urządzenia dodatkowe ............................................................................Strona 26
Wskazówki bezpieczeństwa dla narzędzi szlifujących ................................................................Strona 26
Uruchamianie
Włączanie i wyłączanie ..................................................................................................................Strona 27
Luzowanie blokady wgłębienia ...................................................................................................... Strona 27
Wybieranie głębokości cięcia .........................................................................................................Strona 27
Montaż zderzaka równoległego ....................................................................................................Strona 27
Obsługa pilarki do cięcia wgłębnego ............................................................................................Strona 27
Zaznaczenie długości cięcia ...........................................................................................................Strona 28
Zaznaczenie linii cięcia ................................................................................................................... Strona 28
Podłączenie odsysania wiórów ......................................................................................................Strona 28
Wymiana brzeszczotu .....................................................................................................................Strona 28
Konserwacja i czyszczenie............................................................................................Strona 28
Serwis .............................................................................................................................................Strona 28
Gwarancja ..................................................................................................................................Strona 28
Utylizacja .....................................................................................................................................Strona 29
Tłumaczenie oryginału Deklaracji zgodności WE / Producent ........Strona 30
Translation of the original declaration of conformity / Manufacturer

18 PL
Instrukcja
Piła wgłębna PTS 500 A1
Instrukcja
Gratulujemy Państwu zakupu nowego urządzenia.
Zdecydowali się Państwo na zakup produktu naj-
wyższej jakości. Instrukcja obsługi jest częścią tego
produktu. Zawiera ona ważne wskazówki dotyczące
bezpieczeństwa obsługi, użytkowania i utylizacji
produktu. Przed pierwszym użyciem produktu
należy zapoznać się ze wszystkimi wskazówkami
dotyczącymi obsługi i bezpieczeństwa. Produktu
używać wyłącznie zgodnie z jego poniżej opisanym
przeznaczeniem. W przypadku przekazania produktu
należy dołączyć do niego całą jego dokumentację.
Użycie zgodne z
przeznaczeniem
Maszyna jest przeznaczona przede wszystkim do
wgłębnego piłowania podłużnego i poprzecznego
w stabilnym podłożu jak lite drewno, płyty wiórowe,
sklejki, aluminium, kafelki, kamień, tworzywo sztuczne
i lekkie materiały budowlane. Należy przy tym
uwzględnić, że już zamontowany brzeszczot piły
nadaje się wyłącznie do użycia w drewnie. Stoso-
wanie urządzenie do innych celów lub dokonywa-
nie jego modyfikacji jest uznawane jako sprzeczne
z jego przeznaczeniem i stwarza znaczne zagro-
żenie wypadkiem. Nie do użytku przemysłowego.
Wyposażenie
1
Mechaniczna blokada wgłębiania
2
Dioda LED kontrolna / podłączenia do sieci
3
Przewód sieciowy
4
Szczeliny wentylacyjne
5
Pokrywa szczotek węglowych
6
WŁĄCZNIK / WYŁĄCZNIK
7
Wybór głębokości cięcia
7 a
Skala dla głębokości cięcia
8
Zaznaczenia długości cięcia
9
Podstawa
10
Przyjęcie zderzaka równoległego
11
Zderzak równoległy
11 a
Śruba do zderzaka równoległego
12
Okienko linii cięcia
13
Blokada wrzeciona
14
Przyłącze do odsysania pyłu
15
Klucz trzpieniowy
16
Brzeszczot piły
17
Kołnierz zaciskowy
18
Śruba naprężająca i podkładka
19
Wąż odsysający
20
Okrągły brzeszczot HW Z85 / 30
21
Brzeszczot diamentowy Z85VR
22
Okrągły brzeszczot HS Z85 / 36
Zawartość
1 piła wgłębna PTS 500 A1
1 okrągły brzeszczot HW Z85 / 30
1 brzeszczot diamentowy Z85VR
1 okrągły brzeszczot HS Z85 / 36
1 zderzak równoległy
1 wąż odsysający
1 klucz trzpieniowy
1 walizka do transportu i przechowywania
1 instrukcja obsługi
Dane techniczne
Moc znamionowa: 500 W
Napięcie znamionowe: 230 V∼, 50 Hz
Liczba obrotów biegu
jałowego: n
0
4500 min
-1
Maks. Głębokośći cięcia: 25mm
Klasa ochrony: II /
Informacje dotyczące hałasu i wibracji:
Wartość pomiarowa hałasu uzyskana zgodnie z
EN 60745. Poziom hałasu oceniony na A wynosi
typowo:
Poziom ciśnienia akustycznego: 82 dB(A)
Poziom mocy akustycznej: 93 dB(A)
Niepewność pomiaru K: 3 dB
Zakładać ochraniacze na uszy!
Instrukcja / Ogólne wskazówki bezpieczeństwa dla elektronarzędzi

19 PL
Instrukcja
Instrukcja / Ogólne wskazówki bezpieczeństwa dla elektronarzędzi
Oszacowane przyspieszenie, typowo:
Wibracja dłoni / ręki a
h
= 2,266 m / s
2
Niepewność pomiaru K = 1,5 m / s
2
Podany w niniejszych
instrukcjach poziom drgań wyznaczony został za
pomocą metody pomiarowej określonej w normie
EN 60745 i może zostać użyty do porównania
urządzeń. Podany poziom emisji drgań może być
wykorzystywany również do wstępnego oszaco-
wania przerw w działaniu.
Poziom drgań będzie się różnił w zależności od
zastosowania elektronarzędzia i w niektórych
przypadkach może przekroczyć wartość podaną
w niniejszej instrukcji. Obciążenie drganiami może
wydawać się mniejsze niż w rzeczywistości, jeśli
elektronarzędzie będzie regularnie używane ten
sposób.
Wskazówka: Celem dokładnego oszacowania
obciążenia wibracjami w okresie określonego okresu
czasu pracy należy uwzględnić również te okresy,
w których urządzenie jest wyłączone lub wprawdzie
jest włączone, ale w rzeczywistości nie pracuje.
Może to przyczynić się do znacznej redukcji ob-
ciążenia wibracjami w całym okresie czasu pracy.
Ogólne wskazówki bezpie-
czeństwa dla elektronarzędzi
Należy prze-
czytać wszystkie wskazówki
dotyczące bezpieczeństwa i in-
strukcje. Zaniedbania w przestrzeganiu wskazó
wek
bezpieczeństwa i instrukcji mogą spowodować po-
rażenie prądem elektrycznym, pożar i / lub ciężkie
obrażenia ciała.
Należy zachować wszystkie wskazówki
dotyczące bezpieczeństwa oraz instrukcje.
Używany we wskazówkach dotyczących bezpie-
czeństwa termin „narzędzie elektryczne“ odnosi
się do narzędzi elektrycznych zasilanych z sieci (z
kablem sieciowym) oraz do narzędzi elektrycznych
zasilanych z akumulatorów (bez kabla sieciowego).
1. Bezpieczeństwo miejsca pracy
a) Stanowisko pracy należy utrzymywać
w czystości i dobrze oświetlone. Nie-
porządek i brak oświetlenia w miejscu pracy
może prowadzić do wypadków.
b) Nie należy pracować przy użyciu
urządzenia w otoczeniu zagrożonym
eksplozją, w którym znajdują się palne
ciecze, gazy lub pyły. Urządzenia elek-
tryczne wytwarzają iskry, które mogą zapalić
pył lub pary.
c) Podczas korzystania z elektronarzę-
dzia należy trzymać dzieci i inne osoby
z daleka od urządzenia. Rozproszenie
uwagi może spowodować utratę kontroli nad
urządzeniem.
2. Bezpieczeństwo elektryczne
a) Wtyczka sieciowa elektronarzędzia
musi pasować do gniazdka. W żaden
sposób nie wolno zmieniać wtyczki.
Nie stosować żadnych wtyczek adap-
terowych razem z elektronarzędziami
wyposażonymi w uziemienie ochronne.
Niezmienione wtyczki i pasujące gniazdka
zmniejszają ryzyko porażenia prądem elek-
trycznym.
b) Należy unikać kontaktu ciała z po-
wierzchniami uziemionymi takimi jak
rury, grzejniki, kuchenki i lodówki.
Istnieje podwyższone niebezpieczeństwo po-
rażenia prądem elektrycznym, gdy ciało jest
uziemione.
c) Urządzenie trzymać z dala od deszczu
i wilgoci. Przedostanie się wody do elektro-
narzędzia zwiększa niebezpieczeństwo pora-
żenia prądem.
d) Nie używaj kabla sieciowego w spo-
sób sprzeczny z jego przeznaczeniem,
tj. do noszenia urządzenia, zawiesza-
nia urządzenie lub do wyciągania
wtyku sieciowego z wtykowego
gniazdka sieciowego. Kabel należy
trzymać z dala od wysokiej tempera-

20 PL
Ogólne wskazówki bezpieczeństwa dla elektronarzędzi
tury, oleju, ostrych krawędzi lub
ruchomych części urządzenia. Uszko-
dzone lub poplątane kable powodują zwięk-
szenie ryzyka porażenia prądem elektrycznym.
e) Podczas pracy z elektronarzędziem
na dworze należy używać wyłącznie
przedłużaczy, które są dopuszczone
również do pracy na zewnątrz. Użycie
przedłużacza przeznaczonego do zastosowa-
nia na zewnątrz zmniejsza ryzyko porażenia
prądem elektrycznym.
f) Jeśli praca elektronarzędzia w oto-
czeniu wilgotnym jest nie do uniknięcia,
należy zastosować wyłącznik różni-
cowoprądowy. Zastosowanie wyłącznika
różnicowoprądowego zapobiega niebezpie-
czeństwu porażenia prądem elektrycznym.
3. Bezpieczeństwo osób
a) Należy być stale uważnym, zwracać
uwagę na to co się robi i postępować
rozsądnie w trakcie pracy z narzędziem
elektrycznym. Nie należy używać ja-
kiegokolwiek elektronarzędzia znaj-
dując się w stanie zmęczenia lub pod
wpływem środków odurzających,
alkoholu lub lekarstw. Chwila nieuwagi
przy użyciu narzędzia elektrycznego może
prowadzić do poważnych urazów.
b) Noś osobiste wyposażenie ochronne i
zawsze okulary ochronne. Noszenie
osobistego wyposażenia ochronnego takiego
jak maska przeciwpyłowa, buty antypoślizgo
we,
kask ochronny lub ochrona słuchu stosownie do
sposobu użytkowania narzędzia elektrycznego
zmniejsza ryzyko obrażeń ciała.
c) Należy unikać niezamierzonego
uruchomienia. Należy upewnij się, że
narzędzie elektryczne jest wyłączone
zanim podłączy się je do zasilania,
chwyci się je lub będzie się je przenosić.
Jeżeli podczas przenoszenia urządzenia
będzie się trzymało palec na WŁĄCZNIKU /
WYŁĄCZNIKU. lub jeżeli urządzenie jest
włączone, to może to prowadzić do nieszczę-
śliwych wypadków.
d) Usunąć narzędzia do nastawiania
urządzenia lub klucze płaskie zanim
włączy się urządzenie. Narzędzie lub
klucz, który znajduje się w obracającej się
części urządzenia może prowadzić do urazów.
e) Należy unikać nienormalnej postawy
ciała. Należy stanąć na stabilnym
podłożu i przez cały czas utrzymywać
równowagę. Dzięki temu lepiej można
kontrolować urządzenie, zwłaszcza w nie-
oczekiwanych sytuacjach.
f) Zakładać odpowiednie ubranie. Nie
zakładać obszernej odzieży ani biżu-
terii. Włosy, odzież i rękawice trzymać
z dala od ruchomych części. Luźna odzież,
biżuteria lub długie włosy mogą zostać uchwy-
cone przez ruchome części.
g) Jeżeli zostaną zamontowane urzą-
dzenia do odsysania i wychwytywa-
nia pyłu, to należy upewnić się, że są
one podłączone i że będą prawidłowo
używane. Odsysanie zmniejsza zagrożenie
wywoływane pyłem.
4. Stosowanie i obchodzenie się z
narzędziami elektrycznymi
a) Nie należy przeciążać urządzenia. Do
pracy stosować przeznaczone do niej
narzędzie elektryczne. Dzięki odpowied-
niego elektronarzędzia pracuje się lepiej i
bezpieczniej w danym zakresie robót.
b) Nie używać żadnego narzędzia elek-
trycznego, którego przełącznik jest
uszkodzony. Narzędzie elektryczne, które
nie daje się już więcej włączyć lub wyłączyć,
jest niebezpieczne i musi zostać naprawione.
c) Zanim zacznie się przeprowadzać
ustawienia urządzenia, wymianę
elementów wyposażenia lub odłoży
się urządzenie należy wyciągnąć
wtyczkę z gniazdka. Ten środek ostrożno-
ści zapobiega niezamierzonemu włączeniu się
urządzenia.
d) Nieużywane narzędzia elektryczne
należy przechowywać poza zasięgiem
dzieci. Obsługi urządzenia nie należy
Ogólne … / Wskazówki bezpieczeństwa podczas użytkowania urządzenia
Strona jest ładowana ...
Strona jest ładowana ...
Strona jest ładowana ...
Strona jest ładowana ...
Strona jest ładowana ...
Strona jest ładowana ...
Strona jest ładowana ...
Strona jest ładowana ...
Strona jest ładowana ...
Strona jest ładowana ...
Strona jest ładowana ...
Strona jest ładowana ...
Strona jest ładowana ...
Strona jest ładowana ...
Strona jest ładowana ...
Strona jest ładowana ...
Strona jest ładowana ...
Strona jest ładowana ...
Strona jest ładowana ...
Strona jest ładowana ...
Strona jest ładowana ...
Strona jest ładowana ...
Strona jest ładowana ...
Strona jest ładowana ...
Strona jest ładowana ...
Strona jest ładowana ...
Strona jest ładowana ...
Strona jest ładowana ...
Strona jest ładowana ...
Strona jest ładowana ...
Strona jest ładowana ...
Strona jest ładowana ...
Strona jest ładowana ...
Strona jest ładowana ...
Strona jest ładowana ...
Strona jest ładowana ...
Strona jest ładowana ...
Strona jest ładowana ...
Strona jest ładowana ...
Strona jest ładowana ...
Strona jest ładowana ...
Strona jest ładowana ...
Strona jest ładowana ...
Strona jest ładowana ...
Strona jest ładowana ...
Strona jest ładowana ...
Strona jest ładowana ...
Strona jest ładowana ...
Strona jest ładowana ...
Strona jest ładowana ...
Strona jest ładowana ...
Strona jest ładowana ...
Strona jest ładowana ...
Strona jest ładowana ...
Strona jest ładowana ...
Strona jest ładowana ...
Strona jest ładowana ...
Strona jest ładowana ...
Strona jest ładowana ...
Strona jest ładowana ...
Strona jest ładowana ...
Strona jest ładowana ...
Strona jest ładowana ...
Strona jest ładowana ...
Strona jest ładowana ...
Strona jest ładowana ...
-
 1
1
-
 2
2
-
 3
3
-
 4
4
-
 5
5
-
 6
6
-
 7
7
-
 8
8
-
 9
9
-
 10
10
-
 11
11
-
 12
12
-
 13
13
-
 14
14
-
 15
15
-
 16
16
-
 17
17
-
 18
18
-
 19
19
-
 20
20
-
 21
21
-
 22
22
-
 23
23
-
 24
24
-
 25
25
-
 26
26
-
 27
27
-
 28
28
-
 29
29
-
 30
30
-
 31
31
-
 32
32
-
 33
33
-
 34
34
-
 35
35
-
 36
36
-
 37
37
-
 38
38
-
 39
39
-
 40
40
-
 41
41
-
 42
42
-
 43
43
-
 44
44
-
 45
45
-
 46
46
-
 47
47
-
 48
48
-
 49
49
-
 50
50
-
 51
51
-
 52
52
-
 53
53
-
 54
54
-
 55
55
-
 56
56
-
 57
57
-
 58
58
-
 59
59
-
 60
60
-
 61
61
-
 62
62
-
 63
63
-
 64
64
-
 65
65
-
 66
66
-
 67
67
-
 68
68
-
 69
69
-
 70
70
-
 71
71
-
 72
72
-
 73
73
-
 74
74
-
 75
75
-
 76
76
-
 77
77
-
 78
78
-
 79
79
-
 80
80
-
 81
81
-
 82
82
-
 83
83
-
 84
84
-
 85
85
-
 86
86


Parkside PTS 500 A1 Operation and Safety Notes
- Kategoria
- Elektronarzędzia
- Typ
- Operation and Safety Notes
w innych językach
- Deutsch: Parkside PTS 500 A1
- slovenčina: Parkside PTS 500 A1
Powiązane dokumenty
-
Parkside PMTS Instrukcja obsługi
-
Parkside PTS 480 A1 Original Operation Manual
-
Parkside 327368 1904 Translation Of The Original Instructions
-
Parkside PMNF 1350 A1 Operation and Safety Notes
-
Parkside PHKS 1300 A1 Operation and Safety Notes
-
Parkside PMGS 12 A1 Operation and Safety Notes
-
-
Parkside PHKS 1350 C2 Translation Of The Original Instructions
-
Parkside pmfw 310 b1 Operation and Safety Notes
-
Parkside PMFW 280 A2 Operation and Safety Notes
Inne dokumenty
-
Scheppach 5901202901 Instrukcja obsługi
-
Scheppach PL75 Instrukcja obsługi
-
Skil 5885MA Instrukcja obsługi
-
Rothenberger Angle grinder RO AG 8000 Instrukcja obsługi
-
-
Meister MWS2400-230 Translation Of The Original Instructions
-
Bosch GWS 7-115 Specyfikacja
-
Hilti SCM 22-A Instrukcja obsługi
-
Bosch GWS 15-125 CI Instrukcja obsługi
-
Flex RS 11-28 Instrukcja obsługi