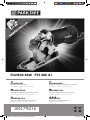
Parkside PTS 480 A1 Original Operation Manual
- Typ
- Original Operation Manual

IAN 79416
PLUNGE SAW PTS 480 A1
TA UCHSÄGE
Bedienungs- und Sicherheitshinweise
Originalbetriebsanleitung
PLUNGE SAW
Operation and Safety Notes
Translation of original operation manual
PIŁA WGŁĘBNA
Wskazówki dotyczące obsługi i bezpieczeństwa
Tłumaczenie oryginalnej instrukcji obsługi
POTOPNA ŽAGA
Navodila za upravljanje in varnostna opozorila
Prevod originalnega navodila za uporabo
PONORNÁ PILA
Pokyny pro obsluhu a bezpečnostní pokyny
Překlad originálního provozního návodu
PONORNÁ PÍLA
Pokyny pre obsluhu a bezpečnostné pokyny
Preklad originálneho návodu na obsluhu
79416_par_Tauchsaege_cover_LB4 (ohne HU).indd 2 06.12.12 17:43

GB Operation and Safety Notes Page 5
PL Wskazówki dotyczące obsługi i bezpieczeństwa Strona 15
SI Navodila za upravljanje in varnostna opozorila Stran 25
CZ Pokyny pro obsluhu a bezpečnostní pokyny Strana 35
SK Pokyny pre obsluhu a bezpečnostné pokyny Strana 45
DE / AT / CH Bedienungs- und Sicherheitshinweise Seite 55
Before reading, unfold the page containing the illustrations and familiarise yourself with all functions of the
device.
Przed przeczytaniem proszę rozłożyć stronę z ilustracjami, a następnie proszę zapoznać się z wszystkimi
funkcjami urządzenia.
Pred branjem odprite stran s slikami in se nato seznanite z vsemi funkcijami naprave.
Před čtením si otevřete stranu s obrázky a potom se seznamte se všemi funkcemi přístroje.
Pred čítaním si odklopte stranu s obrázkami a potom sa oboznámte so všetkými funkciami prístroja.
Klappen Sie vor dem Lesen die Seite mit den Abbildungen aus und machen Sie sich anschließend mit allen
Funktionen des Gerätes vertraut.
79416_par_Tauchsaege_cover_LB4 (ohne HU).indd 3 06.12.12 17:43

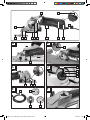
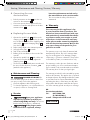
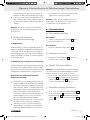
1
4
A
10 5611
D
18
17
16
9
F
7 7 a
11 a
3
6
E
19 20
2221
C
1413 11 a
2
B
8
15
12
79416_par_Tauchsaege_cover_LB4 (ohne HU).indd 4 06.12.12 17:43

79416_par_Tauchsaege_cover_LB4 (ohne HU).indd 5 06.12.12 17:43

5 GB
Introduction
Intended use ........................................................................................................................................ Page 6
Features ...............................................................................................................................................Page 6
Scope of delivery ................................................................................................................................Page 6
Technical Data ....................................................................................................................................Page 6
General safety advice for electrical power tools
1. Workplace safety ...........................................................................................................................Page 7
2. Electrical safety ............................................................................................................................... Page 7
3. Personal safety ................................................................................................................................Page 7
4. Careful handling and use of the electrical power tool.................................................................Page 8
5. Service .............................................................................................................................................Page 8
Safety instructions for all saws ...........................................................................................................Page 9
Safety instructions for plunge saws .................................................................................................... Page 10
Safety recommendations for the correct use of superabrasives.......................................................Page 10
Start-up
Switching on and off ........................................................................................................................... Page 11
Releasing the plunge blocker .............................................................................................................Page 11
Preselect cutting depth ........................................................................................................................ Page 11
Fitting the guide fence .........................................................................................................................Page 11
Handling the plunge saw ...................................................................................................................Page 11
Marking cutting length ........................................................................................................................Page 11
Marking cutting line ............................................................................................................................Page 11
Connecting the saw dust extraction ................................................................................................... Page 12
Replacing the saw blade .................................................................................................................... Page 12
Maintenance and Cleaning ..............................................................................................Page 12
Service ...............................................................................................................................................Page 12
Warranty ......................................................................................................................................... Page 12
Disposal ............................................................................................................................................Page 13
Declaration of Conformity / Manufacturer..........................................................Page 13
Table of contents
79416_par_Tauchsaege_Content_LB4 (ohne HU).indd 5 07.12.12 12:47

6 GB
Introduction / General safety advice for electrical power toolsIntroduction
Plunge saw PTS 480 A1
Introduction
Congratulations on your purchase. You have select-
ed a high quality product. The instructions for use
are a part of this product. They contain important
information about safety, use and disposal. Before
using the product, please familiarise yourself with all
the operating and safety instructions. Use the product
only as described and for the specified applications.
When passing this product on to others please be
sure to also include all of its documentation.
Intended use
The machine is primarily intended for lengthwise
and across cuts in plunge cut with solid support in
solid wood, chipboard, plywood, aluminium, tiles,
stone, plastic and lightweight construction materials.
Please keep in mind that the pre-fitted saw blade is
only suitable for cutting wood. Any other uses, and /
or modifications to the appliance, are deemed to
be improper usage and may result in serious physi-
cal injury. Not for commercial applications.
Features
1
Mechanical plunge blocker
2
Power On / Control LED
3
Mains lead
4
Ventilation slits
5
Cover for brushes
6
ON /OFF switch
7
Pre-selector for cutting depth
7 a
Scale for cutting depth
8
Labelling cutting length
9
Base plate
10
Uptake parallel fence
11
Parallel fence
11 a
Screw for parallel fence
12
Window for cutting line
13
Spindle lock
14
Connection for dust extraction
15
Allen key
16
Saw blade
17
Clamping flange
18
Clamping screw and washer
19
Dust extractor hose
20
HW-Circular saw blade Z85 / 30
21
Diamond cutting disc Z85VR
22
HS Circular saw blade Z85 / 36
Scope of delivery
1 Plunge saw PTS 480 A1
1 HW Circular saw blade Z85 / 30
1 Diamond cutting disc Z85VR
1 HS Circular saw blade Z85 / 36
1 Parallel fence
1 Dust extractor hose
1 Allen key
1 Set of operating instructions
Technical Data
Rated power: 480 W
Rated voltage: 230 V∼, 50 Hz
Idling speed: n
0
4500 min
-1
Max. cutting depth: 25 mm
Protection class: II /
Noise and vibration data:
Measurement for noise level, determined according
to EN 60745. The A-rated noise levels of the elec-
trical power tool are typically at:
Sound pressure level: 82 dB(A)
Sound power level: 93 dB(A)
Uncertainty K: 3 dB
Wear hearing protection!
Evaluated acceleration, typically:
Hand / arm vibration a
h
= 2.266 m / s
2
Uncertainty K = 1.5 m / s
2
The vibration level given in these
operating instructions has been measured in a pro-
cedure according to EN 60745 and can be used
79416_par_Tauchsaege_Content_LB4 (ohne HU).indd 6 07.12.12 12:47

7 GB
Introduction / General safety advice for electrical power toolsIntroduction
for the comparison of appliances. The vibration
emission value specified can also serve as a prelim-
inary assessment of the exposure.
Different uses of the device give rise to different vi-
bration levels and in many cases they may exceed
the values given in these instructions. It is easy to
underestimate the vibration load if the electrical
power tool is used regularly in particular circum-
stances.
Note: If you wish to make an accurate assessment
of the vibration loads experienced during a particu-
lar period of work, you should also take into account
the intervening periods of time when the device is
switched off or is running but is not actually in use.
This can result in a much lower vibration load over
the whole of the work period.
General safety advice for
electrical power tools
Please read all safety
information and instructions. Failure to ob-
serve the safety information and instructions can
result in electric shock, fire and / or serious injury.
For future reference keep all the safety
advice and instructions in a safe place.
The term “electrical tool” used in the safety advice
refers to electrical tools powered by mains electric-
ity (by means of a mains lead) and electrical tools
powered by rechargeable batteries (without a
mains lead).
1. Workplace safety
a) Keep your working area clean and
well lit. Untidy or poorly lit working areas
can lead to accidents.
b) Do not work with the device in poten-
tially explosive environments, which
contain inflammable liquids, gases or
dusts. Electrical power tools create sparks,
which can ignite dusts or fumes.
c) Keep children and other people away
while you are operating the electrical
tool. Distractions can cause you to lose con-
trol of the device.
2. Electrical safety
a) The mains plug on the device must
match the mains socket. The plug
must not be modified in any way. Do
not use an adapter plug with devices
fitted with a protective earth. Unmodified
plugs and matching sockets reduce the risk of
electric shock.
b) Avoid touching grounded surfaces
such as pipes, radiators, ovens, and
refrigerators. There is an increased risk of
electric shock if your body is earthed.
c) Keep the appliance away from rain
or moisture. The penetration of water into
the electrical device increases the risk of an
electric shock.
d) Do not use the mains lead for purpos-
es it was not intended for, e.g. to carry
the device, to hang up the device or to
pull the mains plug out of the mains
socket. Keep the mains lead away
from heat, oil, sharp edges or moving
parts of the device. Damaged or tangled
cables increase the risk of an electric shock.
e) If you are working outdoors with an
electrical power tool, always use ex-
tension cords that are approved for
outdoor use. The use of an extension cable
suitable for outdoor use reduces the risk of
electric shock.
f) Use a residual current device (RCD)
for protection if the operation of the
electrical power tool in a moist envi-
ronment cannot be avoided. The use of
an RCD reduces the risk of electric shock.
3. Personal safety
a) Remain alert at all times, watch what
you are doing and always proceed
79416_par_Tauchsaege_Content_LB4 (ohne HU).indd 7 07.12.12 12:47

8 GB
General safety advice for electrical power tools / Start-upGeneral safety advice for electrical power tools
with caution when using an electrical
tool. Do not use the electrical power
tool if you are tired or under the influ-
ence of drugs, alcohol or medication.
One moment of carelessness when using the
electrical power tool can lead to serious injury.
b) Always wear protective equipment
and wear safety glasses. Depending on
the type of electrical tool and its application,
wearing personal protective equipment such
as ear protection, dust mask or work gloves
reduces the risk of injuries.
c) Avoid unintentional operation of the
device. Check that the electrical power
tool is switched off before you connect
it to the mains, pick it up or carry it.
Accidents can happen if you carry the electri-
cal tool with your finger on the ON / OFF switch
or with the device switched on.
d) Remove any setting tools or spanners
before you switch on the electrical tool.
A tool or spanner left attached to a rotating
part of an electrical tool can lead to injury.
e) Avoid placing your body in an unnat-
ural position. Keep proper footing and
balance at all times. By doing this, you will
be in a better position to control the electrical
power tool in unforeseen circumstances.
f) Wear suitable clothing. Do not wear
loose clothing or jewellery. Keep your
hair, clothing and gloves clear of mov-
ing parts. Loose clothing, jewellery or long
hair can become trapped in moving parts.
g) If vacuum dust extraction and collec-
tion devices are fitted, do not forget to
check that they are properly connected
and used correctly. The use of dust extrac-
tion reduces the hazard presented by dust.
4. Careful handling and use of
the electrical power tool
a) Do not overload the device. Always use
an electrical power tool that is intended
for the task you are undertaking. By
using the right electrical power tool for the job,
you will work safer and achieve a better result.
b) Do not use an electrical power tool if
its switch is defective. An electrical power
tool that can no longer be switched on and off
is dangerous and must be repaired.
c) Pull the mains plug from the socket
before you make any adjustments to
the appliance, change accessories or
when the device is laid aside. This pre-
caution prevents the unintentional start of the
electrical tool.
d) Always ensure that electrical power
tools are kept out of reach of children
when not in use. Do not let anyone
use the device if they are not familiar
with it or have not read the instructions
and advice. Electrical power tools are dan-
gerous when they are used by inexperienced
persons.
e) Maintain the electrical power tool care-
fully. Check that moving parts are work-
ing properly and move freely. Check for
any parts that are broken or damaged
enough to detrimentally affect the func-
tioning of the electrical power tool.
Have
damaged parts repaired before you use
the device. Many accidents have their origins
in poorly maintained electrical power tools.
f) Keep cutting tools clean and sharp.
Carefully maintained cutting tools with sharp
cutting edges are less likely to jam and are
easier to control.
g) Use the electrical power tool, accesso-
ries, inserted tools etc. in accordance
with these instructions. When doing
this, take the working conditions into
consideration, as well as the task at
hand. The use of electrical power tools for
purposes other than those intended can lead
to dangerous situations.
5. Service
a) Only have electrical power tools
repaired by qualified specialist per-
sonnel using OEM spare parts. This
ensures that the safety of the electrical power
tool is maintained.
79416_par_Tauchsaege_Content_LB4 (ohne HU).indd 8 07.12.12 12:47

9 GB
General safety advice for electrical power tools / Start-upGeneral safety advice for electrical power tools
Hold the device by the insulated han-
dle surfaces when performing work
where there is danger of the tool used
striking hidden electrical lines or its
own power cable. Contact with a live wire
could cause metal parts of the device to be-
come live and lead to electric shock.
Safety instructions for all saws
a) DANGER: Stay with your hands out
of the cutting area and keep off the
cutting disc. If you hold the saw with both
hands, they cannot be injured by the saw blade.
b) Do not reach underneath the work-
piece. The protective cover will not protect
you from the saw blade under the work piece.
c) Adjust the cutting depth to the thick-
ness of the work piece. Less than the full
width of a tooth should be visible from under
the work piece.
d) Never hold the workpiece with the
hand or lay it over a leg. Secure the
workpiece on a stable fixture. It is
important to fix the work piece safely, to mini-
mise the danger of contact with the body,
jamming of the saw blade or loss of control.
e) Hold the electrical power tool by the
insulated handle surfaces when you
are undertaking work where there is
the danger of the tool striking hidden
electricity cables or the device’s mains
lead. Contact with a live wire could cause
metal parts of the electrical power tool to
become live and lead to electric shock.
f) When cutting along the way always
use a fence or a straight edge guide.
That improves the precision of the cut and mini-
mises the possibility that the saw blade jams.
g) Always use saw blades of the correct
size and with matching mounting hole
(e.g. star-shaped or round). Saw blades
not matching the attachments of the saw run
untrue and lead to loss of control.
h) Never use damaged or wrong saw
blade washers or bolts. The saw blade
washers and screws were specifically devel-
oped for your saw, for optimal performance
and operating security.
Reasons for and how to avoid a kickback:
- A kickback is the sudden reaction, if the saw
blade sticks, jams or is misaligned and the
uncontrolled saw moves out of the work piece
in the direction of the operator.
- If the saw blade wedges, sticks or jams itself
into the closing saw gap, it blocks and the mo-
tor power kicks the saw back into the direction
of the operator.
- If the saw blade is twisted or wrongly aligned
in the saw gap, the teeth of the rear blade edge
can jam in the surface of the work piece, caus-
ing the saw blade to move out of the saw gap
and the saw to jump back in the direction of
the operator.
A kickback is the result of wrong or unsuitable use
of the saw. It can be avoided by taking the in the
following described precautions.
a) Hold the saw with both hands and
bring your arms into a position that
allows you to absorb the forces of the
kickback. Always stand to the side of
the saw blade, never bring the saw
blade into a line with your body. Dur-
ing a kickback the saw can jump backwards,
however, the operator can master the forces of
the kickback with suitable preventive measures.
b) Should the saw blade jam, or you stop
the work, switch the saw off and hold
it still in the work piece, until the saw
blade has come to a standstill. Never
attempt to remove the saw from the
work piece or to pull it backwards, as
long as the saw blade moves, as oth-
erwise a kickback could occur. Find out
and rectify the reason for the jamming of the
saw blade.
c) If you want to restart a saw that is
stuck
in the workpiece, centre the saw blade
in the saw gap and check that the teeth
are not stuck in the workpiece. If the
saw blade jams, it can move out of the work
79416_par_Tauchsaege_Content_LB4 (ohne HU).indd 9 07.12.12 12:47

10 GB
General safety advice for electrical power tools / Start-upGeneral safety advice for electrical power tools
piece or cause a kickback, when the saw is
started anew.
d) Support big boards to reduce the risk
of a kickback due to a jamming saw
blade. Big boards can bend through due to
their own weight. Boards must be supported
on both sides, at the outside and near the
cutting edge.
e) Do not use blunt or damaged saw
blades. Saw blades with blunt or wrongly set
teeth cause increased friction, jamming of the
blade and kickback due to a saw gap that is
too tight.
f) Tighten the adjustments for cutting
depth and cutting angle before start-
ing to cut. If the adjustments change during
cutting, the saw blade can jam and cause a
kickback.
g) Take particular care, when plunge
cutting into existing walls or other
areas that you cannot inspect. The saw
blade can jam when cutting into hidden ob-
jects and thereby causing a kickback.
Safety instructions for
plunge saws
a) Before every use check that the safe-
ty cover closes without problems. Do
not use the saw, if the safety cover
does not move freely and does not
close instantly. Never fix or tie back
the safety cover in the opened posi-
tion. If the saw is dropped accidentally, the
safety cover can be bent. Ensure that the safety
cover moves freely and does not touch either
the saw blade or other parts.
b) Check condition and function of the
safety cover spring. If safety cover
and spring do not work faultlessly,
get the saw serviced before using it.
Damaged parts, sticky deposits or masses of
wood shavings lead to delayed operation of
the bottom safety cover.
c) If you plunge cut at angles other than
right angles, secure the guide plate of
the saw to prevent sliding sideways.
Lateral movement can lead to jamming of the
saw blade and therewith to kickback.
d) Do not put the saw done on the bench
or on the floor without covering the
saw blade with the safety cover. An
unprotected saw blade moves the saw against
the direction of the cut, and cuts everything
that is in the way. Please keep in mind that the
saw runs on.
Please ensure that only persons over 16 years
of age operate this appliance according to the
instructions in this operating instructions!
Note: Do not use grinding discs. Injuries and dam-
age to objects could result.
Safety recommendations for the
correct use of superabrasives
a) General
Superabrasives are breakable and shall therefore
be handled with utmost care! The use of damaged
or improperly mounted or used superabrasives is
dangerous and can cause serious injuries.
b) Delivery, handling and storage
Superabrasives shall be handled and transportes
with care. Superabrasives shall be stored in such a
manner that they are not subjected to mechanical
damages and harmful environmental influences.
Avoid the danger of death from
electric shock:
Regularly check the condition of the appliance,
mains cable and plug. Do not operate appli-
ances with damaged parts of that description.
Never open the appliance. Damaged appli-
ances, mains cables or plugs main danger to
life due to electric shock. Always have repairs
or parts exchanges carried out at the service
centre or by an electrician.
Do not operate the appliance when it is wet or
in damp environments.
79416_par_Tauchsaege_Content_LB4 (ohne HU).indd 10 07.12.12 12:47

11 GB
General safety advice for electrical power tools / Start-upGeneral safety advice for electrical power tools
If you work outside, connect the device to a
residual current (RCD) protective switch with
a maximum 30 mA tripping current. Only use
extension leads approved for outdoor use.
Note: Always hold the mains cable out of the op-
erating range of the machine and move it towards
the back of the machine.
Start-up
Switching on and off
Switching on:
Pull the ON / OFF switch
6
towards the back
(see Fig. A).
Switching off:
Release the ON / OFF switch
6
.
Releasing the plunge blocker
Push the plunge blocker
1
towards the front
and keep it pressed.
Preselect cutting depth
Note: We recommend adjusting the cutting depth
at least 2 mm deeper than the thickness of the ma-
terial. This will result in a clean cut.
Release the quick release of the cutting depth
pre-selector
7
, adjust the desired cutting depth
at the scale
7 a
and refit the quick release.
Fitting the guide fence
Release the screw of the guide fence
11 a
at
the base plate
9
and insert the guide fence
11
into the guide fence fixture
10
. Retighten these
screws
11 a
.
Handling the plunge saw
1. Put the machine onto the material and switch it on
as described in the chapter “Switching on and off”.
2. If necessary adjust the machine to the guide
fence
11
or a drawn line.
3. Hold the machine as shown in Figure A and
cut with light pressure.
Types of saw blades:
The saw blades included cover the most common
types of application.
HW Circular saw blade
20
Z85 / 30:
Description: ø 85 mm, 30 HW-teeth
Suitable for: Soft wood, hard wood, boards of any type
Diamond cutting disc
21
Z85VR:
Description: ø 85 mm, without teeth
Suitable for: Ceramics, plastics
HS Circular saw blade
22
Z85 / 36:
Description: ø 85 mm, 36 teeth – tooth setting
left / right
Suitable for: Soft wood, soft metals such as aluminium,
copper
Marking cutting length
Orient yourself at the markings for the cutting
length
8
, in order to check where your cut
starts and ends.
Marking cutting line
The cutting line viewing window allows precise
guidance of the machine along the cutting line
applied to the workpiece.
In order to achieve an exact cut, place the
machine on the workpiece so that the cutting
length labelling appears in the cutting line
viewing window
12
, as depicted in Illustration B.
79416_par_Tauchsaege_Content_LB4 (ohne HU).indd 11 07.12.12 12:47

12 GB
Disposal / Declaration of Conformity / ManufacturerStart-up / Maintenance and Cleaning / Service / Warranty
Connecting the saw
dust extraction
Push the extraction air hose
19
onto the con-
nection for dust extraction
14
.
Connect a vacuum device approved for the
extraction of sawdust and splinters to the dust
extraction hose
19
.
Replacing the saw blade
1. Operate the spindle lock
13
and loosen the
clamping screw
18
with the Allen key (to open
turn clockwise). Now lift off the clamping screw
and washer
18
and the clamping flange
17
(see also Fig.D).
2. Adjust cutting depth to the maximum position.
3. Swing the base plate
9
upwards.
4. Take off the saw blade.
5. Refitting of the saw blade is the reversal of the
removal.
6. Operate the spindle lock
13
(until it clicks into
place) and, using the Allen key, tighten the
clamping screw
18
.
The arrow on the saw blade must coincide with
the arrow for the direction of rotation
(marked on the appliance).
Maintenance and Cleaning
DANGER OF INJURY! Re-
move the mains plug from the mains socket before
you carry out any work on the appliance.
Clean the appliance after finishing work.
To clean the appliance, use a cloth and do not
use petrol, solvents or cleaning fluids.
Service
Have your appliance
repaired by qualified specialist per-
sonnel using OEM parts only. This ensures
that the safety of the device is maintained.
If the plug or mains
lead needs to be replaced, always
have the replacement carried out by
the manufacturer or its service centre.
This ensures that the safety of the device is
maintained.
Warranty
The warranty for this appliance is for
3 years from the date of purchase. The
device has been manufactured with care
and meticulously examined before deliv-
ery. Please retain your receipt as proof
of purchase. In the event of a warranty
claim, please make contact by telephone
with our Service Department. Only in this
way can a free post despatch for your
goods be assured.
The warranty covers only claims for material and
manufacturing defects, but not for transport dam-
age, for wearing parts or for damage to fragile
components, e.g. buttons or batteries. This product
is intended for private, non-commercial use only.
The warranty is void in the case of abusive and im-
proper handling, use of force and internal tamper-
ing not carried out by our authorized service branch.
This warranty does not limit your legal rights.
The warranty period will not be extended by repairs
made under warranty. This applies also to replaced
and repaired parts. Any damage and defects extant
on purchase must be reported immediately after
unpacking the device, at the latest, two days after
the purchase date. Repairs made after the expira-
tion of the warranty period are subject to a charge.
GB
Service Great Britain
Tel.: 0871 5000 720
(0,10 GBP/Min.)
e-mail: k[email protected]
IAN 79416
79416_par_Tauchsaege_Content_LB4 (ohne HU).indd 12 07.12.12 12:47

13 GB
Disposal / Declaration of Conformity / ManufacturerStart-up / Maintenance and Cleaning / Service / Warranty
Disposal
The packaging is made of environmentally
friendly materials, which may be disposed
through your local recycling acilities.
Do not dispose of electrical power
tools with household waste!
According to European Directive 2002 / 96 / EC,
used electrical goods must be collected and recy-
cled in an environmentally friendly manner.
Contact your local refuse disposal authority for
more details of how to dispose of your worn out
electrical appliance.
Declaration of Conformity /
Manufacturer
We, Kompernaß GmbH, the person responsible for
documents: Mr Semi Uguzlu, Burgstr. 21, D-44867
Bochum, Germany, hereby declare that this product
complies with the following standards, norm docu-
ments and EU Directives:
Directive on Machinery
(2006 / 42 / EC)
EU Low Voltage Directive
(2006 / 95 / EC)
Electromagnetic Compatibility
(2004 / 108 / EC)
RoHS Directive
(2011 / 65 / EU)
Applicable harmonised standards
EN 60745-1/A11:2010
EN 60745-2-5:2010
EN 60745-2-22:2011
EN 55014-1/A2:2011
EN 55014-2/A2:2008
EN 61000-3-2/A2:2009
EN 61000-3-3:2008
Type designation of the machine:
Plunge saw PTS 480 A1
Date of manufacture: 12–2012
Serial number: IAN 79416
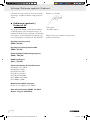
Bochum, 31.12.2012
Semi Uguzlu
- Quality Manager -
We reserve the right to make technical modifications
in the course of product development.
79416_par_Tauchsaege_Content_LB4 (ohne HU).indd 13 07.12.12 12:48

14
Spis zawartości
79416_par_Tauchsaege_Content_LB4 (ohne HU).indd 14 07.12.12 12:48

15 PL
Spis zawartości
Instrukcja
Użycie zgodne z przeznaczeniem ................................................................................................. Strona 16
Wyposażenie ...................................................................................................................................Strona 16
Zawartość .........................................................................................................................................Strona 16
Dane techniczne ..............................................................................................................................Strona 16
Ogólne wskazówki bezpieczeństwa dla elektronarzędzi
1. Bezpieczeństwo miejsca pracy ..................................................................................................Strona 17
2. Bezpieczeństwo elektryczne .......................................................................................................Strona 17
3. Bezpieczeństwo osób .................................................................................................................Strona 18
4. Stosowanie i obchodzenie się z narzędziami elektrycznymi ................................................... Strona 18
5. Serwis ...........................................................................................................................................Strona 19
Wskazówki bezpieczeństwa dla pił ...............................................................................................Strona 19
Wskazówki bezpieczeństwa dla pilarek do wcięć głębnych .......................................................Strona 20
Wskazówki bezpieczeństwa dla narzędzi szlifujących ................................................................Strona 21
Uruchamianie
Włączanie i wyłączanie ..................................................................................................................Strona 21
Luzowanie blokady wgłębienia ...................................................................................................... Strona 21
Wybieranie głębokości cięcia .........................................................................................................Strona 22
Montaż zderzaka równoległego ....................................................................................................Strona 22
Obsługa pilarki do cięcia wgłębnego ............................................................................................Strona 22
Zaznaczenie długości cięcia ...........................................................................................................Strona 22
Zaznaczenie linii cięcia ................................................................................................................... Strona 22
Podłączenie odsysania wiórów ...................................................................................................... Strona 22
Wymiana brzeszczotu .....................................................................................................................Strona 22
Konserwacja i czyszczenie............................................................................................Strona 23
Serwis .............................................................................................................................................Strona 23
Gwarancja ..................................................................................................................................Strona 23
Utylizacja .....................................................................................................................................Strona 23
Deklaracja zgodności / Producent ..........................................................................Strona 24
79416_par_Tauchsaege_Content_LB4 (ohne HU).indd 15 07.12.12 12:48

16 PL
Instrukcja / Ogólne wskazówki bezpieczeństwa dla elektronarzędziInstrukcja
Piła wgłębna PTS 480 A1
Instrukcja
Gratulujemy Państwu zakupu nowego urządzenia.
Zdecydowali się Państwo na zakup produktu naj-
wyższej jakości. Instrukcja obsługi jest częścią tego
produktu. Zawiera ona ważne wskazówki dotyczące
bezpieczeństwa obsługi, użytkowania i utylizacji
produktu. Przed pierwszym użyciem produktu
należy zapoznać się ze wszystkimi wskazówkami
dotyczącymi obsługi i bezpieczeństwa. Produktu
używać wyłącznie zgodnie z jego poniżej opisanym
przeznaczeniem. W przypadku przekazania produktu
należy dołączyć do niego całą jego dokumentację.
Użycie zgodne z przeznacze-
niem
Maszyna jest przeznaczona przede wszystkim do
wgłębnego piłowania podłużnego i poprzecznego
w stabilnym podłożu jak lite drewno, płyty wiórowe,
sklejki, aluminium, kafelki, kamień, tworzywo sztuczne
i lekkie materiały budowlane. Należy przy tym
uwzględnić, że już zamontowany brzeszczot piły
nadaje się wyłącznie do użycia w drewnie. Stoso-
wanie urządzenie do innych celów lub dokonywa-
nie jego modyfikacji jest uznawane jako sprzeczne
z jego przeznaczeniem i stwarza znaczne zagro-
żenie wypadkiem. Nie do użytku przemysłowego.
Wyposażenie
1
Mechaniczna blokada wgłębiania
2
Dioda LED kontrolna / podłączenia do sieci
3
Przewód sieciowy
4
Szczeliny wentylacyjne
5
Pokrywa szczotek węglowych
6
WŁĄCZNIK / WYŁĄCZNIK
7
Wybór głębokości cięcia
7 a
Skala dla głębokości cięcia
8
Zaznaczenia długości cięcia
9
Podstawa
10
Przyjęcie zderzaka równoległego
11
Zderzak równoległy
11 a
Śruba do zderzaka równoległego
12
Okienko linii cięcia
13
Blokada wrzeciona
14
Przyłącze do odsysania pyłu
15
Klucz trzpieniowy
16
Brzeszczot piły
17
Kołnierz zaciskowy
18
Śruba naprężająca i podkładka
19
Wąż odsysający
20
Okrągły brzeszczot HW Z85 / 30
21
Brzeszczot diamentowy Z85VR
22
Okrągły brzeszczot HS Z85 / 36
Zawartość
1 pilarka do cięć wgłębnych PTS 480 A1
1 okrągły brzeszczot HW Z85 / 30
1 brzeszczot diamentowy Z85VR
1 okrągły brzeszczot HS Z85 / 36
1 zderzak równoległy
1 wąż odsysający
1 klucz trzpieniowy
1 instrukcja obsługi
Dane techniczne
Moc znamionowa: 480 W
Napięcie znamionowe: 230 V∼, 50 Hz
Liczba obrotów biegu
jałowego: n
0
4500 min
-1
Maks. Głębokośći cięcia: 25mm
Klasa ochrony: II /
Informacje dotyczące hałasu i wibracji:
Wartość pomiarowa hałasu uzyskana zgodnie z
EN 60745. Poziom hałasu oceniony na A wynosi
typowo:
Poziom ciśnienia akustycznego: 82 dB(A)
Poziom mocy akustycznej: 93 dB(A)
Niepewność pomiaru K: 3 dB
Zakładać ochraniacze na uszy!
79416_par_Tauchsaege_Content_LB4 (ohne HU).indd 16 07.12.12 12:48

17 PL
Instrukcja / Ogólne wskazówki bezpieczeństwa dla elektronarzędziInstrukcja
Oszacowane przyspieszenie, typowo:
Wibracja dłoni / ręki a
h
= 12,669 m / s
2
Niepewność pomiaru K = 1,5 m / s
2
Podany w niniejszych
instrukcjach poziom drgań wyznaczony został za
pomocą metody pomiarowej określonej w normie
EN 60745 i może zostać użyty do porównania
urządzeń. Podany poziom emisji drgań może być
wykorzystywany również do wstępnego oszaco-
wania przerw w działaniu.
Poziom drgań będzie się różnił w zależności od
zastosowania elektronarzędzia i w niektórych
przypadkach może przekroczyć wartość podaną
w niniejszej instrukcji. Obciążenie drganiami może
wydawać się mniejsze niż w rzeczywistości, jeśli
elektronarzędzie będzie regularnie używane ten
sposób.
Wskazówka: Celem dokładnego oszacowania
obciążenia wibracjami w okresie określonego okresu
czasu pracy należy uwzględnić również te okresy,
w których urządzenie jest wyłączone lub wprawdzie
jest włączone, ale w rzeczywistości nie pracuje.
Może to przyczynić się do znacznej redukcji ob-
ciążenia wibracjami w całym okresie czasu pracy.
Ogólne wskazówki bezpie-
czeństwa dla elektronarzędzi
Należy przeczytać
wszystkie wskazówki dotyczące bezpie-
czeństwa i instrukcje. Zaniedbania w prze-
strzeganiu wskazówek bezpieczeństwa i instrukcji
mogą spowodować porażenie prądem elektrycznym,
pożar i / lub ciężkie obrażenia ciała.
Należy zachować wszystkie wskazówki
dotyczące bezpieczeństwa oraz instrukcje.
Używany we wskazówkach dotyczących bezpie-
czeństwa termin „narzędzie elektryczne“ odnosi
się do narzędzi elektrycznych zasilanych z sieci (z
kablem sieciowym) oraz do narzędzi elektrycznych
zasilanych z akumulatorów (bez kabla sieciowego).
1. Bezpieczeństwo miejsca pracy
a) Stanowisko pracy należy utrzymywać
w czystości i dobrze oświetlone. Nie-
porządek i brak oświetlenia w miejscu pracy
może prowadzić do wypadków.
b) Nie należy pracować przy użyciu
urządzenia w otoczeniu zagrożonym
eksplozją, w którym znajdują się palne
ciecze, gazy lub pyły. Urządzenia elek-
tryczne wytwarzają iskry, które mogą zapalić
pył lub pary.
c) Podczas korzystania z elektronarzę-
dzia należy trzymać dzieci i inne osoby
z daleka od urządzenia. Rozproszenie
uwagi może spowodować utratę kontroli nad
urządzeniem.
2. Bezpieczeństwo elektryczne
a) Wtyczka sieciowa elektronarzędzia
musi pasować do gniazdka. W żaden
sposób nie wolno zmieniać wtyczki.
Nie stosować żadnych wtyczek ada-
pterowych razem z elektronarzędziami
wyposażonymi w uziemienie ochronne.
Niezmienione wtyczki i pasujące gniazdka
zmniejszają ryzyko porażenia prądem elek-
trycznym.
b) Należy unikać kontaktu ciała z po-
wierzchniami uziemionymi takimi jak
rury, grzejniki, kuchenki i lodówki.
Istnieje podwyższone niebezpieczeństwo po-
rażenia prądem elektrycznym, gdy ciało jest
uziemione.
c) Urządzenie trzymać z dala od deszczu
i wilgoci. Przedostanie się wody do elektro-
narzędzia zwiększa niebezpieczeństwo pora-
żenia prądem.
d) Nie używaj kabla sieciowego w spo-
sób sprzeczny z jego przeznaczeniem,
tj. do noszenia urządzenia, zawiesza-
nia urządzenie lub do wyciągania
wtyku sieciowego z wtykowego
gniazdka sieciowego. Kabel należy
trzymać z dala od wysokiej tempera-
79416_par_Tauchsaege_Content_LB4 (ohne HU).indd 17 07.12.12 12:48

18 PL
Ogólne wskazówki bezpieczeństwa dla elektronarzędziOgólne wskazówki bezpieczeństwa dla elektronarzędzi
tury, oleju, ostrych krawędzi lub
ruchomych części urządzenia. Uszko-
dzone lub poplątane kable powodują zwięk-
szenie ryzyka porażenia prądem elektrycznym.
e) Podczas pracy z elektronarzędziem
na dworze należy używać wyłącznie
przedłużaczy, które są dopuszczone
również do pracy na zewnątrz. Użycie
przedłużacza przeznaczonego do zastosowa-
nia na zewnątrz zmniejsza ryzyko porażenia
prądem elektrycznym.
f) Jeśli praca elektronarzędzia w oto-
czeniu wilgotnym jest nie do uniknięcia,
należy zastosować wyłącznik różni-
cowoprądowy. Zastosowanie wyłącznika
różnicowoprądowego zapobiega niebezpie-
czeństwu porażenia prądem elektrycznym.
3. Bezpieczeństwo osób
a) Należy być stale uważnym, zwracać
uwagę na to co się robi i postępować
rozsądnie w trakcie pracy z narzędziem
elektrycznym. Nie należy używać ja-
kiegokolwiek elektronarzędzia znaj-
dując się w stanie zmęczenia lub pod
wpływem środków odurzających,
alkoholu lub lekarstw. Chwila nieuwagi
przy użyciu narzędzia elektrycznego może
prowadzić do poważnych urazów.
b) Należy zakładać osobiste wyposaże-
nie ochronne i zawsze okulary
ochronne. Zakładanie osobistego wyposa-
żenia ochronnego jak ochraniacze na uszy,
maski przeciwpyłowe lub rękawice robocze,
zależnie od rodzaju i zastosowania elektrona-
rzędzia zmniejsza ryzyko urazów.
c) Należy unikać niezamierzonego
uruchomienia. Należy upewnij się, że
narzędzie elektryczne jest wyłączone
zanim podłączy się je do zasilania,
chwyci się je lub będzie się je przenosić.
Jeżeli podczas przenoszenia urządzenia
będzie się trzymało palec na WŁĄCZNIKU /
WYŁĄCZNIKU. lub jeżeli urządzenie jest
włączone, to może to prowadzić do nieszczę-
śliwych wypadków.
d) Usunąć narzędzia do nastawiania
urządzenia lub klucze płaskie zanim
włączy się urządzenie. Narzędzie lub
klucz, który znajduje się w obracającej się
części urządzenia może prowadzić do urazów.
e) Należy unikać nienormalnej postawy
ciała. Należy stanąć na stabilnym
podłożu i przez cały czas utrzymywać
równowagę. Dzięki temu lepiej można
kontrolować urządzenie, zwłaszcza w nie-
oczekiwanych sytuacjach.
f) Zakładać odpowiednie ubranie. Nie
zakładać obszernej odzieży ani biżu-
terii. Włosy, odzież i rękawice trzymać
z dala od ruchomych części. Luźna odzież,
biżuteria lub długie włosy mogą zostać uchwy-
cone przez ruchome części.
g) Jeżeli zostaną zamontowane urzą-
dzenia do odsysania i wychwytywa-
nia pyłu, to należy upewnić się, że są
one podłączone i że będą prawidłowo
używane. Odsysanie zmniejsza zagrożenie
wywoływane pyłem.
4. Stosowanie i obchodzenie się z
narzędziami elektrycznymi
a) Nie należy przeciążać urządzenia. Do
pracy stosować przeznaczone do niej
narzędzie elektryczne. Dzięki odpowied-
niego elektronarzędzia pracuje się lepiej i
bezpieczniej w danym zakresie robót.
b) Nie używać żadnego narzędzia elek-
trycznego, którego przełącznik jest
uszkodzony. Narzędzie elektryczne, które
nie daje się już więcej włączyć lub wyłączyć,
jest niebezpieczne i musi zostać naprawione.
c) Zanim zacznie się przeprowadzać
ustawienia urządzenia, wymianę
elementów wyposażenia lub odłoży
się urządzenie należy wyciągnąć
wtyczkę z gniazdka. Ten środek ostrożno-
ści zapobiega niezamierzonemu włączeniu się
urządzenia.
d) Nieużywane narzędzia elektryczne
należy przechowywać poza zasięgiem
dzieci. Obsługi urządzenia nie należy
79416_par_Tauchsaege_Content_LB4 (ohne HU).indd 18 07.12.12 12:48

19 PL
Ogólne wskazówki bezpieczeństwa dla elektronarzędziOgólne wskazówki bezpieczeństwa dla elektronarzędzi
powierzać osobom, które nie są z nią
zaznajomione lub nie przeczytały ni-
niejszej instrukcji. Obsługa urządzeń elek-
trycznych przez osoby niedoświadczone jest
przyczyną zagrożeń.
e) Elektronarzędzia należy starannie
pielęgnować. Należy sprawdzić, czy
ruchome części urządzenia funkcjonują
nienagannie i nie zakleszczają się,
czy części urządzenia nie są złamane
lub uszkodzone w takim stopniu, że
funkcjonowanie urządzenia jest
uszczuplone. Przed użyciem urządze-
nia należy zlecić naprawę uszkodzo-
nych części. Przyczyną wielu wypadków są
źle konserwowane narzędzia elektryczne.
f) Narzędzia tnące należy utrzymywać
w stanie ostrym i czystym. Starannie
pielęgnowane narzędzia tnące o ostrych
krawędziach mniej zakleszczają się i dają się
łatwiej prowadzić.
g) Należy stosować narzędzie elektryczne,
osprzęt, nakładki itd. odpowiadające
niniejszym instrukcjom. Przy tym na-
leży uwzględnić warunki robocze i
wykonywane czynności. Użycie narzędzi
elektrycznych do innych zastosowań niż to
przewidziano może prowadzić do niebez-
piecznych sytuacji.
5. Serwis
a) Narzędzie elektryczne należy oddawać
do naprawy wyłącznie wykwalifiko-
wanym specjalistom i tylko z użyciem
oryginalnych części zamiennych. Za-
pewnia to utrzymanie bezpieczeństwa elektro-
narzędzia.
Urządzenie należy trzymać za izolo-
wane powierzchnie uchwytu podczas
wykonywania prac, w trakcie których
używane narzędzie może mieć stycz-
ność z ukrytą instalacją elektryczną
lub własnym przewodem. Kontakt z
przewodem sieciowym będącym pod napięciem
może wprawić metalowe części urządzenia
pod napięcie i doprowadzić do porażenia
prądem elektrycznym.
Wskazówki bezpieczeństwa
dla pił
a) ZAGROŻENIE: Dłoni nie umieszczać
w obszarze piłowania i na brzeszczo-
cie piły. Gdy obie dłonie trzymają pilarkę,
nie mogą zostać uszkodzone brzeszczotem.
b) Nie sięgać pod obrabiany przedmiot.
Osłona nie chroni pod obrabianym przedmio-
tem przed brzeszczotem.
c) Dopasować głębokość cięcia do gru-
bości obrabianego przedmiotu. Powinna
być widoczna mniej niż jedna cała wysokość
zęba pod obrabianym przedmiotem.
d) Przedmiotu przeznaczonego do piło-
wania nigdy nie trzymać w dłoni lub
na nodze. Przedmiot obrabiany za-
bezpieczyć na stabilnym podłożu.
Ważne jest, żeby obrabiany przedmiot dobrze
przymocować, aby zmniejszyć zagrożenie
kontaktu z ciałem, przyciśnięcia brzeszczotu
lub utraty kontroli.
e) Urządzenie należy trzymać za izolo-
wane powierzchnie uchwytu podczas
wykonywania prac, w trakcie których
używane narzędzie może mieć stycz-
ność z ukrytą instalacją elektryczną
lub własnym przewodem. Kontakt z
przewodem sieciowym będącym pod napięciem
może wprawić metalowe części urządzenia
pod napięcie i doprowadzić do porażenia
prądem elektrycznym.
f) Przy cięciu wzdłuż należy zawsze sto-
sować zderzak lub prostą prowadnicę
brzegów. Polepsza to dokładność cięcia i
zmniejsza możliwość, wciśnięcia brzeszczotu.
g) Stosować zawsze brzeszczoty o pra-
widłowej wielkości z pasującymi
otworami mocującymi (np. gwiazdkowe
lub okrągłe). Brzeszczoty, które nie pasują
do elementów montażowych pilarki, nie pracują
równomiernie i prowadzą do utraty kontroli.
79416_par_Tauchsaege_Content_LB4 (ohne HU).indd 19 07.12.12 12:48

20 PL
Ogólne wskazówki bezpieczeństwa dla elektronarzędzi / UruchamianieOgólne wskazówki bezpieczeństwa dla elektronarzędzi
h) Nigdy nie stosować uszkodzonych lub
złych podkładek lub śrub do brzesz-
czotów. Podkładki i śruby do brzeszczotów
zostały specjalnie skonstruowane do niniejszej
pilarki, dla optymalnej wydajności i bezpie-
czeństwa pracy.
Przyczyny i unikanie odrzutu:
- Odrzut to nagła reakcja na skutek zahaczonego,
przyciśniętego lub źle ustawionego brzeszczotu,
która prowadzi do tego, że niekontrolowana
pilarka oderwie się od obrabianego przedmiotu
i zacznie się poruszać w kierunku obsługującej
osoby.
- Gdy brzeszczot się zahaczy lub zakleszczy w
szczelinie do cięcia, blokuje go a siła silnika
odbija pilarkę w kierunku osoby obsługującej.
- Gdy brzeszczot przekręci się lub zostanie źle
ustawiony, zęby tylnego brzegu brzeszczotu
mogą się zahaczyć w obrabianym przedmio-
cie, przez co brzeszczot wychodzi ze szczeliny
do cięcia i odbija pilarkę w kierunku osoby
obsługującej.
Odrzut to wynik złego i / lub nieodpowiedniego
zastosowania pilarki. Można mu zapobiec przez
odpowiednie środki ostrożności jak zostało to
poniżej opisane.
a) Pilarkę trzymać mocno obiema dłońmi
a ręce umieścić tak, aby móc prze-
chwytywać siły odrzutu. Zawsze
należy stać z boku pilarki, nigdy nie
ustawiać się ciałem z nią na jednej
linii. Przy odrzucie pilarka może odskoczyć
do tyłu, jednak osoba obsługująca dzięki od-
powiednim środkom ostrożności może opano-
wać siły odrzutu.
b) W razie gdy brzeszczot zakleszczy się
lub przerywa się pracę, należy wyłą-
czyć pilarkę i spokojnie ją trzymać aż
brzeszczot przestanie się obracać.
Nigdy nie należy próbować wyciągać
pilarki z obrabianego przedmiotu lub
ciągnąć ją do tyłu, tak długo jak po-
rusza się brzeszczot, w przeciwnym
razie może nastąpić odrzut. Należy
znaleźć i usunąć przyczynę zakleszczenia się
brzeszczotu.
c) Gdy chce się ponownie uruchomić
pilarkę, która znajduje się w obrabia-
nym przedmiocie, należy wyśrodko-
wać brzeszczot w szczelinie do cięcie i
sprawdzić czy zęby nie zahaczyły się
w przedmiocie. Jeśli brzeszczot zakleszczył
się to może wyjść z obrabianego przedmiotu
lub spowodować odrzut, gdy pilarka będzie
ponownie uruchamiana.
d) Należy podpierać duże płyty, aby
zmniejszyć ryzyko odrzutu przez za-
kleszczony brzeszczot. Duże płyty mogą
się wygiąć pod własnym ciężarem. Płyty muszą
zostać podparte po obu stronach zarówno w
pobliżu szczeliny do cięcia jak i na brzegu.
e) Nie stosować tępych lub uszkodzonych
brzeszczotów. Brzeszczoty z tępymi lub źle
ustawionymi zębami powodują przez za cia-
sną szczelinę do cięcia podwyższone tarcie,
zakleszczanie się brzeszczotu i odrzut.
f) Przed piłowaniem dokręcić ustawie-
nia głębokości cięcia i kąta cięcia. Gdy
podczas piłowania zmienią się ustawienia, może
to spowodować zakleszczenie się brzeszczotu
i pojawi się odrzut.
g) Należy być szczególnie ostrożnym
przy „cięciach wgłębnych“ w ścianach
lub innych obszarach, za które nie
można zajrzeć. Wchodzący brzeszczot
może podczas piłowania zostać zablokowany
przez ukryte obiekty i spowodować odrzut.
Wskazówki bezpieczeństwa
dla pilarek do wcięć głębnych
a) Przed każdym użyciem należy spraw-
dzić czy osłona ochronna poprawnie
się zamyka. Nie stosować pilarki gdy
osłona ochronna się nie porusza i nie
zamyka się natychmiast. Nigdy nie
zakleszczać osłony ochronnej w
otwartej pozycji. W razie nieprzewidzia-
nego upadku pilarki, osłona ochronna może
się wygiąć. Należy się upewnić, że osłona
79416_par_Tauchsaege_Content_LB4 (ohne HU).indd 20 07.12.12 12:48
Strona jest ładowana ...
Strona jest ładowana ...
Strona jest ładowana ...
Strona jest ładowana ...
Strona jest ładowana ...
Strona jest ładowana ...
Strona jest ładowana ...
Strona jest ładowana ...
Strona jest ładowana ...
Strona jest ładowana ...
Strona jest ładowana ...
Strona jest ładowana ...
Strona jest ładowana ...
Strona jest ładowana ...
Strona jest ładowana ...
Strona jest ładowana ...
Strona jest ładowana ...
Strona jest ładowana ...
Strona jest ładowana ...
Strona jest ładowana ...
Strona jest ładowana ...
Strona jest ładowana ...
Strona jest ładowana ...
Strona jest ładowana ...
Strona jest ładowana ...
Strona jest ładowana ...
Strona jest ładowana ...
Strona jest ładowana ...
Strona jest ładowana ...
Strona jest ładowana ...
Strona jest ładowana ...
Strona jest ładowana ...
Strona jest ładowana ...
Strona jest ładowana ...
Strona jest ładowana ...
Strona jest ładowana ...
Strona jest ładowana ...
Strona jest ładowana ...
Strona jest ładowana ...
Strona jest ładowana ...
Strona jest ładowana ...
Strona jest ładowana ...
Strona jest ładowana ...
Strona jest ładowana ...
Strona jest ładowana ...
-
 1
1
-
 2
2
-
 3
3
-
 4
4
-
 5
5
-
 6
6
-
 7
7
-
 8
8
-
 9
9
-
 10
10
-
 11
11
-
 12
12
-
 13
13
-
 14
14
-
 15
15
-
 16
16
-
 17
17
-
 18
18
-
 19
19
-
 20
20
-
 21
21
-
 22
22
-
 23
23
-
 24
24
-
 25
25
-
 26
26
-
 27
27
-
 28
28
-
 29
29
-
 30
30
-
 31
31
-
 32
32
-
 33
33
-
 34
34
-
 35
35
-
 36
36
-
 37
37
-
 38
38
-
 39
39
-
 40
40
-
 41
41
-
 42
42
-
 43
43
-
 44
44
-
 45
45
-
 46
46
-
 47
47
-
 48
48
-
 49
49
-
 50
50
-
 51
51
-
 52
52
-
 53
53
-
 54
54
-
 55
55
-
 56
56
-
 57
57
-
 58
58
-
 59
59
-
 60
60
-
 61
61
-
 62
62
-
 63
63
-
 64
64
-
 65
65


Parkside PTS 480 A1 Original Operation Manual
- Typ
- Original Operation Manual
w innych językach
- slovenčina: Parkside PTS 480 A1
Powiązane dokumenty
-
Parkside PTS 500 A1 Operation and Safety Notes
-
Parkside PHKS 1300 A1 Operation and Safety Notes
-
-
Parkside pmfw 310 b1 Operation and Safety Notes
-
Parkside PMFW 280 A2 Operation and Safety Notes
-
-
Parkside PHKS 1350 C2 Translation Of The Original Instructions
-
Inne dokumenty
-
Scheppach 5901202901 Instrukcja obsługi
-
-
Hilti SCM 22-A Instrukcja obsługi
-
Metabo KS 55 Instrukcja obsługi
-
Meister MKS1500-1 Translation Of The Original Instructions
-
 Meec 020-183 Operating Instructions Manual
-
Hilti SR 30 Instrukcja obsługi
-
-
-
Kompernass Saw PHKS 1450 LASER Instrukcja obsługi
