
IAN 94604
RadIO-COntROlled WeatHeR statIOn
Operation and Safety Notes
RádIóvezéRelt IdőjáRásállOMás
Kezelési és biztonsági utalások
BezdRátOvá MeteOROlOGICKá stanICe
Pokyny pro obsluhu a bezpečnostní pokyny
FunK-WetteRstatIOn
Bedienungs- und Sicherheitshinweise
staCja pOGOdOWa steROWana RadIOWO
Wskazówki dotyczące obsługi i bezpieczeństwa
RadIjsKO vOdena vReMensKa pOstaja
Navodila za upravljanje in varnostna opozorila
MeteOstanICa
Pokyny pre obsluhu a bezpečnostné pokyny
RadIO-COntROlled WeatHeR statIOn
94604_aur_Funk-Wetterstation_cover_PL_SI_CZ_SK.indd 2 10.09.13 14:46

GB Operation and Safety Notes Page 4
PL Wskazówki dotyczące obsługi i bezpieczeństwa Strona 13
HU Kezelési és biztonsági utalások Oldal 23
SI Navodila za upravljanje in varnostna opozorila Stran 32
CZ Pokyny pro obsluhu a bezpečnostní pokyny Strana 42
SK Pokyny pre obsluhu a bezpečnostné pokyny Strana 51
DE / AT / CH Bedienungs- und Sicherheitshinweise Seite 60
94604_aur_Funk-Wetterstation_cover_PL_SI_CZ_SK.indd 3 10.09.13 14:46

3
B
C D
38
41
42
39
40
A
1
3
4
5
7
16
17
18
19
21
22
20
9
8
6
1011121415
32
34
33
26 27 28 29 30 31
36
24 2523 2
13
35
37
43
94604_aur_Funk-Wetterstation_content_PL_SI_CZ_SK.indd 3 10.09.13 14:46

4 GB
Intended use ........................................................................................................................Page 5
Description of parts and features ......................................................................Page 5
Technical data .....................................................................................................................Page 5
Scope of supply .................................................................................................................Page 5
Safety
General safety information .........................................................................................................Page 5
Safety instructions for batteries...................................................................................................Page 6
Before initial use
Setting up devices .......................................................................................................................Page 6
Putting the outdoor sensor into operation ..................................................................................Page 6
Putting the weather station into operation .................................................................................Page 6
Operation
DCF radio signal reception ........................................................................................................Page 7
Setting the date / language / location / clock / time zone manually ........................................Page 7
Using the 12 / 24 hour display ..................................................................................................Page 8
Setting the alarm time .................................................................................................................Page 8
Activating / deactivating the alarm function ..............................................................................Page 9
Displaying the sun and moon rising / setting times ...................................................................Page 9
Moon phases ..............................................................................................................................Page 9
Preparing to use the weather forecasting function ....................................................................Page 9
Reading the barometric pressure ...............................................................................................Page 10
Reading the barometric pressure for the last 12 hours ............................................................Page 10
Setting the channel ......................................................................................................................Page 10
Displaying the outdoor temperature ..........................................................................................Page 10
Displaying the temperature trend (outdoor) ..............................................................................Page 11
Displaying the indoor temperature ............................................................................................Page 11
Displaying temperatures in °C / °F ...........................................................................................Page 11
Displaying the air humidity (indoor) ..........................................................................................Page 11
Displaying the maximum / minimum temperature / humidity ....................................................Page 11
Backlight ......................................................................................................................................Page 11
Battery state display ....................................................................................................................Page 11
Replacing the batteries ...............................................................................................................Page 11
Troubleshooting ................................................................................................................Pa ge 11
Cleaning and maintenance .....................................................................................Page 12
Disposal ....................................................................................................................................Page 12
Information
Declaration of conformity ...........................................................................................................Page 12
94604_aur_Funk-Wetterstation_content_PL_SI_CZ_SK.indd 4 10.09.13 14:46

5 GB
Radio-controlled weather station
Intended use
The weather station displays the indoor and out-
door temperatures in Celsius (°C) or Fahrenheit
(°F), the indoor air humidity in percent (% RH) and
their maximum and minimum values. The weather
station also displays the weather forecast, the time
in 12 / 24-hour clock modes and the date. The
weather station also displays the sunrise and sunset
times for that day and the phase of the moon.
In addition, the weather station has an alarm and
calendar function. The device is not intended for
commercial use.
Description of parts
and features
Weather station
1
Weather symbol
2
Barometric pressure bar display
3
Indoor air temperature
4
Comfort indicator
5
Air humidity (%RH) (indoor)
6
Moon phase
7
Moon rise / set
8
Location
9
Sunrise / sunset
10
ALARM button
11
/ button
12
SNOOZE / LIGHT button
13
Alarm icon
14
/ 12 / 24 button
15
MODE button
16
Date (year, month, day)
17
Time display
18
Radio tower symbol
19
Barometric pressure of previous hour
20
Absolute / relative barometric pressure
21
Temperature trend (outdoor)
22
Selected channel
23
Battery state indicator
24
Outdoor temperature
25
Barometric pressure trend
26
Channel button (CHANNEL)
27
HISTORY / WEATHER button
(Weather data memory)
28
“+“ / °C / °F button
29
“–“ / MAX / MIN
button
30
Relative / absolute barometric pressure button
31
SUN / MOON button (Sun / moon)
32
Wall mounting hole
33
Reset button
34
Battery compartment
35
Stand
Sensor
36
Control LED
37
Outdoor temperature / outdoor sensor channel
38
Wall mounting hole
39
Channel selector switch
40
Battery compartment
41
°C / °F button
42
TX button (“Channel setting button”)
43
Stand
Technical data
Weather Station:
Temperature range: 0 – +50 °C
+32 – +122 °F
Temperature resolution: 0.1 °C
Humidity
measurement range: 20 – 99 %
Humidity resolution: 1 %
Radio signal: DCF
Battery: 3 x AA 1.5 V
(Mignon, LR06, included
in scope of supply)
Dimensions: 230 x 150 x 30 mm
(B x H x D)
Outdoor Sensor:
Temperature
measurement range: –20 – +50 °C
–4 – +122 °F
HF transmission signal: 433 MHz
HF transmission range: approx. 100 m
in open spaces
Battery: 2 x AAA 1.5 V
(Micro, LR03, included
in scope of supply)
Scope of supply
1 x weather station
1 x outdoor sensor
3 x battery AA 1.5 V (Mignon, LR06, pre-installed)
2 x dowel (dia. approx. 6 mm)
2 x screw
2 x battery AAA 1.5 V (Micro, LR03 pre-installed)
1 x operating instructions
Safety
YOU SHOULD STORE ALL SAFETY INFOR-
MATION AND INSTRUCTIONS IN A SAFE
PLACE IN CASE YOU NEED TO REFER TO
THEM AGAIN IN THE FUTURE!
General safety information
DANGER
TO LIFE AND ACCIDENT
HAZARD FOR TODDLERS
AND SMALL CHILDREN! Never allow
children to play unsupervised with the packag-
ing material. There is a danger of suffocation
from the packaging material. Children frequently
underestimate the dangers. Children should
be kept away from the product at all times.
This appliance can be used by children aged
from 8 years and above and persons with
reduced physical, sensory or mental capabil-
ities or lack of experience and knowledge if
94604_aur_Funk-Wetterstation_content_PL_SI_CZ_SK.indd 5 10.09.13 14:46

6 GB
they have been given supervision or instruction
concerning use of the appliance in a safe way
and understand the hazards involved. Children
shall not play with the appliance. Cleaning
and user maintenance shall not be made by
children without supervision.
Under no circumstances should you take the
device apart. Repairs should only be carried
out by specialist personnel.
Safety instructions
for batteries
DANGER TO LIFE! Batteries can be swal-
lowed, which may represent a danger to life.
If a battery has been swallowed, medical
help is required immediately.
Remove the batteries from the device if they are
not going to be used for a prolonged period.
CAUTION! DANGER OF EXPLOSION!
The batteries must never be recharged!
When inserting the batteries, ensure the
correct polarity! This is shown in the battery
compartments.
If necessary, clean the batteries and device
contacts before inserting the batteries.
Remove spent batteries immediately from the
device. There is an increased danger of leaks!
Batteries must not be disposed of in the
normal domestic waste!
Every consumer is legally obliged to dispose
of batteries in the proper manner!
Keep batteries away from children. Do not
throw batteries into a fire. Never short-circuit
them or take them apart.
Always replace all the batteries at once.
Use batteries of the same type only.
If the above instructions are not complied
with, the batteries may discharge themselves
beyond their end voltage. There is a danger
of leaking. If the batteries have leaked inside
your device, you should remove them immedi-
ately in order to prevent damage to the device!
Avoid contact with the skin, eyes and mucous
membranes. Any parts of the body coming
into contact with battery acid should be
rinsed off with copious amounts of water
and / or a doctor contacted if necessary!
Before initial use
Put the batteries first into the outdoor
sensor, then into the weather station.
Setting up devices
CAUTION! When selecting a location to
set up the devices, please ensure that they are
not exposed to any direct sunlight, vibrations,
dust, heat, cold or moisture. Do not place the
devices close to sources of heat, e.g. radiators.
Otherwise they may be damaged.
Place the weather station on the accompany-
ing base
35
.
Note: Please ensure that the pins in the
stand
35
are inserted into the corresponding
recesses on the weather station.
Do not place the devices on valuable or sen-
sitive surfaces unless these are appropriately
protected. Otherwise they may be damaged.
Do not place the devices near sources of in-
terference such as television sets, computers,
thick walls etc. Otherwise the transmission of
radio waves between the devices may be
impaired.
Please ensure that neighbouring devices are not
operated at the same frequency of 433 MHz.
Such devices may cause interference to the
radio connection.
Do not place the devices next to or on metal
plates. Otherwise the quality of radio wave
transmission may be reduced.
Do not install the devices in buildings made
of reinforced concrete, e.g. airports, high-rise
buildings, factories or cellars. Otherwise the
transmission of the radio waves between the
devices may be severely impaired.
Putting the outdoor
sensor into operation
Removing the battery safety strip:
Remove the battery compartment cover from
the back of the outdoor sensor.
Remove the battery safety strip. The outdoor
sensor is now ready for operation and the
control LED
36
lights up briefly.
Close the battery compartment cover.
Installing the Outdoor Sensor:
Find an appropriate place for the outdoor sensor.
Note: Please ensure that you install the
outdoor sensor within a radius of 100 m
from the weather station. Check that there
are no obstacles between the outdoor sensor
and the weather station. Otherwise there may
be interference of the transmission of data.
For wall mounting:
Hang the outdoor sensor with the mount
38
on one screw.
Putting the weather
station into operation
Removing the battery safety strip:
Open the battery compartment
34
on the
back of the weather station.
Pull out the battery safety strip.
Then close the battery compartment
34
.
Press the RESET button
33
. All of the symbols
light up briefly.
As soon as the battery safety strip has been
removed, the weather station starts to receive
the radio signal.
94604_aur_Funk-Wetterstation_content_PL_SI_CZ_SK.indd 6 10.09.13 14:46

7 GB
Note: Do not change the location of the weath-
er station during reception. Otherwise there may
be interference.
For wall mounting:
Hang the weather station with the mount
32
on one screw.
For free standing:
Turn the stand
35
out from the bottom of the
weather station.
Connecting the weather station with the
outdoor sensor:
After removal of the battery safety strip the weather
station attempts to establish a connection with
the outdoor sensor. This process may take a few
minutes. When the connection with the outdoor
sensor has been successfully established, the
selected channel symbol
22
is shown the channel
of the outdoor sensor (To change the channel of
the sensor, see “Setting the channel”). If the con-
nection with the outdoor sensor is not established
automatically, this can be done manually by
pressing TX button
42
of the sensor”.
Radio Signal (DCF):
The DCF signal (time signal transmitter) consists
of time pulses emitted by one of the most accurate
clocks in the world close to Frankfurt / Main,
Germany – this varies by 1 second in a million
years.
Your weather station receives these signals under
ideal conditions up to a distance of approximately
1,500 km around Frankfurt / Main. Reception of
the radio signal usually takes about 3–10 minutes.
Operation
DCF radio signal reception
After the establishment of a connection with the
outdoor sensor the weather station automatically
begins to search for the DCF radio signal. The
search is shown in the LC display by the radio
tower symbol
18
flashing.
When the DCF radio signal is being successfully
received, the radio tower symbol
18
is shown
permanently in the display. If at the time of putting
the device into operation it is not possible to syn-
chronise with the atomic clock, you can also carry
out the clock adjustments manually (see “Setting the
Date / Language / Time / Time Zone Manually”).
Note: During the search for the signal, all func-
tion buttons except for the SNOOZE / LIGHT
button
12
are blocked on the weather station.
In order to correct any deviations from the exact
time, the clock is automatically synchronised with
the DCF radio signal every day at 01:00, 02:00
and 03:00. If the synchronisation with the DCF
signal does not succeed, the radio tower signal
goes out
18
. In this case, the weather station att-
empts to conduct a synchronisation with the DCF
radio tower at 04:00 and 05:00.
Reception of the DCF radio signal can also be
started manually on the weather station.
Press and hold down the / button
11
for 3 seconds. The weather station attempts
to receive the DCF radio signal. This process
takes several minutes and is indicated in the LC
display by a flashing radio tower symbol
18
.
If the connection with the DCF radio signal cannot
be established, the search is stopped. A further
attempt to establish a connection is made auto-
matically on the next full hour.
Setting the date / language /
location / clock / time zone
manually
At the location site of the weather station, recep-
tion of the DCF radio signal may be impaired or
interrupted. In this case it is possible to adjust the
device manually.
Follow these steps:
1. Press and hold down the MODE button
15
for about 3 seconds. The time zone display
flashes. Press the
/ button
11
and the
/ 12 / 24 button
14
to set the desired value.
Note: The standard setting for the time
zone is GMT+1. Set the weather station to
correspond to your time zone. Confirm your
setting by pressing the MODE button
15
.
2. The hour value of the time display
17
flashes.
Press the
/ button
11
and the / 12 / 24
button
14
to set it to the desired value.
Tip: By keeping the
/ button
11
and
the
/ 12 / 24 button
14
pressed, you
accelerate the process and reach the desired
value more quickly. This quicker method can
also be used for making the other settings.
If during a period of 30 seconds no buttons
are pressed, the LC display returns automati-
cally to the default display.
3. Confirm your settings by pressing the MODE
button
15
. The minute value of the time dis-
play
17
flashes. Press the / button
11
and the
/ 12 / 24 button
14
to set it to
the desired value.
4. Confirm your settings by pressing the MODE
button
15
. The second value of the time dis-
play
17
flashes. Press the / button
11
or the
/ 12 / 24 button
14
to set the sec-
ond value to 0.
5. Confirm your settings by pressing the MODE
button
15
. The year value flashes in the time
display
17
. Press the / button
11
and
the
/ 12 / 24 button
14
to set it to the
desired value.
6. Confirm your settings by pressing the MODE
button
15
. The month value of the date
display
16
flashes. Press the / button
11
and the / 12 / 24 button
14
to set it
to the desired value.
7. Confirm your settings by pressing the MODE
button
15
. The day value of the date display
94604_aur_Funk-Wetterstation_content_PL_SI_CZ_SK.indd 7 10.09.13 14:46

8 GB
16
flashes. Press the / button
11
and
the
/ 12 / 24 button
14
to set it to the
desired value.
8. Confirm your settings by pressing the MODE
button
15
. The language field for the name
of the day of the week of the date display
16
flashes. Press the
/ button
11
and the
/ 12 / 24 button
14
to set it to the desired
language.
Note: You have the choice of German,
English, Russian, Danish, Dutch, Italian,
Spanish and French.
Note: The weather station is supplied in the
default setting of German (GER).
9. Confirm your settings by pressing the MODE
button
15
. The location display for country
8
flashes. Press the
/ button
11
and the
/ 12 / 24 button
14
to set it to the desired
country. Confirm your setting by pressing the
MODE button
15
. The location display for
city
8
flashes. Press the / button
11
and the
/ 12 / 24 button
14
to set it to
the desired city.
10. Confirm your settings by pressing the MODE
button
15
.
You can choose from the following countries and
cities:
Germany GER
Aachen AAC
Berlin BER
Düsseldorf DUS
Dresden DRE
Erfurt ERF
Frankfurt FRA
Flensburg FLE
Freiburg FRE
Hannover HAN
Bremen BRE
Hamburg HAM
Rostock ROS
Stralsund STR
Köln KOE
Kiel KIE
Kassel KAS
Leipzig LEI
München MUE
Magdeburg MAG
Nürnberg NUE
Regensburg REG
Stuttgart STU
Saarbruecken SAA
Schwerin SCH
Danmark DAN
Albørg ALB
Arhus ARH
Copenhagen COP
Odense ODE
Spain,
Andorra
ESP
Alicante ALI
Andorra AND
Badajoz BAD
Barcelona BAR
Bilbao BIL
Cadix CAD
Cordoba COR
Ibiza IBI
La Corogna LAC
Leon LEO
Las Palmas LPA
Madrid MAD
Malaga MAL
Palma de
Mallorca
PDM
Salamanca SAL
Sevilla SEV
Valencia VAL
Zaragossa ZAR
France FRA
Besançon BES
Biarritz BIA
Bordeaux BOR
Brest BRE
Cherbourg CHE
Lyon LYO
Marseille MAR
Monaco MON
Metz MET
Nantes NAN
Nice NIC
Orléans ORL
Paris PAR
Perpignan PER
Lille LIL
Rouen ROU
Strasbourg STR
Toulouse TOU
Finland FIN
Helsinki HEL
Great Britain GB
Aberdeen ABD
Belfast BEL
Birmingham BIR
Bristol BRI
Edinburgh EDI
Glasgow GLA
London LON
Manchester MAN
Plymouth PLY
Hungary HUN
Budapest BUD
Croatia CRO
Zagreb ZAG
Italy ITA
Ancona ANC
Bari BAI
Bologna BOL
Cagliari CAG
Catania CAT
Firenze FIR
Foggia FOG
Genova GEN
Lecce LEC
Messina MES
Milano MIL
Napoli NAP
Palermo PAL
Parma PAR
Perugia PER
Roma ROM
Torino TOR
Trieste TRI
Venezia VEN
Verona VER
Ventimiglia VTG
Ireland IRL
Dublin DUB
Luxembourg LUX
Norway NOR
Bergen BER
Oslo OSL
Stavanger STA
Netherlands NET
Amsterdam AMS
Eindhoven EIN
Enschede ENS
Groningen GRO
Den Haag DHA
Rotterdam ROT
Portugal POR
Evora EVO
Coimbra COI
Faro FAR
Leiria LEI
Lisbon LIS
Porto POR
Poland POL
Gdansk GDA
Krakow KRA
Poznan POZ
Szczecin SZC
Warsaw WAR
Russia RUS
St.Petersburg PET
Sweden SWE
Gothenburg GOT
Stockholm STO
Slovakia SLK
Bratislave BRA
Slovenia SLO
Ljubljana LJU
Serbia SRB
Belgrade BER
Austria AUS
Graz GRA
Innsbruck INN
Linz LIN
Salzburg SAL
Vienna VIE
Belgium BEL
Antwerpen ANT
Brugges BRU
Bruxelles BRL
Charleroi CHA
Liege LIE
Switzerland,
Liechtenstein
SWI
Basel BAS
Bern BER
Chur CHU
Geneva GEN
Locamo LOC
Luceme LUC
St Moritz MOR
St Gallen GAL
Sion SIO
Vaduz VAD
Zuerich ZUE
Czech
Republic
CZR
Prague PRA
Greece GR
Athens AT
Cyprus CY
Nicosia NI
Romania RO
Bucharest BU
Bulgaria BG
Sofia SO
94604_aur_Funk-Wetterstation_content_PL_SI_CZ_SK.indd 8 10.09.13 14:46

9 GB
If you cannot find your country in the table,
please orient yourself to the local time zone.
Using the 12 / 24 hour display
Press the / 12 / 24 button
14
to switch
between the 12 and 24 hour time formats.
Note: The AM symbol in the time display
17
stands for before noon in the 12 hour format.
The PM symbol in the time display
17
stands
for after noon in the 12 hour format.
Setting the alarm time
Note: You can set two different alarms separately.
Press the MODE button
15
to select either
Alarm 1
13
or Alarm 2
13
. The
currently set alarm time and the selected
alarm symbol
13
,
13
appear in
the time display
17
.
Press and hold down the MODE button
15
for about 3 seconds. The hour value
flashes. Press the
/ button
11
or the
/ 12 / 24 button
14
to set it to the desired
value.
Tip: By keeping the
/ button
11
or the
/ 12 / 24 button
14
pressed, you acceler-
ate the process and reach the desired value
more quickly. This quicker method can also
be used for making the other settings. If dur-
ing a period of 30 seconds no buttons are
pressed, the LC display returns automatically
to the default display.
Press the MODE button
15
. The minute value
flashes. Press the
/ button
11
or the
/ 12 / 24 button
14
to set it to the desired
value.
Confirm your settings by pressing the MODE
button
15
.
Activating / deactivating the
alarm function
Press the MODE button
15
to access the
activate or deactivate the alarm mode.
Press the ALARM button
10
to activate the
alarm function. The Alarm symbol
13
appears
in the LC display.
Press the ALARM button
10
again to deacti-
vate the alarm function. The Alarm symbol
13
disappears from the LC display.
The alarm will sound when it reach to the set
time. Press the MODE button
15
, the /
button
11
, the / 12 / 24 button
14
or the
SNOOZE / LIGHT button
12
to switch off
the alarm signal. Otherwise the alarm signal
sounds for about 2 minutes then stops auto-
matically.
Press the SNOOZE / LIGHT button
12
, to
switch off the alarm. The alarm automatically
switches back on after 5 minutes.
When you press the / button
11
or the
/ 12 / 24 button
14
, the alarm switches
off and only switches on again on the next
day in the previously set time.
Displaying the sun and moon
rising / setting times
Note: The calculated times of setting and rising
of the sun and moon are intended for orientation
only. You should contact your local weather fore-
casting service for the exact times.
Note: After you have completed all the settings
(see”setting the date / language / clock / time
zone), the weather station calculates the rising and
setting times of the sun and moon. The setting /
rising time of the sun or moon flashes during this
operation.
Press the SUN / MOON button
31
to display
the calculated sunshine hours of the selected
day.
To check the setting / rising time for other
location & date, press and hold down the
SUN / MOON button
31
for about 3 sec-
onds to access the setting / rising time of the
sun or moon quick control mode. The loca-
tion
8
flashes.
Set the country, city, year, month and the
day for which you wish the information to be
displayed by pressing the SUN / MOON
button
31
or the / button
11
or the
/ 12 / 24 button
14
.
Press the SUN / MOON button
31
to con-
firm your settings.
Note: The sun and moon setting or rising
time flashes while the values are being
calculated.
Note: If the next moon rising or setting is
on the following day, the display shows
MOONRISE+1 or MOONSET+1.
Moon phases
The following moon phases are shown by the
moon phase symbol
6
:
New moon Waxing half-
moon
Half-moon Waxing full
moon
Full moon Waning full
moon
Half-moon Waning half-
moon
Preparing to use the weather
forecasting function
Note: Please take the weather forecast from
your local weather forecasting service into account
as well as the forecast from your weather station.
If there are discrepancies between the information
from your device and from the local weather
94604_aur_Funk-Wetterstation_content_PL_SI_CZ_SK.indd 9 10.09.13 14:46

10 GB
forecasting service, please take the advice of the
latter as authoritative.
Press the HISTORY / WEATHER button
27
for about 3 seconds. The weather symbol
1
flashes.
Set the current weather by pressing
the “+“ / °C / °F button
28
or the
“–“ / MAX / MIN
button
29
.
You can choose between the following
weather symbols:
= sunny
= light clouds
= cloudy
= cloudburst /
storm
= rainy
Press the HISTORY / WEATHER button
27
to
confirm your settings.
Note: Ensure that you have set the current
weather correctly, otherwise the weather
forecast will not be correctly displayed.
The weather station starts with the weather
forecast approximately 6 hours after you
enter the current weather.
The weather station can display the barometric
pressure trend
25
. You may see the following
displays:
= the barometric pressure will rise.
= the barometric pressure will remain
constant.
= the barometric pressure will fall.
Reading the barometric
pressure
Press the Relative / absolute barometric pres-
sure button
30
to switch between the relative
and absolute barometric pressure display.
Note: The display shows “Abs” if you have
selected absolute pressure. The display shows
“Rel” if you have selected relative pressure.
Note: The absolute barometric pressure is
measured by the weather station.
Set the relative barometric pressure to the
barometric pressure relative to that at sea
level. Ask your local weather forecast service
for the barometric pressure at sea level.
Press and hold down the Relative / absolute
barometric pressure button
30
for about
3 seconds.
Set the current barometric pressure by press-
ing
the “+“ / °C / °F button
28
or the
“–“ / MAX / MIN
button
29
.
Press the Relative / absolute barometric
pressure button
30
to confirm your settings.
Reading the barometric
pressure for the last 12 hours
Press the HISTORY / WEATHER button
27
to read the barometric pressure values for
the last 12 hours.
0HR = present barometric pressure
– 1HR = barometric pressure an hour earlier
– 2HR = barometric pressure two hours
earlier, etc.
Press and hold down the “+“ / °C / °F button
28
for about 3 seconds to switch between
displaying the barometric pressure units in
inHg or mb / hPa.
Setting the channel
To do this open the battery compartment on
the back of the outdoor sensor and take it off.
Set the channel by means of the Channel
selection switch
39
.
Press the channel button
26
for approx. 3
seconds until a signal is sounded. The wea-
ther station has now received one signal.
Press the TX button
42
to transmit the measured
temperature to the weather station manually.
Then close the battery compartment
40
.
Displaying the outdoor
temperature
Press the Channel button
26
to display the
outdoor temperature of each outdoor sensor.
– Press the Channel button
26
1 x to display
channel 1.
– Press the Channel button
26
2 x to display
channel 2.
– Press the Channel button
26
3 x to display
channel 3.
– Press the Channel button
26
4 x to display
all the channels one after the other in a loop.
Only the outdoor sensors which can be
addressed are displayed.
Press and hold down the Channel button
26
to remove unused channels. If a further out-
door sensor and channel are added later,
the weather station will receive the signal
automatically. Alternatively, you can also
transmit the initial signal from the outdoor
sensor manually by pressing the TX button
42
.
94604_aur_Funk-Wetterstation_content_PL_SI_CZ_SK.indd 10 10.09.13 14:46

11 GB
Displaying the temperature
trend (outdoor)
After successfully connecting with the outdoor
sensor, the weather station can display the
Temperature trend
21
.
You may see the following displays:
= The outdoor temperature is rising.
= The outdoor temperature is remaining
constant.
= The outdoor temperature is falling.
Displaying the indoor
temperature
The current Indoor temperature
3
is shown in
the LC display.
Displaying temperatures
in °C / °F
Note: °C is the legally required temperature unit.
Note: The weather station is supplied in the
default setting of °Celsius.
Press the “+“ / °C / °F button
28
to switch
between the Celsius and Fahrenheit tempera-
ture scales.
Displaying the air humidity
(indoor)
The current air humidity
5
is shown in the LC
display. The Comfort indicator
4
displays the
air humidity in three categories.
The following categories are available:
“Dry” = Air humidity
5
< 45 %
“Comfort” = Air humidity
5
45–75 %,
indoor temperature
3
24 °C–27.9 °C
“Wet” = Air humidity
5
> 75 %
Displaying the maximum /
minimum temperature /
humidity
The minimum / maximum temperature / humidity is
measured for the first time after the batteries have
been inserted and stored in the weather station.
Press the
“–“ / MAX / MIN
button
29
briefly.
The maximum indoor
3
and outdoor tem-
perature
24
measured and the maximum
humidity
5
measured are shown.
Press the
“–“ / MAX / MIN
button
29
again
briefly. The minimum indoor
3
and outdoor
temperature
24
measured and the minimum
humidity
5
measured are shown.
Press the
“–“ / MAX / MIN
button
29
again
briefly to return to the current values.
Note: If no button is pressed within 5 seconds,
the displays automatically return to the
standard display.
Hold the
“–“ / MAX / MIN
button
29
down
for approx. 3 seconds in order to delete the
stored maximum and minimum values when
you hear a beep sound. The values measured
from the time of deletion of the old values
until the next time the memory is called up
can be called up again.
Backlight
Press the SNOOZE / LIGHT button
12
. The
backlight illuminates for 3 seconds.
Battery state display
The Battery state indicator
23
appears in the
weather station’s LC display if the batteries are
weak.
Replacing the batteries
Weather station:
Remove the battery compartment cover on
the back of the weather station.
Remove the used batteries.
Insert 3 new batteries type AA 1.5 V
(Mignon, LR06).
Note: Make sure you fit the batteries the
right way round (polarity). The correct polarity
is shown inside the battery compartment
34
.
Close the battery compartment
34
.
Press the RESET button
33
. All the symbols
light up briefly.
Outdoor sensor:
Remove the battery compartment cover from
the back of the outdoor sensor.
Insert 2 new batteries of type AAA 1.5 V
(Micro, LR03).
Note: Ensure the correct polarity. This is
shown in the battery compartment
40
.
Close the battery compartment cover.
Troubleshooting
Note: This appliance has delicate electronic
components. This means that if it is placed near
an object that transmits radio signals, it could
cause interference.
94604_aur_Funk-Wetterstation_content_PL_SI_CZ_SK.indd 11 10.09.13 14:46

12 GB
If the display indicates a problem, move such
objects away from it or remove the batteries
for a short while and then replace them.
Obstacles such as concrete walls can also cause
that the reception is disturbed. In this case,
change the location (eg near a window). Please
take note that the external sensor should always
be set up within max. 100 meters (open space)
from the base station. The specifi ed range is the
free-fi eld range and means that no obstacle
should be between the remote sensor and the
base station. A “visual contact” between remote
sensor and base station often improves the trans-
mission.
Cold (outdoor temperatures below 0 ° C) can
reduce the battery power of the outdoor sensor
and thereby negatively impair the radio transmis-
sion.
Another factor that may cause harmful inter-
ference, are dead or weak batteries in the
outdoor sensor. Replace them by new ones.
If your weather station is not working correctly,
please perform a new start by pressing the
RESET button
33
.
Cleaning and maintenance
Under no circumstances should you use
liquids or detergents, as these will damage
the device.
The device should only be cleaned on the
outside with a soft dry cloth.
Under no circumstances should you spray
the outdoor sensor, e.g. with a garden hose.
The outdoor sensor is only protected against
rain from above.
Disposal
The packaging is made entirely of
recyclable materials, which you may
dispose of at local recycling facilities.
Contact your local refuse disposal authority for
more details of how to dispose of your worn-out
product.
To help protect the environment,
please dispose of the product properly
when it has reached the end of its
useful life and not in the household
waste. Information on collection
points and their opening hours can be
obtained from your local authority.
Faulty or used batteries must be recycled in
accordance with Directive 2006 / 66 / EC.
Please return the batteries and / or the device
to the available collection points.
Pb Hg
Environmental damage
through incorrect disposal of
the batteries!
Batteries may not be disposed of with the usual
domestic waste. They may contain toxic heavy
metals and are subject to hazardous waste treat-
ment rules and regulations. The chemical symbols
for heavy metals are as follows: Cd = cadmium,
Hg = mercury, Pb = lead. That is why you should
dispose of used batteries at a local collection
point.
Information
Declaration of conformity
Herewith OWIM GmbH & Co. KG, Stiftsberg-
straße 1, D-74167 Neckarsulm, declares that
the article Radio-controlled Weather Station,
model number Z31092, version 10 / 2013
fulfi lls the basic requirement and the other
relevant requirements of 1999 / 5 / EC. The
declaration of conformity can be found under
www.owim.com.
EMC
94604_aur_Funk-Wetterstation_content_PL_SI_CZ_SK.indd 12 10.09.13 14:46

13 PL
Zastosowanie zgodne z przeznaczeniem ...............................................Strona 14
Opis części ........................................................................................................................... Strona 14
Dane techniczne ............................................................................................................. Strona 14
Zawartość ...........................................................................................................................Strona 14
Bezpieczeństwo .............................................................................................................Strona 14
Ogólne wskazówki bezpieczeństwa ...................................................................................... Strona 15
Wskazówki bezpieczeństwa dotyczące baterii ....................................................................Strona 15
Przed uruchomieniem
Ustawianie urządzeń ............................................................................................................... Strona 15
Uruchamianie czujnika zewnętrznego ...................................................................................Strona 15
Uruchamianie stacji pogodowej .............................................................................................Strona 16
Obsługa
Odbiór sygnału radiowego DCF ............................................................................................Strona 16
Ręczne ustawianie daty / języka / lokalizacji / godziny / strefy czasowej ........................... Strona 16
Zastosowanie wskaźnika 12 / 24-godzinnego .....................................................................Strona 18
Ustawianie budzika .................................................................................................................Strona 18
Włączanie / wyłączanie funkcji budzika ...............................................................................Strona 18
Wskazywanie czasu wschodu względnie zachodu słońca i księżyca ................................Strona 18
Fazy księżyca ........................................................................................................................... Strona 19
Włączanie prognozy pogody ................................................................................................Strona 19
Odczytywanie ciśnienia atmosferycznego ............................................................................Strona 19
Odczytywanie wskazań ciśnienia atmosferycznego z ostatnich 12 godzin ....................... Strona 20
Ustawianie kanału ...................................................................................................................Strona 20
Wskazywanie temperatury zewnętrznej ................................................................................Strona 20
Wskazywanie trendu temperatury (zewnętrznej) .................................................................. Strona 20
Wskazywanie temperatury wewnętrznej ...............................................................................Strona 20
Wskazywanie temperatury w ˚C / ˚F ....................................................................................Strona 20
Wskazywanie wilgotności powietrza (wewnątrz) ................................................................. Strona 20
Wyświetlanie maksymalnej / minimalnej temperatury / wilgotności powietrza ...................Strona 20
Podświetlenie ............................................................................................................................ Strona 21
Wskaźnik stanu baterii ............................................................................................................Strona 21
Wymiana baterii ......................................................................................................................Strona 21
Usuwanie błędów ........................................................................................................ Strona 21
Czyszczenie i pielęgnacja ...................................................................................... Strona 21
Utylizacja ............................................................................................................................. Strona 21
Informacje
Deklaracja zgodności .............................................................................................................. Strona 22
94604_aur_Funk-Wetterstation_content_PL_SI_CZ_SK.indd 13 10.09.13 14:46

14 PL
Stacja pogodowa
sterowana radiowo
Zastosowanie zgodne
z przeznaczeniem
Stacja pogodowa wskazuje temperaturę wewnętrzną
i zewnętrzną w stopniach Celsjusza (°C) lub
stopniach Fahrenheita (°F) oraz wewnętrzną wil-
gotność powietrza wyrażoną (% RH), oraz jej
wartości maksymalne i minimalne. Pozostałymi
wartościami wskazań stacji pogodowej są: pro-
gnoza pogody, czas w formacie 12- / 24 godzin-
nym, jak również data. Ponadto stacja pogodowa
wskazuje czas zegarowy codziennego wschodu
i zachodu słońca oraz fazy księżyca. Stacja po-
godowa wyposażona jest dodatkowo w funkcję
alarmu i kalendarza. Urządzenie nie jest prze-
znaczone do użytku komercyjnego.
Opis części
Stacja pogodowa
1
Symbol pogody
2
Wskaźnik słupkowy ciśnienia atmosferycznego
3
Temperatura wewnętrzna
4
Wskaźnik komfortu
5
Wilgotność powietrza (%R]) (wewnątrz)
6
Faza księżyca
7
Wschód / zachód księżyca
8
Lokalizacja
9
Wschód / zachód słońca
10
Przycisk ALARM
11
/ -Przycisk /
12
Przycisk SNOOZE / LIGHT
13
Symbol Alarm
14
/ Przycisk / 12 / 24
15
Przycisk MODE
16
Data (rok, miesiąc, dzień)
17
Wskaźnik godziny
18
Symbol wieży radiowej
19
Ciśnienie powietrza minionej godziny
20
Ciśnienie atmosferyczne bezwzględ-
ne / względne
21
Trend temperatury (na zewnątrz)
22
Wybrany kanał
23
Wskaźnik stanu baterii
24
Temperatura zewnętrzna
25
Trend ciśnienia atmosferycznego
26
Przycisk kanału (CHANNEL)
27
Przycisk: HISTORY / WEATHER (pamięć
danych meteorologicznych)
28
Przycisk: „+“ / °C / °F
29
Przycisk: „–“ / MAX / MIN
30
Przycisk: względne / bezwzględne ciśnienie
powietrza
31
Przycisk: SUN / MOON (słońce / księżyc)
32
Element montażowy
33
Przycisk RESET
34
Komora na baterie
35
Stojak
Czujnik zewnętrzny
36
Kontrolka LED
37
Temperatura zewnętrzna / kanał czujnika
zewnętrznego
38
Element montażowy
39
Przełącznik kanału
40
Komora na baterie
41
Przycisk: °C / °F
42
Przycisk: TX („Przycisk nastawiania kanałów”)
43
Stojak
Dane techniczne
Stacja pogodowa:
Zakres pomiaru
temperatury: 0 – +50 °C
+32 – +122 °F
Dokładność pomiaru
temperatury: 0,1 °C
Zakres pomiaru
Wilgotność powietrza: 20 – 99 %
Rozdzielczość
Wilgotność powietrza: 1 %
Sygnał radiowy: DCF
Bateria: 3 x AA 1,5 V (mignon,
LR06, dołączone do
zestawu)
Wymiary: 230 x 150 x 30 mm
(szer. x wys. x gł.)
Czujnik zewnętrzny:
Zakres pomiaru
temperatury: –20 – +50 °C
–4 – +122 °F
Sygnał transmisji HF: 433 MHz
Zasięg
transmisji HF: ok. 100 metrów na
otwartym terenie
Bateria: 2 x AAA 1,5 V (Micro,
LR03, dołączone do
zestawu)
Zawartość
1 x Stacja pogody
1 x Czujnik zewnętrzny
3 x Bateria AA 1,5 V (mignon, LR06, wstępnie
zainstalowane)
2 x Kołek rozporowy (ok. ø 6 mm)
2 x Śruba
2 x Bateria AAA 1,5 V (micro, LR03, wstępnie
zainstalowane)
1 x Instrukcja obsługi
Bezpieczeństwo
WSZYSTKIE INSTRUKCJE WRAZ ZE
WSKAZÓWKAMI BEZPIECZEŃSTWA ZA-
CHOWAĆ NA PRZYSZŁOŚĆ!
94604_aur_Funk-Wetterstation_content_PL_SI_CZ_SK.indd 14 10.09.13 14:46

15 PL
Ogólne wskazówki
bezpieczeństwa
NIEBEZ-
PIECZEŃSTWO UTRATY
ŻYCIA LUB ODNIESIENIA
WYPADKU PRZEZ DZIECI! Nigdy nie
należy pozostawiać bez nadzoru dzieci z
materiałem opakunkowym. Istnieje niebez-
pieczeństwo uduszenia się materiałem opa-
kowaniowym. Dzieci często nie umieją
właściwie ocenić zagrożeń. Dzieci należy
trzymać z dala od produktu.
Niniejsze urządzenie może być używane
przez dzieci od lat 8 oraz przez osoby z
obniżonymi zdolnościami fizycznymi, senso-
rycznymi lub mentalnymi lub brakiem doświad-
czenia i/lub wiedzy, jeśli pozostają pod
nadzorem lub zostały pouczone w kwestii
bezpiecznego użycia urządzenia i rozumieją
wynikające z niego zagrożenia. Dzieci nie
mogą bawić się urządzeniem. Czyszczenie i
konserwacja przez użytkownika nie mogą być
bez nadzoru przeprowadzane przez dzieci.
W żadnym wypadku nie należy rozbierać
urządzenia na części. Wykonywanie na-
praw należy zlecać wyłącznie specjalistom.
Wskazówki bezpieczeń-
stwa dotyczące baterii
ZAGROŻENIE ŻYCIA! Baterie mogą
zostać połknięte, co stwarza zagrożenie
dla życia. Wprzypadku połknięcia baterii
należy natychmiast skorzystać z pomocy
lekarskiej.
Jeżeli baterie nie były używane przez dłuż-
szy czas, należy je wyjąć z urządzenia.
OSTROŻNIE! NIEBEZPIECZEŃSTWO
WYBUCHU! Nie ładować ponownie baterii!
Umieszczając baterie należy zwrócić uwa-
gę na odpowiednią biegunowość! Jest ona
oznakowana w komorze baterii.
W razie potrzeby przed włożeniem baterii
oczyścić jej styki i urządzenia.
Zużyte baterie należy niezwłocznie wyjąć z
urządzenia. W przeciwnym razie zwiększa
się ryzyko wycieku elektrolitu!
Baterii nie należy wyrzucać razem z odpa-
dami domowymi!
Każdy użytkownik jest ustawowo zobowiązany
do prawidłowego usuwania baterii do
odpadów!
Baterie należy przechowywać w miejscu
niedostępnym dla dzieci, nie należy wrzu-
cać ich do ognia, rozbierać na części lub
powodować zwarcia.
Wszystkie baterie należy wymieniać równo-
cześnie.
Używać wyłącznie baterii tego samego typu.
W przypadku wystąpienia wycieku z baterii
znajdujących się w urządzeniu należy je na-
tychmiast wyjąć, aby zapobiec uszkodzeniu
urządzenia!
Unikać kontaktu ze skórą, oczami i błonami
śluzowymi. W razie kontaktu z elektrolitem
przemyć dane miejsce dużą ilością wody
i / lub udać się lekarza!
Przed uruchomieniem
Najpierw włożyć baterie do czujnika
zewnętrznego a następnie do stacji
pogody.
Ustawianie urządzeń
OSTROŻNIE! Przy wyborze miejsca usta-
wienia należy zadbać, aby urządzenia nie były
narażone na bezpośrednie promieniowanie
słoneczne, wibracje, pył, działanie skrajnie wy-
sokich lub niskich temperatur oraz wilgoci.
Urządzeń nie należy ustawiać w pobliżu źródeł
wysokich temperatur, na przykład grzejników.
Grozi to uszkodzeniem urządzeń.
Stację pogodową należy ustawić na
stojaku
35
.
Wskazówka: Zwróć uwagę na to, aby
kołki stojaka
35
były osadzone w odpo-
wiednich wgłębieniach na stacji pogodowej.
Nie ustawiać urządzeń na wartościowych
lub delikatnych powierzchniach bez odpo-
wiedniej ochrony. W przeciwnym razie
może dojść do uszkodzenia powierzchni.
Nie ustawiać urządzeń w pobliżu źródeł
zakłóceń takich jak telewizory, komputery,
grube mury itp. Mogą one ograniczać trans-
misję radiową między urządzeniami.
Należy upewnić się, że urządzenia używa-
ne w bliskiej odległości nie korzystają z tej
samej częstotliwości 433 MHz. Urządzenia
te mogą powodować zakłócenie połączenia
radiowego.
Nie należy ustawiać urządzeń obok lub na
płytach metalowych. Mogą one ograniczać
transmisję radiową między urządzeniami.
Nie ustawiać urządzenia w budynkach z
żelazobetonu, na przykład w portach lotni-
czych, wieżowcach, fabrykach lub w piwni-
cach. Może to znacznie ograniczać
transmisję radiową między urządzeniami.
Uruchamianie czujnika
zewnętrznego
Usuwanie paska zabezpieczającego
baterie:
Zdjąć osłonę komory baterii na tylnej ściance
czujnika zewnętrznego.
Wyjąć pasek zabezpieczający. Czujnik
zewnętrzny jest teraz gotowy do pracy i
kontrolka LED
36
zaświeci się przez krótki
czas.
Zamknąć osłonę komory baterii.
94604_aur_Funk-Wetterstation_content_PL_SI_CZ_SK.indd 15 10.09.13 14:46

16 PL
Montaż czujnika zewnętrznego:
Wybrać odpowiednie miejsce dla czujnika
zewnętrznego.
Wskazówka: Upewnić się, że czujnik
zewnętrzny jest umieszczony w promieniu
100 m od stacji pogodowej. Upewnić się,
że pomiędzy czujnikiem zewnętrznym a sta-
cją pogodową nie znajdują się żadne za-
kłócające przeszkody. W przeciwnym razie
transmisja danych może zostać zakłócona.
Montaż na ścianie:
Zawiesić czujnik zewnętrzny na śrubie za
pomocą elementu montażowego
38
.
Uruchamianie stacji pogodowej
Usuwanie paska zabezpieczającego
baterie:
Otworzyć komorę baterii
34
znajdującą się
na tylnej ściance stacji pogodowej.
Wyjąć pasek zabezpieczający.
Ponownie zamknąć komorę baterii
34
.
Nacisnąć przycisk RESET
33
. Wszystkie
symbole na krótko zapalą się.
Stacja pogodowa rozpoczyna odbiór sygnału
radiowego od razu po wyjęciu paska zabezpie-
czającego baterii.
Wskazówka: Nie należy zmieniać pozycji
stacji pogodowej w trakcie odbioru. W przeciw-
nym razie może dojść do jego zakłóceń.
Montaż na ścianie:
Stację pogodową zawiesić na śrubie przy
pomocy elementu montażowego
32
.
Ustawienie:
Rozłożyć stojak
35
na spodzie stacji pogo-
dowej.
Połączenie stacji pogodowej z
czujnikiem zewnętrznym:
Stacja pogodowa próbuje po usunięciu paska
zabezpieczającego baterii nawiązać połącze-
nie z czujnikiem zewnętrznym. Proces ten może
trwać kilka minut. Po udanym nawiązaniu połą-
czenia z czujnikiem zewnętrznym na wyświetla-
czu LC pokazany zostanie wybrany symbol
kanału
22
z kanałem czujnika zewnętrznego
(w razie potrzeby należy zmienić kanał czujnika
zewnętrznego według instrukcji zawartych w
części „Ustawianie kanału“). Jeżeli połączenie
nie może zostać wykonane automatyczne, to
należy nacisnąć przycisk TX
42
, aby ręcznie je
nawiązać.
Sygnał radiowy (DCF):
Sygnał DCF (nadajnik sygnału czasowego) skła-
da się z impulsów czasowych, które są wysyłane
przez jeden z najdokładniejszych zegarów świa-
ta, znajdującego się w pobliżu Frankfurtu nad
Menem w Niemczech - dokładność zegara
oscyluje wokół 1 sekundy na milion lat.
W optymalnych warunkach stacja pogodowa
odbiera sygnał DCF w odległości do 1500 km
od Frankfurtu nad Menem. Wyszukiwanie sy-
gnału trwa z reguły ok. 3 do 10 minut.
Obsługa
Odbiór sygnału
radiowego DCF
Zegar stacji pogodowej po skutecznym połącze-
niu z czujnikiem zewnętrznym automatycznie
rozpoczyna wyszukiwanie sygnału radiowego
DCF. Wyszukiwanie sygnału jest wskazywane
na wyświetlaczu LC przez miganie symbolu
wieży radiowej
18
.
W przypadku udanego odbioru sygnału radio-
wego DCF na wyświetlaczu LC będzie na trwale
widoczny symbol wieży radiowej
18
. Jeżeli w
momencie uruchomiania nie jest możliwa syn-
chronizacja z zegarem atomowym, to ustawienie
czasu zegarowego można wykonać również
ręcznie (zobacz „Ustawianie ręczne daty / języ-
ka / czasu zegarowego / strefy czasowej”).
Wskazówka: Podczas wyszukiwania sygnału
zablokowane są wszystkie przyciski funkcyjne
stacji pogodowej poza przyciskiem
SNOOZE / LIGHT
12
.
W celu skorygowania ewentualnych odchyleń
od dokładnego czasu, stacja pogodowa prze-
prowadza automatyczną synchronizację z
sygnałem DCF codziennie ogodzinie 01:00,
02:00 i 03:00. Wprzypadku braku synchroni-
zacji zsygnałem DCF znika symbol wieży radio-
wej
18
. Zegar będzie teraz próbował przepro-
wadzić synchronizacje z masztem radiowym
DCF o godzinie 04:00 i 05:00. Odbiór sygnału
radiowego DCF na stacji pogody może zostać
rozpoczęty również ręcznie.
Nacisnąć i przytrzymać przez 3 sekundy
przycisk
/
11
. Stacja pogodowa roz-
poczyna wyszukiwanie sygnału radiowego
DCF. Proces ten zajmuje kilka minut i w jego
trakcie wyświetlany jest migający symbol
wieży radiowej
18
.
Jeżeli połączenie z sygnałem radiowym DCF nie
dojdzie do skutku, to wyszukiwanie zostanie
przerwane. O następnej pełnej godzinie podję-
ta zostanie automatycznie próba nawiązania
połączenia.
Ręczne ustawianie daty /
języka / lokalizacji / godziny /
strefy czasowej
W miejscu ustawienia stacji pogodowej może
dojść do zakłócenia lub przerwania odbioru
sygnału radiowego DCF. W takim przypadku
istnieje możliwość ręcznego ustawienia urzą-
dzenia.
94604_aur_Funk-Wetterstation_content_PL_SI_CZ_SK.indd 16 10.09.13 14:46

17 PL
Tok postępowania:
1. Nacisnąć i przytrzymać przycisk MODE
15
przez ok. 3 sekundy. Wskaźnik strefy czaso-
wej zacznie migać. Przez naciśnięcie przyci-
sku
/
11
oraz przycisku / 12 / 24
14
ustawić żądaną wartość.
Wskazówka: Domyślna strefa czasowa
to GMT+1. Ustawić stację pogodową odpo-
wiednio do strefy czasowej użytkownika.
Zatwierdzić wybór przyciskiem MODE
15
.
2. Wskaźnik godziny w polu czasu
17
miga.
Przez naciśnięcie przycisku
/
11
oraz
przycisku
/ 12 / 24
14
ustawić żądaną
wartość.
Wskazówka: Przytrzymać wciśnięty przy-
cisk
/
11
względnie / 12 / 24
14
.
W ten sposób można przyspieszyć dokony-
wanie ustawień. Szybkie ustawianie można
wykorzystać również podczas zmiany
następnych wartości.
Jeżeli w ciągu 30 sekund nie zostanie naci-
śnięty żaden przycisk, wyświetlacz LC
powróci automatycznie do wskazania stan-
dardowego.
3. Zatwierdzić wybór przyciskiem MODE
15
.
Wskaźnik minut w polu czasu
17
miga.
Przez naciśnięcie przycisku
/
11
oraz
przycisku
/ 12 / 24
14
ustawić żądaną
wartość.
4. Zatwierdzić wybór przyciskiem MODE
15
.
Wskaźnik minut w polu czasu
17
miga.
Na-
cisnąć przycisk /
11
lub / 12 / 24
14
,
aby ustawić wskaźnik sekundowy na 0.
5. Zatwierdzić wybór przyciskiem MODE
15
.
Na wskaźniku czasu
17
miga wskaźnik
roku. Przez naciśnięcie przycisku
/
11
oraz
/ 12 / 24
14
ustawić żądaną war-
tość.
6. Zatwierdzić wybór przyciskiem MODE
15
.
Miga wskaźnik miesiąca wskaźnika daty
16
Przez naciśnięcie przycisku
/
11
oraz
/ 12 / 24
14
ustawić żądaną wartość.
7. Zatwierdzić wybór przyciskiem MODE
15
.
Miga wskaźnik dnia wskaźnika daty
16
Przez naciśnięcie przycisku
/
11
oraz
/ 12 / 24
14
ustawić żądaną wartość.
8. Zatwierdzić wybór przyciskiem MODE
15
.
Na wskaźniku daty
16
miga wskaźnik języ-
ka dla dni tygodnia. Przez naciśnięcie przy-
cisku
/
11
oraz / 12 / 24
14
usta-
wić żądany język.
Wskazówka: Możliwość wyboru pomię-
dzy językiem niemieckim, angielskim, rosyj-
skim, duńskim, holenderskim, włoskim, hisz-
pańskim i francuskim.
Wskazówka: Przy dostawie stacja pogo-
dowa ustawiona jest automatycznie na ję-
zyk niemiecki (GER).
9. Zatwierdzić wybór przyciskiem MODE
15
.
Miga wskaźnik lokalizacji dla danego kraju
8
.
Przez naciśnięcie przycisku
/
11
oraz
/ 12 / 24
14
ustawić żądany kraj. Za-
twierdzić wybór przyciskiem MODE
15
.
Miga wskaźnik lokalizacji dla danego
miasta
8
. Przez naciśnięcie przycisku
/
11
oraz / 12 / 24
14
ustawić żą-
dane miasto.
10. Zatwierdzić wybór przyciskiem MODE
15
.
Można wybrać następujące kraje i miasta:
Niemcy GER
Akwizgran AAC
Berlin BER
Düsseldorf DUS
Drezno DRE
Erfurt ERF
Frankfurt FRA
Flensburg FLE
Fryburg FRE
Hannower HAN
Brema BRE
Hamburg HAM
Rostock ROS
Stralsund STR
Kolonia KOE
Kiel KIE
Kassel KAS
Lipsk LEI
Monachium MUE
Magdeburg MAG
Norymberga NUE
Ratyzbona REG
Stuttgart STU
Saarbrücken SAA
Schwerin SCH
Dania DAN
Aalborg ALB
Aarhus ARH
Kopenhaga COP
Odense ODE
Hiszpania,
Andora
ESP
Alicante ALI
Andora AND
Badajoz BAD
Barcelona BAR
Bilbao BIL
Kadyks CAD
Còrdoba COR
Ibiza IBI
La Coruña LAC
León LEO
Las Palmas LPA
Madryt MAD
Málaga MAL
Palma de
Mallorca
PDM
Salamanka SAL
Sewilla SEV
Valencia VAL
Zaragossa ZAR
Francja FRA
Besançon BES
Biarritz BIA
Bordeaux BOR
Brest BRE
Cherbourg CHE
Lyon LYO
Marsylia MAR
Monako MON
Metz MET
Nantes NAN
Nizza NIC
Orlean ORL
Paryż PAR
Perpignan PER
Lille LIL
Rouen ROU
Strasburg STR
Tuluza TOU
Finlandia FIN
Helsinki HEL
Wielka
Brytania
GB
Aberdeen ABD
Belfast BEL
Birmingham BIR
Bristol BRI
Edynburg EDI
Glasgow GLA
Londyn LON
Manchester MAN
Plymouth PLY
Węgry HUN
Budapeszt BUD
Chorwacja CRO
Zagrzeb ZAG
Włochy ITA
Ancona ANC
Bari BAI
Bolonia BOL
Cagliari CAG
Catania CAT
Florencja FIR
Foggia FOG
Genua GEN
Lecce LEC
Messina MES
Mediolan MIL
Neapol NAP
Palermo PAL
Parma PAR
Perugia PER
Rzym ROM
Turyn TOR
Triest TRI
Wenecja VEN
Werona VER
Ventimiglia VTG
Irlandia IRL
Dublin DUB
Luksemburg LUX
Norwegia NOR
Bergen BER
Oslo OSL
Stavanger STA
Holandia NET
Amsterdam AMS
Eindhoven EIN
Enschede ENS
94604_aur_Funk-Wetterstation_content_PL_SI_CZ_SK.indd 17 10.09.13 14:46

18 PL
Prosimy o zorientowanie się w miejscowej strefie
czasowej gdy Wasz kraj nie jest wyszczególniony
w tabeli.
Zastosowanie wskaźnika
12 / 24-godzinnego
Nacinąćj przycisk / 12 / 24
14
, aby
przełączyć pomiędzy formatami 12- i
24-godzinym.
Wskazówka: Symbol AM przy wskaźniku
czasu
17
oznacza w formacie 12-godzin-
nym godziny przedpołudniowe. Symbol PM
przy wskaźniku czasu
17
oznacza w forma-
cie 12-godzinnym godziny popołudniowe.
Ustawianie budzika
Wskazówka: Istnieje możliwość ustawienia
dwóch różnych, indywidualnych alarmów.
Nacisnąć przycisk MODE
15
, aby wybrać
między Alarmem 1
13
a Alarmem 2
13
. Na wskaźniku czasu
17
pojawi się
aktualnie ustawiony czas budzenia oraz
obecny symbol alarmu
13
,
13
.
Nacisnąć przycisk MODE
15
i przytrzymać
przez ok. 3 sekundy. Wskaźnik godziny za-
cznie migać. Przez naciśnięcie przycisku
/
11
względnie / 12 / 24
14
usta-
wić żądaną wartość.
Wskazówka: Przytrzymać wciśnięty przy-
cisk
/
11
względnie / 12 / 24
14
.
W ten sposób można przyspieszyć dokony-
wanie ustawień. Szybkie ustawianie można
wykorzystać również podczas zmiany
następnych wartości.
Jeżeli w przeciągu 30 sekund nie naciśniesz
żadnego przycisku, to wyświetlacz LC powró-
ci automatycznie do wskazania standardo-
wego.
Nacisnąć przycisk MODE
15
. Wskaźnik
minut zacznie migać. Przez naciśnięcie przy-
cisku
/
11
względnie / 12 / 24
14
ustawić żądaną wartość.
Zatwierdzić wybór przyciskiem MODE
15
.
Włączanie / wyłączanie
funkcji budzika
Nacisnąć przycisk MODE
15
, aby włączyć
względnie wyłączyć alarm.
Nacisnąć przycisk ALARM
10
, aby zakty-
wować funkcję budzika. Symbol Alarm
13
ukazuje się w wyświetlaczu LC.
Należy ponownie nacisnąć przycisk
ALARM
10
, aby wyłączyć funkcję budzika.
Na wyświetlaczu LC gaśnie się symbol alar-
mu
13
.
Sygnał alarmu zabrzmi, gdy tylko zostanie
osiągnięty ustawiony czas zegarowy. Naci-
snąć przycisk SNOOZE / LIGHT
12
, przy-
cisk
/
11
, przycisk / 12 / 24
14
lub
przycisk MODE
15
, aby zatrzymać sygnał
alarmu. W przeciwnym razie sygnał alarmu
będzie rozbrzmiewał przez około 2 minuty,
a następne zostanie wyłączony automatycznie.
Nacisnąć przycisk SNOOZE / LIGHT
12
,
aby wyłączyć alarm. Alarm automatycznie
włącza się ponownie po 5 minutach.
Po naciśnięciu przycisku /
11
lub
/ 12 / 24
14
wyłącza się alarm i włącza
dopiero na drugi dzień o wcześniej ustawio-
nej godzinie.
Wskazywanie czasu
wschodu względnie
zachodu słońca i księżyca
Wskazówka: Obliczony czas wschodów i
zachodów słońca, względnie wschodów i zacho-
dów księżyca służy wyłącznie do orientacji. Aby
dowiedzieć się o dokładne czasy należy zwró-
cić się do lokalnej służby meteorologicznej.
Wskazówka: Po dokonaniu wszystkich usta-
wień (zobacz rozdział „Ustawianie ręczne
daty / języka / lokalizacji / czasu / strefa czaso-
wej”), stacja meteorologiczna obliczy wschody i
zachody słońca względnie wschody i zachody
księżyca. W trakcie obliczania miga czas wscho-
dów i zachodów słońca, względnie wschodów i
zachodów księżyca.
Nacisnąć przycisk SUN / MOON
31
, aby
wskazać godziny słoneczne wybranego dnia.
Groningen GRO
Haga DHA
Rotterdam ROT
Portugalia POR
Èvora EVO
Coimbra COI
Faro FAR
Leiria LEI
Lizbona LIS
Porto POR
Polska POL
Gdańsk GDA
Kraków KRA
Poznań POZ
Szczecin SZC
Warszawa WAR
Rosja RUS
St.Petersburg PET
Szwecja SWE
Göteborg GOT
Sztokholm STO
Słowacja SLK
Bratysława BRA
Słowenia SLO
Lublana LJU
Serbia SRB
Belgrad BER
Austria AUS
Graz GRA
Innsbruck INN
Linz LIN
Salzburg SAL
Wiedeń VIE
Belgia BEL
Antwerpia ANT
Brugia BRU
Bruksela BRL
Charleroi CHA
Liège LIE
Szwajcaria,
Liechtenstein
SWI
Basel BAS
Bern BER
Chur CHU
Warszawa GEN
Locamo LOC
Lucerna LUC
St Moritz MOR
St Gallen GAL
Sitten SIO
Vaduz VAD
Zurych ZUE
Czechy CZR
Praga PRA
Grecja GR
Ateny AT
Cypr CY
Nikozja NI
Rumunia RO
Bukareszt BU
Bułgaria BG
Sofia SO
94604_aur_Funk-Wetterstation_content_PL_SI_CZ_SK.indd 18 10.09.13 14:46

19 PL
Nacisnąć i przytrzymać wciśnięty przycisk
SUN / MOON
31
przez około 3 sekundy,
aby dostać się do skróconej kontroli czasu
zegarowego wschodu słońca i księżyca
względnie zachodu słońca i księżyca. Miga
wskaźnik lokalizacji
8
.
Ustawić kraj, miasto, rok, miesiąc oraz dzień,
który ma zostać pokazany przy naciśnięciu
przycisku SUN / MOON
31
, /
11
lub
/ 12 / 24
14
.
Nacisnąć przycisk SUN / MOON
31
, aby
potwierdzić swoje ustawienie.
Wskazówka: W trakcie obliczania miga
czas zegarowy wschodów i zachodów słoń-
ca, względnie wschodów i zachodów księ-
życa.
Wskazówka: Jeżeli wschód księżyca lub za-
chód
księżyca nastąpi dopiero w następnym
dniu, to wskazywane będzie MOONRISE+1,
względnie MOONSET+1.
Fazy księżyca
Następujące fazy księżyca wskazywane są za
pomocą znaków faz księżyca
6
Nów
Księżyc
dążący do
pierwszej
kwadry
Pierwsza
kwadra
Księżyc
dążący do
pełni
Pełnia Księżyc
ubywający
do ostatniej
kwadry
Ostatnia
kwadra
Księżyc
ubywający do
nowiu
Włączanie prognozy pogody
Wskazówka: Należy dodatkowo zwrócić
uwagę na prognozę pogody swojej lokalnej
służby meteorologicznej. W przypadku rozbież-
ności między prognozą urządzenia a lokalnych
służb meteorologicznych, należy kierować się
wskazaniami tych ostatnich.
Nacisnąć przez około 3 sekundy przycisk
HISTORY / WEATHER
27
. Miga symbol po-
gody
1
.
Ustawianie aktualnej pogody przez naci-
śnięcie przycisku „+“ / °C / °F
28
względnie
„–“ / MAX / MIN
29
.
Do wyboru są następujące symbole pogody:
= słonecznie
= lekkie zachmu-
rzenie
= pochmurno
= Oberwanie
chmury / burza
= deszczowo
Nacisnąć przycisk HISTORY / WEATHER
27
,
aby potwierdzić wprowadzenie danych.
Wskazówka: Zwracać uwagę na to,
żeby prawidłowo ustawiać aktualną pogo-
dę. W przeciwnym razie prognoza pogody
nie może być prawidłowo wskazana.
Stacja pogodowa rozpoczyna prognozę
pogody po około 6 godzinach od wprowa-
dzenia aktualnej pogody.
Stacja pogodowa może wskazywać rów-
nież trend ciśnienia atmosferycznego
25
.
Możliwe są następujące wskazania:
= Ciśnienie atmosferyczne będzie
wzrastało.
= Ciśnienie atmosferyczne pozostaje stałe.
= Ciśnienie atmosferyczne będzie
obniżało się.
Odczytywanie ciśnienia
atmosferycznego
Nacisnąć przycisk Względne / bezwzględne
ciśnienie powietrza
30
, aby przełączać mię-
dzy wskazywaniem względnego i bezwzględ-
nego ciśnienia powietrza.
Wskazówka: Jeżeli zostało ustawione
wskazanie bezwzględne, to na wyświetla-
czu pojawi się „Abs”. Jeżeli zostało ustawio-
ne wskazanie względne, to na wyświetlaczu
pojawi się „Rel”.
Wskazówka: Bezwzględne ciśnienie powie-
trza jest mierzone przez stację pogodową.
Ustawić względne ciśnienie powietrza we-
dług ciśnienia powietrza odniesionego do
wysokości nad poziomem morza. Dowiedz
się w lokalnej służbie meteorologicznej o ci-
śnienie powietrza odniesione do wysokości
nad poziomem morza.
Nacisnąć i przytrzymać wciśnięty przycisk
Względne / bezwzględne ciśnienie powie-
trza
30
przez około 3 sekundy.
Nacisnąć przycisk „+“ / °C / °F
28
względ-
nie przycisk „–“ / MAX / MIN
29
, aby usta-
wić ciśnienie powietrza.
Nacisnąć przycisk Względne / bezwzględ-
ne ciśnienie powietrza
30
, aby potwierdzić
swoje ustawienie.
94604_aur_Funk-Wetterstation_content_PL_SI_CZ_SK.indd 19 10.09.13 14:46

20 PL
Odczytywanie wskazań
ciśnienia atmosferycznego z
ostatnich 12 godzin
Nacisnąć przycisk HISTORY / WEATHER
27
,
aby można było odczytać wartości ciśnienia
powietrza minionych 12 godzin.
0HR = aktualne ciśnienie atmosferyczne
– 1HR = ciśnienie powietrza przed jedną
godziną
– 2HR = ciśnienie powietrza przed dwoma
godzinami itp.
Nacisnąć i przytrzymać wciśnięty przycisk
„+“ / °C / °F
28
przez około 3 sekundy,
aby przełączać między jednostkami pomia-
ru ciśnienia powietrza wyrażonymi w inHG
lub mb / hPa.
Ustawianie kanału
Otworzyć w tym celu pokrywę komory na
baterie z tyłu czujnika zewnętrznego i zdjąć ją.
Ustawić kanał za pomocą przełącznika
kanałów
39
.
Nacisnąć przycisk kanałów
26
przez ok. 3
sekundy, aż zabrzmi sygnał. Stacja pogodo-
wa odebrała sygnał.
Nacisnąć przycisk TX
42
, aby zmierzoną
temperaturę przesłać ręcznie do stacji pogo-
dowej.
Ponownie zamknąć komorę baterii
40
.
Wskazywanie temperatury
zewnętrznej
Nacisnąć przycisk kanału
26
, aby wskazać
temperaturę zewnętrzną różnych czujników
zewnętrznych.
- Nacisnąć przycisk kanału
26
1 x, aby
wskazać kanał 1.
- Nacisnąć przycisk kanału
26
2 x, aby
wskazać kanał 2.
- Nacisnąć przycisk kanału
26
3 x, aby
wskazać kanał 3.
- Nacisnąć przycisk kanału
26
4 x, aby
wskazać naprzemiennie wszystkie kanały
w ramach pętli.
Zostaną wskazane czujniki zewnętrzne,
które można wywołać.
Nacisnąć i przytrzymać wciśnięty przycisk
kanału
26
, aby usunąć wszystkie niewyko-
rzystywane kanały. Jeżeli miałby zostać
dodany kolejny czujnik zewnętrzny a tym
samym kolejny kanał, to stacja pogodowa
odbierze sygnał automatycznie. W przeciw-
nym razie można ręcznie nadać sygnał z
czujnika zewnętrznego naciskając przycisk
TX
42
.
Wskazywanie trendu
temperatury (zewnętrznej)
Po skutecznym nawiązaniu połączenia z czujni-
kiem zewnętrznym wskazywany jest trend tempe-
ratury
21
.
Możliwe są następujące wskazania:
= Temperatura zewnętrzna rośnie.
= Temperatura zewnętrzna pozostaje
stała.
= Temperatura zewnętrzna maleje.
Wskazywanie temperatury
wewnętrznej
Na wyświetlaczu LC wskazywana jest aktualna
temperatura wewnętrzna
3
.
Wskazywanie temperatury
w ˚C / ˚F
Wskazówka: Ustawowo przepisaną jednostką
temperatury jest °C.
Wskazówka: Przy dostawie stacja pogody
jest ustatawiona fabrycznie na °Celsjusza.
Nacisnąć przycisk „+“ / °C / °F
28
, aby
przełączać między skalami temperatury
Celsjusza i Fahrenheita.
Wskazywanie wilgotności
powietrza (wewnątrz)
Aktualna wilgotność powietrza
5
wskazywana
jest na wyświetlaczu LC. Wskaźnik komfortu
4
dokonuje podziału wilgotności powietrza na trzy
kategorie.
Do dyspozycji są następujące kategorie:
„Dry” = wilgotność powietrza
5
< 45 %
„Comfort” = wilgotność powietrza
5
45 – 75 %, temperatura we-
wnętrzna
3
24 °C 27,9 °C
„Wet” = wilgotność powietrza
5
> 75 %
Wyświetlanie maksymalnej /
minimalnej temperatury /
wilgotności powietrza
Stacja pogodowa po raz pierwszy mierzy i
zapisuje minimalną / maksymalną temperatu-
rę / wilgotność powietrza po włożeniu baterii.
Nacisnąćj krótko przycisk „–“ / MAX / MIN
29
. Wskazana zostanie maksymalna zmie-
rzona temperatura wewnętrzna
3
i ze-
wnętrzna
24
oraz maksymalna zmierzona
wilgotność powietrza
5
.
94604_aur_Funk-Wetterstation_content_PL_SI_CZ_SK.indd 20 10.09.13 14:46
Strona się ładuje...
Strona się ładuje...
Strona się ładuje...
Strona się ładuje...
Strona się ładuje...
Strona się ładuje...
Strona się ładuje...
Strona się ładuje...
Strona się ładuje...
Strona się ładuje...
Strona się ładuje...
Strona się ładuje...
Strona się ładuje...
Strona się ładuje...
Strona się ładuje...
Strona się ładuje...
Strona się ładuje...
Strona się ładuje...
Strona się ładuje...
Strona się ładuje...
Strona się ładuje...
Strona się ładuje...
Strona się ładuje...
Strona się ładuje...
Strona się ładuje...
Strona się ładuje...
Strona się ładuje...
Strona się ładuje...
Strona się ładuje...
Strona się ładuje...
Strona się ładuje...
Strona się ładuje...
Strona się ładuje...
Strona się ładuje...
Strona się ładuje...
Strona się ładuje...
Strona się ładuje...
Strona się ładuje...
Strona się ładuje...
Strona się ładuje...
Strona się ładuje...
Strona się ładuje...
Strona się ładuje...
Strona się ładuje...
Strona się ładuje...
Strona się ładuje...
Strona się ładuje...
Strona się ładuje...
Strona się ładuje...
-
 1
1
-
 2
2
-
 3
3
-
 4
4
-
 5
5
-
 6
6
-
 7
7
-
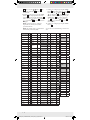 8
8
-
 9
9
-
 10
10
-
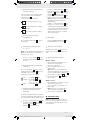 11
11
-
 12
12
-
 13
13
-
 14
14
-
 15
15
-
 16
16
-
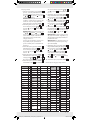 17
17
-
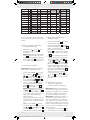 18
18
-
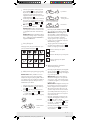 19
19
-
 20
20
-
 21
21
-
 22
22
-
 23
23
-
 24
24
-
 25
25
-
 26
26
-
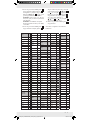 27
27
-
 28
28
-
 29
29
-
 30
30
-
 31
31
-
 32
32
-
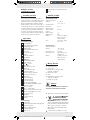 33
33
-
 34
34
-
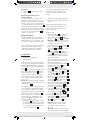 35
35
-
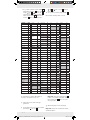 36
36
-
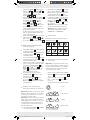 37
37
-
 38
38
-
 39
39
-
 40
40
-
 41
41
-
 42
42
-
 43
43
-
 44
44
-
 45
45
-
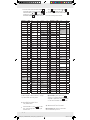 46
46
-
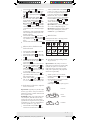 47
47
-
 48
48
-
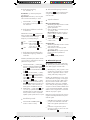 49
49
-
 50
50
-
 51
51
-
 52
52
-
 53
53
-
 54
54
-
 55
55
-
 56
56
-
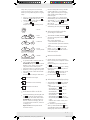 57
57
-
 58
58
-
 59
59
-
 60
60
-
 61
61
-
 62
62
-
 63
63
-
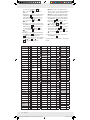 64
64
-
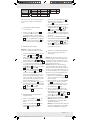 65
65
-
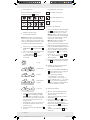 66
66
-
 67
67
-
 68
68
-
 69
69


Auriol 79210 Operation and Safety Notes
- Kategoria
- Stacje pogodowe
- Typ
- Operation and Safety Notes
w innych językach
- slovenčina: Auriol 79210
Powiązane artykuły
-
Auriol Z29536 Operation and Safety Notes
-
-
Auriol IAN 96414 Operation and Safety Notes
-
-
-
-
-
-
-
Inne dokumenty
-
Hyundai 2005 Elantra Instrukcja obsługi
-
-
-
Hyundai WS 1806 BOY Instrukcja obsługi
-
-
-
-
Emos E3070 Instrukcja obsługi
-
 Biowin 183302 Instrukcja obsługi
-
Technoline WS 6750 Instrukcja obsługi
