
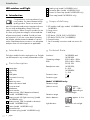
LED OUTDOOR WALL LIGHT
IAN 273687
LED-WANDAUSSENLEUCHTE
Montage- und Sicherheitshinweise
SEINÄÄN KIINNITETT Ä V Ä
LED-ULKOV ALAISIN
Asennus- ja turvaohjeet
LED OUTDOOR WALL LIGHT
Assembly and safety advice
LED-V ÄGGLAMPA
FÖR UTOMHUSBRUK
Monterings- och säkerhetsanvisningar
ŚCIENNA LAMP A
ZEWNĘTRZNA LED
Wskazówki dotyczące montażu oraz bezpieczeństwa

GB / IE Assembly and safety advice Page 5
FI Asennus- ja turvaohjeet Sivu 13
SE Monterings- och säkerhetsanvisningar Sidan 21
PL Wskazówki dotyczące montażu oraz bezpieczeństwa Strona 27
DE / AT / CH Montage- und Sicherheitshinweise Seite 35
Before reading, unfold both pages containing illustrations and familiarise yourself with all functions of the
device.
Käännä ennen lukemista molemmat kuvalliset sivut esiin ja tutustu seuraavaksi laitteen kaikkiin toimintoihin.
Vik ut bildsidan och ha den till hands när du läser igenom anvisningarna och gör dig bekant med
apparatens / maskinens funktioner.
Przed przeczytaniem proszę rozłożyć obie strony z ilustracjami, a następnie proszę zapoznać się z wszy-
stkimi funkcjami urządzenia.
Klappen Sie vor dem Lesen die beiden Seiten mit den Abbildungen aus und machen Sie sich anschließend
mit allen Funktionen des Gerätes vertraut.
ŚCIENNA LAMP A
ZEWNĘTRZNA LED
Wskazówki dotyczące montażu oraz bezpieczeństwa

c
eD
A14109002L B
2 x
8 9
3
7
1
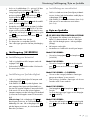
11
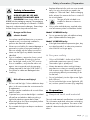
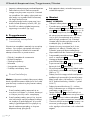
Sensor Space
max. 8 m 200–2 LUX 4 min - 10 s
Sensor degree
100 °
45
2 x
65
1
2 x
10
2
11
3
5 4
8 9
12
14
13
18
18
16

A14109302L B
cD
e
2 x
15
25
16
9
17
6
7
2 x
2 x
15
5
2
2 x 19
19
19
20
21
8

5 GB/IE
Table of Contents
Introduction
Intended use ........................................................................................................................................ Page 6
Parts description ..................................................................................................................................Page 6
Scope of delivery ................................................................................................................................Page 6
Technical Data ....................................................................................................................................Page 6
Safety information
For your safety.....................................................................................................................................Page 7
Preparation
Required tools and material ...............................................................................................................Page 7
Prior to installation ...............................................................................................................................Page 8
Installation .....................................................................................................................................Page 8
Set up
Setting the lighting duration ................................................................................................................Page 9
Setting the light sensitivity ...................................................................................................................Page 9
Setting the sensitivity ...........................................................................................................................Page 9
Replacing a bulb .......................................................................................................................Page 9
Cleaning ...........................................................................................................................................Page 10
Disposal ............................................................................................................................................Page 10
Warranty and Service
Warranty .............................................................................................................................................Page 10
Service Address...................................................................................................................................Page 10
Declaration of conformity ...................................................................................................................Page 10
Manufacturer .......................................................................................................................................Page 11

6 GB/IE
Safety information / PreparationIntroduction
LED outdoor wall light
Introduction
Congratulations on the purchase of your
new product. You have selected a high
quality product. These instructions are
part of the product and contain important informa-
tion on setup and handling. Always follow all
safety instructions. Before using this product for the
first time, verify that the voltage is correct and that
all parts are properly installed. Should you have
any questions or you are unsure about operating
the product, please contact the dealer or service
centre. Please keep these instructions in a safe place
and pass them on to third parties as applicable.
Intended use
This light is suitable for indoor and outdoor use. The light
can be fastened to any normally inflammable surface.
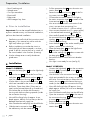
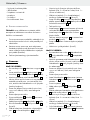
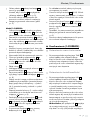
Parts description
1 Lamp glass
2 Light body
3 Nut
4 Wall plate
5 Connection housing
6 Bulb
7 Retaining screw
8 Mains connection lead
9 Lustre terminal
10 Membrane
11 Plastic washer
12 Rotary control SENS (detection distance)
(model 14109002L only)
13 Rotary control LUX (light sensitivity) (model
14109002L only)
14 Rotary control TIME (switched on duration)
(model 14109002L only)
15 Screw (model 14109302L only)
16 Protective tube
17 Connector plug (model 14109302L only)
18 Sealing ring (model 14109002L only)
19 Protective glass (model 14109302L only)
20 Screws for cover cap (model 14109302L only)
21 Cover cap (model 14109302L only)
Scope of delivery
1 LED outdoor wall light, models 14109002L and
14109302L
2 Fixing screws
2 Wall plugs
2 LED lamps, GU10, 5 W (14109302L)
1 LED lamp, GU10, 5 W (14109002L)
2 Protective tubes
1 Set of assembly instructions and instructions for
use
Technical Data
Article no.: 14109002L and
14109302L
Operating voltage: 230–240 V∼ 50 Hz
Bulb: 220–240 V∼ 50 Hz,
GU10, 5 W
Rated power max.: 14109302L:
2 x 5 W
14109002L:
1 x 5 W
Protection class: I /
Protection type: IP44
Model 14109002L only:
Detection angle
(Motion sensor): approx.
80 °–100 °
depending on
mounted height
Detection range
Motion detector: approx. 6–8 m
Light duration: 10 s–4 min with twilight
sensor

7 GB/IE
Safety information / PreparationIntroduction
Safety information
RISK OF LOSS OF LIFE AND
ACCIDENT TO INFANTS AND
CHILDREN! Never leave children unat-
tended with the packaging material. The packaging
material represents a danger of suffocation. Children
frequently underestimate the dangers. Please keep
children away from the product at all times.
Danger to life from
electric shock!
Ensure that a qualified electrician, or a person
trained to carry out electrical installations,
performs the electrical installation.
We assume no liability for material damage or
personal injury due to improper handling or
failure to comply with the safety instructions!
Never use the light if any defects have been
identified.
Prior to installation, remove the fuse or switch
off the circuit breaker (0 setting) in the fuse
box. Set the light switch to the „Off“ position.
Prior to installation, verify that the mains volt-
age on site corresponds with the operating
voltage required for the light (230–240 V ∼).
Ensure that no cables are damaged when
installing.
Risk of burns and injury!
Do not install the light, if it has a defective lamp
glass. In this case contact the service centre for
a replacement.
The light may be installed on all normal inflam-
mable surfaces.
To prevent burns, ensure that the light is switched
off and has cooled down before touching it.
Light bulbs develop a great deal of heat.
Allow the light to cool down completely before
replacing a defective bulb.
Do not attach the light to a damp or conductive
substrate.
Replace defective bulbs with new ones immedi-
ately. Use only those bulbs as stated in the
chapter on “Technical Data”. Before changing
bulbs, always first remove the fuse or switch off
the circuit breaker.
The type of bulb included is not
suitable for dimmer or electronic
switches.
Only use the individual parts supplied, other-
wise all warranty claims will become invalid.
Model 14109002L only:
Do not operate the lights with defective lamp
glass. Replace defective lamp glass.
Model 14109302L only:
If the lights have defective protective glass, they
must be disposed of, as otherwise protection
class IP44 will no longer apply
For your safety
Only use 220-240 V ∼ bulbs with a GU10
socket and a maximum output of 5 watt.
The outdoor light is splash-proof.
Always be attentive when working! Always
pay attention to what you are doing and act
with common sense. Never install the light if
you are having difficulty concentrating or do
not feel well.
Do not look directly into the light source (light
bulb, LED etc.).
Do not look at the light source (light bulb, LED
etc.) with an optical instrument (e.g. magnifier).
Preparation
Required tools and material
The tools and materials specified are not included.
This information and these values are non-binding
and they are only for guidance. The nature of the
material is determined by the individual local con-
ditions.

8 GB/IE
Installation / Set up / Replacing a bulbPreparation / Installation
– Pencil /marking tool
– Voltage tester
– Cross-tip screwdriver
– Electric drill
– Edge cutter
– Allen hexagon key 8 mm
Prior to installation
Important: Ensure that a qualified electrician, or
a person trained to carry out electrical installations,
performs the electrical installation.
Familiarise yourself with all the instructions and
diagrams in this manual, as well as with the
light itself, before you install it.
Before installation ensure that the circuit, to
which the light will be connected, is not ener-
gised. To do this, remove the fuse or switch off
the circuit breaker in the fuse box (0 setting).
Use the voltage tester to verify the de-ener-
gised status.
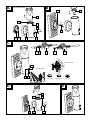
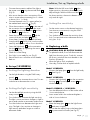
Installation
Model 14109002L:
Unscrew the lamp glass 1 from the light body
2.
Remove the nuts 3 visible at the front of the
wall plate 4 and the plastic washers 11 , and
open the connection housing 5 (see Fig. A).
Use the holes in the connection housing 5,
which are intended for the screws, to mark the
drill holes. Open these holes (if they are not
open) with a pointed object (e.g. screwdriver).
Ensure that that you fasten the connection
housing with the arrow facing upwards (inside
the connection housing).
Now drill the fixing holes (ø approx. 6 mm,
depth approx. 40 mm). Ensure that you do not
damage the electrical supply line.
Now introduce the wall plugs into the drill holes.
Slide the mains connection lead 8 through
the cable entry with the membrane 10 .
Pull the protective tube 16 over the mains con-
nection lead 8.
Fasten the connection housing 5 with the fix-
ing screws included 7, (see fig. B).
Connect the connection cable of the light to
the mains connection lead 8 by means of the
lustre terminal 9, see fig. C.
Also ensure that the colour connection of the
wires is correct when connecting (L or
2 = black or brown, N or 1 = blue or white).
Now connect the earth wire (3 = green-yellow)
to the marked earth terminal (see fig. C).
Now carefully attach the wall plate 4 over
the connection housing 5, attach the plastic
washers 11 and secure with the two nuts 3.
Check for correct fitting.
Insert the bulb 6 into the socket carefully and
tighten it with a ¼ turn clockwise.
Place the lamp glass 1 over the light fixture
2 and screw it tightly.
Be sure the sealing ring 18 makes contact with
the lamp glass 1 (see Fig. D).
Reinsert the fuse or switch the circuit breaker
back on.
Your light is now ready for use (see fig. E).
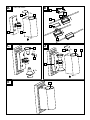
Model 14109302L:
Unscrew the light body 2 from the connection
housing 5 by loosening the screws 15 anti-
clockwise (Fig. A).
Use the holes in the connection housing 5,
which are intended for the screws, to mark the
drill holes. Ensure that that you fasten the con-
nection housing 5 with the arrow facing up-
wards (on the rear of the connection housing).
Now drill the fixing holes (Ø approx. 6 mm,
depth approx. 40 mm). Be sure not to damage
the supply line.
Now introduce the wall plugs into the drill holes.
Open the connection socket 17 on the rear of
the connection housing 5 by unscrewing the
4 screws 20 anti-clockwise.
Remove the cover cap 21 .
Pull the protective tube 16 over the mains con-
nection lead 8.

9 GB/IE
Installation / Set up / Replacing a bulbPreparation / Installation
Connect the connection cable of the light to
the power cord 8 using the terminal block 9
(Fig. B).
Also ensure that the colour connection of the
wires is correct when connecting (L or 2 = black
or brown, N or 1 = blue).
Connect the earth wire (3 = green-yellow) to
the marked earth terminal (Fig. B).
Close the connection socket 17 on the rear of
the connection housing 5. Place the cover
cap 21 on the connector socket 17 and turn
the 4 screws 20 clockwise.
Fasten the connection housing 5 with the
screws which are included 7 (Fig. C).
Use a clean, lint-free cloth to insert the lamp.
Insert the bulb 6 GU10, 5 W, into the socket
carefully and tighten it with a ¼ turn clockwise.
Screw the light body 2 into the connection
housing 5 again by tightening the screws 15
clockwise (Fig. D).
Check for correct fitting.
Your light is now ready for use (Fig. E).
Reinsert the fuse or switch the circuit breaker
back on.
Set up (14109002L)
Setting the lighting duration
Set the light duration using the TIME rotary
control 14 .
Turn clockwise to increase the on time. Turn an-
ti-clockwise to decrease the on time.
Setting the light sensitivity
Set the desired light sensitivity using the LUX
rotary control 13 .
Turn clockwise to increase the light sensitivity.
The light is more sensitive to changes in light in-
tensity and switches to automatic mode sooner.
Turn anti-clockwise to decrease the light sensi-
tivity. The light is less sensitive to changes in
light intensity and takes longer to switch to
automatic mode.
Note: With the LUX control dial 13 at the
highest position, the motion detector will work
day and night. With the LUX control dial 13 in
the lowest position, the motion detector will
only work at night.
Setting the sensitivity
Set the motion sensor to the desired sensitivity
(sensitiveness to movement) using the SENS
rotary control 12 .
Turn clockwise to increase the sensitivity (max.
8 m). Turn anti-clockwise to decrease the sensi-
tivity (min. 2 m).
Replacing a bulb
CAUTION! RISK OF ELECTRIC SHOCK!
To replace the bulb, first of all disconnect the
light from the mains circuit. To do this, remove
the fuse or switch off the circuit breaker in the
fuse box (0 setting).
Allow the light to cool completely.
Use a dry, lint-free cloth to replace a bulb.
Model 14109002L:
Unscrew the lamp glass 1 from the light body
2 (see Fig. A).
Model 14109302L:
Unscrew the light body 2 from the connection
housing 5 by loosening the screws 15 anti-
clockwise (Fig. A).
Model 14109002L + 14109302L:
Turn the defective bulb out of the socket with a
¼ turn anticlockwise.
Insert a new bulb in the socket and tighten it
with a ¼ turn clockwise.
Model 14109002L:
Place the lamp glass 1 over the light fixture
2 and screw it tightly.
Ensure that the sealing ring on the lamp glass
1 is present and in contact (see Fig. D).

10
Warranty and ServiceReplacing a bulb / Cleaning / Disposal / Warranty and Service
Model 14109302L:
Screw the light body 2 into the connection
housing 1 again by tightening the screws 15
clockwise (Fig. D).
Model 14109002L + 14109302L:
Check for correct fitting.
Reinsert the fuse or switch the circuit breaker
back on.
Cleaning
CAUTION! RISK OF ELECTRIC SHOCK!
Disconnect the light from the mains circuit
before cleaning. To do this, remove the fuse or
switch off the circuit breaker in the fuse box
(0 setting).
Allow the light to cool completely.
Only use a dry, lint-free cloth for cleaning. Do
not use solvents, spirit or similar substances.
They could damage the light.
Reinsert the fuse or switch the circuit breaker
back on.
Disposal
The package and packaging materials
consist entirely of environmentally
friendly materials. They can be disposed
of at your local recycling facility.
The symbol of the wheelie bin with the
line through it means that, in the European
Union, the product has to be disposed
of in a separate refuse collection. This applies to
the product and to all components bearing this
symbol. Do not dispose of products bearing this
symbol in your normal household waste, but in-
stead they must be taken for recycling to a collec-
tion site for electrical and electronic appliances.
Recycling helps to reduce the consumption of
raw materials and protects the environment.
Warranty and Service
Warranty
You receive a 36 month warranty on this product,
valid from the date of purchase.
The appliance has been carefully produced under
strict quality control.
We will rectify without charge all material and
manufacturing defects within the warranty period.
In the event of a defect arising during the warranty
period, please send the appliance to the listed
Service Centre address, making reference to the
following article number: 14109002L / 14109302L.
Wearing parts (such as light bulbs) and damage
caused by improper handling, non-observance of
the operating instructions or unauthorised interfer-
ence with the appliance are excluded from the
warranty.
The performance of services under the warranty
does not extend or renew the warranty period.
Service Address
Briloner Leuchten GmbH
Im Kissen 2, 59929 Brilon, Germany
Tel.: +49 2961 / 9712 - 800
Fax: +49 2961 / 9712 - 199
E-Mail: [email protected]
www.briloner.com
IAN 273687
For all inquiries about your product, please have
your receipt and the article number (e.g.
IAN 12345) ready as your proof of purchase.
Declaration of conformity
This product fulfils the requirements of the applicable
European and national directives (Electromagnetic
Compatibility 2004 / 108 / EC, Low Voltage Directive
2006 / 95 / EC, Ecodesign Directive 2009 / 125 / EC,
RoHS Directive 2011/ 65 / EU).
GB/IE

11 GB/IE
Warranty and ServiceReplacing a bulb / Cleaning / Disposal / Warranty and Service
Conformity has been demonstrated. The relevant
declarations and documents are held by the
manufacturer.
Manufacturer
Briloner Leuchten GmbH
Im Kissen 2
59929 Brilon
Germany

12
Sisällysluettelo

13 FI
Sisällysluettelo
Johdanto
Tarkoituksenmukainen käyttö .............................................................................................................. Sivu 14
Osien kuvaus ........................................................................................................................................ Sivu 14
Toimituksen sisältö ................................................................................................................................ Sivu 14
Tekniset tiedot ....................................................................................................................................... Sivu 14
Turvallisuusohjeet
Näin menettelet oikein ......................................................................................................................... Sivu 15
Valmistelut
Tarvittavat työkalut ja materiaalit ........................................................................................................ Sivu 15
Ennen asennusta .................................................................................................................................. Sivu 16
Asennus ............................................................................................................................................. Sivu 16
Käyttöönotto
Valaisuajan säätäminen ...................................................................................................................... Sivu 17
Valoherkkyyden säätäminen ............................................................................................................... Sivu 17
Herkkyyden säätäminen ...................................................................................................................... Sivu 17
Lampun vaihtaminen ............................................................................................................. Sivu 17
Puhdistus .......................................................................................................................................... Sivu 18
Hävittäminen ................................................................................................................................ Sivu 18
Takuu ja huolto
Takuu .................................................................................................................................................... Sivu 18
Huoltopalvelun osoite .......................................................................................................................... Sivu 18
Vaatimustenmu-kaisuusvakuutus .......................................................................................................... Sivu 18
Valmistaja ............................................................................................................................................. Sivu 19

14 FI
Turvallisuusohjeet / Valmistelut Johdanto
Seinään kiinnitettävä LED-
ulkovalaisin
Johdanto
Onnittelemme sinua uuden tuotteen han-
kinnasta. Olet valinnut korkealaatuisen
tuotteen. Tämä ohje on osa tuotetta ja se
sisältää tärkeää käyttöönottoon ja käsittelyyn liitty-
vää tietoa. Noudata aina kaikkia turvallisuusohjeita.
Tarkista ennen käyttöönottoa, että käytössä oleva
jännite on sopiva ja että kaikki osat on oikein asen-
nettu. Jos sinulla on kysymyksiä tai olet epävarma
laitteen käytön suhteen, ota yhteyttä jälleenmyyjään
tai huoltopisteeseen. Säilytä tämä ohje huolellisesti
ja anna tarvittaessa muille henkilöille.
Tarkoituksenmukainen käyttö
Valaisin soveltuu sekä sisä- että ulkokäyttöön. Valaisin
voidaan kiinnittää kaikkiin paloturvallisuuden kan-
nalta normaalisti syttyviin pintoihin.
Osien kuvaus
1 Lampunlasi
2 Valaisimen runko
3 Mutteri
4 Seinäkilpi
5 Liitäntäkotelo
6 Lamppu
7 Kiinnitysruuvi
8 Verkkojohto
9 Sokeripalaliitin
10 Kalvo
11 Muovilevy
12 SENS-kääntösäädin (havaintoetäisyys) (vain
malli 14109002L)
13 LUX-kääntösäädin (valoherkkyys) (vain malli
14109002L)
14 TIME-kääntösäädin (kytkentäaika) (vain malli
14109002L)
15 Ruuvi (vain malli 14109302L)
16 Johtosuojus
17 Liitäntärasia (vain malli 14109302L)
18 Tiivisterengas (vain malli 14109002L)
19 Suojalasi (vain malli 14109302L)
20 Suojakannen ruuvit (vain malli 14109302L)
21 Suojakansi (vain malli 14109302L)
Toimituksen sisältö
1 seinään kiinnitettävä LED-ulkovalaisin, malli
14109002L tai 14109302L
2 kiinnitysruuvia
2 tulppaa
2 LED-lamppua, GU10, 5 W (14109302L)
1 LED-lamppu, GU10, 5 W (14109002L)
2 johtosuojusta
1 asennus- ja käyttöohje
Tekniset tiedot
Tuotenro: 14109002L tai
14109302L
Käyttöjännite: 230–240 V∼ 50 Hz
Lamppu: 220–240 V∼ 50 Hz,
GU10, 5 W
Suurin nimellisteho: 14109302L: 2 x 5 W
14109002L: 1 x 5 W
Kotelointiluokka: I /
IP-luokitus: IP44
Vain malli 14109002L:
Tunnistuskulma
(liiketunnistin): n. 80 °–100 °
asennuskorkeu-
desta riippuen
Tunnistusalue
Liiketunnistin: n. 6–8 m
Valaisuaika: 10 s – 4 min himmenny-
santurilla

15 FI
Turvallisuusohjeet / Valmistelut Johdanto
Turvallisuusohjeet
HENGEN-JA TAPATURMANVAARA
LAPSILLE! Älä koskaan jätä lapsia yksin
pakkausmateriaalin kanssa. Pakkausma-
teriaali voi aiheuttaa tukehtumisen. Lapset aliarvioivat
useimmiten vaaratilanteet. Pidä tuote aina lasten
ulottumattomissa.
Hengenvaara sähköiskun
vuoksi!
Anna sähköasennus pätevän sähköasentajan
tai sähköasennusta varten koulutetun henkilön
suoritettavaksi.
Valmistaja ei vastaa esine- tai henkilövahingoista,
jotka aiheutuvat tuotteen asiattomasta käytöstä
tai käyttöohjeiden noudattamatta jättämisestä!
Älä koskaan käytä valaisinta, jos havaitset siinä
jotain vikoja.
Poista ennen asennusta sulake tai kytke johdon
turvakytkin pois päältä (0-asento) varokekote-
losta käsin. Aseta valokytkin OFF-asentoon.
Varmista ennen asennusta, että käytettävissä
oleva verkkojännite on yhdenmukainen valaisi-
men käyttöjännitteen kanssa (230–240 V ∼).
Varmista, että asennuksessa ei vahingoiteta
johtoja.
Tulipalo- ja
loukkaantumisvaara!
Älä asenna valaisinta, jos lampunlasi on vioittu-
nut. Ota vauriotapauksissa yhteyttä huoltopis-
teeseen, josta saat uuden tuotteen tilalle.
Valaisin voidaan asentaa kaikille normaalisti
syttyville pinnoille.
Varmista palovammojen välttämiseksi, että va-
laisin on kytketty pois päältä ja jäähtynyt ennen
kuin kosketat siihen. Lamput kuumenevat erittäin
kuumiksi käytössä.
Anna valaisimen jäähtyä kunnolla ennen kuin
vaihdat lampun uuteen.
Älä kiinnitä valaisinta kosteaan tai sähköä joh-
tavaan alustaan.
Vaihda viallinen lamppu heti uuteen. Käytä vain
kappaleessa Tekniset tiedot mainittuja lamppuja.
Poista aina ennen lampun vaihtoa sulake tai
kytke johdon suojakytkin pois päältä.
Toimitukseen sisältyvää lamppua ei
voi käyttää himmentimen tai elektro-
nisen kytkimen kanssa.
Käytä ainoastaan toimitukseen sisältyviä osia,
muutoin takuu raukeaa.
Vain malli 14109002L:
Älä käytä valaisinta, jos lampunlasi on vioittunut.
Korvaa lampunlasi uudella.
Vain malli 14109302L:
Valaisin täytyy hävittää, jos suojalasit ovat vau-
rioituneet, sillä IP44-luokitusta ei voida silloin
enää taata
Näin menettelet oikein
Käytä vain 220–240 V:n lamppuja, joissa on
GU10-kanta ja joiden maksimiteho on 5 W.
Ulkovalaisin on roiskevesisuojattu.
Ole aina tarkkaavainen! Keskity siihen mitä teet
ja toimi järkevästi. Älä missään tapauksessa
asenna valaisinta, jos et pysty keskittymään tai
tunnet itsesi huonovointiseksi.
Älä katso suoraan valonlähteeseen (lamppuun,
LED-valoon, jne.).
Älä katso valonlähteeseen (lamppuun, LED-
valoon, jne.) optisella välineellä esim. suuren-
nuslasilla.
Valmistelut
Tarvittavat työkalut ja
materiaalit
Mainitut työkalut ja materiaalit eivät sisälly toimituk-
seen. Kysymys on suuntaa antavista, ei-sitovista
tiedoista ja arvoista. Materiaalin laatu määräytyy
paikan yksilöllisten ominaisuuksien mukaan.

16 FI
Asennus / Käyttöönotto / Lampun vaihtaminenValmistelut / Asennus
– lyijykynä / merkintätyökalu
– jännitemittari
– ristipäinen ruuvimeisseli
– porakone
– sivuleikkuri
– kuusiokoloavain 8 mm
Ennen asennusta
Tärkeää: anna sähköasennus pätevän sähkö-
asentajan tai sähköasennusta varten koulutetun
henkilön suoritettavaksi.
Tutustu ennen asennusta kaikkiin määräyksiin ja
tässä ohjeessa oleviin kuviin sekä perehdy itse
valaisimeen.
Varmista ennen asennusta, ettei valaisimeen
liitettävässä johdossa ole jännitettä. Poista tätä
varten sulake tai kytke sulakekotelon suojakytkin
pois päältä (0-asento).
Tarkista jännitteettömyys jännitemittarilla.
Asennus
Malli 14109002L:
Ruuvaa lampunlasi 1 valaisimen rungosta 2
irti.
Irrota seinäkilvessä 4 näkyvät mutterit 3 ja
muovilevyt 11 ja avaa liitäntäkotelo 5 (kuva A).
Merkitse porattavat reiät liitäntäkotelossa 5
olevien reikien avulla. Avaa ruuvit tarvittaessa
terävällä esineellä esim. ruuvimeisselillä. Huo-
mioi, että kiinnität liitäntäkotelon nuoli ylöspäin
(merkitty koteloon).
Poraa sen jälkeen kiinnitysreiät (ø noin 6 mm,
syvyys noin 40 mm). Varo, ettet vahingoita
johtoa.
Aseta tulpat porausreikiin.
Pujota verkkojohto 8 kalvoilla 10 varustetun
holkkitiivisteen läpi.
Vedä johtosuojukset 16 verkkojohdon 8 päälle.
Kiinnitä liitäntäkotelo 5 kiinnitysruuveilla 7
(kuva B).
Yhdistä valaisimen liitäntäjohto sokeripalaliitti-
men 9 avulla verkkojohtoon 8 (kuva C).
Huomioi myös liitettyjen johtojen värillinen
kytkentä (L tai 2 = musta tai ruskea, N tai 1 =
sininen tai valkoinen).
Yhdistä suojajohdin (3 = vihreä-keltainen)
merkittyyn maattoliittimeen (kuva C).
Aseta seinäkilpi 4 varovasti liitäntäkotelon 5
päälle, aseta muovilevyt 11 päälle ja kiinnitä
molemmilla muttereilla 3.
Tarkista kiinnitys.
Aseta lamppu 6 varovasti kantaan ja kiinnitä
se kiertämällä ¼ kierrosta myötäpäivään.
Aseta lampunlasi 1 valaisimen runkoon 2 ja
kierrä tiukalle.
Tarkista, että tiivisterengas 18 on asetettu lam-
punlasiin 1 (kuva D).
Aseta sulake jälleen sisään tai kytke suojakytkin
päälle.
Valaisin on nyt käyttövalmis (kuva E).
Malli 14109302L:
Ruuvaa valaisimen runko 2 liitäntäkotelosta
5 irti löysäämällä ruuveja 15 vastapäivään
(kuva A).
Merkitse porattavat reiät liitäntäkotelossa 5
olevien reikien avulla. Huomioi, että kiinnität
liitäntäkotelon 5 nuoli ylöspäin (merkitty kote-
lon takaosaan).
Poraa sen jälkeen kiinnitysreiät (ø noin 6 mm,
syvyys noin 40 mm). Varo, ettet vahingoita
johtoa.
Aseta tulpat porausreikiin.
Avaa liitäntäkotelon 5 takaosassa sijaitseva
liitäntärasia 17 löysäämällä 4 ruuvia 20 vasta-
päivään.
Irrota suojakansi 21 .
Vedä johtosuojukset 16 verkkojohdon 8
päälle.
Yhdistä valaisimen liitäntäjohto sokeripalaliittimen
9 avulla verkkojohtoon 8 (kuva B).
Huomioi myös liitettyjen johtojen värillinen
kytkentä (L tai 2 = musta tai ruskea, N tai 1 =
sininen).
Yhdistä suojajohdin (3 = vihreä-keltainen)
merkittyyn maattoliittimeen (kuva B).
Sulje liitäntäkotelon 5 takaosassa sijaitseva
liitäntärasia 17 . Aseta suojakansi 21 liitäntärasian

17 FI
Asennus / Käyttöönotto / Lampun vaihtaminenValmistelut / Asennus
17 päälle ja kiinnitä kaikki 4 ruuvia 20 myötä-
päivään kiertämällä.
Kiinnitä liitäntäkotelo 5 ruuveilla 7 (kuva C).
Käytä lampun kiinnitykseen puhdasta nukatonta
liinaa.
Aseta lamput 6 GU10, 5 W, varovasti kantaan
ja kiinnitä ne kiertämällä ¼ kierrosta myötäpäi-
vään.
Ruuvaa valaisimen runko 2 liitäntäkotelon 5
päälle kiristämällä ruuvit 15 myötäpäivään
(kuva D).
Tarkista kiinnitys.
Valaisin on nyt käyttövalmis (kuva E).
Aseta sulake jälleen sisään tai kytke suojakytkin
päälle.
Käyttöönotto (14109002L)
Valaisuajan säätäminen
Aseta TIME-kääntösäätimellä 14 valaisimen
haluttu kytkentäaika.
Käännä myötäpäivään, kun haluat pidentää
kytkentäaikaa. Kierrä säädintä vastapäivään,
kun haluat lyhentää kytkentäaikaa.
Valoherkkyyden säätäminen
Aseta LUX-kääntösäätimellä 13 valaisimen
haluttu valoherkkyys.
Kierrä säädintä myötäpäivään, kun haluat lisätä
valoherkkyyttä. Valaisin reagoi herkemmin
muuttuneeseen valon voimakkuuteen ja kytkey-
tyy aikaisemmin automaattiseen käyttöön.
Kierrä säädintä vastapäivään, kun haluat alen-
taa valoherkkyyttä. Valaisin reagoi vähemmän
herkästi muuttuneeseen valon voimakkuuteen ja
kytkeytyy myöhemmin automaattiseen käyttöön.
Huomautus: jos LUX-kääntösäädin 13 on
asetettu suurimpaan arvoon, liiketunnistin on
käytössä yötä päivää. Jos LUX-kääntösäädin
13 on asetettu pienimpään arvoon, liiketunnis-
tin on käytössä vain öisin.
Herkkyyden säätäminen
Aseta SENS-kääntösäätimellä 12 liiketunnistimen
haluttu herkkyys (liikkeen tunnistuksen herkkyys).
Käännä myötäpäivään, kun haluat nostaa herk-
kyyttä (maks. 8 m). Käännä vastapäivään, kun
haluat alentaa herkkyyttä (min. 2 m).
Lampun vaihtaminen
VARO! SÄHKÖISKUN VAARA!
Irrota valaisin sähköverkosta ennen kuin vaih-
dat uuden lampun. Poista tätä varten sulake tai
kytke sulakekotelon suojakytkin pois päältä
(0-asento).
Anna lampun jäähtyä kunnolla.
Käytä lampun vaihtoon puhdasta, nukatonta
liinaa.
Malli 14109002L:
Ruuvaa lampunlasi 1 valaisimen rungosta 2
irti (kuva A).
Malli 14109302L:
Ruuvaa valaisimen runko 2 liitäntäkotelosta
5 irti löysäämällä ruuveja 15 vastapäivään
(kuva A).
Malli 14109002L + 14109302L:
Kierrä käytetty lamppu ¼ kierrosta vastapäivään
lampunkannasta.
Aseta uusi lamppu kantaan ja kiinnitä se kiertä-
mällä ¼ kierrosta myötäpäivään.
Malli 14109002L:
Aseta lampunlasi 1 valaisimen runkoon 2 ja
kierrä tiukalle.
Tarkista, että tiivisterengas on asetettu lampun-
lasiin 1 (kuva D).
Malli 14109302L:
Ruuvaa valaisimen runko 2 liitäntäkotelon 1
päälle kiristämällä ruuvit 15 myötäpäivään
(kuva D).

18 FI
Takuu ja huoltoLampun vaihtaminen / Puhdistus / Hävittäminen / Takuu ja huolto
Malli 14109002L + 14109302L:
Tarkista kiinnitys.
Aseta sulake jälleen sisään tai kytke suojakytkin
päälle.
Puhdistus
VARO! SÄHKÖISKUN VAARA! Irrota
valaisin sähköverkosta puhdistusta varten. Poista
tätä varten sulake tai kytke sulakekotelon suoja-
kytkin pois päältä (0-asento).
Anna lampun jäähtyä kunnolla.
Käytä puhdistukseen vain kuivaa, nukkautuma-
tonta liinaa. Älä käytä mitään liuotinainetta, ben-
siiniä tms. Valaisin vaurioituisi niiden käytöstä.
Aseta sulake jälleen sisään tai kytke suojakytkin
päälle.
Hävittäminen
Pakkaus ja pakkausmateriaalit koostuvat
yksinomaan ympäristöystävällisistä mate-
riaaleista. Ne voidaan toimittaa paikallisiin
kierrätyspisteisiin.
Symboli, jossa on yliruksattu pyörillä
varustettu jäteastia, tarkoittaa, että tuote
on lajiteltava Euroopan unioniin kuuluvissa
maissa. Tämä koskee sekä tuotetta että kaikkia tällä
symbolilla merkittyjä lisävarusteita. Tällä merkinnällä
varustettuja tuotteita ei saa heittää lajittelemattomiin
kotitalousjätteisiin, vaan ne on toimitettava sähkö-
ja elektroniikkalaitteiden kierrätyspisteisiin. Kierrätys
vähentää raaka-aineiden kulutusta ja ympäristöön
kohdistuvaa rasitusta.
Takuu ja huolto
Takuu
Laitteella on 3 vuoden takuu, joka on voimassa
laitteen ostopäivästä alkaen.
Laite on valmistettu huolellisesti ja käynyt läpi tarkan
laatutarkastuksen.
Korjaamme takuuajan aikana maksutta kaikki mate-
riaali- tai valmistusvirheet. Jos havaitset laitteessa
takuuajan aikana vikoja, lähetä se alla mainittuun
huoltopalvelun osoitteeseen. Ilmoita lähetyksessä
myös tuotenumero: 14109002L / 14109302L.
Takuu ei kata vikoja, joiden syynä on epäasiallinen
käsittely, käyttöohjeen noudattamatta jättäminen tai
valtuuttamattomien henkilöiden tekemät toimenpiteet.
Myöskään kuluvat osat (esim. lamppu) eivät kuulu
takuun piiriin.
Takuusuoritus ei pidennä eikä uusi 3 vuoden takuu-
aikaa.
Huoltopalvelun osoite
Briloner Leuchten GmbH
Im Kissen 2, 59929 Brilon, Suomi
Puh.: +49 2961 / 9712-800
Faksi: +49 2961 / 9712-199
Sähköposti: [email protected]
www.briloner.com
IAN 273687
Säilytä kassakuitti ja tuotenumero (esim. IAN 12345)
todisteena tekemästäsi ostoksesta.
Vaatimustenmu-
kaisuusvakuutus
Tuote täyttää voimassa olevien eurooppalaisten
ja maakohtaisten direktiivien (sähkömagneettinen
yhteensopivuus 2004 / 108 / EY, pienjännitedirek-
tiivi 2006 / 95 / EY, ekosuunnitteludirektiivi
2009 / 125 / EY, RoHS-direktiivi 2011 / 65 / EU)
asettamat vaatimukset.
Yhteensopivuus on testattu. Vastaavat vakuutukset
ja asiakirjat ovat valmistajan hallussa.

19 FI
Takuu ja huoltoLampun vaihtaminen / Puhdistus / Hävittäminen / Takuu ja huolto
Valmistaja
Briloner Leuchten GmbH
Im Kissen 2
D-59929 Brilon
Suomi

20
Innehållsförteckning
Strona się ładuje...
Strona się ładuje...
Strona się ładuje...
Strona się ładuje...
Strona się ładuje...
Strona się ładuje...
Strona się ładuje...
Strona się ładuje...
Strona się ładuje...
Strona się ładuje...
Strona się ładuje...
Strona się ładuje...
Strona się ładuje...
Strona się ładuje...
Strona się ładuje...
Strona się ładuje...
Strona się ładuje...
Strona się ładuje...
Strona się ładuje...
Strona się ładuje...
Strona się ładuje...
Strona się ładuje...
Strona się ładuje...
Strona się ładuje...
Strona się ładuje...
-
 1
1
-
 2
2
-
 3
3
-
 4
4
-
 5
5
-
 6
6
-
 7
7
-
 8
8
-
 9
9
-
 10
10
-
 11
11
-
 12
12
-
 13
13
-
 14
14
-
 15
15
-
 16
16
-
 17
17
-
 18
18
-
 19
19
-
 20
20
-
 21
21
-
 22
22
-
 23
23
-
 24
24
-
 25
25
-
 26
26
-
 27
27
-
 28
28
-
 29
29
-
 30
30
-
 31
31
-
 32
32
-
 33
33
-
 34
34
-
 35
35
-
 36
36
-
 37
37
-
 38
38
-
 39
39
-
 40
40
-
 41
41
-
 42
42
-
 43
43
-
 44
44
-
 45
45


w innych językach
- Deutsch: LIVARNO 273687 Bedienungsanleitung
- svenska: LIVARNO 273687 Bruksanvisning
- English: LIVARNO 273687 Owner's manual
Powiązane artykuły
-
LIVARNO 279110 Instrukcja obsługi
-
-
-
-
-
-
-
-
-