
CirCular SAW
PHKS 1450 laSEr
Kompernaß GmbH
Burgstraße 21
D-44867 Bochum (Germany)
Last Information Update · Stan informacji · Információk állása · Stanje informacij · Stav informací
Stav informácií · Stanje informacija ·
Stand der Informationen: 10 / 2007 · Ident.-No.: PHKS 1450 L-102007-4
GB Operation and Safety Notes Page 5
PL Wskazówki dotyczące obsługi i bezpieczeństwa Strona 17
HU Kezelési és biztonsági utalások Oldal 31
SI Navodila za upravljanje in varnostna opozorila Stran 43
CZ Pokyny pro obsluhu a bezpečnostní pokyny Strana 55
SK Pokyny pre obsluhu a bezpečnostné pokyny Strana 67
HR Upute za posluživanje i za Vašu sigurnost Stranica 79
DE / AT Bedienungs- und Sicherheitshinweise Seite 91
Klappen Sie vor dem Lesen die beiden Seiten mit den Abbildungen aus und machen Sie sich anschließend
mit allen Funktionen des Gerätes vertraut.
Before reading, unfold both pages containing illustrations and familiarise yourself with all functions
of the device.
Przed przeczytaniem proszę rozłożyć obie strony z ilustracjami, a następnie proszę zapoznać się z
wszystkimi funkcjami urządzenia.
Olvasás előtt kattintson az ábrákat tartalmazó mindkét oldalra és végezetül ismerje meg a készülék
mindegyik funkcióját.
Pred branjem obe strani s slikami odprite navzven in se nato seznanite z vsemi funkcijami naprave.
Před čtením si odklopte obě dvě strany s obrázky a potom se seznamte se všemi funkcemi přístroje.
Pred čítaním si odklopte obidve strany s obrázkami a potom sa oboznámte so všetkými funkciami prístroja.
Rasklopite prije čitanja obije stranice sa slikama i nakon toga se upoznajte sa svim funkcijama uređaja.
Piła tarczowa ręczna
Wskazówki dotyczące obsługi i bezpieczeństwa
ročna krožna žaga
Navodila za upravljanje in varnostna opozorila
ručna kružna Pila
Upute za posluživanje i za Vašu sigurnost
kézi körfűrész
Kezelési és biztonsági utalások
ručná kotúčová Píla
Pokyny pre obsluhu a bezpečnostné pokyny
ruční kotoučová Pila
Pokyny pro obsluhu a bezpečnostní pokyny
circular saw
Operation and Safety Notes
HanDkrEissÄgE
Bedienungs- und Sicherheitshinweise

A
FED
CB
10
13
6
11
12
4
9
1
2
3
4
5
6
7
8
1413
15
22
17
16
21 20 19 18
22
23
24

5 GB
Introduction
Proper use .................................................................................................................. Page 6
Features and equipment ........................................................................................... Page 6
Included items ............................................................................................................ Page 7
Technical information ................................................................................................ Page 7
General safety advice ................................................................................. Page 7
Your working area ..................................................................................................... Page 8
Electrical safety ......................................................................................................... Page 8
Personal safety .......................................................................................................... Page 8
Careful handling and use of electrical tools ........................................................... Page 9
Safety advice relating specifically to this device.................................................... Page 9
Preparing for use ............................................................................................. Page 12
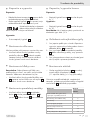
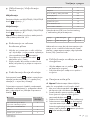
Switching on and off ................................................................................................. Page 13
Setting the cutting angle ........................................................................................... Page 13
Setting the cutting depth ........................................................................................... Page 13
Setting the guide fence ............................................................................................. Page 13
Switching the laser on and off.................................................................................. Page 13
Working with the circular saw ................................................................................. Page 13
Setting the speed....................................................................................................... Page 13
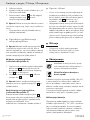
Connecting the vacuum sawdust extraction device ............................................... Page 14
Changing a saw blade ............................................................................................. Page 14
Installing and setting the riving knife ....................................................................... Page 14
Tips and tricks ............................................................................................................ Page 15
Cleaning ................................................................................................................... Page 15
Disposal .................................................................................................................... Page 15
Information
Service centre ............................................................................................................ Page 15
Declaration of Conformity / Manufacturer ............................................................. Page 16
Table of Content

6 GB
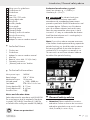
Circular saw PHKS 1450 LASER
Q
Introduction
Please make sure you familiarise yourself
fully with the way the device works
before you use it for the first time and
that you understand how to handle electrical
power tools correctly. To help you do this please
read the accompanying operating instructions.
Keep these instructions in a safe place. If you pass
the device on to anyone else, please ensure that
you also pass on all the documentation.
Q
Proper use
For sawing longitudinal, cross and mitre cuts in
firmly supported solid wood, plywood, plastic and
lightweight construction materials. Please note that
the blade pre-installed in the saw as supplied is
intended for use with wood only. Any other use or
modification to the device shall be considered as
improper use and could give rise to considerable
dangers. Not suitable for commercial use.
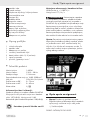
Q
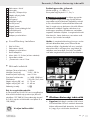
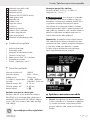
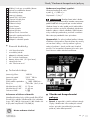
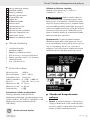
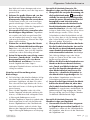
Features and equipment
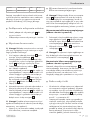
1
Rotation speed setting wheel
2
Safety lock-out
3
Spindle lock
4
Cutting angle setting clamp
5
Cutting depth setting clamp
6
Automatic blade guard
7
Base plate
8
ON / OFF switch
9
Sawdust removal connector
Introduction
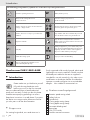
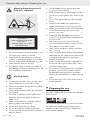
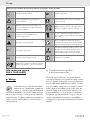
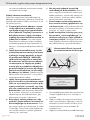
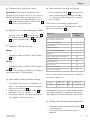
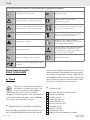
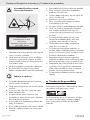
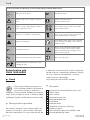
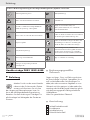
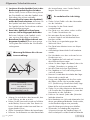
The following pictogrammes / symbols are used in these operating instructions:
Read the operating instructions!
W
Watts (effective power)
Always heed warning labels and
safety instructions!
Protection category II power tool;
double insulated
Caution - Danger of electric shock! Hazardous
voltage – danger to life!
Wear hearing protection, dust protection mask,
protective glasses and protective gloves.
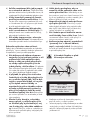
Caution, laser! Do not expose yourself to laser
radiation.
Keep children and other unauthorised personnel
at a safe distance when using electrical tools.
Explosive material!
Keep the device away from rain or moisture.
Water entering an electrical device increases the
risk of electric shock.
V
~
Volt (AC)
Damaged appliances, power cables and power
plugs mean potentially fatal risks from electric shock.
Regularly check the condition of the appliance,
the power cables and the power plugs.
n
0
Rated idle running speed Proper procedure and handling.
Dispose packaging and appliance in an
environmentally-friendly way!

7 GB
10
Wing screw for guide fence
11
Guide fence slot
12
Guide fence
13
Laser unit
14
Laser ON / OFF switch
15
Cutting depth scale
16
Riving knife
17
Auxiliary handle
18
Drive spindle
19
Mounting flange
20
Clamping flange
21
Clamping screw with washer
22
Riving knife mounting
23
Mounting screws
24
Adapter for vacuum sawdust removal
Q
Included items
1 Circular saw
1 Guide fence
1 Adapter for vacuum sawdust removal
1 Allen key
2 Batteries, micro AAA 1.5 V (for laser)
1 Operating instructions
1 „Warranty and service“ booklet
Q
Technical information
Nom. power input: 1450 W
Rated voltage: 230 V
~
50 Hz
Mechanical output: 15 Nm max.
No-load speed: n
0
1800 - 5000 min
-1
Saw blade: 210 x 30 x 1.8 x 2.6 mm
Cutting depth at 90°: 0 - 75 mm
Cutting depth at 45°: 0 - 49 mm
Protection class: II / &
Noise and vibration data:
Values determined in accordance with EN 60745
The sound pressure level (A-weighted) of the device
is typically 107,5 dB (A). Uncertainty K=3 dB. The
sound level while working can exceed 120,5 dB (A).
Wear ear protection!
Evaluated acceleration, typical:
Hand / arm vibration a
h
= 2,309 m / s
2
Uncertainty K = 1,5 m / s
2
WARNING!
The vibration level given
in these instructions has been measured in
accordance with a standardised measurement
procedure specified in EN 60745 and can be used
to compare devices. Different uses of the device
give rise to different vibration levels and in many
cases they may exceed the values given in these
instructions. It is easy to underestimate the vibration
load if the electrical power tool is used regularly in
particular circumstances.
Note: If you wish to make an accurate assessment
of the vibration loads experienced during a particular
period of working, you should also take into account
the intervening periods of time when the device is
switched off or is running but is not actually in use.
This can result in a much lower vibration load over
the whole of the period of working.
Q
General safety advice
J Attention! Please read all the instructions
and advice. Failure to observe the instructions
and advice given below may result in electric
shock, fire and / or serious injury.
Introduction / General safety advice

8 GB
MAKE SURE THAT YOU KEEP THESE
INSTRUCTIONS AND SAFETY ADVICE IN A SAFE
PLACE.
1. Your working area
a) Keep your working area clean and
clutter-free. Untidy or poorly lit working
areas can lead to accidents.
b)
Do not work with the device
in potentially explosive
environments in which there
are inflammable liquids, gases or
dusts. Electrical power tools create sparks,
which can ignite dusts or fumes.
c)
Keep children and other
people away while you are
operating the electrical tool.
Distractions can cause you to lose control of
the device.
2. Electrical safety
a) The mains plug on the device must
match the mains socket. The mains
plug must not be modified in any
way. Do not use an adapter plug
with devices fitted with a protective
earth. Unmodified mains plugs and matching
sockets reduce the risk of electric shock.
b) Avoid touching earthed surfaces
such as pipes, radiators, ovens and
refrigerators with any part of your
body. There is an increased risk of electric
shock if your body is earthed.
c)
Keep the device away from
rain or moisture. Water
entering an electrical device
increases the risk of electric shock.
d)
Do not use the mains lead
for any purpose for which it
was not intended, e.g. to
carry the device, to hang up the
device or to pull the mains plug out
of the mains socket. Keep the mains
lead away from heat, oil, sharp
edges or moving parts of the device.
Damaged or tangled mains leads increase the
risk of electric shock.
e) When working outdoors with an
electrical power tool always use
extension cables that are also
approved for use outdoors. The use of
an extension cable suitable for outdoor use
reduces the risk of electric shock.
3. Personal safety
a) Remain alert at all times, watch what
you are doing and always proceed
with caution. Do not use the device if
you are tired or under the influence
of drugs, alcohol or medication. One
moment of carelessness when using the device
can lead to serious injury.
b)
Wear personal protective
equipment and always
wear safety glasses. The
wearing of personal protective equipment such
as dust masks, non-slip safety shoes, safety
helmets or ear protectors, appropriate to the
type of electrical power tool used and work
undertaken, reduces the risk of injury.
c) Avoid unintentional operation of the
device. Make sure that the switch
is in the “OFF” position before you
insert the mains plug into the socket.
Accidents can happen if you have been
carrying the device with your finger on the
switch or you have already switched the device
on before you connect it to the mains.
d) Remove any setting tools or
spanners before you switch the
device on. A tool or spanner left attached to
a rotating part of a device can lead to injury.
e) Do not overestimate your own
abilities. Keep proper footing and
balance at all times. By doing this you will
be in a better position to control the device,
especially in unforeseen circumstances.
f) Wear suitable clothing. Do not wear
loose clothing or jewellery. Keep
your hair, clothing and gloves clear of
General safety advice

9 GB
moving parts. Loose clothing, jewellery or
long hair can become trapped in moving parts.
g) If vacuum dust extraction and
collection devices are fitted do
not forget to check that they are
properly connected and correctly
used. The use of these devices reduces the
hazard presented by dust.
4. Careful handling and use of
electrical tools
a) Do not overload the device. Always
use an electrical power tool that
is intended for the task you are
undertaking. By using the right electrical
power tool for the job you will work more
safely and achieve a better result.
b) Do not use an electrical power tool
if its switch is defective. An electrical
power tool that can no longer be switched on
and off is dangerous and must be repaired.
c) Pull the mains plug from the socket
before you make any adjustments
to the device, change accessories
or when the device is put away. This
precaution is intended to prevent you from
unintentionally starting the device.
d) When not in use always ensure that
electrical power tools are kept out of
reach of children. Do not let anyone
use the device if he or she is not
familiar with it or has not read the
instructions and advice. Electrical power
tools are dangerous when they are used by
inexperienced people.
e) Look after the device carefully.
Check that moving parts are working
properly and move freely. Check
for any parts that are broken or
damaged enough to detrimentally
affect the functioning of the device.
Have damaged parts repaired
before you use the device. Many
accidents have their origins in poorly
maintained electrical power tools.
f) Keep cutting tools clean and sharp.
Carefully maintained cutting tools with sharp
cutting edges are less likely to jam and are
easier to control.
g) Use the electrical power tool,
accessories, inserted tools etc. in
accordance with these instructions
and advice, and the stipulations
drawn up for this particular type
of device. In doing this, take into
account the working conditions and
the task in hand.
The use of electrical power tools for purposes
other than those intended can lead to
dangerous situations.
Safety advice relating
specifically to this device
J Ensure that the device is always used in
accordance with the advice in these operating
instructions and only by persons over 16 years
of age.
To avoid danger to life from
electric shock:
J
Frequently check the condition of
the device, mains lead and plug.
Do not use the device if these kinds
of parts are damaged. Never open up the device.
A damaged device, mains lead or plug presents a
serious danger to life from electric shock.
Always have any repairs carried out or
replacement parts fitted at the service centre or
by an electrical equipment repair specialist.
J Devices marked with 230 V can also be
operated at 220 V.
J Do not operate the device if it is damp and do
not use it in a damp environment.
J If you use the device outdoors, always connect
it through a residual current device (RCD) with
a maximum trip current of 30 mA. If using
an extension lead, always use one that is
approved for outdoor use.
Note: Always keep the mains lead away from the
working area of the machine and lead away the
mains lead from the rear.
General safety advice

10 GB
Attention! To avoid the
risk of injury:
a) Keep your hands away from the
area around the saw and clear of
the saw blade. Hold the auxiliary
handle or the motor housing with
your free hand. If you have both hands on
the saw they cannot be injured by the saw blade.
b) Do not grip the underside of the
workpiece. The blade guard cannot protect
you from the saw blade under the workpiece.
c) Set the cutting depth to match the
thickness of the workpiece. Less than
a full tooth height should be visible below the
workpiece.
d) Never hold the workpiece in your
hand or steady it with your leg
whilst sawing. Keep the workpiece
steady on a stable supporting
surface. It is important to see that the
workpiece is firmly held in place to minimise
any danger of it making contact with your body,
jamming of the saw blade or loss of control.
e) Hold the device by the insulated
handle surfaces when you are
undertaking work where there is the
danger of the cutting tool striking
hidden electricity cables or the
device‘s mains lead. Contact with a live
wire means that the metal parts of the device
may also become live and this can result in an
electric shock.
f) When cutting longitudinally always
use a guide fence or a straight edge
guide. This will improve the accuracy of your
cut and reduce the risk of the blade jamming.
g) Always use a saw blade of the
correct size and with the appropriate
central fixing hole bore. Saw blades
that do not correspond with the attachment
components on the saw will not run true and
could lead to loss of control.
h) Never use a damaged or incorrect
saw blade washer or screw. The
saw blade washer and screw have been
specially designed to give your saw optimum
performance and safety in use.
What causes kickback and how to
avoid it:
a) A kickback is a sudden reaction to a saw
blade becoming hooked, jammed or
misaligned. This causes an out of control
circular saw to raise itself and move out of the
workpiece and towards the operator.
b) If the sawblade becomes hooked or trapped in
a narrowing saw gap, it is suddenly prevented
from rotating and the force of the motor throws
the device back in the direction of the operator.
c) If the sawblade distorts or becomes misaligned
in the saw cut, the teeth at the rear edge of
the sawblade may hook themselves into the
workpiece surface causing the sawblade to
move out of the saw gap and the circular
saw to jump backwards in the direction of the
operator.
Special safety advice for circular saws
and automatic blade guards
a) Before you use the saw, always
check that the automatic blade
guard
6
closes properly. Do not use
the saw if the bottom compartment
of the blade guard does not move
freely or close immediately. Never
jam or tie the automatic blade guard
in the open position. The bottom part of
automatic blade guard may become bent if the
saw falls on to the floor. Open the blade guard
with the release lever and make sure that it
moves freely and does not touch the saw blade
or other parts at all cutting angles and depths.
b) Check that the spring on the
automatic blade guard functions
properly. If the automatic blade
guard or spring does not function
properly, have the device serviced
before you use it. Damaged parts, sticky
deposits or accumulations of splinters can
delay the operation of the bottom blade guard.
c) Open the automatic blade guard
by hand only for certain cuts such
as plunge or angle cuts. Open the
automatic blade guard with the
release lever and let it go again as
soon as the saw blade penetrates
General safety advice

11 GB
the workpiece. The automatic blade guard
must be allowed to operate automatically for
all saw cuts.
d) Do not put the saw down on a
work bench or the floor without the
automatic blade guard covering
the saw blade. If unprotected, a rotating
saw blade moves the saw against the cutting
direction and saws whatever is in its way.
Always be aware that the saw blade takes
some time to stop.
Special safety advice for circular saws
and riving knives
a) Use the riving knife matched to the
installed saw blade. The riving knife
must be thicker than the body of the blade but
thinner than the width of the teeth.
b) Adjust the riving knife as described
in the operating instructions. If its
thickness, position or alignment is incorrect,
this can lead to the riving knife not effectively
preventing kickback.
c) Always use the riving knife, except
for plunge cuts. After completing plunge
cutting, put the riving knife back in place. The
riving knife interferes with plunge cuts and can
result in kickback.
d) For the riving knife to work properly,
it must be within the saw gap. The
riving knife is ineffective in preventing kickback
for short cuts.
e) Do not operate the saw if the riving
knife is bent out-of-true. Even a slight defect
can cause the blade guard to close too slowly.
To avoid the device kicking back:
Kickback occurs as a result of incorrect use or
misuse of the saw. It can be prevented by taking
the appropriate precautions as described below.
a) Hold the saw with both hands and
bring your arms into a position in
which you will be able to withstand
any kickback forces. Always stand
to the side of the saw blade and
never bring your body in line with
the saw blade. When kickback occurs,
the circular saw may jump backwards but the
operator can control the kickback forces by
adopting suitable precautions.
b) If the saw blade jams or sawing
stops for another reason, release
the ON/OFF switch and hold the saw
in the workpiece without moving
it until the saw blade comes to a
complete standstill. Never try to
remove the saw from the workpiece
or move it backwards until the saw
blade has stopped moving or cannot
cause a kickback. Find the reason for the
saw blade jamming and take the appropriate
action to rectify it.
c) If you wish to restart a saw that has
been inserted into the workpiece,
centre the saw blade in the saw gap
and check that the saw teeth do not
catch on the workpiece. If the saw blade
jams, it may move itself out of the workpiece or
cause a kickback when the saw is restarted.
d) Support boards whilst cutting to
reduce the risk of kickback caused
by a jammed saw blade. Large boards
may bend under their own weight. Boards must
be supported on both sides as well as near the
saw gap and at the edges.
e) Do not use blunt or damaged saw
blades. Saw blades with blunt or misaligned
teeth are in effect too wide for the designed
saw gap and this gives rise to increased
friction, jamming and kickback.
f) Make sure that the cutting depth
and angle setting fastenings are
tightened before sawing starts. If
these settings move during sawing, this can
lead to the saw blade jamming and kickback.
g) Be particularly careful when
carrying out a plunge cut in an
obscured area, e.g. in an existing
wall. The plunging blade could jam in a
hidden object and cause kickback.
General safety advice

12 GB
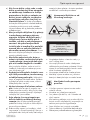
Warning! Protecting yourself
from laser radiation:
Laser radiation
Never look directly into the beam!
Laser class 2
Maximum output power ≤ 1 mW
Wavelength: 650 nm
J Do not look directly into the laser beam or into
the opening from which it is emitted.
J Never direct the laser beam on to reflective
surfaces or at people or animals. Even a brief
look into a laser beam can damage your eyes.
J Never open the laser unit housing.
J If the device is likely to remain unused for an
extended period, remove the batteries from the
laser unit battery compartment.
Working safely:
J If a dangerous situation arises, pull the mains
plug immediately out of the mains socket.
J Never use the device for a purpose for which it
was not intended.
J Always keep the device clean, dry and free of
oil or grease.
J If the saw is used whilst fixed in place on a
saw table then the saw table must have a
restart cut-out.
J Make sure the device is switched on before
placing it against the workpiece.
J Always work away from your body.
J Do not saw materials containing asbestos.
J The course of the cut must have no obstructions
above or below it.
J The saw blade must not project more than
3 mm out of the workpiece.
J When you are sawing, always make sure that
you do not cut through any nails, screws or the
like.
J Do not work with the device in the overhead
position.
J Protect the saw blade from sharp blows or
impacts and prevent it from becoming tilted.
J When you switch off the saw, allow the blade
to slow down naturally - do not assist this
process in any way.
J Cracked or distorted blades are not to be
used. HSS (High Speed Steel) saw blades are
not to be used.
J Before carrying out any work on the saw,
e.g. setting the base plate etc. always pull the
mains plug out of the mains socket.
J Never remove sawdust or splinters whilst the
saw is running.
J Have a suitable, tested vacuum removal device
attached to the saw when working with woods
or materials that create dusts that may be
hazardous to health.
J Always use the safety devices integrated into
the circular saw, e.g. the safety lock-out and
automatic blade guard.
J Ensure that all moving parts of the saw blade
protection system function properly and all
the assemblies and components involved in
covering the saw blade are in perfect working
order.
J Do not lock on the ON / OFF switch in hand-
guided operation.
Q
Preparing for use
The PHKS 1450 LASER circular saw has Intelligent
Power Control.
This automatic power delivery system ensures that
for a particular speed range the power output
remains constant when working on harder and
more resistant materials.
General safety advice / Preparing for use

13 GB
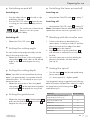
Q
Switching on and off
Switching on:
j Press the safety lock-out
2
to the left or right
and keep it pressed.
j Press the ON / OFF switch
8
. Once the saw
is running you can release the safety lock-out
again.
The circular saw is fitted with an
electronic soft start system.
The motor starts with a delay.
Switching off:
j Release the ON / OFF switch
8
.
Q
Setting the cutting angle
You can set the cutting angle accurately with the
help of the cutting angle scale.
j Release the wing screws of the cutting angle
setting clamp
4
on both sides, set the desired
angle on the scale and retighten the wing
screws.
Q
Setting the cutting depth
Note: If possible we recommend that the cutting
depth is set approximately 3 mm greater than the
material thickness. This should help to ensure you
achieve a clean cut.
j Release the wing screw on the cutting depth
setting clamp
5
, set the required cutting depth
on the scale
15
and retighten the wing screw.
Q
Setting the guide fence
j Release the wing screw
10
of the base plate
7
and insert the guide fence
12
into the slot
11
.
Retighten the wing screw
10
.
Q
Switching the laser on and off
Switching on:
j Move the laser ON/OFF switch
14
to setting “I”.
Switching off:
j Move the laser ON/OFF switch
14
to setting “0”.
Note: If the batteries become exhausted you should
replace them with two new ones, type AAA 1.5 V.
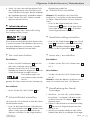
Q
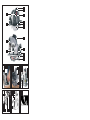
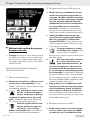
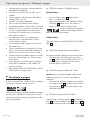
Working with the circular saw
1. Switch on the device as described in the
section about “Switching on and off” and then
place it first with the front edge of the base
plate
7
against the material.
2. Align the device using the guide fence
12
or
with reference to marked-out line or by using
the laser.
3. Saw with a even pressure whilst holding the
device by the handles with both hands
(see Fig. A).
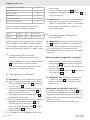
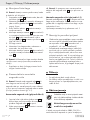
Q
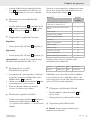
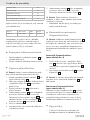
Setting the speed
j Turn the wheel
1
to the desired speed setting
(arrow marking G)
(1 = lowest speed / 6 = highest speed):
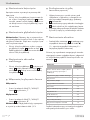
Use the general settings suggested in the following
table (information offered without liability) or adjust
the speed setting on the setting wheel
1
to the
material being cut.
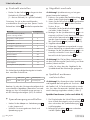
Material Speed setting
Hard- and softwood (solid wood) cut
longitudinally and transversely
6
Plywood, hard fibre board 6
Chipboard 6
Blockboard, laminated wood 6
Coated and veneered board 6
PVC board 3-5
Preparing for use

14 GB
Acrylic glass panels, Plexiglas 2-4
Aluminium board 4-6
Aluminium profiles 4-6
Plasterboard 1-2
Mineral wool board 1-2
Cement-bound chipboard 1-2
The circumferential speeds at minimum and
maximum rotational speeds are approx.:
Setting 1 1,800 rpm CS 20 metres/sec
Setting 6 5,000 rpm CS 55 metres/sec
Make sure that the cutting speed resulting from the
effects of different saw blades, materials and the
force you apply to advance the saw is always less
than the circumferential speed (CS) under no load.
Q
Connecting the vacuum
sawdust extraction device
j Insert the adapter for vacuum sawdust removal
24
into the sawdust removal connector.
j Connect a vacuum device approved for the
extraction of sawdust and splinters.
Q
Changing a saw blade
m Attention! Press the spindle lock only after
the mains plug has been pulled out of the socket!
1. Then remove the guide fence
12
by releasing
the wing screw
10
.
2. Set the cutting depth (by means of the wing
screw for cutting depth setting clamp
5
) to
the minimum position, 0 mm.
3. Swing back the automatic blade guard
6
and place the device down.
4. Press the spindle lock button (until it engages)
and release the clamping screw
21
using
the Allen key. Now remove the clamping
screw with integral washer head
21
and the
clamping flange
20
(see Fig. D).
5. Detach the saw blade.
6. The installation of a sawblade is done in the
reverse order.
7. Press the spindle lock button
3
(until it
engages) and tighten the clamping screw
21
using the Allen key.
m Attention! The arrow on the saw blade must
agree with the arrow showing the direction of
rotation (running direction shown on the device).
j Ensure that the saw blade is suitable for the
saw spindle speed.
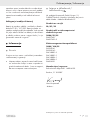
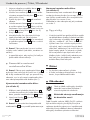
Q
Installing and setting the
riving knife
m Attention! The distance between the riving
knife
16
and the saw blade must not be greater
than 5 mm. If the riving knife has been removed
e.g. for a plunge cut, this distance must be
observed again when the riving knife is reinstalled
(see Fig. F).
Removing the riving knife: (see Fig. E)
1. Release the wing screws of the cutting depth
setting clamp
5
and swing the circular saw
up until it meets the stop; this exposes the riving
knife mounting
22
.
2. Screw out the mounting screws
23
and remove
the riving knife
16
.
m Attention! After completion of the plunge
cut the riving knife
16
must be reinstalled
before the circular saw is used for any other
sawing tasks.
Setting the riving knife: (see Fig. F)
Set the distance between the riving knife
16
and
the tips of the saw blade teeth to a maximum of 5
mm, and the distance between the tip of the riving
blade and the lowest point of the saw blade to a
maximum of 5 mm.
The distances to be set are illustrated in Fig. F.
Preparing for use

15 GB
Q
Tips and tricks
j Use the appropriate marking on the base plate
for the desired cutting angle (the marking can
be found behind the wing screw for the guide
fence
10
): Right-angled cut = marking 0°,
45°- cut = marking 45°.
j Breaking out of the cut edges of delicate
surfaces, e.g. coated chipboard or doors,
can be avoided by applying masking tape
in advance along the cutting line. This has
the additional advantage that masking tape
shows up the cutting line better than a smooth
surface. An even more effective way of
stopping the cut edges from being broken out
is to clamp a thin piece of wood along the
cutting line, which is then also sawn through.
Q
Cleaning
j Clean the device after you have finished using it.
j Use a cloth to clean the outside of the device -
never use petrol, solvents or cleaners.
Q
Disposal
The packaging is wholly composed of
environmentally-friendly materials that
can be disposed of at a local recycling
centre.
Do not dispose of electrical
power tools with the household
rubbish!
In accordance with European Directive
2002 / 96 / EC (covering waste electrical and
electronic equipment) and its transposition into
national legislation, worn out electrical power
tools must be collected separately and taken for
environmentally compatible recycling.
Contact your local refuse disposal authority for
more details of how to dispose of your worn out
electrical devices.
Disposal of batteries
Batteries must be recycled in accordance with
Directive 91 / 157 / EEC and must not be disposed
of with household refuse. Battery users are obliged
by law to take all rechargeable and single-use
batteries to a collection point operated by a public
authority or a retailer.
Q
Information
Q
Service centre
The service centre for your country is shown in the
warranty documentation.
J Have your device repaired only by
qualified specialist personnel using original
manufacturer parts only. This will ensure that
your device remains safe to use.
Preparing for use / Cleaning / Disposal / Information

16 GB
Information
Q
Declaration of Conformity /
Manufacturer
We, Kompernaß GmbH, Burgstr. 21,
D-44867 Bochum, Germany, declare
that this product complies with the
following EU directives:
Machinery Directive
98 / 37 / EC
EU Low Voltage Directive
2006 / 95 / EC
EN60745-1
EN60745-2-5
Electromagnetic Compatibility
2004 / 108 / EC
EN55014-1
EN55014-2
EN61000-3-2
EN61000-3-3
EN61000-6-1
EN61000-6-3
EN60825-1
Type / device description:
Circular saw PHKS 1450 LASER
Bochum, 31.10.2007
Hans Kompernaß
- Managing Director -
We reserve the right to make technical modifications in the course
of further development.

17 PL
Spis zawartości
Wstęp
Użytkowanie zgodne z przeznaczeniem ............................................................... Strona 18
Wyposażenie ............................................................................................................ Strona 19
Zakres dostawy ......................................................................................................... Strona 19
Dane techniczne........................................................................................................ Strona 19
Wskazówki ogólne dotyczące bezpieczeństwa
Stanowisko pracy ...................................................................................................... Strona 20
Bezpieczeństwo elektryczne .................................................................................... Strona 20
Bezpieczeństwo osób ............................................................................................... Strona 20
Staranne obchodzenie się i użytkowanie narzędzi elektrycznych ...................... Strona 21
Wskazówki bezpieczeństwa specyficzne dla urządzenia ................................... Strona 22
Uruchomienie
Włączanie i wyłączanie .......................................................................................... Strona 25
Nastawianie kąta cięcia ........................................................................................... Strona 26
Nastawianie głębokości cięcia ............................................................................... Strona 26
Nastawianie zderzaka wahliwego ......................................................................... Strona 26
Włączanie/wyłączanie lasera ................................................................................ Strona 26
Posługiwanie się piłą tarczową ręczną ................................................................... Strona 26
Nastawianie obrotów ............................................................................................... Strona 26
Podłączenie odsysania wiórów ............................................................................... Strona 27
Wymiana brzeszczotu .............................................................................................. Strona 27
Wymontowanie i nastawienie klina rozszczepiającego ....................................... Strona 27
Dobre rady i triki ....................................................................................................... Strona 27
Czyszczenie ........................................................................................................... Strona 28
Utylizacja ................................................................................................................ Strona 28
Informacje
Serwis ........................................................................................................................ Strona 28
Deklaracja zgodności / Producent ........................................................................... Strona 29

18 PL
Wstęp
Piła tarczowa ręczna
PHKS 1450 LASER
Q
Wstęp
Przed pierwszym uruchomieniem należy
zapoznać się z działaniem urządzenia
i nauczyć się właściwego obchodzenia
się z elektronarzędziami. W tym celu należy przeczy-
tać poniższą instrukcję. Instrukcję należy starannie
przechowywać. W razie przekazania urządzenia
osobom trzecim należy dać również niniejszą in-
strukcję obsługi
Q
Użytkowanie zgodne
z przeznaczeniem
Piłowanie cięć wzdłużnych, cięć poprzecznych
oraz cięć pod kątem przy podporze stałej w drew-
nie litym, płytach wiórowych, tworzywie sztucznym
oraz w materiałach budowlanych lekkich. Zwrócić
przy tym należy uwagę na to, że wstępnie zamon-
towany brzeszczot nadaje się do użytku tylko do
drewna. Każde inne zastosowanie maszyny lub
przeprowadzenie w niej zmian jest uznawane za
niezgodne z przeznaczeniem i kryje w sobie po-
ważne zagrożenie nieszczęśliwym wypadkiem.
Urządzenie nie jest przewidziane do celów zarob-
kowych.
W niniejszej instrukcji obsługi zastosowano następujące znaki / symbole:
Przeczytaj instrukcję obsługi!
W
Watt (moc skuteczna)
Przestrzegaj wskazówek ostrzegawczych
i bezpieczeństwa!
Elektronarzędzie klasy ochrony II; podwójna
izolacja ochronna
Ostrzeżenie przed porażeniem prądem elek-
trycznym! Niebezpieczne napięcie elektryczne
- zagrożenie dla życia!
Zakładać okulary ochronne, ochronniki słuchu,
maskę przeciwpyłową i rękawice ochronne.
Uwaga, laser! Nie wystawiać się na
promieniowanie lasera.
W czasie użytkowania urządzenia dopilnuj,
aby w pobliżu nie przebywały dzieci ani żadne
inne osoby.
Niebezpieczeństwo wybuchu!
Chronić urządzenie przed deszczem i wilgocią.
Przedostanie się wody do wnętrza elektronarzędzia
zwiększa niebezpieczeństwo porażenia prądowego.
V
~
Volt (napięcie przemienne)
Uszkodzenie urządzenia, kabla sieciowego lub
wtyczki sieciowej zwiększa ryzyko porażenia
prądem elektrycznym. Regularnie sprawdzaj
stan urządzenia, kabla sieciowego, wtyczki.
n
0
Projektowe o0broty biegu jałowego Prawidłowe postępowanie.
Opakowanie i urządzenie przekaż do utylizacji
zgodnie z przepisami o ochronie środowiska!

19 PL
Wstęp
Q
Wyposażenie
1
Kółko nastawcze wyboru wstępnego obrotów
2
Blokada włączenia
3
Blokada wrzeciona
4
Wybór wstępny kąta cięcia
5
Wybór wstępny głębokości cięcia
6
Kołpak ochronny wahliwy
7
Płyta podstawy
8
Przełącznik WŁĄCZ. / WYŁĄCZ.
9
Wyrzut wiórów
10
Śruba skrzydełkowa do zderzaka równoległego
11
Mocowanie zderzaka równoległego
12
Zderzak równoległy
13
Nasadka laserowa
14
Przełącznik WŁĄCZ. / WYŁĄCZ. lasera
15
Skala głębokości cięcia
16
Klin rozszczepiający
17
Rękojeść dodatkowa
18
Wrzeciono napędowe
19
Kołnierz uchwytowy
20
Kołnierz mocujący
21
Śruba mocująca z podkładką
22
Zamocowanie klina rozszczepiającego
23
Śruby mocujące
24
Adapter do odsysania pyłu
Q
Zakres dostawy
1 Piła tarczowa ręczna
1 Zderzak równoległy
1 Adapter do odsysania pyłu
1 Klucz do śrub z łbem okrągłym o gnieździe
sześciokątnym
2 Baterie Micro AAA 1,5 V (do lasera)
1 Instrukcja obsługi
1 Zeszyt „Gwarancja i serwis“
Q
Dane techniczne
Pobór mocy znamionowy: 1450 W
Napięcie znamionowe: 230 V
~
50 Hz
Moc wtórna: 15 Nm maks.
Obroty jałowe: n
0
1800 - 5000 min
-1
Brzeszczot: 210 x 30 x 1,8 x
2,6 mm
Głębokość cięcia przy 90°: 0 - 75 mm
Głębokość cięcia przy 45°: 0 -49 mm
Klasa ochrony: II / &
Informacje dotyczące hałasu i wibracji:
Wartości pomiarowe wyznaczone zgodnie z
EN 60745. Poziom ciśnienia hałasu urządzenia
według oceny A wynosi 107,5 dB (A). Niepewność
pomiaru K=3 dB. Poziom hałasu podczas pracy
może przekroczyć 120,5 dB (A).
Zakładać ochronniki słuchu!
Określone przyśpieszenie, typowe:
Przenoszenie wibracji a
h
= 2,309 m / s
2
Niepewność K = 1,5 m / s
2
OSTRZEŻENIE!
Podany w niniejszych in-
strukcjach poziom drgań wyznaczony został za
pomocą metody pomiarowej określonej w normie
EN 60745 i może zostać użyty do porównania
urządzeń. Poziom wibracji będzie się różnił w za-
leżności od zastosowania elektronarzędzia i w nie-
których przypadkach może przekroczyć wartość
podaną w niniejszej instrukcji. Obciążenie drgania-
mi może być mniej uciążliwe, jeśli elektronarzędzie
będzie regularnie trzymane w ten sposób.
Wskazówka: Celem dokładnego oszacowania
obciążenia wibracjami w okresie określonego okresu
czasu pracy należy uwzględnić również te okresy, w
których urządzenie jest wyłączone lub wprawdzie
jest włączone, ale w rzeczywistości nie pracuje.
Może to przyczynić się do znacznej redukcji obcią-
żenia wibracjami w całym okresie czasu pracy.

20 PL
Wstęp / Wskazówki ogólne dotyczące bezpieczeństwa
Q
Wskazówki ogólne dotyczące
bezpieczeństwa
J U w a g a ! Wszystkie instrukcje należy przeczy-
tać. Błędy przy zachowywaniu wymienionych
poniżej instrukcji mogą spowodować poraże-
nie prądem elektrycznym, pożar i / lub ciężkie
obrażenia ciała.
PROSZĘ PRZECHOWYWAĆ STARANNIE
NINIEJSZE INSTRUKCJE.
1. Stanowisko pracy
a) Utrzymuj swój obszar roboczy w sta-
nie czystym i posprzątanym. Niepo-
rządek i nieoświetlone obszary robocze mogą
prowadzić do wypadków.
b)
Nie pracuj przy użyciu urzą-
dzenia w otoczeniu zagro-
żonym eksplozją, w którym
znajdują się palne ciecze, gazy lub
pyły. Urządzenia elektryczne wytwarzają
iskry, które mogą zapalić pył lub pary.
c)
Podczas użytkowania urzą-
dzenia elektrycznego trzy-
maj dzieci i inne osoby z
daleka od urządzenia. Przy odchyleniu
możesz stracić kontrolę nad urządzeniem.
2. Bezpieczeństwo elektryczne
a) Wtyk sieciowy urządzenia musi pa-
sować do wtykowego gniazda sie-
ciowego. W żaden sposób nie wolno
zmieniać wtyku sieciowego urządze-
nia. Nie używaj żadnych wtyków
adapterowych razem z urządzenia-
mi wyposażonymi w uziemienie
ochronne. Niezmienione wtyki sieciowe i
pasujące wtykowe gniazda sieciowe zmniej-
szają ryzyko porażenia prądem elektrycznym.
b) Unikaj kontaktu fizycznego z po-
wierzchniami uziemionymi, takimi
jak: rury, grzejniki, kuchnie elek-
tryczne i lodówki. Istnieje podwyższone
ryzyko porażenia prądem elektrycznym, gdy
twoje ciało jest uziemione.
c)
Trzymaj urządzenie z dale-
ka od deszczu i wilgoci. Wnik-
nięcie wody do urządzenia
elektrycznego zwiększa ryzyko porażenia prą-
dem elektrycznym.
d)
Nie używaj kabla sieciowe-
go w sposób sprzeczny z
jego przeznaczeniem tj. do
noszenia urządzenia, zawieszania
urządzenia lub do wyciągania wty-
ku sieciowego z wtykowego gniazd-
ka sieciowego. Trzymaj kabel z daleka od
gorących elementów, oleju, ostrych krawędzi
lub poruszających się części urządzeń. Uszko-
dzone lub poplątane kable zwiększają ryzyko
porażenia prądem elektrycznym.
e) Gdy pracujesz z urządzeniem elek-
trycznym na dworze używaj wyłącz-
nie przedłużaczy, które są dopusz-
czone również do pracy na dworze.
Użycie przedłużacza przystosowanego do
stosowania na dworze zmniejsza ryzyko pora-
żenia prądem elektrycznym.
3. Bezpieczeństwo osób
a) Bądź stale uważny, zwracaj uwagę
na to co robisz i postępuj rozsądnie
w trakcie pracy z narzędziem elek-

21 PL
Wskazówki ogólne dotyczące bezpieczeństwa
trycznym. Nie używaj narzędzia,
gdy jesteś zmęczony lub znajdujesz
się pod wpływem narkotyków, alko-
holu lub lekarstw. Chwila nieuwagi przy
użytkowaniu urządzenia może prowadzić do
poważnych obrażeń ciała.
b)
Noś osobiste wyposażenie
ochronne i zawsze okulary
ochronne. Noszenie osobistego
wyposażenia ochronnego takiego jak maska
przeciwpyłowa, buty antypoślizgowe, kask
ochronny lub ochrona słuchu stosownie do
sposobu użytkowania narzędzia elektrycznego
zmniejsza ryzyko obrażeń ciała.
c) Unikaj niezamierzonego uruchomie-
nia urządzenia. Upewnij się, że prze-
łącznik znajduje się w pozycji „WY-
ŁĄCZ.” zanim wetkniesz wtyk
sieciowy do wtykowego gniazdka
sieciowego. Jeżeli podczas przenoszenia
urządzenia będziesz trzymał palec na prze-
łączniku lub gdy podłączysz włączone już
urządzenie do zasilania sieciowego, to może
to prowadzić do wypadków.
d) Usuń narzędzia do nastawiania urzą-
dzenia lub klucze płaskie zanim włą-
czysz urządzenie. Narzędzie lub klucz,
który znajduje się w obracającej się części
urządzenia może prowadzić do obrażeń ciała.
e) Nie przeceniaj swoich możliwości.
Zadbaj o bezpieczne stanowisko i
utrzymuj w każdej chwili równowa-
gę. Dzięki temu możesz w nieoczekiwanych
sytuacjach lepiej kontrolować urządzenie.
f) Noś odpowiednią odzież. Nie noś
obszernej odzieży ani biżuterii. Trzy-
maj włosy, odzież i rękawice z dale-
ka od poruszających się części. Luźna
odzież, biżuteria lub długie włosy mogą zo-
stać uchwycone przez poruszające się części.
g) Jeżeli zostaną zamontowane urzą-
dzenia do odsysania i wychwytywa-
nia pyłu, to upewnij się, że są one
podłączone i że będą prawidłowo
używane. Używanie tych urządzeń zmniej-
sza zagrożenie wywoływane pyłem.
4. Staranne obchodzenie się i
użytkowanie narzędzi elek-
trycznych
a) Nie przeciążaj urządzenia. Używaj
do swojej pracy przeznaczonego do
niej narzędzia elektrycznego. Za po-
mocą odpowiedniego narzędzia elektryczne-
go pracujesz lepiej i bezpieczniej w danym za-
kresie robót.
b) Nie używaj żadnego narzędzia elek-
trycznego, którego przełącznik jest
uszkodzony. Narzędzie elektryczne, które
nie daje się już więcej włączyć lub wyłączyć,
jest niebezpieczne i musi zostać naprawione.
c) Wyciągnij wtyk sieciowy z wtyko-
wego gniazdka sieciowego zanim
dokonasz nastaw urządzenia, wy-
mienisz części osprzętu lub odłożysz
urządzenie. Ten środek ostrożności zapo-
biega niezamierzonemu startowi urządzenia.
d) Przechowuj nieużywane narzędzia
elektryczne poza zasięgiem dzieci.
Nie pozwól na użytkowanie urzą-
dzenia osobom, które nie są z nim
obznajomione lub nie przeczytały ni-
niejszych instrukcji. Narzędzia elektrycz-
ne są niebezpieczne, gdy są używane przez
osoby niedoświadczone.
e) Pielęgnuj starannie urządzenie.
Sprawdź, czy ruchome części urzą-
dzenia funkcjonują nienagannie i nie
zakleszczają się, czy części urządze-
nia nie są złamane lub uszkodzone
w takim stopniu, że funkcjonowanie
urządzenia jest uszczuplone. Zleć na-
prawę uszkodzonych części przed
użyciem urządzenia. Przyczyną wielu
wypadków są źle konserwowane narzędzia
elektryczne.
f) Utrzymuj narzędzia tnące w stanie
ostrym i czystym. Starannie pielęgnowa-
ne narzędzia tnące o ostrych krawędziach tną-
cych mniej zakleszczają się i dają się łatwiej
prowadzić.
g) Używaj narzędzia elektrycznego,
osprzętu, narzędzi wymiennych itp.
odpowiednio do niniejszych instruk-

22 PL
Wskazówki ogólne dotyczące bezpieczeństwa
cji i w taki sposób, jaki jest zalecany
dla tego specjalnego typu urządze-
nia. Uwzględniaj przy tym warunki
robocze i wykonywane czynności.
Użycie narzędzi elektrycznych do innych za-
stosowań niż to przewidziano może prowa-
dzić do niebezpiecznych sytuacji.
Wskazówki bezpieczeństwa
specyficzne dla urządzenia
J Zapewnić, by urządzenie było uruchamiane
przepisowo i zgodnie z instrukcją obsługi wy-
łącznie przez osoby, które ukończyły 16 rok
życia!
Unikaj zagrożenia życia wskutek
porażenia prądem elektrycznym:
J
Kontroluj regularnie stan urządzenia,
kabla sieciowego oraz wtyku siecio-
wego. Nie włączaj do eksploatacji
urządzeń z tego rodzaju uszkodzonymi czę-
ściami. Nigdy nie otwieraj urządzenia. Uszko-
dzone urządzenia, przyłącza sieciowe lub
wtyki sieciowe oznaczają zagrożenie życia
wskutek porażenia prądem elektrycznym.
Wykonywanie robót związanych z naprawą
lub wymianą zlecaj wyłącznie placówce ser-
wisowej lub elektrykowi.
J Urządzenia oznakowane 230 V mogą praco-
wać również pod napięciem 220 V.
J Nie używaj urządzenia, gdy jest ono wilgotne
ani w wilgotnym otoczeniu.
J W trakcie pracy na dworze podłączaj urzą-
dzenie poprzez wyłącznik ochronny prądu
uszkodzeniowego (FI) o maksymalnym prądzie
wyzwalania wynoszącym 30 mA. Używaj wy-
łącznie przedłużacza dopuszczonego do ob-
szaru zewnętrznego.
Wskazówka: Trzymaj kabel sieciowy z daleka
od obszaru działania maszyny i prowadź go od
maszyny do tyłu.
Uwaga! Unikaj niebezpieczeń-
stwa obrażeń ciała:
a) Nie zbliżaj rąk do obszaru piłowania
ani do brzeszczotu. Trzymaj drugą
ręką rękojeść dodatkową lub obudo-
wę silnika. Gdy obie ręce trzymają piłę tar-
czową brzeszczot nie może ich skaleczyć.
b) Nie sięgaj pod obrabiany przedmiot.
Kołpak ochronny nie może ochronić cię przed
brzeszczotem pod przedmiotem obrabianym.
c) Dopasuj głębokość cięcia do grubo-
ści przedmiotu obrabianego. Pod
przedmiotem obrabianym powinna być wi-
doczna mniej niż jedna pełna wysokość zęba.
d) Nigdy nie przytrzymuj piłowanego
przedmiotu w ręce lub nogą. Zabez-
piecz przedmiot obrabiany na stabil-
nym podłożu. Ważnym jest, żeby dobrze
zamocować przedmiot obrabiany, aby zmini-
malizować niebezpieczeństwo kontaktu fizycz-
nego, zakleszczenia brzeszczotu lub utraty
kontroli nad urządzeniem.
e) Trzymaj urządzenie wyłącznie za
izolowane powierzchnie rękojeści,
gdy wykonujesz roboty, w trakcie
których narzędzie tnące może natra-
fić na ukryte przewody prądowe lub
na własne kable sieciowe. Kontakt z
przewodem pod napięciem spowoduje, że me-
talowe części urządzenia również znajdą się
pod napięciem, i prowadzi do porażenia prą-
dem elektrycznym.
f) Przy piłowaniu wzdłużnym zawsze
używaj zderzaka lub prostej pro-
wadnicy kątowej. Poprawia to dokład-
ność cięcia i zmniejsza możliwość zakleszcze-
nia się brzeszczotu.
g) Używaj zawsze brzeszczotów o wła-
ściwej wielkości i odpowiednim
otworze mocującym. Brzeszczoty, które
nie pasują do części montażowych piły poru-
szają się biegiem niedokładnie obrotowym i
prowadzą do utraty kontroli nad urządzeniem.
h) Nigdy nie używaj uszkodzonych lub
niewłaściwych podkładek lub śrub
pod brzeszczot. Podkładki i śruby pod
brzeszczot zostały skonstruowane specjalnie
Strona się ładuje...
Strona się ładuje...
Strona się ładuje...
Strona się ładuje...
Strona się ładuje...
Strona się ładuje...
Strona się ładuje...
Strona się ładuje...
Strona się ładuje...
Strona się ładuje...
Strona się ładuje...
Strona się ładuje...
Strona się ładuje...
Strona się ładuje...
Strona się ładuje...
Strona się ładuje...
Strona się ładuje...
Strona się ładuje...
Strona się ładuje...
Strona się ładuje...
Strona się ładuje...
Strona się ładuje...
Strona się ładuje...
Strona się ładuje...
Strona się ładuje...
Strona się ładuje...
Strona się ładuje...
Strona się ładuje...
Strona się ładuje...
Strona się ładuje...
Strona się ładuje...
Strona się ładuje...
Strona się ładuje...
Strona się ładuje...
Strona się ładuje...
Strona się ładuje...
Strona się ładuje...
Strona się ładuje...
Strona się ładuje...
Strona się ładuje...
Strona się ładuje...
Strona się ładuje...
Strona się ładuje...
Strona się ładuje...
Strona się ładuje...
Strona się ładuje...
Strona się ładuje...
Strona się ładuje...
Strona się ładuje...
Strona się ładuje...
Strona się ładuje...
Strona się ładuje...
Strona się ładuje...
Strona się ładuje...
Strona się ładuje...
Strona się ładuje...
Strona się ładuje...
Strona się ładuje...
Strona się ładuje...
Strona się ładuje...
Strona się ładuje...
Strona się ładuje...
Strona się ładuje...
Strona się ładuje...
Strona się ładuje...
Strona się ładuje...
Strona się ładuje...
Strona się ładuje...
Strona się ładuje...
Strona się ładuje...
Strona się ładuje...
Strona się ładuje...
Strona się ładuje...
Strona się ładuje...
Strona się ładuje...
Strona się ładuje...
Strona się ładuje...
Strona się ładuje...
Strona się ładuje...
Strona się ładuje...
-
 1
1
-
 2
2
-
 3
3
-
 4
4
-
 5
5
-
 6
6
-
 7
7
-
 8
8
-
 9
9
-
 10
10
-
 11
11
-
 12
12
-
 13
13
-
 14
14
-
 15
15
-
 16
16
-
 17
17
-
 18
18
-
 19
19
-
 20
20
-
 21
21
-
 22
22
-
 23
23
-
 24
24
-
 25
25
-
 26
26
-
 27
27
-
 28
28
-
 29
29
-
 30
30
-
 31
31
-
 32
32
-
 33
33
-
 34
34
-
 35
35
-
 36
36
-
 37
37
-
 38
38
-
 39
39
-
 40
40
-
 41
41
-
 42
42
-
 43
43
-
 44
44
-
 45
45
-
 46
46
-
 47
47
-
 48
48
-
 49
49
-
 50
50
-
 51
51
-
 52
52
-
 53
53
-
 54
54
-
 55
55
-
 56
56
-
 57
57
-
 58
58
-
 59
59
-
 60
60
-
 61
61
-
 62
62
-
 63
63
-
 64
64
-
 65
65
-
 66
66
-
 67
67
-
 68
68
-
 69
69
-
 70
70
-
 71
71
-
 72
72
-
 73
73
-
 74
74
-
 75
75
-
 76
76
-
 77
77
-
 78
78
-
 79
79
-
 80
80
-
 81
81
-
 82
82
-
 83
83
-
 84
84
-
 85
85
-
 86
86
-
 87
87
-
 88
88
-
 89
89
-
 90
90
-
 91
91
-
 92
92
-
 93
93
-
 94
94
-
 95
95
-
 96
96
-
 97
97
-
 98
98
-
 99
99
-
 100
100


Kompernass Saw PHKS 1450 LASER Instrukcja obsługi
- Typ
- Instrukcja obsługi
- Niniejsza instrukcja jest również odpowiednia dla
w innych językach
Inne dokumenty
-
Parkside PHKS 1300 A1 Operation and Safety Notes
-
Scheppach PL55 Instructions Manual
-
Parkside PTKS 1800 SE Operation and Safety Notes
-
Flex RS 11-28 Instrukcja obsługi
-
Scheppach 5901809900 Translation Of Original Instruction Manual
-
Meister MKS1500-1 Translation Of The Original Instructions
-
Hilti WSC 55 Operating Instructions Manual
-
BLACK DECKER CD602 Instrukcja obsługi
-
Festool HK 132/RS-HK Instrukcja obsługi
-
Bosch GKS 160 Instrukcja obsługi