
Modele:
EOL 100
EOL 100B
EOL 100T
EOL 100HT
EOL 100FT
EOL 120
EOL 120B
EOL 120T
EOL 120HT
EOL 120FT
EOL 150
EOL 150B
EOL 150T
EOL 150HT
EOL 150FT
2010/02/02
Parametry techniczne Ø100 Ø120 Ø150
230 V
50 Hz
19 W 20W 22W
Wydatek powietrza 100 m
3
/h 150 m
3
/h 200 m
3
/h
Klasa izolacji II
IP-X4
EOL F10
EOL F10B
EOL F10T
EOL F10HT
EOL 10FT
EOL F12
EOL F12B
EOL F12T
EOL F12HT
EOL F12FT
EOL F15
EOL F15B
EOL F15T
EOL F15HT
EOL F15FT
EU / GUARANTEE CONDITIONS
-The producer grants a guarantee for a failure-free operation of the fan.
-The guarantee period is 24 months from the sale date.
-This Guarantee Certificate is valid only with a receipt confirming the date of
purchase.
- Claims under this guarantee should be made through the authorized dealer.
- The costs between of carriage to the dealer shall be borne by the purchaser.
- The producer shall not be liable for mechanical damage or when the purchaser
makes any construction changes in the product.
PL / WARUNKI GWARANCJI
-
-
zakupu.
-
-
latora na nowy.
-
- W razie dokonania napraw lub zmian konstrukcyjnych przez osoby producent
Information for Users on Disposal of Old Equipment.
This symbol indicates that the electrical and electronic equipment
should not be disposed of as general household waste at its end-of-life.
Instead, the products should be handed over to the appliance collection
points for the recycling of electrical and electronic equipment., recovery and
recycling in accordance with your national legislation and the Directive 2002/96/
EC and 2006/66/EC.
Informacje dla użytkowników dotyczące pozbywania się zużytego
sprzętu.
w celu ich odpowiedniego przerobu., odzysku i recyklingu zgodnie z krajowym
ustawodawstwem oraz w zgodzie z Dyrektywami 202/96/EC i 206/66/EC
User instruction
Models:
EOL 100
EOL 100B
EOL 100T
EOL 100HT
EOL 100FT
EOL 120
EOL 120B
EOL 120T
EOL 120HT
EOL 120FT
EOL 150
EOL 150B
EOL 150T
EOL 150HT
EOL 150FT
EOL F10
EOL F10B
EOL F10T
EOL F10HT
EOL 10FT
EOL F12
EOL F12B
EOL F12T
EOL F12HT
EOL F12FT
EOL F15
EOL F15B
EOL F15T
EOL F15HT
EOL F15FT
PRZEZNACZENIE
o ogra-
przeznaczony do zabawy dla dzieci.
SPOSÓB MONTAŻU I OBSŁUGI
UWAGA:
zasilania.
Technical data Ø100 Ø120 Ø150
Voltage 230 V
Frequency 50 Hz
Power 19 W 20W 22W
Air flow 100 m
3
/h 150 m
3
/h 200 m
3
/h
Insulation class II
Protection IP-X4
-
-
-
-
z
UWAGA:
FT – wentylator z fotokomórką
-
niki jak na (rys.3).
nej pracy wentylatora. I rodzaju pracy
latora. II rodzaju pracy
UWAGA:
T – wentylator z układem czasowym
pomieszczenia wentylowanego I wersja połączenia wentylatora (rys.4) lub do-
II wersja połącze-
nia wentylatora
0,5 do 30 min.
UWAGA: Potencjometr jest ustawiony przez producenta w pozycji minimalnej
HT - wentylator z czujnikiem wilgotności
H -
T -
H jest ustawiony przez
T - w pozycji minimalnej. Po
T
H.
UWAGA:
PL
UK
1
2
3
4
2010/02/02
6
7
Producer: ELPLAST.com Sp.J.
ul. Konarskiego 20, 99-300 Kutno, Poland, email: [email protected]
Producent: ELPLAST.com Sp.J.
ul. Konarskiego 20, 99-300 Kutno, Poland, email: [email protected]
APPLICATION
The exhaust duct fans are ideal for bathrooms and toilet applications. They are
used for supporting natural ventilation and can be installed the areas with their
own ventilation duct lines with the exception of areas prone to corrosion and
explosion.
The equipment is not intended for use by persons (including children) with
reduced physical, sensory or mental ability.
The equipment is not designed to be fun for children
INSTALATION
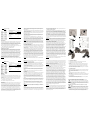
Please take off the front cover using a small cross screw driver. Remove a small
srew in the low part of the fan showed in the (pic.1). The fan should be fitted
instead of the ventilation grill or in the place prepared exactly for his kind of
fans. For installation please use the holes situated in a fan body.The fans with a
pull switch and 1,9m cable with a plug should be plugged into the electric socket
~230V. In order to use the fan please pull the cord to switch it on and off. The
fans in basic version with terminal block only or with the electronic control
systems (T, FT, HT) should be connected with the wiring system directly. Please
take off the small cover showed in the (pic.2) using a small cross screw driver.
The terminal block is situated under the cover and depending of the fan version
there are 2 or 3 units to connect the fan with, LN or NLS.
Please note that all wiring must comply with current I.E.E. Wiring Regulations, if
in any doubt consult a qualified electrician.
-The fan with a pull switcher enables temporary starting and stopping of the fan
by pulling the strip coming out of the fan.
-The fixed cover should evenly adhere to the wall panel to avoid distortion
Every precaution should be taken to avoid reverse gas flow to the open ventila-
tion trunk or other open fire areas.
- For the fans with the permanent electrical connection, the electrical installation
must have a switch with the distance between the contacts of all poles of not
less than 3 mm.
Should the permanent power lead be damaged it ought to be exchanged by the
manufacturer, specialized repair service or an authorized person to avoid the
danger.
The fans extended with the electronic control systems have a mounted timer.
Fan activation depends on the control system.
FT- photocell
Starting the fan is done by the change in the light intensity in the area where the
fan is installed. The switches 1,2,3 are for setting the time of the fan activity.
Given lengths of time can be set by moving the switches according to (pic.3).
The 4 switch is for setting two automatic cycles of the fan activity.
I.The switch in an apper position (ON): the fan starts itself by switching off the
light in the ventilated area and works for the period of time set by the time-lag
switches.
II.The switch in a low position (OFF): the fan starts itself by switching on the light
in the ventilated area and works for as long as the light is on. After the light is
turned off, the fan keeps working for the length of time set by the time-lag swi-
tch.
The 5 switch is for adjusting the system sensitivity to the lighting. The upper
position (ON) is for dark areas, while the low position (OFF) is for partially lit
areas. The system works on condition that there is a significant change in the
lighting.
Attention : The fan with the photocell is not be suitable to work accomoda-
tions wich can be light ( max. 5 ) before turn on the light , for - accomodations
with window.
T- timer
The fan is activated after the light is switched on (1st version of fan installation)
or after pressing the switcher (2nd version of fan installation) look in the (pic.4).
After turning off the light or switcher the fan works for the time allocated by the
adjustable screw. Fan models with timer, set the required length of time for the
fan to run after the fan is switched off by first ensuring the mains power is isola-
ted, and then with the cover of the fan removed insert a small screwdriver into
the aperture marked and slowly rotate clockwise or anti-clockwise to increase or
decrease the timer setting from 0,5-30 minutes.
Attention : Variable wiper is set by producer minimal position (0,5 min.) After
connect fan to the electric installation it should be start to work. Still , the time
of lateoff fan is set for a minimum .On the first time after plug fan to electric
socket , it will be work after a period of several to tens of minutes.
HT-humidity sensor
The fan is activated automatically after receiving expected humidity threshold
or switching on the light or switcher connected according to the (pic.4).
The fan works until the switcher or light is on or the humidity above the expec-
ted threshold. After turning off the light or switcher and when the humidity is
below the expected threshold the fan works for the time allocated by the adju-
stable screw. The time interval is between 0 - 30 min. The fan has adjustable
humidity knob and the humidity threshold could be set up between 30-80%.
Please set up all required parameters before use. Switching on the fan is auto-
matically when humidity reaches the vicinity of the fan-oriented level or switch
attached (pic..4). Exclusion occurs after a set period of delay, counted from the
room until the required level of humidity. At the bottom of the plate (pic.7),
there are two potentiometers labeled H and T-humidity-time delay, by which
adjusts the parameters of the fan. Humidity sensor is mounted on an electronic
circuit board. Fan should turn on automatically in the event of an excessive hu-
midity in the room. H potentiometer is set by the manufacturer in middle posi-
tion and the potentiometer T - at the minimum position. After connecting the
fan to the outlet fan should start working. Despite the fact that the fan off delay
time is set at a minimum is the first fan to turn it off the network after time from
several seconds to several minutes. After the power is switched off (excluding
fuses) T potentiometer knob to set the position depending on the required time
delay off. The moisture content at which the fan can attach adjusted upward or
downward by changing the setting potentiometer H.
Attention :
1. Before commencting any electrical work or making any adjustments with the
fans in basic version with terminal block only or with the electronic control sys-
tems (T, FT, HT)) please ensure the mains isolator switch on the consumer unit /
fuse board is in the 'OFF' position, to prevent the possibility of electric shock.
2. When you set the timeout in 0 min. fan during normal operation shall be atta-
ched to the tens of seconds.
5
-
 1
1

w innych językach
- English: ELPLAST EOL 100
Powiązane artykuły

Inne dokumenty
-
ABB PSTX Series Instrukcja obsługi
-
Pyronix KX15DT Instrukcja obsługi
-
PowerWalker AVR 600 Instrukcja obsługi
-
-
-
-
-
-
Kenwood AT850B Instrukcja obsługi
-
Risco PIR 4150200A Instrukcja obsługi