Truelife SonicBrush GL UV Instrukcja obsługi
- Kategoria
- Elektryczne szczoteczki do zębów
- Typ
- Instrukcja obsługi


2
EN – USER MANUAL
BOX CONTENTS
−Body of toothbrush
−4× Standard brush heads
−Glass
−Charging station
−Travel case
−TrueLife SonicBrush UV Sterilizer
−Manual and safety instructions
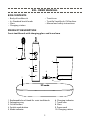
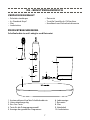
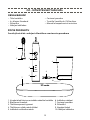
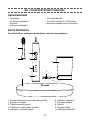
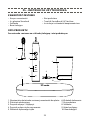
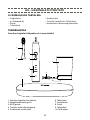
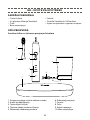
PRODUCT DESCRIPTION
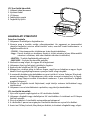
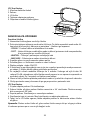
Sonic toothbrush with charging glass and travel case
7
9
1
3
24
8
10
5
6
1. Replaceable brush head for sonic toothbrush
2. Separating ring
3. On/o button
4. Switch mode button
5. Mode indicator
6. Charging indicator
7. Travel case
8. Glass
9. Power cord
10. Charging station

3
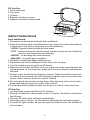
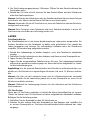
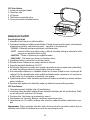
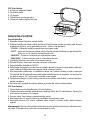
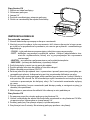
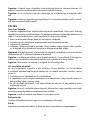
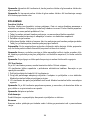
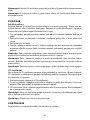
UV Steriliser
1. Power cord input
2. Case cover
3. UV lamp
4. Button to unlock case cover
5. Holder for toothbrush/brush head
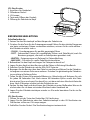
INSTRUCTIONS FOR USE
Sonic toothbrush
1. Place the brush head onto the body of the toothbrush.
2. Select the cleaning mode using the button. If you intend to use the same mode as
in the previous use, there is no need to reset the toothbrush.
- CLEAN – Regular mode for brilliantly clean teeth
- SOFT – Gentle brushing for sensitive teeth and gums (may also be suitable for
users less accustomed to sonic cleaning)
- WHITEN – For brushing with tooth polishing
- MASSAGE – For gentle gum stimulation
3. Wet the brush head and apply toothpaste to it.
4. Place the bristles of the toothbrush on the teeth, near the gums.
5. Turn the toothbrush on using the on/o button.
6. Move the bristles back and forth over your teeth and slowly move between the
individual teeth. At the same time, gently push the brush towards and between
the teeth
7. For best results, divide the brushing into 4 sections. Take 30 seconds for each secti-
on. After a 30-second cycle, the brush will pause and alert you to move to the next
section. After 2 minutes, the brush switches itself o.
8. Rinse the brush head under running water. Wipe the body of the brush with a
damp cloth and then wipe it dry with a cloth or towel .
9. Put the body of the toothbrush back into the glass or store it in the travel case.
UV Steriliser
1. Use the button to open the lid of the UV sterilizer .
2. Place the toothbrush or brush head in the UV sterilizer. The bristles should face
the UV lamp .
3. Close the lid. Sterilisation will begin automatically.
4. Sterilisation lasts 3 minutes. Do not open the lid during the sterilisation process.
5. Once the UV light switches o, you can open the lid and remove the toothbrush
or brush head.
1
5
2
3
4

4
Caution: While the bristles of the toothbrush or toothbrush head may be slightly damp
when placed in the steriliser, they should never be dripping wet.
Caution: Use the UV sterilizer only when the toothbrush or toothbrush head is facing
down.
Caution: When transporting a toothbrush or toothbrush head inside a UV sterilizer, the
bristles must be completely dry.
CHARGING
Sonic toothbrush
The sonic toothbrush is equipped with a contactless charging system. As a result,
a direct connection to the power cord is not necessary. This makes charging safer
and more convenient. To reach a full charge, the brush should be left to charge for
approximately 24 hours.
1. If the charging indicator starts blinking, the toothbrush needs to be charged.
2. Connect the charging station to the adapter and then to the power supply.
3. Place the glass on the charging station.
4. Put the toothbrush (switched o) into the glass. The charging indicator lights up
red while charging. When the toothbrush is fully charged, the charging indicator
changes to green.
Recommendation: In order to ensure optimal battery life, we recommend charging the
toothbrush at regular intervals (e.g., every 2–3 weeks).
Note: The glass for the charging station can also be used as a toothbrush stand. Howe-
ver, do not connect the charging base to a power source unless you are charging the
toothbrush.
Caution: The charging station and toothbrush may become slightly warm during char-
ging.
UV Steriliser
If the UV steriliser needs to be charged, the blue light inside will ash 10 times.
You can charge the UV steriliser using the power cord included. Follow the instructi-
ons below.
1. Connect the UV steriliser to the power cord.
2. Plug the other end of the AC adapter into the adapter and connect it to a power
source. The blue indicator light will ash while charging.
3. The UV steriliser will be fully charged after approximately 3 hours. The blue light
will switch o automatically once charging is complete.
Note: If the UV sterilizer’s charge is completely empty, the LED may not light up until it is
at least minimally charged.
Note: The adapter is not included in the package.

5
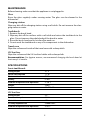
MAINTENANCE
Before cleaning, make sure that the appliance is not plugged in.
Glass
Rinse the glass regularly under running water. The glass can be cleaned in the
dishwasher.
Charging station
Wipe any dirt o the charging station using a soft cloth. Do not immerse the char-
ging station in water.
Toothbrush
1. Remove the brush head.
2. Wipe any dirt o the surfaces with a soft cloth and return the toothbrush to the
glass. Do not immerse the whole body of the brush in water.
3. Rinse the brush head and its bristles after each use.
4. Do not wash the toothbrush or any of its components in the dishwasher.
Travel case
Wipe the surface and inside of the travel case with a damp cloth.
UV Steriliser
Wipe the surface and the UV steriliser holder with a damp cloth.
Recommendation: For hygiene reasons, we recommend changing the brush head at
least every 3–4 months.
SPECIFICATIONS
Sonic toothbrush
Voltage input 3.7 V
Power consumption 1.7 W
Water resistance IPX7
Battery Li-Ion
Ambient temperature for operation 5–50 °C
Weight 538 g
Dimensions 29×300×29 mm
UV Steriliser
Voltage input 5 V
Power consumption 0.2 W
Material ABS
UV lamp expected life ≥5000 hours
Ambient temperature for operation 4-50 °C

6 7
UV radiation ≥1000μW/cm²
Weight 33,5 g
Dimensions 60×52×25 mm
PRODUCT LIABILITY
TrueLife products are guaranteed to be free from manufacturing defects. In the
event of such defects, elem6 s.r.o. will repair or replace the defective part or pro-
duct with a comparable part or product at its sole discretion. The warranty will be
deemed void if the device is altered or tampered with. The warranty does not cover
damage resulting from use, accident or normal wear and tear. elem6 s.r.o. assumes
no responsibility for any accident, injury, death, loss, or other claims related to or
resulting from the use of this product. elem6 s.r.o. shall in no event be liable for inci-
dental or consequential damages in connection with or arising from the use of this
product or any of its components. Return or exchange of spare parts and / or produ-
cts may be subject to shipping, handling, and replacement or replenishment fees.
Printing errors and changes of information reserved.
SAFETY GUIDELINES WHEN OPERATING THE DEVICE
1. Read the leaet included in the packaging carefully .
2. The latest version of the manual, including instructions for operating the device,
can be downloaded at: www.truelife.eu.
3. Printing errors and changes of information reserved.
Manufacturer:
elem6 s.r.o.,
Braškovská 15, 16100 Prague 6,
Czech Republic

6 7
DE – BENUTZERHANDBUCH
VERPACKUNGSINHALT
−Zahnbürstenkörper
−4× Standard-Kopf
−Glas
−Ladestation
−Reiseetui
−TrueLife SonicBrush UV Sterilizer
−Handbuch und Sicherheitshinweise
PRODUKTBESCHREIBUNG
Schallzahnbürste mit Ladeglas und Reiseetui
7
9
1
3
24
8
10
5
6
1. Austauschbarer Kopf der Schallzahnbürste
2. Unterscheidungsring
3. Ein-/Aus-Taste
4. Taste für die Putzprogrammwahl
5. Anzeige des gewählten Programms
6. Ladeanzeige
7. Reiseetui
8. Glas
9. Netzkabel
10. Ladestation

8
UV-Sterilisator
1. Anschluss für Netzkabel
2. Öenbarer Deckel
3. UV-Lampe
4. Taste zum Önen des Deckels
5. Önung für Zahnbürste/Kopf
BEDIENUNGSANLEITUNG
Schallzahnbürste
1. Setzen Sie den Bürstenkopf auf den Körper der Zahnbürste.
2. Drücken Sie die Taste für die Putzprogrammwahl. Wenn Sie das gleiche Programm
wie beim vorherigen Putzen verwenden möchten, müssen Sie es nicht wählen –
die Zahnbürste merkt sich es.
- CLEAN – Grundprogramm für perfekt gereinigte Zähne
- SOFT – Schonendes Putzen für empndliche Zähne und Zahneisch (auch für
Benutzer geeignet, die nicht an Schallputzen gewöhnt sind)
- WHITEN – Putzprogramm mit Polieren für Zahnaufhellung
- MASSAGE – Pulsieren für sanfte Zahneischstimulation
3. Befeuchten Sie den Kopf und tragen Sie Zahnpasta darauf auf.
4. Legen Sie den Kopf mit den Borsten auf die Zähne in Richtung Zahneisch.
5. Schalten Sie die Zahnbürste mit der EIN-/AUS-Taste ein.
6. Bewegen Sie die Borsten über den Zahn hin und her und führen Sie die Zahnbürs-
te langsam von einem Zahn zum anderen. Drücken Sie gleichzeitig die Zahnbürs-
te vorsichtig in Richtung Zahn.
7. Teilen Sie das Putzen für maximale Ezienz in 4 Abschnitte auf. Nehmen Sie sich
für jeden 30 Sekunden Zeit. Nach einem 30-Sekunden-Zyklus macht die Zahn-
bürste eine Pause und weist Sie darauf hin, mit dem nächsten Abschnitt fortzufa-
hren. Nach 2 Minuten schaltet sich die Zahnbürste aus.
8. Spülen Sie den Kopf und den Körper der Zahnbürste unter ießendem Wasser ab
und wischen Sie sie dann mit einem Wischtuch oder Handtuch ab.
9. Legen Sie den Zahnbürstenkörper wieder ins Glas oder bewahren Sie ihn im Re-
iseetui auf.
UV-Sterilisator
1. Önen Sie mit der Taste den Deckel des UV-Sterilisators.
2. Legen Sie die Zahnbürste oder den Zahnbürstenkopf in den UV-Sterilisator ein.
Die Borsten sollten zur UV-Lampe zeigen.
3. Schließen Sie den Deckel. Die Sterilisation beginnt automatisch.
1
5
2
3
4

9
4. Der Sterilisationsvorgang dauert 3 Minuten. Önen Sie den Deckel während der
Sterilisation nicht.
5. Sobald das UV-Licht erlischt, können Sie den Deckel önen und die Zahnbürste
oder den Kopf entnehmen.
Hinweis: Die Borsten der Zahnbürste oder des Zahnbürstenkopfes können beim Einlegen
leicht feucht sein. Aber es darf auf keinen Fall Wasser von ihnen tropfen.
Hinweis: Verwenden Sie den UV-Sterilisator nur, wenn die Zahnbürste oder der Zahnbürs-
tenkopf nach unten zeigt.
Hinweis: Beim Transport einer Zahnbürste oder eines Zahnbürstenkopfes in einem UV-
Sterilisator müssen die Borsten vollständig trocken sein.
LADEN
Schallzahnbürste
Die Schallzahnbürste ist mit einem berührungslosen Ladesystem ausgestattet. Ein
direkter Anschluss an das Netzkabel ist daher nicht erforderlich. Dies macht das
Laden bequemer und sicherer. Für vollständiges Auaden muss die Zahnbürste
ungefähr 24 Stunden lang aufgeladen werden.
1. Sobald die Ladeanzeige zu blinken beginnt, muss die Zahnbürste aufgeladen
werden.
2. Schließen Sie die Ladestation an den Adapter und dann an eine Stromquelle an.
3. Legen Sie das Glas darauf.
4. Legen Sie die ausgeschaltete Zahnbürste ins Glas ein. Die Ladeanzeige leuchtet
während des gesamten Ladevorgangs rot. Wenn die Bürste aufgeladen ist, leuch-
tet die Ladeanzeige grün.
Empfehlung: Um die optimale Batterielaufzeit der Zahnbürste aufrechtzuerhalten, em-
pfehlen wir, die Zahnbürste in regelmäßigen Abständen (z.B. nach 2-3 Wochen) aufzula-
den.
Hinweis: Das Glas mit der Ladestation kann auch als Zahnbürstenständer verwendet
werden. Schließen Sie die Ladestation jedoch nur an eine Stromquelle an, wenn Sie die
Zahnbürste auaden möchten.
Hinweis: Während des Ladevorgangs können sich die Ladestation und die Zahnbürste
leicht erwärmen.
UV-Sterilisator
Wenn der UV-Sterilisator entladen ist, blinkt die blaue Kontrollleuchte im Inneren
10mal. Sie können den UV-Sterilisator mit dem mitgelieferten Netzkabel auaden.
Befolgen Sie die Anleitung unten.
1. Schließen Sie das Netzkabel an den UV-Sterilisator an.
2. Stecken Sie das andere Ende des Netzkabels in den Adapter und schließen Sie
es an eine Stromquelle an. Die blaue Kontrollleuchte blinkt während des Lade-
vorgangs.

10
3. Der UV-Sterilisator ist nach ca. 3 Stunden vollständig aufgeladen. Die blaue Kont-
rollleuchte erlischt automatisch.
Hinweis: Wenn der UV-Sterilisator vollständig entladen ist, leuchtet die Kontrollleuchte
normalerweise nicht, bis das Gerät zumindest minimal aufgeladen ist.
Hinweis: Der Adapter ist nicht im Lieferumfang enthalten.
WARTUNG
Stellen Sie vor der Reinigung sicher, dass das Gerät nicht an der Steckdose an-
geschlossen ist.
Glas
Spülen Sie das Glas regelmäßig unter ießendem Wasser ab. Sie können auch einen
Geschirrspüler verwenden.
Ladestation
Wischen Sie Schmutz mit einem weichen Tuch von der Ladestation ab. Tauchen Sie
die Ladestation nicht in Wasser.
Zahnbürste
1. Entfernen Sie den Borstenkopf.
2. Wischen Sie Schmutz mit einem weichen Tuch von allen Oberächen ab und le-
gen Sie die Zahnbürste wieder ins Glas. Tauchen Sie nicht den ganzen Körper der
Zahnbürste in Wasser.
3. Spülen Sie den Borstenkopf und seine Borsten nach jedem Gebrauch ab.
4. Reinigen Sie die Zahnbürste oder ihre Bestandteile nicht in der Spülmaschine.
Reiseetui
Wischen Sie die Oberäche und das Innere des Reiseetuis mit einem feuchten Tuch
ab.
UV-Sterilisator
Wischen Sie die Oberäche und den Halter des UV-Sterilisators mit einem feuchten
Tuch ab.
Empfehlung: Aus hygienischen Gründen empfehlen wir, die Zahnbürstenköpfe nach 3-4
Monaten regelmäßig zu wechseln.

11
SPEZIFIKATION
Schallzahnbürste
Spannung Eingang 3,7 V
Energieverbrauch 1,7 W
Wasserfestigkeit IPX7
Batterie Li-Ion
Betriebstemperatur 5-50 °C
Gewicht 538 g
Abmessungen 29×300×29 mm
UV-Sterilisator
Spannung Eingang 5 V
Energieverbrauch 0,2 W
Material ABS
Lebensdauer UV-Lampe ≥5000 Stunden
Betriebstemperatur 4-50 °C
UV-Strahlung ≥1000μW/cm²
Gewicht 33,5 g
Abmessungen 60×52×25 mm
HAFTUNG DES HERSTELLERS
Auf TrueLife-Produkte bezieht sich Gewährleistung für Produktionsfehler. Firma
elem6 s.r.o. ist bei solchen Gewährleistungsmängeln verpichtet, das defekte Teil
oder Produkt nach eigenem Ermessen zu reparieren oder durch ein vergleichbares
Teil oder Produkt zu ersetzen. Umbau, Änderung oder andere unbefugte Handha-
bung des Produkts bedeuten eine Überschreitung des Umfangs dieser Gewähr-
leistung. Und zwar auch dann, wenn das Produkt aufgrund eines Mangels, einer
Fahrlässigkeit oder eines anderen Fehlers verloren geht oder beschädigt wird. Die
Gewährleistung deckt keine Schäden ab, die auf Gebrauch, Unfall oder normale
Abnutzung zurückzuführen sind. Firma elem6 s.r.o. übernimmt keine Haftung für
Unfälle, Verletzungen, Tod, Verlust oder andere Ansprüche im Zusammenhang mit
diesem Produkt oder aufgrund der Verwendung dieses Produkts. Firma elem6 s.r.o.
haftet in keinem Fall für Zufalls- oder Folgeschäden im Zusammenhang mit oder aus
der Verwendung dieses Produkts oder einer seiner Komponenten. Für die Rückgabe
oder den Austausch von Ersatzteilen und/oder Produkten können Versand-, Bearbei-
tungs-, Ersatz- und/oder Austauschgebühren anfallen.
Druckfehler und Änderungen von Informationen vorbehalten.

12
SICHERHEIT BEI ARBEIT MIT DEM GERÄT
1. Lesen Sie die beigefügten Sicherheitshinweise sorgfältig durch.
2. Lesen Sie zur ordnungsgemäßen Handhabung des Produkts die aktuelle Version
des Handbuchs, das unter www.truelife.eu heruntergeladen werden kann.
3. Druckfehler und Änderungen von Informationen vorbehalten.
Hersteller:
elem6 s.r.o.,
Braškovská 15, 16100 Praha 6,
Tschechische Republik

13
CZ – UŽIVATELSKÝ MANUÁL
OBSAH BALENÍ
−Tělo kartáčku
−4× hlavice Standard
−Sklenička
−Nabíjecí základna
−Cestovní pouzdro
−TrueLife SonicBrush UV Sterilizer
−Manuál a bezpečnostní instrukce
POPIS PRODUKTU
Sonický kartáček s nabíjecí skleničkou a cestovním pouzdrem
7
9
1
3
24
8
10
5
6
1. Vyměnitelná hlavice sonického zubního kartáčku
2. Rozlišovací kroužek
3. Tlačítko zapnout/vypnout
4. Tlačítko pro výběr módu čištění
5. Indikátor zvoleného módu
6. Indikátor nabíjení
7. Cestovní pouzdro
8. Sklenička
9. Napájecí kabel
10. Nabíjecí základna

14
UV Sterilizátor
1. Vstup pro napájecí kabel
2. Otevírací víko
3. UV lampa
4. Tlačítko pro otevírání víka
5. Otvor pro zubní kartáček/hlavici
NÁVOD K POUŽITÍ
Sonický kartáček
1. Nasaďte čistící hlavici na tělo kartáčku.
2. Stiskněte tlačítko pro výběr módu čištění. Pokud chcete použít stejný mód jako při
předchozím čištění, není třeba ho volit – kartáček si ho pamatuje.
- CLEAN – Základní mód pro perfektně vyčištěné zuby
- SOFT – Jemné čištění pro citlivé zuby a dásně (vhodné také pro uživatele, kteří
nejsou na sonické čištění zvyklí)
- WHITEN – Čištění s leštěním pro vybělení zubů
- MASSAGE – Pulsování pro jemnou stimulaci dásní
3. Navlhčete hlavici a naneste na ní zubní pastu.
4. Přiložte hlavici štětinami na zuby směrem k dásním.
5. Zapněte kartáček tlačítkem ON/OFF.
6. Pohybujte štětinami po zubu tam a zpět a pomalu se přesouvejte mezi jednotlivý-
mi zuby. Kartáčkem zároveň jemně tlačte směrem k zubu.
7. Pro maximální efektivitu si rozdělte čištění na 4 sekce. Každé z nich se věnujte 30
sekund. Po 30 sekundovém cyklu udělá kartáček pauzu a upozorní vás na přesun
k další sekci. Po 2 minutách se kartáček sám vypne.
8. Opláchněte hlavici i tělo kartáčku pod tekoucí vodou a následně je otřete utěrkou
nebo ručníkem.
9. Postavte tělo zpátky do skleničky nebo jej uložte do cestovního pouzdra.
UV Sterilizátor
1. Otevřete pomocí tlačítka víko UV sterilizátoru.
2. Umístěte zubní kartáček anebo hlavici zubního kartáčku do UV sterilizátoru. Štěti-
ny by měly mířit směrem k UV lampě.
3. Zavřete víko. Sterilizace se automaticky spustí.
4. Sterilizace trvá 3 minuty. Během sterilizace neotvírejte víko.
5. Jakmile zhasne UV světlo, můžete víko otevřít a zubní kartáček nebo hlavici vyn-
dat.
Upozornění: Štětiny zubního kartáčku nebo hlavice zubního kartáčku mohou být při
vkládání mírně vlhké. Za žádnou cenu z nich ale nesmí kapat voda.
1
5
2
3
4

15
Upozornění: Používejte UV sterilizátor pouze v poloze, kdy zubní kartáček nebo hlavice
zubního kartáčku je směrem dolů.
Upozornění: Při přepravě zubního kartáčku nebo hlavice zubního kartáčku uvnitř UV ste-
rilizátoru, musí být štětiny úplně suché.
NABÍJENÍ
Sonický kartáček
Sonický kartáček je vybaven bezkontaktním systémem nabíjení. Není proto nutné
přímé spojení s napájecím kabelem. Nabíjení je tak pohodlnější a bezpečnější. Pro
plné nabití je nutné kartáček ponechat nabíjet přibližně 24 hodin.
1. Jakmile začne indikátor nabíjení blikat, je potřeba zubní kartáček nabít.
2. Připojte nabíjecí základnu k adaptéru a poté do zdroje elektrického napětí.
3. Položte na ni skleničku.
4. Vložte vypnutý kartáček do skleničky. Po celou dobu nabíjení svítí indikátor nabí-
jení červeně. Jakmile je kartáček nabit, indikátor nabíjení svítí zeleně.
Doporučení: V rámci zachování optimální životnosti baterie kartáčku, doporučujeme
kartáček nabíjet v pravidelných intervalech (např. po 2–3 týdnech).
Upozornění: Skleničku s nabíjecí základnou je možné používat i jako stojan na zubní
kartáček. Nezapojujte však nabíjecí základnu do zdroje elektrické napětí, pokud nechcete
kartáček nabíjet.
Upozornění: Při nabíjení se nabíjecí základna a zubní kartáček mohou mírně zahřívat.
UV Sterilizátor
Pokud je UV sterilizátor vybitý, modrá kontrolka uvnitř 10krát zabliká.
UV sterilizátor můžete nabíjet pomocí přiloženého napájecího kabelu. Postupujte
podle návodu níže.
1. Připojte napájecí kabel k UV sterilizátoru.
2. Druhý konec napájecího adaptéru zapojte do adaptéru a připojte ke zdroji napá-
jení. Modrá kontrolka bude při nabíjení blikat.
3. UV sterilizátor bude přibližně po 3 hodinách plně nabitý. Modrá kontrolka auto-
maticky zhasne.
Upozornění: Pokud je UV sterilizátor plně vybitý, je běžné, že kontrolka nesvítí, dokud se
aspoň minimálně nenabije.
Upozornění: Adaptér není součástí balení.
ÚDRŽBA
Před čištěním se ujistěte, že zařízení není zapojené do zásuvky.
Sklenička
Skleničku pravidelně oplachujte pod tekoucí vodou. Můžete použít i myčku nádobí.

16
Nabíjecí základna
Jemným hadříkem otřete nečistoty z nabíjecí základny. Nabíjecí základnu nepono-
řujte do vody.
Kartáček
1. Odstraňte čistící hlavici.
2. Jemným hadříkem otřete nečistoty ze všech ploch a vraťte kartáček zpět do skle-
ničky. Neponořujte celé tělo kartáčku do vody.
3. Čistící hlavici a její štětinky oplachujte po každém použití.
4. Neumývejte kartáček ani jeho součásti v myčce na nádobí.
Cestovní pouzdro
Povrch a vnitřek cestovního pouzdra otřete vlhkým hadříkem.
UV Sterilizátor
Povrch a držák UV sterilizátoru otřete vlhkým hadříkem.
Doporučení: Z hygienických důvodů doporučujeme zubní hlavice pravidelně měnit po
3–4 měsících.
SPECIFIKACE
Sonický kartáček
Napětí vstup 3,7 V
Spotřeba energie 1,7 W
Voděodolnost IPX7
Baterie Li-Ion
Pracovní teplota 5-50 °C
Váha 538 g
Rozměry 29×300×29 mm
UV Sterilizátor
Napětí vstup 5 V
Spotřeba energie 0,2 W
Materiál ABS
Životnost UV lampy ≥5000 hodin
Pracovní teplota 4-50 °C
UV záření ≥1000μW/cm²
Váha 33,5 g
Rozměry 60×52×25 mm

17
ODPOVĚDNOST VÝROBCE
Na výrobky TrueLife se vztahuje záruka týkající se výrobních vad. Povinností spo-
lečnosti elem6 s.r.o. je v případě takovýchto vad ze záruky opravit nebo vyměnit
vadnou součást nebo výrobek za srovnatelnou součást nebo výrobek dle vlastního
uvážení. Přestavba, změna nebo jiná neoprávněná manipulace s výrobkem znamená
překročení rozsahu této záruky. To i v případě, že v důsledku závady, nedbalosti nebo
jiné chyby ve výrobku dojde k jeho ztrátě nebo poškození. Záruka se nevztahuje na
poškození vyplývajícího z používání, nehody nebo běžného opotřebení. Společnost
elem6 s.r.o. nepřebírá žádnou odpovědnost za jakékoliv nehody, zranění, smrt, ztrá-
tu nebo jiné požadavky související s výrobkem nebo vyplývající z používání tohoto
výrobku. Společnost elem6 s.r.o. v žádném případě nenese odpovědnost za náhod-
né nebo následné škody související s nebo vyplývající z používání tohoto výrobku
nebo některé z jeho součástí. Vrácení nebo výměna náhradních dílů a/nebo výrobků
může podléhat poplatkům za dopravu, manipulaci, výměnu a/nebo doplnění.
Tiskové chyby a změny informací vyhrazeny.
BEZPEČNOST PŘI PRÁCI SE ZAŘÍZENÍM
1. Pozorně si pročtěte příbalové bezpečnostní informace.
2. Pro správné zacházení s produktem si pročtěte aktuální verzi manuálu, která je
dostupná ke stažení na stránce: www.truelife.eu.
3. Tiskové chyby a změny informací vyhrazeny.
Výrobce:
elem6 s.r.o.,
Braškovská 15, 16100 Praha 6,
Česká republika

18
SK – POUŽÍVATEĽSKÝ MANUÁL
OBSAH BALENIA
−Telo kefky
−4× hlavica Standard
−Pohárik
−Nabíjacia základňa
−Cestovné puzdro
−TrueLife SonicBrush UV Sterilizer
−Manuál a bezpečnostné inštrukcie
POPIS PRODUKTU
Sonická kefka s nabíjacím pohárikom a cestovným puzdrom
7
9
1
3
24
8
10
5
6
1. Vymeniteľná hlavica sonickej zubnej kefky
2. Rozlišovací krúžok
3. Tlačidlo zapnúť/vypnúť
4. Tlačidlo pre výber módu čistenia
5. Indikátor zvoleného módu
6. Indikátor nabíjania
7. Cestovné puzdro
8. Pohárik
9. Napájací kábel
10. Nabíjacia základňa

19
UV Sterilizátor
1. Vstup pre napájací kábel
2. Otváracie veko
3. UV lampa
4. Tlačidlo pre otváranie veka
5. Otvor pre zubnú kefku/hlavicu
NÁVOD NA POUŽITIE
Sonická kefka
1. Nasaďte čistiacu hlavicu na telo kefky.
2. Stlačte tlačidlo pre výber módu čistenia. Pokiaľ chcete použiť rovnaký mód ako pri
predošlom čistení, nie je potreba ho voliť – kefka si ho pamätá.
- CLEAN – Základný mód pre perfektne vyčistené zuby
- SOFT – Jemné čistenie pre citlivé zuby a ďasná (vhodné takisto pre používateľov,
ktorí nie sú na sonické čistenie zvyknutí)
- WHITEN – Čistenie s leštením pre vybielenie zubov
- MASSAGE – Pulzovanie pre jemnú stimuláciu ďasien
3. Navlhčite hlavicu a naneste na ňu zubnú pastu.
4. Priložte hlavicu štetinami na zuby smerom k ďasnám.
5. Zapnite kefku tlačidlom ON/OFF.
6. Pohybujte štetinami po zube tam a nazad a pomaly sa presúvajte medzi jednotli-
vými zubami. Kefkou zároveň jemne tlačte smerom k zubu.
7. Pre maximálnu efektivitu si rozdeľte čistenie na 4 sekcie. Každej z nich sa venujte
30 sekúnd. Po 30 sekundovom cykle vykoná kefka pauzu a upozorní vás na presun
na ďalšiu sekciu. Po 2 minútach sa kefka sama vypne.
8. Opláchnite hlavicu aj telo kefky pod tečúcou vodou a následne ju otrite utierkou
alebo uterákom.
9. Postavte telo naspäť do pohára alebo jej uložte do cestovného puzdra.
UV Sterilizátor
1. Otvorte pomocou tlačidla veko UV sterilizátoru.
2. Umiestnite zubnú kefku alebo hlavicu zubnej kefky do UV sterilizátoru. Štetiny by
mali mieriť smerom k UV lampe.
3. Zavrite veko. Sterilizácia sa automaticky spustí.
4. Sterilizácia trvá 3 minúty. Behom sterilizácie neotvárajte veko.
5. Akonáhle zhasne UV svetlo, môžete veko otvoriť a zubnú kefku alebo hlavicu
vybrať.
Upozornenie: Štetiny zubnej kefky alebo hlavice zubnej kefky môžu byť pri vkladaní mier-
ne vlhké. Za žiadnu cenu z nich ale nesmie kvapkať voda.
1
5
2
3
4

20 21
Upozornenie: UV sterilizátor používajte iba vtedy, keď je zubná kefka alebo hlava kefky
smerom nadol.
Upozornenie: Pri preprave zubnej kefky alebo hlavy kefky vo vnútri UV sterilizátora musia
byť štetiny úplne suché.
NABÍJANIE
Sonická kefka
Sonická kefka je vybavená bezkontaktným systémom nabíjania. Nie je preto nutné
priame spojenie s napájacím káblom. Nabíjanie je tak pohodlnejšie a bezpečnejšie.
Pre plné nabitie je nutné kefku ponechať nabíjať približne 24 hodín.
1. Akonáhle začne indikátor nabíjanie blikať, je potreba zubnú kefku nabiť.
2. Pripojte nabíjaciu základňu k adaptéru a potom do zdroja elektrického napätie.
3. Položte na ňu pohár.
4. Vložte vypnutú kefku do pohárika. Po celú dobu nabíjania svieti indikátor nabíja-
nia červenou. Akonáhle je kefka nabitá, indikátor nabíjania svieti zelenou.
Odporučenie: V rámci zachovania optimálnej životnosti batérie kefky, odporúčame kefku
nabíjať v pravidelných intervaloch (napr. po 2–3 týždňoch).
Upozornenie: Pohárik s nabíjaciu základňu je možné používať aj ako stojan na zubnú kef-
ku. Nezapájajte však nabíjaciu základňu do zdroja elektrického napätia, pokiaľ nechcete
kefku nabíjať.
Upozornenie: Pri nabíjaní sa nabíjacia základňa a zubná kefka môžu mierne zahrievať.
UV Sterilizátor
Pokiaľ je UV sterilizátor vybitý, modrá kontrolka vo vnútri 10krát zabliká. UV steri-
lizátor môžete nabíjať pomocou priloženého napájacieho kábla. Postupujte podľa
návodu nižšie.
1. Pripojte napájací kábel k UV sterilizátoru.
2. Druhý koniec napájacieho adaptéra zapojte do adaptéru a pripojte k zdroju napá-
jania. Modrá kontrolka bude pri nabíjaní blikať.
3. UV sterilizátor bude približne po 3 hodinách plne nabitý. Modrá kontrolka auto-
maticky zhasne.
Upozornenie: Pokiaľ je UV sterilizátor plne vybitý, je bežné, že kontrolka nesvieti, dokiaľ
sa aspoň minimálne nenabije.
Upozornenie: Adaptér nie je súčasťou balenia.
ÚDRŽBA
Pred čistením sa uistite, že zariadenie nie je zapojené do zásuvky.
Pohárik
Pohár pravidelne oplachujte pod tečúcou vodou. Môžete použiť i umývačku riadu.
Strona się ładuje...
Strona się ładuje...
Strona się ładuje...
Strona się ładuje...
Strona się ładuje...
Strona się ładuje...
Strona się ładuje...
Strona się ładuje...
Strona się ładuje...
Strona się ładuje...
Strona się ładuje...
Strona się ładuje...
Strona się ładuje...
Strona się ładuje...
Strona się ładuje...
Strona się ładuje...
Strona się ładuje...
Strona się ładuje...
Strona się ładuje...
Strona się ładuje...
Strona się ładuje...
Strona się ładuje...
Strona się ładuje...
Strona się ładuje...
-
 1
1
-
 2
2
-
 3
3
-
 4
4
-
 5
5
-
 6
6
-
 7
7
-
 8
8
-
 9
9
-
 10
10
-
 11
11
-
 12
12
-
 13
13
-
 14
14
-
 15
15
-
 16
16
-
 17
17
-
 18
18
-
 19
19
-
 20
20
-
 21
21
-
 22
22
-
 23
23
-
 24
24
-
 25
25
-
 26
26
-
 27
27
-
 28
28
-
 29
29
-
 30
30
-
 31
31
-
 32
32
-
 33
33
-
 34
34
-
 35
35
-
 36
36
-
 37
37
-
 38
38
-
 39
39
-
 40
40
-
 41
41
-
 42
42
-
 43
43
-
 44
44


Truelife SonicBrush GL UV Instrukcja obsługi
- Kategoria
- Elektryczne szczoteczki do zębów
- Typ
- Instrukcja obsługi
w innych językach
- slovenčina: Truelife SonicBrush GL UV Používateľská príručka
Powiązane artykuły
-
Truelife SonicBrush UV Sterilizer Instrukcja obsługi
-
Truelife SonicBrush K150 UV Instrukcja obsługi
-
-
-
-
Truelife Invio MS5 Instrukcja obsługi
-
-
-