
DE Gebrauchsanweisung
GB Instructions for use
FR Mode d’emploi
NL Gebruiksaanwijzing
ES Instrucciones de uso
IT Manuale d’uso
DK Brugsanvisning
SE Bruksanvisning
FI Käyttöohje
PL Instrukcja obsugi
GR O
RU
Flaschenkühlschrank 3
Refrigerator for bottles 9
Réfrigérateur pour bouteilles 15
Koelkast voor fl essen 21
Frigorífi co para botellas 27
Refrigeratore per bottiglie 33
Køleskab til fl asker 39
Kylskåp för fl askor 45
Jääkaappi pulloille 51
Chodziarka do napojów w butelkach 57
63
69
www.severin.com
KS 9878

2
Liebe Kundin, lieber Kunde,
wir wünschen Ihnen mit dem Qualitätsprodukt aus dem Hause SEVERIN viel Freude und bedanken uns
für Ihr Vertrauen.
Die Marke SEVERIN steht seit über 120 Jahren für Beständigkeit, deutsche Qualität und
Entwicklungskraft. Jedes Gerät wurde mit Sorgfalt hergestellt und geprüft.
Mit der sprichwörtlichen Sauerländer Gründlichkeit, Genauigkeit und Ehrlichkeit überzeugt das
Familienunternehmen aus Sundern seit der Gründung 1892 mit innovativen Produkten Kunden in aller
Welt.
In den sieben Produktgruppen Kaffee, Frühstück, Küche, Grillen, Haushalt, Personal Care und Kühlen &
Gefrieren bietet SEVERIN mit über 250 Produkten ein umfassendes Elektrokleingeräte-Sortiment. Für
jeden Anlass das richtige Produkt!
Lernen Sie die SEVERIN-Produktvielfalt kennen und besuchen Sie uns unter www.severin.de oder
www.severin.com.
Ihre
Geschäftsleitung und Mitarbeiter
der SEVERIN Elektrogeräte GmbH

3
Original-Betriebsanleitung
Flaschenkühlschrank
Bitte die Gebrauchsanweisung sorgfältig vor der Benutzung
des Gerätes durchlesen und für den weiteren Gebrauch
aufbewahren. Das Gerät darf nur von Personen benutzt
werden, die mit den Sicherheitsanweisungen vertraut sind.
Anschluss
∙ Das Gerät nur an eine vorschriftsmäßig installierte
Schutzkontaktsteckdose anschließen. Die Netzspannung
muss der auf dem Typenschild des Gerätes angegebenen
Spannung entsprechen. Das Gerät entspricht den
Richtlinien, die für die CE-Kennzeichnung verbindlich sind
(siehe EG-Konformitätserklärung am Ende der Anleitung).
∙ Das Gerät nicht an Wechselgleichrichter oder zusammen mit
anderen Geräten über ein Verlängerungskabel anschließen.
∙ Die Anschlussleitung sollte nicht die Rückseite, wie
z.B. den Wärmetauscher berühren, um eventuelle
Vibrationsgeräusche zu vermeiden.
Bestimmungsgemäße Verwendung
∙ Das Gerät ist ein Kompressorkühlgerät, welches
ausschließlich für die Kühlung und Aufbewahrung von
Flaschen bestimmt ist.
∙ Kühlgeräte sind in Klimaklassen eingeteilt. Die Klimaklasse
für dieses Gerät entnehmen Sie bitte dem Produktdatenblatt.
∙ Wird das Gerät falsch bedient, oder zweckentfremdet
verwendet, kann keine Haftung für evtl. auftretende
Schäden übernommen werden.
Sicherheitshinweise
∙ Das Gerät ist für den gewerblichen
Einsatz bestimmt.
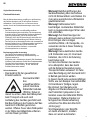
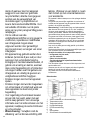
∙
Das Gerät enthält
das
umweltfreundliche,
jedoch brennbare
Kältemittel Isobutan
(R600a). Daher ist
darauf zu achten, dass das Kältesystem
beim Transport und auch nach
Aufstellung des Gerätes geschützt wird.
Bei Beschädigung des Systems darf das
Gerät nicht in Betrieb genommen
werden. Offenes Feuer oder Zündquellen
in der Nähe des Kältemittels entfernen
und den Raum gut lüften.
∙ Warnung! Belüftungsöffnungen der
Geräteverkleidung oder des Aufbaus
nicht mit Einbaumöbeln verschließen. Es
muss eine ausreichende Luftzirkulation
gewährleistet sein.
∙ Warnung! Kühlkreislauf nicht
beschädigen. Austretendes Kältemittel
kann zu Augenverletzungen führen oder
sich entzünden.
∙ Warnung! Zum Beschleunigen der
Abtauung keine anderen mechanischen
Einrichtungen oder sonstigen
künstlichen Mittel, z.B. Heizgeräte, o.ä.
verwenden als die in dieser Anleitung
beschriebenen.
∙ Warnung! Keine elektrischen Geräte
(z.B. Eisbereiter usw.) im Innenraum
betreiben, die nicht in der Anleitung
beschrieben sind.
∙ Vor dem Anschließen des Gerätes
ist zu überprüfen, dass das Gerät
und die Netzanschlussleitung keine
Transportschäden aufweisen. Im Falle
einer Beschädigung darf das Gerät nicht
in Betrieb genommen werden.
∙ In diesem Gerät keine explosionsfähigen
Stoffe, wie zum Beispiel Aerosolbehälter
mit brennbarem Treibgas, lagern.
∙ Bei Verkauf, bei Übergabe oder
Abgabe zur Wiederverwertung ist auf
das Treibmittel Cyklopentan in der
Isolation sowie das Kältemittel R600a
hinzuweisen. Weitere Angaben zur
fachgerechten Wiederverwertung
entnehmen Sie bitte dem Abschnitt
„Entsorgung“.
∙ Sind Reparaturen oder Eingriffe
am Gerät erforderlich, müssen
diese von einem autorisierten
DE

4
Kundendienst durchgeführt werden, um
Sicherheitsbestimmungen zu beachten
und Gefährdungen zu vermeiden.
Dies gilt auch für den Austausch der
Anschlussleitung.
∙ Das Gerät kann von Kindern ab 8 Jahren
sowie von Personen mit reduzierter
physischen, sensorischen oder mentalen
Fähigkeiten oder Mangel an Erfahrung
und/oder Wissen benutzt werden,
wenn sie beaufsichtigt oder bezüglich
des sicheren Gebrauchs des Gerätes
unterwiesen wurden und die daraus
resultierenden Gefahren verstanden
haben.
∙ Kinder dürfen nicht mit dem Gerät
spielen.
∙ Reinigung und Benutzer-Wartung dürfen
nicht durch Kinder ohne Beaufsichtigung
durchgeführt werden.
∙ Zur regelmäßigen Pfl ege eignet sich
lauwarmes Wasser mit einem Zusatz
von Spülmittel. Nähere Angaben zur
Reinigung entnehmen Sie bitte dem
Abschnitt Abtauen und Reinigung.
∙ Warnung! Nehmen Sie nicht
die Abdeckung der LED-
Innenraumbeleuchtung ab. Im Falle
eines Defektes der LED-Lampe rufen Sie
den Kundendienst (siehe Anhang).
∙ Nur Getränke im Gerät lagern.
∙ Zur Vermeidung von Personen- und Sachschäden, das
Gerät nur verpackt transportieren und mit zwei Personen
aufstellen.
∙ Achtung! Halten Sie Kinder fern von Verpackungsmaterial.
Es besteht u.a. Erstickungsgefahr!
∙ Überprüfen Sie die Anschlussleitung regelmäßig auf
Beschädigungen. Im Falle einer Beschädigung darf das
Gerät nicht weiter benutzt werden.
∙ Keine Elektrogeräte auf der Abstellfl äche betreiben, um
Brandgefahren zu vermeiden. Stellen Sie auch keine
Flüssigkeitsbehälter auf das Gerät, damit eventuell
auslaufende Flüssigkeiten die elektrische Isolierung nicht
beeinträchtigen.
∙ Ablagen, Fächer, Tür usw. nicht als Trittfl äche oder zum
Aufstützen missbrauchen.
∙ Im Geräteinnenraum nicht mit offenem Feuer oder
Zündquellen hantieren.
∙ Netzstecker ziehen,
- bei Störungen während des Betriebes,
- vor dem Abtauen des Gerätes,
- vor jeder Reinigung,
- bei Arbeiten am Gerät.
∙ Den Netzstecker nicht an der Anschlussleitung aus der
Steckdose ziehen; fassen Sie den Netzstecker an.
∙ Ist das Gerät für längere Zeit außer Betrieb, sollte die Tür
geöffnet bleiben.
∙ Technische Änderungen behalten wir uns vor.
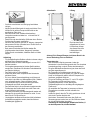
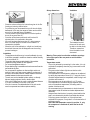
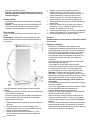
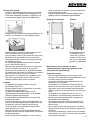
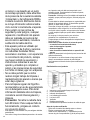
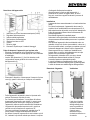
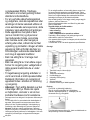
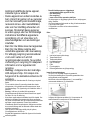
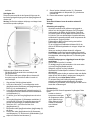
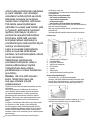
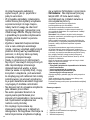
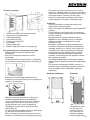
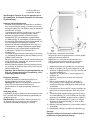
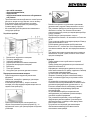
Aufbau
1. Ein-/Ausschalter Beleuchtung
2. Temperaturregler
3. Anzeige der Temperaturregelung
4. Netzkontrollleuchte
5. LED-Leuchte
6. Ventilator
7. Ablageroste
8. Reinigungsinstrument für die Ablaufrinne
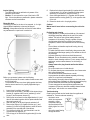
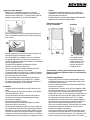
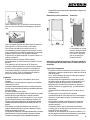
Vor der ersten Inbetriebnahme
∙ Entfernen Sie sämtliche Verpackung im und am Gerät.
∙ Entsorgen Sie die Verpackung fachgerecht.
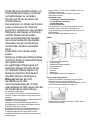
∙ Setzen Sie die beiden beiliegenden Abstandhalter (1) in die
auf der Rückseite befi ndlichen Führungen (2).
∙ Entfernen Sie das Transportschutzteil (A). Dieses wird nur
für den Transport benötigt.

5
∙ Gerät wie unter Abtauen und Reinigung beschrieben
reinigen.
∙ Neigen Sie den Kühlschrank ein wenig nach hinten. Dann
können Sie ihn auf den Transportrollen leicht an den
gewünschten Platz rollen.
∙ Das Gerät sollte in der vertikalen Arbeitsstellung
transportiert werden und dabei um nicht mehr als 30°
geneigt werden.
∙ Warten Sie nach dem Aufstellen 30 Minuten bevor Sie das
Gerät an das Stromnetz anschließen.
∙ Wenn Sie das Gerät mit mehr als 30° Neigung transportiert
haben warten Sie bitte 4 Stunden bevor Sie das Gerät an
das Stromnetz anschließen.
∙ Beim ersten Einschalten des Gerätes werden Sie
möglicherweise einen leichten „Neugeruch“ bemerken.
Dieser Geruch verschwindet, sobald das Gerät zu kühlen
beginnt.
Aufstellung
∙ Für die Aufstellung des Gerätes sollte ein trockener und gut
gelüfteter Raum ausgesucht werden.
∙ Das Gerät kann bei einer Luftfeuchtigkeit von max. 60 %
betrieben werden.
∙ Die Umgebungstemperatur bei der das Gerät betrieben
werden kann, entnehmen Sie bitte dem Produktdatenblatt
am Ende der Anleitung.
∙ Das Gerät nicht im Freien aufstellen.
∙ Achten Sie darauf, dass Sie jederzeit den Netzstecker
abziehen können.
∙ Es ist vor direkter Sonneneinstrahlung zu schützen und
sollte nicht in der Nähe von Wärmequellen (Ofen, Radiator
usw.) aufgestellt werden. Wenn sich dieses jedoch
nicht vermeiden lässt, muss eine Isolierung zwischen
Wärmequelle und Gerät verwendet werden.
∙ Das Gerät darf nicht in einem Schrank eingebaut werden.
Die Montage des Gerätes direkt unter einer Platte oder
einem Schrank ist nicht erlaubt.
∙ Falls das Gerät neben einer Wand aufgestellt werden soll,
belassen Sie einen seitlichen Abstand von mind. 10 mm,
damit Sie die Tür öffnen können.
∙ Unebenheiten des Bodens können durch die justierbaren
Aufstellfüße ausgeglichen werden, damit eine sichere
Standfestigkeit gegeben ist.
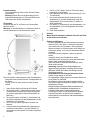
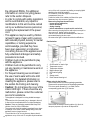
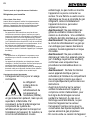
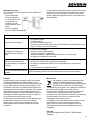
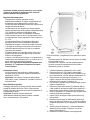
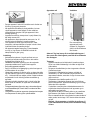
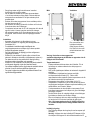
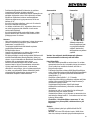
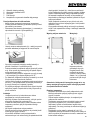
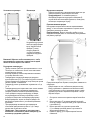
Aufstellmaße Lüftung
Die hinter dem Gerät
aufgewärmte Luft muss
frei zirkulieren können.
Aus diesem Grund die
Luftzirkulation nicht
beeinträchtigen.
Achtung! Die Lüftungsöffnungen im hinteren Bereich der
oberen Abdeckung nicht verschließen!
Temperaturregler
∙ Das Gerät wird in Betrieb genommen, indem der
Netzstecker in eine Steckdose gesteckt wird. Eine komplette
Ausschaltung erfolgt nur durch Ziehen des Netzsteckers.
∙ Die grüne Betriebskontrollleuchte zeigt an, dass das Gerät
ans Netz angeschlossen ist.
∙ Die Temperatur im Geräteinnenraum wird mit dem
Temperaturregler-Knopf eingestellt (0-5). Wird der Regler-
Knopf im Uhrzeigersinn gedreht, sinkt die Temperatur im
Innenraum, umgekehrt steigt sie.
∙ Es ist eine Einstellung zwischen 0°C und 10°C möglich.
∙ Die Temperatur im Kühlraum hängt von der
Umgebungstemperatur, von der Stellung des
Temperaturreglers und von der Menge der eingelagerten
Flaschen ab.
∙ Wir empfehlen die Temperatur im Innenraum mit einem
Thermometer zu ermitteln und falls erforderlich zu
korrigieren.
∙ Achten Sie darauf, dass die Tür richtig geschlossen ist und
nicht durch Flaschen blockiert wird.
∙ Nach einem Stromausfall oder wenn das Gerät vom
Stromnetz getrennt wurde, kann es 3 bis 5 Minuten dauern
bis sich das Gerät wieder einschaltet.
∙ Anmerkung: Der Temperaturregler schaltet in der Position „0“
nur den Kompressor ab, nicht den Ventilator!

6
Innenbeleuchtung
∙ Die Innenbeleuchtung wird durch den Ein/Aus-Schalter
eingeschaltet.
∙ Warnung! Nehmen Sie nicht die Abdeckung der LED-
Innenraumbeleuchtung ab. Im Falle eines Defektes der
LED-Lampe rufen Sie den Kundendienst.
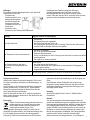
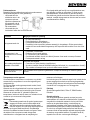
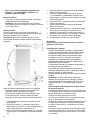
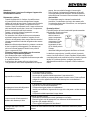
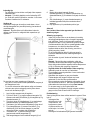
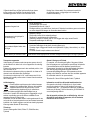
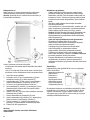
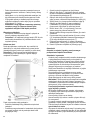
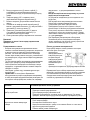
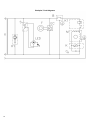
Türanschlag
Bei Bedarf kann die Tür von Rechts- auf Linksanschlag
geändert werden.
Warnung! Vor dem Durchführen von Arbeiten am Gerät ist
stets der Netzstecker aus der Steckdose zu ziehen.
Bevor Sie mit dem Umbau beginnen etwas Grundsätzliches:
∙ Achten Sie immer auf die Anzahl der Unterlegscheiben auf
den Bolzen.
∙ Richten Sie die Tür immer exakt aus, damit Sie dicht
schließt.
1. Legen Sie das Gerät vorsichtig auf die Rückseite.
2. Die zwei Schrauben (7) abschrauben und den unteren
Scharnierhalter (8) zusammen mit dem Scheibensatz
(6) auf dem Lagerzapfen und dem Abstandshalter (5)
abnehmen.
2. Die zwei Schrauben am Winkel (11) abschrauben und
den Winkel zusammen mit dem Abstandshalter und der
Abdeckleiste (10) abnehmen.
3. Die Tür (4) vom oberen Lagerzapfen abziehen und
abheben.
4. Aus dem oberen Scharnierhalter den Lagerzapfen (2)
zusammen mit der Mutter (1) und den Scheiben (3)
abschrauben und den ganzen Satz auf der Gegenseite
montieren.
5. Die Tür um 180° drehen. Dann die Tür auf den oberen
Lagerzapfen (2) aufschieben.
6. Den Lagerzapfen des unteren Scharnierhalters (8) in die
Tür einschieben.
7. Den unteren Scharnierhalter (8) zusammen mit der
Abdeckleiste (10) und dem Scheibensatz sowie dem
Abstandshalter (5) mit den Schrauben (7) wieder am
Gerät anschrauben.
8. Den Winkel (11) zusammen mit dem Abstandshalter und
der Abdeckleiste (10) auf der Gegenseite des Gerätes
anschrauben.
10. Gerät wieder aufstellen.
Achtung!
Warten Sie bitte mindestens 4 Stunden bevor Sie das Gerät
an das Stromnetz anschließen.
Abtauen und Reinigung
∙ Auf dem Verdampfer an der Rückwand des Innenraumes
bildet sich Reif. In den Zeiten, in denen der Kompressor
nicht arbeitet, kann der Reif abtauen. Das entstehende
Wasser wird durch ein Schlauchsystem auf die Wanne am
Kompressor geführt, wo es durch die entstehende Wärme
verdampft.
∙ Das Gerät muss nicht abgetaut, sondern nur gereinigt
werden.
∙ Achten Sie darauf, dass die Ablaufrinne und die
Ablauföffnung nicht verstopft sind, damit das entstehende
Wasser immer ungehindert abfl ießen kann.
∙ Sollte sich Wasser in der Bodenmulde sammeln, muss
dieses entfernt werden.
∙ Anmerkung: Verwenden Sie keine alkoholhaltigen und
aggressiven Reinigungsmitteln. Verwenden Sie auch keine
elektrischen Geräte zum Auftauen oder Reinigen wie z.B.
Dampfreinigungsgeräte.
∙ Grundsätzlich vor dem Reinigen Netzstecker ziehen.
∙ Gießen Sie kein Wasser in das Gerät.
∙ Zur regelmäßigen Pfl ege eignet sich lauwarmes Wasser mit
einem Zusatz von Spülmittel.
∙ Der Kühlraum sollte einmal im Monat gereinigt werden.
∙ Das Zubehör separat im Spülwasser reinigen. Nicht in der
Spülmaschine reinigen.
∙ Nach der Reinigung mit klarem Wasser nachwischen und
sorgfältig trocknen. Anschließend den Netzstecker mit
trockenen Händen wieder in eine Steckdose stecken.
∙ Um Energie zu sparen und die Produktivität zu erhalten,
sollte der Kompressor auf der Rückseite mindestens
zweimal jährlich mit einem Besen oder einem Staubsauger
gereinigt werden.

7
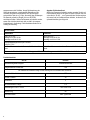
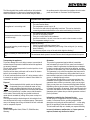
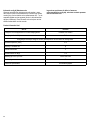
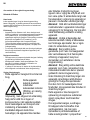
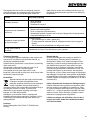
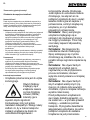
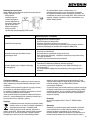
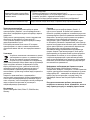
Störungen
Es entstehen typische Betriebsgeräusche, wenn das Gerät
eingeschaltet ist. Das sind:
∙ Geräusche des
elektrischen Motors vom
arbeitenden Kompressor.
Bei Betriebsbeginn des
Kompressors sind die
Geräusche für kurze Zeit
etwas lauter.
∙ Geräusche in den
Röhrchen bei der Zirkulation des Kältemittels.
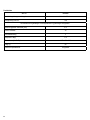
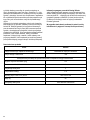
Nachfolgend eine Tabelle mit möglichen Störungen
und Beseitigungsmethoden. Prüfen Sie, ob durch die
Beseitigungsmethoden die Störungen behoben werden
können. Falls dies nicht der Fall ist, muss das Gerät vom Netz
getrennt und der Kundendienst benachrichtigt werden.
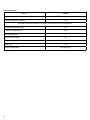
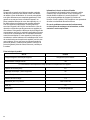
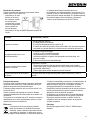
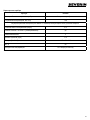
Störung Mögliche Ursache und Beseitigung
Das Gerät läuft nicht.
∙ Stromausfall
∙ Die Hauptsicherung ist ausgefallen.
∙ Das Thermostat steht auf Position „0“.
∙ Die Sicherung der Steckdose ist nicht in Ordnung. Prüfen Sie dies, indem Sie ein
anderes Gerät an derselben Steckdose anschließen.
Die Temperatur ist nicht ausreichend tief.
∙ Das Gerät ist überladen.
∙ Die Tür ist nicht korrekt verschlossen.
∙ Staub auf dem Kompressor.
∙ Die Be- und Entlüftung ist nicht in Ordnung. Das Gerät steht zu nah an einer Wand
oder Gegenstand.
∙ Der Regler ist zu niedrig eingestellt.
Die Geräusche sind zu laut (wenn
die normalen Betriebsgeräusche sich
verändern)
Prüfen Sie ob:
∙ das Gerät fest auf dem Boden steht.
∙ nebenstehende Möbel oder Gegenstände von dem laufenden Kühlaggregat in
Vibration gesetzt werden.
∙ Gegenstände auf der Geräteoberfl äche vibrieren.
Im Gerät sammelt sich Wasser am Boden. Das Abführsystem des Tauwassers ist verstopft. Die Ablaufrinne ist zu reinigen.
Transport des Gerätes
Während des Transportes sind alle beweglichen Teile im und
am Gerät zuverlässig zu befestigen, um Beschädigungen zu
vermeiden.
Das Gerät sollte in der vertikalen Arbeitsstellung transportiert
werden und dabei nicht um mehr als 30° geneigt werden.
Warten Sie nach dem Aufstellen 30 Minuten bevor Sie das
Gerät an das Stromnetz anschließen.
Wenn Sie das Gerät mit mehr als 30° Neigung transportiert
haben; warten Sie bitte 4 Stunden bevor Sie das Gerät an das
Stromnetz anschließen.
Entsorgung
Geräte, die mit diesem Symbol gekennzeichnet sind,
müssen getrennt vom Hausmüll entsorgt werden.
Diese Geräte enthalten wertvolle Rohstoffe, die
wiederverwertet werden können. Eine
ordnungsgemäße Entsorgung schützt die Umwelt und die
Gesundheit Ihrer Mitmenschen. Ihre Gemeindeverwaltung bzw.
Ihr Fachhändler gibt Auskunft über die ordnungsgemäße
Entsorgung. Ziehen Sie den Netzstecker aus der Steckdose
und trennen Sie die Anschlussleitung vor der Entsorgung vom
Gerät.
Das Kältemittel und das Treibmittel in der Isolation muss
fachgerecht entsorgt werden. Beachten Sie, dass die Rohre
des Kühlkreislaufes bis zur fachgerechten Entsorgung nicht
beschädigt werden dürfen.
Hersteller
Severin Elektrogeräte GmbH, Röhre 27, 59846 Sundern,
Deutschland
Garantie
Von den nachfolgenden Garantiebedingungen bleiben die
gesetzlichen Gewährleistungsrechte gegenüber dem Verkäufer
und eventuelle Verkäufergarantien unberührt. Wenden Sie sich
im Garantiefall daher direkt an den Fachhändler. Zusätzlich
gewährt SEVERIN eine Herstellergarantie von zwei Jahren ab
Kaufdatum. In diesem Zeitraum beseitigen wir kostenlos alle
Mängel, die nachweislich auf Material- oder Fertigungsfehlern
beruhen und die Funktion wesentlich beeinträchtigen.
Weitere Ansprüche sind ausgeschlossen. Von der Garantie

8
ausgenommen sind: Schäden, die auf Nichtbeachtung der
Gebrauchsanweisung, unsachgemäße Behandlung oder
normalen Verschleiß zurückzuführen sind, ebenso leicht
zerbrechliche Teile wie z. B. Glas, Kunststoff oder Glühlampen.
Die Garantie erlischt bei Eingriff nicht von SEVERIN
autorisierter Stellen. Sollte eine Reparatur erforderlich werden,
setzen Sie sich bitte telefonisch oder per Mail mit unserem
Kundendienst in Verbindung. Die Kontaktdaten fi nden Sie im
Anhang der Anleitung.
Angaben für Kundendienst
Sollte eine Reparatur erforderlich werden, wenden Sie sich mit
Fehlererklärung direkt an die Service-Hotline. Notieren Sie sich
vorher die Art.-Nr. KS ... vom Typenschild des Gerätes welches
sich unten links im Geräteinnenraum befi ndet, da diese für die
optimale Abwicklung benötigt wird.
Service-Hotline
Deutschland Österreich
0180 / 501 5 700 *
werktags von 8 bis 19 Uhr,
samstags von 9 bis 13 Uhr
0820 / 890 015 **
werktags von 8 bis 19 Uhr,
samstags von 9 bis 13 Uhr
Ersatzteilbestellungen direkt per Fax unter:
0180/501 5 700 *
* 14 Cent/Minute aus dem dt. Festnetz, Mobilfunk deutlich
teurer
** 14,6 Cent/Minute aus dem österr. Festnetz, Mobilfunk deutlich
teurer
Bitte wenden Sie sich bei Funktionsstörungen und Ersatzteilbestellungen ausschließlich an die Service-Hotline!
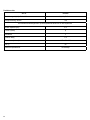
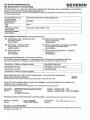
Produktdatenblatt
Art.-Nr. KS 9878
Haushaltskühlgeräte-Kategorie Flaschenkühlschrank
Energieverbrauch in kWh/Jahr 748
Der tatsächliche Verbrauch hängt von der Nutzung und vom Standort des Gerätes ab
Nutzinhalt Kühlteil in Liter 275
Frostfrei : Kühlteil Ja
Klimaklasse 3
Geräuschemission in dB(a) < 70
Abmessungen H x B x T in mm 1450 x 600 x 600
Gewicht in kg 58
Elektrische Daten siehe Typenschild

9
Translation from original operating manual
Refrigerator for bottles
Dear Customer,
Before using the appliance, please read the following
instructions carefully and keep this manual for future reference.
The appliance must only be used by persons familiar with these
instructions.
Connection to the mains supply
∙ The appliance should only be connected to an earthed
socket installed in accordance with the regulations. Make
sure that the supply voltage corresponds with the voltage
marked on the rating label. This product complies with
all binding CE labelling directives (see EC-Declaration of
Conformity at the end of the manual).
∙ Do not operate this unit by means of a transformer or,
together with other electrical appliances, by means of an
extension cable.
∙ To prevent noise vibration, ensure that the power cord does
not touch any part of the rear of the unit (e.g. the heat-
exchanger).
Designated use
∙ This appliance is a compressor refrigerator designed for
cooling and storing bottled beverages only.
∙ Refrigeration appliances are classifi ed into certain climate
classes. Please refer to the product data sheet for
information on the classifi cation for this unit.
∙ No responsibility is accepted if damage results from
improper use, or if these instructions are not complied with.
Important safety instructions
∙ This appliance is intended for commercial
use.
∙
The cooling circuit in
this appliance
contains the
refrigerant isobutane
(R600a), a natural
gas with a high level
of environmental compatibility, which is
nevertheless fl ammable. Ensure,
therefore, that none of the components of
the refrigerant circuit become damaged
during transportation and installation of
the appliance. If damage to the cooling
circuit does occur, do not switch on or
connect the appliance to the mains
power. In the case that there is an open
fi re or any other sources of ignition in the
vicinity of the refrigerant gas, make sure
it is removed immediately from this area
and that the room is then thoroughly
ventilated.
∙ Warning: Keep ventilation openings, in
the appliance enclosure or in the built-in
structure, clear of obstruction. Suffi cient
ventilation must be ensured at all times.
∙ Warning: Do not damage the cooling
circuit. Any escaping refrigerant causes
damage to the eyes; there is also a
danger of the gas igniting.
∙ Warning: Do not use any external
device (e.g.; heaters or heating fans) to
accelerate de-frosting; follow only the
methods recommended in this manual.
∙ Warning: Do not operate any electrical
appliances (e.g. ice makers) inside
the storage compartment that are
not specifi cally permitted in these
instructions.
∙ Before it is connected to the mains
power, the unit must be thoroughly
checked for transport damage, including
its power cord. In the event of any such
damage being found, the appliance must
not be connected to the mains.
∙ This appliance is not designed for the
storage of explosive substances such
as aerosol cans with a fl ammable
propellant.
∙ If the unit is sold, handed over to a
third party or disposed of at a suitable
recycling facility, attention must be
drawn to the presence of the insulation
agent ‘cyclopenthane’ as well as to
GB

10
the refrigerant R600a. For additional
information on correct recycling please
refer to the section Disposal.
∙ In order to comply with safety regulations
and to avoid hazards, any repairs or
modifi cations to this unit must be carried
out by our authorised service personnel,
including the replacement of the power
cord.
∙ This appliance may be used by children
(at least 8 years of age) and by persons
with reduced physical, sensory or mental
capabilities, or lacking experience
and knowledge, provided they have
been given supervision or instruction
concerning the use of the appliance and
fully understand all dangers and safety
precautions involved.
∙ Children must not be permitted to play
with the appliance.
∙ Children must not be permitted to carry
out any cleaning or maintenance work on
the appliance.
∙ For frequent cleaning we recommend
the use of warm water with some mild
detergent. For detailed information on
cleaning the appliance, please refer to
the section De-frosting and cleaning.
∙ Caution: Do not remove the cover of the
interior LED light. If there should be any
malfunction, please contact the customer
service for assistance.
∙ This appliance is designed for storing bottled beverages
only.
∙ To prevent the risk of personal injury or damage to the unit,
it must only be transported while in its original packaging.
∙ Caution: Keep any packaging materials well away from
children: there is a risk of suffocation.
∙ The power cord should be regularly examined for any signs
of damage. In the event of such damage being found, the
appliance must no longer be used.
∙ To avoid the risk of fi re, do not place any thermo-electric
appliances on top of the unit. Do not place liquid containers
on top of the unit, to prevent any leaking or escaping liquid
damaging the electrical insulation.
∙ Do not lean or put undue weight on the shelves,
compartments, door etc.
∙ Protect the inside of the cabinet at all times from open
fl ames and any other sources of ignition.
∙ Remove the plug from the wall socket
- in case of any malfunction,
- before de-frosting,
- during cleaning,
- before maintenance or repair work is carried out.
∙ When removing the plug from the wall socket, never pull on
the power cord; always grip the plug itself.
∙ If the unit is not used for an extended period of time, we
recommend keeping the door open.
∙ We reserve the right to introduce technical modifi cations.
Familiarisation
1. On/Off switch for interior light
2. Temperature control
3. Temperature indicator
4. Mains indicator light
5. LED interior lighting
6. Fan
7. Storage racks
8. Drain channel cleaning tool
Before using for the fi rst time
∙ Remove any exterior and interior packaging materials.
∙ Please ensure proper disposal of all packaging materials.
∙ Fit the two spacer elements (1), provided, into the
corresponding guide slots (2) on the rear.
∙ Remove the red transport securing device (A); this is for
transport purposes only and can be disposed of.

11
∙ Clean the unit according to the instructions given in the De-
frosting and cleaning section below.
∙ For positioning, we recommend that you tilt the unit slightly
backwards. In this way, the transport rollers can be used to
move it to its intended place of installation.
∙ The unit should only be transported in its vertical position;
do not tilt any more than 30°.
∙ Once the unit has been positioned, wait for about 30
minutes before it is connected to the mains.
∙ If the unit has been tilted more than 30° during transport,
allow it to stand upright for at least 4 hours before it is
connected to the mains.
∙ When the unit is fi rst switched on, a slight ‘new’ smell may
be noticed. However, this will disappear once the cooling
process has begun.
Installation
∙ The appliance should be set up in a well-ventilated, dry room.
∙ It should be operated in conditions where the relative humidity
is no more than 60 %.
∙ The product data sheet contains details of the ambient
temperature range suitable for this appliance.
∙ Do not use the appliance outdoors.
∙ Ensure that the plug is accessible and can be removed from the
wall socket at any time.
∙ Do not expose the appliance to direct sunlight, and do not
position it next to any heat sources (radiators, cookers etc). If
this cannot be avoided, however, suitable insulation must be in
installed between the heat source and the unit.
∙ The unit must not be installed inside a cabinet, nor directly
below a hanging cupboard, shelf or similar object.
∙ If the unit is installed next to a wall, a minimum lateral distance
of 10 mm is necessary for the door to fully open.
∙ If the fl oor is uneven, the adjustable feet on the unit can be
used to compensate and ensure optimum stability.
Set-up dimensions Ventilation
The heated air around
the rear of the unit must
be able to circulate freely.
Therefore, ensure that
the air circulation is not
obstructed.
Warning: Take special care that the ventilation openings
in the upper part of the rear panel are not blocked or
obstructed.
Temperature control
∙ The unit is activated by connecting it to the mains. It is only
switched off completely when the plug is removed from the
wall socket.
∙ The green mains indicator light shows that the unit is
connected to the mains.
∙ The temperature in the refrigerator cabinet can be adjusted
by setting the temperature control (0-5). Turning the control
clockwise will decrease the temperature, while turning it anti-
clockwise will increase it.
∙ The temperature can be set within a 0 to 10°C range.
∙ The temperature in the cabinet largely depends on factors
such as the ambient temperature, the setting and the
number of bottles stored.
∙ We recommend using a thermometer to check the actual
temperature inside the cabinet and make adjustments as
necessary.
∙ Always ensure that the door is properly closed and that the
seal is not obstructed by bottles stored inside the cabinet.
∙ Following a power interruption, or if the unit has been
switched off on purpose, it may take 3 to 5 minutes before it
switches on again.
∙ Note: With the temperature control in position ‘0’, only
the compressor is switched off, while the fan is still
running.

12
Interior lighting
∙ The interior light can be switched on by means of the
separate On/Off switch.
∙ Caution: Do not remove the cover of the interior LED
light. If there should be any malfunction, please contact the
customer service for assistance.
Reversible door
The design provides for the door to be reversed, i.e. for right-
hinged (default installation) to become left-hinged.
Warning: Always disconnect the unit from the mains before
any maintenance or repair work is carried out.
Before you get started, please note the following:
∙ Always ensure that the correct number of washers are used
on the hinge bolts.
∙ To ensure that the door can close tightly against the frame,
take the utmost care that it is properly aligned during re-
assembly.
1. Lower the unit carefully onto its back.
2. Remove the two screws (7) and take off the bottom hinge
bracket (8), together with the set of washers (6) on the
hinge pin, and the spacer element (5).
3. Remove the two screws from the angled bracket (11) and
take off the bracket together with the spacer element and
the covering panel (10).
4. Slide the door (4) off the top hinge pin and take it off.
5. Remove the hinge pin (2) together with the nut (1) and
washers (3) from the top hinge bracket, and fi t the entire
assembly to the opposite side of the cabinet.
6. Turn the door through 180°, and then slide it over the
re-positioned top hinge pin (2).
7. Fit the hinge pin of the bottom hinge bracket (8) into the
door.
8. Replace the bottom hinge bracket (8) together with the
covering panel (10), the set of washers and the spacer
element (5) to the cabinet, using the screws (7).
9. Screw the angled bracket (11), together with the spacer
element and the covering panel (10), to the opposite side
of the unit.
10. Return the whole unit to its upright position.
Caution!
Wait at least 4 hours before re-connecting the unit to the
mains.
De-frosting and cleaning
∙ During operation, you may notice a build-up of frost around
the integral evaporator sealed into the rear of the inside
cabinet. This layer of frost will start melting when the
compressor is not working. Through a system of hoses,
the melt-water drains into the collection tray below the
compressor, where it will be absorbed into the surrounding
air.
∙ The unit does not therefore require de-frosting, but only
proper cleaning.
∙ To enable the melt-water to drain freely, always ensure that
the channel and discharge opening in the cabinet are free of
any blockage.
∙ Any water collecting in the bottom should be removed.
∙ Remark: Do not use abrasive tools, materials containing
alcohol or harsh cleaning solutions. Do not use any electrical
appliances, such as steam cleaners, for de-frosting or
cleaning.
∙ Always remove the plug from the wall socket before
cleaning.
∙ Do not pour water over or inside the unit.
∙ For frequent cleaning we recommend the use of warm water
with some mild detergent.
∙ The cabinet should be cleaned once a month.
∙ Any accessories should be cleaned separately with soapy
water. Do not put them in a dishwasher.
∙ After cleaning, thoroughly clean all surfaces with fresh water
before wiping them completely dry. When re-inserting the plug
into the wall socket ensure that you have dry hands.
∙ To save energy and to ensure optimum performance, the
compressor (at the rear) should be carefully cleaned at least
twice a year, with a brush or a vacuum cleaner.
Trouble-shooting
Certain typical sounds can be heard when the appliance is
switched on. These sounds are caused by:
∙ the electric motor
within the compressor
assembly; during
compressor start-up
the sound level will be
slightly higher for a short
time.
∙ the cooling agent fl owing
through the circuit.

13
Transporting the appliance
To prevent damage to the unit during transport, ensure that all
accessories and components inside and around the appliance
are securely fastened.
The unit must only be transported in its vertical position; do not
tilt any more than 30°.
Once the unit has been positioned, wait for about 30 minutes
before it is connected to the mains.
If the unit has been tilted more than 30° during transport, allow
it to stand in an upright position for at least 4 hours before it is
connected to the mains.
Disposal
Devices marked with this symbol must be disposed
of separately from your household waste, as they
contain valuable materials which can be recycled.
Proper disposal protects the environment and human
health. Your local authority or retailer can provide information
on the matter. Remove the plug from the wall socket and
render the unit unusable by cutting off the power cord prior to
disposal.
The refrigerant and the chemical agent in the insulation foam
must be disposed of through a competent agency. Take special
care not to damage the cooling circuit before the unit is handed
over for competent disposal.
Manufacturer
Severin Elektrogeräte GmbH, Röhre 27, 59846 Sundern,
Germany
Guarantee
This product is guaranteed against defects in materials
and workmanship for a period of two years from the date of
purchase. Under this guarantee the manufacturer undertakes
to repair or replace any parts found to be defective, providing
the product is returned to one of our authorised service centres.
This guarantee is only valid if the appliance has been used in
accordance with the instructions, and provided that it has not
been modifi ed, repaired or interfered with by any unauthorised
person, or damaged through misuse.
This guarantee naturally does not cover wear and tear, nor
breakables such as glass and ceramic items, bulbs etc. This
guarantee does not affect your statutory rights, nor any legal
rights you may have as a consumer under applicable national
legislation governing the purchase of goods. If the product fails
to operate and needs to be returned, pack it carefully, enclosing
your name and address and the reason for return. If within the
guarantee period, please also provide the guarantee card and
proof of purchase.
Information needed by the Customer Service
Should repairs to the appliance become necessary, please
contact our Customer Service, providing a detailed fault
description and quoting the article number KS ... on the rating
label of the appliance (inside the cabinet at the bottom left).
This information will help us to handle your request effi ciently.
In case of problems or malfunction, or if spare parts are
required, contact only the Service hotline.
The following table lists possible malfunctions, their probable
causes and solutions. In the event of operational problems,
check fi rst whether a solution can be found using this table. If
the problem persists, disconnect the appliance from the mains
power and contact our Customer Service Department.
Problem Possible cause and solution
The appliance is not working at all.
∙ There is a power failure
∙ The main fuse has blown.
∙ The temperature control is set to ‘0‘.
∙ The fuse in the wall socket (if applicable) has blown. This can be checked by
connecting another electrical device to the socket and checking for function.
The temperature inside the compartment
is not low enough.
∙ The cabinet has been overloaded.
∙ The door is not properly closed.
∙ There is too much dust on the condenser.
∙ Insuffi cient ventilation: the unit is too close to a wall or other structure or object.
∙ The temperature setting is too low
The normal operating sound changes or
becomes louder.
Check the following:
∙ Check for proper positioning (uneven fl oor).
∙ Are any adjacent objects affected by the running of the cooling unit (i.e. causing
them to vibrate?)
∙ Are there any objects on top of the unit which might be vibrating?
Water is collecting on the bottom of the
unit.
The melt-water drain system is blocked. Remove the blockage and clean the system.

14
Product data sheet
Art. no. KS 9878
Household refrigerating appliance category Refrigerator for bottles
Energy consumption in kWh/year 748
The actual consumption depends on the pattern of use and the location of the appliance
Usable cabinet capacity (litres) 275
Frost-free : refrigeration unit yes
Climate classifi cation 3
Noise emission in dB(a) < 70
Dimensions (H x W x D) in mm 1450 x 600 x 600
Weight (kg) 58
Electrical specifi cations See rating plate

15
Traduit à partir de l’original du manuel d’utilisation
Réfrigérateur pour bouteilles
Chère cliente, Cher client,
Avant d’utiliser cet appareil, veuillez lire soigneusement les
instructions suivantes et conserver ce manuel pour future
référence. L’appareil doit être utilisé exclusivement par des
personnes familiarisées avec les présentes instructions.
Branchement de l’appareil
∙ Cet appareil doit être branché sur une prise de terre
conforme aux normes en vigueur. Assurez–vous que la
tension sur le réseau de votre habitation coïncide avec les
indications fournies sur la fi che signalétique de l’appareil.
Cet appareil répond aux normes de sécurité CE en vigueur
(voir la déclaration de conformité CE à la fi n de ce manuel)
∙ Ne pas brancher cet appareil sur un transformateur, ni sur
une rallonge avec d’autres appareils électriques.
∙ Pour éviter tout bruit de vibration, vérifi ez que le cordon ne
touche aucune partie à l’arrière de l’appareil (ex. l’échangeur
de chaleur).
Utilisation
∙ Cet appareil est un réfrigérateur à compresseur conçu
uniquement pour refroidir et conserver les liquides en
bouteilles.
∙ Les appareils de réfrigération sont classés par classes
climatiques. Veuillez vous référer à la fi che technique pour
connaître la classe climatique de cet appareil.
∙ Nous déclinons toute responsabilité en cas de dommages
éventuels subis par cet appareil, résultant d’une utilisation
incorrecte ou du non-respect de ce mode d’emploi.
Consignes de sécurité importantes
∙ Cet appareil est conçu pour un usage
commercial.
∙
Le réfrigérant
contenu dans le
circuit de
refroidissement de
cet appareil est
l’isobutane (R600a),
un gaz naturel non polluant, mais qui est,
cependant, infl ammable. Par
conséquent, évitez d’endommager les
composants du système de
refroidissement pendant le transport et
l’installation de l’appareil. Si, toutefois, le
circuit de refroidissement s’avère
endommagé, ne pas mettre en marche
l’appareil et ne pas le connecter au
secteur. Si une fl amme ou autre source
d’allumage se trouve à proximité du gaz
réfrigérant, retirez immédiatement
l’appareil de la zone, puis aérez
amplement la pièce.
∙ Avertissement : Ne pas obstruer les
grilles de ventilation situées dans le
caisson ou la structure. Une ventilation
suffi sante doit être maintenue en continu.
∙ Avertissement : Ne pas endommager
le circuit de refroidissement. Le gaz qui
s’en échappe peut causer des lésions
oculaires; il existe également un risque
d’incendie.
∙ Avertissement : Ne pas accélérer le
dégivrage à l’aide d’un appareil externe
(ex. chauffage rayonnant ou souffl ant);
conformez-vous uniquement aux
procédures recommandées dans ce
manuel.
∙ Avertissement : Ne faire fonctionner
aucun appareil électrique (par ex.
sorbetières) à l’intérieur du compartiment
de conservation à moins que celui-ci
ne soit spécifi quement permis dans ces
instructions.
∙ Avant de le brancher sur le secteur,
vérifi ez minutieusement l’appareil, y
compris le cordon d’alimentation, pour
tout signe de dommages survenus
pendant le transport. Au cas où un
dommage aurait été détecté, ne pas
brancher l’appareil sur le secteur.
∙ Cet appareil n’est pas conçu pour la
conservation des liquides explosifs tels
que les aérosols à gaz propulseur.
∙ En cas de vente ou cession de l’appareil
FR

16
à un tiers, ou sa remise à un centre
de recyclage agréé, il est important
de signaler la présence de la matière
isolante ‘cyclopentane’ et également du
réfrigérant R600a. Pour des informations
supplémentaires concernant un
recyclage approprié, veuillez vous référer
au paragraphe Mise au rebut.
∙ A fi n de se conformer aux normes de
sécurité en vigueur et d’éviter tout risque,
la réparation ou la modifi cation de cet
appareil, y compris le remplacement du
cordon d’alimentation, doit être effectuée
par un de nos agents agréés.
∙ Cet appareil peut être utilisé par des
enfants (à partir de 8 ans) et par des
personnes souffrant de défi ciences
physiques, sensorielles ou mentales,
ou manquant d’expérience ou de
connaissances, s’ils ont été formés
à l’utilisation de l’appareil et ont été
supervisés, et s’ils en comprennent les
dangers et les précautions de sécurité à
prendre.
∙ Les enfants ne sont pas autorisés à jouer
avec l’appareil.
∙ Les enfants ne doivent pas procéder
à des travaux de maintenance ou de
nettoyage sur l’appareil à moins d’être
surveillés.
∙ Pour un nettoyage fréquent, nous vous
conseillons d’utiliser de l’eau tiède
additionnée d’un détergent doux. Pour
des informations détaillées concernant
le nettoyage de l’appareil, veuillez vous
référer au paragraphe Dégivrage et
nettoyage.
∙ Attention : Ne pas retirer le couvercle
de l’éclairage LED intérieur. En cas
de mauvais fonctionnement, veuillez
contacter le service clientèle pour toute
assistance.
∙ Cet appareil est conçu uniquement pour la conservation des
liquides en bouteilles.
∙ Pour prévenir tout risque de blessure corporelle ou de
dommage au l’armoire, l’appareil doit être transporté
uniquement dans son emballage d’origine.
∙ Attention : Tenez les enfants à l’écart des emballages,
qui représentent un risque potentiel, par exemple, de
suffocation.
∙ Examinez régulièrement le cordon pour vous assurer de
son parfait état. Ne pas utiliser l’appareil si le cordon est
endommagé.
∙ Pour éviter tout risque d’incendie, ne placez aucun appareil
thermoélectrique sur l’armoire. Ne placez aucun récipient
contenant des liquides sur l’appareil : ceci afi n d’éviter tout
risque de fuite ou de renversement de liquide qui pourrait
endommager l’isolation électrique.
∙ Ne pas s’appuyer sur les clayettes, compartiments, porte
etc., ni les surcharger.
∙ Protégez l’intérieur de l’armoire contre les fl ammes ou toute
autre source susceptible de provoquer des fl ammes.
∙ Débranchez toujours la fi che de la prise murale
- en cas de fonctionnement défectueux,
- avant de dégivrer l’appareil,
- avant de nettoyer l’appareil,
- avant des travaux de maintenance ou de réparation.
∙ Ne débranchez pas l’appareil en tirant sur le cordon ; tirez
toujours sur la fi che.
∙ Si l’appareil reste longtemps sans être utilisé, nous vous
recommandons de laisser la porte ouverte.
∙ Nous nous réservons le droit d’apporter à cet appareil toute
modifi cation technique quelconque.
Description
1. Interrupteur marche/arrêt pour éclairage intérieur
2. Thermostat
3. Indicateur de température
4. Témoin lumineux principal
5. Eclairage intérieur LED
6. Ventilateur
7. Clayettes
8. Outil de nettoyage du tuyau d’évacuation

17
Avant la première utilisation
∙ Retirez tous les emballages extérieurs et intérieurs.
∙ Débarrassez-vous des emballages de façon appropriée.
∙ Insérez les deux entretoises (1, fournies) dans les rails de
guidage correspondants (2) à l’arrière de l’appareil.
∙ Retirez le dispositif de fi xation rouge destiné au transport ;
celle-ci est destinée uniquement au transport et peut être
mise au rebut.
∙ Nettoyez l’appareil en suivant les instructions fi gurant à la
rubrique Dégivrage et nettoyage ci-après.
∙ Lors de l’installation de l’appareil, nous vous conseillons
de l’incliner légèrement vers l’arrière. De cette façon, les
roulettes de transport peuvent être utilisées pour le déplacer
vers son emplacement fi nal.
∙ L’appareil doit être déplacé uniquement en position
verticale ; ne pas l’incliner à plus de 30°.
∙ Une fois que l’appareil est installé, attendez environ 30
minutes avant de le brancher sur le secteur.
∙ Si l’appareil a été incliné à plus de 30° pendant le transport,
laissez-le en position verticale pendant 4 heures minimum
avant de le brancher sur le secteur.
∙ Ne vous inquiétez pas si lorsque l’appareil est branché
sur le réseau électrique pour la première fois, il dégage
une légère odeur de neuf. Celle-ci disparaîtra dès que le
processus de réfrigération aura commencé.
Installation
∙ L’appareil doit être installé dans une pièce sèche et bien
aérée.
∙ Il doit fonctionner dans des environnements où l’humidité
relative est inférieure à 60 %.
∙ La fi che technique du produit contient des informations
concernant les moyennes de températures ambiantes
convenant à cet appareil.
∙ Ne pas utiliser l’appareil à l’extérieur.
∙ Assurez-vous que la fi che reste accessible et peut être
retirée de la prise à tout moment.
∙ Ne pas exposer l’appareil au soleil et ne pas le positionner
à proximité d’une source de chaleur quelconque (radiateur,
cuisinière etc.). Si cela n’est pas possible, mettez en place
un dispositif isolant entre la source de chaleur et l’appareil.
∙ L’appareil ne doit pas être installé à l’intérieur d’un meuble,
ni directement sous un placard mural, une étagère ou objet
similaire.
∙ Si l’appareil est installé à proximité d’un mur, une distance
minimum de 10 mm sur les côtés est nécessaire pour que la
porte puisse être ouverte à fond.
∙ Les dénivelées du sol peuvent être rattrapés à l’aide des pieds
réglables, assurant ainsi une stabilité parfaite.
Dimensions à respecter
lors de l’installation Ventilation
L’air chauffé derrière
l’appareil doit pouvoir
circuler librement. Donc,
assurez-vous qu’il n’y
a aucune entrave à la
circulation de l’air.
Avertissement : Prenez grand soin de ne pas obstruer ou
bloquer les grilles de ventilation situées en partie haute du
panneau arrière.
Contrôle de température
∙ Cet appareil est mis en marche automatiquement par son
branchement au secteur. Il n’est éteint que lorsque la fi che
est retirée de la prise murale.
∙ Le témoin lumineux principal vert indique que l’appareil est
branché sur le secteur.
∙ La température à l’intérieur de l’armoire est réglable à l’aide
du bouton du thermostat (0-5). Vous réduisez la température
en tournant le bouton du thermostat dans le sens des
aiguilles d’une montre, et vous augmentez la température en
le tournant dans le sens inverse des aiguilles d’une montre.
∙ La température peut être réglée entre 0 et 10°C degrés.
∙ La température à l’intérieur de l’armoire dépend largement
de facteurs tels que la température ambiante de la pièce, la
façon dont les bouteilles sont rangées et leur nombre.
∙ Nous vous conseillons d’utiliser un thermomètre pour vérifi er
la température actuelle à l’intérieur de l’armoire et pour
effectuer les réglages si nécessaire.
∙ Assurez-vous que la porte est fermée correctement et que
les bouteilles ne font pas obstruction au joint d’étanchéité.
∙ A la suite d’une interruption de courant, ou si l’appareil a été
éteint volontairement, il peut prendre entre 3 à 5 minutes

18
avant de se remettre en marche.
∙ Attention : Lorsque le thermostat est sur la position ‘0’,
seul le compresseur est éteint, le ventilateur, par contre,
fonctionne toujours.
Eclairage intérieur
∙ L’éclairage intérieur peut être allumé grâce à l’interrupteur
marche/arrêt.
∙ Attention : Ne pas retirer le couvercle de l’éclairage LED
intérieur. En cas de mauvais fonctionnement, veuillez
contacter le service clientèle pour toute assistance.
Porte réversible
La porte peut être montée pour une ouverture à droite ou à
gauche.
Avertissement: Débranchez toujours l’appareil de la prise
murale avant de procéder à des travaux de maintenance ou
de réparation.
Avant de commencer, veuillez prendre note des consignes
suivantes :
∙ Veillez toujours à utiliser le nombre correct de rondelles pour
tous les boulons de charnière.
∙ Assurez-vous que la porte peut se fermer hermétiquement
contre le cadre et veillez à ce qu’elle soit correctement
alignée pendant le montage.
1. Baissez soigneusement l’appareil en arrière et couchez-le
sur le dos.
2. Dévissez les deux vis (7) et retirez le support de la
charnière inferieure (8), ainsi que les rondelles (6) de la
goupille, et l’élément d’écartement (5).
3. Retirez les deux vis de l’équerre de fi xation (11) puis
retirez l’équerre ainsi que l’entretoise et le panneau de
protection (10).
4. Dégagez la porte (4) de la goupille supérieure.
5. Retirez la goupille (2) ainsi que le l’écrou (1) et les
rondelles (3) du support de la charnière supérieure, et
refi xez l’ensemble sur le côté opposé de l’armoire.
6. Tournez la porte à 180°, puis faites-la glisser sur la
goupille supérieure que vous venez de déplacer (2).
7. Fixez la goupille du support de la charnière inférieure (8)
dans la porte.
8. Montez la charnière du bas (8) ainsi que le panneau
de protection (10), les rondelles et l’entretoise (5) sur
l’armoire, et maintenez avec les vis (7).
9. Vissez l’équerre de fi xation (11), ainsi que l’entretoise et le
panneau de protection (10), de l’autre côté de l’appareil.
10. Remettez l’appareil dans sa position verticale.
Attention !
Attendez au moins 4 heures avant de rebrancher l’appareil
sur le secteur.
Dégivrage et nettoyage
∙ Pendant le fonctionnement, il est possible que vous
constatiez une accumulation de givre autour de l’évaporateur
intégré scellé dans la partie arrière à l’intérieur de l’appareil.
Cette couche de glace se dégivre lorsque le compresseur
est à l’arrêt. L’eau de dégivrage est alors évacuée par
un système de tuyaux et se vide dans un bac situé sous
le compresseur et prévu à cet effet, dans lequel elle
s’évaporera.
∙ Vous n’avez donc pas besoin de dégivrer votre appareil,
mais simplement de le nettoyer.
∙ Pour permettre à l’eau de dégivrage de s’évacuer
correctement, assurez toujours que le tuyau d’évacuation et
son embouchure dans l’armoire ne sont pas bouchés.
∙ Tout eau récupérée au fond de l’armoire doit être vidée.
∙ Remarque : N’utilisez aucun outil abrasif ni produit à
base d’alcool, ni produit de nettoyage surpuissant. Pour le
dégivrage et le nettoyage de l’intérieur de l’armoire, n’utilisez
aucun appareil électrique, tel qu’un nettoyeur à vapeur.
∙ Avant de procéder au nettoyage, retirez la fi che de la
prise murale.
∙ Ne pas asperger d’eau l’extérieur de l’appareil et ne pas en
répandre à l’intérieur.
∙ Pour un nettoyage fréquent, nous vous conseillons d’utiliser
de l’eau tiède additionnée d’un détergent doux.
∙ L’armoire doit être nettoyée une fois par mois.
∙ Nettoyez les accessoires séparément à l’eau savonneuse.
Ne pas les mettre au lave-vaisselle.
∙ Après le nettoyage, essuyez toutes les surfaces à l’eau
claire avant de bien les sécher. Lorsque vous rebranchez
la fi che à la prise murale, assurez-vous d’avoir les mains
sèches.
∙ Pour éviter une surconsommation d’énergie et pour assurer
une performance optimale, le compresseur (à l’arrière de
l’appareil) doit être nettoyé délicatement au moins deux fois
par an avec une brosse ou un aspirateur.

19
Dépistage des pannes
Lors de la mise en marche, certains sons sont audibles. Ces
sons sont dus :
∙ au moteur électrique
du bloc compresseur;
lors de la mise en route
du compresseur, le
niveau du son reste
élevé pendant un certain
temps.
∙ au fl ux de réfrigérant
dans le circuit de refroidissement.
Le tableau suivant présente les pannes possibles, leurs causes
et solutions. En cas de problème de fonctionnement, vérifi ez
d’abord si la solution fi gure dans ce tableau. Si le problème
persiste, débranchez l’appareil du secteur, puis appelez notre
Service Clientèle.
Problème Cause possible et solution
L’appareil ne fonctionne pas.
∙ Le courant est coupé
∙ Un fusible a sauté.
∙ Le bouton du thermostat est sur ‘0’.
∙ Le fusible de la prise murale (selon le cas) a sauté. Branchez un appareil différent sur la
prise pour vérifi er son bon fonctionnement.
La température à l’intérieur du
compartiment n’est pas assez
basse.
∙ L’armoire est en surcharge.
∙ Les portes ne sont pas bien fermées.
∙ Trop de poussière sur le condensateur.
∙ Ventilation insuffi sante: l’appareil est trop près du mur ou d’un autre objet.
∙ Le réglage de la température est trop bas.
Le bruit lors du fonctionnement
n’est plus le même ou a augmenté
d’intensité
Vérifi ez les choses suivantes :
∙ Vérifi ez le bon positionnement de l’appareil (sol irrégulier).
∙ Le système de refroidissement infl ue t-il sur un objet adjacent (ex. provoque des
vibrations) ?
∙ Y a-t-il des objets sur l’appareil qui vibrent ?
De l’eau s’accumule dans le fond de
l’appareil.
Le tube d’évacuation d’eau est bouché. Retirez l’obstruction et nettoyez le système.
Transport
Les appareils qui portent ce symbole doivent être collectés
et traités séparément de vos déchets ménagers, car ils
contiennent des matériaux précieux qui peuvent être recyclés.
En vous débarrassant correctement de ces appareils, vous
contribuez à la prévention de potentiels effets négatifs sur la
santé humaine et l’environnement. Votre mairie ou le magasin
auprès duquel vous avez acquis l’appareil peuvent vous
donner des informations à ce sujet. Débranchez la fi che de la
prise murale et mettez l’appareil hors service en coupant le
cordon d’alimentation avant la mise au rebut.
Le réfrigérant et le produit chimique contenu dans la mousse
isolante doivent être traités par un service compétent
agréé. Prenez soin de ne pas endommager le circuit de
refroidissement avant de remettre l’appareil aux services
compétents.
Mise au rebut
Les appareils qui portent ce symbole doivent être
collectés et traités séparément de vos déchets
ménagers, car ils contiennent des matériaux précieux
qui peuvent être recyclés. En vous débarrassant
correctement de ces appareils, vous contribuez à la prévention
de potentiels effets négatifs sur la santé humaine et
l’environnement. Votre mairie ou le magasin auprès duquel
vous avez acquis l’appareil peuvent vous donner des
informations à ce sujet. Débranchez la fi che de la prise murale
et mettez l’appareil hors service en coupant le cordon
d’alimentation avant la mise au rebut.
Le réfrigérant et le produit chimique contenu dans la mousse
isolante doivent être traités par un service compétent
agréé. Prenez soin de ne pas endommager le circuit de
refroidissement avant de remettre l’appareil aux services
compétents.
Fabricant
Severin Elektrogeräte GmbH, Röhre 27, 59846 Sundern,
Allemagne

20
Garantie
Cet appareil est garanti par le fabricant pendant une durée
de deux ans à partir de la date d‘achat, contre tous défauts
de matière et vices de fabrication. Au cours de cette période,
toute pièce défectueuse sera remplacée gratuitement. Cette
garantie ne couvre pas l‘usure normale de l‘appareil, les
pièces cassables telles que du verre, des ampoules, etc., ni
les détériorations provoquées par une mauvaise utilisation
et le non-respect du mode d‘emploi. Aucune garantie ne
sera due si l‘appareil a fait l‘objet d‘une intervention à titre de
réparation ou d‘entretien par des personnes non-agréées par
nous-mêmes. Cette garantie n‘affecte pas les droits légaux des
consommateurs sous les lois nationales applicables en vigueur,
ni les droits du consommateur face au revendeur résultant du
contrat de vente/d‘achat. Si votre appareil ne fonctionne plus
normalement, veuillez l‘adresser, sous emballage solide, à une
de nos stations de service après-vente agréées, muni de votre
nom et adresse. Si vous retournez votre appareil pendant la
période de garantie, n‘oubliez pas de joindre à votre envoi la
preuve de garantie (ticket de caisse, facture etc.) certifi ée par
le vendeur.
Informations à fournir au Service Clientèle
Si une réparation de l’appareil s’avère nécessaire, veuillez
contacter notre Service Clientèle, en leur fournissant un
résumé détaillé du défaut et le numéro d’article KS ... fi gurant
sur la plaque signalétique de l’appareil (à l’intérieur de
l’armoire, en bas à gauche). Ces informations nous permettront
de traiter votre demande de manière effi cace.
En cas de problèmes ou de mauvais fonctionnement,
ou si des pièces de rechange sont nécessaires, veuillez
contacter le service après-vente.
Fiche technique du produit
Art. no. KS 9878
Catégorie d’appareil domestique réfrigérant Réfrigérateur pour bouteilles
Consommation d’énergie kWh/an 748
La consommation réelle dépend de l’usage quotidien et l’emplacement de l’appareil
Capacité de l’armoire (litres) 275
Dégivrage automatique : partie réfrigérateur oui
Classe climatique 3
Emission de bruit en dB(a) < 70
Dimensions (H x L x P) en mm 1450 x 600 x 600
Poids, kg 58
Alimentation Voir plaque signalétique
Strona się ładuje...
Strona się ładuje...
Strona się ładuje...
Strona się ładuje...
Strona się ładuje...
Strona się ładuje...
Strona się ładuje...
Strona się ładuje...
Strona się ładuje...
Strona się ładuje...
Strona się ładuje...
Strona się ładuje...
Strona się ładuje...
Strona się ładuje...
Strona się ładuje...
Strona się ładuje...
Strona się ładuje...
Strona się ładuje...
Strona się ładuje...
Strona się ładuje...
Strona się ładuje...
Strona się ładuje...
Strona się ładuje...
Strona się ładuje...
Strona się ładuje...
Strona się ładuje...
Strona się ładuje...
Strona się ładuje...
Strona się ładuje...
Strona się ładuje...
Strona się ładuje...
Strona się ładuje...
Strona się ładuje...
Strona się ładuje...
Strona się ładuje...
Strona się ładuje...
Strona się ładuje...
Strona się ładuje...
Strona się ładuje...
Strona się ładuje...
Strona się ładuje...
Strona się ładuje...
Strona się ładuje...
Strona się ładuje...
Strona się ładuje...
Strona się ładuje...
Strona się ładuje...
Strona się ładuje...
Strona się ładuje...
Strona się ładuje...
Strona się ładuje...
Strona się ładuje...
Strona się ładuje...
Strona się ładuje...
Strona się ładuje...
Strona się ładuje...
Strona się ładuje...
Strona się ładuje...
Strona się ładuje...
Strona się ładuje...
-
 1
1
-
 2
2
-
 3
3
-
 4
4
-
 5
5
-
 6
6
-
 7
7
-
 8
8
-
 9
9
-
 10
10
-
 11
11
-
 12
12
-
 13
13
-
 14
14
-
 15
15
-
 16
16
-
 17
17
-
 18
18
-
 19
19
-
 20
20
-
 21
21
-
 22
22
-
 23
23
-
 24
24
-
 25
25
-
 26
26
-
 27
27
-
 28
28
-
 29
29
-
 30
30
-
 31
31
-
 32
32
-
 33
33
-
 34
34
-
 35
35
-
 36
36
-
 37
37
-
 38
38
-
 39
39
-
 40
40
-
 41
41
-
 42
42
-
 43
43
-
 44
44
-
 45
45
-
 46
46
-
 47
47
-
 48
48
-
 49
49
-
 50
50
-
 51
51
-
 52
52
-
 53
53
-
 54
54
-
 55
55
-
 56
56
-
 57
57
-
 58
58
-
 59
59
-
 60
60
-
 61
61
-
 62
62
-
 63
63
-
 64
64
-
 65
65
-
 66
66
-
 67
67
-
 68
68
-
 69
69
-
 70
70
-
 71
71
-
 72
72
-
 73
73
-
 74
74
-
 75
75
-
 76
76
-
 77
77
-
 78
78
-
 79
79
-
 80
80


w innych językach
- italiano: SEVERIN KS 9878 Manuale utente
- Deutsch: SEVERIN KS 9878 Benutzerhandbuch
- svenska: SEVERIN KS 9878 Användarmanual
- français: SEVERIN KS 9878 Manuel utilisateur
- dansk: SEVERIN KS 9878 Brugermanual
- Nederlands: SEVERIN KS 9878 Handleiding
Powiązane artykuły
-
SEVERIN KS 9776 Instrukcja obsługi
-
SEVERIN KS 9864 Instrukcja obsługi
-
-
SEVERIN KS9894 Instrukcja obsługi
-
SEVERIN KS 9889 Instrukcja obsługi
-
SEVERIN KS 9859 Instrukcja obsługi
-
-
SEVERIN KS 9828 Informacje o produkcie
-
SEVERIN KS 9833 Instrukcja obsługi
-
SEVERIN KS 9886 Instrukcja obsługi