
1
QUICK GUIDE
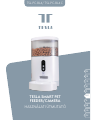
TESLA SMART PET
FEEDER/CAMERA
TSL-PC-BL4/ TSL-PC-BL4 C
EN
CZ
SK
PL
HU
SL
HR
UA
RU
DE

2
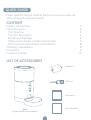
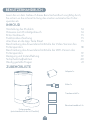
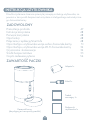
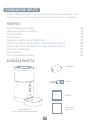
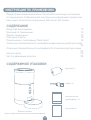
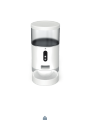
Feeder
(subject to the actual product)
Adapter 1x
Cable x1
Desiccan 1x
Quick Guide 1x
QUICK GUIDE
CONTENT
LIST OF ACCESSORIES
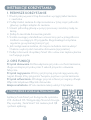
Please read this manual carefully before use to ensure safe use
of the intelligent automatic feeder.
Product Introduction 3
Operation guide 4
Frist Time Use 4
Function Description 4
Bind Tesla Smart App 4
Video version feeder interface introduction 6
Wi-Fi version feeder interface introduction 8
Cleaning/ maintenance 8
Precautions 9
Common problem 10

3
TTF
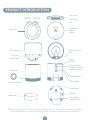
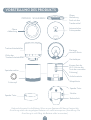
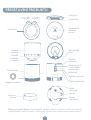
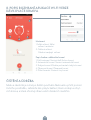
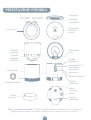
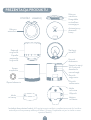
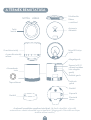
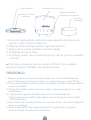
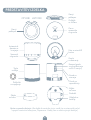
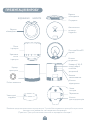
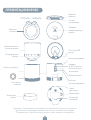
PRODUCT INTRODUCTION
Top cover
Top cover
Desiccant
box
Automatic
feeding
device
MicroSD card
slot
Feed
Button
Camera (Wi-FI
version is manual
feeding button)
Record button
Play button
Food bowl
Switch
Dry battery
compartment
Grain barrel
Main body
Power interface
Food bowl
OPEN CLOSE
Dry grain
bucket lock
Battery use instructions: When the external power fails, the device will automatically enable
the installed battery to power the device. (Note: the device cannot charge the battery)

4
OPERATION GUIDE
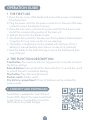
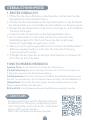
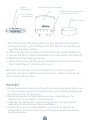
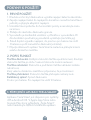
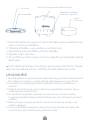
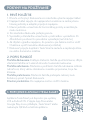
1. THE FIRST USE
1. Open the top cover of the feeder and remove the power cord adapter
from the bucket.
2. Plug the power cord into the power connector on the rear of the main
unit and connect the adapter to power.
3. Place the main unit in a horizontal position and the food bowl is insta-
lled at the corresponding position of the main unit.
4. Add pet dry food to the feeder bucket.
5. The desiccant is placed in the desiccant box by default. Please replace
it regularly for long-term use (do not use cleaning)
6. The battery compartment can be installed with 3sections of No. 1
battery for manual feeding when there is no electricity (optional).
7. Bind the feeder to the Smart Life app to set up the feeding and plan-
ning of the pet.
2. THE FUNCTION DESCRIPTION
Feed button: Short press to eat one, long press for 5 seconds to restore
the factory settings.
Record button: Press and hold the “Record button” to record the sound
to remind the pet to eat before feeding.
Play button: Plays the recorded sound.
Rocker switch: Feeder switch.
Dry battery compartment: Three 1st batteries can be installed for
power supply.
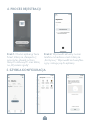
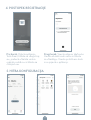
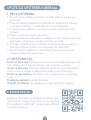
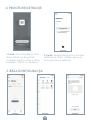
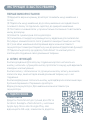
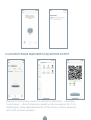
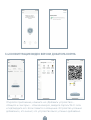
3. CONNECT AND DOWNLOAD
Tesla Smart is available for both iOS and
Android OS. Search the name ‚Tesla Smart‘,
in App Store or Google Play, or scan the
QR-Code to download the App.

5
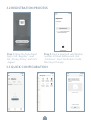
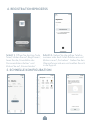
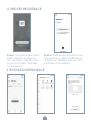
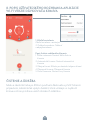
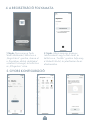
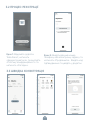
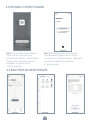
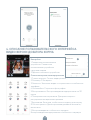
3.2 REGISTRATION PROCESS
Step 1 Open the Tesla Smart
App, click „Register“, read
the „Privacy Policy“ and click
„Agree“ .
Step 2 Input a legal and valid Mobile
number or Email address and click
„Continue“. Input Verification Code,
then log in the app.
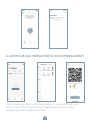
3.3 QUICK CONFIGURATION

6
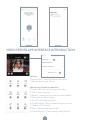
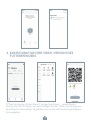
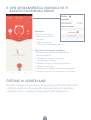
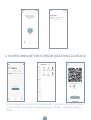
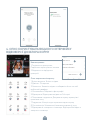
3.4 VIDEO VERSION PET FEEDER CONFIGURATION
Open the APP ,click „add device“- enter wifi password and confirm,
connecting till „device added successfully“.

7
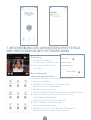
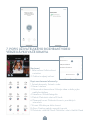
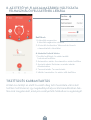
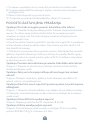
VIDEO FEEDER APP INTERFACE INTRODUCTION
Setting
1 Share device : Share the device with others
2 Remove device and unbind
Monitoring Screen Introduction
1 Screenshot: také a picture from the video
2 Talk: 2 voice intercom
3 Record : record and save into the mobile phone
4 Photo Album: Store photos
5 Play: SD card video playback
6 Timed Feeding: Delivery food at regular intervals
7 Feeding: Click to feed
8 Alarm: Motion detection on/off
9 Cloud playback: Cloud storage video playback
Share Device
Others
FAQ & Feed Back
Firmware information
Remove Device
1
1
1
2
2
3
3
4
4
5
5
6
7 8 9

8
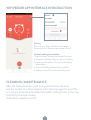
Setting
Share device. Share the device with others
Remove device: Remove device and unbind
Online Feeding Introduction
1 More Settings: Set up other feeder function
2 Automatic feeding: Setup automatic feeding
3 Feeding information: Click to check feeding
information
4 Manual Feeding: Manual feeding online
5 Adding timing: Set up timing feeding rules
WIFI FEEDER APP INTERFACE INTRODUCTION
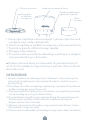
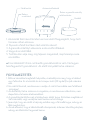
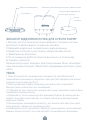
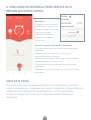
CLEANING/MAINTENANCE
After the feeder has been used for a period of time, the bowl
and the bucket should be cleaned with a cleaning agent to avoid the
occurrence of bacteria that affect the health of the pet due to the long
time left by the food residue.
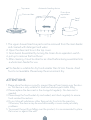
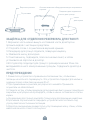
Grain drum separation switch
1
1
2
2
34
5

9
Top cover
Grain drum
separation
switch Food
bowl
Automatic feeding device
Desiccant box
1. The upper showed machine parts can be removed from the main feeder
and cleaned with detergent and water.
2. Open the desiccant box in the top cover.
3. Grain barrel dissembled by turning the Grain drum separation switch .
4. pull up to remove the food bowl.
5. After cleaning, it must be dried or air-dried before being assembled into
a whole main feeder for use.
▲ This feeder is suitable for dry foods smaller than 12 mm. Freeze- dried
food is not available. Please keep the environment dry.
ATTENTIONS
1. Please place the device correctly; prevent the pet from tipping over the devi-
ce. This device is only suitable for small and medium pets under 20kg.
2. Please replace the desiccant in the storage lid regularly. No desiccant is
needed.
3. Please keep the food bucket dry and sealed, and check regularly to ensure
food residue Precautions
4. Do not drop all substances other than pet dry food into the grain bin.
Otherwise, the device may be used abnormally or even cause pet safety
problems.
5. To prevent the pet from falling over the product, it is recommended to place
the corner or against the wall.

10
FAQ
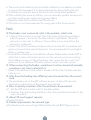
Q.The feeder is not connected, what is the problem, what to do.
A. 1: Check if the machine is normal: Check the status of the device indicator.
After the power is turned on, the blue indicator light flashes. When the
network is connected, it will be on. There will be a drop tone before the
network is configured.
2. Check if the Wi-Fi username and password are normal: Wi-Fi username and
password cannot have special characters. It is recommended to use English
letters + number signs.
3. Uninstall the software and reinstall the software: Please authorize the APP to
obtain the location information and access the network permissions during
the installation process. Follow the above steps, and enter the correct wifi
password. If you still have difficulties, please contact customer service.
Q. When connecting the feeder, sometimes it can be connected normally,
sometime s not, how to deal with it.
1. Check if the machine‘s food outlet is blocked. At this time, the blue indicator
is alw ays on.
Q. Why does the feeding time differ by tens of seconds from the current
time .
A. The parameters set on the APP will have an error of about 30 seconds
depending on the timing of the network environment.
Q. How to quickly reconnect after the machine is disconnected.
A 1 : Exit the APP and re-enter, wait for the data update
2: Switches from the feeding interface to the video interface and waits for the
vide o to refresh.
Q. About SD card support capacity.
A.Support 8-64G
Q. Feeder requirements for network type
A.The feeder must use a wifi signal that satisfies the wifi 802.11bgn protocol.
6. The product anti-battering line should be installed as concealed as possible
to prevent the equipment from being damaged by the pet biting the wire.
7. If children are using this device, be sure to use it under adult guidance.
8. After installing the spare dry battery, you can manually operate the device to
provide normal power supply during power failure.
9. Regularly clean the food bucket and food bowl.
10.This device is not recommended for young pets within three months

11
This product is marked with the symbol for separate collection. The product
must be disposed of in accordance with the regulations for disposal of
electrical and electronic equipment (Directive 2012/19/EU on waste electrical
and electronic equipment). Disposal together with regular municipal waste
is prohibited. Dispose of all electrical and electronic products in accordance
with all local and European regulations at the designated collection points
which hold the appropriate authorisation and certification in line with the local
and legislative regulations. Correct disposal and recycling help to minimise
impacts on the environment and human health. Further information regarding
disposal can be obtained from the vendor, authorised service centre or local
authorities.
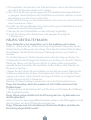
INFORMATION ABOUT DISPOSAL AND RECYCLING
EU DECLARATION OF CONFORMITY
Hereby, Witty s.r.o. declares that the radio equipment type TSL-PC-BL4/
TSL-PC-BL4C is in compliance with EU directives. The full text of the EU dec-
laration of conformity is available at the following internet address: teslasmart.
com/declaration
Connectivity: Wi-Fi 2,4 GHz IEEE 802.11b/g/n
Frequency band: 2.400 - 2.4835 GHz
Max. radio-frequency power (EIRP): < 20 dBm
Manufacturer
Tesla Global Limited
Gee Chang Industrial Building,
121 Des Voeux Road Central
852 00 Hong Kong
www.teslasmart.com

12

13
BENUTZERHANDBUCH
TESLA SMART PET
FEEDER/CAMERA
TSL-PC-BL4/ TSL-PC-BL4 C
EN
CZ
SK
PL
HU
SL
HR
UA
RU
DE

14
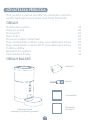
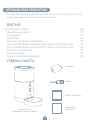
Futterspender
(entscheidend ist das Ist-Produkt)
Adapter 1x
Kabe 1x
Trockenmittel 1x
Benutzerhandbuch 1x
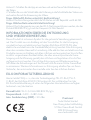
BENUTZERHANDBUCH
INHOUD
ZUBEHÖRLISTE
Lesen Sie vor dem Gebrauch dieses Benutzerhandbuch sorgfältig durch,
Sie sichern so die sichere Nutzung des smarten automatischen Futter-
spenders ab
Vorstellung des Produkts 14
Hinweise zum Produktgebrauch 14
Erster Gebrauch 15
Funktionsbeschreibung 15
Anschluss an die App Tesla Smart 15
Beschreibung des Anwenderschnittstelle der Video-Version des
Futterspenders 18
Beschreibung des Anwenderschnittstelle der WiFi-Version des
Futterspenders 19
Reinigung und Instandhaltung 19
Sicherheitsmaßnahmen 20
Häufig gestellte Fragen 21

15
TTF
VORSTELLUNG DES PRODUKTS
Obere
Abdeckung
Obere
Abdeckung
Fach mit dem
Trockenmittel
Automatischer
Futterspender
Slot einer
microSD-Karte
Gerätekörper
Kamera (bei der
Wi-Fi-Version die
Taste der manuellen
Fütterung)
Aufnahmetaste
Abspieltaste
Spende-Taste
Schalter
Batteriefach
Trockenfutterbehälter
Speisekonnektor
Futternapf
Spende-Taste
ÖFFNEN SCHLIESSEN
Klinke des
Trockenfutterbehälters
Gebrauchshinweise für die Batterie: Wenn es zum Speiseausfall kommt, beginnt die
Einrichtung mittels der eingelegten Batterien sich selbst einzuspeisen. (Anmerkung: Die
Einrichtung ist nicht fähig, die Batterie selbst zu ersetzen.)

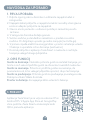
GEBRAUCHSHINWEISE
1. ERSTER GEBRAUCH
1. Öffnen Sie die obere Abdeckung des Spenders und nehmen Sie das
Speisekabel aus dem Behälter heraus.
2. Schalten Sie das Speisekabel in den Speisekonnektor an der Rückseite
der Haupteinheit ein und schließen Sie den Adapter zur Einspeisung an.
3. Bringen Sie die Haupteinheit in die horizontale Lage an und installieren
Sie einen Futternapf.
4. Geben Sie das Trockenfutter in den Spenderbehälter hinzu.
5. Das Trockenmittel ist in dem Fach mit dem Trockenmittel stan
dardmäßig angebracht. Wechseln Sie es bei dem langfristigen
Gebrauch regelmäßig (reinigen Sie es nicht).
6. Wenn es zum Einspeisungsausfall kommt, können in das Batteriefach 3
Batterie eingelegt werden und es kann die manuelle Fütterung
(optional) genutzt werden.
7. Schließen Sie den Spender an die App Tesla Smart an und planen Sie
die Fütterung Ihres Haustiers.
FUNKTIONSBESCHREIBUNG
Spende-Taste: Durch das kurze Drücken der Taste lassen
Sie die Fütterung an; durch das lange Drücken der Taste für die Dauer von
5 Sekunden erneuern Sie die Werkeinstellung.
Aufnahmetaste: Durch das Drücken und Halten der Aufnahmetaste können
Sie den Ton aufnehmen, der Ihr Haustier daran erinnert, dass die Mahlzeit ist.
Abspieltaste: Durch das Drücken spielen Sie den aufgenommen Ton ab.
Wippschalter Schalter des Spenders
Batteriefach: Zum Einspeisen können drei Batterien eingelegt werden.
3. ANSCHLUSS
16
Die App Tesla Smart steht für Systeme iOS und
Android OS zur Verfügung. In Apple App Store
oder Google Play Store suchen Sie „Tesla Smart“
heraus oder scannen Sie den
QR-Code und laden Sie die App herunter.

17
4. REGISTRATIONSPROZESS
Schritt 1: Öffnen Sie die App Tesla
Smart, klicken Sie auf „Registrieren“,
lesen Sie die„Grundsätze des
Personendatenschutzes“ und
klicken Sie auf „Einverstanden“.
Schritt 2: Geben Sie die gültige Telefon-
nummer oder die E-Mail-Adresse ein und
klicken sie auf „Fortsetzen“. Geben Sie den
Überprüfungscode ein und melden Sie sich
in die App an.
5. SCHNELLE KONFIGURATION

18
6. KONFIGURATION DER VIDEO-VERSION DES
FUTTERSPENDERS
Öffnen Sie die App, klicken Sie auf „Anlage hinzufügen“ - geben Sie das
Passwort des Wi-Fi-Netzes ein und bestätigen Sie das. Wenn „Einrichtung wur-
de erfolgreich hinzugefügt“ abgebildet wird, wurde die Einrichtung erfolgreich
hinzugegeben.

19
Share Device
Others
FAQ & Feed Back
Firmware information
Remove Device
1
1
1
2
2
3
3
4
4
5
5
6
7 8 9
7. BESCHREIBUNG DES ANWENDERSCHNITTSTELLE
DER-VIDEOVERSION DES FUTTERSPENDERS
Einstellung
1. Teilen der Einrichtung:
Einrichtung mit anderen teilen
2. Einrichtung abnehmen und
abschalten
Beschreibung des
Überwachungsbildschirms
1. Aufnahme des Bildschirms: Aufnahme aus Video
2. Gespräch: 2 Interkom
3. Aufnehmen: Nehmen Sie ein Video auf und
speichern Sie es ins Mobiltelefon
4 .Fotoalbum: Fotos speichern
5. Abspielen: Abspielen der Videoaufnahmen auf der SD-Karte
6. Geplante Fütterung: Dosieren des Futters in den
regelmäßigen Zeitabständen
7. Fütterung: Klicken Sie für die Futterrate
8. Alarm: Detektion der Bewegungen
eingeschaltet/ausgeschaltet
9. Abspielen von dem Cloud-Speicher: Abspielen der
Videoaufnahmen von dem Cloud-Speicher

20
8. BESCHREIBUNG DES ANWENDERSCHNITTSTELLE
DER APP DER WIFI-VERSION DES FUTTERSPENDERS
Einstellung
1. Teilen der Einrichtung:
Einrichtung mit anderen
teilen
2. Einrichtung abnehmen:
Einrichtung abnehmen und abschalten
Beschreibung der Funktion
der Fernfütterung
1. Weitere Einstellungen: Weitere Funktionen der
Fütterung einstellen
2. Automatische Fütterung: Automatische
Fütterung einstellen
3. Angaben über die Fütterung: Klicken Sie zur
Kontrolle der Angaben über die Fütterung
4. Geplante Fütterung: Geplante Fütterung
5. Zeitschaltung hinzufügen: Fütterungszeiten einstellen
1
2
34
5
1
2
REINIGUNG UND INSTANDHALTUNG
Der Napf und der Behälter sind nach dem längeren Gebrauch des Spen-
ders mit Hilfe eines Reinigungsmittels zu reinigen. Sie verhindern so das
Vorkommen der Bakterien, die in den Futterresten entstehen und die die
Gesundheit ihrer Haustiere bedrohen.
Strona się ładuje...
Strona się ładuje...
Strona się ładuje...
Strona się ładuje...
Strona się ładuje...
Strona się ładuje...
Strona się ładuje...
Strona się ładuje...
Strona się ładuje...
Strona się ładuje...
Strona się ładuje...
Strona się ładuje...
Strona się ładuje...
Strona się ładuje...
Strona się ładuje...
Strona się ładuje...
Strona się ładuje...
Strona się ładuje...
Strona się ładuje...
Strona się ładuje...
Strona się ładuje...
Strona się ładuje...
Strona się ładuje...
Strona się ładuje...
Strona się ładuje...
Strona się ładuje...
Strona się ładuje...
Strona się ładuje...
Strona się ładuje...
Strona się ładuje...
Strona się ładuje...
Strona się ładuje...
Strona się ładuje...
Strona się ładuje...
Strona się ładuje...
Strona się ładuje...
Strona się ładuje...
Strona się ładuje...
Strona się ładuje...
Strona się ładuje...
Strona się ładuje...
Strona się ładuje...
Strona się ładuje...
Strona się ładuje...
Strona się ładuje...
Strona się ładuje...
Strona się ładuje...
Strona się ładuje...
Strona się ładuje...
Strona się ładuje...
Strona się ładuje...
Strona się ładuje...
Strona się ładuje...
Strona się ładuje...
Strona się ładuje...
Strona się ładuje...
Strona się ładuje...
Strona się ładuje...
Strona się ładuje...
Strona się ładuje...
Strona się ładuje...
Strona się ładuje...
Strona się ładuje...
Strona się ładuje...
Strona się ładuje...
Strona się ładuje...
Strona się ładuje...
Strona się ładuje...
Strona się ładuje...
Strona się ładuje...
Strona się ładuje...
Strona się ładuje...
Strona się ładuje...
Strona się ładuje...
Strona się ładuje...
Strona się ładuje...
Strona się ładuje...
Strona się ładuje...
Strona się ładuje...
Strona się ładuje...
Strona się ładuje...
Strona się ładuje...
Strona się ładuje...
Strona się ładuje...
Strona się ładuje...
Strona się ładuje...
Strona się ładuje...
Strona się ładuje...
Strona się ładuje...
Strona się ładuje...
Strona się ładuje...
Strona się ładuje...
Strona się ładuje...
Strona się ładuje...
Strona się ładuje...
Strona się ładuje...
Strona się ładuje...
Strona się ładuje...
Strona się ładuje...
Strona się ładuje...
Strona się ładuje...
Strona się ładuje...
-
 1
1
-
 2
2
-
 3
3
-
 4
4
-
 5
5
-
 6
6
-
 7
7
-
 8
8
-
 9
9
-
 10
10
-
 11
11
-
 12
12
-
 13
13
-
 14
14
-
 15
15
-
 16
16
-
 17
17
-
 18
18
-
 19
19
-
 20
20
-
 21
21
-
 22
22
-
 23
23
-
 24
24
-
 25
25
-
 26
26
-
 27
27
-
 28
28
-
 29
29
-
 30
30
-
 31
31
-
 32
32
-
 33
33
-
 34
34
-
 35
35
-
 36
36
-
 37
37
-
 38
38
-
 39
39
-
 40
40
-
 41
41
-
 42
42
-
 43
43
-
 44
44
-
 45
45
-
 46
46
-
 47
47
-
 48
48
-
 49
49
-
 50
50
-
 51
51
-
 52
52
-
 53
53
-
 54
54
-
 55
55
-
 56
56
-
 57
57
-
 58
58
-
 59
59
-
 60
60
-
 61
61
-
 62
62
-
 63
63
-
 64
64
-
 65
65
-
 66
66
-
 67
67
-
 68
68
-
 69
69
-
 70
70
-
 71
71
-
 72
72
-
 73
73
-
 74
74
-
 75
75
-
 76
76
-
 77
77
-
 78
78
-
 79
79
-
 80
80
-
 81
81
-
 82
82
-
 83
83
-
 84
84
-
 85
85
-
 86
86
-
 87
87
-
 88
88
-
 89
89
-
 90
90
-
 91
91
-
 92
92
-
 93
93
-
 94
94
-
 95
95
-
 96
96
-
 97
97
-
 98
98
-
 99
99
-
 100
100
-
 101
101
-
 102
102
-
 103
103
-
 104
104
-
 105
105
-
 106
106
-
 107
107
-
 108
108
-
 109
109
-
 110
110
-
 111
111
-
 112
112
-
 113
113
-
 114
114
-
 115
115
-
 116
116
-
 117
117
-
 118
118
-
 119
119
-
 120
120
-
 121
121
-
 122
122


w innych językach
- Deutsch: Tesla TSL-PC-BL4 Benutzerhandbuch
- slovenčina: Tesla TSL-PC-BL4 Užívateľská príručka
Powiązane artykuły
-
Tesla TSL-CAM-BULLET8S Instrukcja obsługi
-
Tesla TSL-CAM-SPEED17 Instrukcja obsługi
-
Tesla TSL-CAM-MINI22S Instrukcja obsługi
-
-
Tesla TSL-SEN-MOTION instrukcja
-
Tesla Smart Sensor Button Instrukcja obsługi
-
-
Tesla Smart Instrukcja obsługi
-
Tesla TSL-SWI-WBREAK2 instrukcja
-
Inne dokumenty
-
Sera Deckel Futterbehälter für X-Feeder Information For Use
-
JBL PROPOND AUTOFOOD Instrukcja obsługi
-
EHEIM TWINfeeder Instrukcja obsługi
-
-
-
-
-
Ferplast M01100 Instrukcja obsługi
-