Silvercrest SGB 1380 B2 Operating Instructions Manual
- Kategoria
- Raclety
- Typ
- Operating Instructions Manual

KOMPERNASS GMBH
Burgstraße 21
D-44867 Bochum
www.kompernass.com
Last Information Update · Stan informacji · Stav informací
Stav informácií · Stand der Informationen:
02 / 2012 · Ident.-No.: SGB1380B2022012-1
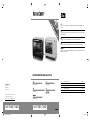
ELECTRIC OVEN WITH GRILL SGB 1380 B2
ELECTRIC OVEN WITH GRILL
Operating instructions
PIEKARNIK ELEKTRYCZNY
Instrukcja obsługi
GB Operating instructions Page 1
PL Instrukcja obsługi Strona 13
CZ Návod k obsluze Strana 25
SK Návod na obsluhu Strana 37
DE / AT / CH Bedienungsanleitung Seite 49
Before reading, unfold the page containing the illustrations and familiarise yourself with all functions of
the device.
Przed przeczytaniem proszę rozłożyć stronę z ilustracjami, a następnie proszę zapoznać się z wszystkimi
funkcjami urządzenia.
Před čtením si otevřete stranu s obrázky a potom se seznamte se všemi funkcemi přístroje.
Pred čítaním si odklopte stranu s obrázkami a potom sa oboznámte so všetkými funkciami prístroja.
Klappen Sie vor dem Lesen die Seite mit den Abbildungen aus und machen Sie sich anschließend mit allen
Funktionen des Gerätes vertraut.
AUTOMAT NA GRILOVANIE
A PEČENIE
Návod na obsluhu
TROUBA NA GRILOVÁNÍ A PEČENÍ
Návod k obsluze
GRILL- UND BACKAUTOMAT
Bedienungsanleitung
IAN 75602/75603 IAN 75602/75603
CV_75602_3_SGB1380B2_LB4.indd 1-3CV_75602_3_SGB1380B2_LB4.indd 1-3 10.04.12 09:2510.04.12 09:25

7
9
8
1
2
3
4
5
6
B
A
CV_75602_3_SGB1380B2_LB4.indd 4-6CV_75602_3_SGB1380B2_LB4.indd 4-6 10.04.12 09:2510.04.12 09:25

- 1 -
CONTENT PAGE
Intended use 2
Items supplied 2
Description 2
Technical data 2
Safety information 3
Setup 4
Preparation for use 4
Switching off and transportation 5
Switching off . . . . . . . . . . . . . . . . . . . . . . . . . . . . . . . . . . . . . . . . . . . . . . . . . . . . . . . . . . . . . . .5
Transporting . . . . . . . . . . . . . . . . . . . . . . . . . . . . . . . . . . . . . . . . . . . . . . . . . . . . . . . . . . . . . . . .5
Operation 5
Grilling and baking . . . . . . . . . . . . . . . . . . . . . . . . . . . . . . . . . . . . . . . . . . . . . . . . . . . . . . . . . .5
Grilling and baking with circulating air . . . . . . . . . . . . . . . . . . . . . . . . . . . . . . . . . . . . . . . . . .7
Tips for preparation and recipes 7
Muffins . . . . . . . . . . . . . . . . . . . . . . . . . . . . . . . . . . . . . . . . . . . . . . . . . . . . . . . . . . . . . . . . . . . .7
Hawaii toast . . . . . . . . . . . . . . . . . . . . . . . . . . . . . . . . . . . . . . . . . . . . . . . . . . . . . . . . . . . . . . . .8
Baking deep-frozen pizza . . . . . . . . . . . . . . . . . . . . . . . . . . . . . . . . . . . . . . . . . . . . . . . . . . . . .8
Biscuits . . . . . . . . . . . . . . . . . . . . . . . . . . . . . . . . . . . . . . . . . . . . . . . . . . . . . . . . . . . . . . . . . . . .8
Rolls . . . . . . . . . . . . . . . . . . . . . . . . . . . . . . . . . . . . . . . . . . . . . . . . . . . . . . . . . . . . . . . . . . . . . .8
Meringue . . . . . . . . . . . . . . . . . . . . . . . . . . . . . . . . . . . . . . . . . . . . . . . . . . . . . . . . . . . . . . . . . .9
Buttered croutons . . . . . . . . . . . . . . . . . . . . . . . . . . . . . . . . . . . . . . . . . . . . . . . . . . . . . . . . . . . .9
Minced meat baguettes . . . . . . . . . . . . . . . . . . . . . . . . . . . . . . . . . . . . . . . . . . . . . . . . . . . . . .9
Cauliflower (overbaked) . . . . . . . . . . . . . . . . . . . . . . . . . . . . . . . . . . . . . . . . . . . . . . . . . . . .10
Puff pastry pouches (Bourekas) filled with salmon . . . . . . . . . . . . . . . . . . . . . . . . . . . . . . . . .10
Changing the bulb 11
Cleaning 11
Troubleshooting 11
Disposal 12
Warranty & Service 12
Importer 12
Read the operating instructions carefully before using the device for the first time and preserve this booklet
for later reference. Pass this manual on to whoever might acquire the device at a future date.
IB_75602_3_SGB1380B2_LB4.qxp 12.04.2012 12:09 Uhr Seite 1

- 2 -
Electric Oven with Grill
Congratulations on the purchase of your new
appliance.
You have clearly decided in favour of a quality
product. These operating instructions are a part of
this product. They contain important information in
regard to safety, use and disposal. Before using the
product, familiarise yourself with all of these opera-
ting and safety instructions. Use the product only
as described and only for the specified areas of
application. In addition, pass these documents on,
together with the product, to any future owner.
Intended use
The Oven and Grill automat is intended for the
heating, cooking and grilling of food. This appliance is
intended exclusively for use in domestic households.
Do not use it for commercial applications.
All other uses are deemed to be improper and may
result in property damage or even in personal injury.
Kompernaß GmbH accepts no liability for damage
caused by improper use of the appliance.
Items supplied
The package contains
• Electric Oven with Grill
• a roasting grill
• a baking tray
• a handle for the roasting grills/baking tray
• operating instructions
Description
The Oven with Grill automat is intended for the heating,
cooking and grilling of food. The air circulation system
provides for an equable and rapid distribution of
heat in the appliance.
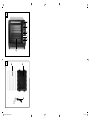
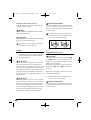
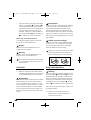
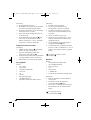
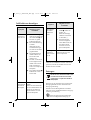
Illustration A:
1
Control lamp (Power)
Glows during operation
2
Temperature regulator
Stepless adjustment of the temperature from
100° C to 230° C
3
Function switch for
OFF,
Upper heat,
Lower heat,
Upper and lower heat
4
Rocker switch for air circulation
5
Timer switch
Adjustment of the required baking/grilling time
from 0 – 60 min.
6
Glass door with handle
Illustration B:
7
Roasting grill
8
Baking tray
9
Handle for roasting grill/baking tray
Technical data
Mains voltage: 220 - 240 V
~
/50 Hz
Nominal power: 1380 W
Capacity: 15 Litres
Bulb: 240 V, 15 W, E 14, 300°C
IB_75602_3_SGB1380B2_LB4.qxp 12.04.2012 12:09 Uhr Seite 2

- 3 -
Safety information
Danger!
• This appliance is not intended for use by indivi-
duals (including children) with restricted physical,
physiological or intellectual abilities or deficien-
ces in experience and/or knowledge unless they
are supervised by a person responsible for
their safety or receive from this person instruc-
tion in how the appliance is to be used.
• Children should be supervised to ensure that
they do not play with the appliance.
• You may not open the housing of the appliance
or carry out any repairs. Should you do so,
the safety concept of the appliance may be
compromised and the warranty becomes
void.Arrange for defects on the appliance to
be repaired only by the dealer or authorised
specialists.
• Arrange for defective power plugs and/or
cables to be replaced at once by qualified
technicians or our Customer Service Depart-
ment.
• Ensure that fluids cannot permeate into the
housing of the appliance. Do not expose the
appliance to humidity and do not use it out-
doors. Additionally, DO NOT place fluid-filled
receptacles such as flower vases on the appli-
ance. This would increase the risk of fire and of
receiving an electric shock! Should liquids per-
meate into the housing, unplug the appliance
immediately and arrange for it to be repaired
by a qualified technician.
• NEVER touch the heating rods or the viewing
window when the appliance is in use, or before it
has cooled down completely. Do not reach in
to the cooking area when the appliance is in
use. Wait until the appliance has cooled down.
Otherwise, you could be burnt.
• After use, allow the Oven and Grill automat to
cool down completely before transporting it.
• NEVER grasp the appliance, power cable or
power plug with wet hands. There is the risk of
receiving an electric shock.
• Lay the power cable in such a way that no one
can tread on or trip over it.
Caution! Hot surfaces.
NEVER touch the glass door or the housing
during use as these become very hot. To open
the glass door use oven gloves or something
similar, so as to avoid being burnt!
Caution!
• NEVER leave the appliance unattended when
it is in use.
• When the Oven and Grill automat is in use
ensure that there are no lightly inflammable
materials close to it (e. g.dishcloths, oven
cloths, etc.).
NEVER dry textiles or other objects on or
above the appliance. There is a risk of fire.
• To disconnect, always pull the plug itself from
the power socket, do not pull on the power
cable.
• Do not fold or crush the power cable.
• Do not use extension cables.
• If you do not intend to use the appliance for
an extended period, you must disconnect it
from the power source. The appliance is com-
pletely free of electrical power only when you
unplug it.
• Do not use an external timing switch or a se-
parate remote control system to operate the
appliance.
• Never place objects, food, bowls, baking tray
8
, the grill
7
or other containers on the floor
of the backing area! The resulting accumula-
tion of heat will damage the appliance!
ALWAYS place food, bowls or other containers
on the baking tray
8
or the grill
7
and slide
them in on the rails.
IB_75602_3_SGB1380B2_LB4.qxp 12.04.2012 12:09 Uhr Seite 3

- 4 -
Clarification of the safety warnings
In the operating instructions there are the following
categories of safety warning:
Danger!
A warning with the word DANGER refers to possible
personal physical damage.
Important!
A warning with the word CAUTION refers to possible
property or environmental damage.
These warnings contain specific indications for
the economic use of the appliance.
Setup
➩ Place the appliance on a firm, level and heat-resis-
tant surface. Ensure there is sufficient ventilation
around the appliance.
Risk of fire!
The distance between the appliance rear side and
the wall should be at least 10 cm, with at least a
clear 10 cm above the appliance and 5 cm to each
side. For this reason the appliance may not be used,
for example, in cupboards or similar. Should it be so
used, there is likely to be insufficient ventilation for
the appliance, increasing both the risk of fire or of it
being damaged.
Risk of fire!
Ensure the appliance is placed on a firm, level and
heat-resistant surface. Failure to do so increases the
risk of fire or of it being damaged. The area under
the base of the appliance could become discolou-
red and damaged. Additionally, if placed on a soft
upper surface, the appliance could cause perma-
nent damage to it due to pressure indentations.
Risk of electric shock!
Do not place the appliance immediately adjacent
to sources of water, e.g. sinks or basins, or in damp
cellar areas. Otherwise, there is a risk of receiving
an electric shock.
Do NOT support yourself on the glass door.
Do NOT place objects on the glass door. This
would cause damage to the hinges.
Preparation for use
Take note!
Never place objects, food, bowls, baking tray
8
,
the grill
7
or other containers on the floor of the
backing area! The resulting accumulation of heat
will damage the appliance!
ALWAYS place food, bowls or other containers on
the baking tray
8
or the grill
7
and slide them in
on the rails.
Before using the appliance, however, proceed as
described in the following:
➩ Take the electrical Oven with Grill and all
accessories from the packaging.
Risk of crush injuries!
When opening and closing the door, do not place
your fingers/hand between the door hinges. They
could be crushed.
IB_75602_3_SGB1380B2_LB4.qxp 12.04.2012 12:09 Uhr Seite 4

- 5 -
➩ Before using the appliance for the first time, it
and all of the accessories must be cleaned free
of possible packaging residues. Clean the ac-
cessories with a handwarm and mild detergent
solution and then dry them ab.
➩ Wipe the appliance housing with a cloth lightly
moistened with water and then dry it carefully.
➩ When the appliance is completely dry inside
and out, insert the plug into a suitable power
socket (220 - 240 V
~
/50 Hz).
➩ Now switch the appliance on, without the ac-
cessories and without foodstuffs. Leave the ap-
pliance door completely open.
➩ Select the setting 230° C with the temperature
regulator
2
. Place the function switch
3
to
upper and lower heat.
➩ Place the time switch
5
at 15 minutes.
The appliance allows itself to be switched on
with the time switch
5
. As soon as the time
switch
5
is set the control lamp
1
glows.
As the heating elements are lightly greased, a
slight smell may occur when first putting them
into operation. This is harmless and stops after
a short time. Open a window and provide for
sufficient ventilation.
➩ When the appliance has switched itself off auto-
matically, place the function switch
3
to OFF .
➩ Remove the plug from the power socket and wait
until the appliance has cooled itself down.
➩ Then clean the grill and baking area with a
cloth lightly moistened with water and then
dry it carefully.
Switching off and transportation
Switching off
➩ Place the function switch
3
and the time switch
5
at OFF. Unplug the power plug from the socket.
Transporting
➩ If you wish to transport the appliance, first allow
it to cool down.
➩ Remove the plug from the power socket.
➩ Wrap the power cable around the retaining
hooks on the rear of the appliance.
Operation
Grilling and baking
➩ Remove the roasting grill
7
and baking tray
8
from the appliance. If required, cover these
with baking paper resp. smear the baking tray
8
with butter or oil.
➩ Allow the appliance to heat up for ca. 10 minutes
(dependant on the setting) to the required tem-
perature:
- Select the required temperature with the tem-
perature regulator
2
.
For grilling, you must always select the highest
temperature setting (230° C).
- Then, select with the function switch
3
either
upper heat (e.g. for toppings), lower heat
(e.g. for cakes) or upper and lower heat (e.g.
for Pizza). If you want to grill, always select
the setting upper heat with the function switch
3
.
- With the time switch
5
set the pre-heat time
(ca. 10 minutes).
- Close the glass door
6
.
➩ When the warm-up period is finished, place
the foodstuffs on the roasting grill
7
resp. the
baking tray
8
and slide it in on one of the run-
ners. Ensure that there is sufficient space between
the foodstuffs and the inner walls/heating ele-
ments of the appliance.
IB_75602_3_SGB1380B2_LB4.qxp 12.04.2012 12:09 Uhr Seite 5

- 6 -
Attention!
Never place food, bowls or other containers directly
on the bottom of the baking area! The appliance
could be irreparably damaged! Always place food,
bowls or other containers on the baking sheet
8
or the grill grating
7
.
If you wish to prepare food on the roasting grill
7
that drips excessively, then slide the baking
tray
8
into the bottom rail. By doing this, drip-
ping fat for example will be caught and the ap-
pliance is then easier to clean.
The most uniform baking results are obtained
when the baking tray
8
resp. the roasting grill
7
are placed on the central runner and the air
circulation is switched on.
➩ Close the glass door
6
before starting the grill
or baking process.
If you are cooking especially fatty foodstuffs,
an increased smoke development can occur.
In this case, do not close the glass door
6
completely, instead, allow it to be slightly open:
If you carefully push the door to, it comes into
this position shortly before closing.
➩ Adjust the time switch
5
to the required grilling
or baking time.
The maximum grilling or baking time is 60 minutes.
➩ If the cooking time for the foodstuff amounts to
less than 25 minutes, first of all place the time
switch
5
at 60 minutes and then turn it back
to the required grilling or baking time.
The control lamp
1
indicates that your Oven with
Grill is switched on. The switch of the time switch
5
now rotates itself anti-clockwise towards OFF.
When your Oven with Grill has reached the set
temperature, the heating elements switch them-
selves off at intervals, to ensure that the tempe-
rature is maintained.
➩ The appliance switches itself off automatically
on completion of the programmed time. If you
wish to switch the appliance off prematurely,
turn the time switch
5
back to OFF. Place the
function switch
3
at the position OFF and re-
move the plug from the power socket.
You will hear a signal sound and the control lamp
1
extinguishes.
After the appliance has switched itself off, the
time switch
5
can continue to run for a short
period.
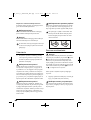
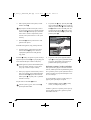
➩ To remove the roasting grill
7
resp. baking tray
8
, ALWAYS use the provided handle
9
. To lift
the roasting grill
7
out, you must engage the
small hook of the handle
9
in the grill from above.
To lift the baking tray
8
out of the appliance,
the large hooks of the handle
9
must engage
with the front edge of the baking tray
8
.
IB_75602_3_SGB1380B2_LB4.qxp 12.04.2012 12:09 Uhr Seite 6

- 7 -
➩ After grilling or baking, place the function
switch
3
in the position OFF. Remove the plug
from the power socket. Allow the appliance to
cool down before cleaning it or switching it
back on.
Grilling and baking with circulating air
As a general rule, if you are baking or grilling with
air circulation vou can dispense with a pre-heating
of the cooking space. The cooking and browning
results are more even with the use of circulating air.
Take note of the instructions given in the recipes
when using air circulation.
➩ Press the rocker switch
4
for air circulation
until it engages in position "-".
The aerator in the grill and baking space starts to
rotate.
The methods of operation are then the same as for
grilling and baking without air circulation.
Tips for preparation and recipes
In this chapter we provide you with various examples
for the preparation of foods. These examples are re-
commendations. The preparation periods can vary.
Take note of the preparation details given on
the packaging of the foodstuff .
Muffins
Ingredients for four people:
• 1 Cup of flour
• 1 Teaspoon of baking powder
• 1 Egg
• 1 Tablespoon of melted butter
• 1 Cup of milk
• 3 Tablespoons of sugar
• Salt
• for variations, additionally nuts, chopped
bananas or chocolate flakes
Preparation:
➩ Mix together in a bowl, slowly and one after
the other, the flour, baking powder, egg, milk,
salt and sugar.
➩ Melt the butter in a pan and mix it into the pastry.
➩ Subject to taste, blend in the nuts, chocolate
flakes or chopped bananas.
➩ Place the prepared pastry into typical muffin
moulds and place them on the baking sheet
8
.
➩ Bake the baking sheet at 200° C for about
15 minutes on the bottom rail with top heat
and convection air.
IB_75602_3_SGB1380B2_LB4.qxp 12.04.2012 12:09 Uhr Seite 7

- 8 -
Hawaii toast
Ingredients for 4 toasts:
• 4 Slices of toast
• 1–2 Tablespoons of remoulade
• 120 g cooked ham
• 1/2 Tin of pineapples
• 4 Slices of cheese for melting
• Curry
Preparation:
➩ Toast the toast slices.
➩ Spread the remoulade thinly over the toasts
and lay the slices of cooked ham on them.
➩ Lay one slice of pineapple on each of the
garnished toasts. Spice with curry.
➩ Then place a slice of cheese over each of the
pineapple slices.
➩ Lay the Hawaiian toasts on the grill
7
and
then bake them for about 8 minutes on the
middle level of the grill and baking machine, at
approx. 180°C with upper heat and air circu-
lation.
Baking deep-frozen pizza
Preparation:
➩ Place the roasting grill
7
on the middle runner
in the cooking area.
➩ Lay the deep-frozen pizza without packaging
onto the roasting grill
7
.
➩ Bake the pizza with upper and lower heating
and switched on air circulation for ca.20 minutes.
➩ Take heed of the details given on the packaging.
Biscuits
Ingredients:
• 125 g butter
• 125 g sugar
• 1 Packet of vanilla sugar
• 1 Pinch of salt
• 1 Egg
• 1 Egg white
• 250 g Plain flour
• 1 Teaspoon of baking powder
• Scraped peel of half a lemon
Preparation:
➩ Beat the butter until foamy.
➩ Add the sugar, vanilla sugar, lemon peel and
the eggs.
➩ Mix together the flour, baking powder and
salt, then blend them into the mixture with a
mixing spoon.
➩ Allow the pastry to stand for ca. 10 minutes.
➩ Bring the pastry into the desired shape, e.g.
with the assistance of a mincer, biscuit shaper
or a shaping bag with nozzle.
➩ Place the biscuits onto the baking tray
8
, this
being first covered with baking paper.
➩ Bake the biscuits on the middle rail in a pre-
heated oven at 180° C, with top and bottom
heat, for about 10–15 minutes, until they
are golden brown.
The pastry volume is sufficient for several
baking trays
8
.
Rolls
Ingredients:
• 300 g Flour (or wholemeal flour)
• good 2 Teaspoons of baking powder
• 200 g Linseeds
• 1 Egg
• 500 g Curds
• 1 Teaspoon of salt
• Subject to taste, caraway seeds, onions,
cubed bacon ...
Preparation:
➩ Knead everything together well and then
shape it into small rolls.
➩ Place the biscuits onto the baking tray
8
this
being first covered with baking paper.
➩ Bake at about 180° C, with top heat and
convection air, for approximately 30 minutes
on the middle rail.
The pastry volume is sufficient for several
baking trays
8
.
IB_75602_3_SGB1380B2_LB4.qxp 12.04.2012 12:09 Uhr Seite 8

- 9 -
Meringue
Ingredients:
• 1 Egg white
• Salt
• 45 g Sugar
Preparation:
➩ Place the cooled egg white into a fat-free mixing
bowl. It may not contain any egg yolk, other-
wise the meringue will not be firm.
➩ Beat the egg white at a slow speed, so that the
bubbles formed in the meringue are not too large.
➩ Add a pich of salt to taste.
➩ Gradually add in a half of the sugar when the
meringue starts to firm up.
➩ Then beat it at the highest speed until stiff.
➩ Add the remaining sugar. With this the meringue
attains the required solidity.
➩ Fill the meringue mixture into a squeezing bag
with large star nozzles and, with a little space
between them, shape rosettes, tongues and
other designs on the backing tray, this being
first covered with baking paper.
➩ Pre-heat the Oven with Grill to ca. 100° C
with air circulation.
➩ Bake the meringues with air circulation at ca.
100° C for about 2 hours.
Buttered croutons
Ingredients:
• 2 slices of toast bread
• 1 tbsp. Butter
Preparation:
➩ Cut the toast bread into small cubes.
➩ Melt the butter over low heat in a saucepan
and mix in the cubed toast bread.
➩ Cover a baking sheet
8
with baking paper
and spread the toast bread cubes evenly on it.
➩ Bake the toast bread cubes at 150°C (con-
vection) on the middle rail until golden brown
(approx. 15-20 minutes).
You can also use herb or garlic butter instead of
regular butter. The baking time is then reduced
by about 5 minutes.
Minced meat baguettes
Ingredients:
• 2 Baguette rolls
• 250 g Minced meat (half and half)
• 2 Tomatoes
• 1 Onion (diced)
• 2 tbsp. Tomato paste
• 40 g grated Parmesan cheese
• 4 slices of cheese
• Salt and pepper
Preparation:
➩ Slice the baguettes and hollow them out.
➩ Combine the minced meat, tomato paste,
onion, parmesan, some salt and some pepper.
➩ Shape the minced meat to 4 equal-sized, flat
as possible, meat patties and place them on
the baguette halves.
➩ Cut the tomato into slices and distribute them
onto the baguettes.
➩ Distribute the cheese slices onto the baguettes.
➩ Place the baguettes on a baking sheet
8
and
then bake them on the bottom rail at about
225°C in a preheated oven with top and
bottom heat for about 20 minutes.
You can also season the minced meat mixture
with basil, chili and other spices.
IB_75602_3_SGB1380B2_LB4.qxp 12.04.2012 12:09 Uhr Seite 9

- 10 -
Cauliflower (overbaked)
Ingredients:
• 1/2 head cauliflower (about 250 g)
• 3 Lemon slices
• 1 tbsp. Butter
• 1 heaped tsp Flour
• 1 tbsp. lemon juice
• 1 tbsp slivered Almonds
• 2 tbsp Gratin cheese (grated)
• salt, pepper, nutmeg
Preparation:
➩ Divide the cauliflower into florets and wash
them.
➩ Cook the cauliflower with the lemon slices in
boiling salted water for 8-10 minutes, until the
cauliflower is al dente. Retain about 150 ml
of the cooking water before pouring the rest
away.
➩ Melt the butter in a saucepan and then brown
the flour, with constant stirring, for about 1 mi-
nute.
Under constant stirring pour in the cauliflower
water and let it cook for about 2 minutes.
Should the roux be too hard, gradually add
more water until a creamy consistency is achie-
ved. Flavour with lemon juice, nutmeg, salt and
pepper.
➩ Place the cauliflower in a baking dish (about
14 cm in diameter) and pour the sauce evenly
over it.
➩ Sprinkle the cheese and almond slivers over it.
➩ Place the baking dish on a baking tray
8
.
➩ Bake the prepared dish at 200°C in a pre-
heated oven, with top and bottom heat, for
about 20 minutes on the bottom rail.
Puff pastry pouches (Bourekas) filled
with salmon
Ingredients:
• 1 pack Puff pastry sheets (about 8 pieces)
• 1 Pack Smoked salmon, sliced (about 200 g)
• 1 Lemon
• 1 Onion
• 1 Pack Cottage cheese (200 g)
fresh Dill
Salt and pepper
1 Egg yolk
Preparation:
➩ Take the puff pastry sheets apart and, if neces-
sary, allow them to thaw.
➩ Combine the Cottage cheese with salt, pepper
and the juice of one lemon.
➩ Finely dice the onion.
➩ Add half of the salmon and the onion to the
cottage cheese mixture and mix it all coarsely
with a hand blender.
➩ Cut the remaining salmon into thin strips.
➩ Add the salmon and the dill to the mass and
mix everything together.
➩ Place a tablespoon of the mixture on a puff
pastry sheet and fold it over.
➩ Coat the resulting pouch with egg yolk.
➩ Place the bourekas on a baking sheet
8
.
Leave sufficient space between the individual
pouches, because the puff pastry will expand.
➩ Bake the bourekas on the lower rail at about
200° C with convection for approx. 25-30 mi-
nutes. The puff pastry should gain a light brown
colour.
The given pastry volume is sufficient for several
baking trays
8
.
These recipes are provided without guarantee. All
ingredients and preparation information are guiding
values. Expand these recipe suggestions based on
your personal experiences. We hope you enjoy
the recipes and wish you "bon appetit".
IB_75602_3_SGB1380B2_LB4.qxp 12.04.2012 12:09 Uhr Seite 10

- 11 -
Changing the bulb
Danger!
Always wait until until the appliance has cooled
down before changing the bulb. Otherwise, there is
a risk of being burnt!
Replace the bulb only with a bulb of the same
type (see chapter "Technical data ").
➩ Open the glass door
6
.
➩ Unscrew the glass cover of the light bulb
located at the right rear of the interior.
➩ Unscrew the defective bulb and replace it with
the new bulb.
➩ Screw the glass cover back on hand-tight.
Cleaning
Risk of electric shock!
Before you clean the Oven with Grill, you must
always remove the plug from the power socket.
There is a risk of receiving an electric shock!
Risk of electric shock!
When cleaning it, under no circumstances
may the appliance be submersed in water.
There is a risk of receiving an electric shock!
Important!
Do not use household detergents or sharp/pointed
objects to remove soiling. They could damge the spe-
cial coatings on the inner walls of the Oven with Grill.
➩ Should soiling occur, the Oven with Grill can
be cleaned with a soft cloth lightly moistened
with a mild soapy solution. For stubborn stai-
ning or baked-on soiling, place a cloth soaked
with a mild detergent on the contamination.
Wait until the contamination has softened and
then remove it!
➩ Clean the baking tray
8
and the roasting grill
7
in a detergent solution. Allow stubborn soiling
to be softened. Rinse them off with clear water.
Risk of electric shock!
The Oven with Grill must be completely dry before
using it again after cleaning. Therefore, after cleaning
leave the appliance door open.
Troubleshooting
Symptom
Possible cause and
solution
The appliance
does not heat
up.
The time switch
5
is
showing OFF. Adjust the
time switch
5
to a time
greater than 0 minutes
(OFF) .
A domestic fuse is defect.
Check the domestic fuses
and, if necessary, renew
the defective one.
The power socket is
defective. Try another
wall socket.
The appliance is possibly
defective. Arrange for
the appliance to be
checked by specialists.
The function switch
3
is at the position OFF.
It is not possible
to switch the
appliance off.
An electronic component is
defective.
Remove the plug from the
wall socket and arrange for
the appliance to be checked
by specialists.
IB_75602_3_SGB1380B2_LB4.qxp 12.04.2012 12:09 Uhr Seite 11

- 12 -
Should a defect not allow itself to be eliminated,
please contact your dealer or the manufacturer.
Disposal
Do not dispose of the appliance in your
normal domestic waste. This product is
subject to the European guideline
2002/96/EC.
Dispose of the appliance through an approved dis-
posal centre or at your community waste facility.
Observe the currently applicable regulations.
In case of doubt, please contact your waste disposal
centre.
Dispose of all packaging materials in an
environmentally responsible manner.
Symptom
Possible cause and
solution
The aerator for
the air circula-
tion does not
function.
The switch for air circula-
tion
4
is in the position
"O". Move the rocker
switch for air circulation
to the position "-".
The appliance is possibly
defective. Arrange for
the appliance to be
checked by specialists.
The door
glass is broken
or showing
cracks.
Arrange for the appliance
to be checked/repaired by
specialists.
Warranty & Service
The warranty for this appliance is for 3 years from
the date of purchase. The appliance has been ma-
nufactured with care and meticulously examined be-
fore delivery. Please retain your receipt as proof of
purchase. In the event of a warranty claim, please
make contact by telephone with our Service Depart-
ment. Only in this way can a post-free despatch for
your goods be assured.
The warranty covers only claims for material and
maufacturing defects, but not for transport damage,
for wearing parts or for damage to fragile compo-
nents, e.g. buttons or batteries. This product is for
private use only and is not intended for commercial
use. The warranty is void in the case of abusive and
improper handling, use of force and internal tampe-
ring not carried out by our authorized service
branch. Your statutory rights are not restricted in any
way by this warranty.
The warranty period will not be extended by repairs
made under warranty. This applies also to replaced
and repaired parts. Any damage and defects extant
on purchase must be reported immediately after un-
packing the appliance, at the latest, two days after
the purchase date. Repairs made after the expira-
tion of the warranty period are subject to payment.
Service Great Britain
Tel.: 0871 5000 720 (£ 0.10/Min.)
E-Mail: [email protected]
Service Ireland
Tel.: 1890 930 034
(0,08 EUR/Min., (peak))
(0,06 EUR/Min., (off peak))
E-Mail: [email protected]
Importer
KOMPERNASS GMBH
BURGSTRASSE 21
44867 BOCHUM, GERMANY
www.kompernass.com
IAN 75602/75603
IAN 75602/75603
IB_75602_3_SGB1380B2_LB4.qxp 12.04.2012 12:09 Uhr Seite 12

- 13 -
SPIS TREŚCI STRONA
Zastosowanie zgodnie z przeznaczeniem 14
Zakres dostawy 14
Opis 14
Dane techniczne 14
Wskazówki bezpieczeństwa 15
Ustawianie 16
Pierwsze uruchomienie 16
Wyłączenie i transport 17
Wyłączenie . . . . . . . . . . . . . . . . . . . . . . . . . . . . . . . . . . . . . . . . . . . . . . . . . . . . . . . . . . . . . . .17
Transport . . . . . . . . . . . . . . . . . . . . . . . . . . . . . . . . . . . . . . . . . . . . . . . . . . . . . . . . . . . . . . . . .17
Obsługa 17
Grillowanie i pieczenie . . . . . . . . . . . . . . . . . . . . . . . . . . . . . . . . . . . . . . . . . . . . . . . . . . . . . .17
Grillowanie i pieczenie z obiegiem powietrza . . . . . . . . . . . . . . . . . . . . . . . . . . . . . . . . . . .19
Porady o przyrządzaniu potraw i przepisy 19
Babeczki . . . . . . . . . . . . . . . . . . . . . . . . . . . . . . . . . . . . . . . . . . . . . . . . . . . . . . . . . . . . . . . . .19
Tost hawajski . . . . . . . . . . . . . . . . . . . . . . . . . . . . . . . . . . . . . . . . . . . . . . . . . . . . . . . . . . . . . .19
Pieczenie pizzy z zamrażarki . . . . . . . . . . . . . . . . . . . . . . . . . . . . . . . . . . . . . . . . . . . . . . . . .20
Ciastka kruche . . . . . . . . . . . . . . . . . . . . . . . . . . . . . . . . . . . . . . . . . . . . . . . . . . . . . . . . . . . . .20
Bułki . . . . . . . . . . . . . . . . . . . . . . . . . . . . . . . . . . . . . . . . . . . . . . . . . . . . . . . . . . . . . . . . . . . . .20
Bezy . . . . . . . . . . . . . . . . . . . . . . . . . . . . . . . . . . . . . . . . . . . . . . . . . . . . . . . . . . . . . . . . . . . . .20
Grzanki maślane . . . . . . . . . . . . . . . . . . . . . . . . . . . . . . . . . . . . . . . . . . . . . . . . . . . . . . . . . . .21
Bagietki zapiekane z mięsem mielonym . . . . . . . . . . . . . . . . . . . . . . . . . . . . . . . . . . . . . . . . .21
Kalafior (zapiekany) . . . . . . . . . . . . . . . . . . . . . . . . . . . . . . . . . . . . . . . . . . . . . . . . . . . . . . . .21
Kieszonki z łososiem . . . . . . . . . . . . . . . . . . . . . . . . . . . . . . . . . . . . . . . . . . . . . . . . . . . . . . . .22
Zmiana żarówki 22
Czyszczenie 23
Usuwanie zakłóceń działania 23
Utylizacja 24
Gwarancja i serwis 24
Importer 24
Przed pierwszym użyciem urządzenia należy dokładnie przeczytać niniejszą instrukcję obsługi i zachować ją na
przyszłość. W przypadku przekazania urządzenia osobom trzecim należy przekazać im także instrukcję.
IB_75602_3_SGB1380B2_LB4.qxp 12.04.2012 12:09 Uhr Seite 13

- 14 -
Piekarnik elektryczny
Gratulujemy Ci zakupu naszego urządzenia.
Jest to produkt wysokiej jakości. Instrukcja obsługi
stanowi część tego produktu. Zawiera ona ważne
wskazówki dotyczące bezpieczeństwa, użytkowa-
nia i utylizacji urządzenia. Przed przystąpieniem do
użytkowania produktu zapoznaj się z wszystkimi
wskazówkami obsługi i bezpieczeństwa. Używaj
produkt zgodnie z opisem i w podanych obszarach
użytkowania. W razie przekazania produktu na-
stępnej osobie, nie zapomnij dołączyć również in-
strukcji obsługi.
Zastosowanie zgodnie
z przeznaczeniem
Automat grillujący służy wyłącznie do podgrzewa-
nia, pieczenia i grillowania potraw. Urządzenie
jest przystosowane wyłącznie do użytkowania
w warunkach domowych. Wykorzystywanie do
celów komercyjnych jest zabronione.
Każde inne użycie jest niezgodne z przeznaczeniem i
może być przyczyną odniesienia poważnych obrażeń
lub uszkodzenia urządzenia. Kompernaß nie ponosi
odpowiedzialności za szkody, powstałe w wyniku
użytkowania urządzenia niezgodnie z jego przez-
naczeniem.
Zakres dostawy
Co zawiera opakowanie
• Piekarnik elektryczny
• ruszt
• blacha do pieczenia
• uchwyt do rusztu/blachy do pieczenia
• Instrukcja obsługi
Opis
Automat grillujący służy do podgrzewania, piecze-
nia i grillowania potraw. Funkcja obiegu powietrza
zapewnia równomierny i szybki rozdział ciepła we
wnętrzu urządzenia.
Ilustracja A:
1
Lampka kontrolna (zasilanie)
Włączona podczas pracy urządzenia
2
Regulator temperatury
Bezstopniowe ustawienie temperatury w
zakresie od 100° C do 230° C
3
Przełącznik funkcji
OFF (wył.),
Grzanie od góry,
Grzanie od dołu,
Grzanie od góry i od dołu.
4
Przełącznik wychylny obiegu powietrza
5
Zegar sterujący
Ustawienie żądanego czasu pieczenia/
grillowania w zakresie od 0 do 60 min.
6
Drzwiczki szklane z uchwytem
Rysunek B:
7
Ruszt
8
Blacha do pieczenia
9
Uchwyt do rusztu/blachy do pieczenia
Dane techniczne
Napięcie sieciowe: 220 - 240 V
~
/50 Hz
Moc znamionowa: 1380 W
Pojemność: 15 litrów
Żarówka: 240 V, 15 W, E 14, 300°C
IB_75602_3_SGB1380B2_LB4.qxp 12.04.2012 12:09 Uhr Seite 14

- 15 -
Wskazówki bezpieczeństwa
Niebezpieczeństwo!
• Urządzenie nie jest przeznaczone do użytko-
wania przez osoby (w tym dzieci) o ograniczonej
sprawności fizycznej, ruchowej bądź umysłowej
lub nieposiadające doświadczenia i / lub
wiedzy, chyba że będą one przebywały pod
opieką osoby odpowiedzialnej za ich bezpie-
czeństwo lub uzyskały od niej wskazówki
dotyczące właściwego używania urządzenia.
• Nie można pozwolić dzieciom na zabawę
urządzeniem.
• Nie wolno otwierać obudowy ani też samemu
naprawiać automatu grillującego. Stanowi to
poważne zagrożenie i powoduje wygaśnięcie
gwarancji. Naprawę uszkodzonego automatu
grillującego powierzaj wyłącznie producentowi
lub autoryzowanemu serwisowi.
• Naprawę uszkodzonej wtyczki lub kabla siecio-
wego zleć niezwłocznie wykwalifikowanemu
personelowi lub serwisowi.
• Nie dopuść do przedostania się cieczy do
wnętrza obudowy automatu grillującego.
Nie wolno również dopuścić do sytuacji, w
której ciecz dostałaby się do obudowy silnika.
Nie należy użytkować urządzenia w warunkach
podwyższonej wilgotności ani na wolnym
powietrzu. Na automat grillujący nie stawiaj
przedmiotów napełnionych wodą, np. misek.
Istnieje zagrożenie porażenia prądem elek-
trycznym! Jeśli zdarzyło by się, że jakaś ciecz
dostała się do wnętrza obudowy silnika, jak
najszybciej wyciągnij wtyczkę z gniazdka
sieciowego i oddaj urządzenie do naprawy.
• Nigdy nie dotykaj grzałek ani szyby w drzwicz-
kach przy pracującym urządzeniu, ani też po
zakończeniu pracy, dopóki urządzenie nie ost-
ygnie. Nie wkładaj rąk do komory grillującej
podczas pracy urządzenia. Odczekaj do ost-
ygnięcia urządzenia. W przeciwnym wypadku
można się poparzyć.
• Zanim przeniesiesz urządzenie w inne miejsce
najpierw odczekaj, aż ostygnie.
• Nigdy nie dotykaj wilgotnymi rękami urządze-
nia, kabla zasilającego ani wtyczki. Istnieje
zagrożenie porażenia prądem elektrycznym.
• Kabel sieciowy układaj w taki sposób, by nikt
się o niego nie potknął.
Uwaga! Gorąca powierzchnia.
Nigdy nie dotykaj drzwi szklanych ani obudowy
w trakcie pracy urządzenia, gdyż wtedy elementy
te bardzo się nagrzewają. Do otwierania drzwi
szklanych używaj np. rękawicy kuchennej,
chroniącej przed wysokimi temperaturami!
Uwaga!
• W trakcie używania nigdy nie zostawiać urzą-
dzenia bez nadzoru.
• Przy pracującym automacie grillującym w jego
pobliżu nie odkładaj łatwopalnych materiałów
(np. ręczników do wycierania naczyń, rękawic
ochronnych do gorących naczyń itp.).
Nigdy nie próbuj suszyć materiałów ani żad-
nych przedmiotów nad i w urządzeniu.
Zagrożenie spowodowania pożaru!
• Wyciągając kabel sieciowy z gniazdka, pociągaj
zawsze za wtyczkę, a nie za kabel .
• Nie wyginaj i nie przygniataj kabla sieciowego.
• Nie używaj przedłużaczy.
• Gdy nie zamierzasz używać urządzenia przez
dłuższy czas, odłącz wtyczkę od gniazdka
zasilania. Jedynie po wyciągnięciu wtyczki z
gniazdka sieciowego, uzyskujemy pewność,
że urządzenie nie znajduje się pod prądem.
• Do sterowania pracą urządzenia nie próbuj
używać żadnych zewnętrznych zegarów steru-
jących ani żadnego innego systemu zdalnego
sterowania.
• Nigdy nie kładź żadnych przedmiotów, produk-
tów spożywczych, misek, blachy do pieczenia
8
, rusztu
7
ani żadnych innych naczyń bez-
pośrednio na dnie komory do pieczenia! Pow-
stały wtedy zator cieplny mógłby spowodować
uszkodzenie urządzenia! Produkty spożywcze,
miski lub inne naczynia kładź zawsze na blas-
ze do pieczenia
8
lub na ruszcie
7
, a następ-
nie wsuń na szynach.
IB_75602_3_SGB1380B2_LB4.qxp 12.04.2012 12:09 Uhr Seite 15

- 16 -
Objaśnienie wskazówek bezpieczeństwa
W instrukcji obsługi znajdują się następujące kate-
gorie wskazówek bezpieczeństwa:
Niebezpieczeństwo!
Wskazówki NIEBEZPIECZEŃSTWO ostrzegają
przed szkodami niebezpiecznymi dla ludzi.
Uwaga!
Wskazówki UWAGA ostrzegają przed możliwymi
szkodami materialnymi i środowiskowymi.
Te wskazówki zawierają szczególne informacje
na temat oszczędnego użytkowania automatu
grillującego.
Ustawianie
➩ Urządzenie postaw na stabilnej, płaskiej
i żaroodpornej podstawie. Sprawdź, czy
dookoła urządzenia znajduje się dostateczna
przestrzeń do wentylacji.
Niebezpieczeństwo pożaru!
Odstęp między tyłem urządzenia a ścianą powi-
nien wynosić co najmniej 10 cm, od góry 10 cm,
a po bokach 5 cm. Ze względu na te wymagania
urządzenia nie stawiaj w szafach ani żadnych in-
nych meblach. W takich zabudowanych miejscach
nie ma dostatecznej wentylacji automatu grillujące-
go i podczas pracy urządzenia mogłoby dojść do
wybuchu pożaru lub uszkodzenia urządzenia i mebli.
Niebezpieczeństwo pożaru!
Grill stawiaj zawsze na stabilnych, płaskich i ża-
roodpornych podłożach. W przeciwnym wypadku
występuje niebezpieczeństwo wybuchu pożaru i
uszkodzenia urządzenia. Obszar pod dnem urząd-
zenia może ulec odbarwieniu i uszkodzeniu. Po-
nadto przy zbyt miękkim podłożu mogą pozostać
trwałe odciski.
Niebezpieczeństwo porażenia prądem!
Nie stawiaj urządzenia bezpośrednio przy źródle
wody, np. obok zlewu lub w wilgotnej piwnicy. Ist-
nieje zagrożenie porażenia prądem elektrycznym!
Nie opieraj się o szybkę w drzwiczkach. Nie
stawiaj na drzwiczki szklane żadnych przed-
miotów. Mogłoby to doprowadzić do uszko-
dzenia zawiasów.
Pierwsze uruchomienie
Uwaga!
Nigdy nie kładź żadnych przedmiotów, produktów
spożywczych, misek, blachy do pieczenia
8
, rusztu
7
ani żadnych innych naczyń bezpośrednio na
dnie komory do pieczenia! Powstały wtedy zator
cieplny mógłby spowodować uszkodzenie urządze-
nia! Produkty spożywcze, miski lub inne naczynia kł-
adź zawsze na blasze do pieczenia
8
lub na rusz-
cie
7
, a następnie wsuń na szynach.
Przed użyciem urządzenia wykonaj następujące
czynności:
➩ Wyjmij z opakowania elektryczny automat gril-
lujący i wszystkie dołączone elementy.
Niebezpieczeństwo przytrzaśnięcia!
Przy otwieraniu lub zamykaniu drzwiczek nie chwy-
taj za zawiasy. Mogłoby to skończyć się przytrzaś-
nięciem palców.
IB_75602_3_SGB1380B2_LB4.qxp 12.04.2012 12:09 Uhr Seite 16

- 17 -
➩ Przed przystąpieniem do pierwszego uruchomie-
nia dokładnie wyczyść z pozostałości po opako-
waniu urządzenie i wszystkie dodatkowe ele-
menty. Elementy wyposażenia urządzenia
wymyj letnią wodą z płynem do mycia naczyń i
wysusz.
➩ Obudowę urządzenia wyczyść lekko zwilżoną
wodą szmatką, a następnie wytrzyj do sucha.
➩ Gdy urządzenie dokładnie wyschnie wew-
nątrz i zewnątrz, wtyczkę podłącz do odpo-
wiedniego gniazdka zasilania
(220 - 240 V
~
/50 Hz) w ścianie.
➩ Teraz włącz urządzenie, ale jeszcze bez wy-
posażenia w środku ani bez potrawy. Otwórz
drzwiczki na pełną szerokość.
➩ Regulatorem temperatury wybierz
2
230° C.
Przełącznik funkcji
3
ustaw na grzanie od
góry i od dołu.
➩ Z
egar sterujący 5
ustaw na 15 minut.
Urządzenie możesz włączyć wyłącznie za po-
mocą zegara sterującego 5
. P
rzy włączonym
zegarze sterującym 5
zapalona jest lampka
kontrolna
1
.
Ponieważ elementy grzewcze są lekko nasma-
rowane, przy pierwszym uruchamianiu można
poczuć lekki zapach palonego smaru. Jest on
nieszkodliwy i z czasem ustąpi. Otwórz okno
i zadbaj o dostateczne przewietrzenie po-
mieszczenia.
➩ Gdy urządzenie wyłączy się automatycznie,
przełącznik funkcji
3
ustaw na OFF (wył.).
➩ Wyciągnij wtyczkę z gniazdka i odczekaj do ca-
łkowitego ostygnięcia urządzenia.
➩ Następnie szmatką zwilżoną lekko wodą wyc-
zyść dokładnie komorę grillującą i wytrzyj do
sucha.
Wyłączenie i transport
Wyłączenie
➩ Przełącznik funkcji
3
i zegar sterujący
5
ustaw
na OFF (wył.). Wyciągnij wtyczkę z gniazdka.
Transport
➩ Zanim zdecydujesz się na przeniesienie automatu
grillującego w inne miejsce odczekaj do ostygnię-
cia urządzenia.
➩ Wyciągnij wtyczkę z gniazdka.
➩ Kabel sieciowy zawiń wokół haczyków nacią-
gowych z tyłu urządzenia.
Obsługa
Grillowanie i pieczenie
➩ Wyjmij ruszt
7
i blachę do pieczenia
8
z urzą-
dzenia. W razie potrzeby wyłóż je papierem
do pieczenia wzgl. posmaruj blachę do
pieczenia
8
masłem lub olejem.
➩ Urządzenie pozostaw na 10 minut do nagrza-
nia do żądanej temperatury (w zależności od
ustawienia temperatury):
- R
egulatorem temperatury 2
wybierz żądaną
temperaturę.
Przy grillowaniu wybierane temperatury mus-
zą być zawsze wyższe (230° C).
- N
astępnie przełącznikiem funkcji 3
wybierz
grzanie od góry (np. zapiekanie), grzanie
od dołu (np. ciasto) lub grzanie od góry i od
dołu (np. pizza). D
o przygotowania po-
traw grillowanych przełącznikiem funkcji 3
wybieraj zawsze grzanie od góry
.
- Za pomocą zegara sterującego
5
nastaw
czas nagrzewania (około 10 minut).
- Z
amknij drzwiczki szklane 6
.
➩ Po upływie nastawionego czasu połóż na ruszt
7
wzgl. na blachę
8
przygotowywaną potrawę
i umieść w urządzeniu, wsuwając ruszt wzgl.
blachę po szynach. Zwróć przy tym uwagę
na dostateczny odstęp potrawy od ścian wew-
nętrznych i elementów grzewczych.
IB_75602_3_SGB1380B2_LB4.qxp 12.04.2012 12:09 Uhr Seite 17

- 18 -
Uwaga!
Nigdy nie kładź produktów spożywczych, półmisków
ani żadnych innych naczyń bezpośrednio na dnie
komory do pieczenia! Może dojść do uszkodzenia
urządzenia! Produkty spożywcze, półmiski i inne
naczynia kładź zawsze na blasze do pieczenia
8
lub na ruszcie
7
.
Przygotowując na ruszcie
7
produkty, z
których mocno kapie tłuszcz, wsuń blachę
do pieczenia
8
na najniższą szynę. W ten
sposób tłuszcz można zebrać w jednym
miejscu, co ułatwi czyszczenie urządzenia.
Najrówniejsze upieczenie uzyskuje się, um-
ieszczając blachę
8
wzgl. ruszt
7
na środ-
kową szynę i nastawiając obieg powietrza.
➩ P
rzed włączeniem grillowania lub pieczenia
zamknij drzwiczki szklane 6
.
Przy grillowaniu/pieczeniu tłustych potraw
może pojawić się zwiększone zadymienie.
W takiej sytuacji nie zamykaj drzwiczek s
zkla-
nych 6
, lecz nieco je uchyl: Po delikatnym
przymknięciu drzwiczek, przed zamknięciem
zaryglują się one w tym położeniu.
➩ Z
a pomocą zegara sterującego 5
nastaw
żądany czas grillowania wzgl. pieczenia.
Maksymalny czas grillowania wzgl. pieczenia wynosi
60 minut.
➩ Gdy czas pracy będzie krótszy niż 25 minut,
zegar sterujący
5
najpierw nastaw na 60 mi-
nut, a następnie cofnij na żądany czas grillo-
wania wzgl. pieczenia.
L
ampka kontrolna 1
pokazuje, że automat grillujący
jest włączony. Pokrętło zegara sterującego
5
obraca
się teraz w kierunku przeciwnym do ruchu wskazówek
zegara w położenie OFF (zero).
Gdy automat grillujący osiągnie nastawioną
temperaturę, elementy grzewcze na chwilę
wyłączą się, by utrzymać nastawioną temperaturę.
➩ Urządzenie po upływie nastawionego czasu
wyłączy się automatycznie. By urządzenie
wyłączyć przedwcześnie, pokrętło zegara
sterującego
5
cofnij w położenie OFF. Prze-
łącznik funkcji
3
ustaw w położenie OFF, a
następnie wyciągnij wtyczkę z gniazdka.
Usłyszysz dzwonek, po czym zgaśnie lampka kon-
trolna 1
.
Po wyłączeniu urządzenia zegar sterujący 5
może jeszcze przez jakiś czas odmierzać czas.
➩ D
o wyciągnięcia rusztu 7
wzgl. blachy
8
u
żywaj zawsze dołączonego uchwytu 9
.
D
o podniesienia rusztu 7
niewielkie haczyki
uchwytu
9
zaczep od góry o kratkę.
Do pod-
niesienia blachy 8
i wyjęcia jej z urządzenia,
zaczep większe haczyki uchwytu
9
o krawędź
przednią blachy
8
.
➩ P
o zakończeniu grillowania lub pieczenia
ustaw przełącznik funkcji 3
w położenie OFF
(wył.). Wyciągnij wtyczkę z gniazdka. Przed
przystąpieniem do czyszczenia lub ponownego
użycia odczekaj do ostygnięcia gorących
części.
IB_75602_3_SGB1380B2_LB4.qxp 12.04.2012 12:09 Uhr Seite 18
Strona się ładuje...
Strona się ładuje...
Strona się ładuje...
Strona się ładuje...
Strona się ładuje...
Strona się ładuje...
Strona się ładuje...
Strona się ładuje...
Strona się ładuje...
Strona się ładuje...
Strona się ładuje...
Strona się ładuje...
Strona się ładuje...
Strona się ładuje...
Strona się ładuje...
Strona się ładuje...
Strona się ładuje...
Strona się ładuje...
Strona się ładuje...
Strona się ładuje...
Strona się ładuje...
Strona się ładuje...
Strona się ładuje...
Strona się ładuje...
Strona się ładuje...
Strona się ładuje...
Strona się ładuje...
Strona się ładuje...
Strona się ładuje...
Strona się ładuje...
Strona się ładuje...
Strona się ładuje...
Strona się ładuje...
Strona się ładuje...
Strona się ładuje...
Strona się ładuje...
Strona się ładuje...
Strona się ładuje...
Strona się ładuje...
Strona się ładuje...
Strona się ładuje...
Strona się ładuje...
Strona się ładuje...
-
 1
1
-
 2
2
-
 3
3
-
 4
4
-
 5
5
-
 6
6
-
 7
7
-
 8
8
-
 9
9
-
 10
10
-
 11
11
-
 12
12
-
 13
13
-
 14
14
-
 15
15
-
 16
16
-
 17
17
-
 18
18
-
 19
19
-
 20
20
-
 21
21
-
 22
22
-
 23
23
-
 24
24
-
 25
25
-
 26
26
-
 27
27
-
 28
28
-
 29
29
-
 30
30
-
 31
31
-
 32
32
-
 33
33
-
 34
34
-
 35
35
-
 36
36
-
 37
37
-
 38
38
-
 39
39
-
 40
40
-
 41
41
-
 42
42
-
 43
43
-
 44
44
-
 45
45
-
 46
46
-
 47
47
-
 48
48
-
 49
49
-
 50
50
-
 51
51
-
 52
52
-
 53
53
-
 54
54
-
 55
55
-
 56
56
-
 57
57
-
 58
58
-
 59
59
-
 60
60
-
 61
61
-
 62
62
-
 63
63


Silvercrest SGB 1380 B2 Operating Instructions Manual
- Kategoria
- Raclety
- Typ
- Operating Instructions Manual
w innych językach
- Deutsch: Silvercrest SGB 1380 B2
- slovenčina: Silvercrest SGB 1380 B2
Powiązane artykuły
Inne dokumenty
-
Bifinett KH 1139 Operating Instructions Manual
-
Kompernass KH 1139 Instrukcja obsługi
-
Bosch HBC84K553N Instrukcja obsługi
-
Bosch HB84K.52B Instrukcja obsługi
-
Samsung NV75J5170BS/EO Instrukcja obsługi
-
Bosch HBN311E2/02 Instrukcja obsługi
-
-
Russell Hobbs 26095-56 Instrukcja obsługi
-
Teesa TSA8053 Digital Air Fryer Instrukcja obsługi
-