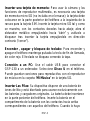
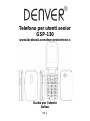
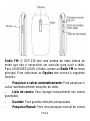
Denver GSP-130 Instrukcja obsługi
- Kategoria
- Telefony
- Typ
- Instrukcja obsługi
Niniejsza instrukcja jest również odpowiednia dla


ENG-2
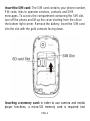
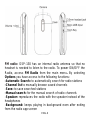
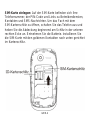
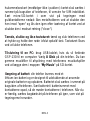
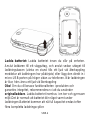
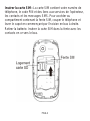
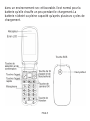
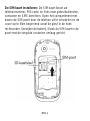
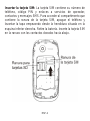
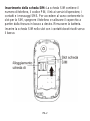
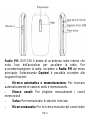
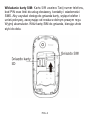
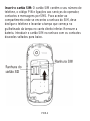
Insert the SIM card: The SIM card contains your phone number,
PIN code, links to operator services, contacts and SMS
messages. To access the compartment containing the SIM slot,
turn off the phone and lift up the cover starting from the slit on
the bottom right corner. Remove the battery. Insert the SIM card
into the slot with the gold contacts facing down.
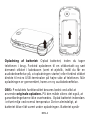
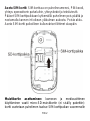
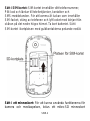
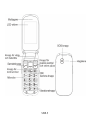
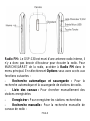
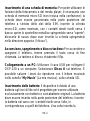
Inserting a memory card: in order to use camera and media
player functions, a micro-SD memory card is required (not

ENG-3
included in the package): the card must be placed into the rear
of the phone to the left of the SIM slot. Insert the micro-SD card
as shown, with the gold contacts facing downwards: open the
metal shutter by pushing it towards "open" and lock it again after
inserting the card by pushing it in the opposite direction
("close").
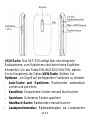
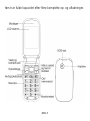
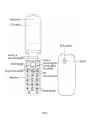
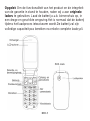
Turn ON, Turn OFF and keypad lock: to turn on and turn off
the phone, press and hold the red end call key. The keypad
locks by closing the flip.
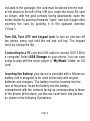
Connecting to a PC: use the USB cable to connect GSP-130 to
a computer. Select USB Storage on your phone. You can save
songs to play with the music player in "My Music" folder, on SD
card.
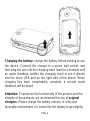
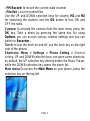
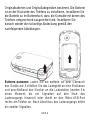
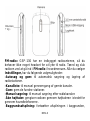
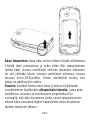
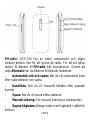
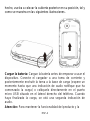
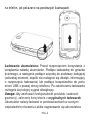
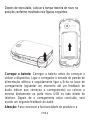
Inserting the Battery: your device is provided with a lithium-ion
battery and is designed to be used exclusively with original
batteries and chargers. The battery must be inserted into the
rear of the phone. Insert the battery into the battery
compartment with the contacts facing up corresponding to those
of the phone. When done, put the rear cover back into position
as shown in the following illustrations.

ENG-4
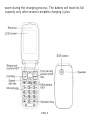
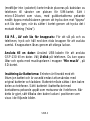
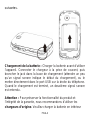
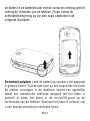
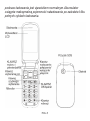
Charging the battery: charge the battery before starting to use
the device. Connect the charger to a mains wall socket, and
then plug the jack into the charging base (wait for a moment until
an audio feedback notifies the charging start) or put it directly
into the micro USB port on the right side of the phone. When
charging has been completed/is complete, a second audio
feedback will be heard
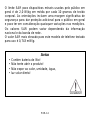
Attention: To preserve the functionality of the product and the
integrity of the warranty, we recommend the use of original
chargers. Please charge the battery indoors, in a dry and
favorable environment. It’s normal for the battery to get slightly

ENG-5
warm during the charging process. The battery will reach its full
capacity only after several complete charging cycles.

ENG-6
FM radio: GSP-130 has an internal radio antenna so that no
headset is needed to listen to the radio. To power ON/OFF the
Radio, access FM Radio from the main menu. By selecting
Options you have access to the following functions:
-Automatic Search: to automatically search for radio stations
-Channel list to manually browse saved channels
-Save: to save searched stations
-Manual search: for the manual search of radio channels
-Speaker: reproduces the radio with the speaker instead of the
headphones
-Background: keeps playing in background even after exiting
from the radio app screen

ENG-7
- FM Record: to record the current radio channel
- File list: List of recorded files
Use the UP and DOWN selection keys for volume, M1 and M2
for searching the stations and the OK button to turn ON and
OFF the radio.
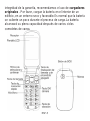
Camera: to activate the camera from the main menu press the
OK key. Take a photo by pressing the same key. By using
Options you can access various camera settings and you can
switch to Recorder .
Torch: to turn the torch on and off, use the torch key on the right
side of the phone.
Shortcuts: Menu > Settings > Phone Setting > Shortcut
setting. UP and DOWN selection keys can open some shortcuts;
by default, the UP selection key directly enters the Music Player,
while the DOWN selection key opens the alarm list.
Main menu:To access the Main Menu on your phone, press the
selection key on the top left

ENG-8
- Messaging: to write and read SMS text messages
- Contacts: to manage and save contacts
- Calls Log: Missed Calls, dialled calls...
- Multimedia: camera, radio, gallery…
- FM Radio: to turn on and off the radio
- Settings: to customize your phone
-Tools: with Calendar, Bluetooth, Calculator, Alarms...
- SOS: to enable and customize the SOS function
Answer an incoming call: respond to an incoming call simply
by opening the flip. To set up the answer mode select Settings >
Call settings > Answer mode
Making a call: to make a call from the Home screen, select the
desired number by using the
keypad and then press the green call button. To end the call,
press the red end call key.
Call a number from the contacts: from the main screen, press
the upper right selection key; this will automatically open the
Contacts. Scroll through contacts with the UP/DOWN keys and
press the green call button to call the desired contact.
Call anumber from the call log: from the main screen, press
the green call key, the missed, received, and outgoing calls
will be automatically displayed.
Scroll with UP/Down keys and press the green call button when
you find the number you want to call.

ENG-9
Add contacts to the Contacts: Select Menu > Contacts >
Options > New, and choose to save the number on the SIM or
the Phone. Enter the name and the new number, then press
Save.
Speed dial: in Menu > Contacts > Options >More > Speed
Dial > Options > Edit, you can assign to keys 2-9 certain
numbers that will be called automatically if you press and hold
the related button. The device has two other additional quick dial
keys M1 and M2, to which you can associate as many numbers
in the same menu. These keys, placed to the left and to the right
of OK button, are activated/activate activated with a simple
press.
Memory status: this feature within the contacts settings allows
you to see how much free storage there is on the phone and
SIM card.
Speech Dial: GSP-130 Start speaks out loud each number you
press. To activate this function, select Menu > Settings >
Profiles > General > Options > More tones > Dialpad >
Speech Dial
Send and read SMS
Send SMS: from the main screen, choose Menu >Messaging >
Write message and write your message. Press Options >
Send to > Number and enter the number using the numeric

ENG-10
keypad or Add from contacts to select from the Contacts the
contact you want to text.
Read SMS: when you receive a new text message, the phone
displays an envelope icon on the top bar(until the message is
read/for as long as the message is unread) and a notification
pop up appears on the main screen. Press the upper left
selection key to enter the Inbox or access it fromthe main
screen by selecting Menu > Messages >Inbox.
Notification Led: The flash below the Camera can notify
incoming or missed calls and messages,when flip is closed. You
can enable or disable thisfunction whenever you want for each
event to notify in Settings > Notification LED
Bluetooth: In Settings > Connectivity > Bluetooth >Power
on you can turn on Bluetooth and search forother devices
(headsets, phones…). Select the device you would like to
associate with and confirm it on both devices.
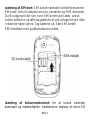
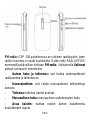
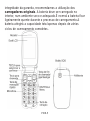
S.O.S. Function: GSP-130 is equipped with a dedicated button
for fast forwarding emergency calls (*). This feature can be
turned on and off by selecting Menu> SOS > Status. SOS
button is placed on the rear of the phone In case of emergency,
use this function to ask for help from up to five phone numbers,
previously set in Menu> SOS > SOS numbers; press and hold
the SOS button for 2-3 seconds. As soon as the SOS function is
activated, the phone will send out a high volume alarm (that can
be turned on and off in SOS > SOS alarm On/Off). Then,

ENG-11
it will send a customizable SOS message to the chosen SOS
numbers. Afterwards, the phone will call the 5 SOS numbers, for
about 25 seconds each. If there is no answer, there will be a
second cycle of calls. This procedure will be repeated for 5 times.
If one of the called numbers answers, the cycle will be
interrupted and the call will automatically switch to speaker
phone (handsfree).
Attention: The S.O.S. calls cycle will be interrupted if the
answering machine or voicemail of one of the called SOS
numbers takes the call.
Set Ringtones: select Menu > Settings > Profiles > General >
Options > Ringtone. Select Call Ringtone and set the desired
tone from those available.
Quickly turn on/off vibration mode To quickly turn off incoming
calls ringtone and messages tone, and activate vibration, press
and hold #. By pressing # again, the phone will enter in General
mode.
Phone Settings: from Menu > Settings > Phone , you
have/will have access to various settings such as Date and Time,
Language, and Display. Select Restore to reset the factory
settings of GSP-130: enter the phone password 1234 to
confirm the restoring.
Radio frequency (RF) exposure and SAR THIS DEVICE

ENG-12
MEETS INTERNATIONAL GUIDELINES FOR EXPOSURE TO
RADIO WAVES
Your mobile device is a radio transmitter and receiver. It is
designed and manufactured not to exceed the limits for
exposure to radio frequency (RF) recommended by international
guidelines (ICNIRP). These limits are part of comprehensive
guidelines and establish permitted levels of RF energy for the
general population. The guidelines were developed by
independent scientific organizations through periodic and
thorough evaluation of scientific studies. The guidelines include
a substantial safety margin designed to assure the safety of all
persons, regardless of age and health.
The exposure standard for mobile devices employs a unit of
measurement known as the Specific Absorption Rate, or SAR.
The SAR limit stated in the international guidelines is 2.0
watts/kilogram (W/kg)*. Tests for SAR are conducted using
standard operating positions with the device transmitting at
its highest certified well below the maximum value. This is
because the device is designed to operate at
multiple power levels so as to use only the power required to
reach the network. In general, the closer you are to a base
station, the lower the power output of the device. power level in
all tested frequency bands.
Although the SAR is determined at the highest certified power

ENG-13
level, the actual SAR of the device while operating can be well
below the maximum value. This is because the device is
designed to operate at multiple power levels so as to use only
the power required to reach the network. In general, the closer
you are to a base station, the lower the power output of the
device.
SAR values may vary depending on national reporting and
testing requirements and the network band. Use of device
accessories and enhancements may result in
different SAR values.
The SAR limit for mobile devices used by the public is 2.0 W/kg
averaged over 10 grams of body tissue. The guidelines
incorporate a substantial margin of safety to give additional
protection for the public and to account for any variations in
measurements. SAR values may vary depending on
national reporting requirements and the network band.
The highest SAR value for this model phone tested for use is
0.743 mW/g


ENG-15
Electric and electronic equipment and included batteries
contains materials, components and substances that can be
hazardous to your health and the environment, if the waste
material (discarded electric and electronic equipment and
batteries) is not handled correctly.
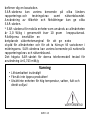
Electric and electronic equipment and batteries is marked with
the crossed out trash can symbol, seen below. This symbol
signifies that electric and electronic equipment and batteries
should not be disposed of with other household waste, but
should be disposed of separately.
As the end user it is important that you submit your used
batteries to the approriate and designated facility. In this manner
you make sure that the batteries are recycled in accordance with
legislature and will not harm the environment.
All cities have established collection points, where electric and
electronic equipment and batteries can either be submitted free
of charge at recycling stations and other collection sites, or be
collected from the households. Additional information is

ENG-16
available at the technical department of your city.
Hereby, Inter Sales A/S, declares that this senior mobile phone
DENVER GSP-130 is in compliance with the essential
requirements and other relevant provisions of Directive
1999/5/EC. A copy of the Declaration of Conformity may be
obtained at Inter Sales A/S, Stavneagervej 22, DK-8250 Egaa,
Danmark
Code for factory default:1234
Code for security password:1234
Importer:
DENVER ELECTRONICS A/S
Stavneagervej 22
DK-8250 EGAA
DENMARK
www.facebook.com/denverelectronics


GER-2
SIM-Karte einlegen: Auf der SIM-Karte befinden sich Ihre
Telefonnummer, der PIN-Code und Links zu Betreiberdiensten,
Kontakten und SMS-Nachrichten. Um das Fach mit dem
SIM-Kartenschlitz zu öffnen, schalten Sie das Telefon aus und
heben Sie die Abdeckung beginnend am Schlitz in der unteren
rechten Ecke an. Entnehmen Sie die Batterie. Installieren Sie
die SIM-Karte mit den goldenen Kontakten nach unten gerichtet
im Kartenschlitz.

GER-3
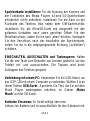
Speicherkarte installieren: Für die Nutzung der Kamera und
der Funktionen des Media Players ist eine SD-Speicherkarte
erforderlich (nicht enthalten): Installieren Sie die Kare an der
Rückseite des Telefons links neben dem SIM-Kartenschlitz.
Installieren Sie die MicroSD-Karte wie dargestellt mit den
goldenen Kontakten nach unten gerichtet: Öffnen Sie den
Metallverschluss, indem Sie ihn nach „oben“ drücken. Verriegeln
Sie den Verschluss nach der Installation der Speicherkarte,
indem Sie ihn in die entgegengesetzte Richtung („schließen“)
schieben.
EINSCHALTEN, AUSSCHALTEN und Tastensperre: Halten
Sie die rote Taste zum Beenden von Anrufen gedrückt, um das
Telefon ein- und auszuschalten. Die Tastatur wird durch
Zuklappen des Telefons gesperrt.
Verbindung mit einem PC: Verwenden Sie ein USB-Kabel, um
das GSP-130 mit einem Computer zu verbinden. Wählen Sie an
Ihrem Telefon USB-Gerät . Speichern Sie Titel, die Sie mit dem
Musik Player wiedergeben möchten, im Ordner „Meine
Musik“ auf der SD-Karte.
Batterien Einsetzen: Ihr Gerät verfügt über eine
Lithium-Ion-Batterie und ist ausschließlich für den Gebrauch mit

GER-4
Originalbatterien und Originalladegeräten bestimmt. Die Batterie
ist an der Rückseite des Telefons zu installieren. Installieren Sie
die Batterie so im Batteriefach, dass die Kontakte mit denen des
Telefons entsprechend ausgerichtet sind. Installieren Sie
danach wieder die rückseitige Abdeckung gemäß den
nachfolgenden Abbildungen.
Batterie aufladen: Laden Sie die Batterie vor dem Gebrauch
des Geräts auf. Schließen Sie das Ladegerät an eine Steckdose
und anschließend den Stecker an die Ladestation (warten Sie
einen Moment, bis ein Signalton auf den Start des
Ladevorgangs hinweist) oder direkt an den Mikro-USB-Port
rechts am Telefon an. Nach Abschluss des Ladevorgangs ertönt
ein zweiter Signalton.
Strona się ładuje...
Strona się ładuje...
Strona się ładuje...
Strona się ładuje...
Strona się ładuje...
Strona się ładuje...
Strona się ładuje...
Strona się ładuje...
Strona się ładuje...
Strona się ładuje...
Strona się ładuje...
Strona się ładuje...
Strona się ładuje...
Strona się ładuje...
Strona się ładuje...
Strona się ładuje...
Strona się ładuje...
Strona się ładuje...
Strona się ładuje...
Strona się ładuje...
Strona się ładuje...
Strona się ładuje...
Strona się ładuje...
Strona się ładuje...
Strona się ładuje...
Strona się ładuje...
Strona się ładuje...
Strona się ładuje...
Strona się ładuje...
Strona się ładuje...
Strona się ładuje...
Strona się ładuje...
Strona się ładuje...
Strona się ładuje...
Strona się ładuje...
Strona się ładuje...
Strona się ładuje...
Strona się ładuje...
Strona się ładuje...
Strona się ładuje...
Strona się ładuje...
Strona się ładuje...
Strona się ładuje...
Strona się ładuje...
Strona się ładuje...
Strona się ładuje...
Strona się ładuje...
Strona się ładuje...
Strona się ładuje...
Strona się ładuje...
Strona się ładuje...
Strona się ładuje...
Strona się ładuje...
Strona się ładuje...
Strona się ładuje...
Strona się ładuje...
Strona się ładuje...
Strona się ładuje...
Strona się ładuje...
Strona się ładuje...
Strona się ładuje...
Strona się ładuje...
Strona się ładuje...
Strona się ładuje...
Strona się ładuje...
Strona się ładuje...
Strona się ładuje...
Strona się ładuje...
Strona się ładuje...
Strona się ładuje...
Strona się ładuje...
Strona się ładuje...
Strona się ładuje...
Strona się ładuje...
Strona się ładuje...
Strona się ładuje...
Strona się ładuje...
Strona się ładuje...
Strona się ładuje...
Strona się ładuje...
Strona się ładuje...
Strona się ładuje...
Strona się ładuje...
Strona się ładuje...
Strona się ładuje...
Strona się ładuje...
Strona się ładuje...
Strona się ładuje...
Strona się ładuje...
Strona się ładuje...
Strona się ładuje...
Strona się ładuje...
Strona się ładuje...
Strona się ładuje...
Strona się ładuje...
Strona się ładuje...
Strona się ładuje...
Strona się ładuje...
Strona się ładuje...
Strona się ładuje...
Strona się ładuje...
Strona się ładuje...
Strona się ładuje...
Strona się ładuje...
Strona się ładuje...
Strona się ładuje...
Strona się ładuje...
Strona się ładuje...
Strona się ładuje...
Strona się ładuje...
Strona się ładuje...
Strona się ładuje...
Strona się ładuje...
Strona się ładuje...
Strona się ładuje...
Strona się ładuje...
Strona się ładuje...
Strona się ładuje...
Strona się ładuje...
Strona się ładuje...
Strona się ładuje...
Strona się ładuje...
Strona się ładuje...
Strona się ładuje...
Strona się ładuje...
Strona się ładuje...
Strona się ładuje...
Strona się ładuje...
Strona się ładuje...
Strona się ładuje...
Strona się ładuje...
Strona się ładuje...
Strona się ładuje...
Strona się ładuje...
Strona się ładuje...
Strona się ładuje...
Strona się ładuje...
Strona się ładuje...
Strona się ładuje...
Strona się ładuje...
Strona się ładuje...
Strona się ładuje...
Strona się ładuje...
Strona się ładuje...
Strona się ładuje...
Strona się ładuje...
Strona się ładuje...
Strona się ładuje...
Strona się ładuje...
Strona się ładuje...
Strona się ładuje...
Strona się ładuje...
Strona się ładuje...
Strona się ładuje...
Strona się ładuje...
Strona się ładuje...
Strona się ładuje...
Strona się ładuje...
Strona się ładuje...
Strona się ładuje...
-
 1
1
-
 2
2
-
 3
3
-
 4
4
-
 5
5
-
 6
6
-
 7
7
-
 8
8
-
 9
9
-
 10
10
-
 11
11
-
 12
12
-
 13
13
-
 14
14
-
 15
15
-
 16
16
-
 17
17
-
 18
18
-
 19
19
-
 20
20
-
 21
21
-
 22
22
-
 23
23
-
 24
24
-
 25
25
-
 26
26
-
 27
27
-
 28
28
-
 29
29
-
 30
30
-
 31
31
-
 32
32
-
 33
33
-
 34
34
-
 35
35
-
 36
36
-
 37
37
-
 38
38
-
 39
39
-
 40
40
-
 41
41
-
 42
42
-
 43
43
-
 44
44
-
 45
45
-
 46
46
-
 47
47
-
 48
48
-
 49
49
-
 50
50
-
 51
51
-
 52
52
-
 53
53
-
 54
54
-
 55
55
-
 56
56
-
 57
57
-
 58
58
-
 59
59
-
 60
60
-
 61
61
-
 62
62
-
 63
63
-
 64
64
-
 65
65
-
 66
66
-
 67
67
-
 68
68
-
 69
69
-
 70
70
-
 71
71
-
 72
72
-
 73
73
-
 74
74
-
 75
75
-
 76
76
-
 77
77
-
 78
78
-
 79
79
-
 80
80
-
 81
81
-
 82
82
-
 83
83
-
 84
84
-
 85
85
-
 86
86
-
 87
87
-
 88
88
-
 89
89
-
 90
90
-
 91
91
-
 92
92
-
 93
93
-
 94
94
-
 95
95
-
 96
96
-
 97
97
-
 98
98
-
 99
99
-
 100
100
-
 101
101
-
 102
102
-
 103
103
-
 104
104
-
 105
105
-
 106
106
-
 107
107
-
 108
108
-
 109
109
-
 110
110
-
 111
111
-
 112
112
-
 113
113
-
 114
114
-
 115
115
-
 116
116
-
 117
117
-
 118
118
-
 119
119
-
 120
120
-
 121
121
-
 122
122
-
 123
123
-
 124
124
-
 125
125
-
 126
126
-
 127
127
-
 128
128
-
 129
129
-
 130
130
-
 131
131
-
 132
132
-
 133
133
-
 134
134
-
 135
135
-
 136
136
-
 137
137
-
 138
138
-
 139
139
-
 140
140
-
 141
141
-
 142
142
-
 143
143
-
 144
144
-
 145
145
-
 146
146
-
 147
147
-
 148
148
-
 149
149
-
 150
150
-
 151
151
-
 152
152
-
 153
153
-
 154
154
-
 155
155
-
 156
156
-
 157
157
-
 158
158
-
 159
159
-
 160
160
-
 161
161
-
 162
162
-
 163
163
-
 164
164
-
 165
165
-
 166
166
-
 167
167
-
 168
168
-
 169
169
-
 170
170
-
 171
171
-
 172
172
-
 173
173
-
 174
174
-
 175
175
-
 176
176
-
 177
177
-
 178
178
-
 179
179
-
 180
180


Denver GSP-130 Instrukcja obsługi
- Kategoria
- Telefony
- Typ
- Instrukcja obsługi
- Niniejsza instrukcja jest również odpowiednia dla
w innych językach
- español: Denver GSP-130 Manual de usuario
- italiano: Denver GSP-130 Manuale utente
- Deutsch: Denver GSP-130 Benutzerhandbuch
- eesti: Denver GSP-130 Kasutusjuhend
- svenska: Denver GSP-130 Användarmanual
- português: Denver GSP-130 Manual do usuário
- français: Denver GSP-130 Manuel utilisateur
- dansk: Denver GSP-130 Brugermanual
- Nederlands: Denver GSP-130 Handleiding
Powiązane artykuły
-
Denver GSP-130BLACK Instrukcja obsługi
-
-
Denver WAS-18110M Instrukcja obsługi
-
Denver FAS-24100M Instrukcja obsługi
-
Denver FAS-18100M Instrukcja obsługi
-
Denver BAS-24100M Instrukcja obsługi
-
Denver MFR-400 Instrukcja obsługi
-
Denver Electronics CAU-439BT Instrukcja obsługi
-
-
