Electrolux ERB2623 Instrukcja obsługi
- Kategoria
- Lodówko-zamrażarki
- Typ
- Instrukcja obsługi

Ch∏odziarko-zamra˝arka / Refrigerator-Freezer
INSTRUKCJA OBS¸UGI
INSTALLATION AND INSTRUCTION MANUAL
ERB 2623
2222 254-82
GB
PL

2
ZZAALECENIA WST¢PNE
Przed uruchomieniem urzàdzenia nale˝y dok∏adnie zapoznaç si´ z instrukcjà obs∏ugi, która powinna zostaç
zachowana przez ca∏y czas u˝ytkowania. W wypadku sprzeda˝y urzàdzenia instrukcj´ nale˝y przekazaç nowemu
u˝ytkownikowi, aby móg∏ zapoznaç si´ z zasadami bezpieczeƒstwa i funkcjonowania zakupionego sprz´tu.
JeÊli urzàdzenie wyposa˝one w zamek magnetyczny ma zastàpiç zu˝yte urzàdzenie z drzwiami lub zamkiem
spr´˝ynowym (zatrzask), nale˝y rozmontowaç zatrzask przed wyrzuceniem sprz´tu. W przeciwnym razie
móg∏by on stanowiç zagro˝enie dla dzieci.
Przed zainstalowaniem i rozpocz´ciem u˝ytkowania nale˝y dok∏adnie zapoznaç si´ z ni˝ej podanymi
zaleceniami, majàcymi na celu zapewnienie bezpieczeƒstwa.
Ogólne zasady
bezpieczeƒstwa
• Urzàdzenie mogà obs∏ugiwaç wy∏àcznie osoby
doros∏e. Nie wolno pozwalaç dzieciom na
manipulowanie elementami sterujàcymi ani
bawienie si´ urzàdzeniem.
• Zmiana parametrów technicznych i/lub
modyfikacje urzàdzenia sa niebezpieczne.
• Nale˝y uwa˝aç, aby urzàdzenie nie sta∏o na
przewodzie zasilajàcym.
• Przed przystàpieniem do czyszczenia i konserwacji
urzàdzenia nale˝y je wy∏àczyç z zasilania.
• Urzàdzenie jest ci´˝kie i nale˝y je
przenosiç/przesuwaç ostro˝nie.
• Nie nale˝y jeÊç lodów wyj´tych bezpoÊrednio z
zamra˝arki, gdy˝ grozi to odmro˝eniami.
• Nale˝y uwa˝aç, aby podczas przemieszczania
urzàdzenia nie uszkodziç spr´˝arki i uk∏adu
ch∏odniczego i w konsekwencji nie spowodowaç
wycieku.
• Urzàdzenie nie mo˝e znajdowaç si´ w
bezpoÊrednim sàsiedztwie kaloryferów i kuchenki
gazowej.
• Urzàdzenie nie powinno byç przez d∏u˝szy czas
nara˝one na bezpoÊrednie dzia∏anie promieni
s∏onecznych.
• Musi byç zapewniony odpowiedni przep∏yw
powietrza w tylnej cz´Êci urzàdzenia i nie wolno
dopuÊciç do jakiegokolwiek uszkodzenia uk∏adu
ch∏odniczego.
• Dotyczy wy∏àcznie zamra˝arek (z wyjàtkiem
modeli do zabudowy): najlepsza lokalizacja to
piwnica lub posadzka.
• W zamra˝arce nie wolno u˝ywaç innych
urzàdzeƒ elektrycznych (np. maszynki do lodów)
bez uprzedniej akceptacji producenta.
Serwis / Naprawy
• Wszelkie interwencje elektryczne mogà byç
wykonywane tylko przez uprawnionego
elektromontera.
• Naprawy serwisowe mogà byç dokonywane
wy∏àcznie przez autoryzowane placówki, a do
napraw u˝ywa si´ tylko oryginalnych cz´Êci
zamiennych.
• Pod ˝adnym pozorem nie wolno samodzielnie
naprawiaç urzàdzenia.
• Naprawy przeprowadzone przez osoby
nieuprawnione mogà spowodowaç jeszcze
powa˝niejsze uszkodzenia. W wypadku
niesprawnego dzia∏ania urzàdzenia nale˝y
zwróciç si´ do autoryzowanej placówki
serwisowej i zawsze ˝àdaç oryginalnych cz´Êci
zamiennych.
• Uk∏ad ch∏odniczy zawiera w´glowodory: konserwacja
i uzupe∏nianie muszà byç przeprowadzone przez
personel autoryzowanych zak∏adów serwisowych.
U˝ytkowanie
• Domowy sprz´t ch∏odniczy przeznaczony jest
wy∏àcznie do przechowywania produktów
˝ywnoÊciowych.
• Urzàdzenie najlepiej pracuje w temperaturze
otoczenia +18°C – +43°C (klasa T); +18°C –
+38°C (klasa ST); +16°C – +32°C (klasa N);
+10°C – +32°C (klasa SN). Klasa urzàdzenia
podana jest na tabliczce znamionowej.
Uwaga: je˝eli temperatura otoczenia nie mieÊci
si´ w podanych zakresach, nale˝y przestrzegaç
nast´pujàcych zaleceƒ:
• JeÊli temperatura spada poni˝ej poziomu
minimalnego, temperatura mro˝enia w zamra˝arce
nie mo˝e byç zapewniona. Nale˝y jak najszybciej
skonsumowaç przechowywanà ˝ywnoÊç.
• Raz rozmro˝one produkty nie powinny byç
ponownie zamra˝ane.
• Przechowywanie i zamra˝anie produktów
˝ywnoÊciowych powinno odbywaç si´ zgodnie ze
wskazówkami podanymi przez producenta.
Wydrukowano na papierze z odzysku

3
• We wn´trzu urzàdzenia ch∏odniczego
przebiegajà kana∏y z czynnikiem ch∏odzàcym. Ich
przek∏ucie mo˝e spowodowaç nieodwracalne
uszkodzenie urzàdzenia i zepsucie si´
produktów ˝ywnoÊciowych. NIE NALE˚Y
U˚YWAå OSTRYCH PRZYRZÑDÓW do
usuwania szronu lub lodu. Szron mo˝na usunàç
specjalnà ∏opatkà wchodzàcà w sk∏ad
wyposa˝enia. Pod ˝adnym pozorem nie wolno
odrywaç powsta∏ego lodu, który mo˝e zostaç
usuni´ty tylko podczas rozmra˝ania, zgodnie z
ni˝ej podanymi instrukcjami.
• Do zamra˝arki nie nale˝y wk∏adaç butelek z
napojami gazowanymi i musujàcymi, gdy˝ mogà
one eksplodowaç uszkadzajàc urzàdzenie. Nie
nale˝y u˝ywaç ˝adnych urzàdzeƒ ani sztucznych
Êrodków przyspieszajàcych proces rozmra˝ania,
oprócz sposobów zalecanych przez producenta.
Czyszczàc urzàdzenie nie wolno u˝ywaç
przedmiotów metalowych, poniewa˝ mogà one
spowodowaç jego uszkodzenie.
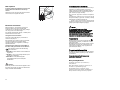
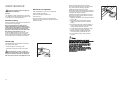
Instalacja
• Podczas normalnego funkcjonowania skraplacz i
spr´˝arka, znajdujàce si´ w tylnej cz´Êci
urzàdzenia, ulegajà znacznemu rozgrzaniu. Musi
byç wi´c zapewniona minimalna wentylacja,
zgodnie z odnoÊnym rysunkiem.
Uwaga: nale˝y usunàç elementy utrudniajàce
wentylacj´.
• Nale˝y uwa˝aç, aby urzàdzenie nie sta∏o na
przewodzie zasilajàcym.
•
Wa˝ne:
W razie uszkodzenia przewodu
zasilajàcego nale˝y zastàpiç go specjalnym
przewodem lub zespo∏em przy∏àczeniowym
dost´pnym w autoryzowanym serwisie.
• Poniewa˝ cz´Êci robocze urzàdzenia nagrzewajà
si´ podczas jego pracy, nale˝y pami´taç o
zapewnieniu swobodnego dop∏ywu powietrza,
zgodnie z podanymi instrukcjami instalacyjnymi.
Niewystarczajàcy przep∏yw powietrza mo˝e
spowodowaç uszkodzenie nagrzewajàcych si´
elementów oraz zepsucie produktów
˝ywnoÊciowych.
• Wszystkie elementy nagrzewajàce si´ powinny
byç zabezpieczone przed dotykiem. Nale˝y
staraç si´ tak ustawiç zamra˝ark´, aby jej tylna
cz´Êç by∏a zwrócona do Êciany.
W razie transportu w pozycji poziomej,
znajdujàcy si´ w spr´˝arce olej mo˝e dostaç si´
do uk∏adu ch∏odzàcego. Przed pod∏àczeniem
urzàdzenia do sieci elektrycznej nale˝y wi´c
poczekaç przynajmniej dwie godziny, aby olej
sp∏ynà∏ ponownie do spr´˝arki.
Ochrona Êrodowiska
Urzàdzenie to nie zawiera gazów szkodliwych dla
warstwy ozonowej. Dotyczy to zarówno uk∏adu
ch∏odzàcego jak materia∏ów izolacyjnych.
Urzàdzenia nie mo˝na usuwaç razem z innymi
odpadami miejskimi. Nie wolno niszczyç uk∏adu
ch∏odzàcego, zw∏aszcza w pobli˝u wymiennika
ciep∏a. Informacji na temat punktów zbiórki udzielajà
w∏adze lokalne. Zastosowane w tym urzàdzeniu
materia∏y ze znakiem nadajà si´ do ponownego
wykorzystania.
SSPPIISS TREÂCI
Zalecenia wst´pne
. . . . . . . . . . . . . . . . . . . . . . . . . . . . . . . . . . . . . . . . . . . . . . . . . . . . . . . . . . . . . . . . . 2
U˝ytkowanie /
Panel sterujàcy - Czyszczenie wn´trza - Korzystanie z chlodziarki / Uruchomienie - . . .
Regulacja temperatury - Szybkie zamra˝anie - Zamra˝anie Êwie˝ej ˝ywnoÊci . . . . . . . . . . . . . . . . . . . 4
U˝ytkowanie /
Przechowywanie mro˝onek - Rozmra˝anie - . . . . . . . . . . . . . . . . . . . . . . . . . . . . . . . . . .
Przygotowanie kostek lodu - Masy kriohydratowe . . . . . . . . . . . . . . . . . . . . . . . . . . . . . . . . . . . . . . . . . . 5
U˝ytkowanie /
Przechowywanie produktów ˝ywnoÊciowych w ch∏odziarce - . . . . . . . . . . . . . . . . . . . . .
Regulacja pó∏ek przenoÊnych - Rozmieszczenie pó∏ek na drzwiach . . . . . . . . . . . . . . . . . . . . . . . . . . . . 6
Zalecenia /
Zalecenia dotyczàce przechowywania ˝ywnoÊci w ch∏odziarce - . . . . . . . . . . . . . . . . . . . . . .
Zalecenia dotyczàce zamra˝ania - Zalecenia dotyczàce przechowywania mro˝onek . . . . . . . . . . . . . . . 7
Konserwacja /
Przerwy w u˝ytkowaniu - Wymiana ˝arówki - Okresowe czyszczenie - Rozmra˝anie . . . 8
G∏oÊne dzia∏anie/
Możliwe źródła głośnego działania, łatwo usuwalne . . . . . . . . . . . . . . . . . . . . . . . . . 10
Serwis / Naprawy i cz´Êci zamienne
. . . . . . . . . . . . . . . . . . . . . . . . . . . . . . . . . . . . . . . . . . . . . . . . . . . . 10
Parametry techniczne / Instalacja
– Ustawienie - Blokada Półek . . . . . . . . . . . . . . . . . . . . . . . . . . . . . . 11
Instalacja /
Tylne elementy dystansowe - Pod∏àczenie do zasilania . . . . . . . . . . . . . . . . . . . . . . . . . . . . . 12
Instalacja /
Zmiana kierunku otwierania drzwi . . . . . . . . . . . . . . . . . . . . . . . . . . . . . . . . . . . . . . . . . . . . 13

4
Czyszczenie wn´trza
Przed rozpocz´ciem u˝ytkowania nowego
urzàdzenia nale˝y umyç starannie jego wn´trze i
wszystkie akcesoria letnià wodà z ∏agodnym
detergentem, w celu usuni´cia zapachu typowego
dla fabrycznie nowego wyrobu, a nast´pnie
dok∏adnie osuszyç mi´kkà szmatkà.
Nie nale˝y u˝ywaç detergentów i Êrodków
szorujàcych, mogàcych uszkodziç
powierzchni´ urzàdzenia.
KORZYSTANIE Z CHLODZIARKI
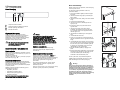
Uruchomienie
W∏o˝yç wtyczk´ do najbli˝szego gniazdka w Êcianie.
Przekr´ciç pokr´t∏o termostatu (D) w prawo na
pozycj´ poÊrednià.
Lampka (C) zaÊwieci si´.
W celu wy∏àczenia lodówki, przekr´ciç pokr´t∏o
termostatu na pozycj´ «».
Regulacja temperatury
Regulacja temperatury odbywa si´ automatycznie.
Przestawienie pokr´t∏a termostatu na ni˝szà wartoÊç
powoduje wzrost temperatury wewn´trznej.
Temperatura spada wraz z przestawieniem pokr´t∏a
na wy˝szà wartoÊç.
W∏aÊciwy wybór temperatury uzale˝niony jest od
nast´pujàcych czynników:
• temperatury otoczenia
• cz´stotliwoÊci otwierania drzwi
• iloÊci przechowywanej ˝ywnoÊci
• lokalizacji urzàdzenia.
Ustawienie temperatury w pozycji poÊredniej jest
zalecane przy normalnym u˝ywaniu sprz´tu.
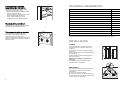
UU˚˚YTKOWANIE
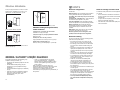
Panel sterujàcy
CB
D
A
ON
N-S
A.
Lampka kontrolna zasilania
B.
Lampka kontrolna szybkiego zamra˝ania
C.
Pokr´t∏o szybkiego zamra˝ania
D.
Pokr´t∏o termostatu
Wa˝ne:
JeÊli temperatura otoczenia jest wysoka lub
urzàdzenie jest maksymalnie wype∏nione i
ustawione na najni˝szà temperatur´, urzàdzenie
b´dzie pracowaç bez przerwy powodujàc
gromadzenie si´ lodu na tylnej Êcianie. W tym
wypadku nale˝y przestawiç termostat na ni˝szà
wartoÊç, umo˝liwiajàc samoczynne rozmra˝anie i
obni˝ajàc zu˝ycie energii.
Szybkie zamra˝anie
W∏àczenie szybkiego zamra˝ania wymaga
wciÊni´cia wy∏àcznika (B). Zapala si´ lampka
kontrolna (A).
Zamra˝anie Êwie˝ej ˝ywnoÊci
Komora oznaczona 4 gwiazdkami jest
przeznaczona do d∏ugoterminowego
przechowywania mro˝onek i do zamra˝ania Êwie˝ej
˝ywnoÊci. Nie nale˝y przekraczaç daty wa˝noÊci
podanej przez producenta na oryginalnym
opakowaniu.
Aby zamroziç Êwie˝à ˝ywnoÊç, nale˝y ustawiç
funkcj´ szybkiego mro˝enia 12 godzin przed
w∏o˝eniem ˝ywnoÊci.
˚ywnoÊç przeznaczonà do zamro˝enia nale˝y
umieÊciç w górnej cz´Êci komory zamra˝arki.
25
H
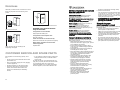
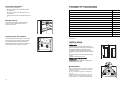
Door reversibility
Before carrying out any operations, remove the plug
from the power socket.
To change the opening direction of the door,
proceed as follows:
1. pull off the ventilation grille (D) which is clipped
into place;
2. remove the bottom hinge (E) by unscrewing its
fixing screws;
3. remove the lower door, sliding it out of the middle
hinge;
4. unscrew the middle hinge (H);
5. remove the upper door, releasing it from the
upper pin (G);
6. unscrew the upper pin (G) and refit it on the
opposite side;
7. remove the two plugs of the door (where
available), discovering the holes for the hinge
pins, assemble them on the opposite side and
refit the upper door;
8. reassemble the middle hinge on the opposite
side;
9. reassemble the lower door;
10. using a 10 mm spanner, unscrew the hinge pin
(E) and reassemble it on the opposite side of the
hinge;
11. reassemble the lower hinge (E) on the opposite
side, using the screws previously removed. Slide
the hole cover (F) out of the ventilation grille (D)
by pushing it in the direction of the arrow and
reassemble it on the opposite side;
12. refit the ventilation grille (D), clipping it into
place.
13.Unscrew the handles. Refit them on the opposite
side after having pierced the plugs with a punch.
Cover the holes left open with the plugs
contained in the documentation pack.
To line up the doors, it is possible to adjust the
middle hinge (H) horizontally by means of a tool,
after slackening the two screws (see figure).
Warning:
After having reversed the opening direction of
the doors check that all the screws are properly
tightened and that the magnetic seal adheres to
the cabinet. If the ambient temperature is cold
(i.e. in Winter), the gasket may not fit perfectly to
the cabinet. In that case, wait for the natural
fitting of the gasket or accelerate this process by
heating up the part involved with a normal
hairdrier.
G
F
F
D
F
F
E
E

5
Przechowywanie mro˝onek
Przed w∏o˝eniem ˝ywnoÊci do zamra˝arki w nowym
urzàdzeniu, po d∏u˝szej przerwie w jego pracy,
nale˝y uruchomiç urzàdzenie ustawiajàc pokr´t∏o na
najni˝szà temperatur´. Po up∏ywie przynajmniej 2
godz. wróciç do pozycji normalnej.
Aby zapewniç optymalne dzia∏ania urzàdzenia,
nale˝y:
przechowujàc wi´ksze iloÊci mro˝onek usunàç
wszystkie szuflady i pojemniki i umieÊciç produkty
bezpoÊrednio na pó∏kach ch∏odzàcych.
- uwa˝aç, ˝eby nie przekroczyç maksymalnego
obcià˝enia wskazanego na bocznej tabliczce w
górnej cz´Êci urzàdzenia (jeÊli wyst´puje).
Wa˝ne
W razie przypadkowego rozmro˝enia,
spowodowanego np. przerwà w dostawie energii
elektrycznej trwajàcà d∏u˝ej ni˝ czas podany w
parametrach technicznych (poz.: zdolnoÊç
utrzymywania temperatury), rozmro˝ona ˝ywnoÊç
musi zostaç szybko spo˝yta lub natychmiast
ugotowana i po ostudzeniu ponownie zamro˝ona.
Rozmra˝anie
Mro˝onki mo˝na rozmroziç w ch∏odziarce lub
w temperaturze pokojowej, w zale˝noÊci od czasu,
jakim dysponujemy.
Niewielkie porcje ˝ywnoÊci mo˝na gotowaç równie˝
bezpoÊrednio po wyj´ciu ich z zamra˝arki, tj. bez
uprzedniego rozmra˝ania. W tym wypadku czas
gotowania b´dzie d∏u˝szy.
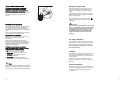
Przygotowanie kostek lodu
W sk∏ad wyposa˝enia zamra˝arki wchodzi pojemnik
na kostki lodu. Nale˝y wype∏niç go wodà i umieÊciç
w zamra˝arce.
Nie nale˝y wyjmowaç kostek przy pomocy
przedmiotów metalowych.
Masy kriohydratowe
Urządzenie wyposażone jest w dwie masy
kriohydratowe.
Masy kriohydratowe muszą być umieszczone w
zamrażarce w przewidzianej pozycji.
W przypadku przerwy w dopływie energii
elektrycznej masy kriohydratowe przedłużą przez
kilka godzin konserwację zamrożonych potraw.
24
Electrical connection
Before plugging in, ensure that the voltage and
frequency shown on the serial number plate
correspond to your domestic power supply. Voltage
can vary by ±6% of the rated voltage.
For operation with different voltages, a suitably sized
auto-transformer must be used.
The appliance must be earthed.
The power supply cable plug is provided with a
contact for this purpose.
If the domestic power supply socket is not earthed,
connect the appliance to a separate earth in
compliance with current regulations, consulting a
specialist technician.
The Manufacturer declines all responsibility if
the above safety precautions are not observed.
This appliance complies with the following
E.E.C. Directives:
- 87/308 EEC of 2/6/87 relative to radio interference
suppression.
- 73/23 EEC of 19.2.73 (Low Voltage Directive) and
subsequent modifications;
- 89/336 EEC of 3.5.89 (Electromagnetic
Compatibility Directive) and subsequent
modifications.
Rear spacers
In the bag with the documentation, there are two
spacers which must be fitted in the two top
corners.
Slacken the screws and insert the spacer under the
screw head, then re-tighten the screws.
D594
Attention
It must be possible to disconnect the appliance from
the mains power supply; the plug must therefore be
easily accessible after installation.

6
RRozmieszczenie pó∏ek na drzwiach
Aby umo˝liwiç przechowywanie artyku∏ów
spo˝ywczych ró˝nej wielkoÊci, pó∏ki mo˝na
umieszczaç na ró˝nych wysokoÊciach.
KolejnoÊç post´powania: pociàgnàç pó∏k´ zgodnie z
kierunkiem strza∏ki a˝ do obluzowania, umieÊciç na
˝àdanej wysokoÊci.
D338
Regulacja pó∏ek przenoÊnych
Ukszta∏towanie wewn´trznych Êcianek ch∏odziarki
umo˝liwia dowolne rozmieszczenie pó∏ek.
Przechowywanie produktów
˝ywnoÊciowych w ch∏odziarce
Optymalne wykorzystanie urzàdzenia wymaga
przestrzegania nast´pujàcych zasad:
• Nie wolno przechowywaç w ch∏odziarce ciep∏ej
˝ywnoÊci i parujàcych p∏ynów
• ˚ywnoÊç powinna byç przykryta lub opakowana,
zw∏aszcza jeÊli wydziela silny zapach
• Nale˝y rozmieÊciç produkty w sposób
umo˝liwiajàcy swobodny przep∏yw powietrza
23
TECHNICAL INFORMATION
Modell
ERB 2623
178
176
86
82
165,5x60x62,5
220-240/50
0,85
A
9
30
36
SN, ST
Gross Fridge Capacity lt.
Gross Freezer Capacity lt.
Net Freezer Capacity lt.
Dimensions (width*height*depth, cm)
Tension (V/Hz)
Net Fridge Capacity lt.
Energy Consumption (kWh/24h)
Energy Class
Freezing Capacity (kg/24h)
Temperature increase time h
Noise (dB/A)
Climatic Class
The technical infomation are situated in the rating plate on the internal left side of the appliance .
INSTALLATION
Location
The appliance should be installed well away from
sources of heat such as radiators, boilers, direct
sunlight etc.
For safety reasons, minimum ventilation must be as
shown in Fig.
Appliance positioned under overhanging kitchen wall
units (see Fig. A).
Appliance positioned without overhanging kitchen
wall units (see Fig. B).
Attention: keep ventilation openings clear of
obstruction.
Two adjustable feet at the cabinet base allow
accurate levelling of the appliance.
NP008
100 mm15 mm
15 mm
A
B
Shelf holders
Your appliance is equipped with shelf retainers that
make it possible to secure the shelves during
transportation.
To remove them proceed as follows:
Move the shelf retainers in the direction of the arrow,
raise the shelf from the rear and push it forward until
it is freed and remove the retainers.
A
C
B

7
ZALECENIA
Zalecenia dotyczàce przechowywania
˝ywnoÊci w ch∏odziarce
Podstawowe zalecenia:
Mi´so (ka˝dego rodzaju):
zawinàç w torebki z
tworzywa i umieÊciç na szklanej pó∏ce nad
pojemnikiem na warzywa.
Ze wzgl´dów bezpieczeƒstwa przechowywaç w ten
sposób najwy˝ej 1-2 dni.
Produkty ugotowane, ciep∏e potrawy itd.:
przykryç i
umieÊciç na dowolnych pó∏kach.
Owoce i warzywa:
dok∏adnie umyç i umieÊciç na
dole, w szufladzie na warzywa.
Mas∏o i sery:
powinny byç umieszczone w
specjalnych szczelnych pojemnikach lub w
opakowaniach aluminiowych bàdê foliowych, aby
utrudniç dost´p powietrza.
Butelki z mlekiem:
powinny byç zamkni´te i
ustawione na specjalnej pó∏ce drzwiowej.
Banany, ziemniaki, cebula i czosnek, je˝eli sà
nieopakowane, nie mogà byç przechowywane w
ch∏odziarce.
Zalecenia dotyczàce zamra˝ania
Prawid∏owe zamra˝anie wymaga przestrzegania
kilku poni˝szych zasad:
• Maksymalna iloÊç artyku∏ów ˝ywnoÊciowych,
którà mo˝na zamroziç w ciàgu 24 godz., podana
jest na tabliczce znamionowej;
• Proces zamra˝ania trwa 24 godziny. W tym
czasie nie wolno dok∏adaç kolejnych produktów
do zamro˝enia.
• Podlegajàce zamro˝eniu produkty muszà byç
doskona∏ej jakoÊci, Êwie˝e i czyste;
• Przed zamro˝eniem nale˝y podzieliç ˝ywnoÊç na
ma∏e porcje, co przyspiesza proces zamra˝ania
oraz umo˝liwia rozmra˝anie produktów w
odpowiedniej iloÊci;
• Produkty spo˝ywcze nale˝y zawijaç w foli´
aluminiowà lub polietylenowà, dbajàc, by
opakowanie by∏o przylegajàce i szczelne;
• Âwie˝e produkty ˝ywnoÊciowe nie powinny
dotykaç zamro˝onych, aby nie powodowaç
zmian temperatury ˝ywnoÊci wczeÊniej
zamro˝onej;
• ˚ywnoÊç o niskiej zawartoÊci t∏uszczu
przechowuje si´ d∏u˝ej i lepiej ni˝ o wysokiej
zawartoÊci t∏uszczu; sól skraca okres
przechowywania produktów;
• Nie nale˝y spo˝ywaç lodów bezpoÊrednio po
wyj´ciu z zamra˝alnika, gdy˝ mo˝e to
spowodowaç odmro˝enia skóry;
• Zaleca si´ opatrzyç ka˝dy produkt datà
zamro˝enia. U∏atwi to kontrol´ okresu
przechowywania;
•
Symbole na pojemnikach oznaczajà rodzaje
˝ywnoÊci do zamro˝enia.
Cyfry oznaczajà okres przechowywania ka˝dego
z produktów (w miesiàcach). Od jakoÊci
produktów ˝ywnoÊciowych i od rodzaju ich
wst´pnej obróbki przed zamro˝eniem zale˝y
wybór górnej lub dolnej wartoÊci.
• Do zamra˝alnika nie wolno wk∏adaç p∏ynów
zawierajàcych w´glany (napoje gazowane itp.),
gdy˝ mogà one eksplodowaç.
Zalecenia dotyczàce
przechowywania mro˝onek
Aby w optymalny sposób wykorzystaç mo˝liwoÊci
urzàdzenia, nale˝y:
• upewniç si´, ˝e mro˝onki by∏y odpowiednio
przechowywane w miejscu zakupu;
• zadbaç, by czas od momentu zakupu do chwili
w∏o˝enia do zamra˝arki by∏ jak najkrótszy.
• nie otwieraç zbyt cz´sto drzwiczek zamra˝alnika
i nie pozostawiaç ich otwartych d∏u˝ej ni˝ to
konieczne.
• Po rozmro˝eniu ˝ywnoÊç bardzo szybko si´
psuje i nie mo˝e ponownie zostaç zamro˝ona.
• Nie nale˝y przekraczaç daty wa˝noÊci podanej
przez producenta na opakowaniu ˝ywnoÊci..
22
Noise due to the adjustment of the unit’s structure
Possible noise sources that are
easy to eliminate:
The appliance is not well levelled:
Simply adjust the levelling foot.
The appliance touches adjacent units:
Move the units away
Interior accessories are not fixed securely:
Remove the accessories and put them back properly
Bottles and/or receptacles touch each other
inside the appliance:
Separate them.
Tic
Tic
Hereunder you will find some normal causes of noise
that do not jeopardise normal functioning of the
product.
Compressor motor noise
Noise caused by the gas circulating in the
refrigerating circuit pipes
Blubb
Blubb
Brrrr
Noisiness
CUSTOMER SERVICE AND SPARE PARTS
If the appliance is not functioning properly, check
that:
• the plug is firmly in the wall socket and the mains
power switch is on;
• there is an electricity supply (find out by plugging
in another appliance);
• the thermostat knob is in the correct position.
• If there are water drops on the bottom of the
cabinet, check that the defrost water drain
opening is not obstructed (see “Defrosting”
section).
• If your appliance is still not working properly after
making the above checks, contact the nearest
service centre.
To obtain fast service, it is essential that when you
apply for it you specify the model and serial number
of your appliance which can be found on the
guarantee certificate or on the rating plate located
inside the appliance, on the bottom left-hand side.

8
KONSERWACJA
Nale˝y wy∏àczyç urzàdzenie z sieci przed
rozpocz´ciem jakichkolwiek czynnoÊci
konserwacyjnych.
Uwaga
Urzàdzenie to zawiera weglowodory w uk∏adzie
ch∏odniczym; konserwacja i uzupe∏nianie musi byç
przeprowadzane wy∏àcznie przez personel
autoryzowanych zak∏adów serwisowych.
Okresowe czyszczenie
Komor´ ch∏odziarki nale˝y myç ciep∏à wodà z
dodatkiem oczyszczonej sody.
Starannie op∏ukaç i osuszyç.
Skraplacz (czarny ruszt) i spr´˝ark´ w tylnej cz´Êci
zamra˝arki odkurzyç przy pomocy szczotki lub
odkurzacza. Regularne usuwanie kurzu zapewnia
bezawaryjnà prac´ urzàdzenia i oszcz´dne zu˝ycie
energii elektrycznej.
Wiele specyficznych środków czyszczących
stosowanych do mycia powierzchni kuchennej
zawiera czynniki chemiczne, które mogą
porysować/uszkodzić plastikowe części znajdujące
się w tym urządzeniu. Stąd zaleca się mycie
zewnętrznego pokrycia tego urządzenia jedynie ciepłą
wodą z niewielkim dodatkiem płynu do mycia naczyń.
Przerwy w u˝ytkowaniu
Je˝eli urzàdzenie nie b´dzie u˝ytkowane przez
d∏u˝szy okres czasu, nale˝y:
wy∏àczyç urzàdzenie z sieci;
wyjàç wszystkie produkty;
rozmroziç, wyczyÊciç wn´trze i akcesoria;
pozostawiç otwarte drzwi, aby umo˝liwiç swobodny
przep∏yw powietrza i zapobiec powstawaniu
nieprzyjemnych zapachów.
Wymiana ˝arówki
Dost´p do ˝arówki oÊwietlajàcej komor´ ch∏odziarki
uzyskaç mo˝na w nast´pujàcy sposób:
- nale˝y odkr´ciç Êrub´ os∏ony ˝arówki.
- wyjàç jej cz´Êç ruchomà przez naciÊni´cie, zob.
rysunek.
Je˝eli po otwarciu drzwi ˝arówka si´ nie
zapala, nale˝y sprawdziç, czy jest ona dobrze
wkr´cona. Je˝eli nie zapala si´ w dalszym ciàgu,
nale˝y zastàpiç jà nowà o tej samej mocy. Moc
maksymalna podana jest na os∏onie ˝arówki.
D037
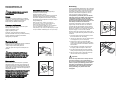
Rozmra˝anie
Szron usuwany jest automatycznie z parownika
ch∏odziarki podczas ka˝dego cyklu wy∏àczania si´
spr´˝arki w trakcie pracy urzàdzenia. Powsta∏a w
wyniku tego woda sp∏ywa do specjalnego pojemnika
znajdujàcego si´ z ty∏u urzàdzenia nad spr´˝arkà, a
nast´pnie wyparowuje.
Nale˝y pami´taç o okresowym czyszczeniu otworu
odp∏ywowego wody, znajdujàcego si´ poÊrodku
kana∏u odp∏ywowego w komorze ch∏odziarki.
Zapobiega si´ w ten sposób gromadzeniu wody,
która mog∏aby dostaç si´ do przechowywanej
˝ywnoÊci. U˝yç nale˝y specjalnej przetyczki,
znajdujàcej si´ w otworze odp∏ywowym.
21
D068
Defrosting
Frost is automatically eliminated from the evaporator
of the refrigerator compartment every time the motor
compressor stops, during normal use. The defrost
water drains out through a trough into a special
container at the back of the appliance, over the
motor compressor, where it evaporates.
It is important to periodically clean the defrost
water drain hole in the middle of the refrigerator
compartment channel to prevent the water
overflowing and dripping onto the food inside.
Use the special cleaner provided, which you will
find already inserted into the drain hole.
The freezer compartment, however, will become
progressively covered with frost. This should be
removed with the special plastic scraper provided,
whenever the thickness of the frost exceeds 4 mm.
During this operation it is not necessary to switch off
the power supply or to remove the foodstuffs.
However, when the ice becomes very thick on the
inner liner, complete defrosting should be carried out
as follows:
1. pull out the plug from the wall socket or turn the
thermostat knob to the «
■» setting;
2. remove any stored food, wrap it in several layers
of newspaper and put it in a cool place;
3. leave the door open, and insert the plastic
scraper in the appropriate seating at the bottom
centre, placing a basin underneath to collect the
defrost water.
4. when defrosting is completed, dry the interior
thoroughly; keep the scraper for future use;
5. turn the thermostat knob back to the required
setting or replace the plug in the power socket.
6. After two or three hours, reload the previously
removed food into the compartment.
Important:
Never use sharp metal tools to scrape off frost
from the evaporator as you could damage it.
Do not use a maechanical device or any artificial
means to speed up the thawing process other
than those recommended by the manufacturer.
A temperature rise of the frozen food packs,
during defrosting, may shorten their safe
storage life.
D037

9
Komora zamra˝arki pokrywa si´ stopniowo
szronem. Dopóki warstwa szronu nie przekracza 4
mm. gruboÊci, nale˝y usuwaç jà specjalnà
plastikowà ∏opatkà, wchodzàcà w sk∏ad
wyposa˝enia urzàdzenia. Podczas wykonywania tej
czynnoÊci nie jest konieczne od∏àczenie urzàdzenia
od zasilania lub wyj´cie produktów.
Ca∏kowite rozmro˝enie zamra˝alnika, w razie gdy
lód w komorze osiàga znacznà gruboÊç, wymaga
nast´pujàcych czynnoÊci:
1. Wy∏àczyç urzàdzenie z sieci, ustawiç termostat w
pozycji «»;
2. Wyjàç wszystkie przechowywane produkty,
owinàç w kilka gazet i umieÊciç w ch∏odnym
miejscu;
3. Pozostawiç otwarte drzwi, umieÊciç zbiornik na
wod´ na najwy˝szej pó∏ce komory ch∏odziarki,
usunàç zatyczk´ zgodnie z rysunkiem;
4. Po ca∏kowitym rozmro˝eniu dok∏adnie osuszyç
komor´; ponownie umocowaç zatyczk´;
5. Ustawiç termostat na ˝àdanej wartoÊci lub
ponownie pod∏àczyç urzàdzenie do sieci.
6. Po 2-3 godzinach w∏o˝yç wyj´te przedtem
produkty.
Wa˝ne
Nie u˝ywaç pod ˝adnym pozorem ostrych
metalowych przedmiotów do zeskrobywania szronu
z parownika. Grozi to jego uszkodzeniem.
Do rozmra˝ania nie u˝ywaç innych urzàdzeƒ
mechanicznych i sztucznych Êrodków, ni˝ te
zalecane przez producenta.
Wzrost temperatury zamro˝onych produktów,
majàcy miejsce podczas operacji rozmra˝ania,
mo˝e skróciç ich bezpieczny okres
przechowywania.
D068
20
MAINTENANCE
Unplug the appliance before carrying out
any maintenance operation.
Warning
This appliance contains hydrocarbons in its cooling
unit; maintenance and recharging must therfore only
be carried out by authorized technicians.
Periods of non-operation
When the appliance is not in use for long periods,
take the following precautions:
remove the plug from the wall socket;
remove all food;
defrost and clean the interior and all accessories;
leave the door ajar to allow air to circulate to prevent
unpleasant smells.
Periodic cleaning
Clean the inside with warm water and bicarbonate of
soda. Rinse and dry thoroughly.
Many proprietary kitchen surface cleaners
contain chemicals that can attack/damage the
plastics used in this appliance. For this reason it
is recommended that the outer casing of this
appliance is only cleaned with warm water with a
little washing-up liquid added. Clean the
condenser (black grill) and the compressor at the
back of the appliance with a brush or a vacuum
cleaner. This operstion will improve the performance
of the appliance and save electricity consumption.
Interior light
The light bulb inside the refrigerator compartment
can be reached as follows:
- unscrew the light cover securing screw.
- unhook the moving part as shown in the figure.
If the light does not come on when the
door is open, check that it is screwed into place
properly. If it still does not light up, change the
bulb. The rating is shown on the light bulb cover.

10
SERWIS / NAPRAWY I CZ¢ÂCI ZAMIENNE
W wypadku stwierdzenia nieprawid∏owej pracy
urzàdzenia nale˝y sprawdziç, czy:
• urzàdzenie jest w∏aÊciwie pod∏àczone do sieci
zasilajàcej
• obwód zasilania elektrycznego jest pod
napi´ciem (np. przez pod∏àczenie innego
urzàdzenia)
• pokr´t∏o termostatu znajduje si´ we w∏aÊciwej
pozycji
• Je˝eli na dnie komory ch∏odziarki wyst´pujà
Êlady wody, nale˝y sprawdziç, czy otwór
odp∏ywowy jest dro˝ny (zob. rozdz.
“Rozmra˝anie”).
• Je˝eli – po przeprowadzeniu powy˝szych
czynnoÊci sprawdzajàcych – urzàdzenie w
dalszym ciàgu nie pracuje prawid∏owo, nale˝y
zwróciç si´ do najbli˝szego autoryzowanego
punktu napraw.
˚eby przyspieszyç wykonanie us∏ugi, przy
zg∏oszeniu nale˝y koniecznie podaç model i numer
produktu urzàdzenia, znajdujàcy si´ w karcie
gwarancyjnej i na tabliczce znamionowej
umieszczonej w dolnej cz´Êci komory ch∏odziarki, po
lewej stronie.
Poniżej zostały przedstawione niektóre normalne
źródła głośnego działania, które pomimo to nie
wpływają na normalną działalność wyrobu.
Spowodowane silnikiem sprężarki
Spowodowane gazem krążącym w przewodach
obwodu chłodzącego
Blubb
Blubb
Brrrr
Spowodowane osiadaniem się struktury mebla
Możliwe źródła głośnego działania,
łatwo usuwalne:
Urządzenie nie jest dobrze upoziomowane
Zadziałać na nóżkę poziomującą
Urządzenie styka się z innymi pobliskimi meblami:
Odsunąć meble
Wewnętrzne akcesoria źle położone:
Wyjąć półki lub inne konsolki i ponownie je położyć
Butelki lub pojemniki stykają się:
Odsunąć różne pojemniki znajdujące się wewnątrz
Tic
Tic
Głośne działanie
19
HINTS
Hints for storage of frozen food
To obtain the best performance from this appliance,
you should:
• be sure that frozen foodstuffs are transferred
from the foodstore to the freezer in the shortest
possible time;
• not open the door frequently or leave it open
longer than absolutely necessary.
• Once defrosted, food deteriorates rapidly and
cannot be refrozen.
Hints for freezing
To help you make the most of the freezing process,
here are some important hints:
• the maximum quantity of food which can be
frozen in 24 hrs. is shown on the rating plate;
• the freezing process takes 24 hours. No further
food to be frozen should be added during this
period;
• prepare food in small portions to enable it to be
rapidly and completely frozen and to make it
possible subsequently to thaw only the quantity
required;
• wrap up the food in aluminium foil or polythene
and make sure that the packages are airtight;
• do not allow fresh, unfrozen food to touch food
which is already frozen, thus avoiding a rise in
temperature of the latter;
• water ices, if consumed immediately after
removal from the freezer compartment, can
possibly cause the skin to be freeze burnt;
• it is advisable to show the freezing-in date on
each individual pack to enable you to keep tab of
the storage time;
• The symbols on the drawers show different types
of frozen goods.
The numbers indicate storage times in months
for the appropriate types of frozen goods.
Whether the upper or lower value of the indicated
storage time is valid depends on the quality of
the foods and pre-treating before freezing.
• do not put carbonated liquids (fizzy drinks,
etc.) in the freezer compartment as they may
burst.
Hints for refrigeration
Useful hints:
Meat (all types): wrap in polythene bags and place
on the glass shelf above the vegetable drawer.
For safety, store in this way only one or two days
at the most.
Cooked foods, cold dishes, etc..: these should be
covered and may be placed on any shelf.
Fruit and vegetables: these should be thoroughly
cleaned and placed in the special drawer(s) provided.
Butter and cheese: these should be placed in
special airtight containers or wrapped in aluminium
foil or polythene bags to exclude as much air as
possible.
Milk bottles: these should have a cap and should
be stored in the bottle rack on the door.
Bananas, potatoes, onions and garlic, if not
packed, must not be kept in the refrigerator.

11
INSTALACJA
Ustawienie
Urzàdzenie powinno zostaç ustawione z dala od
takich êróde∏ ciep∏a jak kaloryfery, grzejniki wody czy
bezpoÊrednie dzia∏anie promieni s∏onecznych.
Ze wzgl´dów bezpieczeƒstwa nale˝y zapewniç
minimalny swobodny przep∏yw powietrza, zgodnie z
rys.
Urzàdzenie stojàce pod kuchennà szafkà wiszàcà
(rys. A).
Urzàdzenie wolnostojàce (rys. B).
Uwaga: nie wolno zas∏aniaç otworów
wentylacyjnych.
Regulacja obu nó˝ek urzàdzenia umo˝liwia jego
dok∏adne wypoziomowanie.
PARAMETRY TECHNICZNE
Informacje techniczne znajdujà si´ na tabliczce znamionowej umieszczonej w dolnej cz´Êci ch∏odziarki, po
lewej stronie.
Model
ERB 2623
178
176
86
82
165,5x60x62,5
220-240/50
0,85
A
9
30
36
SN-ST
PojemnoÊç brutto: zamra˝alnik (l)
PojemnoÊç brutto: ch∏odziarka (l)
PojemnoÊç netto: ch∏odziarka (l)
Wymiary (*wys. *szer.*g∏´b., cm.)
Napi´cie (V/HZ)
PojemnoÊç netto: zamra˝alnik (l)
Zu˝ycie efektywnoÊci energetycznej (kWh/24h)
Klasa energii
ZdolnoÊç zamra˝ania (kg/24h)
ZdolnoÊç utrzymywania temperatury (h)
Poziom ha∏asu (dB/A)
Klasa klimatyczna
NP008
100 mm15 mm
15 mm
A
B
Blokada Półek
Wasze urządzenie zostało wyposażone w blokadę
półek, które pozwala na unieruchomienie półek
podczas transportu.
W celu jej usunięcia postępować w następujący
sposób:
poruszać blokadę półek w kierunku oznaczonym
strzałką, podnieść od spodu szkło i popchnąć go
do przodu aż do jego uwolnienia i zdjąć blokadę.
A
C
B
18
Positioning the door shelves
To permit storage of food packages of various sizes,
the door shelves can be placed at different heights.
To make these adjustments proceed as follows:
Gradually pull the shelf in the direction of the arrows
until it comes free, then reposition as required.
Fresh food refrigeration
To obtain the best performance:
• do not store warm food or evaporating liquids in
the refrigerator;
• do cover or wrap the food, particularly if it has a
strong flavour.
• Position food so that air can circulate freely round
it.
D338
Movable shelves
The walls of the refrigerator are equipped with a
series of runners so that the shelves can be
positioned as desired.

12
Pod∏àczenie do zasilania
Przed pod∏àczeniem urzàdzenia nale˝y upewniç si´,
czy napi´cie i nat´˝enie podane na tabliczce
znamionowej sà zgodne z parametrami Paƒstwa
sieci zasilajàcej. Dopuszcza si´ +-6% odchylenia od
normy.
Przy innych wartoÊciach napi´cia nale˝y stosowaç
autotransformator o odpowiedniej mocy.
Urzàdzenie musi byç uziemione.
Wtyczka przewodu zasilajàcego jest w tym celu
zaopatrzona w specjalny styk ochronny
(uziemienie).
Je˝eli w Paƒstwa instalacji elektrycznej brak
uziemienia, to urzàdzenie musi zostaç pod∏àczone
przez uprawnionego elektromontera do odzielnej
instalacji uziemiajàcej, zgodnie z obowiàzujàcymi
przepisami bezpieczeƒstwa
W wypadku nieprzestrzegania powy˝szych
przepisów bezpieczeƒstwa, producent nie ponosi
odpowiedzialnoÊci za powsta∏e szkody.
Urzàdzenie to spe∏nia wymagania
nast´pujàcych wytycznych EWG:
- 87/308 EEC
z 2.06.87 dot. zak∏óceƒ RTV.
- 73/23 EEC
19.02.73 (niskie napi´cia) i
póêniejsze nowelizacje.
- 89/336 EEC
03.05.89 (kompatybilnoÊç
elektromagnetyczna) i póêniejsze nowelizacje.
Uwaga
Konieczna jest mo˝liwoÊç od∏àczenia urzàdzenia od
g∏ównej sieci zasilania; stàd wtyczka musi byç ∏atwo
dost´pna po przeprowadzeniu operacji instalowania.
D594
Tylne elementy dystansowe
W opakowaniu zawierajàcym dokumentacj´
urzàdzenia, znajdà Paƒstwo dwa elementy
dystansowe, przeznaczone do zamontowania w
dwóch górnych rogach jego tylnej Êciany.
W tym celu nale˝y odkr´ciç Êruby, wprowadziç pod
nie element dystansowy i ponownie Êruby te
dokr´ciç.
17
Ice-cube production
This appliance is equipped with one or more trays
for the production of ice-cubes. Fill these trays with
water, then put them in the freezer compartment.
Do not use metallic instruments to remove the
trays from the freezer.
Thawing
Deep-frozen or frozen food, prior to being used, can
be thawed in the refrigerator compartment or at
room temperature, depending on the time available
for this operation.
Small pieces may even be cooked still frozen,
directly from the freezer: in this case, cooking will
take longer.
Storage of frozen food
When first starting-up or after a period out of use,
before putting the products in the compartment
press the quick-freezing switch at least 12 hours
before.
If large quantities of food are to be stored, remove
all drawers and baskets from appliance and place
food on cooling shelves.
Pay careful attention not to exceed load limit
stated on the side of the upper section (where
applicable).
Important
In the event of accidental defrosting, for example
due to a power failure, if the power has been off
for longer than the value shown in the technical
characteristics chart under “rising time”, the
defrosted food must be consumed quickly or
cooked immediately and then refrozen (after
cooking).
Cold accumulators
The freezer contains two cold accumulators which
increases storage times in the event of a power cut
or breakdown. They are located in the upper
compartment.

13
Zmiana kierunku otwierania drzwi
Przed przystàpieniem do wykonywania
jakichkolwiek czynnoÊci nale˝y wyjàç wtyczk´ z
gniazdka zasilajàcego.
Aby zmieniç kierunek otwierania drzwi, nale˝y
postàpiç nast´pujàco:
1. wyciàgnàç kratk´ wentylacyjnà (D);
2. wyjàç dolny zawias (E), odkr´cajàc Êruby s∏u˝àce
do jego zamocowania;
3. wyjàç dolne drzwi, wyjmujàc je z zawiasu
Êrodkowego;
4. wyjàç zawias Êrodkowy (H);
5. wyjàç górne drzwi, wyjmujac je z trzpienia
górnego (G);
6. odkr´ciç górny trzpieƒ (G) i umieÊciç go po
przeciwnej stronie;
7. wyjàç dwie zaÊlepki z drzwi (jeÊli zosta∏y
przewidziane), w celu uzyskania otworów
s∏u˝àcych do za∏o˝enia zawiasu, po czym
umieÊciç je z przeciwnej strony, a nast´pnie
za∏o˝yç drzwi górne;
8. zamocowaç zawias Êrodkowy po przeciwnej
stronie;
9. za∏o˝yç dolne drzwi;
10. kluczem 10 mm odkr´ciç trzpieƒ zawiasu (E) i
za∏o˝yç go po przeciwnej stronie tego samego
zawiasu;
11. zamocowaç dolny zawias (E) po przeciwnej
stronie przy pomocy poprzednio wyj´tych Êrub.
Wyjàç zaÊlepk´ (F) z kratki wentylacyjnej (D)
wciskajàc jà zgodnie z kierunkiem strza∏ki, a
nast´pnie za∏o˝yç po przeciwnej stronie.
12. ponownie za∏o˝yç kratk´ wentylacyjnà (D)
poprzez wciÊni´cie.
13.Odkr´ciç uchwyty. Przek∏uç zaÊlepki przy
pomocy ostrego narz´dzia, zamocowaç uchwyty
po przeciwnej stronie. Zakryç pozosta∏e po
uchwytach otwory zaÊlepkami znajdujàcymi si´ w
opakowaniu z dokumentacjà.
Wzajemne ustawienie osiowe drzwi uzyskuje si´
poprzez poziomà regulacj´ zawiasu Êrodkowego (H)
przy pomocy w∏aÊciwego przyrzàdu, po uprzednim
poluzowaniu dwóch Êrub (por. rys.).
Uwaga:
Po prze∏o˝eniu drzwi nale˝y sprawdziç, czy
wszystkie Êruby sà dobrze dokr´cone i czy
uszczelka magnetyczna w∏aÊciwie przylega do
obudowy. Je˝eli temperatura otoczenia jest niska
(np. zimà) i uszczelka przylega niedok∏adnie, mo˝na
poczekaç na jej powrót do naturalnego stanu lub
przyspieszyç ten proces, ogrzewajàc wymagajàcy
tego odcinek zwyk∏à suszarkà do w∏osów.
G
H
F
F
D
F
F
E
E
16
Cleaning the interior
Before using the appliance for the first time, wash
the interior and all internal accessories with luke-
warm water and some neutral soap so as to remove
the typical smell of a brand-new product, then dry
thoroughly.
USE
Control panel
A. Pilot light
B. N-S operating control light
C. Normal/Super (quick-freezing) switch
D. Thermostat knob
Do not use detergents or abrasive
powders, as these will damage the finish.
CB
D
A
ON
N-S
Temperature regulation
The temperature is automatically regulated and can
be increased to achieve a higher temperature
(warmer) by rotating the thermostat knob toward
lower settings or reduced (colder) rotating the knob
towards higher settings.
However, the exact setting should be chosen
keeping in mind that the temperature inside the
refrigerator depends on:
• room temperature;
• how often the door is opened;
• the quantity of food stored;
• location of appliance.
A medium setting is generally the most suitable.
USE OF THE FRIDGE
Operation
Insert the power supply plug into the nearest wall
socket.
Turn the thermostat knob (D) to the right to a
medium setting.
The pilot light (C) will light up.
To turn off the refrigerator, turn the thermostat knob
to the «■» position.
Quick-freezing
For quick-freezing, press the N/S switch (B). The
quick-freezing indicator light (A) will then light up.
Freezing fresh food
The 4-star compartment is suitable for
long term storage of commercially frozen food, and
for freezing fresh food.
To freeze fresh foods press the quick freezing switch
at least 12 hours before introducing the food into the
freezer in order to ensure better freezing results.
Place the food to be frozen on the upper
compartment.
Important
If the ambient temperature is high or the
appliance is fully loaded, and the appliance is
set to the lowest temperatures, it may run
continuously causing frost to form on the rear
wall. In this case the dial must be set to a higher
temperature to allow automatic defrosting and
therefore reduced energy consumption.

14
WARNINGS
It is most important that this instruction book should be retained with the appliance for future
reference. Should the appliance be sold or transferred to another owner, or should you move house
and leave the appliance, always ensure that the book is supplied with the appliance in order that the
new owner can be acquainted with the functioning of the appliance and the relevant warnings.
If this appliance featuring magnetic door seals is to replace an older appliance having a spring lock
(latch) on the door or lid, be sure to make that spring lock unusable before you discard the old
appliance. This will prevent it from becoming a death-trap for a child.
These warnings are provided in the interest of safety. You must read them carefully before installing or
using the appliance.
General Safety
• This appliance is designed to be operated by
adults. Children should not be allowed to tamper
with the controls or play with the product.
• It is dangerous to alter the specifications or
modify this product in any way.
• Before any cleaning or maintenance work is carried
out, be sure to switch off and unplug the appliance.
• This appliance is heavy. Care should be taken
when moving it
• Ice lollies can cause frost burns if consumed
straight from the appliance.
• Take utmost care when handling your
appliance so as not to cause any damages to
the cooling unit with consequent possible
fluid leakages.
• The appliance must not be located close to
radiators or gas cookers.
• Avoid prolonged exposure of the appliance to
direct sunlight.
• There must be adequate ventilation round the
back of the appliance and any damage to the
refrigerant circuit must be avoided.
• For freezers only (except built-in models): an
ideal location is the cellar or basement.
• Do not use other electrical appliances (such
as ice cream makers) inside of refrigerating
appliances.
Service/Repair
• Any electrical work required to install this
appliance should be carried out by a qualified
electrician or competent person
• This product should be serviced by an authorized
Service Centre, and only genuine spare parts
should be used.
• Under no circumstances should you attempt to
repair the appliance yourself. Repairs carried out
by inexperienced persons may cause injury or
more serious malfunctioning. Refer to your local
Service Centre, and always insist on genuine
spare parts.
• This appliance contains hydrocarbons in its
cooling unit; maintenance and recharging must
therefore only be carried out by authorized
technicians.
Use
• The domestic refrigerators and freezers are
designed to be used specifically for the storage
of edible foodstuffs only.
• Best performance is obtained with ambient
temperature between +18°C and +43°C (class
T); +18°C and +38°C (class ST); +16°C and
+32°C (class N); +10°C and +32°C (class SN).
The class of your appliance is shown on its rating
plate.
Warning: when the ambient temperature is not
included within the range indicated for the class
of this appliance, the following instructions must
be observed: when the ambient temperature
drops below the minimum level, the storage
temperature in the freezer compartment cannot
be guaranteed; therefore it is advisable to use
the food stored as soon as possible.
• Frozen food must not be re-frozen once it has
been thawed out.
• Manufacturers’ storage recommendations should
be strictly adhered to. Refer to relevant
instructions.
• The inner lining of the appliance consists of
channels through which the refrigerant passes. If
these should be punctured this would damage the
appliance beyond repair and cause food loss. DO
NOT USE SHARP INSTRUMENTS to scrape off
frost or ice. Frost may be removed by using the
scraper provided. Under no circumstances should
solid ice be forced off the liner. Solid ice should be
allowed to thaw when defrosting the appliance.
15
CONTENTS
Warnings .................................................................................................................................................14
Use - Cleaning the interior - Control panel - Use of the fridge - Operation - Temperature regulation - .......
Quick-freezing - Freezing fresh food ........................................................................................................16
Use - Storage of frozen food - Ice-cube production - Thawing - Cold accumulators ................................17
Use - Fresh food refrigeration - Movable shelves - Positioning the door shelves .....................................18
Hints - Hints for refrigeration - Hints for freezing - Hints for storage of frozen food .................................19
Maintenance - Periodic cleaning - Periods of non-operation - Interior light..............................................20
Maintenance - Defrosting .......................................................................................................................21
Noisinnes - Customer service and spare parts ...................................................................................22
Technical information / Installation - Location - Shelf holders ..............................................................23
Installation - Rear spacers - Electrical connection ...................................................................................24
Installation - Door reversibility..................................................................................................................25
• Do not place carbonated or fizzy drinks in the
freezer as it creates pressure on the container,
which may cause it to explode, resulting in
damage to the appliance. Do not use a
mechanical device or any artificial means to
speed up the thawing process other than those
recommended by the manufacturer. Never use
metal objects for cleaning your appliance as it
may get damaged.
Installation
• During normal operation, the condenser and
compressor at the back of the appliance heat up
considerably. For safety reasons, minimum
ventilation must be as shown in the instructions.
Attention: keep ventilation openings clear of
obstruction.
• Care must be taken to ensure that the appliance
does not stand on the electrical supply cable.
Important: if the supply cord is damaged, it must
be replaced by a special cord or assembly availa-
ble from the manufacturer or its service agent.
• If the appliance is transported horizontally, it is
possible that the oil contained in the compressor
flows in the refrigerant circuit. It is advisable to
wait at least two hours before connecting the
appliance to allow the oil to flow back in the
compressor.
• There are working parts in this product which
heat up. Always ensure that there is adequate
ventilation as a failure to do this will result in
component failure and possible food loss. See
installation instructions.
• Parts which heat up should not be exposed.
Wherever possible the back of the product
should be against a wall.
Environment Protection
This appliance does not contain gasses which
could damage the ozone layer, in either its
refrigerant circuit or insulation materials. The
appliance shall not be discarded together with
the urban refuse and rubbish. Avoid damaging
the cooling unit, especially at the rear near the
heat exchanger. Information on your local
disposal sites may be obtained from municipal
authorities. The materials used on this appliance
marked by the symbol are recyclable.
-
 1
1
-
 2
2
-
 3
3
-
 4
4
-
 5
5
-
 6
6
-
 7
7
-
 8
8
-
 9
9
-
 10
10
-
 11
11
-
 12
12
-
 13
13
-
 14
14


Electrolux ERB2623 Instrukcja obsługi
- Kategoria
- Lodówko-zamrażarki
- Typ
- Instrukcja obsługi
w innych językach
- English: Electrolux ERB2623 User manual
Powiązane artykuły
-
Electrolux ER8020B Instrukcja obsługi
-
Electrolux ER8021B Instrukcja obsługi
-
-
-
-
-
-
-
-
Inne dokumenty
-
Küppersbusch FK2545.0i Instrukcja obsługi
-
Teka TGI2 110 Instrukcja obsługi
-
-
Candy HFLO3550E/N Instrukcja obsługi
-
LG GBB940BMQZT Instrukcja obsługi
-
LG GBB940DNQZN Instrukcja obsługi
-
Aeg-Electrolux S75428DT Instrukcja obsługi
-
Haier HLE 172 DE Instrukcja obsługi
-
Beko CSA22002 Instrukcja obsługi
-
Haier HFRZ-506WM Instrukcja obsługi