
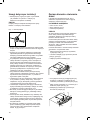
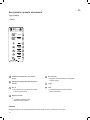
OWNER’S MANUAL
FRIDGE &
FREEZER
Read this owner's manual thoroughly before operating the appliance
and keep it handy for reference at all times.
www.lg. com
MFL42818347
Rev.10_081818
EN ENGLISH
AFN36881839
*AFN36881839*
PL POLSKI
Copyright © 2017 - 2018 LG Electronics Inc. All rights reserved.

TABLE OF CONTENTS
This manual may contain images or content
different from the model you purchased.
This manual is subject to revision by the
manufacturer.
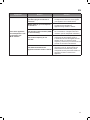
SAFETY INSTRUCTIONS ........................................... 03
Important Safety Instructions .....................................................
03
INSTALLATION ........................................................... 09
Notes for Movement and Transport ........................................... 09
Leg Adjustment .......................................................................... 09
Reversible doors ........................................................................ 10
OPERATION ................................................................ 12
Parts and Functions .................................................................... 12
Notes for Operation .................................................................... . 13
Using the Control Panel ............................................................. 14
Using Ice Maker ......................................................................... 16
Optimal temperature zone «Fresh Converter» ........................... 16
Using the Folding Shelf .............................................................. 16
SMART FUNCTIONS ................................................... 17
Using LG SmartThinQ Application .............................................. 17
18
18
MAINTENANCE ........................................................... 19
Notes for cleaning ....................................................................... 19
Removing and refitting the fridge Door Basket ........................... . 19
Removing the Fridge Shelf ......................................................... 20
Removing and refitting the Vege table Drawer ............................ 20
Removing the pull-out Cover Drawer .......................................... 21
TROUBLESHOOTING ....... ............................................. 22
Removing the Folding Shelf ....................................................... 20
Removing the refrigerator drawer .............................................. 21
Removing and refitting the freezer drawers ............................... 21
OPERATING DATA ..................................................... 26
WARRANTY ................................................................ 27
Notes for Installation ..................................................................
09
Pull-out drawer «Fresh Balancer» .............................................. 16
Open Source Software Notice Information ..................................
Smart Diagnosis™ Through the Customer Information Centre ...
Dimensions and Clearances ...................................................... 09
Climate class ..............................................................................
09

03
SAFETY INSTRUCTIONS
The following safety guidelines are intended to prevent unforeseen risks or
damage from unsafe or incorrect operation of the appliance.
The guidelines are separated into ‘WARNING’ and ‘CAUTION’ as described
below.
This symbol is displayed to the indicate matters and operations that
can cause risk. Read the part with this symbol carefully and follow
the instructions in order to avoid risk.
WARNING
This indicates that the failure to follow the instructions can casuse
serious injury or death.
CAUTION
This indicates that the failure to follow the instructions can cause the
minor injury or damage to the product.
WARNING
To reduce the risk of explosion, fire, death, electric shock, injury or
scalding to persons when using this product, follow basic precautions,
including the following:
For use in Europe:
This appliance can be used by children aged from 8 years and above and persons with
reduced physical, sensory or mental capabilities or lack of experience and knowledge
if they have been given supervision or instruction concerning use of the appliance
in a safe way and understand the hazards involved. Children shall not play with the
appliance. Cleaning and user maintenance shall not be made by children without
supervision.
EN
Children in the Household
This appliance is not intended for use by persons (including children) with reduced
physical, sensory or mental capabilities, or lack of experience and knowledge, unless
they have been given supervision or instruction concerning use of the appliance by a
person responsible for their safety. Children should be supervised to ensure that they
do not play with the appliance.
IMPORTANT SAFETY INSTRUCTIONS

04
Installation
•
This appliance should only be transported by two or more people holding the
appliance securely.
•
Ensure that the socket outlet is properly grounded, and that the earth pin on the
power cord is not damaged or removed from the power plug. For more details on
grounding, inquire at an LG Electronics customer information centre.
•
This appliance is equipped with a power cord having an equipment-grounding
conductor and a grounding power plug. The power plug must be plugged into an
appropriate socket outlet that is installed and grounded in accordance with all local
codes and ordinances.
•
If the power cord is damaged or the hole of the socket outlet is loose, do not use the
power cord and contact an authorized service centre.
•
Do not plug the appliance into multiple socket outlets or extension power cable.
•
Do not modify or extend the power cord.
•
Avoid using any extension cords or double adaptor. The appliance should be
connected to a dedicated power line which is separately fused.
•
Install the appliance in a place where is easy to unplug the power plug of the
appliance.
•
Be careful not to point the power plug up or let the appliance lean against the power
plug.
•
•
Do not install the appliance in a damp and dusty place. Do not install or store the
appliance in any outdoor area, or any area that is subject to weathering conditions
such as direct sunlight, wind or rain or temperatures below freezing.
•
Do not place the appliance in direct sunlight or expose it to the heat from heating
appliances such as stoves or heaters.
•
Be careful not to expose the rear of the appliance when installing.
Install the appliance on a film and level floor.
EN
•
Be careful not to let the appliance door fall during assembly or disassembly.
•
Be careful not to pinch, crush, or damage the power cable during assembly or
disassembly of the appliance door.

05
EN
Operation
•
Do not use the appliance for any purpose (storage of medical or experimental
materials or shipping) other than any domestic household food storage use.
•
In case of flood, disconnect the power plug and contact the LG Electronics
customer information centre.
•
Unplug the power plug during a severe thunderstorm or lightening or when not in use
for a long period of time.
•
Do not touch the power plug or the appliance controls with wet hands.
•
Do not bend the power cable excessively or place a heavy object on it.
•
If water penetrates electrical parts of the appliance, disconnect power plug and
contact an LG Electronics customer information centre.
•
Do not place hands or metallic objects inside the area emitting the cold air, cover or
heat releasing grill on the back.
•
Do not apply excessive force or impact to the back cover of the appliance.
•
Do not put animals, such as pets into the appliance.
•
Be careful of nearby children when you open or close the appliance door. The door
may bump the child and cause injury.
•
Avoid the danger of children getting trapped inside the appliance. A child trapped
inside the appliance can cause suffocation.
•
Do not place heavy or fragile objects, liquid filled containers, combustible
substances, or flammable objects (such as candles and lamps) on the appliance.
•
If there is a gas leakage (isobutane, propane, natural gas, etc.), do not touch the
appliance or power plug and ventilate the area immediately. This appliance uses
a refrigerant gas (isobutane,R600a). Although it uses a small amount of the gas,
it is still combustible gas. Gas leakage during appliance transport, installation or
operation can cause fire, explosion or injury if sparks are caused.
•
Do not damage the pipes of the refrigerant circuit.
•
chemical, LPG, combustible spray, insecticide, air freshener, cosmetics, etc.) near
the appliance.
•
Immediately unplug the power plug and contact an LG Electronics customer
information centre if you detect a strange sound, odour, or smoke coming from the
appliance.
Do not use or store flammable or combustible substances (ether, benzene, alcohol,
Maintenance
•
Disconnect the power cord before cleaning the appliance or replacing the inside
lamp(where fitted).
•
Securely plug the power plug in the socket outlet after completely removing any
moisture and dust.

06
•
Do not spray water inside or outside the appliance to clean it.
•
Do not clean the appliance with brushes, cloths or sponges with rough surfaces or
which are made of metallic material.
•
Only a qualified service personnel from LG Electronics service centre should
disassemble, repair, or modify the appliance. Contact an LG Electronics customer
information centre if you move and install the appliance in a different location.
•
Do not use a hair drier to dry the inside of the appliance or place a candle inside to
remove the odours.
•
Do not use mechanical devices or other means to accelerate the defrosting process,
other than those recommended by the manufacturer.
Disposal
•
When discarding the appliance, remove the door gasket while leaving the shelves
and baskets in place and keep children away from the appliance.
•
Dispose of all packaging materials (such as plastic bags and styrofoam) away from
children. The packaging materials can cause suffocation.
Prohibition of Storage of Explosive Substances
Do not store explosive substances such as aerosol cans with a flammable propellant
in this appliance.
EN
•
Never unplug the appliance by pulling on the power cable. Always grip the power
plug firmly and pull straight out from the socket outlet.
Technical safety
•
Keep ventilation openings, in the appliance enclosure or in the built-in structure,
clear of obstruction.
•
Do not use electrical appliances inside the food storage compartments of the
appliance, unless they are of the type recommended by the manufacturer.
•
The refrigerant and insulation blowing gas used in the appliance require special
disposal procedures. Consult with service agent or a similarly qualified person
before disposing of them.
•
This appliance contains a small amount of isobutane refrigerant (R600a), but it is
also combustible. When transporting and installing the appliance, care should be
taken to ensure that no parts of the refrigerating circuit are damaged.
•
Refrigerant leaking out of the pipes could ignite or cause an explosion.
•
The amount of refrigerant in your particular appliance is shown
plate inside the appliance.
•
Never start up an appliance showing any signs of damage. If in doubt, consult your
dealer.

07
•
If a leak is detected, avoid any naked flames or potential sources of ignition and air
the room in which the appliance is standing for several minutes. In order to avoid the
creation of a flammable gas air mixture if a leak in the refrigerating circuit occurs, the
size of the room in which the appliance is used should correspond to the amount of
refrigerant used. The room must be 1 m
2
in size for every 8 g of R600a refrigerant
inside the appliance.
•
This appliance is intended to be used in household and similar applications such as
-staff kitchen areas in shops, offices and other working environments;
-farm houses and by clients in hotels, motels and other residential type environments;
-bed and breakfast type environments;
-catering and similar non-retail applications.
EN
CAUTION
To reduce the risk of minor injury to persons, malfunction, or damage to
the product or property when using this product, follow basic precautions,
including the following:
Installation
•
Do not tilt the appliance to pull or push it when transporting.
Operation
•
Do not touch frozen food or the metal parts in the freezer compartment with wet or
damp hands. It may cause frostbite.
•
Do not place glass containers or bottles inside the freezer, shelves or ice bin that will
be exposed to temperatures below freezing.
•
The tempered glass on the front side of the appliance door or the shelves can be
damaged by an impact. If it is broken, do not touch it with hands, as this may result
in injury.
•
Make sure your hands and feet do not get stuck when opening and closing the
appliance door.
•
Do not hang from the appliance doors, storage room, shelf or climb up into it.
•
Do not store an excessive amount of water bottles or containers for side dishes
on the door baskets. The basket may break or your hand may bump into the
surrounding structure, causing injury.
•
Keep food organized inside the appliance.
•
Prevent animals from nibbling on the power cable.

08
•
Do not place any electronic appliance (such as heater and mobile phone) inside the
appliance.
•
Do not clean glass shelves or covers with warm water when they are cold. They may
break if exposed to sudden temperature changes.
•
Never eat frozen foods immediately after they have been taken out in the freezer.
Maintenance
•
Do not insert the shelves upside down. The shelves may fall, causing injury.
•
To remove frost from the appliance, contact an LG Electronics customer information
centre.
•
Dispose of the ice inside the ice bin in the freezer during an extended power outage.
EN
•
Do not open or close the appliance door with excessive force.
•
If the hinge of the appliance door is damaged or operates improperly, stop using the
appliance and contact an authorized service centre.
•
Supervise a child or a person with poor cognitive skills to ensure they use the
appliance safety.
Disposal of Your Old Appliance
•
This crossed-out wheeled bin symbol indicates that waste electrical and
electronic products (WEEE) should be disposed of separately from the
municipal waste stream.
•
Old electrical products can contain hazardous substances so correct
disposal of your old appliance will help prevent potential negative
consequences for the environment and human health.
Your old appliance may contain reusable parts that could be used to
repair other products, and other valuable materials that can be recycled
to conserve limited resources.
•
You can take your appliance either to the shop where you purchased
the product, or contact your local government waste office for detail of
your nearest authorized WEEE collection point. For the most up to date
information for your country please see www.lg.com/global/recycling

09
INSTALLATION
Notes for Movement and
Transport
•
Remove all food from inside the appliance. Then,
transport the appliance only after fixing fragile parts
such as shelves and the door handle with tape.
Failure to do so may cause appliance damage.
•
power plug hook at the rear or on top of the
appliance. Failure to do so may cause damage to
the power plug or floor scratch.
•
When transporting the appliance, more than two
people should transport the appliance carefully.
Dropping the appliance, which is extremely heavy,
may cause personal injury or appliance failure.
•
When transporting the appliance over a long
distance, keep the appliance upright.
The appliance may fall over, causing malfunctions.
Never transport the appliance laying down as it
can cause a refrigerant circulation malfunction
when it is turned back on again.
Notes for Installation
•
–
it can cause vibration and noise causing the
appliance to fall resulting in injury. It could also
cause the doors not to close correctly and introduce
moisture inside the unit during operation.
–
If the appliance front or rear is not level, adjust the
front feet so that it can be corrected. Severe cases
may need the floor to be packed out with strips of
thin timber.
Pull the power plug out, insert and fix it into the
Leg Adjustment
To avoid vibration, the unit must be leveled.
If required, adjust the leveling screws to compensate
for the uneven floor.
The front should be slightly higher than the rear to
aid in door closing.
Leveling screws can be turned easily by tipping the
cabinet slightly.
Turn the leveling screws counterclockwise (
) to
raise the unit, clockwise (
) to lower it.
Install the appliance on a solid and flat area.
If the appliance is installed on an uneven floor,
EN
Climate class
The climate class is indicated on the
refrigerator's specification label located inside
the refrigerator compartment. Do not use the
refrigerator at a temperature exceeding the
established limits. The climate class is
defined by the refrigerator’s conditions of
use.
SN
N
T
ST
Class
From +10 to +32
From +16 to +43
From +16 to +38
From +16 to +32
Designation
Outside temperature
range, in °C
Extended
temperate
Temperate
Subtropical
Tropical
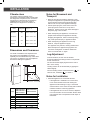
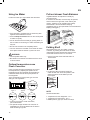
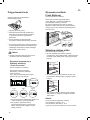
Dimensions and Clearances
Too small of a distance from adjacent items
may result in the degradation of freezing
capability and increased electricity costs. Allow
over 50 mm of clearance from each adjacent
wall when installing the appliance.
A
B
C
D
E
F
G
1025 1045
790 710
-
595
2000
668
668
Model
GBB940DFQZT/
GBB940BMQZT/
GBB940LBQZT
GBB940DNQZN/
GBB940SWQZT
size
A
C
B
G
DEF

10
EN
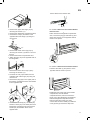
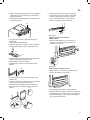
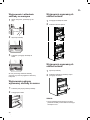
Reversible doors
Your appliance is designed with reversible doors,
do that they may open from either the left of right
hand side to suit your kitchen design
Required tools:
•
10 mm and 6 mm wrenches;
• 5 mm hex wrench;
•
Crosstip screwdriver
Do not lay the refrigerator down on the
floor.
Be careful to not drop the door while
disassembling and reassembling the
refrigerator.
• Move the plug (3) to the opposite side of
the upper cover (2).
NOTE
If you need to reverse the doors, you
should call a service technician. The
warranty does not cover door reversal.
Before reversing the refrigerator doors,
unplug the device and remove the food
and all removable accessories like
shelves and drawers from the
refrigerator.
•
Remove the upper cover (2) of the refrigerator
compartment door by removing the screws (1).
(1)
(1)
(2)
(3)
(4)
• Disconnect the connector cable (4).
•
After removing the screws (5), pull it
forward and lift the cover without
damaging the wire (6).
•
Remove the wire holder (7) and attach it to
the center of the cover (6).
(6) (5)
(7)
(9)
(5)
(8)
•
Pull the wire holder (8) out of the central
part of the cover (6) and attach it to the
opposite side of the cover (6).
•
Move the lead wires (10) to the opposite
side of the cover (6).
•
Install the plug (9) on the opposite side of
the cover (6).
•
Avoid placing the unit near heat sources, direct
sunlight or moisture.
•
Connect the power supply cord (or plug) to the outlet.
Don't double up with other appliances on the same
outlet.
•
After connecting the power supply cord (or plug) to
the outlet, Wait 2-3 hours before you put food into the
appliance. If you add food before the appliance has
cooled completely, your food may spoil.
•
Models with handles should be located at least 55 mm
from the wall on the hinge side to open door by 90°.
•
Allow over 55 mm clearance to the right, left, back and
top when installing.
•
To provide necessary air circulation, you should leave
enough space on each side, top and behind the
refrigerator-freezer.
•
Set the limit stops in the upper corners of the back
plate of the device as shown in Fig.1 Stops (2) can be
found in the drawer inside appliance compartment.
–
Fig.1 : Push Stopper (2) into part (1) until the end.
Push the refrigerator to the wall.
2
1
(5)
(5)

11
EN
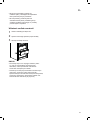
•
Remove the doorstop (21), the bush (22)
and door closer (23) in the lower part of the
refrigerator compartment by removing the
screws (24) and reattach them on the
opposite side.
Do the same for the freezer door.
For models: GBB940DFQZT/GBB940BMQZT
GBB940LBQZT
•
After removal the refrigerator compartment
door, remove the plug (2) and slider (1) and
place each of them on the opposite side as
shown in the picture.
(2)
(1)
(1)
For models: GBB940DNQZN/GBB940SWQZT
•
Remove the slider (1) and place it on the
opposite side as shown in picture.
•
Install the lower hinge (18) of the freezer
compartment, then the freezer
compartment door, then the center door
hinge (15) of the refrigerator compartment,
then the refrigerator compartment door,
(20)
(17)
(19)
(18)
then the upper door hinge (12), then
connect the connector cable (4), install the
cover (6) and (2) reverse the sequence.
(24)
(21)
(23)
(22)
(6)
(10)
(11)
(12)
(13)
•
Remove the upper door hinge (12) by
removing the screws (11).
•
Remove the refrigerator compartment door;
•
Unscrew the rod (13) and affix it to the
opposite side of the hinge (12) using a 6
mm wrench.
•
Remove the center door hinge (15) by
removing the screws (14) with a 5 mm hex
wrench.
•
Remove the freezer compartment door.
•
Attach the plug (16) to the opposite side on
the refrigerator
(14)
(15)
(16)
•
Remove the lower door hinge (18) by
removing the screws (17).
•
Unscrew the rod (19) and affix it to the
opposite side of the hinge (18) using a 6
mm wrench.
•
Remove the plug (20) in the upper part of
the freezer compartment door and install it
on the opposite side

12
EN
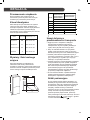
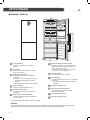
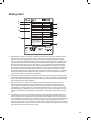
OPERATION
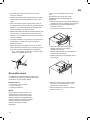
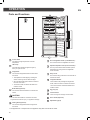
Parts and Functions
Control Panel
This sets the fridge temperature or freezer
temperature.
LED Lamp
The LED lamps inside the appliance light up
when you open the door.
Fridge Shelf
This is where refrigerated foods and other items
are stored.
•
This adjusts the shelf height by inserting the
shelf in another groove of different height.
•
Store the foods with higher moisture content at
the front of the shelf.
•
The actual number of shelves will differ from
model to model.
Bottle Rack (Optional)*
This is where drinks tall bottles or containers are
stored.
CAUTION
•
Do not store short bottles or containers. The items
may fall and to cause an injury or appliance dam age.
Folding Shelf (Optional)*
This is where refrigerated foods and high items
are stored.
Pull-out Vegetable drawer (Fresh Balancer)*
This is where fruits and vegetables are stored.
•
The appearance or components of the appliance may differ from model to model.
Optimal temperature zone (Fresh Converter)*
This is a pull-out drawer that maintains optimal
temperature for storing fruits and vegetables
or fish and meat.
1
Dairy Corner
This is where dairy products such as the butter or
cheese are stored.
Fridge Door Basket
This is where small packages of refrigerated
foods, drinks and sauce containers are stored.
The actual number of baskets will differ from
model to model.
•
Egg Tray (x2)
Freezer Drawer
This is for long-term storage of frozen items.
Adjustable legs(x2)
Door Handle (Optional)*
2
3
4
5
1
8
9
10
13
11
12
6
7

13
EN
Notes for Operation
•
Users should keep in mind that frost can form If the
door is not closed completely, if the humidity is high
during the summer, or if the freezer door is opened
frequently.
•
on the shelf or door basket to allow the door to close
completely.
•
Opening the door lets warm air enter the appliance,
and may cause the internal temperature to rise.
•
Do not open or close the appliance door excessively.
•
The LED lamp is only intended for use in domestic
appliances and is not suitable for household room
illumination.
Suggestion for Energy Saving
•
This allows cold air to be circulated evenly and lowers
electricity bills.
•
Store hot food only after it has cooled in order to
prevent dew or frost.
Storing Foods Effectively
•
Store frozen food or refrigerated food inside sealed
containers.
•
Check the expiration date and label (storage
instructions) before storing food in the appliance.
•
Not recommended to store foods like bananas
and melons that go bad quickly at low
temperatures.
•
Do nor block holes for cold air flow which located
on rear side of the refrigerator compartment. Free
air circulation allows you to maintain a uniform
temperature throughout the volume of compartment.
Products placed close to such holes can be
damaged due to lowc temperature explosure of the
air flow.
•
Do not wrap and store vegetables with newspape
Printing material of newspaper or other foreign
substances may smear foods.
•
the space. Cold air can not circulate properly if the
appliance is overfilled.
Max Freezing Capacity
•
The Express Freeze function will allow the freezer
to freezer to its maximum freezing capacity. This
generally takes up to 24 hours, however, it will
automatically turn off after a given time and can also
be turned off manually at any given time.
•
To get better air circulation, insert all inner parts like
baskets, drawers, and shelves.
Ensure there is sufficient space between food stored
Ensure there is sufficient space between stored foods.
Do not overfill the appliance. Fill less than 70% of
•
Do not store bottles in the freezer, as they
may explode as they freeze
•
Do not refreeze items that have been defrosted.
This causes food to lose its flavor and
nutritional value.
•
Do not store pharmaceutical products, scientific
research materials or other products that
require a constant temperature.
•
Frozen foods should be packaged (plastic
wrap, aluminum foil, etc.) to be stored in
the freezer.
Power Failure
A 1 to 2 hour power failure will not harm the food stored
in the refrigerator. Try to open and close the doors as
little as possible during a power failure.
Refrigerator Features
As a result of temperature - induced deformations
of refrigerator components, you may hear a slight
crackling noise. Sounds typically heard when a
thermal regulator or compressor turns on are
normal and may be heard during the operation
of any electrical device.
The refrigerant circulating inside the refrigeration
system may produce a slight gurgling sound, even
if the compressor is off. Do not worry, it is absolutely
normal. During refrigerator operation, you may hear:
- sound of compressor working;
- rustling of fans blades;
- sound of circulating air flow of cooling system
No Frost;
- relay operating clicks;
- buzzing of drive when openning and closing
damper;
- gurgling of refrigerant circulating through pipes
of refrigeration system;
- a slight crackling when materials deform due
to temperature changes.
These noises are not related to any defect and
have functional character.

14
OPERATION
EN
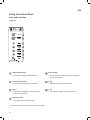
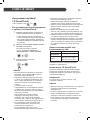
Using the Control Panel
Units and Functions
<Type 1>
Fridge Temperature
•
This sets the fridge target temperature.
Eco Friendly
•
This controls the Power Save mode for lowering
energy consumption.
Freezer Temperature
•
This sets the freezer target temperature.
Lock
•
This locks the buttons on the control panel.
Express Freeze
•
This sets Express Freeze function.
Light
•
ON/OFF Freezer compartment lamp.
•
The actual control panel may differ from model to model.
Wi - Fi
•
This sets the refrigerator to connect to your
home’s Wi-Fi network.
7

15
EN
Setting the Temperature
This sets the fridge temperature or freezer temperature.
•
Press the Fridge button or Freezer button to adjust
the temperature.
•
The initial temperature of the fridge is set to 3 °C, and
the temperature can be adjusted between 1 °C – 7 °C.
•
The initial temperature of the freezer is set to -20 °C,
and the temperature can be adjusted between -15 °C
– -23 °C.
•
Sets the refrigerator temperature according to food
storage appliance. The actual inner temperature
varies depending on the food status, as the indicated
setting temperature is a target temperature, not actual
temperature within appliance.
NOTE
•
Wait until 2 or 3 hours have passed after connecting
the appliance to the outlet before storing food in the
appliance.
•
The temperature indicated on the LED display is
its designated temperature because the actual
temperature inside the refrigerator changes
depending on how intensively external factors
impact it, like the temperature of any foodstuffs
placed in it and how often the doors are opened.
After it is turned on, the refrigerator will begin
operating in the specified mode within 2-3 days.
Setting Express Freeze
The function can quickly freeze a large amount of ice
or frozen foods.
•
When you press the Express Freeze button, the
Express Freeze icon lights on the control panel.
•
The function is enabled and disabled in turn each
time you press the button.
•
The Express Freeze function automatically
terminates after a specific period has passed.
Setting Eco Friendly
Setting and Resetting Lock
This lockes the buttons on the control panel.
Notes for Use the Control Panel
• The control panel will turn on in any of the
following cases.
– When the power is turned on
– When a button is touched
– When the appliance door (fridge
compartment, freezer compartment) is
opened.
• The control panel will turn off automatically
for energy saving in any of the following
cases.
– When one minute has passed after turning
on the power
– When no button operation is carried out
for 20 seconds after a desired button is
pressed
– When 20 seconds has passed after the
appliance door (fridge compartment,
freezer compartment) is opened and closed
•
The function makes the fridge-freezer work
in the power saving mode which is useful when
you are away on a holiday as it reduces energy
consumption.
•
Pressing the Eco Friendly button starts the
operation with the lamp on, and pressing it
again stops the operation.
• Press and hold the Lock button for 3
seconds . When the Lock function is set, all
buttons are locked.
Setting Light
This ON/OFF Freezer copartment lamp.
•
When you press the Light button, the
freezer conpartment lighting ON/OFF.
Subsequently pressing this button may
turn the light permanently on, reduce it
brightness, and turn it off.
When the doors of the freezer
compartment are open, the light
remains on.
•

16
EN
Using Ice Maker
Fill the ice maker up to the indicator line with water.
•
•
Press the Express Freeze button on the control panel
to make ice quickly.
•
Ice can be removed more easily by pouring water on
the ice maker or immersing it in water and twisting the
tray first.
•
Do not store ice that is not completely frozen.
•
You can remove the icemaker or ice bucket to create
more space inside the freezer if you do not use it.
WARNING
•
Fill with potable water only.
•
Be careful not to twist the ice maker with force since
it can be broken.
Pull-out drawer Fresh Balancer
If the icemaker is overfilled, the ise cubes may stick
together and be difficult to remove.
Folding Shelf
Store taller items, such as a gallon container
or bottles, by pushing the front half of the shelf
underneath the back half the shelf. Pull the front
of the shelf forward to return to a full shelf.
•
Lift the front side of the shelf and shift it on
its back side.
•
Lift the front side of the shelf and shift it
under its back side. From this position, both
sides of the shelf can be lifted up to free
more space.
NOTE
Recommended state:
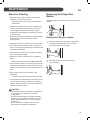
Optimal temperature zone
Fresh Converter
Fresh Converter storage compartment can control
the temperature by adjusting the position of the
temperature knob and generally its temperature is
maintained lower than the set-up temperature of
the refrigerator.
Fresh Converter
Meat Fish Vegetable
Fresh Converter
Meat
Fish
Vegetable
Fresh Converter
Meat
Fish
Vegetable
Fresh Converter
Meat
Fish
Vegetable
Type 1 Type 2 Type 3
Type 1 designed for storing meat, type 2 for fish
and type 3 for vegetables.
•
To store more food in "Fresh Converter",
pull out the drawer.
Vegetable drawer can adjust the humidity by
moving the knob.
If moved to the left side, cover and tray are opened,
and if moved to the right side, cover and tray are
closed – therefore, it can maintain the humidity.
Closed state is recommended for keeping
vegetables (type 2), and open state is recommended for
keeping fruits (type 1).
Type 1 Type 2
•
Temperature for the refrigerator: +3
° С
•
Temperature for the freezer: -20
° С
•
Middle position (type 2) in Fresh Converter
•
For optimal storage conditions of meat, fish or
vegetables it is recommended to set the knob in
mode according to goods.

SMART FUNCTIONS
EN
Using LG SmartThinQ
Application
Wireless LAN Module Specifications
Model LCW-004
Frequency
Range
2412 to 2472 MHz
Output
Power(Max)
IEEE 802.11b:17.82 dBm
IEEE 802.11g:17.72 dBm
IEEE 802.11n:16.61 dBm
Declaration of Conformity
Hereby, LG Electronics declares that the radio
equipment type refrigerator freezer is in compliance
with Directive 2014/53/EU. The full text of the
EU declaration of conformity is available at the
following internet address:
http://www.lg.com/global/support/cedoc/cedoc#
LG Electronics European Shared Service Center B.V.
Krijgsman 1
1186 DM Amstelveen
The Netherlands
17
For consideration of the user, this device should
be installed and operated with a minimum distance
of 20 cm between the device and the body.
Wireless funtion S/W version : V 1.0
Things to check before using
LG SmartThinQ
1
Check the distance between the
appliance and the wireless router (Wi-Fi
network).
• If the distance between the appliance
and the wireless router is too far,
the signal strength becomes weak.
It may take a long time to register or
installation may fail.
2
Turn off the Mobile data or Cellular Data
on your smartphone.
• Turn data off by going to
Settings → Cellular → Cellular Data.
3
Connect your smartphone to the wireless
router
.
NOTE
• To verify the Wi-Fi connection, check that
Wi-Fi
icon on the control panel is lit.
• The appliance supports 2.4 GHz Wi-Fi
networks only. To check your network
frequency, contact your Internet service
provider or refer to your wireless router
manual.
• LG SmartThinQ is not responsible for any
network connection problems or any faults,
malfunctions, or errors caused by network
connection.
• If the appliance is having trouble connecting
to the Wi-Fi network, it may be too far from
the router. Purchase a Wi-Fi repeater (range
extender) to improve the Wi-Fi signal strength.
• The Wi-Fi connection may not connect or may
be interrupted because of the home network
environment.
• The network connection may not work properly
depending on the Internet service provider.
• The surrounding wireless environment can
make the wireless network service run slowly.
• The appliance cannot be registered due to
problems with the wireless signal transmission.
Unplug the appliance and wait about a minute
before trying again.
• If the firewall on your wireless router is
enabled, disable the firewall or add an
exception to it.
• The wireless network name (SSID) should be
a combination of English letters and numbers.
(Do not use special characters).
• Smartphone user interface (UI) may vary
depending on the mobile operating system
(OS) and the manufacturer.
.
• If the security protocol of the router is set to
WEP, you may fail to set up the network.
Please change it to other security protocols
(WPA2 is recommended) and register the
product again.
Installing LG SmartThinQ
Search for the LG SmartThinQ application from
the Google Play Store or Apple App Store on a
smart phone. Follow instructions to download
and install the application.
Settings
Allows you to set various options on the
refrigerator and in the application.
NOTE
• If you change your wireless router, Internet
service provider, or password, delete the
registered appliance from the LG SmartThinQ
application and register it again.
• The application is subject to change for
appliance improvement purposes without
notice to users.
• Functions may vary by model.
• For appliances with the or logo

18
•
Position the phone so that its microphone is
aligned with the speaker hole.
•
The Smart Diagnosis™ sound is generated
after around 3 seconds.
•
Do not take the phone o ff the speak hole
while the data is transmitted.
•
Hold the phone on the upper right speaker
hole and wait while the data is transmitted.
•
The data transfer sound may be harsh to the
ear while the Smart Diagnosis™ data is being
transmitted, but do not take the phone o ff the
speaker hole fo r accurate diagnosis until the
data transfer sound has stopped.
2
Following the operator's instructions, bring
the microphone of your phone as close to
the SmartDiagnosis sign as possible. Hold
your phone in this position until the data
transfer is complete.
3
The Customer Support Center operator
may ask you to repeat the data transfer if
operator considers the results corrupted or
incomplete.
4
In order to cease transmitting data and
turn off SmartDiagnosis™, push Lock
button and Freezer Temperature Control
buttons.
NOTE
•
The Smart Diagnosis™ function depends on the
local call quality..
•
The Smart Diagnosis™ function cannot
be used if the refrigerator is not plugged in.
•
If the Smart Diagnosis™ data transfer is
poor due to poor call quality, you may not
receive the best Smart Diagnosis™ service.
EN
5
As soon as the transfer is complete, you
can continue the conversation with the
operator, who will send the information to
technical support for analysis.
Open Source Software Notice
Information
To obtain the source code under GPL, LGPL,
MPL, and other open source licenses, that is
contained in this product, please visit
http://opensource.lge.com. In addition to the
source code, all referred license terms, warranty
disclaimers and copyright notices are available
for download. LG Electronics will also provide
open source code to you on CD-ROM for a
charge covering the cost of performing such
distribution (such as the cost of media, shipping,
and handling) upon email request to
[email protected]. This offer is valid for a
period of three years after our last shipment of t
his product. This offer is valid to anyone in receipt
of this information.
Smart Diagnosis™ Through the
Customer Information Centre
Use this function if you need an accurate diagnosis
by an LG Electronics customer information center
when the appliance malfunctions or fails. Use this
function only to contact the service representative,
not during normal operation.
1
Close the refrigerator compartment door, push
«Lock Hold 3sec.» button and hold it for 3
seconds until lock function activation, then push
the freezer compartment temperature control button
and hold it for 3 seconds, then open the refrigerator
compartment door
• For appliances with the or logo

19
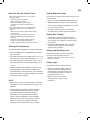
MAINTENANCE
Notes for Cleaning
•
When removing a shelf or drawer from inside the
appliance, remove all stored foods.
–
Otherwise, injury may occur due to the weight of
stored foods.
•
If cleaning the outside air vents of the appliance by
means of vacuuming, then the power cord should
be unplugged from the outlet to avoid any static
discharge than can damage the electronics or cause
an electric shock.
•
Detach the shelves and drawers and clean them with
water, and then dry them sufficiently, before
replacing them.
•
Regularly wipe the door gasket with a wet soft towel.
•
Door basket spills and stains should be cleaned as
they can compromise storage ability of the basket and
could even be damaged.
•
After cleaning, check if the power cable is damaged,
warm or improperly plugged.
•
Keep the air vents on the exterior of the appliance
clean.
–
•
For the appliance exterior, use a clean sponge or soft
cloth and a mild detergent in warm water. Do not use
abrasive or harsh cleaners. Dry thoroughly with a soft
cloth.
•
Never clean the shelves or containers in the
dishwasher.
–
The parts may become deformed due to the heat.
•
If the appliacne is equipped with an LED lamp, do not
remove lamp cover and LED lamp in any attempt to
repair or service it. Please, contact an LG Electronics
customer information centre.
Blocked air vents can cause fire or appliance damage.
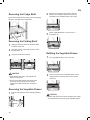
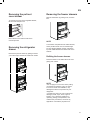
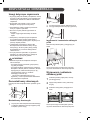
Removing the Fridge Door
Basket
Hold both edges of the basket and remove it by lifting it
upward.
Refitting the Fridge Door Basket
1
Hold both edges of the door basket, gently push
one edge to assemble, and then in the same
manner assemble the other edge.
2
After refitting, tap the door basket gently to
fix it horizontally.
EN
CAUTION
•
When cleaning the inside or outside of the appliance:
- do not wipe it with a rough brush, hot water,
or toothpaste;
- do not use cleaning agents containing flammable
substances: alcohol (ethanol, methanol, isopropyl
alcohol, isobutyl alcohol, etc.), thinner, gasoline,
benzene etc.;
- do not use abrasive or bleach, this may cause
discoloration or damage to the appliance.

20
EN
Removing the Fridge Shelf
Remove the fridge shelf by pulling it out while slightly
lifting the rear edge of the fridge shelf.
Removing the Folding Shelf
1
Slightly lift the front half of the shelf and slide
it under the rear half.
2
Take both halves of the shelf out of the frame
by lifting them up.
3
Lifting the shelf frame and pull.
Removing the Vegetable Drawer
1
Remove the fridge door lower basket by pulling
it up.
2
Remove the contents of the drawer. Hold the
handle of the vegetable drawer and pull it out
completely until it outward gently until it stops.
3
Lift the vegetable drawer up and remove it
by pulling it out.
1
If the vegetable drawer has a cover, lift it.
2
Insert the bottom of the vegetable drawer into its
original position and ently push it back in while
lowering it.
CAUTION
•
Please note that injuries can be caused by the weight
of stored foods when removing the vegetable drawer.
Refitting the Vegetable Drawer
CAUTION
•
Glass shelves are heavy. Use special care
when removing them.
•
Do not clean glass shelves with warm water
while they are cold. Shelves may break if
exposed to sudden temperature changes or
impact.
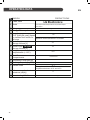
Strona jest ładowana ...
Strona jest ładowana ...
Strona jest ładowana ...
Strona jest ładowana ...
Strona jest ładowana ...
Strona jest ładowana ...
Strona jest ładowana ...
Strona jest ładowana ...
Strona jest ładowana ...
Strona jest ładowana ...
Strona jest ładowana ...
Strona jest ładowana ...
Strona jest ładowana ...
Strona jest ładowana ...
Strona jest ładowana ...
Strona jest ładowana ...
Strona jest ładowana ...
Strona jest ładowana ...
Strona jest ładowana ...
Strona jest ładowana ...
Strona jest ładowana ...
Strona jest ładowana ...
Strona jest ładowana ...
Strona jest ładowana ...
Strona jest ładowana ...
Strona jest ładowana ...
Strona jest ładowana ...
Strona jest ładowana ...
Strona jest ładowana ...
Strona jest ładowana ...
Strona jest ładowana ...
Strona jest ładowana ...
Strona jest ładowana ...
Strona jest ładowana ...
Strona jest ładowana ...
Strona jest ładowana ...
Strona jest ładowana ...
Strona jest ładowana ...
Strona jest ładowana ...
Strona jest ładowana ...
Strona jest ładowana ...
Strona jest ładowana ...
Strona jest ładowana ...
Strona jest ładowana ...
Strona jest ładowana ...
Strona jest ładowana ...
Strona jest ładowana ...
Strona jest ładowana ...
-
 1
1
-
 2
2
-
 3
3
-
 4
4
-
 5
5
-
 6
6
-
 7
7
-
 8
8
-
 9
9
-
 10
10
-
 11
11
-
 12
12
-
 13
13
-
 14
14
-
 15
15
-
 16
16
-
 17
17
-
 18
18
-
 19
19
-
 20
20
-
 21
21
-
 22
22
-
 23
23
-
 24
24
-
 25
25
-
 26
26
-
 27
27
-
 28
28
-
 29
29
-
 30
30
-
 31
31
-
 32
32
-
 33
33
-
 34
34
-
 35
35
-
 36
36
-
 37
37
-
 38
38
-
 39
39
-
 40
40
-
 41
41
-
 42
42
-
 43
43
-
 44
44
-
 45
45
-
 46
46
-
 47
47
-
 48
48
-
 49
49
-
 50
50
-
 51
51
-
 52
52
-
 53
53
-
 54
54
-
 55
55
-
 56
56
-
 57
57
-
 58
58
-
 59
59
-
 60
60
-
 61
61
-
 62
62
-
 63
63
-
 64
64
-
 65
65
-
 66
66
-
 67
67
-
 68
68


w innych językach
- English: LG GBB940BMQZT Owner's manual
Powiązane dokumenty
-
LG LSR200B Instrukcja obsługi
-
LG GBB940BMQZT Instrukcja obsługi
-
-
-
LG GSX960 Instrukcja obsługi
-
-
LG GSL761PZXV SBS FFREEZER WTD SS Instrukcja obsługi
-
LG GSB760PZXV American Fridge Freezer Instrukcja obsługi
-
Inne dokumenty
-
Beko RCHE39OK3OXPN Instrukcja obsługi
-
Candy CCQP4T620CX Instrukcja obsługi
-
Dometic CU407 Instrukcja obsługi
-
Haier A3FE737CPJM Instrukcja obsługi
-
Samsung RL43THCSW Instrukcja obsługi
-
Electrolux ERB2623 Instrukcja obsługi
-
Electrolux EN3850DOX Instrukcja obsługi
-
Amica BK3235.4DFOM Instrukcja obsługi
-
Beko GN1416231JX Instrukcja obsługi
-
Haier C2FE836CXJ Instrukcja obsługi