HUUM CORE ELECTRIC SAUNA HEATER Instrukcja obsługi
- Typ
- Instrukcja obsługi

[email protected] www.huum.eu
CORE
ELECTRIC SAUNA HEATER 3–13
SAUNA ELEKTRIKERIS 15–25
SÄHKÖKIUKAAN 27–37
ELEKTRISCHER SAUNAOFEN 39–49
ЭЛЕКТРОКАМЕНКИ 51–61
ELEKTRISKT BASTUAGGREGAT 63–73
STUFA ELETTRICA PER SAUNA 75–85
PIEC ELEKTRYCZNY DO SAUNY 87–97
ELEKTRICKÝOHŘÍVAČ 99–109
POÊLE ÉLECTRIQUE 111-121

2

3
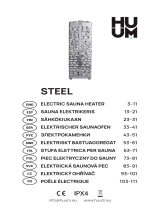
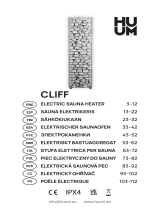
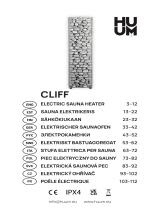
CORE
ELECTRIC SAUNA HEATER
Installation and operation manual
NB! The following instructions for electrical works must be carried out
-
requirements for sauna heating appliances and infrared cabins”.
• electric heater;
• installation and operation manual for the electric heater.
•
strip fastening screws.
NB!

4
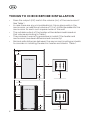
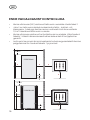
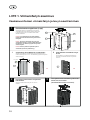
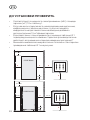
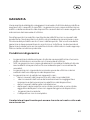
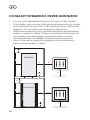
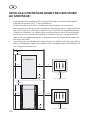
THINGS TO CHECK BEFORE INSTALLATION
• Does the output (kW) match the volume (m3) of the sauna room?
•
sauna room for each such square meter of the wall.
• The suitable output of the heater will be determined based on
• The producer’s warranty guarantee is invalid if the heater and
sauna room have been dimensioned incorrectly!
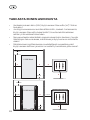
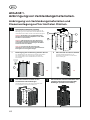
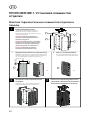
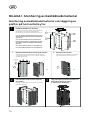
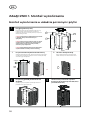
•
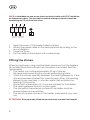
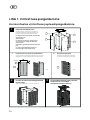
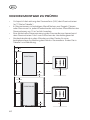
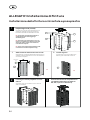
H
min 1200
A
A
A
A
CORE Black
min 25
H
min 1200
Amin 20min 20
A
CORE BK/SS
min 25

5
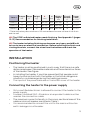
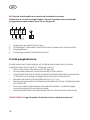
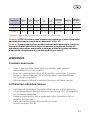
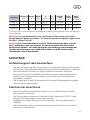
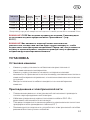
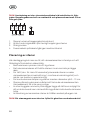
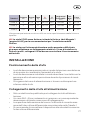
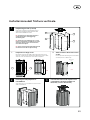
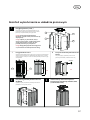
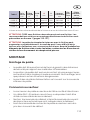
Table 1 Output
kW Room
m3Weight
kg A
mm H
mm
Width/
Depth
mm
Circuit
Breaker
A
Power
cable
N × mm
6 6 830
385/385
9 9 830
385/385
830
385/385
and the wall
NB!
NB!
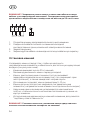
INSTALLATION
Positioning the heater
• The heater must be positioned in such a way that there is a safe
of the heater. See Figure.
•
have physical contact with the heater or that other dangerous
situations could emerge during the heating process.
• T
heater.
Connecting the heater to the power supply
•
power supply.
•
used as the connection cable.
• The maximum current intensity in the cross-sectional area of the
• It is recommended to connect the unit to the mains without an
earth-leakage circuit breaker.

6
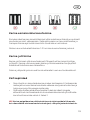
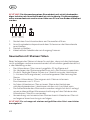
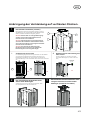
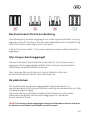
NB! It is forbidden to use a non-heat-resistant cable with PVC isolation
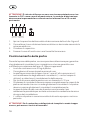
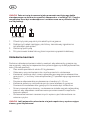
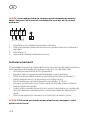
3/N ~ 400V
L1 L3 NL2
circuit diagram.
3.
Fix the cable on the output with a cable strap.
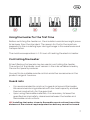
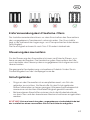
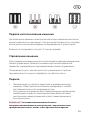
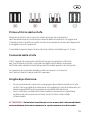
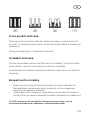
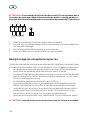
Fiingthestones
• The heater can hold approximately 30 kg of stones.
• We recommend washing the stones before laying them.
• Stack the stones sparsely between the heating elements. If the
elements may overheat (= shorter useful life) and slow the
heating of the sauna.
•
• The heating elements must not be visible
• The stones on the external surface of the heater must be
stacked close to one another.
• The use of ceramic stones in the heater is allowed at your own
risk.
ATTENTION!

7
Usingtheheaterforthefirsttime
to be lower than the standard. The reason for that is the moisture
seeped into the insulating layer during storage in the warehouse and
transportation.
Controlling the heater
The output of the heater must remain in the interval determined by
the control panel’s producer.
product range at huum.eu.
Guard rails
• It is recommended to construct a guard rail around the heater.
We recommend using materials with low heat capacity and bad
thermal conductivity for the guard rail.
•
NB!

8
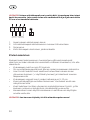
SAUNA ROOM
Wall materials and insulating the sauna room
the electric heater with a regular output.
The following sauna wall and ceiling construction is considered
•
• the construction is damp proofed with taped aluminium paper or
• t
boarding;
•
• there is an air gap of at least 5 mm on the edge of the ceiling
panels at the upper part of the wall panelling.
room diminishes. The ceiling is insulated with an insulation laer at
above.
Wood should be used to cover internal surfaces; an exception may be
made for heat resistant walls in the vicinity of the heater.
ATTENTION!
NB!

9
Floor of the sauna room
The heater stones in use crumble due to temperature changes.
The pieces and pebbles breaking away from the heater stones are
order to avoid aesthetic damage (caused by the reasons mentioned
around the heater.
Ventilationofthesauna
•
advisable to direct the fresh air into the sauna room from above
the heater stones.
•
heater.
• The air inlet must be equipped with an adjustable valve.
• The exhaust valve must be installed in the opposite wall from the
• It is advised to install a ventilation valve at the upper part of the

10
WARNING!
•
room and heater.
•
with stones.
•
•
• Ventilating the sauna room incorrectly may dry the wood too
•
• Never make steam by using a water hose.
•
under the boarding.
• Sauna doors must always open outward.
• Do not use the sauna for any other purpose than it is meant to be
used.
• Do not install more than one heater in the sauna room.
•
on the stones.
•
• Sudden cooling after staying in the steam room is not
• Enjoy the sauna as long as it is comfortable for you.
• Keep this information in a secure place.
• The product’s warranty guarantee does not extend to heating
elements.

11
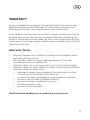
WARRANTY
requirements presented. Damage to the product caused by not
following instructions and requirements will void warranty.
product. Demands must be made not later than 5 years after buying
the product. Purchase receipt needs to be presented when warranty
demands are made.
Warranty Terms
• Warranty applies only to electric heaters that have been used
according to the manual
•
considered as consumable parts.
• Warranty does not cover wear that occurs from natural usage.
• Warranty does not cover defects or wear caused by planned use.
•
• damage or defects are caused by transportation or other
actions not controlled by manufacturer;
• product has been damaged by carelessness or overload;
• product has not been installed correctly;
•
• warranty period is over;
• product is not complete.

12
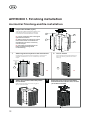
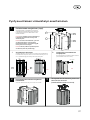
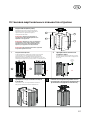
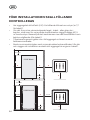
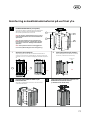
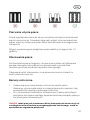
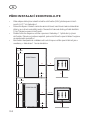
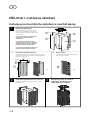
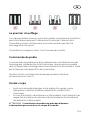
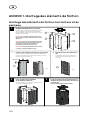
APPENDIX 1. Finishing installation
Horizontalfi nishingandtileinstallation
1Prepare the shields (4 pcs)
Make sure that there is a minimum air gap of
25 mm under the heater
Choose the right screws to secure the finish. The maximum
diameter of the screw is 4.2 mm. If necessary, consult an
expert.
At this stage, we recommend aaching
the corner moldings to the two shield
moldings.
Corner shieldsAaching the wood panel to the metal shield
2x
2 3
A
B
B
A
The instructions below are recommended and are
intended for aaching timber or slabs from
horizontal slats to the CORE electric heater.
NB! Consult a specialist when choosing the
right fasteners and tools.
NB! Make sure that the material you want to
finish with the heater is suitable for the
intended use in the sauna. If necessary,
consult an expert.
NB! The weight of one side panel of the
heater including finishing should
not exceed 20 kg.
x 2
B
Place the cover strips on the heater
and fasten them with M4,2x9,5 screws
(16 screws included).
Aach the prefabricated side panels
to the heater
1
2
A
2x
7
386
( 800 )
Openings pointing
upwards
x 4

13
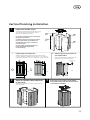
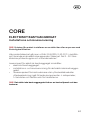
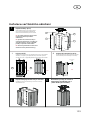
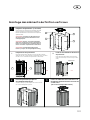
Verticalfi nishinginstallation
A
B
B
A
1
1 2
Prepare the shields (4 pcs)
Aach the base plates to the shields with
M5x8 screws (24 screws included).
Select the appropriate screws to secure the finish to the
mounting brackets (available as an accessory). The maximum
diameter of the screw is 4.2 mm. If necessary, consult an expert.
Preparing the wood panels Aaching the wood panels to
the metal shield
Aach the prefabricated side panels
to the heater.
2 3
The instructions below are recommended and are
intended for aaching material from vertical
slats to the CORE electric heater.
NB! Consult a specialist when choosing the
right fasteners and tools.
NB! Make sure that the material you want to
finish with the heater is suitable for the
intended use in the sauna. If necessary,
consult an expert.
NB! The weight of one side panel of the
heater including finishing should
not exceed 20 kg.
Make sure that there is a minimum air gap of 25 mm
under the heater.
Place the cover strips on the heater
and fasten them with M4,2x9,5 screws
(16 screws included).
x 4
Openings pointing
upwards
x 2x 2
( 800 )S
A B
80 648
386
80 648
386 + 2 x S
( 800 )

14

15
CORE
SAUNA ELEKTRIKERIS
Paigaldus- ja kasutusjuhend
NB!
-
• elektrikeris;
• elektrikerise paigaldus– ja kasutusjuhend;
•
kinnituskruvid.
NB!

16
ENNE PAIGALDAMIST KONTROLLIDA
•
•
•
garantii.
• Leiliruumi lae ja seinte minimaalsed ohutuskaugused elektrikerise
H
min 1200
A
A
A
A
CORE Black
min 25
H
min 1200
Amin 20min 20
A
CORE BK/SS
min 25

17
Tabel 1 Võimsus
kW Ruum
m3
Kaal
kg A
mm H
mm
Laius/
mm
Kaitse
A
Toite-
kaabel
N × mm
6 6 830 385/385
9 9 830 385/385
830 385/385
NB!
NB!
-
PAIGALDAMINE
Kerise paigutamine
•
• Kerise paigaldusega peab olema välistatud inimese ja kerise
tekkimine.
•
Elektrivõrguga ühendamine
•
•
•
•
kaitsmelülitita

18
NB! Kerise toitekaablina on keelatud kasutada kuumust
3/N ~ 400V
L1 L3 NL2
Avage kerise elektrikarbi kaas.
Ühendage toitekaabel vastavalt elektriskeemile klemmliistule.
3. Sulgege kaas.
Fikseerige kaabel kaabliklambrisse.
Kivide paigaldamine
• Keris mahutab orienteeruvalt 30 kg kive.
• Enne kivide ladumist soovitame kivid puhtaks pesta.
•
(= lühem kasutusaeg) ja aeglustavad sauna kuumenemist.
•
•
tohi näha olla.
•
kuumuse kiirgumist kerise korpusele
• Keraamiliste kivide kasutamine kerises on lubatud omal vastutusel.
TÄHELEPANU!

19
Kerise esmakordne kasutamine
transportimise ajal isolatsioonikihi sisse imbunud niiskus.
Kerise juhtimine
Sobiva juhtpuldi ja ka muud tarvikud leiate huum.eu tootevalikust.
Kaitsepiirded
• Soovituslik on kasutada kerise ümber kaitsepiiret. Kaitsepiirde
materjalina soovitame kasutada väikese soojusmahutavuse ja
halva soojusjuhtivusega materjale.
•
NB!

20
LEILIRUUM
Leiliruumi isoleerimine ja seinamaterjalid
kerise kasutamiseks isoleerida.
•
mm);
•
muu peegeldav materjal;
•
•
voodrilaud;
• seinavoodri ülaosas laepaneelide piiril on vähemalt 5 mm
vooderdatakse ülal kirjeldatud viisil.
kuumuskindlad seinad kerise vahetusläheduses.
TÄHELEPANU!
NB!
Strona się ładuje...
Strona się ładuje...
Strona się ładuje...
Strona się ładuje...
Strona się ładuje...
Strona się ładuje...
Strona się ładuje...
Strona się ładuje...
Strona się ładuje...
Strona się ładuje...
Strona się ładuje...
Strona się ładuje...
Strona się ładuje...
Strona się ładuje...
Strona się ładuje...
Strona się ładuje...
Strona się ładuje...
Strona się ładuje...
Strona się ładuje...
Strona się ładuje...
Strona się ładuje...
Strona się ładuje...
Strona się ładuje...
Strona się ładuje...
Strona się ładuje...
Strona się ładuje...
Strona się ładuje...
Strona się ładuje...
Strona się ładuje...
Strona się ładuje...
Strona się ładuje...
Strona się ładuje...
Strona się ładuje...
Strona się ładuje...
Strona się ładuje...
Strona się ładuje...
Strona się ładuje...
Strona się ładuje...
Strona się ładuje...
Strona się ładuje...
Strona się ładuje...
Strona się ładuje...
Strona się ładuje...
Strona się ładuje...
Strona się ładuje...
Strona się ładuje...
Strona się ładuje...
Strona się ładuje...
Strona się ładuje...
Strona się ładuje...
Strona się ładuje...
Strona się ładuje...
Strona się ładuje...
Strona się ładuje...
Strona się ładuje...
Strona się ładuje...
Strona się ładuje...
Strona się ładuje...
Strona się ładuje...
Strona się ładuje...
Strona się ładuje...
Strona się ładuje...
Strona się ładuje...
Strona się ładuje...
Strona się ładuje...
Strona się ładuje...
Strona się ładuje...
Strona się ładuje...
Strona się ładuje...
Strona się ładuje...
Strona się ładuje...
Strona się ładuje...
Strona się ładuje...
Strona się ładuje...
Strona się ładuje...
Strona się ładuje...
Strona się ładuje...
Strona się ładuje...
Strona się ładuje...
Strona się ładuje...
Strona się ładuje...
Strona się ładuje...
Strona się ładuje...
Strona się ładuje...
Strona się ładuje...
Strona się ładuje...
Strona się ładuje...
Strona się ładuje...
Strona się ładuje...
Strona się ładuje...
Strona się ładuje...
Strona się ładuje...
Strona się ładuje...
Strona się ładuje...
Strona się ładuje...
Strona się ładuje...
Strona się ładuje...
Strona się ładuje...
Strona się ładuje...
Strona się ładuje...
Strona się ładuje...
Strona się ładuje...
Strona się ładuje...
Strona się ładuje...
-
 1
1
-
 2
2
-
 3
3
-
 4
4
-
 5
5
-
 6
6
-
 7
7
-
 8
8
-
 9
9
-
 10
10
-
 11
11
-
 12
12
-
 13
13
-
 14
14
-
 15
15
-
 16
16
-
 17
17
-
 18
18
-
 19
19
-
 20
20
-
 21
21
-
 22
22
-
 23
23
-
 24
24
-
 25
25
-
 26
26
-
 27
27
-
 28
28
-
 29
29
-
 30
30
-
 31
31
-
 32
32
-
 33
33
-
 34
34
-
 35
35
-
 36
36
-
 37
37
-
 38
38
-
 39
39
-
 40
40
-
 41
41
-
 42
42
-
 43
43
-
 44
44
-
 45
45
-
 46
46
-
 47
47
-
 48
48
-
 49
49
-
 50
50
-
 51
51
-
 52
52
-
 53
53
-
 54
54
-
 55
55
-
 56
56
-
 57
57
-
 58
58
-
 59
59
-
 60
60
-
 61
61
-
 62
62
-
 63
63
-
 64
64
-
 65
65
-
 66
66
-
 67
67
-
 68
68
-
 69
69
-
 70
70
-
 71
71
-
 72
72
-
 73
73
-
 74
74
-
 75
75
-
 76
76
-
 77
77
-
 78
78
-
 79
79
-
 80
80
-
 81
81
-
 82
82
-
 83
83
-
 84
84
-
 85
85
-
 86
86
-
 87
87
-
 88
88
-
 89
89
-
 90
90
-
 91
91
-
 92
92
-
 93
93
-
 94
94
-
 95
95
-
 96
96
-
 97
97
-
 98
98
-
 99
99
-
 100
100
-
 101
101
-
 102
102
-
 103
103
-
 104
104
-
 105
105
-
 106
106
-
 107
107
-
 108
108
-
 109
109
-
 110
110
-
 111
111
-
 112
112
-
 113
113
-
 114
114
-
 115
115
-
 116
116
-
 117
117
-
 118
118
-
 119
119
-
 120
120
-
 121
121
-
 122
122
-
 123
123
-
 124
124


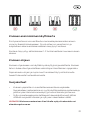
HUUM CORE ELECTRIC SAUNA HEATER Instrukcja obsługi
- Typ
- Instrukcja obsługi
w innych językach
Powiązane artykuły
-
HUUM DROP Electric Sauna Heater Instrukcja obsługi
-
 HUUM 4744103010233 Instrukcja obsługi
-
-
HUUM HIVE Instrukcja obsługi
-
-
 HUUM Cliff Electric Sauna Heater Instrukcja obsługi
-
 HUUM 4744103010332 Instrukcja instalacji
-
 HUUM 4744103010332 Instrukcja instalacji
-
 HUUM Hive Heat Instrukcja obsługi
-
HUUM HIVE Wood Instrukcja instalacji


Inne dokumenty
-
HARVIA HPC704XW Instructions for Installation and Use
-
HARVIA SW45 Instructions For Installation And Use Manual
-
Tylö SENSE SPORT COMBI Installation#hs_cos_wrapper_module_170083095099528 .icon-style--link .g-module-macros-icon { padding-left:8px; } #hs_cos_wrapper_module_170083095099528 .icon-style--link .g-module-macros-icon svg { fill:#C65622; } Instrukcja obsługi
-
Narvitech NM, MINEX, NS Sauna Heater Instrukcja instalacji
-
Sentiotec Home premium combi Instrukcja obsługi
-
-
-
-
-