Gigabyte GV-N84S-512l Instrukcja obsługi
- Kategoria
- Karty graficzne
- Typ
- Instrukcja obsługi

GIGABYTE
Щ nViDIA

GV-N84S-51Ш
NVIDIA® GeForce™ 8400 GS Graphics Accelerator
User's Manual
Rev. 102
12MM-N84S5I-102R
Copyright
© 2009 GIGABYTE TECHNOLOGY CO., LTD
Copyright by GIGA-BYTE TECHNOLOGY CO., LTD. ("GBT"). No part of this manual may be reproduced or transmitted
in any form without the expressed, written permission of GBT.
Trademarks
Third-party brands and names are the properties of their respective owners.
Notice
Please do not remove any labels on this graphics card. Doing so may void the warranty of this card.
Due to rapid change in technology, some of the specifications might be out of date before publication of this this manual.
The author assumes no responsibility for any errors or omissions that may appear in this document nor does the author
make a commitment to update the information contained herein.
Macrovision corporation product notice:
This product incorporates copyright protection technology that is protected by U.S. patents and other intellectual property
rights. Use of this copyright protection technology must be authorized by Macrovision, and is intended for home and other
limited viewing uses only unless otherwise authorized by Macrovision. Reverse engineering or disassembly is prohibited.

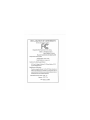
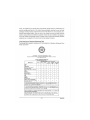
Declaration of Conformity
We, Manufacturer/Importer
(tut *.<мпив)
G.B.T. Technology Trading GMbH
Bultenkoppe) 18,22047 Hamburg, Germany
declare thai the product
(description of the apparatus, sy "em, Installation to which it refers)
VGA Card
GV-N84S-512I
is in conformity with
(reference to the specification under which conformity is declared)
in accordance with 2004,'ЮШЕС EMC Dire-.4ve
Limits and methods of m
of radio disturbance characteristics of
industrial, scientific and medical (ISM)
high frequency equipment
• EN 55013 Limits and methods of m.
of radio disturbance characteristics of
broadcast receivers and associated
equipment
• EN 55014-1 Limits and methods of measurement
of radio disturbance characteristics of
household electrical appliances,
portable tools and similar electrical
apparatus
0 EN 61000-3-2 Disturbances in supply syster e caused
В EN 61000-3-3 Disturbances in eupply systems caused
by household appliances and similar
electrical equipment "Voltage fluctuations"
В EN 55024 information Technology
equipment-Immunity
characteristics-Limits and methods of
O EN 50082-2
Limits and methods of measurement
of radio disturbance characteristics of
fluorescent lamps and luminaries
Immunity from radio interference of
broadcast rece..'ers and assoi died
equipment
D EN 55014-2
EMC requirements for uninterruptible
power systems (UPS)
• DIN VDE 0855 Cabled distribution svstems; Equipment
C€
(EC conformity marking)
Safety requirements for mains operated
electronic and related apparatus for
household and similar general use
Manufarturer'lrnpprter
Signature:
(Stamp)
Date; June. 15,2009
Timmy Huang

DECLARATION OF CONFORMITY
Per FCC Part 2 Section 2.1077(a)
Responsible Party Name: G.B.T. INC. (U.S.A.)
Address: 17358 Railroad Street
City of Industry, CA 91748
Phone/Fax No: (8X8) 854-9338/ (818) 854-9339
hereby declares that the product
Product Name: VGA Card
Model Number: GV-N84S-5121
Conforms to the following specifications:
FCC Part 15, Subpart B, Section 15.107(a) and Section 15.109
(a),Class В Digital Device
Supplementary Information:
This device complies with part 15 of the FCC Rules. Operation is
subject to the following two conditions: (1) This device may not
cause harmful and (2) this device must accept any inference received,
including that may cause undesired operation.
Representative Person's Name: ERIC LU
Signature: Eri<• Lv.
Date: June. 15.2009

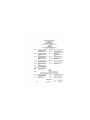
Table of Contents
1. Introduction 4
1.1. Features 4
1.2. Minimum System Requirements 4
2. Hardware Installation 5
2.1. Board Layout 5
2.2. Hardware Installation 7
3. Software Installation 9
3.1. Driver and Utility Installation 9
3.1.1. Driver Installation 9
3.1.2. GIGABYTE Gamer HUD Lite on Driver Disk 11
3.2. Display Properties Pages 13
3.3. Accessing NVIDIA Control Panel 14
4. Troubleshooting Tips 22
5. Appendix 23
5.1. How to Reflash the BIOS in MS-DOS Mode 23
5.2. Resolutions and Color Depth Tables 24
5.3. Regulatory Statements 26

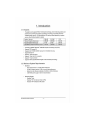
1. introduction
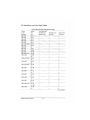
1.1. Features
• The graphics card supports NVIDIA TurboCache technology, which enhances graphics card
performance by allowing the graphics processing unit (GPU) to dynamically share the
available system memory. The total effective VGA memory differs depending on system
memory. See the following table for details:
System Memory
256MB 512MB 1 GB
Onboard Graphics Memory (a)
256 MB 256 MB
512MB
Allocated System Memory (b)
0 MB 0 MB 256 MB
Total Effective Graphics Memory (a)+(b)
256 MB 256 MB 76» MB
• Powered by NVIDIA® GeForce™ 8400 GS Graphics Processing Unit (GPU)
• Supports PCI Express 2.0
• Integrated with 512MB GDDR2 memory (For GV-N84S-512I only)
• Supports DirectX 10
• Supports
1
HDMI connector
• Supports
1
Dual-Link DVI-I connector
• Supports
1
D-sub connector
• Supports HDCP (High-Bandwidth Digital Content Protection) technology
1.2. Minimum System Requirements
• Hardware
- Intel" Pentium®/Core™ 2 or AMD Athlon
M
/Phenom™
128 M В of system memory; 2 GB or more for best performance
- Optical drive for software installation (CD-ROM or DVD-ROM drive)
- A 300 Watt power supply or above is recommended
• Operating System
- Windows® Vista
- Windows® XP with Service Pack 2 (SP2)
- Windows® XP Professional x64 Edition
GV-N84S-512I Graphics Accelerator
—
- 7 -

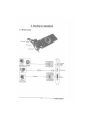
2. Hardware Installation
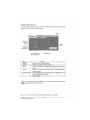
2.1. Board Layout
HDMI Connector
DVI-I Connector
D-Sub monitor Connector
(15-pin)
("TT-u-ij—j ""fl
ГГЬ
n,
*T"
as ч —
pnnr
HJUUL
I
m
D-Sub monitor
Connector
(15-pin)
HDMI Connector
DVI-I
Connector
-cFr
DVI Output
Hardware Installation

/\ Expansion cards contain very delicate Integrated Circuit (1С) chips. To
/ 1 \ protect them against damage from static electricity, you should follow some
CAUTION p
recau
tj
ons
whenever
you
work on your computer.
1. Turn off your computer and unplug power supply.
2. Use a grounded wrist strap before handling computer components. If
you
do not
have one, touch both of your hands to a safely grounded object or to a metal object,
such as the power supply case.
3. Place components on a grounded antistatic pad or
on
the bag that came with the
components whenever the components are separated from the system.
The card contains sensitive electric components, which can be easily damaged by static
electricity, so the card should be left
in
its original packing until it is installed.
Unpacking and installation should be done on a grounded anti-static mat. The operator
should be wearing an anti-static wristband, grounded at the same point as the anti-static
mat
Inspect the card carton for obvious damage. Shipping and handling may cause damage
to your card. Be sure there are no shipping and handling damages on the card before
proceeding.
DO NOT APPLY POWER TO YOUR SYSTEM IF THE GRAPHICS CARD IS
DAMAGED.
§
r
In order to ensure that your graphics card can work correctly, please use
official GIGABYTE BIOS only. Using non-official GIGABYTE BIOS might
cause problem(s) on the graphics card.
GV-N84S-512I Graphics Accelerator
—
- 9 -

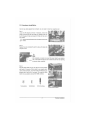
2.2. Hardware Installation
Now that you have prepared your computer, you are ready to install your graphics card.
Step 1.
Locate the PCI Express x16 slot. If necessary, remove the
metal cover from this slot; then align your graphics card with
the PCI Express x16 slot, and press it in firmly until the card is
fully seated.
Make sure that the gold edge connector of the graphics card is securely
noiir-' inserted.
Step 2.
Replace the screw to fasten the card in place, and replace the
computer cover.
A
CAUTION
After installation, remember to connect the power cable to your graphics
card, or the system will not boot. Do not touch the card when it's operating
to prevent system instability.
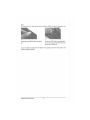
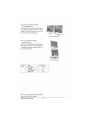
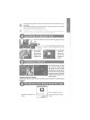
Step 3.
Plug the display cable into your card; then turn on the computer
and monitor. To connect a D-Sub monitor to your graphics card,
use the D-Sub connector. To connect a flat panel display to your
graphics card, use the DVI-I connector. To connect an HDMI
monitor to your graphics card,use the HDMI connector.
S3
JL
ПОП
t
To D-Sub Monitor To HDMI Monitor To Flat Panel Display
Connect a flat panel display
- 7 -
Hardware Installation

Step 4.
To connect an HDMI TV, follow the steps below to enable the S/PDIF in function for the graphics card.
1. 2.
Connect the provided S/PDIF cable to the graphics Connect the S/PDIF cable to the motherboard,
card. (the red wire connects to the S/PDIF out pin and
the black to the Ground pin)
You are now ready to proceed with the installation of the graphics card driver. Please refer to next
chapter for detailed instructions.
GV-N84S-512I Graphics Accelerator
—
- 11 -

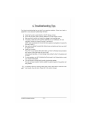
3. Software installation
Notice the following guidelines before installing the drivers:
1. First make sure your system has installed DirectX 9 or later version.
2. Make sure your system has installed the appropriate motherboard drivers (for the motherboard
drivers, please contact the motherboard manufacturer.)
3.1. Driver and Utility Installation
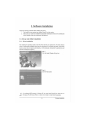
3.1.1. Driver Installation
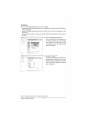
After installing the operating system, insert the driver disk into your optical drive. The driver Autorun
screen is automatically displayed which looks like that shown in the screen shot below. (If the driver
Autorun screen does not appear automatically, go to My Computer, double-click the optical drive and
execute the setup.exe program.)
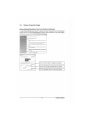
Step 1:
Click the Install Display Driver item.
Step 2:
Click the Next button.
For software MPEG support in Windows XP, you must install DirectX first. Users who run
„^f^ Windows XP with Service Pack 2 or above do not need to install DirectX separately.
- 9 - Software Installation

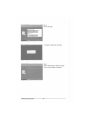
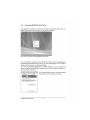
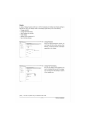
Step 3:
Click the Yes button.
yVIDJA Windows
Vista
[32-bit] Display Drivers
The system is installing the components.
Step 4:
Click the Finish button to restart the computer.
Then the driver installation is completed.
GV-N84S-512I Graphics Accelerator
—
- 10 -

3.1,2. GIGABYTE Gamer HUD Lite on Driver Disk
GIGABYTE
V
N84OO
GS
% Install DirectX 9
ф Install Display Driver
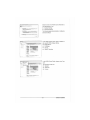
Step 1:
Click the GIGABYTE Gamer HUD Lite item.
P
iwtjff Ullage
Select
tt»
language
(a (hi
intfJaoon «ил
the
etaawt be
" ?H»IUn»BiSM»«l
OP . Lar>cel
Step 2:
Choose the language for the installation and click the OK button.
- 63
Welcome to the InstaBShleW wizard for
НЦ
Gamer
HUD
lite
7*1rattóSretóSl. •. •iJiJjMtfKayte» '-i
А *Ча sr«sw a се» out- and
1-е
Step 3:
Click the Next button.
Ready to Inttai! the Program
TV* - я <etiiwlaten,
.1
Step 4:
Click the Install button.
The system is installing the components.
Step 5:
Click the Finish button. Then the installation of
the GIGABYTE Gamer HUD Lite is completed.
- 11 - Software Installation

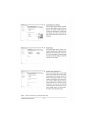
GIGABYTE Gamer HUD Lite
The GIGABYTE Gamer HUD Lite allows you to adjust the voltage of your graphics card and the working
frequency of the GPU, Shader, and video memory.
Help page
Enables manual adjustment Clock adjustment
11
™''
of the voltage/frequency
Button
Function
Default'"
0
'
8
'
Allows you to load the default settings
Apply'"
01
®
1
Allows you to save the values you adjust
Enable
Lets the utility optimize the voltage and GPU/Shader/memory frequency
settings
Disable
Allows you to manually configure the voltage and GPU/Shader/Memory
frequency settings
Hardware Monitor
Displays the GPU usage and temperature, the GPU usage/thermal curve
;
and your graphics card information
?
Opens Help page
/j\ incorrectly doing overclock/overvoltage may result in damage to your system and reduce
/ » \ the useful life of the system components.
CAUTION
(Note) This item is configurable only if 2D/3D Auto-Optimized is set to Disable.
—
- 12 -
GV-N84S-512I Graphics Accelerator

3.2. Display Properties Pages
Display Settings (Resolutions and Color Quality for Windows)
To access Display Settings page, right-click on desktop and select Personalize, then the Personalization
windows will show up. Select Display Settings to adjust the screen resolution and color quality settings.
лг T 4''' >'
wT"
P .1 ...аг-гагг
? £".d sounds
nd
style Ы
шг windows.
t •.
Rr
- leB.fi
ds are heird
when
you do
everything
from getting e-miv. to emptying your
se
j
,.nter. You
an also change how
the mouse pointer looks during such
and selecting.
including
the appea ance of menus, icons. ba< "(ground^ screen savers,
j^.-ne computer sounds.
^
Adjust, our mkfcito resolution,
which changes the
iuw m norc
or fewer
items fit on
the screen,
monitor
flicker (refresh rate).
1
щя a
I
. _ . .
1 Gen«n-PnPM£.-4tr-'n(MDIAGef/vc»a;33C5
-н
You can move the slider to change the resolution.
Besol> ont Colors;
• tow High [^hJin,
-н
You can click the item to change the color quality.
-. . . I ' "
'У. 'м
MdWKerfSettmgi ^
Ж C« _ I
-н
Click the Advanced button for advanced settings.
- 13 -
Software Installation

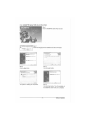
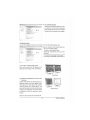
3.3. Accessing NVIDIA Control Panel
After installation of the display driver, right-click on the desktop and select NVIDIA Control Panel. The
NVIDIA Control Panel is used to configure all your graphics card settings.
Right-click on the desktop and select NVIDIA Control Panel.
Or you can right-click on the desktop and select Personalize, and then the Control Panel\Appearance
Personalization\Personalization window will show up. Select Display Settings. When the Display
Settings dialog box appears, click Advanced Settings.
After clicking the Advanced Settings button in Display Settings, you'll see the Generic PnP
Monitor and NVIDIA GeForce 8400 GS Properties dialog box. Click the GeForce 8400 GS tab to
access the NVIDIA Control Panel.
On the GeForce 8400 GS tab page, click Start the NVIDIA
Control Panel to launch the NVIDIA Control Panel.
'W
GeriSńcPnPM ач
>JQT MwB&sment
IW X* GeForce GTS "JO P-c .^tics
Morto 1 Tmut»Bhoj>
Looking for the NVIDIA Display Control Panel?
PS of the NVIDiA
raintrol
panels have been consofelated irfo a single
application, the fi. .DIA
Control
Panel. It can be launched From the Wra
Control Pand or
1
, .ight-cicking on the Windows desktop.
art'heli-
DIAC-whol Pane'
GV-N84S-512I Graphics Accelerator
—
- 14 -

fcffifflS'CoftfisstPane ««««Ммю»
Lfevj Choose the view tła is most appropriate
for
you.
standard Settng»
If you Ы e a new or casual user, select Standard Settngs. This
лет vv3
sJtipCfy many of the saeens you '«1 see,
at
Advanced Settings
Ifju are an enth ;=o.i or technical user, select Advanced Settings. '.Wr
ie« includes e3 of the screens and optora avafebfein Standard Settings,
pJus ^ of the advanced features.
you ta,i change
you.
view etany time ircde the Jontro! Pane). Toleamho»
Select the view of the NVIDIA Control Panel that is
most appropriate for you.
• Standard Settings
• Advanced Settings
The following pages provide details on configuring
advanced settings.
i
«а
—
•iit'.T - Sottl s ч! .. Pre'-iev «.^---W.
i H-E.™
Щ
Щ
!
i
»
a»™"— ~
~~ S3
J «'SI
st łmage Setnnes «*»£> preview
*• i
la
IS'
i a
In the NVIDIA Control Panel, select a category to
alter specific NVIDIA display settings.
The categories are:
• 3D Settings
• Display
• Video & Television
In the NVIDIA Control Panel, change a view if you
want.
The supported modes are:
• Standard
• Advanced
• Custom
- 15 -
Software Installation

3D Settings
Tasks in the 3D Settings pages allow you to do the following:
• Change the image and rendering settings of your 3D applications and games that utilize Direct3D and
OpenGL technology.
• Override the shipped clocked frequencies of your GPU and GPU memory to increase your GPU
performance.
• Assign specific 3D settings to a game so that these settings automatically load when a game is
launched.
• Adjust Image Settings with Preview
If you are unfamiliar with 3D technology or not
an advanced graphics user, use the Adjust
Image Settings with Preview page to preview
any changes you make for improved image
quality and rendering.
• Manage 3D Settings
<
NDte1
>
The Manage 3D Settings page enables you to
establish default 3D settings to use for all your
Direct3D or OpenGL applications and to estab-
lish a unique set of 3D settings for a particular
game or application.
(Note 1) This item is present only in Advanced view mode.
GV-N84S-5121 Graphics Accelerator - 16 -

Display
A variety of display features enable you to further manipulate and configure your display settings to
optimize the use of your displays. Tasks in the Display pages allow you to do the following:
• Change resolution
• Change Flat Panel Scaling
• Adjust desktop color settings
• Rotate display
• Manage custom resolutions
(Nole|
• Set up multiple displays
• Change Resolution
Using the Change Resolution controls, you
can change the color setting, reduce screen
flickering, or adjust the amount of information
appearing on your display.
Им» ' '23
«•; —-
г о Chan»» Fi* Panel Scaling
..
У
—«— ( -
I.' '
1
-
•
• Change Fiat Panel Scaling
Not using the display's native resolution may
result in a desktop that does not fill the display.
You can change how the desktop is scaled to
fit the viewable area.
(Note) This item is present only in Advanced view mode.
- 17 - Software Installation

• Adjust Desktop Color Settings
Use this page to set the contrast, sharpness,
and color depth (Digital Vibrance) of the im-
ages on your desktop. These changes will
not affect any video playback. To change video
color settings, go to Adjust Video Color Set-
tings under the Video and TV section from the
Start page.
• Rotate Display
The NVIDIA Rotate features enable you to
change the orientation of your desktop to portrait,
landscape, and inverted modes. This is use-
ful if you have rotated your physical display
and need to rotate the desktop to match the
orientation of your display.
L
,J
•
"KŁ
i
JL
i Mar»** Cut - im Rw.!utjo.i5
•
a
— -
• Manage Custom Resolutions
(Note)
If you are an advanced user, you can create
custom timing modes with the width, height,
bit-color depth, and the refresh rate etc. The
Advanced Timing page enables you to adjust
timings for your graphics card in order to sup-
port a variety of different display timings for
ultimate flexibility for analog CRT and DVI
connections. You can use the advanced
Change Resolution Attributes page to view
custom display modes you have saved in
the Create Custom Resolutions page.
(Note) This item is present only in Advanced view mode.
GV-N84S-512I Graphics Accelerator
—
- 18 -
Strona się ładuje...
Strona się ładuje...
Strona się ładuje...
Strona się ładuje...
Strona się ładuje...
Strona się ładuje...
Strona się ładuje...
Strona się ładuje...
Strona się ładuje...
Strona się ładuje...
Strona się ładuje...
Strona się ładuje...
-
 1
1
-
 2
2
-
 3
3
-
 4
4
-
 5
5
-
 6
6
-
 7
7
-
 8
8
-
 9
9
-
 10
10
-
 11
11
-
 12
12
-
 13
13
-
 14
14
-
 15
15
-
 16
16
-
 17
17
-
 18
18
-
 19
19
-
 20
20
-
 21
21
-
 22
22
-
 23
23
-
 24
24
-
 25
25
-
 26
26
-
 27
27
-
 28
28
-
 29
29
-
 30
30
-
 31
31
-
 32
32


Gigabyte GV-N84S-512l Instrukcja obsługi
- Kategoria
- Karty graficzne
- Typ
- Instrukcja obsługi
w innych językach
- English: Gigabyte GV-N84S-512l User manual
Inne dokumenty
-
Asus CM6870 Instrukcja obsługi
-
Nvidia Quadro GV100 NVLink Bridge Skrócona instrukcja obsługi
-
Asus ROG-STRIX-RX580-8G-GAMING Instrukcja obsługi
-
Alienware M11x R3 Instrukcja obsługi
-
Nvidia Quadro RTX Skrócona instrukcja obsługi
-
Asus AREZ-STRIX-RX560-O4G-GAMING Instrukcja obsługi
-
PNI MP10 Instrukcja obsługi
-
Hitachi NCD 2085 Instrukcja obsługi
-
-
Acer Aspire E1-522 Instrukcja obsługi