Lavor LAV54 Instrukcja obsługi
- Kategoria
- Myjki wysokociśnieniowe
- Typ
- Instrukcja obsługi

IDROPULITRICE AD ALTA PRESSIONE A CALDO pag. 10 IT
HOT HIGH-PRESSURE WASHER MACHINE pag. 16 EN
NETTOYEUR HAUTE PRESSION A CHAUD page 22 FR
HEIßWASSER-HOCHDRUCKREINIGER Seite 28 DE
HIDROLIPIADORA DE ALTA PRESIÓN EN CALIENTE pág. 34 ES
HIDROLIMPADORA DE ALTA PRESSÃO A QUENTE pág. 40 PT
HYDRAULINEN KORKEAPAINEPESURI sivu 46 FI
HEET WATER HOGEDRUCK REINIGER blz. 51 NL
VYSOKOTLAKÝ VODNÍ ČISTIČ PRO ČIŠTĚNÍ ZA TEPLA srt. 57 CS
VARMTVANDS HØJTRYKSRENSER sd. 62 DA
VISOKOTLAČNI VODNI ČISTILEC NA VROČO VODO str. 67 SL
VATTENKURANSTALT RENGÖRA HÖG - TRYCK PÅ VÄRMA sid. 72 SV
TOPLI VODENI PERAČ VISOKOG PRITISKA str. 77 HR
YÜKSEK BASINÇLI SICAK SULU YIKAMA MAKINESI sf. 82 TR
KÕRGSURVEPESUR
lk.
88 ET
HØYTRYKKSVASKER RU - ГИДРООЧИСТИТЕЛЬ ВЫСОКОГО ДАВЛЕНИЯ
side
94 NO
MYJKA WYSOKOCIŚNIENIOWA str.
100 PL
ГИДРООЧИСТИТЕЛЬ ВЫСОКОГО ДАВЛЕНИЯ
стр.
106 RU
1-123 AR
ATTENZIONE: leggere le istruzioni prima dell’ utilizzo.
WARNING: read the instructions carefully before use.
ATTENTION: lire attentivement les istructions avant l’usage.
ACHTUNG: die anweisungen bitte vor gebrauch sorgfältig lesen.
ADVERTENCIA: leer atentamente las advertencias antes el uso de aparado.
ATENÇÃO: ler atentamente as instruções antes da utilização.
HUOMIO: lue ohjeet ennen käyttöä.
LET OP: vóór gebruik de gebruiksaanwijzing aandachtig lezen.
POZOR: před použitím si přečtěte návod k obsluze. PAS PÅ! læs instruktionsbogen før
maskinen tages i brug. POZOR: pred uporabo preberite navodila.
VIKTIGT! läs
anvisningarna före användning.
PAŽNJA: prije upotrebe pročitajte upute.
DİKKAT: MAKİNAYI KULLANMADAN ÖNCE KULLANIM TALİMATLARINI OKUYUNUZ. ADVARSEL:
les bruksanvisningen før bruk. TÄHELEPANU: lugege juhised enne seadme kasutamist läbi
UWAGA: przed użyciem przeczytać instrukcje. ВНИМАНИЕ: перед использованием
прочитайте инструкцию по эксплуатации
FKX, Kappa,
RIO, Kappa A,
XTR, Fuego,

model:
Fuego
model:
XTR
FKX
Kappa
model:
Rio
Kappa A
4 X
8 X
4 X
2
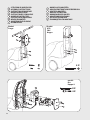
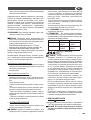
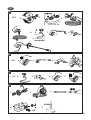
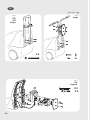
• ISTRUZIONI DI MONTAGGIO
• ASSEMBLY INSTRUCTIONS
• INSTRUCTION DE MONTAGE
• MONTAGEANLEITUNG
• INSTRUCCIONES DE MONTAJE
• MONTAGE-INSTRUCTIES
• INSTRUÇÃO DE MONTAGEM
• NÁVOD K MONTÁŽI
• MONTERINGSVEJELDNING
• ASENNUSOHJE
• NAVODILA ZA MONTAŽO
• MONTAGEINSTRUKTIONPÅ FÖRFRÅGAN
• UPUTE ZA MONTAŽU
• MONTAJ TALIMATLARI
• KOKKUPANEMISE JUHISED
• MONTERINGSVEILEDNING
• INSTRUKCJE MONTAŻU
• РУКОВОДСТВО ПО МОНТАЖУ

1 X
4 X
OPTIONAL
model:
XTR
FKX
Kappa
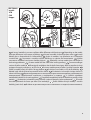
1.
4.
2.
5.
3.
6.
In base al modello si possono verificare delle differenze nella fornitura. Depending on the model,
there are differences in the scopes of delivery. Suivant le modèle, la fourniture peut varier. Je nach
Modell gibt es Unterschiede im Lieferumfang. Según el modelos, hay diferencias en el contenido
suministrado. Consoante o modelo, existem diferenças no volume de fornecimento. Mallien
varustetaso vaihtelee, katso kuvaus laatikon kyljestä. Afhankelijk van het model zijn er verschillen in
de leveringspakketten. Alt etter modell kan det være ulike leveringsomfang. Leveransomfånget
varierar allt efter modell. Afhængigt af modellen er der forskelle i leveringen. Στο παραδοτέο υλικό
υπάρχουν διαφορέ ανάλογα ε το οντέλο. Ovisno o modelu postoje razlike u sadržaju isporuke.
Glede na model prihaja do razlik v obsegu dobave. V závislosti na modelu se liší obsah dodávky.
Modele bağlı olarak teslimat kapsamında farklar olabilir. W zależności od modelu istnieją różnice w
zakresie dostawy. В данном руководстве по эксплуатации дано описание прибора с максимальной
комплектацией. Комплектация отличается в зависимости от модели. A szállítási terjedelem
modellenként eltérő (lásd a csomagoláson). Piegādātā komplektācija atšķiras atkarībā no putekļu sūcēja
modeļa. W zależności od modelu istnieją różnice w zakresie dostawy (patrz opakowanie). În funcţie
de model pachetele de livrare pot diferi (vezi ambalajul). Podľa modelu existujú rozdiely v rozsahu
dodávky (pozri obal). В обема на доставка има разлики в зависимост от модела (вижте опаковката).
3
• NAVODILA ZA MONTAŽO
• MONTAGEINSTRUKTIONPÅ FÖRFRÅGAN
• UPUTE ZA MONTAŽU
• MONTAJ TALIMATLARI
• KOKKUPANEMISE JUHISED
• MONTERINGSVEILEDNING
• INSTRUKCJE MONTAŻU
• РУКОВОДСТВО ПО МОНТАЖУ

OPTIONAL
1/2 inch • 13 mm
ON ( I )
OFF (0)
ON ( I )
OFF (0)
10
4
7
1
2
5
6
11
3
9
8
model:
Rio
4
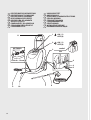
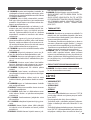
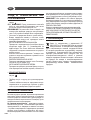
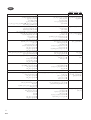
• DESCRIZIONE DELL’APPARECCHIO
• DESCRIPTION OF THE MACHINE
• DESCRIPTION DU L’APPAREIL
• BESCHREIBUNG DES GERÄTS
• DESCRIPCIÓN DEL APARATO
• TOESTEL UITZICHT
• COMPONENTES DO APARELHO
• STANDARDNÍ PŘÍSLUŠENSTVÍ
• STANDARDUDSTYR
• VAKIOVARUSTEET
• OBSEG DOBAVE
• UTRUSTNING STANDARDUTRUSTNING
• SERIJSKA OPREMA
• STANDART DONANIM
• STANDARDVARUSTUS
• SERIETILBEHØR
• WYPOSAŻENIE SERYJNE
• БАЗОВАЯ КОМПЛЕКТАЦИЯ

OPTIONAL
SE PRESENTE
IF PRESENT
SI INCLUSE
WENN VORHANDEN
SI ESTUVIERA PRESENTE
INDIEN AANWEZIG
SE PRESENTE
JE-LI PŘÍTOMNÁ
SÅFREMT MASKINEN ER
FORSYNET DERMED
MIKÄLI VARUSTEENA
ČE JE V KOMPLETU
I FÖREKOMMANDE FALL
NEKI MODELI
MEVCUT İSE
KUI OLEMAS
DERSOM SLIK FINNES
JEŻELI WYSTĘPUJE
ЕСЛИ ЕСТЬ
5
1
Interruttore bruciatore
2
Interruttore
elettropompa
ON/OFF
3
Serbatoio detergente
4
Uscita
5
Tubo ad alta pressione
6
Pistola
7
Lancia
8
Serbatoio gasolio
9
Cavo elettrico con spina
10
Entrata + filtro
11
Manico
1
Burner switch
2
ON/OFF
Electropump switch
3
Detergent tank
4
Water outlet
5
High pressure hose
6
Gun
7
Lance
8Diesel tank
9
Electric cable
10
Water inlet + filter
11 Handle
1
Interrupteur brûleur
2
Interrupteur
électropompe
ON/OFF
3
Réservoir de détergent
4
Sortie H.P.
5
Flexible haute pression
6
Pistolet
7
Lance
8
réservoir du DIESEL
9
Cable electrique avec prise
10
Entrée d’eau + filtre
11 Manche
1
Schalter Brenner
2
Schalter Elektropumpe
ON
3
Reinigungsmittelbehälter
4
Auslauf
5
Hochdruckschlauch
6
Pistole
7
Lanze
8Diesel
behälter
9
Anschlusskabel mit Stecker
10
Einlauf + Filter
11 Griff
1
Interruptor quemador
2
Interruptor eléctropompa
ON/OFF
3
Depósito detergente
4
Salida
5
Manguera de alta presión
6
Pistola
7
Lanza
8
Depósito Diesel
9
Cable eléctrico con enchufe
10
Entrada + filtro
11
Mango
1
Schakelaar van de verwarmer
2
UIT/ AAN
Schakelaar elektro pomp
ON/OFF
3
Reinigingsmiddeltank
4
Wateruitgang
5
Hogedrukslang
6
Pistool
7
Lans
8
Diesel tank
9
Eelectrische kabel
10
Wateringang + filter
11 Handvat

6
1
Interruptor queimador
2
Interruptor de
bomba eléctrica
ON/OFF
3
Reservatório detergente
4
Saida
5
Tubo flexível de alta pressão
6
Pistola
7
Lança
8
Reservatório Diesel
9
Cabo elétrico com ficha
10
Entrada + filtro
11 Alça
1
Přepínač hořáku
2
Přepínač elektrického čerpadla
ON/OFF
3
Nádrž se saponátem
4
Výstup
5
Vysokotlaká hadice
6
Pistole
7
Tryska
8
Diesel
9
Elektrická přívodní šňůra se zástrčkou
10
Vstup + filtr
11 Rukojeť
1
Afbryder til brænder
2
ON/OFF
Afbryder til elektrisk pumpe
3
Tank for rengøringsmiddel
4
Vandafgang
5
Højtryksslange
6
Pistol
7
Dyserør
8
Tank for Diesel
9
El-kabel med stik
10
Vandtilgang + filter
11 håndtag
1
Polttimen katkaisin
2
Sähköpumpun katkaisin
ON/OFF
3
Pesuainesäiliö
4
Veden ulostulo
5
Korkeapaineinen letku
6
Pesukahva
7
Suutin
8
Diesel
9
Sähköjohto ja pistotulppa
10
Veden sisäänmeno + suodatin
11 kahva
1
Stikalo gorilnika
2
ON/OFF
Stikalo elektročrpalke
3
Posoda za čistilo
4
Izstop
5
Visokotlačna cev
6
Pištola
7
Brizgalka
8
Diesel
9
Električna vrvica z vtičem
10
Vstop + filter
11 Ročaj
1
Strömbrytare brännare
2
ON/OFF
Strömbrytare elpump
3
Behållare till rengöringsmedel
4
Uttag (vatten)
5
Tryckslang
6
Pistol
7
Lans
8
Behållare till Diesel
9
Elkabel med stickpropp
10
Intag + filter (vatten)
11 handtag
1
Prekidač gorionika
2
ON/OFF
Prekidač električne pumpe
3
Spremnik deterdženta
4
Izlaz
5
Visokotlačno crijevo
6
Pištolj
7
Cijev s mlaznicom
8
Diesel
9
Električni kabel s utikačem
10
Ulaz + filtar
11 Drška
1
Brülör açma kapama düğmesi
2
Elektrikli pompa açma kapama düğmesi ON/OFF
3
Deterjan deposu
4
Çıkış
5
Yüksek basınçlı boru
6
Tabanca
7
Lans
8
Diesel deposu
9
Fişli elektrik kablosu
10
Giriş + filtre
11 Kulp

7
•Questa macchina è soggetta ad allacciamento sotto condizione: Zmax • The appliance shall
be connected to the electrical network providing that the impedence zmax • Cette machine
est soumise a un raccordement électrique sous condition du respect de l’impédence zmax
• Nach Berechnung ist die maximal zulässige Netzipedanz Zmax am Versorgungs-Anschlusspunkt
des Kunden • Esta máquina esta sujeta a conexi ón bajo condición: Zmax • Deze toestel is
onderworp aan een electrische verbinding op basis van een respekt van het impedantie zmax •
Esta maquina é sujeita à ligaçao sob condiçao: Zmax • Tento stroj podléhá připojení za následující
podmínky: Zmax • Elforsyningen, som maskinen tilsluttes, skal opfylde følgende krav: Zmax
• Η συσκευή προορίζεται για σύνδεση σε δίκτυο ε: Zmax • Sähkövirran, johon laite kytketään,
on täytettävä seuraavat ehdot: Zmax • Pri priključitvi aparata na omrežje je potrebno zagotoviti
naslednji pogoj: Zmax • Denna maskin ska anslutas enligt följande villkor: Zmax • Električno
napajanje na koje je uređaj priključen mora zadovoljavati sljedeći uvjet: Zmax • Bu makinenin
bağlandığı elektrik beslemesi sistemi, aşağıdaki şarta uygun olmalıdır: Zmax
Zmax = 0,256 Ohm
1
põleti lüliti
2
elektripumba lüliti ON/OFF
3
paak Pesuaine, uvahendi imemine
4
väljalaskeava
5
kõrgsurvevoolik
6
pesupüstol
7
pesutoru
8
paagi kütusega
9
toitejuhtme pistik
10
vee sissevõtuava + filter
11
kandesangast
1
Strømbryter for brenner
2
Strømbryter for elektrisk pumpe
3
tanken for rengjøringsmiddel
4
Utløp
5
Høytrykksslange
6
Spylepistol
7
Lanse
8
Tanken med drivstoff
9
Kabelen
10
Vanninnløp + filter
11
Håndtere
1
Przełącznik palnika
2
Przełącznik pompy elektryczney ON/OFF
3
zbiornik na detergent
4
Wylot
5
Wąż wysokociśnieniowy
6
Pistolet natryskowy
7
Lanca
8
zbiornik paliwem
9
przewodu elektrycznego.
10 Wlot + filtr
11
uchwyt
1
Выключатель горелки ON/OFF
2
Выключатель горелки
ON/OFF
3Бачок для моющего средства
4
Выпускное отверстие
5
Шланг высокого давления
6
Водяной пистолет
7
Копье
8
топливный бак топливом
9Соединительный кабель с вилкой
10
Впускное отверстие + фильтр
11
обрабатывать
Pучка

8
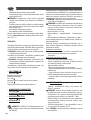
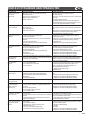
1/2 inch • 13 mm
5÷40°C
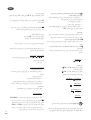
1.
2. 3. 4.
2.
OFF
ON
3. 4.
5. 6. 7.
9.
1.
8.
min 15 l/min
max 1 MPa
1 min
OFF
1. 2. 3.
5. 1. 2. 3. 4.
4. 5.
A
B
C
D
DIESEL

9
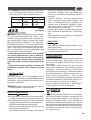
E
I
H
·
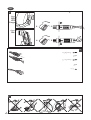
getto spillo/ventaglio
·
spread pattern/pencil jet
·
jet
variable
·
vario Duese
·
chorro regulable
·
jato variavel
·
pistemäinen/viuhkamainen suihku
·
dunne straal/
waaiervormige straal
·
vějířová/přímá tryska
·
nålesprøjt/
viftesprøjt
·
iglasti/pahljačasti curek vode
·
nål-/
sol ädersformad stråle
·
mlaznica-fi ni mlaz/raspršivač
·
jet püskürtme/jet fan waaiervormige straal vifteformet
stråle strumień wachlarzowy веерообразная струя
·
lancia turbo
·
turbo lance
·
lance turbo
·
turbo
lanze
·
lanza turbo
·
turbo lança
·
turbo suihkuputki
·
turbo Lans
·
tryska turbo
·
turbolanse
·
turbo
pištola
·
turbolans
·
turbo mlaznica
·
turbo lans
turbootsik turbo-lanse lanca turbo насадка турбо
OPTIONAL
1
2
1
2
1.
1.
2.
4.
3.
5.
OPTIONAL
SE PRESENTE
IF PRESENT
SI INCLUSE
WENN VORHANDEN
SI ESTUVIERA PRESENTE
INDIEN AANWEZIG
SE PRESENTE
JE-LI PŘÍTOMNÁ
SÅFREMT MASKINEN ER
FORSYNET DERMED
MIKÄLI VARUSTEENA
ČE JE V KOMPLETU
I FÖREKOMMANDE FALL
NEKI MODELI
model:
FKX
XTR
Fuego
model:
Rio
MEVCUT İSE
KUI OLEMAS
DERSOM SLIK FINNES
JEŻELI WYSTĘPUJE
ЕСЛИ ЕСТЬ
Strona się ładuje...
Strona się ładuje...
Strona się ładuje...
Strona się ładuje...
Strona się ładuje...
Strona się ładuje...

Translation of the original instructions
EN
16
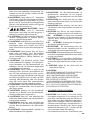
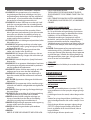
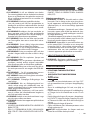
SAFETY PRECAUTIONS
> WARNINGS
• 01WARNING: This appliance is for outdoor
use only.
• 02WARNING: Always disconnect the elec-
tricity and water supplies on completion of
every job.
• 03WARNING: Do not use the machine if a
supply cord or important parts of the ma-
chine are damaged, e.g. safety devices, high
pressure hoses, trigger gun.
• 04WARNING: This appliance has been de-
signed for use with the detergent provided
or the detergent specified by the manufac-
turer, such as a neutral shampoo based on
biodegradable anionic surface active deter-
gents. The use of other detergents or chemi-
cals may put the appliance’s safety at risk.
• 05WARNING: o not use the machine within
range of persons unless they wear protective
clothing.
• 06WARNING: Do not direct the nozzle to-
ward mechanical parts containing lubricant
grease, as the grease will dissolve and spread
over the surrounding ground. Vehicle tyres/
tyre valves may only be cleaned from a mini-
mum distance of 30 cm, otherwise the vehi-
cle tyre/tyre valve could be damaged by the
high-pressure jet. The first indication of this
is a discoloration of the tyre. Damaged vehi-
cle tyres/tyre valves can be deadly danger-
ous.
• 07WARNING: High pressure jets
can be dangerous if subject to
misuse. The jet must not be di-
rected at persons,animal, live electrical
equipment or the machine itself.
• 08WARNING: High pressure hoses, fittings
and couplings are important for the safety
of the machine. Use only hoses, fittings and
couplings recommended by the manufac-
turer. (it is extremely important to protect
these components against damage by avoid-
ing their improper use and protecting them
against bending, knocks and scratches).
• 09WARNING: Appliances not equipped
with A.S.S. – Automatic Stop System: must
not be left in operation for more than 2 min-
utes with the gun released. The recycled wa-
ter heats up considerably, seriously damag-
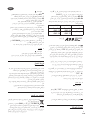
INDEX pag.
General information 1
Symbols 1
Safety precautions 1
Usage 3
Care and maintenance 5
Warranty conditions 5
Disposal 5
Troubleshooting 6
Pictures 8-9
GENERAL INFORMATION
> INTENDED USE
· The appliance can be used for washing surfaces out-
doors, whenever pressurised water is required to re-
move dirt.
· With special optional accessories, it can be used for
foaming and sandingblasting, and for washing with
a rotary brush for application to the gun.
· This appliance’s performance and userfriendliness
make it suitable for NON PROFESSIONAL use.
> THECNICAL DATA
(see thecnical data plate)
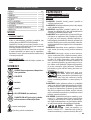
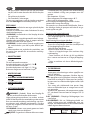
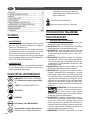
SYMBOLS
CAUTION! It is important to be
careful of the following items.
IMPORTANT
LOCKED
OPEN
IF PRESENT
Double insulated (IF PRESENT): supple-
mentary insulation is applied to the basic
insulation to protect against electric shock
in the event of failure of the basic insulation.
warning do not touch
warning symbol : do not inhale
..
- 1

EN
17
ing the pump.
• 10WARNING: Appli-
ances equipped with
A.S.S – Automatic Stop System: these appli-
ances should not be left in standby for more
than 5 minutes.
• 11WARNING: Switch the appliance off com-
pletely (master switch on (0)OFF) whenever
it is left unattended.
• 12WARNING: Every machine is tested in its
operating conditions, so it is normal for a few
drops of water to be left inside it.
• 13WARNING: Take care not damage the
electric cable. If the supply cord is damaged,
it must be replaced by the manufacturer, its
service agent or similarly qualified persons in
order to avoid a hazard
• 14WARNING: Appliance with fluid under
pressure. Keep a firm hold on the gun and be
prepared to take the kickback pressure. Only
use the high pressure nozzle provided with
the appliance.
• 16WARNING: This appliance is not intended
for use by persons (including children) with
reduced physical, sensory or mental capa-
bilities, or lack of experience and knowledge,
unless they have been given supervision or
instruction concerning use of the appliance
by a person responsible for their safety.
• 17WARNING: Children should be super-
vised to ensure that they do not play with
the appliance.
• 18WARNING: Never start the high-pressure
cleaner without first completely unwinding
the high-pressure hose.
• 19WARNING: When winding and unwind-
ing the pipe take care not to cause the high-
pressure cleaner to overturn.
• 20WARNING: Before unwinding or winding
the hose, switch the machine off and release
the pressure in the hose itself (switching off).
• 21WARNING: Risk of explosion — Do not
spray flammable liquids.
• 22WARNING: To ensure machine safety, use
only original spare parts from the manufac-
turer or approved by the manufacturer.
• 23WARNING: Do not direct the jet against
yourself or others in order to clean clothes or
foot-wear.
• 24WARNING: High pressure cleaners shall
not be used by children or untrained person-
nel.
• WARNING: Water that has flown through
backflow preventers is considered to be
non-potable.
• XX WARNING: the machine shall be discon-
nected from its power source, by removing
the plug from the socket-outlet, during
cleaning or maintenance and when replac-
ing spare parts
• XJ WARNING: If an extension cord is used,
the plug and socket must be of watertight
construction.
• XY WARNING: Inadequate extension cords
can be dangerous.
•
WARNING: When the unit is working do not use it in
a closed place where ventilation may be insufficient
and never cover the unit.
•
WARNING: By no means use the machine during
thunderstorms or when it is raining.
•
WARNING: Do not use the unit on inflammables
surfaces.
•
WARNING:
- NEVER EVER TOUCH THE MACHINE WITH WET
HANDS OR BARE FEET.
- NEVER PULL THE POWER SUPPLY CABLE OR MA-
CHINE IN ORDER TO DISCONNECT THE PLUG FROM
THE SOCKET.
- IF DURING FUNCTIONING THE POWER SUPPLY
RUNS OUT, FOR SAFETY REASONS, TURN THE MA-
CHINE OFF.
> SAFETY DEVICE
• WARNING: the gun is fitted with a safety
catch. Whenever use of the machine is inter-
rupted it is important to operate the safety
catch to prevent accidental activation of the
jet.
- Safety features: gun equipped with safety
locking device, appliance equipped with
(Class I) overload cutout, pump equipped
with by-pass valve or shutdown device.
- The safety button on the gun is not there to
lock the lever during operation, but to pre-
vent its accidental operation.
• WARNING: The appliance is equipped with
a motor protection device: in case of device
intervention, wait some minutes or, in alter-
native, disconnect and re-connect the prod-
uct to the electric system. In case this prob-
lem repeats again or if the product does not
start again, take the product to the nearest
After Sales Service Point
> STABILITY
2 -

EN
18
• WARNING: The machine must be always kept
on horizontal bases, in a safe and stable way.
USAGE
> DESCRIPTION OF THE MACHINE
See pag.3-4-5.
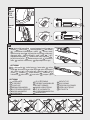
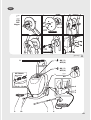
> ASSEMBLY INSTRUCTIONS
See pag.2.
> PUT INTO SERVICE
See fig.
* Check that the master switch is turned to
“OFF” and that the water filter is fitted into
the pump’s inlet pipe.
* Screw the snap connection into place by
hand, without the aid of tools.
* Connect the water supply hose to the snap
connection. The hose must have an inside
diameter of at least 13 mm (1/2”).
* Connect the high pressure hose to the
pump’s outlet pipe. Press the high pressure
hose coupling fully down and then screw
into place by hand without the aid of tools.
* Connect the high pressure hose to the gun.
* Turn the water tap fully on. The water tem-
perature absolutely must be below 40°C.
IMPORTANT: The washer machine has to
operate with clean water in order to avoid
any damages to the washer machine itself.
* Release the gun safety catch and keep the
trigger pressed, allowing the water to flow
until all the air has been expelled.
* Fit the lance into the gun.
* Connect the plug to the power socket.
* To start the machine, press the gun trigger
and at the same time tur
n the master switch to
“ON”.
FILLING UP
Fill up the tank with the fuel
indicated on the
technical data plate.
Avoid that the tank is empty when the ma-
chine is running in order not to damage the
fu
el pump.
•
WARNING:
Incorrect fuel shall not used as
they as provide hazard.
Fill up the detergent tank with the suggested prod-
ucts, suitable for the kind of washing to be carried
out .
•WARNING:
make use only of liquid deter-
gent, do not absolutely use acid or too much
alkaline products.
We suggest you to make use of our products, which
have been studied for the use with washer ma-
chines.
> STARTING UP
See fig.
Start the machine:
turn the switch pos. 2 ( I ) ON .
To wash with hot water:
turn the switch pos. 1 ( I ) ON .
The burner operates when the machine is in pres-
sion.
> HIGH PRESSURE LANCE
See fig.
> DETERGENT SUCTION
See fig.
> HIGH PRESSURE HOSE
See fig.
> WATER SUPPLY
Water supply collection
Water supply from the water main
· Connect a supply hose (not included) to the water
inlet of the unit and to the water supply.
· Open the water supply.
WARNING: (symbol) machine not suitable for
connection to the potable water mains.
The cleaner can only be connected to the wa-
ter mains if the water mains is separated by a
backflow preventer. Make sure that the hose
is at least Ø 13mm-1/2 inch and that it is rein-
forced.
• WARNING: Water that has flown through
backflow preventers is considered to be
nonpotable.
IMPORTANT: Only clean or filtered water
should be used for intake. The delivery of the
water intake tap should be equal to the dou-
ble of the maximum pump range.
-
Minimum delivery rate: 15 l/ min.
-
Maximum intake water temperature: 40°C
-
Max inlet water pressure: 1Mpa
Place the cleaner as close to the water supply
system as possible.
- 3

EN
19
Water supply from an open container
· Unscrew the coupling part for the water inlet.
· Screw the suction hose with filter (not included) onto
the water connection of the unit.
· Hang the filter in the container.
· Vent the unit before operation.
· Unscrew the high-pressure line at the high-pressure
outlet of the unit.
· Switch on the unit and let it run until water free of
bubbles emerges at the high-pressure outlet.
· Switch off the unit and screw on the high-pressure
hose again.
Failure to comply with the above conditions
causes serious mechanical damage to the
pump and the loss of warranty cover.
> ELECTRICITY SUPPLY
- The appliance’s electrical connection must
comply with the IEC 60364-1 standard.
IMPORTANT: Before connecting the ap-
pliance, make sure that the nameplate data
are the same as those of the electrical mains
and that the socket is protected by a differ-
ential security breaker with tripping sensitiv-
ity below 0.03 A - 30 ms.
- If the appliance’s plug is not compatible
with the socket, have the socket replaced
with another of suitable type by profession-
ally qualified staff.
- Never use the appliance in ambient temper-
atures below 0° C if it is equipped with a PVC
(H VV-F) cable.
• XY WARNING: Inadequate extension cords
can be dangerous.
• XJ WARNING: If an extension cord is used,
the plug and socket must be of watertight
construction.
Information for supply may also be obtained
from the plug manufacturer.
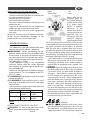
<16 A <25 A
<20 m ø 1,5 mm2
14 AWG
ø 2,5 mm2
12 AWG
20 m - 50 m ø 2,5 mm2
12 AWG
ø 4,0 mm2
10 AWG
> PLUG
HOW TO CONNECT THE CORD TO A U.K. PLUG:
IMPORTANT The wires in the mains lead are col-
oured in accordance with the following code:
Blue Neutral
Brown Live
Yellow/Green Earth
Please read the in-
structions given be-
low before connect-
ing the cord to a plug.
If in doubt please
consult a qualified
electrician. As the
colours of the wires in
the mains lead of this
appliance may not
correspond with the
coloured markings
identifying the termi-
nals in your plug, proceed as follows: The wires that
is coloured Brown must be connected to the termi-
nal which is marked with the letter L or coloured
Red. The wire that is coloured Blue must be con-
nected to the terminal wich is marked with the letter
N or coloured Black. Safety points for rewireable or
moulded plug: The mains lead of this appliance may
be already fitted with a BS1363 13A plug.
- If your socket outlet is not suitable for the plug, then
the plug must be removed (cut off if it is a mould-
ed on plug), the flexible cord insulation should be
stripped back as appropriate and a suitable 3 pin
plug fitted.
•
WARNING: Dispose of a plug that has been cut from
the power supply cord, as such a plug is hazardous
if inserted in a live 13A socket outlet elsewhere in
the house. - Should the fuse need to be replaced
an ASTA marked fuse, approved to BS1362, of the
same rating must be used. - Always replace the fuse
cover after fitting a fuse. The plug must NOT be used
if the cover is omitted or lost until a replacement is
obtained. - Make certain that only the correct fuse
cover is used and fitted. - For plugs with detachable
fuse cover the replacement must be the same as the
colour insert in the base of the plug, or as directed by
the embossed wording on the base of the plug. - If
the detachable fuse cover is lost a replacement may
be purchased from a Service Centre.
( if fitted)
NOTE:
(Automatic Stop System), which
stops the machine during the bypass phase. To start
the water cleaner, it is therefore necessary to set the
switch on position (I)“ON”; after that press the pistol
4 -

EN
20
trigger: the Automatic Stop System will start the ma-
chine and will stop it automatically when the trigger
is released. It is advisable to put on the safety of the
pistol trigger whenever the machine is stopped, in
order to avoid unintentional starting.
· Any automatic start of the machine without press-
ing the gun trigger is attributable to air bubbles in
the water or other similar phenomena which do not
imply the existence of any defects in the machine.
· Do not leave the appliance unattended during the
standby for more than 5 minutes. Contrarily, for the
safety of the appliance it is necessary to re-turn the
switch into the (0) OFF position.
· Please check that the coupling of the high pressure
hose with the appliance and the gun supplied as
standard equipments made correctly, that is to say
without any water leak.
> SWITCHING OFF
See fig.
turn the switch pos. 2 (0) OFF position and wait that
the water get completly cold.
In this way you avoid any calcareous deposit and
overheatings of the coil and the boiler, which are al-
ways dangerous.
IMPORTANT:
When the machine is switched off,
always discharge the pressure hose, opening the
gun.
CARE AND MAINTENANCE
See fig.
• XX WARNING: the machine shall be discon-
nected from its power source, by removing
the plug from the socket-outlet, during
cleaning or maintenance
• WARNING: Do not spray the appliance with
water and do not use detergents or aggres-
sive solvents. Machine could be damaged.
· Clean the exterior part of the machine with a dry
cloth.
- Always keep the machine clean so that the cooling
air can pass through the slits without obstructions..
- Cleaning the water filter: To ensure the pump gives
good service it is extremely important to check and
clean the water filter frequently. Use pliers to extract
it from the pump and rinse it carefully in running wa-
ter.
- Cleaning the nozzle: A blockage in the nozzle may
prevent the machine from operating correctly, so it
must be kept clean. Switch off the machine and re-
move the lance. Clean the nozzle with the pin pro-
vided. Rinse the lance in running water.
- When topping up the oil in the pump, use a SAE
20W40 mineral oil. Quantity supplied: 70 gr.
- The replacement of the fuel metal pipe is requested
after disassembling to avoid fuel leakages.
> STORAGE
See fig.
· Move the machine only by grasping the car-
rying handle
· Store the appliance and the accessories in a
frost-safe room.
WARRANTY CONDITIONS
All our machines are subjected to strict tests
and are covered against manufacturing de-
fects in accordance with applicable regula-
tions. The warranty is effective from the date of
purchase. The following are not included in
the warranty: - Parts subject to normal wear.
- Rubber parts, charcoal, filters and the acces-
sories and optional accessories. - Accidental
damage, caused by transport, neglect or inad-
equate treatment, incorrect or improper use
and installation failing - The warranty shall not
cover any cleaning operations to which the op-
erative components may be subjected, such
as clogged nozzles and filter blocked due to
limestones. This pressure cleaner is intended
to be used for domestic and hobby work: the
warranty does not cover any other different
kind of use.
DISPOSAL WEEE
As the owner of electrical or electronic
equipment, the law (in accordance
with the EU Directive 2002/96/EC of 27 Janu-
ary 2003) prohibits you from disposing of this
product or its electrical / electronic accessories
as municipal solid waste and obliges you to
make use of the appropriate waste collection
facilities.
The product can be disposed of by returning it
to the distributor when a new product is pur-
chased. The new product must be equivalent
to that being disposed of.
- 5

EN
21
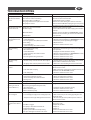
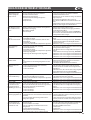
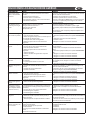
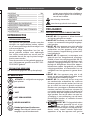
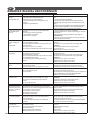
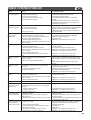
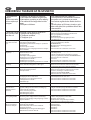
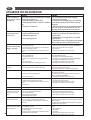
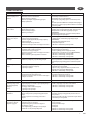
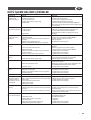
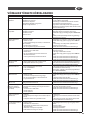
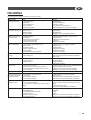
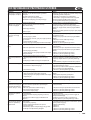
TROUBLESHOOTING
FAULT PROBABLE CAUSE REPAIR
1. The pump does not
start when the switch is
pressed.
1. The plug is not properly connected to the socket.
2. The electrical socket is not working.
3. The mains voltage is insufficient.
4. The gauge of the electrical power lead is too small.
5. The pump has cut out.
1. Connect the plug to the power socket correctly.
2. Have the electrical socket checked.
3. Check that the system is suitable.
4. Refer to the section detailing the electrical connection.
5. Turn the switch to ON while keeping the gun lever pressed;
if the problem persists contact an authorised service centre.
2. The machine starts, but
no water comes out.
6. Pump, hoses or accessories frozen.
7. No water supply.
8. Water filter fouled.
9. Nozzle fouled.
6. Allow the pump and hoses to thaw.
7. Connect the machine to the water supply system and turn
on the tap.
8. Remove and clean the filter (see “MAINTENANCE” section).
9. Remove the lance from the gun and clean the nozzle with
the pin provided.
3. The pump runs but
pressurisation does not
take place.
10. Insufficient water.
11. Suction filter fouled.
12. Pressure regulator valve (if fitted) on minimum
pressure setting.
13. Lance nozzle worn.
14. Suction or delivery valves fouled or worn.
10. Check that the delivery rate is at least 12 l/min.
11. Remove and clean the filter (see “MAINTENANCE” section).
12. Increase the pressure by turning the handgrip.
13. Replace the lance.
14. Contact an authorised service centre.
4. Uneven working
pressure.
15. Lance nozzle fouled or dirty.
16. Air in intake water.
17. Suction filter fouled.
18. Suction or delivery valves fouled or worn.
19. Gaskets worn.
20. Pressure regulator valve gaskets worn.
15. Remove the lance from the gun and clean the nozzle with
the pin provided.
16. Supply the machine with water correctly.
17. Remove and clean the filter (see “MAINTENANCE” section).
18. Contact an authorised service centre.
19. Contact an authorised service centre.
20. Contact an authorised service centre.
5. The motor stops
suddenly.
21. Machine’s safety overload cutout has been tripped.
22. The gauge of the electrical power lead is too small.
21. Allow the motor to cool for a few minutes. If the problem
persists contact an authorised service centre.
22. Refer to the section detailing the electrical connection.
6. Water leaks from the
machine.
23. Leaks from hose reel (if used).
24. Leaks from intake coupling.
25. Leaks from pump.
23. Tighten the couplings; if the problem persists contact an
authorised service centre.
24. Make sure that the coupling has been fitted correctly (See
illustrations in the “INSTALLATION” section).
25. Contact an authorised service centre.
7. Abnormal noise. 26. Suction filter fouled.
27. Intake water temperature too high.
28. Suction or delivery valves fouled or worn.
29. Bearings worn.
26. Remove and clean the filter (see “MAINTENANCE” section).
27. Reduce the temperature below 40°C.
28. Contact an authorised service centre.
29. Contact an authorised service centre.
8. Water in the oil. 30. O-ring seals worn. 30. Contact an authorised service centre.
9. The machine restarts
with the gun released
(versions with A.S.S.).
31.Water leak from hose - gun connection (except models
with hose and gun supplied readyconnected).
32. Air in intake water.
33.Water leak from the gun.
34.Water leak from the pump.
31. Tighten the connection with 2 spanners.
32. Supply the machine with water correctly.
33. Contact an authorised service centre.
34. Contact an authorised service centre.
10.The machine does not
suck in detergent.
35. Tank empty.
36. Lance handgrip on high pressure setting (if present).
37. Transparent suction pipe damaged or disconnected.
35. Fill the tank.
36. Move it to the low pressure setting by pulling the lever
towards the nozzle.
37. Reconnect the pipe. If the problem persists contact an
authorised service centre.
11.Turning on the burner
switch the boiler doesn’t
start.
38.No fuel
39.Fuel filter is clogged
40.Fuel pump is either blocked or burnt out
41.Damaged thermostat
42.Ignition spark insufficient or totally lacking
43.The space among the electrodes is not correct
38.Check the level in the tank and check whether the rigid
suction pipe is clean
39.Replace the line filter
40.Replace it.
41.Replace it.
42.Contact an authorised service centre.
43.Contact an authorised service centre.
6 -
Strona się ładuje...
Strona się ładuje...
Strona się ładuje...
Strona się ładuje...
Strona się ładuje...
Strona się ładuje...
Strona się ładuje...
Strona się ładuje...
Strona się ładuje...
Strona się ładuje...
Strona się ładuje...
Strona się ładuje...
Strona się ładuje...
Strona się ładuje...
Strona się ładuje...
Strona się ładuje...
Strona się ładuje...
Strona się ładuje...
Strona się ładuje...
Strona się ładuje...
Strona się ładuje...
Strona się ładuje...
Strona się ładuje...
Strona się ładuje...
Strona się ładuje...
Strona się ładuje...
Strona się ładuje...
Strona się ładuje...
Strona się ładuje...
Strona się ładuje...
Strona się ładuje...
Strona się ładuje...
Strona się ładuje...
Strona się ładuje...
Strona się ładuje...
Strona się ładuje...
Strona się ładuje...
Strona się ładuje...
Strona się ładuje...
Strona się ładuje...
Strona się ładuje...
Strona się ładuje...
Strona się ładuje...
Strona się ładuje...

DA
66
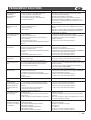
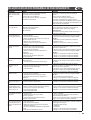
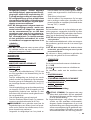
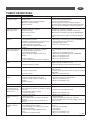
UDBEDRING I TILFÆLDE AF FEJLFUNKTIO
FEJL
MULIG ÅRSAG AFHJÆLPNING
1. Den elektriske
pumpe
vil ikke starte efter
at have trykket på
knappen
1. Stikket er sat dårligt ind i stikdåsen.
2. Den elektriske stikdåse fungerer ikke.
3. Netværkets spænding er utilstrækkelig.
4. Det elektriske forlængerkabel er ikke
egnet
5. Pumpen er blokeret.
1. Sæt stikket korrekt ind i stikdåsen.
2. Få en elektriker til at kontrollere stikdåsen.
3. Kontroller at el-systemet er passende.
4. Se afsnittet angående den elektriske tilslut-
ning.
5. Stil afbryderen på ON mens pistolens greb
holdes nedtrykket, hvis problemet ikke er løst,
ret henvendelse
til et autoriseret servicecenter.
2. Maskinen starter,
men vandet strøm-
mer ikke ud.
6. Pumpe, rør og udstyr er nedfrosset.
7. Manglende vandforsyning.
8. Tilstoppet vandfilter.
9. Tilstoppet dyse.
6.Optø pumpe og slanger.
7. Forbind maskinen til vandværket og åbn for hanen.
8. Fjern og rengør filteret (se afsnittet
“VEDLIGEHOLDELSE”).
9.Fjern lansen fra pistolen og rengør dysen med
den medfølgende nål.
3. Den elektriske pumpe
drejer, men der er ikke
tryk.
10.Utilstrækkeligt vand.
11.TIlstoppet indsugningsfilter.
12.Trykjusteringsventilen (ekstraudstyr) er i position for
minimumstryk.
13.Lansens dyse er nedslidt
14.Indsugnings- eller udsugningsventilerne er tilstoppe-
de eller nedslidte.
10.Kontroller, at ydelsen mindst er på 12 l/min.
11.Fjern og rengør filteret (se afsnittet
“VEDLIGEHOLDELSE “).
12.Øg trykket ved at skrue kuglegrebet til.
13.Udskift lansen.
14.Ret henvendelse til et autoriseret servicecenter.
4. Uregelmæssigt
arbejdstryk. 15.Lansens dyse er nedslidt eller snavset.
16.Tilstedeværelse af luft
I forsyningsvandet.
17.TIlstoppet indsugningsfilter.
18.Indsugnings- eller udsugningsventilerne
er tilstoppede eller nedslidte.
19.Tætningerne er nedslidte.
20.Tætningerne på trykjusteringsventilerne er nedslidte.
15.Fjern lansen fra pistolen og rengør dysen med
den medfølgende nål.
16.Sørg for at vandforsyningen til maskinen er korrekt.
17.Fjern og rengør filteret (se afsnittet “VEDLIGEHOLDELSE”).
18.Ret henvendelse til et autoriseret
servicecenter.
19 Ret henvendelse til et autoriseret servicecenter.
20. Ret henvendelse til et autoriseret servicecenter.
5. Motoren standser
pludseligt. 21Maskinens fejlstrømsafbryder er aktiveret.
22.Det elektriske forlængerkabel er Ikke egnet. 21.Lad motoren køle af i nogle minutter..Hvis fejlen
vedbliver ret henvendelse til et autoriseret servicecenter.
22.Sei afsnittet angående den elektriske tilslutning.
6. Maskinen lækker
vand. 23.Kabeloprulleren (ekstraudstyr) lækker.
24.Forsyningskoblingen lækker.
25.Pumpen lækker.
23.Spænd koblingerne, hvis fejlen
vedbliver ret henvendelse til et autoriseret servicecenter.
24.Kontroller, at koblingen er korrekt monteret
(Se figurerne i afsnittet INSTALLATION).
25.Ret henvendelse til et autoriseret servicecenter.
7. Unormal støj. 26.Tilstoppet indsugningsfilter.
27.Indgangsvandet er alt for varmt.
28.Indsugnings- eller udsugningsventilerne
er tilstoppede eller nedslidte.
29.Nedslidte lejer.
26.Fjern og rengør filteret (se afsnittet “VEDLIGEHOLDELSE”).
27.Indstil temperaturen til under 40°C.
28. Ret henvendelse til et autoriseret servicecenter.
29. Ret henvendelse til et autoriseret servicecenter.
8. Der er vand i olien. 30.Nedslidte tætningsringe. 30. Ret henvendelse til et autoriseret servicecenter.
9. Når pistolen er udløst
starter maskinen
ufrivilligt (versioner
med A.S.S.).
31.Vandlækage fra forbindelsen mellem slange
og pistol (undtagen for de modeller, hvor flange og
pistolen allerede er tilsluttet).
32.Der er luft i forsyningsvandet.
33.Vandlækage fra pistolen.
34.Vandlækage fra pumpen.
31.Spænd forbindelsen ved brug af 2 universalnøgler.
32.Sørg for at vandforsyningen til maskinen er korrekt.
33. Ret henvendelse til et autoriseret servicecenter.
34. Ret henvendelse til et autoriseret servicecenter.
10. Maskinen opsuger
ikke rengøringsmidlet. 35.Tanken er tom.
36.Lansens greb er i højtryk Position (ekstraudstyr).
37.Den lille gennemsigtige indsugningsslange er beska-
diget eller afkoblet.
35.Fyld tanken op.
36.Stil den i lavtryksposition ved at trække
Kuglegrebet i dysens retning.
37.Forbind den lille slange. Hvis fejlen vedbliver,
ret henvendelse til et autoriseret servicecenter.
11. Kedlen tændes ikke
efter at have aktiveret
brænderens afbryder
38.Der mangler dieselolie
39.Tilstoppet dieseloliefilter
40.Dieseloliepumpe blokeret eller nedbrændt
41.Fejlagtig termostat
42.Utilstrækkelig eller manglende tændingsgnist
43.Elektrodernes afstand er ukorrekt
38.Kontroller tankens niveau og rengøringen af den stive
indsugningsslange
39.Udskift linjefilteret
40.Udskift den
41.Udskift den
42. Ret henvendelse til et autoriseret servicecenter.
43. Ret henvendelse til et autoriseret servicecenter.
- 5
Strona się ładuje...
Strona się ładuje...
Strona się ładuje...
Strona się ładuje...
Strona się ładuje...
Strona się ładuje...
Strona się ładuje...
Strona się ładuje...
Strona się ładuje...
Strona się ładuje...
Strona się ładuje...
Strona się ładuje...
Strona się ładuje...
Strona się ładuje...
Strona się ładuje...
Strona się ładuje...
Strona się ładuje...
Strona się ładuje...
Strona się ładuje...
Strona się ładuje...
Strona się ładuje...
Strona się ładuje...
Strona się ładuje...
Strona się ładuje...
Strona się ładuje...
Strona się ładuje...
Strona się ładuje...
Strona się ładuje...
Strona się ładuje...

NO
96
en vente noen minutter eller alternativt koble
fra og koble maskinen til strømnettet igjen.
Ved gjentatte problemer eller at maskinen fei-
ler å starte skal en bringe maskinen til den nær-
meste service senter.
> FORUTSETNING FOR AT DEN STÅR STØDING
•
ADVARSEL:
Maskinen står støtt når den står
på et flatt underlag.
BETJENING
> SERIETILBEHØR
Se pag.3-4-5.
> MONTERINGSVEILEDNING
Se pag.2
> INSTALLASJON
Se fig.
1- Sjekk at hovedbryteren er på “OFF”(0) og at vannfil-
teret er innsatt ipumpens innløp (INLET).
2- Skru hurtigkoblingen på for hånd, uten hjelp av verk-
tøy.
3- Koble vannslangen til hurtigkoblingen. Slangen må
ha en innvendig diameter på
minst 13 mm (1/2 ").
4- Koble høytrykksslangen til pumpens utløp (OUT-
LET). Skyv koblingen til høytrykksslangen helt ned
og skru den på for hånd uten hjelp av verktøy.
5- Koble høytrykksslangen til spylepistolen.
6- Åpne vannkranen helt. Vanntemperaturen skal alltid
være under 40°C.
VIKTIG! høytrykksvaskeren skal brukes kun med
rent vann for å unngå skade på selve apparatet.
- Slipp spylepistolens sikkerhetslås og hold avtrekke-
ren inne, slik at vannet kan strømme helt til all luft er
tømt ut.
- Sett lansen i spylepistolen.
- Sett støpselet i stikkontakten.
- For å starte maskinen, trekk inn avtrekkeren og sett
samtidig hovedbryteren på “ON” .
FYLL TANKEN
Fyll tanken med drivstoff iht. merkeplaten.
Kjør aldri maskinen med tom tank. Det skader
drivstoffpumpen.
•
ADVARSEL: Feil drivstoff må aldri brukes. Dette er en
sikkerhetsrisiko.
Fyll tanken for rengjøringsmiddel med riktig
rengjøringsmiddel.
•
ADVARSEL: Det må kun brukes flytende
rengjøringsmiddel. Rengjøringsmiddelet må ikke
inneholde syre eller være for alkalisk.
Bruk kun rengjøringsmidler som er beregnet
for vaskemaskiner.
>
OPPSTART
Se fig.
Oppstart av maskinen:
Sett bryteren i posisjon 2 ( I ) ON .
For å vaske med varmt vann:
Sett bryteren i posisjon 1( I ) ON .
Brenneren fungerer når maskinen er i trykk.
> HØYTRYKKS SPYLELANSE HT
Se fig.
> BRUK AV VASKEMIDDEL
Se fig.
> HØYTRYKKSSLANGE
Se fig.
> VANNFORSYNING
Vanntilkobling
ADVARSEL:
(
SYMBOLER
):
enheten er
ikke egnet for tilkobling til drikkevann.
Høytrykksvaskeren kan kobles direkte til det of-
fentlige vannettet kun dersom det i tilførselsrø-
ret er installert en stengeventil som forhindrer
tilbakestrøm, som tømmes i samsvar med gjel-
dende normer. Forsikre deg om at slangen er
forsterket, og at den har en diameter på minst
Ø 13mm
- 1/2 inch.
•
ADVARSEL:
Vann som har passert gjennom en
systemskiller regnes ikke som drikkbart vann
.
VIKTIG:
Sug opp bare filtrert eller rent vann.
Vannkranen må garantere en væskestrøm som
tilsvarer det dobbelte av pumpens maksimale
ytelse.
.
- 3
Strona się ładuje...
Strona się ładuje...
Strona się ładuje...

Oryginalna instrukcjaleggere
PL
100
SPIS TREŚCI str.
Wstęp 1
Oznaczenie 1
Instrukcja bezpieczeństwa 1
Zastosowanie 3
Dbałość i trzymanie 5
Warunki gwarancji 5
Utylizacja odpadów 5
Porady w przypadku wadliwego
działania 6
Ilustracje 8-9
WSTĘP
> PRZEWIDZIANE ZASTOSOWANIE
·
Urządzenie może być stosowane do mycia po-
wierzchni w warunkach zewnętrznych, zawsze gdy
wymaga to użycia wody pod ciśnieniem do pozbycia
się brudu.
·
Z odpowiednimi dodatkowymi akcesoriami można
wykonać prace pianowania, piaskowania i mycia z
obrotową szczotką do nałożenia na pistolet.
·
Osiągi oraz łatwość użycia urządzenia są odpowied-
nie do użytku NIEPROFESJONALNEGO
> DANE TECHNICZNE
(spójrz tabliczka z danymi technicznymi)
SYMBOLE
UWAGA: Zwrócić uwagę na względy
bezpieczeństwa
WAŻNE
ZABLOKOWANE
OTWARTE
Opcja JEŚLI JEST
Podwójna izolacja (JEŚLI JEST): to
dodatkowa ochrona izolacji elektrycznej
Uwaga: nie dotykać
Uwaga: oznaczenie: nie wdychać
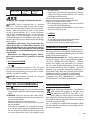
BEZPIECZEŃSTWO
> OGÓLNE OSTRZEŻENIA
•
01 UWAGA: Urządzenie do użytku tylko na ze-
wnątrz
•
02 UWAGA: Po każdorazowym użyciu odłą-
czyć zawsze dopływ prądu i wody .
•
03 UWAGA: Nie stosować urządzenia jeśli ka-
bel elektryczny lub ważne części urządzenia są
uszkodzone, np. urządzenia zabezpieczające,
wąż wysokiego ciśnienia, pistolet itp.
•
04 UWAGA: To urządzenie zostało zaprojekto-
wane do używania ze środkiem myjącym do-
starczonym lub zalecanym przez konstruktora,
typu szampon neutralny detergent na bazie
biodegradalnych anionowych środków po-
wierzchniowo czynnych. Zastosowanie innych
detergentów lub innych substancji chemicz-
nych może zagrażać bezpieczeństwu urządze-
nia.
•
05 UWAGA: Nie stosować urządzenia w pobli-
żu osób, chyba, ze mają one na sobie odzież
ochronną.
•
06 UWAGA: Strumień pod wysokim ciśnie-
niem może być skierowany na części mecha-
niczne zawierające tłuszcz- smar: w przeciw-
nym wypadku tłuszcz rozpuści się i wsiąknie w
podłoże. Opony i dętki opon musza być myte
z zachowaniem odległości 30 cm; w przeciw-
nym razie te będą mogły zostać uszkodzone
przez strumień wody pod wysokim ciśnieniem.
Pierwszą oznaką takiego uszkodzenie jest
przejaśnienie na oponie. Uszkodzone opony i
dętki opon są szkodliwe dla życia.
•
07UWAGA: Strumienie pod wyso-
kim ciśnieniem mogą być szkodli-
we jeśli są użyte niewłaściwie.
Strumienie nie mogą być skierowane w stronę
osób, zwierząt, włączonych urządzeń elek-
trycznych lub samego urządzenia.
•
08 UWAGA: Rury giętkie, akcesoria i złączki do
wysokiego ciśnienia są ważne dla bezpieczeń-
stwa urządzenia. Stosować tylko rury giętkie,
akcesoria i złączki polecane przez konstruktora
( to niezwykle ważne by zachować spójność
tych elementów unikając niewłaściwego uży-
cia oraz zapobiegając zgięciom, uderzeniom,
- 1

PL
101
ścieraniu).
•
09 UWAGA: Urządzenia nie posiadające A.S.S.
– Automatic Stop System: nie musza pozosta-
wać uruchomione przez dłużej niż 2 minuty
na zwolnionym pistolecie. Pompowana woda
zwiększa znacznie temperaturę poważnie
uszkadzając pompę.
• 10
UWAGA:
Urządzenia zaopatrzo-
ne w A.S.S – Automatic Stop System: zaleca się
nie zostawiać ich na stand-by przez więcej niż
5 minut.
•
11 UWAGA: Wyłączyć całkowicie urządzenie (
główny wyłącznik w pozycji (0)OFF) za każdym
razem gdy pozostawia się go bez nadzoru.
•
12 UWAGA: Każda maszyna jest poddawana
próbie pod względem warunków użycia, dlate-
go to normalne, że niektóre krople pozostają w
jej wnętrzu.
•
13 UWAGA: Zwrócić uwagę by nie uszkodzić
przewodu elektrycznego. Jeśli przewód zasi-
lający jest uszkodzony, to musi zostać wymie-
niony przez konstruktora lub serwis, lub przez
wykwalifikowanego pracownika, w celu unik-
nięcia sytuacji zagrożenia.
•
14 UWAGA: Maszyna z płynem pod ciśnie-
niem. Trzymać silnie pistolet, żeby zapobiec
sile reakcji. Używać tylko dyszy o wysokim ci-
śnieniu na wyposażeniu maszyny.
•
16 UWAGA: To urządzenie nie jest przeznaczo-
ne do użytku przez osoby ( włącznie z dziećmi)
o ograniczonych zdolnościach fizycznych, spo-
strzegawczych, mentalnych lub pozbawionych
doświadczenia lub znajomości, chyba , że nie
otrzymały instrukcji obsługi lub nadzoru ze
strony osoby odpowiedzialnej za ich bezpie-
czeństwo.
•
17 UWAGA: Dzieci muszą być nadzorowane
dla pewności, ze nie bawią się urządzeniem.
•
18 UWAGA: Nie włączać myjki wysokociśnie-
niowej zanim nie przestanie się toczyć wąż wy-
sokiego ciśnienia.
•
19 UWAGA: Zwijać i rozwijać wąż , żeby nie
przewrócić myjki wysokociśnieniowej.
•
20 UWAGA: Gdy wąż się zwija lub rozwija, ma-
szyna musi być wyłączona a wąż pozbawiony
ciśnienia ( nieużywany).
•
21UWAGA: Ryzyko wybuchu. Nie rozpylać pły-
nów łatwopalnych.
•
22 UWAGA: By zagwarantować bezpieczeń-
stwo maszyny, używać tylko oryginalnych czę-
ści zamiennych od producenta lub zatwierdzo-
nych przez wytwórcę.
•
23 UWAGA: nie kierować strumienia na siebie
samych lub na inne osoby w celu umycia ubrań
lub butów
•
24 UWAGA : Nie pozwalać, żeby urządzenie
było używane przez dzieci lub osoby nieupo-
ważnione.
•
UWAGA: Woda, która przeszła przez urządze-
nia nie jest pitna.
•
XX U WA GA : Wyłączyć urządzenie z prądu,
wyjmując wtyczkę z gniazdka przez wykona-
niem jakiegokolwiek zabiegu konserwacji lub
czyszczenia.
•
XY UWAG A Nieodpowiednie przedłużacze
mogą być niebezpieczne.
•
XJ UWAGA: Jeśli będzie użyty przedłużacz to
wtyczka i gniazdko muszą być zabezpieczone
przed wodą nie podłączać maszyny w miejscu,
gdzie jest tymczasowe napowietrzanie i po-
nadto przykryć ją
•
UWAGA: Unikać używania maszyny podczas
deszczu e nie kierować strumienia przeciw
deszczowi.
•
UWAGA: Nie używać urządzenia na po-
wierzchniach łatwopalnych.
•
UWAGA:
- NIE DOTYKAĆ URZĄDZENIA MOKRYMI RĘKO-
MA ANI BOSYMI STOPAMI
- NIE CIĄGNĄĆ ZA PRZEWÓD ZASILAJĄCY ANI
ZA SAMO URZĄDZENIE W CELU ODŁĄCZENIA
WTYCZKI Z GNIAZDKIEM OD PRĄDU
- W PRZYPADKU GDYBY PODCZAS PRACY ZA-
BRAKŁO DOSTAWY PRĄDU, Z POWODÓW BEZ-
PIECZEŃSTWA, WYŁĄCZYC MASZYNĘ (off).
> NORMY BEZPIECZEŃSTWA
•
UWAGA: Pistolet jest zaopatrzony w zawór bezpie-
czeństwa. Za każdym razem, gdy praca maszyny
zostanie przerwana ważne, by uruchomić zawór
bezpieczeństwa, który zapobiegnie przypadkowe-
mu otwarciu.
- Normy bezpieczeństwa: pistolet zaopatrzony w zawór
bezpieczeństwa, maszyna zaopatrzona w ochronę
przeciwko spięciom elektrycznym (CL.I), pompa za-
opatrzona w zawór by pass lub urządzenie zatrzy-
mujące.
- Guzik bezpieczeństwa pistoletu służy do blokady
dźwigni podczas działania.
•
UWAGA:Urządzenie jest zaopatrzone w system
chroniący silnik: w przypadku interwencji systemu
poczekać kilka minut lub odłączyć i ponownie pod-
łączyć urządzenie do prądu. W przypadku powta-
rzania się problemu lub nieudanego uruchomienia
silnika zanieść urządzenie do najbliższego Centrum
Obsługi.
2 -

PL
102
> STABILNOŚĆ
•
UWAGA: Maszyna musi zawsze być ustawiona w
pozycji horyzontalnej , w sposób stabilny i spokojny
ZASTOSOWANIE
> OPIS URZĄDZENIA
Zobacz str.3-4-5.
> MONTAŻ URZĄDZENIA
Zobacz str. 2
> INSTALACJA
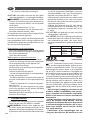
Zobacz fig.
- Sprawdzić czy główny wyłącznik jest w pozycji
“OFF”(0) i czy filtr wody jest włożony do nasuwki za-
sysającej pompy ( INLET).
- Uruchomić szybkie sprzęgło ręczne, bez pomocy na-
rzędzi.
- Połączyć rurę doprowadzającą wodę z szybkim
sprzęgłem. Rura musi mieć średnicę wewnętrzną
przynajmniej 13 mm (1/2”).
- Połączyć wąż wysokiego ciśnienia z nasuwką wyjścia
pompy (OUTLET). Złączka węża wysokiego ciśnienia
jest wciśnięta do końca i następnie uruchomiona
ręcznie bez pomocy narzędzi.
- Połączyć wąż wysokiego ciśnienia z pistoletem
- Odkręcić całkowicie kran z wodą.
Temperatura wody musi być zdecydowanie niższa
niż 40°C.
WAŻNE : myjka wysokociśnieniowa musi dzia-
łać z czystą wodą, żeby uniknąć uszkodzenia sa-
mej myjki wysokociśnieniowej.
- Odblokować zacisk bezpieczeństwa pistoletu i przyci-
skać spust , żeby płynęła woda aż do momentu gdy
całe powietrze zostanie wydalone.
- Wstawić końcówkę pistoletu.
Włączyć wtyczkę do kontaktu z prądem.
Żeby uruchomić maszynę, nacisnąć spust pistoletu i
równocześnie ustawić główny włącznik na “ON”
Rozpakowanie
Napełnić zbiornik paliwem wskazanym na ta-
bliczce z danymi technicznymi. Unikać całkowite-
go opróżnienia zbiornika podczas pracy urządze-
nia , by nie uszkodzić pompy paliwowej.
•
UWAGA: Nigdy nie używaj niewłaściwego paliwa. Sta-
nowi to zagrożenie bezpieczeństwa.
Napełnić zbiornik na detergent odpowiednimi
produktami właściwymi
do typu mycia.
•
UWAGA: Używać tylko płynnych detergentów, unikać
całkowicie produktów kwaśnych i bardzo alkalicznych.
Radzimy Wam używać naszych produktów, które zo-
stały opracowane specjalnie do użytku z myjkami
wysokociśnieniowymi.
> URUCHOMIENIE
Zobacz fig.
Uruchomić maszynę :
Włącznik , pozycja 2 ( I ) ON .
By umyć ciepłą wodą :
włącznik pozycja
1
( I ) ON
.
Palnik działa z maszyna pod ciśnieniem.
> KOŃCÓWKA WYSOKIEGO CIŚNIENIA
Zobacz fig.
> ZASYSANIE DETERGENTU
Zobacz sekwencję fig.
> RURA WYSOKIEGO CIŚNIENIA
Zobacz fig.
> ZASILANIE WODĄ
Przewód doprowadzający wodę
ATTENZIONE (symbol)
: urządzenie nie na-
daje się do podłączenia do sieci wody pitnej.
Myjka wysokociśnieniowa może być podłą-
czona bezpośrednio do sieci dystrybucji wody
PITNEJ tylko jeśli w rurze doprowadzającej jest
zainstalowane urządzenie przeciwodpływowe
z opróżnianiem zgodnym z obowiązującymi
wytycznymi.
Upewnić się , że rura ma przynajmniej O 13mm
- 1/2inch i że jest wzmacniana.
•
UWAGA:
Woda, która przeszła przez urządzenia
przeciodpływowe nie jest pitna.
WAŻNE
: Zassać jedynie wodę filtrowaną lub
czystą. Kran przelewowy wody musi gwarantować
dostawę równą podwójnemu maksymalnemu natę-
żeniu przepływu pompy.
-Natężenie minimalne :15 l/ min.
•
Nigdy nie używaj niewłaściwego paliwa. Stanowi to
zagrożenie bezpieczeństwa.
- 3
Strona się ładuje...
Strona się ładuje...
Strona się ładuje...
Strona się ładuje...
Strona się ładuje...
Strona się ładuje...
Strona się ładuje...
Strona się ładuje...
Strona się ładuje...
Strona się ładuje...
Strona się ładuje...
Strona się ładuje...
Strona się ładuje...
Strona się ładuje...
Strona się ładuje...
Strona się ładuje...
Strona się ładuje...
Strona się ładuje...
Strona się ładuje...
Strona się ładuje...
Strona się ładuje...
Strona się ładuje...
Strona się ładuje...
Strona się ładuje...
Strona się ładuje...
Strona się ładuje...
-
 1
1
-
 2
2
-
 3
3
-
 4
4
-
 5
5
-
 6
6
-
 7
7
-
 8
8
-
 9
9
-
 10
10
-
 11
11
-
 12
12
-
 13
13
-
 14
14
-
 15
15
-
 16
16
-
 17
17
-
 18
18
-
 19
19
-
 20
20
-
 21
21
-
 22
22
-
 23
23
-
 24
24
-
 25
25
-
 26
26
-
 27
27
-
 28
28
-
 29
29
-
 30
30
-
 31
31
-
 32
32
-
 33
33
-
 34
34
-
 35
35
-
 36
36
-
 37
37
-
 38
38
-
 39
39
-
 40
40
-
 41
41
-
 42
42
-
 43
43
-
 44
44
-
 45
45
-
 46
46
-
 47
47
-
 48
48
-
 49
49
-
 50
50
-
 51
51
-
 52
52
-
 53
53
-
 54
54
-
 55
55
-
 56
56
-
 57
57
-
 58
58
-
 59
59
-
 60
60
-
 61
61
-
 62
62
-
 63
63
-
 64
64
-
 65
65
-
 66
66
-
 67
67
-
 68
68
-
 69
69
-
 70
70
-
 71
71
-
 72
72
-
 73
73
-
 74
74
-
 75
75
-
 76
76
-
 77
77
-
 78
78
-
 79
79
-
 80
80
-
 81
81
-
 82
82
-
 83
83
-
 84
84
-
 85
85
-
 86
86
-
 87
87
-
 88
88
-
 89
89
-
 90
90
-
 91
91
-
 92
92
-
 93
93
-
 94
94
-
 95
95
-
 96
96
-
 97
97
-
 98
98
-
 99
99
-
 100
100
-
 101
101
-
 102
102
-
 103
103
-
 104
104
-
 105
105
-
 106
106
-
 107
107
-
 108
108
-
 109
109
-
 110
110
-
 111
111
-
 112
112
-
 113
113
-
 114
114
-
 115
115
-
 116
116
-
 117
117
-
 118
118
-
 119
119
-
 120
120
-
 121
121
-
 122
122
-
 123
123
-
 124
124
-
 125
125
-
 126
126
-
 127
127
-
 128
128


Lavor LAV54 Instrukcja obsługi
- Kategoria
- Myjki wysokociśnieniowe
- Typ
- Instrukcja obsługi
w innych językach
- čeština: Lavor LAV54 Uživatelský manuál
- español: Lavor LAV54 Manual de usuario
- italiano: Lavor LAV54 Manuale utente
- Deutsch: Lavor LAV54 Benutzerhandbuch
- eesti: Lavor LAV54 Kasutusjuhend
- svenska: Lavor LAV54 Användarmanual
- português: Lavor LAV54 Manual do usuário
- français: Lavor LAV54 Manuel utilisateur
- Türkçe: Lavor LAV54 Kullanım kılavuzu
- dansk: Lavor LAV54 Brugermanual
- русский: Lavor LAV54 Руководство пользователя
- suomi: Lavor LAV54 Ohjekirja
- Nederlands: Lavor LAV54 Handleiding
Powiązane artykuły
Inne dokumenty
-
Comet KR PORTABLE Instrukcja obsługi
-
Vonroc PW504AC Instrukcja obsługi
-
Efco IP 1100 S Instrukcja obsługi
-
Vonroc PW503AC Instrukcja obsługi
-
Güde Hochdruckreiniger GHD 1400-105 Instrukcja obsługi
-
-
-