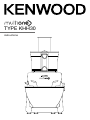
Kenwood KHH301WH Instrukcja obsługi
- Kategoria
- Miksery
- Typ
- Instrukcja obsługi

TYPE KHH30
instructions

English 2 - 18
´¸∂w
91 - 43

4
8
9
7
2
b
b
b
b
b
1
3
2
4
1
b
b b b b
56
3

b
5
8
9
6
7
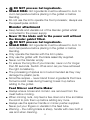
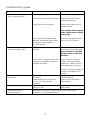
Creaming Beater
Spanner shown
is for illustration
purposes only
and not supplied
in pack.

A
F
A
B
G
H
I
C
B
D
E
b b
b
A
C
B
D
E

A
B
D
E
F
C
b
-
F
G
H
I
A
I
A
B
C
D
E
A
B
C

safety
l
Read these instructions carefully and retain for future
reference.
l
Remove all packaging and any labels.
l
If the cord is damaged it must, for safety reasons, be
replaced by KENWOOD or an authorised KENWOOD
repairer.
l
Switch off and unplug:
before fitting or removing parts;
when not in use;
before cleaning.
l
Turn the speed control to ‘O’ (OFF) position and unplug
before fitting or removing tools/attachments, after use and
before cleaning.
l
Keep your fingers away from moving parts and fitted
attachments.
l
Never leave the Kitchen Machine unattended when it is
operating.
l
Never use a damaged appliance. Get it checked or repaired:
see ‘service and customer care’ section.
l
Never let the cord hang down where a child could grab it.
l
Never let the power unit, cord or plug get wet.
l
Ensure that no bowl tools are fitted or stored in
the bowl when using the dual drive outlet.
l
Never use an unauthorised attachment or more than one
attachment at once.
l
Never exceed the quantities stated in the maximum capacity
chart.
l
Take care when lifting this appliance. Ensure the head is
correctly latched in the down position and that the bowl,
tools, outlet cover and cord are secure before lifting.
l
Ensure the cord is fully unwound from the cord storage
compartment
4
before using the Kitchen Machine.
l
Children should be supervised to ensure that they do not play
with the appliance.
2

l
Do not move or raise the mixer head with an attachment fitted
as the Kitchen Machine could become unstable.
l
Do not operate your appliance near the edge of a work
surface.
l
Appliances can be used by persons with reduced physical,
sensory or mental capabilities or lack of experience and
knowledge if they have been given supervision or instruction
concerning use of the appliance in a safe way and if they
understand the hazards involved.
l
Misuse of your appliance can result in injury.
l
This appliance shall not be used by children. Keep the
appliance and its cord out of reach of children.
l
Only use the appliance for its intended domestic use.
Kenwood will not accept any liability if the appliance is subject
to improper use, or failure to comply with these instructions.
l
The maximum rating is based on the attachment that draws
the greatest load. Other attachments may draw less power.
l
Attachments will be damaged and may cause
injury if the interlock mechanism is subjected to
excessive force.
Food Processor attachment
l
The food processor knife blade and discs are extremely
sharp, handle with care. Always hold by the finger grip
at the top, away from the cutting edge, both when
handling and cleaning.
l
Always remove the knife blade before pouring contents from
the bowl.
l
Keep hands and utensils out of the food processor bowl
whilst connected to the power supply.
l
Never use your fingers to push food down the feed tube.
Always use the pusher supplied.
l
Before removing the lid from the food processor bowl:
switch off;
wait until the attachment/blades have completely stopped.
l
Never remove the food processor lid until the knife
blades/cutting discs have completely stopped.
3

l
DO NOT process hot ingredients.
l
SCALD RISK: Hot ingredients must be allowed to cool to
room temperature before placing in the goblet or before
blending.
l
Do not use the lid to operate the food processor, always use
the speed/pulse control.
Blender attachment
l
Keep hands and utensils out of the blender goblet whilst
connected to the power supply.
l
Never fit the blade unit to the power unit without
the blender goblet fitted.
l
DO NOT process hot ingredients.
l
SCALD RISK: Hot ingredients must be allowed to cool to
room temperature before placing in the goblet or before
blending.
l
Only operate the blender with the lid in place.
l
Only use the goblet with the blade assembly supplied.
l
Never run the blender empty.
l
To ensure the long life of your blender, never run for longer
than 60 seconds. Switch off as soon as you have achieved
the right consistency.
l
The processing of spices is not recommended as they may
damage the plastic parts.
l
Smoothie recipes – never blend frozen ingredients that have
formed a solid mass during freezing; break it up before
adding to the goblet.
Food Mincer and Pasta Maker
l
Always ensure bones and rind etc. are removed from the
meat before mincing.
l
When mincing nuts, only feed a few down at a time and allow
the scroll to pick them up before adding any more.
l
Always use the spanner handle or mincer pusher supplied.
Never put your fingers or utensils in the feed tube.
l
Warning – the cutting blade is sharp, handle with care both in
use and when cleaning.
4

l
Ensure the attachment is secured in position before switching
on.
l
Always ensure a minimum of 45% liquid is used in your pasta
dough recipe. Pasta mix made too dry or fed through too
quickly can break your pasta maker and/or machine.
l
Only use the spanner handle to push the dough down the
feed tube and do not push too hard.
l
Feed the dough in small amounts at a time and at a steady
rate. Do not allow the feed tube to fill up.
Juice Extractor attachment
l
Do not use the juicer if the filter is damaged.
l
The cutting blades on the base of the filter are very sharp,
take care when handling and cleaning the filter.
l
Do not use the lid to operate the juicer, always use the
speed/pulse control.
l
Should excessive vibration occur when using this attachment,
either adjust the speed or stop the machine, unplug and
clear any pulp from the drum (the juicer vibrates if the pulp
becomes unevenly distributed).
Compact Chopper/Grinder attachment
l
Do not touch sharp blades. Keep the blade unit away from
children.
l
Before removing the compact chopper/grinder from the
machine:
switch off;
wait until the blades have completely stopped;
take care not to unscrew the jar from the blade assembly.
l
Only use the jar and blade unit with the base supplied.
l
Never blend hot liquids in the compact chopper/grinder.
l
Never attempt to fit the blade unit to the machine without the
jar fitted.
l
To ensure the long life of your compact chopper/grinder,
never run for longer than 30 seconds. Switch off as soon as
you have got the right consistency.
l
The processing of spices is not recommended as they may
damage the plastic parts.
5

before plugging in
l
Make sure your electricity supply is the same as
the one shown on the underside of your appliance.
important - UK only
l
The wires in the cord are coloured as follows:
Blue = Neutral,
Brown = Live.
l
The appliance must be protected by a 13A
approved (BS1362) fuse.
Note:
l
For non-rewireable plugs the fuse cover MUST
be refitted when replacing the fuse. If the fuse
cover is lost then the plug must not be used until
a replacement can be obtained. The correct fuse
cover is identified by colour and a replacement
may be obtained from your Kenwood Authorised
Repairer (see Service).
l
If a non-rewireable plug is cut off it must be
DESTROYED IMMEDIATELY. An electric shock
hazard may arise if an unwanted non-rewireable
plug is inadvertently inserted into a 13A socket
outlet.
l
This appliance conforms to EC Regulation
1935/2004 on materials and articles intended to
come into contact with food.
before using for the first time
l
Wash the parts: see ‘care and cleaning’.
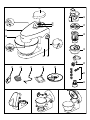
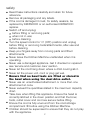
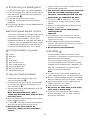
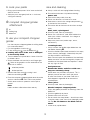
key
1
outlet cover
2
dual drive outlet (medium and high speed)
3
interlocks
4
cord storage compartment
5
speed/pulse control
6
power unit
7
bowl tool socket
8
bowl
9
mixer head
bk
head release lever
bl
K-beater
bm
whisk
bn
spiral dough hook
bo
creaming beater (if supplied)
bp
splashguard
attachments
Not all of the attachments listed will
necessarily be included with your
kitchen machine. Attachments are
dependent upon the model variant.
bq
food processor (if supplied)
br
citrus juicer (if supplied)
bs
glass blender (if supplied)
bt
juice extractor (if supplied)
ck
food mincer (if supplied)
cl
pasta maker (accessory for food mincer) (if
supplied)
cm
compact chopper/grinder (if supplied)
Refer to the recommended speed chart for each
attachment.
the mixing tools and some of
their uses
bl
K-beater
l
For making cakes, biscuits, pastry, icing, fillings,
éclairs and mashed potato.
bm
whisk
l
For eggs, cream, batters, fatless sponges,
meringues, cheesecakes, mousses, soufflés.
Do not use the whisk for heavy mixtures (e.g.
creaming fat and sugar) - you could damage it.
bn
spiral dough hook
l
For yeast mixtures.
bo
creaming beater (if supplied)
l
The creaming beater is designed for creaming and
mixing soft ingredients. Do not use with heavy
recipes such as dough or hard ingredients, for
example those containing fruit stones, bones or
shells.
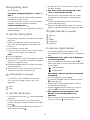
Fitting the wiper blade
l
The wiper blade is supplied already fitted and
should always be removed for cleaning
bk
.
1 Carefully fit the flexible wiper blade onto the tool
by locating the base of the wiper blade into the
slot
5
then fit one side into the groove before
gently hooking the end in place
6
. Repeat with
the other side
7
.
6
l
The appliance will not work if the compact chopper/grinder is
incorrectly fitted.
l
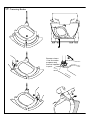
Use dry ingredients only.

Checking the beater height
l
The beater height has been set in the factory and
should not require adjusting. If height adjustment is
required follow the procedure below.
1 With the mixer switched off, insert the creaming
beater and lower the mixer head.
Check the position of the beater in the bowl
8
.
Ideally it should be in contact with the bowl surface
so that it gently wipes the bowl during mixing.
2 If the clearance needs to be adjusted, raise the
mixer head and remove the beater.
3 To loosen and allow adjustment of the shaft
9
,
rotate the nut clockwise using a 15mm spanner
(not supplied in pack).
l
To lower the beater closer to the bottom of the
bowl, turn the beater shaft clockwise.
l
To raise the beater away from the bottom of the
bowl turn the shaft anticlockwise.
4 Tighten the nut by turning anticlockwise.
5 Fit the beater and lower the mixer head. Check its
position (see point 2). Repeat the above steps as
necessary until the beater is set correctly. Once
this is achieved tighten the nut securely.
Note: If the mixer vibrates heavily when
the speed is selected, the beater has
been set too close to the bowl and needs
adjusting.
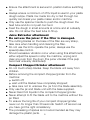
to use your bowl tools
1 Press the head release lever down
1
and raise the
mixer head until it locks into position.
2 Fit the bowl into the base and turn anti-clockwise
to lock into position
2
.
3 Select a tool and push into the tool socket until it
clicks
3
.
4 Press the head release lever down and lower the
mixer head until it locks into position.
5 Plug into the power supply. To switch on, turn the
speed switch to the desired setting. To switch off
turn to ‘O’ (OFF) position.
If the mixer head is in the raised position
or the outlet cover is not fitted, the Power
On light will flash and the machine will
not operate.
l
Switch to pulse
P
P
for short bursts.
6 Unplug from the power supply.
7 Raise the mixer head and whilst holding it steady,
pull the tool from the tool socket.
important
l
If the mixer head is raised during operation, the
machine will stop working straight away. To
re-start, lower the mixer head, turn the speed
switch to the ‘O’ (OFF) position, wait a few seconds
and then re-select the speed. The machine should
resume operating straight away.
l
If for any reason power is interrupted and the
machine stops working, turn the speed switch to
the ‘O’ (OFF) position, wait a few seconds and then
re-select the speed. It should resume operating
straight away.
l
The machine will not operate unless the
outlet cover is correctly fitted.
l
If you hear the machine labouring either switch off
and remove some of the mixture or increase the
speed.
l
Always remove attachments fitted to the dual drive
outlet before raising the mixer head.
l
Ensure that no bowl tools are fitted or
stored in the bowl when using the dual
drive outlet.
hints
l
Switch off and scrape the bowl with a spatula
when necessary.
l
Eggs at room temperature are best for whisking.
l
Before whisking egg whites, make sure there is no
grease or egg yolk on the whisk or bowl.
l
Use cold ingredients for pastry unless your recipe
states otherwise.
l
When creaming fat and sugar for cake mixes,
always use the fat at room temperature or soften it
first.
l
Your machine has been fitted with a ‘soft start’
feature to minimise spillage. However if the
machine is switched on with a heavy mixture in the
bowl such as bread dough, you may notice that it
takes a few seconds to reach the selected speed.
points for bread making
important
l
Never exceed the maximum capacities stated - you
will overload the machine.
l
Some movement of the mixer head is
normal when mixing heavy loads such as
bread dough.
l
The ingredients mix best if you put the liquid in first.
l
At intervals stop the machine and scrape the
mixture off the dough hook.
l
Different batches of flour vary considerably in the
quantities of liquid required and the stickiness of
the dough can have a marked effect on the load
imposed on the machine. You are advised to keep
the machine under observation whilst the dough is
being mixed; the operation should take no longer
than 6-8 minutes.
7

to fit and use your splashguard
1 Fit the bowl into the base and add the ingredients.
2 Fit the splashguard
bp
by aligning the tabs with the
bowl tool socket
7
and rotate anti-clockwise to
lock into position
4
.
3 Fit the tool then lower the mixer head.
4 To remove the splashguard reverse the above
procedure.
l
During mixing, ingredients can be added directly to
the bowl via the chute.
electronic speed sensor control
Your mixer is fitted with an electronic speed sensor
control that is designed to maintain the speed
under different load conditions, such as when
kneading bread dough or when eggs are added to
a cake mix. You may therefore hear some variation
in speed during the operation as the mixer adjusts
to the load and speed selected - this is normal.
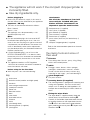
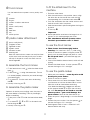
bq
food processor (if supplied)
A
pusher
B
feed tube
C
lid
D
knife blade
E
bowl with drive shaft
F
thick slicing/grating disc
G
thin slicing/grating disc
H
extra fine grating disc
I
detachable drive shaft
to use your food processor
1 Remove the outlet cover by turning it anti-
clockwise and lifting off
bl
.
2 Fit the bowl
E
over the outlet
2
with the handle
to the right hand side and turn clockwise until it
locks into position
bm
.
3 Add the knife blade or detachable drive shaft with
the desired attachment.
Note: The detachable drive shaft
I
should only be fitted when using the discs
and citrus juicer.
l
Always fit the bowl and attachment onto the outlet
before adding ingredients.
4 Fit the lid
bn
– ensuring the top of the knife blade/
drive shaft locates into the centre of the lid.
l
Do not use the lid to operate the
processor, always use the speed/pulse
control.
5 Plug in, switch on and select a speed (refer to the
recommended speed chart).
l
The processor will not operate if the bowl
or lid are not fitted correctly into the
interlocks. Check that the feed tube and
bowl handle are situated to the front.
l
Use the pulse
P
P
for short bursts. The pulse
will operate for as long as the control is held in
position.
6 Reverse the above procedure to remove the lid,
attachments and bowl.
l
Always switch off and unplug before
removing the lid.
important
l
Your processor is not suitable for crushing or
grinding coffee beans, or converting granulated
sugar to caster sugar.
l
When adding almond essence or flavouring to
mixtures, avoid contact with the plastic as this may
result in permanent marking.
l
Do not process hot ingredients.
knife blade
D
The knife blade is the most versatile of all the
attachments. The length of the processing time will
determine the texture achieved.
For coarser textures use the pulse control.
Use the knife blade for cake and pastry making,
chopping raw and cooked meat, vegetables, nuts,
pâté, dips, pureeing soups and to also make
crumbs from biscuits and bread.
hints
l
Cut food such as meat, bread, vegetables into
cubes approximately 2cm/ ¾in before processing.
l
Biscuits should be broken into pieces and added
down the feed tube whilst the machine is running.
l
When making pastry, use fat straight from the
fridge cut into 2cm/ ¾in cubes.
l
Take care not to over-process.
l
Do not use the knife blade to mix heavy
loads such as bread dough.
l
Do not use the knife blade to chop ice cubes
or other hard foods, such as spices, they may
damage the attachment.
8

slicing/grating discs
to use the discs
reversible slicing/grating discs – thick
F
,
thin
G
Use the grating side for cheese, carrots, potatoes
and foods of a similar nature.
Use the slicing side for cheese, carrots, potatoes,
cabbage, cucumber, beetroot and onions.
extra fine grating disc
H
Grates Parmesan cheese and potatoes for German
potato dumplings.
to use the cutting discs
1 Fit the bowl on the power unit, add the detachable
drive shaft.
2 Hold by the finger grip, place the disc onto the
drive shaft with the appropriate side uppermost.
3 Fit the lid.
4 Put the food in the feed tube.
5 Switch on, then push down evenly with the pusher
– never put your fingers in the feed tube.
hints
l
Use fresh ingredients.
l
Do not cut food too small. Fill the width of the feed
tube fairly full. This prevents the food from slipping
sideways during processing.
l
Food placed upright comes out shorter than food
placed horizontally.
l
There will always be a small amount of waste on
the disc or in the bowl after processing.
br
citrus juicer (if supplied)
Use the citrus juicer to squeeze the juice from
citrus fruits (e.g. oranges, lemons, limes and
grapefruits).
A
cone
B
sieve
to use the citrus juicer
1 Fit the bowl onto the outlet
2
, add the detachable
drive shaft.
2 Fit the sieve into the bowl – ensuring the sieve
handle is locked into position directly over the bowl
handle
bo
.
3 Place the cone over the drive shaft turning until it
drops all the way down
bp
.
4 Cut the fruit in half. Then switch on and press the
fruit onto the cone.
l
The citrus juicer will not operate if the
sieve is not locked correctly.
l
For best results store and juice the fruit at room
temperature and hand roll on a worktop before
juicing.
l
To help with juice extraction move the fruit from
side to side when juicing.
l
When juicing large quantities, empty the strainer
regularly to prevent the build up of pulp and seeds.
bs
glass blender (if supplied)
A
filler cap
B
lid
C
goblet
D
sealing ring
E
blade unit
to use your glass blender
1 Fit the sealing ring
D
into the blade unit
E
-
ensuring the seal is located correctly in the grooved
area.
l
Leaking will occur if the seal is damaged
or incorrectly fitted.
2 Screw the goblet onto the blade assembly
bq
.
Refer to the graphics on the underside of the blade
unit as follows:
- unlocked position
- locked position
The blender will not operate if incorrectly
assembled.
3 Put your ingredients into the goblet.
4 Fit the lid to the goblet and push down to secure
br
. Fit the filler cap.
5 Remove the dual drive outlet cover by turning it
anti-clockwise and lifting off.
6 Place the blender onto the power unit, and turn
clockwise
bs
until it clicks into position.
l
The appliance will not operate if the
blender is incorrectly fitted to the
interlock.
7 Select a speed (refer to recommended speed
chart) or use pulse
P
P
for short bursts.
9

hints
l
When making mayonnaise, put all the ingredients,
except the oil, into the blender. Remove the filler
cap. Then, with the appliance running, add the oil
slowly through the hole in the lid.
l
Thick mixtures, e.g. pâtés and dips, may need
scraping down. If the mixture is difficult to process,
add more liquid.
l
Ice crushing – operate the pulse in short bursts
until crushed to the desired consistency.
l
The processing of spices is not recommended as
they may damage the plastic parts.
l
The appliance will not work if the blender
is incorrectly fitted.
l
To blend dry ingredients – cut into pieces, remove
the filler cap, then with the appliance running, drop
the pieces down one by one. Keep your hand over
the opening. For best results empty regularly.
l
Do not use the blender as a storage container.
Keep it empty before and after use.
l
Never blend more than 1.2 litres (42 fl oz) – less for
frothy liquids like milkshakes.
bt
juice extractor (if supplied)
Use the juice extractor for making juice from firm
fruit and vegetables.
A
pusher
B
juicer lid
C
pulp remover
D
filter drum
E
juicer bowl
F
spout
to use your juice extractor
1 Fit the juicer bowl
E
over the dual drive outlet
2
with the spout
F
to the left hand side and turn
clockwise until it locks
bt
.
2 Place the pulp remover
C
into the filter drum
D
– ensuring the tabs locate with the slots in the
bottom of the drum
ck
.
3 Fit the filter drum
cl
.
4 Place the juicer lid
B
onto the bowl and turn until
it locks
cm
. Your juicer will not operate if
the bowl or lid are not fitted correctly into
the interlock.
5 Place a suitable container under the juice outlet.
6 Cut the food to fit the feed tube.
7 Switch to maximum speed, then place the food
into the feed tube. Push down evenly with the
pusher - never put your fingers in the feed
tube. Process fully before adding more.
l
After adding the last piece, let the juicer run for a
further 30 seconds to extract all the juice from the
filter drum.
important
l
If the juicer starts to vibrate, switch off and empty
the pulp from the filter. (The juicer vibrates if the
pulp becomes unevenly distributed).
l
Maximum capacity that can be processed at one
time is 800g (1lb 12oz) of fruit or vegetables.
l
Some very hard foods may make your attachment
slow down or stop. If this happens switch off and
unblock the filter.
l
Switch off and empty the pulp and juice containers
regularly during use.
hints
l
Insert soft food slowly to get the most juice.
l
Vitamins disappear - the sooner you drink your
juice, the more vitamins you will get.
l
If you need to store the juice for a few hours put
it in the fridge. It will keep better if you add a few
drops of lemon juice.
l
Do not drink more than three 230mls (8 fl.oz.)
glasses of juice a day unless you are used to it.
l
Dilute juice for children with an equal amount of
water.
l
Juice from dark green (broccoli, spinach etc.) or
dark red (beetroot, red cabbage etc.) vegetables is
extremely strong, so always dilute it.
l
Fruit juice is high in fructose (fruit sugar), so people
with diabetes or low blood sugar should avoid
drinking too much.
10

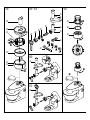
ck
food mincer
Use the food mincer to process meat, poultry and
fish.
A
spanner
B
ring nut
C
screens: medium and coarse
D
cutter
E
mincer scroll (metal)
F
body
G
feed tube
H
tray
I
mincer pusher
cl
pasta maker attachment
J
pasta scroll (plastic)
K
spaghetti screen
L
tagliatelle screen
M
rigatoni screen
N
macaroni screen
O
cleaning tool
Note: the metal mincer screens can only be fitted
to the metal scroll and the plastic pasta screens
will only fit the plastic scroll, the scrolls are not
interchangeable.
to assemble the food mincer
1 Fit the food mincer scroll
E
inside the food mincer
body
F
.
2 Fit the cutter
D
– cutting side outermost. Ensure
it is seated properly, otherwise you could damage
your food mincer.
3 Fit a screen
C
. Put the notch over the locating
tab
cn
.
4 Loosely fit the ring nut
B
.
to assemble the pasta maker
Optional: for easier pasta making, warm the parts in
hot water before assembling. Then dry thoroughly
before assembling.
1 Fit the pasta scroll
J
inside the food mincer body
F
.
2 Fit a screen
K
,
L
,
M
or
N
. Put the notch over
the locating tab
co
.
3 Loosely fit the ring nut
B
.
to fit the attachment to the
machine
1 Raise the mixer head.
2 With the attachment in the position shown, align
the drive tabs on the end of the scroll with the
corresponding slots in the bowl tool socket
cp
.
3 Push the attachment into the socket and turn anti-
clockwise until it locks into place.
4 Hold the feed tube in place and tighten the ring nut
by hand.
5 Fit the tray
cq
.
important
l
Never operate the attachment for longer than 10
minutes as this could damage your mixer.
l
The attachment will not operate unless
the dual speed outlet cover is fitted.
to use the food mincer
l
Thaw frozen food thoroughly before
mincing. Cut meat into 2.5cm (1”) wide strips.
1 Switch to maximum speed. Using the pusher
I
,
gently push the food through one piece at a time.
Do not push hard – you could damage your
food mincer.
2 Once all the food has been minced, switch off and
unplug.
3 Remove the food mincer. Use the spanner
A
to
remove the ring nut if it is too tight.
to use the pasta maker
1 Make your pasta dough. – a too-dry mix could
break your pasta maker.
2 Switch to maximum speed.
3 Place some of the mix onto the hopper. Feed a
small amount of mix into the feed tube at a time.
Allow the scroll to clear before continuing.
If the feed tube becomes clogged use the end
of the spanner handle
A
to push the mix onto
the scroll. Do not push too hard or use the
mincer pusher – you could damage the
pasta maker. Never let the feed tube fill up.
4 When the pasta is long enough, cut to the desired
length.
5 Remove the pasta maker. Use the spanner
A
to
remove the ring nut if it is too tight.
l
Cook rigatoni within 4 hours. Otherwise it will
become brittle and snap.
11

to cook your pasta
1 Bring a pan three quarters full of water to the boil.
Add salt to taste.
2 Add your pasta and gently boil for 3- 8 minutes,
stirring occasionally.
cm
compact chopper/grinder
attachment
A
jar
B
sealing ring
C
blade unit
to use your compact chopper/
grinder
Use the compact chopper/grinder for milling herbs,
nuts and coffee beans.
1
Put the ingredients into the jar
A
.
2
Fit the sealing ring
B
into the blade unit
C
.
l
Leaking will occur if the seal is damaged
or incorrectly fitted.
3
Turn the blade unit upside down. Lower it into the
jar, blades down.
4
Screw the blade unit onto the jar until finger tight
cr
. Refer to the graphics on the underside of the
blade unit as follows:
- unlocked position
- locked position
5 Remove the outlet cover by turning it anti-
clockwise and lifting off
cs
.
6 Place the compact chopper/grinder onto the outlet
and turn clockwise
ct
until it clicks into position.
7
Switch onto maximum speed or use the pulse
control.
hints
Herbs are best milled when clean and dry.
care and cleaning
l
Always switch off and unplug before cleaning.
l
Dismantle attachments fully before cleaning.
power unit
l
Wipe with a damp cloth, then dry.
l
Never use abrasives or immerse in water.
l
Store excess cord in the storage compartment
4
at the back of the machine.
l
Ensure the feet on the base of the mixer are kept
clean.
bowl, tools, splashguard
l
Wash by hand, then dry thoroughly.
l
Never use a wire brush, steel wool or bleach to
clean your stainless steel bowl. Use vinegar to
remove limescale.
l
Keep away from heat (cooker tops, ovens,
microwaves).
creaming beater
1 Always remove the flexible wiper blade from the
tool before cleaning
bk
.
2 Wash the flexible wiper blade and tool in hot soapy
water, then dry thoroughly. Alternatively the parts
can be washed in a dishwasher.
Note: Please inspect the condition of the tool body
before and after use and also regularly inspect the
condition of the wiper blade and replace it if there
are any signs of wear.
food processor
l
Handle the blades and discs with care –
they are extremely sharp.
l
Some foods may discolour the plastic. This is
perfectly normal and won’t harm the plastic
or affect the flavour of your food. Rub with a
cloth dipped in vegetable oil to remove the
discolouration.
citrus juicer
l
Wash by hand, then dry thoroughly.
blender/compact chopper/grinder
1 Empty the goblet/jar before unscrewing it from the
blade unit.
2 Wash the goblet/jar by hand.
3 Remove and wash the seals.
4 Do not touch the sharp blades – brush them clean
using hot soapy water, then rinse thoroughly under
the tap. Do not immerse the blade unit in
water.
5 Leave to dry upside down.
12

juice extractor
l
For easier cleaning always wash the parts
immediately after use.
l
Some foods, e.g. carrot, will discolour the plastic.
Rubbing with a cloth dipped in vegetable oil helps
remove discolouring.
l
Clean the filter using a soft brush.
l
Check the filter regularly for signs
of damage. Do not use if the filter is
damaged. Refer to “service and customer
care”.
food mincer
l
Wash all parts in hot soapy water, then dry
thoroughly. Do not wash any part in the
dishwasher. Never use a soda solution.
l
Wipe the screens with vegetable oil, then wrap in
greaseproof paper to prevent discolouring/rusting.
pasta maker
Screens
l
Use the cleaning tool
O
to remove all dough from
the screens.
l
Allow the dough to dry in the screens before using
the cleaning tool.
l
If the dough is difficult to remove from the screen,
place the screen in the freezer for 10 minutes and
lightly tap the screen on the worksurface to remove
the dough.
l
Wash the screens in hot soapy water, then dry.
Plastic Pasta scroll
l
Do not immerse in water.
l
Wipe clean, then dry.
all other parts
l
Wash by hand, then dry.
l
Alternatively, refer to dishwasher chart for parts
that are dishwasher safe and can be washed on
the top rack of your dishwasher. Avoid placing
items on the bottom rack directly over the heating
element. A short, low temperature (Maximum 50°C)
programme is recommended.
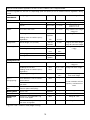
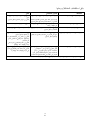
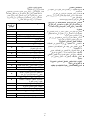
13
item suitable for
dishwashing
Mixer
Bowl 4
Whisk, beater and dough hook 4
Creaming beater and wiper blade 4
Splashguard 4
Outlet cover 8
Food Processor
Main bowl, lid and pusher 4
Knife blade 4
Detachable drive shaft 4
Discs 4
Citrus juicer
Cone, sieve 4
Blender
Goblet, lid and filler cap 4
Blade unit and seal 8
Juice extractor
Bowl, pusher, lid, filter drum and
pulp remover
4
Food mincer and Pasta Maker
Ring nut, screens, cutter, food
scrolls and body
8
Tray and pusher 4
Pasta screens 4
Spanner 4
Compact chopper/Grinder
Jar 4
Blade unit and seal 8

service and customer care
l
If you experience any problems with
the operation of the Kitchen Machine or
attachments, before calling for assistance
refer to the troubleshooting guide or visit
www.kenwoodworld.com.
UK
If you need help with:
l
using your appliance
l
servicing or repairs
Z call Kenwood Customer Care on
023 9239
2333.
Have your model number (e.g. TYPE
KHH30) and date code (5 digit code e.g.
13L35) ready. They are on the underside of the
power unit.
l
spares and attachments
Z call 0844 557 3653.
other countries
l
If you experience any problems with the operation
of your appliance, before requesting assistance
refer to the “troubleshooting guide” section in the
manual or visit www.kenwoodworld.com.
l
Please note that your product is covered by a
warranty, which complies with all legal provisions
concerning any existing warranty and consumer
rights in the country where the product was
purchased.
l
If your Kenwood product malfunctions or you
find any defects, please send it or bring it to
an authorised KENWOOD Service Centre.
To find up to date details of your nearest
authorised KENWOOD Service centre visit
www.kenwoodworld.com or the website specific to
your Country.
l
Designed and engineered by Kenwood in the UK.
l
Made in China.
IMPORTANT INFORMATION FOR
CORRECT DISPOSAL OF THE PRODUCT
IN ACCORDANCE WITH THE EUROPEAN
DIRECTIVE ON WASTE ELECTRICAL AND
ELECTRONIC EQUIPMENT (WEEE)
At the end of its working life, the product must not be
disposed of as urban waste.
It must be taken to a special local authority
differentiated waste collection centre or to a dealer
providing this service.
Disposing of a household appliance separately avoids
possible negative consequences for the environment
and health deriving from inappropriate disposal and
enables the constituent materials to be recovered to
obtain significant savings in energy and resources.
As a reminder of the need to dispose of household
appliances separately, the product is marked with a
crossed-out wheeled dustbin.
guarantee UK only
l
If your machine goes wrong within one year from
the date you bought it, we will repair or replace it
free of charge provided:
l
you have not misused, neglected or damaged it;
l
it has not been modified;
l
it is not second-hand;
l
it has not been used commercially;
l
you have not fitted a plug incorrectly; and
l
you supply your receipt to show when you
bought it.
This guarantee does not affect your statutory
rights.
14

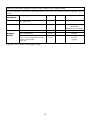
recommended speed chart and maximum capacities
These are a guide only and will vary depending upon the quantity of mix in the bowl and the ingredients being
mixed.
tool/ recipe type speed time maximum capacities
attachment
Kitchen machine
Whisk Egg whites Min to Max 2 mins 2-8 (70g-280g/2oz-10oz)
Cream Min to Max 1½ mins 125ml/4½ fl oz
600ml/21 fl oz
Beater All in one cake mixes Min to Max 1½ mins 1.6kg /3lb 8oz total weight
8 egg mix
Rubbing fat into flour Min to 5 mins 450g/1lb flour
Speed 2
Adding water to combine pastry
ingredients Min 30 secs
Dough hook Bread dough (stiff yeasted) Min to 4 mins 500g/1lb 2oz flour weight
Speed 2 800g/1lb 12oz total weight
Creaming beater Fruit Cake 1.8Kg/4lb total weight
Creaming fat and sugar Speed 4 - 1½ – 3½ 6 eggs
max mins
Adding eggs Speed 3 1 – 2 mins
Folding in flour, fruit, etc. Min to 30 secs
speed 1
Food processor
Knife blade All in one cake mixes Max 15 secs 600g/1lb 5oz total weight
3 egg mix
Rubbing fat into flour Max Up to 1 min 340g/12oz flour weight
Adding water to combine pastry Max 10 secs
ingredients
Chopping/pureeing/pâtés Max Up to 30 400g/14oz chopping lean
secs meat total weight
Discs – Firm food items such as carrots, Max –
slicing/grating hard cheeses
Softer items such as cucumbers, Speed 3 –
tomatoes
Extra fine grating Parmesan cheese, potato for Max –
disc German potato dumplings
Citrus juicer Citrus fruits Speed 2 – –
Blender All processing Max Up to 1 min 1.2 litres/42 fl oz
Centrifugal Hard fruits and vegetables e.g. Max – 800g/1lb 12oz
juicer carrots and apples
Soft fruits and vegetables e.g. Max – 500g/1lb 2oz
tomatoes and grapes
15
*Egg sizes used = medium sized (Weight 53-63g)
Do not exceed maximum
capacity marked on the
bowl.
Strona się ładuje...
Strona się ładuje...
Strona się ładuje...
Strona się ładuje...
Strona się ładuje...
Strona się ładuje...
Strona się ładuje...
Strona się ładuje...
Strona się ładuje...
Strona się ładuje...
Strona się ładuje...
Strona się ładuje...
Strona się ładuje...
Strona się ładuje...
Strona się ładuje...
Strona się ładuje...
Strona się ładuje...
Strona się ładuje...
Strona się ładuje...
Strona się ładuje...
Strona się ładuje...
-
 1
1
-
 2
2
-
 3
3
-
 4
4
-
 5
5
-
 6
6
-
 7
7
-
 8
8
-
 9
9
-
 10
10
-
 11
11
-
 12
12
-
 13
13
-
 14
14
-
 15
15
-
 16
16
-
 17
17
-
 18
18
-
 19
19
-
 20
20
-
 21
21
-
 22
22
-
 23
23
-
 24
24
-
 25
25
-
 26
26
-
 27
27
-
 28
28
-
 29
29
-
 30
30
-
 31
31
-
 32
32
-
 33
33
-
 34
34
-
 35
35
-
 36
36
-
 37
37
-
 38
38
-
 39
39
-
 40
40
-
 41
41


Kenwood KHH301WH Instrukcja obsługi
- Kategoria
- Miksery
- Typ
- Instrukcja obsługi
w innych językach
- English: Kenwood KHH301WH Owner's manual
Powiązane artykuły
-
Kenwood Multione KHH30 Instructions Manual
-
Kenwood FDM303SS Instrukcja obsługi
-
-
-
-
-
Kenwood FDP301WH Instrukcja obsługi
-
-
-
Kenwood TITANIUM CHEF PATISSIER XL KWL90.124SI Instrukcja obsługi
Inne dokumenty
-
Tefal QB404138 Instrukcja obsługi
-
Tefal QB413H38 Instrukcja obsługi
-
-
Manitou McLeod Shaft O-ring Instrukcja instalacji
-
Philips HR7754/99 Instrukcja obsługi
-
Philips HR7766/13 Instrukcja obsługi
-
-
-
-
Thomson THFP06764 Karta katalogowa