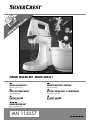
Silvercrest SHMS 300 B1 Operating Instructions Manual
- Kategoria
- Blendery
- Typ
- Operating Instructions Manual

IAN 113057
HAND MIXER SET SHMS 300 B1
HAND MIXER SET
Operating instructions
ROČNI MEŠALNIK S PRIBOROM
Navodila za uporabo
KÉZI MIXERKÉSZLET
Használati utasítás
MIKSER RĘCZNY- ZESTAW
Instrukcja obsługi
RUČNÝ MIXÉR
Návod na obsluhu
RUČNÍ MIXÉR
Návod k obsluze
HANDMIXER-SET
Bedienungsanleitung

GB Operating instructions Page 1
PL Instrukcja obsługi Strona 11
HU Használati utasítás Oldal 21
SI Navodila za uporabo Stran 31
CZ Návod k obsluze Strana 41
SK Návod na obsluhu Strana 51
DE / AT / CH Bedienungsanleitung Seite 61
Before reading, unfold the page containing the illustrations and familiarise yourself with all functions of
the device.
Przed przeczytaniem proszę rozłożyć stronę z ilustracjami, a następnie proszę zapoznać się z wszystkimi
funkcjami urządzenia.
Olvasás előtt kattintson az ábrát tartalmazó oldalra és végezetül ismerje meg a készülék mindegyik
funkcióját.
Pred branjem odprite stran s slikami in se nato seznanite z vsemi funkcijami naprave.
Před čtením si otevřete stranu s obrázky a potom se seznamte se všemi funkcemi přístroje.
Pred čítaním si odklopte stranu s obrázkami a potom sa oboznámte so všetkými funkciami prístroja.
Klappen Sie vor dem Lesen die Seite mit den Abbildungen aus und machen Sie sich anschließend mit allen
Funktionen des Gerätes vertraut.

A
B

- 1 -
CONTENT PAGE
Introduction 2
Intended Use 2
Items supplied 2
Description of Components 2
Technical data 2
Safety instructions 3
Unpacking 5
Placing 5
Speed levels 5
Operation 5
Kneading and Whisking . . . . . . . . . . . . . . . . . . . . . . . . . . . . . . . . . . . . . . . . . . . . . . . . . . . . . .5
Blending . . . . . . . . . . . . . . . . . . . . . . . . . . . . . . . . . . . . . . . . . . . . . . . . . . . . . . . . . . . . . . . . . . .7
Cleaning 7
Recipes 8
Chocolate Amaretto Cream . . . . . . . . . . . . . . . . . . . . . . . . . . . . . . . . . . . . . . . . . . . . . . . . . . .8
Braided Bread . . . . . . . . . . . . . . . . . . . . . . . . . . . . . . . . . . . . . . . . . . . . . . . . . . . . . . . . . . . . . .8
Chocolate Cream . . . . . . . . . . . . . . . . . . . . . . . . . . . . . . . . . . . . . . . . . . . . . . . . . . . . . . . . . . .8
Aioli . . . . . . . . . . . . . . . . . . . . . . . . . . . . . . . . . . . . . . . . . . . . . . . . . . . . . . . . . . . . . . . . . . . . . .9
Herb Vinaigrette . . . . . . . . . . . . . . . . . . . . . . . . . . . . . . . . . . . . . . . . . . . . . . . . . . . . . . . . . . . .9
Disposal 9
Warranty and Service 9
Importer 10
IB_113057_SHMS300B1_LB4.qxp 05.03.2015 12:08 Uhr Seite 1

- 2 -
HAND MIXER SET
Introduction
Congratulations on the purchase of your new appli-
ance.
You have clearly decided in favour of a quality
product. These operating instructions are a part of
this product. They contain important information in
regard to safety, use and disposal. Before using the
product, familiarise yourself with all of these operating
and safety instructions. Use the product only as des-
cribed and only for the specified areas of application.
In addition, pass these documents on, together with
the product, to any future owner.
Intended Use
This Handmixer set is intended exclusively for knea-
ding dough, mixing liquids (e.g. fruit juices), whipping
cream and the pureeing of fruit. It is only suitable
for the processing of foodstuffs. This appliance is
intended exclusively for use in domestic households.
Do not use it for commercial purposes.
Items supplied
1 Hand mixer
1 Mixing stand
1 Mixing bowl with lid
2 Kneading hooks
2 Whisks
1 Blender
1 Dough scraper
Operating instructions
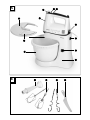
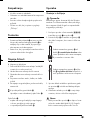
Description of Components
Illustration A:
1 Speed switch
2 Turbo button
3 Fixture for the blender, with safety cover
4 Unlocking button for handmixer
5 Unlocking button
6 Mixing stand
7 Mixing bowl
8 Filler opening
9 Lid
0 Hand element
q Ejection button
Illustration B:
w Blender
e Whisk made of stainless steel
r Kneading hooks made of stainless steel
t Dough scraper
Technical data
Power rating: 220 - 240 V
~
, 50 Hz
Rated output: 300 W
Protection class: II /
Continuous
operating time: Mixer: 10 min.
Blender: 1 min.
CO Time
The C.O. Time (Continuous Operation) details how
long an appliance may be used without the motor
overheating and being damaged. When the given
C.O. Time has lapsed, the appliance must be switched
off until the motor has cooled itself down.
IB_113057_SHMS300B1_LB4.qxp 05.03.2015 12:08 Uhr Seite 2

- 3 -
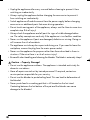
Safety instructions
Danger – Risk of electric shocks!
• Keep power cable away from hot parts of the appliance and other heat
sources. Do not run power cable over sharp edges or corners.
• Do not kink or crush the power cable.
• To avoid danger, have defective plugs and/or power cables replaced imme-
diately by qualified technicians or our Customer Service Department.
• Always hold the plug when disconnecting the appliance from the power
supply, do not pull on the power cable. Otherwise the power cable could
be damaged!
Do not submerge the hand element in water or any other liquid!
Risk of electrocution if residual liquids come into contact with live components
during operation.
Warning – Risk of injury!
• This appliance may be used by people with reduced physical, sensory or mental
capabilities or lack of experience and/or knowledge if they are supervised and
have been instructed in how to use the appliance safely and have understood
the potential risks.
• This appliance may not be used by children.
• Children must not use the appliance as a plaything.
• The appliance and its connecting cable must be kept away from children.
• The appliance should always be disconnected from the mains when not super-
vised and before assembly, disassembly or cleaning.
• Do not touch the whisks, kneading hooks or the blender while the appliance is
in use. The blender blade is sharp! Do not dangle long hair, scarves or the like
over the mixing attachments.
• NEVER attempt to fit attachments with differing functions at the same time.
IB_113057_SHMS300B1_LB4.qxp 05.03.2015 12:08 Uhr Seite 3

- 4 -
• Unplug the appliance after every use and before cleaning to prevent it from
switching on inadvertently.
• Always unplug the appliance before changing the accessories to prevent it
from switching on inadvertently.
• Switch appliance off and disconnect from the power supply before changing
accessories or additional parts that move during operation.
• Do not touch moving parts of the appliance, always wait for them to come to a
complete stop. Risk of injury!
• Always check the appliance and all parts for signs of visible damage before
use. The safety concept can work only if the appliance is in a faultless condition.
• Never use the appliance if parts are damaged, defective or missing. Doing so
will increase the risk of accidents.
• The appliance must always be supervised during use. If you need to leave the
workplace, remove the plug from the mains power socket.
• Never use the appliance for purposes other than those described in these in-
structions. Otherwise there is a risk of serious injury!
• Be careful when handling and cleaning the blender. The blade is extremely sharp!
Caution – Property Damage!
• Do not use the appliance outdoors. The appliance is intended exclusively for
domestic use indoors.
• Have all repairs carried out by trained personnel. If required, contact our
service partner responsible for your country.
• Do not use the blender to purée boiling food. This can lead to deformation of
the blender!
• Never purée food in a cooking pot that is still located on the hot stove!
Contacting between the hot bottom of the pot and the blender can cause
damage to the blender!
IB_113057_SHMS300B1_LB4.qxp 05.03.2015 12:08 Uhr Seite 4

- 5 -
Unpacking
• Take all components out the packaging.
• Remove all packaging materials and transport
restraints.
• Check that all of the items listed are present and
that they do not show signs of damage.
• Clean all of the components as described in the
section “Cleaning”.
Placing
• Place the mixer stand 6 onto a level surface.
Three suction discs have been fixed to the base
of the mixer stand 6 to prevent it sliding during
operation.
• Ensure that the mains power socket is easily
accessible in the event of a risk situation.
Speed levels
0 Appliance is switched off
1 Good starting speed for mixing "soft" ingredients
such as flour, butter, etc.
2 Best speed for blending liquid ingredients
3 Optimum speed for mixing cake and bread
dough
4 For whipping butter to form a fine foam, sugar,
for desserts etc.
5 For beating egg whites, cake glazing, cream etc.
For operating the blender w:
Only usable in combination with the turbo
button 2.
Turbo button 2:
• this button allows you to have the full power of
your appliance immediately at your disposal.
• for operating the blender w.
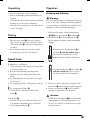
Operation
Kneading and Whisking
Warning:
Do not operate the mixer for longer than 10 minutes
in one session. After 10 minutes, allow the appliance
to rest until it has cooled itself down. Otherwise, the
appliance could be irreparably damaged.
1. Before the first usage, clean the attachments
(e,r,t), the mixing bowl 7 and the lid 9.
2. Push the whisk e or the kneading hooks r
into the appliance until they safely and audibly
engage:
Always insert the kneading hook r or
the whisk e with the toothed ring on
the rod into the intended slot on the
appliance which is marked with an icon.
Insert the kneading hook r or the whisk e
with the smooth ring on the rod only
into the intended slot on the appliance.
3. Release the mixer holder by pressing the unlok-
king button 5 and lift the mixer holder upwards.
4. Remove the mixing bowl 7 and fill it with the
quantities of ingredients to be prepared.
Attention:
• NEVER fill the mixing bowl 7 beyond the MAX
marking (approx. 2.5 l) with ingredients. If you
do, there is a risk they could spill over the edge
during operation.
IB_113057_SHMS300B1_LB4.qxp 05.03.2015 12:08 Uhr Seite 5

- 6 -
• Never fill the mixing bowl 7 with more than a
total of 1.5 kg of ingredients. Otherwise the
motor may be damaged.
5. Replace the mixing bowl 7 onto the mixing
stand 6.
6. Press the unlocking button 5 and lower the hol-
der downwards.
7. Place the hand element 0 on the holder so that
it firmly engages.
8. Slide the lid 9 into the guiderails on the mixing
stand 6 so that it is firmly seated.
Note:
Should you wish to add ingredients whilst mixing,
open the filler opening 8 and insert them through
it. To avoid a splattering of the ingredients, be sure
to reclose the filler opening 8!
You can also use the hand mixer without the mixing
stand 6. Especially with minor amounts of liquids
you are advised to use the hand mixer without the
mixing stand 6. Otherwise, the liquid may not be
completely captured and thus not mixed thoroughly.
Attention:
Under no circumstance should you use receptacles
made of glass or other very fragile/easily breakable
materials. These containers can be damaged and
then cause potentially serious injuries.
9. Insert the plug into a mains power socket.
10. To set the mixer into motion, push the speed
switch 1 to the desired speed setting. You
can select between 5 speed settings or the
turbo button 2 (see section "Speed levels").
Warning:
Do not operate the mixer for longer than 10 minutes
in one session. After 10 minutes, allow the appliance
to rest until it has cooled itself down. Otherwise, the
appliance could be irreparably damaged.
Note:
If ingredients become stuck to the side of the mixing
bowl 7 and they cannot be captured with the
kneading hooks r/ whisks e, switch the hand mixer
off. Remove the lid 9. Use the dough scraper t to
push them back into the middle of the mixing bowl 7.
Replace the lid 9. Switch the hand mixer back on.
11. To remove the contents of the bowl, switch off
the blender. Pull the lid 9 off to the side.
12. Press the unlocking button for the handmixer 4,
remove the handmixer and set this to one side.
Press the ejection button q if required to
release the whisk e or the kneading hooks r.
Note:
For safety reasons, the whisk e and kneading
hooks r can only be released if the speed switch 1
is set to the position "0" or „ “ .
13. Press the unlocking button 5, flip up the bracket
and remove the mixing bowl 7 from the mixing
stand 6.
IB_113057_SHMS300B1_LB4.qxp 05.03.2015 12:08 Uhr Seite 6

- 7 -
Blending
Warning:
Never use the blender w for hard foodstuffs such as:
coffee beans, ice cubes, sugar, cereals, chocolate,
raw/hard vegetables etc. They could cause serious
damage to the appliance.
Attention:
Under no circumstance should you use receptacles
made of glass or other very fragile/easily breakable
materials. These containers can be damaged and
then cause potentially serious injuries.
1. Open the fixture for the blender 3 and hold the
safety cover 3 firmly.
Note:
The blender w can only be utilised when the
whisks e or the kneading hooks r are not installed.
2. Push the blender w into the fixture 3, push the
blender w down firmly and tighten it by turning
anticlockwise in the direction of the arrow .
3. To avoid overflows, the container used for blen-
ding should only be filled to 2/3rds of its capa-
city. Select a sufficiently large container.
Tips:
• To ensure an effective blending of the ingredients,
the foodstuffs to be processed should cover at le-
ast the lower section of the blender w.
• First switch the hand mixer on when the blender w
has been inserted into the ingredients to be
blended.
4. Push the speed switch 1 into the position "Blen-
der" (s. section " Speed levels“) and press the
turbo button 2 Keep the turbo button 2 pres-
sed down during the whole procedure. The ap-
pliance stops as soon as it is released.
Warning:
Do not operate the blender w for longer than 1
minute in one session. After one minute, allow the
appliance to rest until it has cooled itself down.
5. When you have finished working with the blen-
der w, place the speed switch 1 back into the
position "0" and remove the plug from the mains
power socket.
Attention:
Clean only the lower part of the blender w under
running water. Under no circumstances may water
permeate into the blender w. This could result in
damage to the appliance.
6. To clean the blender w twist and remove it from
the retaining mechanism 3.
Cleaning
Attention:
Always remove the power plug before cleaning the
appliance. There is a risk of receiving an electric
shock!
UNDER NO CIRCUMSTANCES may the
hand element 0 be submersed in water or
other liquids! ! This would increase the risk of
a potentially fatal electric shock should liquids
come into contact with powered components.
• Clean the hand element 0 with the electric mo-
tor only with a damp cloth and, if necessary,
with a mild detergent.
• Clean the mixing stand 6 only with a moist cloth
and, if required, with a mild cleaning detergent.
• The whisks e and the kneading hooks r can
be cleaned under running water or in warm
water with detergent. Dry everything well after
cleaning.
IB_113057_SHMS300B1_LB4.qxp 05.03.2015 12:08 Uhr Seite 7

- 8 -
Warning:
Clean only the lower part of the blender w under
running water. Under no circumstances may water
permeate into the blender w. These could result in
damage to the appliance.
• We recommend cleaning the ancillaries directly
after use. Food remnants are then immediately
removed, greatly reducing the risks of bacterial
contamination.
• Clean the mixing bowl 7, the lid 9 and the
dough scraper t in warm water with washing-
up liquid.
Tips:
You can also wash the mixing bowl 7, the lid 9
and the dough scraper t in the dishwasher.
If possible, place everything in the top basket of the
dishwasher.
Recipes
Chocolate Amaretto Cream
500 ml Cream
500 ml Mascarpone
100 g Nut-Nougat Cream
5 tbsp Amaretto
1 - 2 tbsp Honey
1. Place the cream and the mascarpone into the
mixing bowl 7 and blend it with whisks e.
2. Gradually add the amaretto, the honey and
nut-nougat cream and mix everything together
thoroughly.
Fill the cream into dessert glasses and refrigerate
them until consumption.
Braided Bread
500 g Flour
60 g Butter
60 g Sugar
7 g Salt
42 g Yeast (1 Pkt fresh yeast)
200 ml Milk
1 Egg
1 Egg yolk
perhaps a little coarse sugar
1. Put the yeast in some lukewarm milk with sugar.
2. Once the yeast has raised a little, add all the in-
gredients to the mixing bowl 7.
3. Knead the ingredients well using the dough
hooks r.
4. Let the dough rise for approx. 20 minutes.
5. Shape the braided bread and then let the pastry
rise for 30 minutes.
6. Brush the braided bread with a little egg yolk.
If you wish, you can sprinkle a little coarse sugar
on the braided bread.
7. Preheat the oven to 200°C fan heat and bake
the braided bread for about 25 minutes until it
is golden brown.
Chocolate Cream
300 g Cream
200 g Bittersweet chocolate
1. Boil the cream.
2. Crumble the chocolate and let it melt into the
cream.
3. Leave the chocolate mixture to cool in the re-
frigerator until it is firm.
4. When the mixture has become cold and firm,
beat it with the whisks e until creamy.
Before serving, sprinkle a few slivered almonds
over it.
Note:
You can also use this chocolate cream as a filling
for other pastries.
IB_113057_SHMS300B1_LB4.qxp 05.03.2015 12:08 Uhr Seite 8

- 9 -
Aioli
500 g Mayonnaise
1 beaker Sour cream
50 g Garlic
2 tsp Mustard (medium-sharp)
1 pkt. Mixed herbs (frozen)
1 pinch Sugar
1/2 tsp. Salt
1/2 tsp Pepper
1. Skin the garlic cloves and then squeeze them
through a garlic press.
2. Place the mayonnaise, sour cream and the garlic
in the mixing bowl 7 and blend all of it together
thoroughly with the whisks e.
3. Gradually blend the mustard, herbs, sugar,
pepper and salt and mix everything well.
4. Finally, season the Aioli to taste with herbs.
Herb Vinaigrette
3 - 4 sprigs of flat Parsley
3 - 4 Basil
1 Lemon
1 tsp Mustard (medium-sharp)
1 Garlic clove
Salt, Pepper
100 ml Ölive oil
perhaps 1 pinch of Sugar
1. Place the leaves of the herbs, the juice of the
lemon, the mustard, garlic, salt and pepper into
a tall mixing vessel.
2. Combine everything with a hand blender w
and then gradually add the olive oil until the
sauce is creamy.
3. Season the vinaigrette to taste, perhaps with
a pinch of sugar.
Disposal
Do not dispose of the appliance in your
normal domestic waste. This product is
subject to the European guideline
2012/19/EU.
Dispose of the appliance through an approved waste
disposal centre or at your community waste facility.
Observe the currently applicable regulations.
In case of doubt, please contact your waste disposal
centre.
Dispose of all packaging materials in an
environmentally friendly manner.
Warranty and Service
The warranty for this appliance is for 3 years from
the date of purchase. The appliance has been ma-
nufactured with care and meticulously examined
before delivery.
Please retain your receipt as proof of purchase. In the
event of a warranty claim, please make contact by
telephone with our Service Department. Only in this
way can a post-free despatch for your goods be as-
sured.
The warranty covers only claims for material and ma-
nufacturing defects, but not for transport damage, for
wearing parts or for damage to fragile components,
e.g. buttons or batteries. This product is for private use
only and is not intended for commercial use.
The warranty is void in the case of abusive and impro-
per handling, use of force and internal tampering not
carried out by our authorized service branch. Your
statutory rights are not restricted in any way by this
warranty.
IB_113057_SHMS300B1_LB4.qxp 05.03.2015 12:08 Uhr Seite 9

- 10 -
The warranty period will not be extended by repairs
made under warranty. This applies also to replaced
and repaired parts. Any damage and defects extant
on purchase must be reported immediately after un-
packing the appliance, at the latest, two days after
the purchase date. Repairs made after the expiration
of the warranty period are subject to payment.
Service Great Britain
Tel.: 0871 5000 720 (£ 0.10/Min.)
E-Mail: k[email protected]
Hotline availability:
Monday to Friday 08:00 - 20:00 (CET)
Importer
KOMPERNASS HANDELS GMBH
BURGSTRASSE 21
44867 BOCHUM
GERMANY
www.kompernass.com
IAN 113057
IB_113057_SHMS300B1_LB4.qxp 05.03.2015 12:08 Uhr Seite 10

- 11 -
SPIS TREŚCI STRONA
Wprowadzenie 12
Zastosowanie zgodnie z przeznaczeniem 12
Zakres dostawy 12
Elementy urządzenia 12
Dane techniczne 12
Wskazówki bezpieczeństwa 13
Rozpakowanie 15
Ustawianie 15
Stopnie prędkości 15
Obsługa 15
Wyrabianie ciasta, mieszanie i ubijanie . . . . . . . . . . . . . . . . . . . . . . . . . . . . . . . . . . . . . . . .15
Przecieranie . . . . . . . . . . . . . . . . . . . . . . . . . . . . . . . . . . . . . . . . . . . . . . . . . . . . . . . . . . . . . . .17
Czyszczenie 17
Przepisy 18
Krem czekoladowy z Amaretto . . . . . . . . . . . . . . . . . . . . . . . . . . . . . . . . . . . . . . . . . . . . . . .18
Chałka drożdżowa . . . . . . . . . . . . . . . . . . . . . . . . . . . . . . . . . . . . . . . . . . . . . . . . . . . . . . . . .18
Krem czekoladowy . . . . . . . . . . . . . . . . . . . . . . . . . . . . . . . . . . . . . . . . . . . . . . . . . . . . . . . . .18
Aioli . . . . . . . . . . . . . . . . . . . . . . . . . . . . . . . . . . . . . . . . . . . . . . . . . . . . . . . . . . . . . . . . . . . . .19
Vinaigrette z ziołami . . . . . . . . . . . . . . . . . . . . . . . . . . . . . . . . . . . . . . . . . . . . . . . . . . . . . . . .19
Usuwanie/wyrzucanie 19
Gwarancja i serwis 19
Importer 20
IB_113057_SHMS300B1_LB4.qxp 05.03.2015 12:08 Uhr Seite 11

- 12 -
MIKSER RĘCZNY -
ZESTAW
Wprowadzenie
Gratulujemy Ci zakupu naszego urządzenia.
Jest to produkt wysokiej jakości. Instrukcja obsługi
stanowi część tego produktu. Zawiera ona ważne
wskazówki dotyczące bezpieczeństwa, użytkowa-
nia i utylizacji urządzenia. Przed przystąpieniem
do użytkowania produktu zapoznaj się z wszystkimi
wskazówkami obsługi i bezpieczeństwa. Używaj
produkt zgodnie z opisem i w podanych obszarach
użytkowania. W razie przekazania produktu następ-
nej osobie, nie zapomnij dołączyć również instrukcji
obsługi.
Zastosowanie zgodnie z
przeznaczeniem
Niniejszy mikser ręczny służy wyłącznie do wyrabi-
ania ciasta, miksowania płynnych produktów
(np. soków owocowych), ubijania śmietany i ucierania
owoców. Urządzenie nie nadaje się do obróbki
produktów spożywczych. Urządzenie jest przez-
naczone wyłącznie do użytku prywatnego. Nie mo-
żna używać urządzenia do celów komercyjnych.
Zakres dostawy
1 mikser ręczny z obrotową misą
1 stojak miksera
1 naczynie do mieszania z przykrywką
2 haki do wyrabiania ciasta
2 trzepaczki
1 końcówka do przecierania
1 skrobak do ciasta
Instrukcja obsługi
Elementy urządzenia
Rysunek A:
1 Przełącznik prędkości
2 Przycisk Turbo
3 Urządzenie do mocowania końcówki do prze-
cierania z zamknięciem zabezpieczającym
4 Przycisk odblokowania miksera ręcznego
5 Przycisk odblokowania
6 Stojak miksera
7 Naczynie do mieszania
8 Otwór do nalewania
9 Pokrywka
0 Część ręczna
q Przycisk zwalniający końcówki
Rysunek B:
w Końcówka do przecierania
e Trzepaczki ze stali szlachetnej
r Haki ze stali szlachetnej do wyrabiania ciasta
t Skrobak do ciasta
Dane techniczne
Napięcie znamionowe: 220 - 240 V
~
, 50 Hz
Moc znamionowa: 300 W
Klasa ochrony: II /
Czas pracy:
Mikser: 10 minut
Końcówka do przecierania: 1 minut
Czas pracy
Czas pracy określa, jak długo można używać urzą-
dzenie bez zagrożenia przegrzaniem silnika i tym
samym jego uszkodzenia. Po upływie określonego
czasu pracy urządzenie należy wyłączyć i pocze-
kać, aż silnik ostygnie.
IB_113057_SHMS300B1_LB4.qxp 13.03.2015 10:45 Uhr Seite 12

- 13 -
Wskazówki bezpieczeństwa
Niebezpieczeństwo porażenia prądem elektrycznym!
• Kabel sieciowy nie może znajdować się w pobliżu lub mieć kontaktu z rozgr-
zanymi elementami urządzenia lub innymi źródłami ciepła. Nie dopuścić,
by kabel sieciowy leżał na krawędziach lub narożnikach.
• Nie zginaj ani nie przygniataj kabla sieciowego.
• Naprawę uszkodzonego wtyku lub kabla sieciowego zleć niezwłocznie wyk-
walifikowanemu specjaliście lub serwisowi, aby uniknąć wszelkich zagrożeń.
• Odłączając urządzenie z sieci, ciągnij zawsze za wtyk, nigdy za kabel sieciowy.
W przeciwnym razie można uszkodzić kabel sieciowy!
Nigdy nie zanurzaj rękojeści w wodzie ani żadnej innej cieczy! Przedostanie
się cieczy na części przewodzące prąd podczas pracy urządzenia może
spowodować grożące śmiercią porażenie prądem elektrycznym.
Ostreżenie – Niebezpieczeństwo odniesienia obrażeń!
• To urządzenie może być używane przez osoby o zmniejszonych zdolnościach
fizycznych, sensorycznych lub umysłowych lub też osoby nieposiadające od-
powiedniego doświadczenia i/lub wiedzy, wyłącznie pod nadzorem lub po
przeszkoleniu w zakresie bezpiecznego używania urządzenia oraz wynikają-
cych z niego zagrożeń.
• Dzieci nie mogą posługiwać się urządzeniem.
• Dzieci nie mogą bawić się urządzeniem.
• Urządzenie oraz jego kabel zasilający należy trzymać poza zasięgiem dzieci.
• Przy braku nadzoru oraz przed montażem, złożeniem, rozłożeniem lub
czyszczeniem należy zawsze odłączać urządzenie od zasilania sieciowego.
• Podczas pracy urządzenia nie wolno dotykać końcówek do miksowania, haków
do ugniatania ani końcówki do przecierania. Nóż końcówki do przecierania jest
ostry! Długie włosy, szale i tym podobne trzymać z dala od nasadek.
• Nigdy nie zakładać nasadek o różnej funkcji jednocześnie.
IB_113057_SHMS300B1_LB4.qxp 05.03.2015 12:08 Uhr Seite 13

- 14 -
• Aby uniknąć przypadkowego włączenia urządzenia, po każdym jego użyciu i
przed każdym czyszczeniem wyciągać wtyk z gniazda sieciowego.
• Aby uniknąć przypadkowego włączenia urządzenia, przed każdą wymianą
akcesoriów wyciągać wtyk z gniazda elektrycznego.
• Przed wymianą osprzętu lub elementów dodatkowych, które podczas pracy
są w ruchu, należy wyłączyć urządzenie i odłączyć je od sieci elektrycznej.
• Nie dotykać ruchomych elementów urządzenia i zawsze odczekać, aż urząd-
zenie całkowicie się zatrzyma. Niebezpieczeństwo odniesienia obrażeń!
• Przed każdym użyciem sprawdzać urządzenie pod kątem widocznych
uszkodzeń. Bezpieczeństwo urządzenia gwarantowane jest wyłącznie wtedy,
jeżeli jest ono w prawidłowym stanie.
• Nie wolno uruchamiać urządzenia, jeżeli jakieś części są uszkodzone lub ich
brak. W przeciwnym razie istnieje poważne niebezpieczeństwo wypadku.
• Nigdy nie zostawiaj włączonego urządzenia bez nadzoru. Zanim odejdziesz
od miejsca pracy, najpierw wyjmij wtyk z gniazda elektrycznego.
• Nie używaj urządzenia do innych celów niż opisane w tej instrukcji. W prze-
ciwnym razie istnieje zagrożenie odniesieniem obrażeń!
• Zachowaj ostrożność podczas obsługi oraz czyszczenia końcówki do przecie-
rania. Nóż jest bardzo ostry!
Uwaga – Szkody materialne!
• Nie używać urządzenia na otwartej przestrzeni. Urządzenie przeznaczone
jest wyłącznie do użytku domowego w pomieszczeniach zamkniętych.
• Wszelkie naprawy urządzenia należy zlecać wyłącznie wykwalifikowanym
specjalistom. W razie awarii urządzenia należy zwrócić się do autoryzowanego
serwisu, właściwego dla kraju zamieszkania.
• Nie używaj końcówki do przecierania do przecierania gotujących się produktów
spożywczych. Może to być przyczyną deformacji końcówki do przecierania!
• Nigdy nie przecieraj produktów w garnku, który znajduje się jeszcze na gorącej
płycie kuchennej! Dotknięcie gorącego dna garnka końcówką do przecierania
może spowodować jej uszkodzenie!
IB_113057_SHMS300B1_LB4.qxp 05.03.2015 12:08 Uhr Seite 14

- 15 -
Rozpakowanie
• Wyjmij wszystkie elementy z opakowania.
• Usuń wszelkie materiały pakunkowe oraz
zabezpieczenia transportowe.
• Sprawdzić dostawę pod katem kompletności
oraz uszkodzeń.
• Oczyścić wszystkie elementy urządzenia w
sposób opisany w rozdziale „Czyszczenie”.
Ustawianie
• Stojak miksera 6 postawić na równej powierzchni.
Na spodzie stojaka 6 znajdują się trzy przyssawki,
których zadaniem jest zapobieganie przesuwaniu
się urządzenia podczas pracy.
• Proszę zwrócić uwagę na łatwą dostępność
gniazdka zasilania w razie awarii lub usterki
urządzenia.
Stopnie prędkości
0 Urządzenie jest wyłączone
1 Odpowiednia prędkość wyjściowa do miksowania
miękkich składników takich jak mąka, masło itd.
2 Najlepsza prędkość do miksowania płynnych
składników
3 Optymalna prędkość do miksowania ciast
4 Do ubijania masła, cukru przeznaczonych do sł-
odkich potraw itd.
5 Do ubijania piany z białek, robienia polewy,
bitej śmietany.
Odnośnie obsługi końcówki do przecierania w:
Końcówkę do przecierania można używać tylko
w połączeniu z przyciskiem funkcji turbo 2.
Przycisk Turbo 2:
• przycisk ten pozwala na natychmiastowe uzyskanie
całkowitej mocy urządzenia.
• funkcja ta służy do obsługi końcówki do prze-
cierania w.
Obsługa
Wyrabianie ciasta, mieszanie i ubijanie
Ostrzeżenie:
Nie należy użytkować miksera dłużej niż 10 minut
bez przerwy. Po upływie pięciu minut należy zrobić
przerwę, dopóki urządzenie się nie ochłodzi.
W przeciwnym wypadku urządzenie może ulec
nieodwracalnemu uszkodzeniu.
1. Przed pierwszym użyciem wymyj nasadki (e,
r, t), naczynie do mieszania 7 i pokrywę 9.
2. Wsuń trzepaczki e lub haki do wyrabiania
ciasta r w urządzenie dotąd, aż pewnie i z
wyraźnie słyszalnym odgłosem zatrzasną się w
mocowaniu:
Umieszczaj hak do wyrabiania ciasta r
lub trzepaczkę e z zębatym pierście-
niem zawsze w przewidzianym do tego i
oznaczonym piktogramem gnieździe ur-
ządzenia.
Umieszczaj hak do wyrabiania ciasta r
lub trzepaczkę e z gładkim pierście-
niem zawsze w przeznaczonym do tego
i oznaczonym piktogramem gnieździe
urządzenia.
3. Odblokuj podstawę mocującą miksera poprzez
wciśnięcie przycisku odblokowującego 5 i odchyl
ją do góry.
4. Zdejmij naczynie do mieszania 7 i włożyć do
niej składniki, w ilości zależnej od receptury.
Uwaga:
• Nigdy nie wkładj do naczynia 7 więcej skład-
ników niż do znaku MAX (ok. 2,5 l). W przeciw-
nym razie składniki będą się przelewały przez
brzegi naczynia.
IB_113057_SHMS300B1_LB4.qxp 05.03.2015 14:40 Uhr Seite 15

- 16 -
• Nigdy nie dodawaj do miski 7 więcej składni-
ków niż 1,5 kg. W przeciwnym razie może dojść
do uszkodzenia silnika.
5. Naczynie do mieszania 7 postaw ponownie
na stojaku miksera 6.
6. Wciśnij przycisk odblokowujący 5 i pochyl
podstawę mocującą ku dołowi.
7. Umieść część ręczną 0 w uchwycie tak, by się
zatrzasnęła.
8. Wsuń pokrywę 9 na szynę w stojaku 6 dotąd,
aż będzie pewnie zamocowana.
Wskazówka:
Otwórz otwór 8 w pokrywie i dodaj składniki
do wymieszania. Następnie koniecznie zamknij
ponownie otwór 8, by uniknąć rozrzucania skład-
ników na zewnątrz!
Miksera można używać także bez stojaka 6.
Szczególnie przy obróbce niewielkich ilości cieczy
zaleca się używanie miksera bez stojaka 6.
W innym wypadku część cieczy nie będzie miała
kontaktu z trzepaczkami i nie będzie dobrze wy-
mieszana.
Uwaga:
W żadnym wypadku nie wolno używać naczyń ze
szkła lub z innych kruchych materiałów. Naczynia
te mogą ulec uszkodzeniu i spowodować urazy.
9. Włóż wtyczkę sieciową do gniazdka zasilania.
10. W celu uruchomienia miksera przesuń przełą-
cznik prędkości 1 na żądany stopień. Mo-
żesz wybrać jeden z 5 stopni prędkości
lub przycisk Turbo 2 (patrz rozdział „Stopnie
prędkości”).
Ostrzeżenie:
Nigdy nie używaj miksera jednorazowo dłużej
niż 10 minut. Po upływie 10 minut wyłącz mikser
i odczekaj, aż urządzenie ostygnie. W przeciwnym
wypadku urządzenie może ulec nieodwracalnemu
uszkodzeniu.
Wskazówka:
Jeżeli składniki przykleją się do brzegów naczynia
do mieszania 7 i będą poza zasięgiem haków
do wyrabiania ciasta r/trzepaczek e, wyłącz
mikser. Zdejmij pokrywę 9. Za pomocą skrobaka
do ciasta t zeskrob składniki ze ścianek naczynia
do mieszania 7 na środek.
Załóż ponownie pokrywę 9. Ponownie włącz mikser.
11. Aby wyjąc zawartość miski, wyłącz mikser.
Odsuń na bok pokrywkę 9.
12. Naciśnij przycisk odblokowania miksera ręcz-
nego 4, zdejmij mikser i odłóż go na bok.
Jeśli jest to potrzebne, naciśnij przycisk zwalni-
ania końcówek q, aby wyjąć trzepaczki e
lub haki do wyrabiania ciasta r.
Wskazówka:
Ze względów bezpieczeństwa trzepaczki e lub
haki do wyrabiania ciasta r mogą zostać wyjęte
tylko wtedy, gdy przełącznik prędkości 1 znajduje
się w położeniu „0“ lub „ ”.
13. Naciśnij przycisk odblokowania 5, złóż uchwyt
do góry i zdejmij naczynie do mieszania 7 ze
stojaka miksera 6.
IB_113057_SHMS300B1_LB4.qxp 05.03.2015 12:08 Uhr Seite 16

- 17 -
Przecieranie
Ostrzeżenie:
Nigdy nie używaj końcówki do przecierania w
do obróbki twardych artykułów spożywczych,
takich jak: ziarna kawy, kostki lodu, cukier, zboże,
czekolada, bardzo twarde warzywa itp. Może
to spowodować uszkodzenie urządzenia.
Uwaga:
W żadnym wypadku nie wolno używać naczyń ze
szkła lub z innych kruchych materiałów. Naczynia
te mogą ulec uszkodzeniu i spowodować urazy.
1. Otwórz urządzenie do mocowania końcówki
do przecierania 3 i przytrzymaj zamknięcie
zabezpieczające 3.
Wskazówka:
Końcówkę do przecierania w zakładaj tylko wtedy,
gdy nie są założone trzepaczki e ani haki do
wyrabiania ciasta r.
2. Wsuń końcówkę do przecierania w w urządzenie
mocujące 3, wciśnij końcówkę do przecierania w
mocno do dołu i dokręć ją mocno o kilka obrotów
w lewo, w kierunku wskazanym strzałką .
3. Aby zapobiec przelewaniu, naczynie, w którym
będzie odbywało się przecieranie, należy napeł-
niać tylko do 2ŕ3. Należy wybrać wystarczająco
duże naczynie.
Wskazówki:
• Przygotowywane produkty spożywcze powinny
zakrywać co najmniej dolną część końcówki do
przecierania w, aby zapewnić dobre wymie-
szanie składników.
• Mikser włączaj dopiero wtedy, gdy końcówka
do przecierania w będzie zanurzona w prze-
cieranych składnikach.
4. Przesuń przełącznik prędkości 1 w pozycję
„Końcówka do przecierania” (patrz rozdział
„Stopnie prędkości”) i naciśnij przycisk Turbo
2. Podczas pracy cały czas trzymać przycisk
turbo 2. Po zwolnieniu przycisku urządzenie
zostanie zatrzymane.
Ostrzeżenie:
Nigdy nie używaj miksera z założoną końcówką do
przecierania w dłużej niż jedną minutę jednorazowo.
Po upływie jednej minuty przerwij pracę, dopóki
urządzenie nie ostygnie.
5. Po zakończeniu pracy z końcówką do prze-
cierania w przestaw przełącznik prędkości 1
w położenie „0” i wyciągnij wtyczkę sieciową
z gniazdka.
Uwaga:
Pod bieżącą wodą myj tylko część dolną końcówki
do przecierania w. Do wnętrza końcówki do prze-
cierania w nie może przedostać się woda. Ich
działanie spowoduje uszkodzenie urządzenia.
6. W celu umycia końcówki do przecierania w
wykręć ją z urządzenia mocującego 3.
Czyszczenie
Uwaga:
Przed rozpoczęciem czyszczenia wyciągnąć wty-
czkę z gniazdka. Istnieje zagrożenie porażenia
prądem elektrycznym!
Nigdy zanurzaj części ręcznej 0 z silnikiem
pod wodę ani pod żadną inną ciecz! Przedo-
stanie się cieczy na części prowadzące prąd
podczas pracy urządzenia powoduje powstanie
zagro-żenia dla życia wskutek porażenia prą-
dem elektrycznym.
• Część ręczną 0 z silnikiem czyść samą zwilżo-
ną szmatką i ewentualnie łagodnym środkiem
czyszczącym.
• Stojak miksera 6 czyść samą wilgotną szmatką
i ewentualnie łagodnym środkiem czyszczącym.
• Trzepaczki e lub haki do wyrabiania ciasta r
myć pod bieżącą wodą lub w ciepłej wodzie z
dodatkiem płynu do zmywania. Po umyciu wysusz
je starannie.
IB_113057_SHMS300B1_LB4.qxp 05.03.2015 12:08 Uhr Seite 17
Strona się ładuje...
Strona się ładuje...
Strona się ładuje...
Strona się ładuje...
Strona się ładuje...
Strona się ładuje...
Strona się ładuje...
Strona się ładuje...
Strona się ładuje...
Strona się ładuje...
Strona się ładuje...
Strona się ładuje...
Strona się ładuje...
Strona się ładuje...
Strona się ładuje...
Strona się ładuje...
Strona się ładuje...
Strona się ładuje...
Strona się ładuje...
Strona się ładuje...
Strona się ładuje...
Strona się ładuje...
Strona się ładuje...
Strona się ładuje...
Strona się ładuje...
Strona się ładuje...
Strona się ładuje...
Strona się ładuje...
Strona się ładuje...
Strona się ładuje...
Strona się ładuje...
Strona się ładuje...
Strona się ładuje...
Strona się ładuje...
Strona się ładuje...
Strona się ładuje...
Strona się ładuje...
Strona się ładuje...
Strona się ładuje...
Strona się ładuje...
Strona się ładuje...
Strona się ładuje...
Strona się ładuje...
Strona się ładuje...
Strona się ładuje...
Strona się ładuje...
Strona się ładuje...
Strona się ładuje...
Strona się ładuje...
Strona się ładuje...
Strona się ładuje...
Strona się ładuje...
Strona się ładuje...
Strona się ładuje...
-
 1
1
-
 2
2
-
 3
3
-
 4
4
-
 5
5
-
 6
6
-
 7
7
-
 8
8
-
 9
9
-
 10
10
-
 11
11
-
 12
12
-
 13
13
-
 14
14
-
 15
15
-
 16
16
-
 17
17
-
 18
18
-
 19
19
-
 20
20
-
 21
21
-
 22
22
-
 23
23
-
 24
24
-
 25
25
-
 26
26
-
 27
27
-
 28
28
-
 29
29
-
 30
30
-
 31
31
-
 32
32
-
 33
33
-
 34
34
-
 35
35
-
 36
36
-
 37
37
-
 38
38
-
 39
39
-
 40
40
-
 41
41
-
 42
42
-
 43
43
-
 44
44
-
 45
45
-
 46
46
-
 47
47
-
 48
48
-
 49
49
-
 50
50
-
 51
51
-
 52
52
-
 53
53
-
 54
54
-
 55
55
-
 56
56
-
 57
57
-
 58
58
-
 59
59
-
 60
60
-
 61
61
-
 62
62
-
 63
63
-
 64
64
-
 65
65
-
 66
66
-
 67
67
-
 68
68
-
 69
69
-
 70
70
-
 71
71
-
 72
72
-
 73
73
-
 74
74


Silvercrest SHMS 300 B1 Operating Instructions Manual
- Kategoria
- Blendery
- Typ
- Operating Instructions Manual
w innych językach
- Deutsch: Silvercrest SHMS 300 B1
- slovenčina: Silvercrest SHMS 300 B1
Powiązane artykuły
-
Silvercrest SHMS 300 A1 Operating Instructions Manual
-
-
Silvercrest 102824 Operating Instructions Manual
-
Silvercrest 329290 1904 Operating Instructions Manual
-
Silvercrest SHM 300 A1 Operating Instructions Manual
-
Silvercrest 276996 Operating Instructions Manual
-
-
-
Inne dokumenty
-
Koenic KHB 3121 Instrukcja obsługi
-
AEG KM400 Instrukcja obsługi
-
Zelmer ZHB1630W Instrukcja obsługi
-
eta CUORE 2089 90000 Instrukcja obsługi
-
Gallet GALMIX 332 Instrukcja obsługi
-
-
-
eta GRATUS Instructions For Use Manual
-
Bifinett BIFINETT KH 1130 SET BATTEUR ELECTRIQUE Instrukcja obsługi
-
Tefal 814432 Instrukcja obsługi