
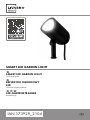
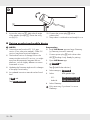
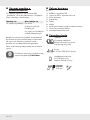
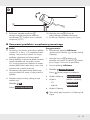
SMART LED GARDEN LIGHT
Quick start guide
REFLEKTOR OGRODOWY
LED
Skrócona instrukcja obsługi
LED-GARTENSTRAHLER
Kurzanleitung
IAN 373929_2104
SMART LED GARDEN LIGHT

GB Quick start guide Page 4
PL Skrócona instrukcja obsługi Strona 13
DE/AT/CH Kurzanleitung Seite 22

This quick start guide is a fixed part of the operating instructions, which enables you to start up
your product immediately. Read the operating instructions before use, and pay particular attention to
the safety instructions.
In order to fully understand all functions of the product, please select the User Manual link in
the app’s Me tab. You may also download the full operating instructions from this website:
http://www.lidl‑service.com
Keep this quick start guide in a safe place. When passing this product on to third parties, be sure to
include all documentation.
Niniejsza skrócona instrukcja obsługi jest integralną częścią instrukcji obsługi. Umożliwia
natychmiastowe uruchomienie produktu. Przed użyciem należy przeczytać instrukcję obsługi i zwrócić
szczególną uwagę na zawarte w niej instrukcje bezpieczeństwa.
Aby móc w pełni korzystać ze wszystkich funkcji produktu, wybierz łącze Instrukcjaobsługi
wmenu Ja aplikacji. Pełną instrukcję obsługi można też pobrać z tej strony:
http://www.lidl‑service.com
Tę skróconą instrukcję obsługi należy przechowywać w bezpiecznym miejscu. Przekazując produkt
osobom trzecim należy przekazać wszystkie dokumenty.
Diese Kurzanleitung ist fester Bestandteil der Bedienungs anleitung. Sie dient dazu, dieses
Produkt sofort in Betrieb nehmen zu können. Lesen Sie vor der Verwendung die Bedienungs anleitung
und beachten Sie insbesondere die Sicherheitshinweise.
Um alle Funktionen des Produkts vollständig nachlesen zu können, wählen Sie bitte den Link
Bedienungsanleitung im App‑Menü Ich aus. Sie können die vollständige Bedienungsanleitung
auch von der folgenden Website herunterladen: http://www.lidl‑service.com
Bewahren Sie diese Kurzanleitung an einem sicheren Ort auf. Händigen Sie bei Weitergabe des
Produkts an Dritte alle Unterlagen mit aus.

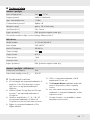
4 GB
SMART LED GARDEN LIGHT
Intended use ......................................................... Page 5
Scope of delivery .................................................... Page 5
You will need......................................................... Page 5
Description of parts.................................................. Page 6
Technical data ........................................................ Page 7
Trademark notices ....................................................... Page 7
Installation ........................................................... Page 8
Ground spike ........................................................... Page 8
Wall mounting .......................................................... Page 9
Pairing product and mobile device................................ Page 10
Unpairing product from mobile device ........................... Page 11
Resetting product manually........................................ Page 11
Disposal............................................................... Page 12
Simplified EU declaration of conformity .......................... Page 12

5GB
Intended use
This smart LED garden light (hereinafter called
“product”) is used for effect lighting indoors or
outdoors.
Suitable Not suitable
Private use Industrial/commercial purposes
Use in tropical climates
Any other use is considered improper. Any
claims resulting from improper use or due to
unauthorised modification of the product will be
considered unwarranted. Any such use is at your
own risk.
The Lidl Home app is required to
control and set up the product.
Scope of delivery
Fig. A:
1x Smart LED garden light
1x LED driver with power plug
1x Ground spike
1x Extension pole
2x Dowel
2x Screw
1x Headless screw (pre-installed)
1x Quick start guide
1x Safety instructions
You will need
Gateway:
(Sold separately
Please visit Lidl website for further
details)
Router:
2.4 GHz, IEEE 802.11b/g/n
Mobile device:
iOS 9.0 or higher
Android 5.0 or higher
Ø 6 mm

6 GB
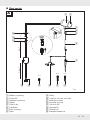
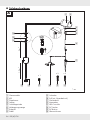
Description of parts
A
1.5 m * 2 m *
* approx.
[][][]
[1] [2]
[3]
[4]
[6]
[7]
[8]
x 2x 2
[9]
[5]
[]
[]
[]
[]
x 1
[1] Garden spotlight
[2] LED
[3] Wing nut
[4] Pole
[5] Screw thread
[6] Extension pole
[7] Ground spike
[8] Dowel
[9] Screw
[] Foot
[] Headless screw
[] Power plug
[] LED driver
[] DC plug
[] DC socket
[] Cap nut

7GB
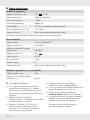
Technical data
Garden spotlight
Input voltage/power 24 V , 7.7 W
Frequency band 2405 to 2480 MHz
Max. transmitted power 13 dBm
Communication protocol ZigBee 3.0
Reception range approx. 70 m (free area)
Spot head (H x L) 74 x 74 mm
Ingress protection IP65 (protection against water jets)
This product contains a light source of energy efficiency class F.
LED driver
Model number SS-18-24 IP65 MB-ST
Input voltage 220–240 V~
Input AC frequency 50/60 Hz
Output voltage 24 V
Output current 0.75 A
Output power 18 W
Protection class II
Ingress protection IP65 (protection against water jets)
Garden spotlight + LED driver
Total power consumption 9 W
Networked standby power (Pnet) 0.38 W
Trademark notices
iOS and Apple are registered trademarks of
Apple Inc. in the USA and other countries.
App Store is a registered trademark of
Apple Inc.
Android, Gmail, Google Play and Google
Assistant * are registered trademarks of
Google Inc.
Windows and Windows 7 / 8 / 10 / XP
are registered trademarks of Microsoft
Corporation in the USA and other countries.
Zigbee is a registered trademark of The
Zigbee Alliance.
USB® is a registered trademark of USB
Implementers Forum, Inc.
The Livarno Home trademark and trade
name is the property of their respective
owners.
Any other names and products may be
trademarks or registered trademarks of their
respective owners.
* Google Assistant is not available in certain
languages and countries.

8 GB
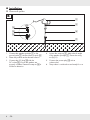
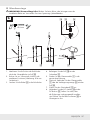
Installation
Ground spike
B
[7]
[1]
[3]
[6]
[]
[]
[]
1. Connect the garden spotlight [1] to the
ground spike [7] via the extension pole [6].
2. Place the product at the desired location.
3. Connect the DC plug [] with the
DC socket []. Ensure the gaskets are
properly installed. Fasten the cap nut [] in
clockwise direction.
4. Loosen the wing nut [3]. Adjust the tilt angle
of the garden spotlight [1]. Fasten the wing
nut (fig. D).
5. Connect the power plug [] with a
socket-outlet.
6. The product is switched on and ready for use.

9GB
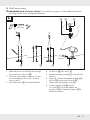
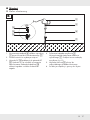
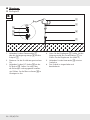
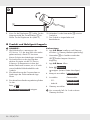
Wall mounting
mWARNING! Risk of electric shock! Do not drill into any pipes or mains cables beneath the
mounting surface. Use a voltage/metal detector.
C
Ø 6 mm
[] [8] [9]
[] [] []
[]
1. Mark the position of the drill holes through
the screw holes in the foot [].
2. Drill holes with a depth of approx. 30 mm
into the marked positions (tool: Ø 6 mm
masonry drill).
3. Insert the dowels [8] into the drilled holes.
4. Fix the foot [] with screws [9].
5. Rotate the garden spotlight [1] to the desired
direction.
6. Optional: Connect the garden spotlight [1] to
the foot [] via the extension pole [6].
7. Tighten with the headless screw [].
8. Connect the DC plug [] with the
DC socket []. Ensure the gaskets are
properly installed. Fasten the cap nut [] in
clockwise direction.

10 GB
D
[1]
[3]
9. Loosen the wing nut [3]. Adjust the tilt angle
of the garden spotlight [1]. Fasten the wing
nut (fig. D).
10. Connect the power plug [] with a
socket-outlet.
11. The product is switched on and ready for use.
Pairing product and mobile device
NOTES:
Screenshots are from the iOS 13.3 app
version (if not otherwise marked). Older iOS
versions may have functional limitations.
The Android version of the app follows the
same principles as the iOS version; you might
encounter discrepancies between the two
platforms, such as slightly different on-screen
commands or icons.
Updating the firmware might result in changes
to the app’s functionality.
An updated instruction manual can be found
here:
{
Me
}
tab:
Tap
{
User Manual
}
.
Preparation
Install Lidl Home app and setup Gateway
( Gateway instruction manual).
1. Connect power plug [] with socket-outlet.
LED [2] flashing slowly. Ready for pairing.
2. Open Lidl Home app.
3.
{
Home
}
tab:
Tap (add further devices).
4. Select category:
{
Lighting
}
5. Select: RGB garden light
– iOS:
{
RGB Garden Light
}
– Android:
{
RGB Garden Light
}
6. Select Gateway.
Only necessary, if you have 2 or more
Gateways.

11GB
7. Follow the app instructions.
8. Establishing connection.
9. Naming the product: Tap and enter a
name.
10. Tap one of the rooms to set location of
product (selected room is grayed out).
If more than one product is connected:
You can rename the product and define its
location.
11. Tap
{
Done
}
.
12. Pairing completed.
13. Return to home screen:
Tap
{
<
}
.
Unpairing product from
mobile device
1. Open Lidl Home app.
2.
{
Home
}
tab:
Tap
{
RGB Garden Light
}
3. Tap (top right).
4. Tap
{
Remove Device
}
.
Select:
–
{
Disconnect
}
or
–
{
Disconnect and wipe data
}
( “Additional functions” in the full
instruction manual).
5. Tap
{
Confirm
}
.
Resetting product manually
1. Switch on/off 3 times by connecting and
disconnecting the power plug to/from the
socket-outlet.
2. Switch on. LED [2] flashing slowly. Reset
successful.
This function only resets the data which is
stored in the local memory of the product. If
you want to reset the cloud memory as well,
perform a reset via the app (see “Additional
functions”,
{
Disconnect and wipe data
}
in the full instruction manual).

12 GB
Disposal
Before passing on, disposing of or returning
the product to the manufacturer, make sure
that all data has been deleted from the
product and the cloud.
To do this, refer to the full instruction manual’s
chapter:
“Additional functions”, menu point:
{
Disconnect and wipe data
}
The packaging is made entirely of recyclable
materials, which you may dispose of at local
recycling facilities.
Observe the marking of the packaging
materials for waste separation, which
are marked with abbreviations (a) and
numbers (b) with following meaning:
1–7: plastics / 20–22: paper and
fibreboard / 80–98: composite
materials.
The product and packaging materials
are recyclable, dispose of it separately
for better waste treatment.
The Triman logo is valid in France only.
Contact your local refuse disposal
authority for more details of how to
dispose of your worn-out product.
To help protect the environment, please
dispose of the product properly when
it has reached the end of its useful
life and not in the household waste.
Information on collection points and
their opening hours can be obtained
from your local authority.
Simplified EU declaration
of conformity
Hereby, OWIM GmbH & Co. KG,
Stiftsbergstraße 1, 74167 Neckarsulm,
GERMANY declares that the product SMART
LED GARDEN LIGHT, HG08633 is in compliance
with Directive 2014/53/EU, 2011/65/EU and
2009/125/EC.
The full text of the EU declaration of conformity
is available at the following internet address:
www.owim.com

13PL
REFLEKTOR OGRODOWY LED
Używać zgodnie z przeznaczeniem.............................. Strona 14
Zakres dostawy .................................................... Strona 14
Potrzebne będą..................................................... Strona 14
Opis części ........................................................... Strona 15
Dane techniczne .................................................... Strona 16
Uwagi handlowe ....................................................... Strona 16
Montaż............................................................... Strona 17
Kolec doziemny ........................................................ Strona 17
Montaż ścienny ........................................................ Strona 18
Parowanie produktu i urządzenia przenośnego............... Strona 19
Usuwanie sparowania produktu
z urządzeniem przenośnym....................................... Strona 20
Ręczne resetowanie produktu (Reset)........................... Strona 20
Utylizacja ............................................................ Strona 21
Uproszczona deklaracja zgodności WE ......................... Strona 21

14 PL
Używać zgodnie z
przeznaczeniem
Ten reflektor ogrodowy LED (zwana dalej
„produktem”) służy do efektownego oświetlania
miejsc wewnątrz i na zewnątrz.
Nadaje się Nie nadaje się
Do użytku prywatnego Do celów
przemysłowych lub
handlowych
Do użytku w tropikalnych
strefach klimatycznych
Każde inne użycie jest uważane za niewłaściwe.
Roszczenia z tytułu niewłaściwego użytkowania
lub z powodu nieautoryzowanych zmian
produktu nie są objęte zakresem gwarancji.
Takie użytkowanie podejmowane jest na własne
ryzyko.
Produkt jest sterowany i konfigurowany
za pomocą aplikacji Lidl Home.
Zakres dostawy
Rys.A:
1x Reflektor ogrodowy LED
1x Sterownik LED z wtyczką sieciową
1x Kolec doziemny
1x Przedłużka
2x Dybel
2x Wkręt
1x Kołek gwintowany (wstępnie zamontowany)
1x Skrócona instrukcja obsługi
1x Instrukcje bezpieczeństwa
Potrzebne będą
Gateway
(Dostępna oddzielnie
Więcej informacji na stronie
internetowej firmy Lidl)
Router:
2,4 GHz, IEEE 802.11b/g/n
Urządzenie przenośne:
iOS9.0lub nowszy
Android5.0lub nowszy
Ø6 mm

15PL
Opis części
A
1,5 m * 2 m *
* ok.
[][][]
[1] [2]
[3]
[4]
[6]
[7]
[8]
x 2x 2
[9]
[5]
[]
[]
[]
[]
x 1
[1] Reflektor ogrodowy
[2] Dioda LED
[3] Nakrętka motylkowa
[4] Drążek
[5] Gwint śruby
[6] Przedłużka
[7] Kolec doziemny
[8] Dybel
[9] Wkręt
[] Stopka (z otworem na wkręt)
[] Kołek gwintowany
[] Wtyczka sieciowa
[] Sterownik LED
[] Wtyczka DC
[] Gniazdo DC
[] Nakrętka kołpakowa

16 PL
Dane techniczne
Reflektor ogrodowy
Napięcie wejściowe/ moc 24 V , 7, 7 W
Zakres częstotliwości 2405do2480MHz
Maks.moc transmisji 13 dBm
Protokół komunikacyjny ZigBee3.0
Zasięg odbioru ok.70 m (w obszarze niezabudowanym)
Głowica reflektora (wys.xdł.) 74 x 74 mm
Stopień ochronyIP IP65(ochronaprzed strumieniami wody)
Ten produkt zawiera źródło światła o klasie efektywności energetycznejF.
Sterownik LED
Numer modelu SS-18-24IP65MB-ST
Napięcie wejściowe 220–240 V∼
Wejściowa częstotliwość prądu
przemiennego 50/60 Hz
Napięcie wyjściowe 24 V
Prąd wyjściowy 0,75 A
Moc wyjściowa 18 W
Stopień ochrony II
Stopień ochronyIP IP65(ochronaprzed strumieniami wody)
Reflektor ogrodowy+ sterownik LED
Całkowity pobór mocy 9 W
Pobór mocy w sieciowym trybie
czuwania(Pnet) 0,38W
Uwagi handlowe
iOS i Apple są zastrzeżonymi znakami
towarowymi firmy AppleInc. w Stanach
Zjednoczonych i innych krajach. AppStore
jest zastrzeżonym znakiem towarowym firmy
AppleInc.
Android, Gmail, GooglePlay i
GoogleAssistant* są zastrzeżonymi znakami
towarowymi firmy GoogleInc.
Windows i Windows7/8/10/XP są
zastrzeżonymi znakami towarowymi
firmy MicrosoftCorporation w Stanach
Zjednoczonych i innych krajach.
Zigbee jest zastrzeżonym znakiem
towarowym firmy TheZigbeeAlliance.
USB® jest zastrzeżonym znakiem towarowym
firmy USBImplementersForum,Inc.
Znak towarowy i nazwa handlowa
Livarno Home należą do ich właścicieli.
Wszystkie inne nazwy i produkty mogą być
znakami towarowymi lub zastrzeżonymi
znakami towarowymi ich właścicieli.
* GoogleAssistant nie jest dostępny w
niektórych językach i krajach.

17PL
Montaż
Kolec doziemny
B
[7]
[1]
[3]
[6]
[]
[]
[]
1. Za pomocą przedłużki [6] reflektor ogrodowy
[1] przymocować do kolca doziemnego [7].
2. Produkt umieścić w wybranym miejscu.
3. Wtyczkę DC [] podłączyć do gniazda DC
[]. Upewnić się, że uszczelki są starannie
zamontowane. Nakrętkę kołpakową []
dokręcić zgodnie z ruchem wskazówek
zegara.
4. Poluzować nakrętkę motylkową [3].
Wyregulować kąt nachylenia reflektora
ogrodowego [1]. Dokręcić mocno nakrętkę
motylkową (rys.D).
5. Wtyczkę sieciową[] włożyć do
odpowiedniego gniazdka sieciowego.
6. Produkt jest włączony i gotowy do użycia.

18 PL
Montaż ścienny
mOSTRZEŻENIE! Ryzyko porażenia prądem! Nie przewiercić rur lub przewodów w miejscu
montażu. Użyj wykrywacza napięcia lub metalu.
C
Ø6 mm
[] [8] [9]
[] [] []
[]
1. Przez otwory na śruby w stopce []
zaznaczyć położenie wierconych otworów.
2. W zaznaczonych miejscach wywiercić
otwory na głębokość ok.30mm
(narzędzie:Wiertło do betonu Ø6mm).
3. Do wywierconych otworów włożyć dyble [8].
4. Stopkę [] przykręcić wkrętami [9].
5. Reflektor ogrodowy [1] obrócić w żądanym
kierunku.
6. Opcjonalnie: Za pomocą przedłużki [6]
reflektor ogrodowy [1] przymocować do
stopki [].
7. Dokręcić kołek gwintowany [].
8. Wtyczkę DC [] podłączyć do gniazda DC
[]. Upewnić się, że uszczelki są starannie
zamontowane. Nakrętkę kołpakową []
dokręcić zgodnie z ruchem wskazówek
zegara.

19PL
D
[1]
[3]
9. Poluzować nakrętkę motylkową [3].
Wyregulować kąt nachylenia reflektora
ogrodowego [1]. Dokręcić mocno nakrętkę
motylkową (rys.D).
10. Wtyczkę sieciową[] włożyć do
odpowiedniego gniazdka sieciowego.
11. Produkt jest włączony i gotowy do użycia.
Parowanie produktu i urządzenia przenośnego
RADY:
Wszystkie zrzuty ekranu pochodzą z aplikacji
systemu iOSwwersji13.3(chybaże podano
inaczej). Starsze wersje systemu iOS mogą
podlegać ograniczeniom funkcjonalnym.
Wersja aplikacji na Androida działa na takich
samych zasadach jak wersja dla systemu
iOS; mogą występować rozbieżności między
dwiema platformami, takie jak np.nieco inne
polecenia lub symbole ekranowe.
Aktualizacja oprogramowania układowego
może prowadzić do zmian w funkcjonalności
aplikacji.
Zaktualizowaną instrukcję obsługi można
znaleźć tutaj:
Zakładka
{
Ja
}
:
Dotknij
{
Instrukcja obsługi
}
.
Przygotowanie
Zainstalować aplikację Lidl Home i
skonfigurować Gateway ( instrukcja obsługi
Gateway).
1. Wtyczkę sieciową [] podłączyć do
gniazdka sieciowego. Dioda LED [2] zacznie
powoli migać. Gotowość do parowania.
2. Otwórz aplikację Lidl Home.
3. Zakładka
{
Strona główna
}
:
Dotknij (dodaj następne urządzenie).
4. Wybierz kategorię:
{
Podświetlenie
}
5. Wybierz: Reflektor ogrodowy
– iOS:
{
Atmosfera
}
– Android:
{
Atmosfera
}
6. Wybierz Gateway.
Tylko wtedy, gdy używane są 2 Gateway lub
więcej.

20 PL
Utylizacja
Przed przekazaniem produkt innej osobie,
pozbyciem lub zwróceniem do producenta
należy upewnić się, że wszystkie dane z
produktu i chmury zostały usunięte.
Aby to zrobić, należy zajrzeć do
następującego rozdziału w pełnej instrukcji
obsługi:
„Funkcje zaawansowane”, punkt menu:
{
Rozwiąż i skasuj wszystkie dane
}
.
Opakowanie wykonane jest z materiałów
przyjaznych dla środowiska, które można
przekazać do utylizacji w lokalnym punkcie
przetwarzania surowców wtórnych.
Przy segregowaniu odpadów prosimy
zwrócić uwagę na oznakowanie
materiałów opakowaniowych,
oznaczone są one skrótami (a)
i numerami (b) o następującym
znaczeniu: 1–7: Tworzywa sztuczne /
20–22: Papier i tektura / 80–98:
Materiały kompozytowe.
Produkt i materiał opakowania nadają
się do ponownego przetworzenia,
należy je zutylizować osobno w celu
lepszego przetworzenia odpadów.
Logo Triman jest ważne tylko dla
Francji.
Informacji na temat możliwości utylizacji
wyeksploatowanego produktu udziela
urząd gminy lub miasta.
Z uwagi na ochronę środowiska nie
wyrzucać urządzenia po zakończeniu
eksploatacji do odpadów domowych,
lecz prawidłowo zutylizować. Informacji
o punktach zbiorczych i ich godzinach
otwarcia udziela odpowiedni urząd.
7. Postępuj zgodnie z instrukcjami aplikacji.
8. Rozpocznie się nawiązywanie połączenia.
9. Zredaguj nazwę produktu: Dotknij i wpisz
nazwę.
10. Dotknij jedno z miejsc, aby określić
lokalizację produktu (wybrane pomieszczenie
zostanie zaznaczone kolorem szarym).
Jeśli trzeba podłączyć więcej niż jeden
produkt: Można zmienić nazwę produktu i
określić jego miejsce.
11. Dotknij
{
Gotowe
}
.
12. Parowanie jest zakończone.
13. Powrót do strony głównej:
Dotknij
{
<
}
.
Usuwanie sparowania
produktu z urządzeniem
przenośnym
1. Otwórz aplikację Lidl Home.
2. Zakładka
{
Strona główna
}
:
Dotknij
{
Reflektor ogrodowy
}
.
3. Dotknij (u góry po prawej).
4. Dotknij
{
Usuń urządzenie
}
.
Wybierz:
–
{
Rozwiąż
}
albo
–
{
Rozwiąż i skasuj wszystkie dane
}
( „Funkcje zaawansowane” w pełnej
instrukcji obsługi).
5. Dotknij
{
Potwierdź
}
.
Ręczne resetowanie produktu
(Reset)
1. 3razy włączyć i wyłączyć, wkładając i
wyjmując wtyczkę sieciową.
2. Włączyć. Dioda LED [2] zacznie powoli
migać. Zresetowano pomyślnie.
Ta funkcja resetuje tylko dane
przechowywane lokalnie w produkcie.
Jeśli pamięci w chmurze również chcesz
przywrócić ustawienia domyślne, zresetuj
ją za pomocą aplikacji (patrz „Funkcje
zaawansowane”,
{
Rozwiąż i skasuj
wszystkie dane
}
w pełnej instrukcji
obsługi).
Strona się ładuje...
Strona się ładuje...
Strona się ładuje...
Strona się ładuje...
Strona się ładuje...
Strona się ładuje...
Strona się ładuje...
Strona się ładuje...
Strona się ładuje...
Strona się ładuje...
Strona się ładuje...
-
 1
1
-
 2
2
-
 3
3
-
 4
4
-
 5
5
-
 6
6
-
 7
7
-
 8
8
-
 9
9
-
 10
10
-
 11
11
-
 12
12
-
 13
13
-
 14
14
-
 15
15
-
 16
16
-
 17
17
-
 18
18
-
 19
19
-
 20
20
-
 21
21
-
 22
22
-
 23
23
-
 24
24
-
 25
25
-
 26
26
-
 27
27
-
 28
28
-
 29
29
-
 30
30
-
 31
31


w innych językach
- Deutsch: LIVARNO 373929 Bedienungsanleitung
- English: LIVARNO 373929 Owner's manual
Powiązane artykuły
-
LIVARNO 383852 Instrukcja obsługi
-
-
-
-
-
-
-
-
-