
Gebrauchsanweisung
Instructions for use
Mode d’emploi
Gebruiksaanwijzing
Istruzioni per l’uso
Brugsanvisning
Bruksanvisning
Käyttöohje
Manual de utilização
Instrucciones para el uso
Instrukcje użytkowania
Használati utasítás
ИнструкциЯ за употреба
Қолдану бойынша нұсқаулық
Návod k použití
Návod na použitie
Instruc∑iuni de utilizare
Инструкции по эксплуатации
Інструкція з експлуатації


3
ENGLISH Instructions for use Page 4
POLSKI Instrukcje użytkowania Strona
17
MAGYAR Használati utasítás Oldal
30
РУCCКИЙ
Инcтpyкции по экcплyaтaции Cтpaницa
43
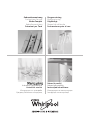
AMD 081/1 - 081/1NB - 082/1 - 084/1

4
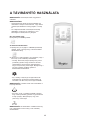
SAFETY PRECAUTIONS
• Do not install the appliance if it is connected to
the power supply.
• The Installation and service/repair must be
performed by a qualified technician, in
compliance with the producer's instructions and
following local safety norms. Do not repair or
replace any parts of the appliance unless it is
specifically written in the user instructions.
• The grounding of this appliance is compulsory.
• Make sure that the power supply cord is long
enough to allow the right connection. Do not
use any extension cord for power supply.
• Do not pull the power supply cord to remove it
from the socket.
• Do not twist or press the power supply cord,
and make sure it is not broken.
• Once installation is completed, the electric
components must not be accessible to the users.
• Do not touch the operation buttons when your
hands are wet and don't use the appliance when
you are barefoot.
• Physically or mentally disabled people, children
and people without any experience with the
product are only allowed to use the appliance if
they have had specific training on how to
operate the appliance by a person responsible
for their security and well-being. The appliance
is not intended for use by disabled people and
very young children without supervision.
AIR CONDITIONER PRECAUTIONS
Please strictly follow the below instructions:
• Long and direct exposure to cool air might be
harmful to health. It is advisable to set the
louvers in order to avoid direct cool air and
deflect it within the room.
• Prevent the air flow from reaching the gas
burners and stoves.
• Upon malfunctioning first turn the appliance off
by pressing the ON/OFF button on the remote
control, then disconnect it from the mains.
• This product contains Fluorinated Greenhouse
Gases covered by the Kyoto Protocol, the
refrigerant gas being in a hermetically sealed
system. Refrigerant gas: R410a has a Global
Warming Potential (GWP) 1975.
• This appliance has been made of recyclable or
re-usable material. Scrapping must be carried
out in compliance with local waste disposal
regulations. Before scrapping it, make sure to
cut off the mains cord so that the appliance
cannot be re-used.
• For more detailed information on handling and
recycling of this product, contact your local
authorities who deal with the separate collection
of rubbish or the shop where you bought the
appliance.
SCRAPPING OF PACKAGING
• The packaging can be 100% recycled as
confirmed by the recycling symbol . The
various parts of the packaging must not be
dispersed in the environment, but must be
scrapped in line with local authority regulations.
SCRAPPING OF APPLIANCE
• This appliance is marked according to the
European Directive 2002/96/EC, Waste
Electrical and Electronic Equipment (WEEE).
• By ensuring that this product is disposed of
correctly, you will help to prevent potentially
negative consequences for the environment and
for human health.
• The symbol on the product or on the
documents accompanying the product indicates
that this appliance should not be treated as
household waste, but must be given to the
appropriate local gathering place where electric
and electronic appliances are stored and
recycled.
SAFEGUARDING THE ENVIRONMENT

5
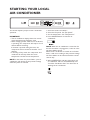
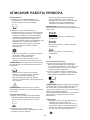
STARTING YOUR LOCAL
AIR CONDITIONER
This section explains proper local air conditioner
operation.
IMPORTANT:
• The air conditioner display shows the current
room temperature and 24-hour clock.
• When changing modes while the air conditioner
is operating, the compressor will stop for 3 to 5
minutes before restarting.
If a button is pressed during this time, the
compressor will not restart for another 3 to 5
minutes.
• In Cooling or Dry mode, the compressor and
condenser fan will stop when the room
temperature reaches the set temperature.
NOTE: In the event of a power failure, your air
conditioner will operate at the previous settings
when the power is restored.
1. Select the mode. See "Mode."
2. Select the fan speed. See "Fan Speed."
3. Set the temperature. See "Temperature."
4. Press ON/OFF button to start the air
conditioner.
NOTE: When the air conditioner is turned on for
the first time after it is plugged in, it will run in the
6th Sense Mode control.
When the air conditioner is turned on at all other
times, it will run according to the previous settings.
6th Sense Mode can be selected with the remote
control only.
5. When WATER FULL indicator light glows red,
air conditioner will turn off automatically. See
"Local Air Conditioner Care" for directions on
draining the air conditioner.
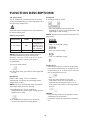
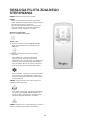
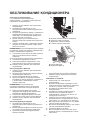
Timer
Swing
RapidCool
Adjust
Fan
Speed
Mode
On/Off
Filter
Reset
Wat e r
Full
On
Off

6
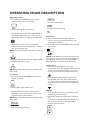
OPERATING MODE DESCRIPTION
Operating modes:
1. Press and release MODE until you see the
symbol glow for the desired setting
2. Choose Cooling, Dry or Fan Only.
• Cooling-Cools the room. Press FAN SPEED to
select Auto, High, Mid or Low. Press the up or
down Adjust button to adjust the temperature.
• Dry-Dries the room. The air conditioner
automatically selects the temperature. The fan
runs on Low speed only.
NOTE: Dry mode should not be used to cool the
room.
• Fan Only-Only the fan runs. Press FAN SPEED
to select High, Mid or Low.
NOTE: Auto fan speed cannot be selected in Fan
Only mode.
Fan Speed
1. Press and release FAN SPEED to choose the
desired fan speed.
2. Choose Auto, High, Mid or Low.
• Auto-automatically controls the fan speed
depending on the current room temperature
and temperature control setting.
NOTE: Auto fan speed cannot be selected in Fan
Only mode.
• High-for maximum cooling
• Mid-for normal cooling
• Low-for minimum cooling
Filter Reset
1. When the Filter Reset indicator light is lit,
remove, clean and replace the air filter. See
"Cleaning the Air Filter."
2. Press and release FILTER RESET after replacing
the air filter.
NOTE: After 360 hours of fan operating time, the
Filter indicator light will turn on. It will remain on
for 180 hours or until you press FILTER RESET.
After 180 hours, it will turn off automatically.
Temperature
• Press the up Adjust button to raise the
temperature. Press the up Adjust button once to
increase the set temperature by 1°C or press
twice to increase the set temperature by 2ºC.
• Press the down Adjust button to lower the
temperature. Press the down Adjust button
once to decrease the set temperature by 1ºC,
or press twice to decrease the set temperature
by 2ºC.
NOTES:
• In the Cooling mode, the temperature can be
set between 18ºC and 32ºC.
• In Fan Only mode, the temperature cannot be
set.
• To change the temperature display between ºC
and ºF, press both the up and down Adjust
buttons at the same time.

7
Clock function
You can adjust real time clock by pressing Timer
On and Timer Off buttons at same time on control
panel or Clock button on the remote. Press up or
down Adjusting button to get the correct time.
Press Timer On and Timer Off at the same time
again, and then the real time is set.
Timer On/Off
Set the real time to turn on the conditioner.
1. Press Timer On, Timer "On 12:00" indicator will
flash.
2. Press the up or down Adjust button to get your
desired time to turn on the appliance.
• Press the up or down Adjust button once to
increase or decrease the time setting by 1
minute.
• Press and hold the up or down Adjust button
for one and a half seconds to increase or
decrease the time setting by 10 minutes.
• Press and hold the up or down Adjust button
for a longer time to increase or decrease the
time setting by 1 hour.
3. When your desired time displayed on LCD,
press the TIMER ON button and confirm it,
then Timer "ON" indicator stops flashing and
your desired time remains on.
4. After your desired time displayed for 5 seconds,
the clock will be displayed on the LCD.
NOTE: If you don't set the time in 10 seconds
after you press TIMER ON button, the controller
will exit the TIMER ON mode automatically.
How to cancel Timer On
Press Timer On again, the indicator disappears and
the Timer On is canceled.
NOTE: It is similar to set Timer Off, you can make
the appliance unit switch off automatically at your
desired time.
Rapid Cool mode
Used for fast cooling. The air conditioner
automatically sets the fan speed to High and the
temperature to 18ºC.
NOTE: 6th Sense mode button does not operate
when Rapid Cool function is selected.
1. Press Rapid Cool. The air conditioner
automatically sets the fan speed to High and the
temperature to 18ºC.
2. To exit Rapid Cool mode press any button
except Timer On/Off and Swing button.

8
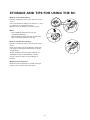
STORAGE AND TIPS FOR USING THE RC
How to insert the batteries
Remove the battery cover in the direction of the
arrow.
Insert new batteries making sure that the (+) and
(-) of battery are matched correctly.
Refit the cover by sliding it back into position.
Note:
• Use 2 LR06 AA batteries. Do not use
rechargeable batteries.
Replace batteries with new ones of the same
type when the display becomes dim.
How to remove the batteries
Remove the battery cover in the direction of the
arrow.
Press the positive pole of the battery softly with
your fingers, then draw the batteries out of the
compartment.
All this should be done by adults, children are
forbidden to remove the batteries from the
remote control in order to avoid danger of
swallow.
Disposal of the batteries
Please discard the batteries as sorted municipal
waste at the accessible collection point.

9
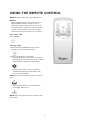
USING THE REMOTE CONTROL
NOTE: Remote control may vary in appearance.
NOTES:
• Two AA batteries power the remote control.
Replace batteries after 6 months of use, or
when the remote control starts to lose power.
• To operate the air conditioner with the remote
control, aim the remote control at the signal
receptor from no more than 23 ft (7 m) away.
Power On or Off
Press POWER.
Selecting mode
1. Press and release MODE until you see the
symbol glow for the desired setting.
2. Choose Cooling, Dry or Fan Only.
• Cooling-Cools the room. Press Fan to select
Auto, High, Mid or Low. Press the up or down
Adjust button to adjust the temperature.
• Dry-Dries the room. The air conditioner
automatically selects the temperature. Fan
runs on Low speed only.
NOTE: Dry mode should not be used to cool the
room.
• Fan Only-Only the fan runs. Press FAN to
select High, Mid or Low.
NOTE: Auto fan speed cannot be selected in Fan
Only mode.

10
FUNCTION DESCRIPTIONS
6th Sense mode
The air conditioner automatically selects Cooling
or Dry mode,depending on room temperature and
sets the target temperature.
Operation mode and temperature are determined
by indoor temperature.
Cooling only models
NOTE: Temperature, airflow and direction are
controlled automatically in 6th Sense mode.
However, a decrease or rise of up to 2°C can be
set with the remote control if you still feel
uncomfortable.
1. Press 6th Sense button.
2. In Fan Only mode, press Fan to select High, Mid
or Low.
Rapid Cool
Used for fast cooling. The air conditioner
automatically sets the fan speed to High and the
temperature to 18ºC.
NOTE: 6th Sense mode button does not operate
when Rapid Cool function is selected.
1. Press Rapid Cool. The air conditioner
automatically sets the fan speed to High and the
temperature to 18°C.
2. To exit Rapid Cool mode, press any button
except Timer On/Off and Swing button.
Fan Speed
1. Choose desired fan speed.
• Auto-automatically controls fan speed
depending on current room temperature and
temperature control setting.
NOTE: Auto fan speed cannot be selected in Fan
Only mode.
• High - for maximum cooling
• Mid - for normal cooling
• Low - for minimum cooling
Temperature
• Press the plus button to raise the temperature.
Press the plus button once to increase the set
temperature by 1ºC, or press twice to increase
the set temperature by 2ºC.
• Press the minus button to lower the
temperature. Press the minus button to
decrease the set temperature by 1ºC, or
press twice to decrease the set temperature
by 2ºC.
NOTES:
• In the Cooling mode, the temperature can be
set between 18ºC and 32ºC.
• In Fan Only mode, the temperature cannot be
set.
Indoor
temperature
Operation
mode
Target
temperature
26°C or below DRY
Room
temperature
decrease 1.5°C
after operating
for 3 minutes
Over 26°C COOLING 26°C

11
Sleep mode
Press Sleep button on remote control, the
appliance operates in sleep mode and the fan speed
is automatically set to low speed.
NOTES:
• In Cooling mode if the current room
temperature is 26ºC or higher the set
temperature will not change when Sleep mode is
activated, otherwise, the temperature will
automatically increase 1ºC during the first hour.
• The set temperature will not increase during the
last 7 hours in Sleep mode.
1. Press MODE to select Cooling or Dry.
NOTE: Sleep mode cannot be selected when Fan
Only is selected.
2. Press Fan button .
3. Press the or button to set the
temperature.
4. Press SLEEP. The On/Off indicator will flash for
10 seconds, and the lights on the control panel
display will dim after 5 seconds.
NOTES:
• The temperature and airflow direction can be
adjusted during Sleep Mode.
• To turn off Sleep mode, press MODE, ON/OFF,
6th SENSE, JET or SLEEP again or wait 8 hours
for the air conditioner to turn off automatically.
Changing Air Direction
On Remote Control or Control Panel
Press SWING once to change vertical airflow
direction. Press again to stop airflow louver at
desired airflow direction.
Normal Sounds
When your air conditioner is operating normally,
you may hear sounds such as:
• Air movement from the fan.
• Clicks from the thermostat cycle.
• Vibrations or noise due to poor wall or window
construction.
• A high-pitched hum or pulsating noise caused by
the modern high-efficiency compressor cycling
on and off.
11

12
MAINTENANCE
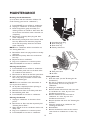
Draining the Air Conditioner
(in accordance with the indication of Water Full
under "Starting your local air conditioner".)
1. Press ON/OFF to turn off the air conditioner.
2. Unplug air conditioner or disconnect power.
3. Move the appliance gently and stably to a
draining location or outside to drain water. Do
not move the unit before water is drained out
completely.
4. Remove the secondary drain plug and drain
water completely.
5. Remove the primary drain hose from the drain
hose clip. Remove the drain hose plug from
the end of the primary drain hose and drain
water completely.
NOTE: If air conditioner will be stored after use,
see "Storing After Use."
6. Reinstall the drain hose plug and the secondary
drain plug.
7. Reattach the primary drain hose to the drain
hose clip.
8. Reposition the air conditioner.
9. Plug in air conditioner or reconnect power.
10. Press ON/OFF to start the air conditioner.
Cleaning the Air Filter
1. Press ON/OFF to turn off the air conditioner.
2. Open the filter panel door on the back of the
air conditioner and remove it.
3. Remove the air filter from the filter panel door.
4. Use a vacuum cleaner to clean the filter. If
filter is very dirty, wash filter in warm water
with a mild detergent.
NOTE: Do not wash filter in the dishwasher or
use any chemical cleaners.
5. Air dry filter completely before replacing to
ensure maximum efficiency.
6. Reattach the air filter to the filter panel door.
7. Reinstall filter panel door.
8. Press ON/OFF to start the air conditioner.
Cleaning the Outside
1. Unplug air conditioner or disconnect from
power.
2. Remove the air filter and clean separately. See
"Cleaning the Air Filter."
3. Wipe outside of the air conditioner with a soft,
damp cloth.
4. Plug in air conditioner or reconnect power.
5. Press ON/OFF to start the air conditioner.
Storing After Use
1. Drain the water (see the "Draining the Air
Conditioner")
2. Run the air conditioner set to Fan Only for
approximately 12 hours to dry the air
conditioner.
3. Unplug air conditioner.
4. Remove flexible exhaust hose and store with
air conditioner in a clean, dry area. See
"Installation Instructions."
5. Remove window kit and store with air
conditioner in a clean, dry area. See
"Installation Instructions."
6. Remove the filter and clean. See "Cleaning the
Air Filter."
7. Clean the outside of air conditioner. See
"Cleaning the Outside."
8. Reinstall filter.
9. Remove the batteries and store the remote
control with air conditioner in a clean, dry
area.
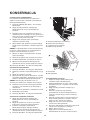
A. Secondary drain plug
B. Drain hose plug
C. Drain hose clip
D. Primary drain hose
A. Filter panel door
B. Air filter

13
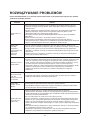
TROUBLESHOOTING
Trouble Analysis
Air conditioner does
not operate
• The power supply cord is unplugged. Plug into a grounded outlet. See "Electrical
Requirements."
• A household fuse has blown, or a circuit breaker has tripped. Replace the fuse, or
reset the circuit breaker. See "Electrical Requirements."
• The On/Off button has not been pressed. Press ON/OFF.
• The local power has failed. Wait for power to be restored.
• Time-delay fuse or circuit breaker of the wrong capacity is being used. Replace
with a time-delay fuse or circuit breaker of the correct capacity. See "Electrical
Requirements."
Air conditioner
blows fuses or trips
circuit breakers
• Too many appliances are being used on the same circuit. Unplug or relocate
appliances that share the same circuit.
• You are trying to restart the air conditioner too soon after turning off air
conditioner. Wait at least 3 minutes after turning off air conditioner before trying to
restart it.
• You have changed modes. Wait at least 3 minutes after turning off air conditioner
before trying to restart the appliance.
Air conditioner
seems to run too
much
• Is there a door or window open? Keep doors and windows closed.
• In cooling mode: the air conditioner is in a heavily occupied room, or heat
producing appliances are in use in the room. Use exhaust vent fans while cooking
or bathing and try not to use heat producing appliances during the hottest part of
the day. Local air conditioners are designed as supplemental cooling to local areas
within a room. A higher capacity air conditioner may be required, depending on
the size of the room being cooled.
Air conditioner runs
for a short time
only, but room is
not cool
• Set temperature is close to room temperature. Lower set temperature. See
"Operating mode description".
Air conditioner
runs, but does not
cool
• The filter is dirty or obstructed by debris. Clean the filter.
• Air outlet is blocked. Clear air outlet.
• The setting temperature is not compatible. In cooling mode: set temperature is too
high. Lower set temperature.
Air conditioner
cycles on and off
too much
• The air conditioner is not properly sized for your room. Check the
cooling/heating capabilities of your local air conditioner. Local air conditioner are
designed as supplemental cooling/heating to local areas within a room.
• The filter is dirty or obstructed by debris. Clean the filter.
• In cooling mode there is excessive heat or moisture (open container cooking,
showers, etc.) in the room. Use a fan to exhaust heat or moisture from the
room. Try not to use heat-producing appliances during the hottest part of the
day.
• The louvers are blocked. Install the air conditioner in a location where the
louvers are free from curtains, blinds, furniture, etc.
• The outside temperature is below 18°C. Do not try to operate your air
conditioner in the cooling mode when the outside temperature is below 18°C.
Before calling for service, try the suggestions below to see whether you can solve your
problem without outside help.:

14
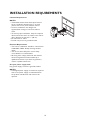
Location Requirements
NOTES:
• The flexible exhaust hose allows placement of
the air conditioner between 23¹⁄ ₂ " and 64"
(60 cm and 163 cm) from window or door.
• Local air conditioners are designed as
supplemental cooling to local areas within a
room.
• To ensure proper ventilation, keep the required
distance from the return air outlet to the wall or
other obstacles at least 23¹⁄ ₂ " (60 cm).
• Do not block air outlet.
• Provide easy access to grounded outlet.
Electrical Requirements
• The local air conditioner should be connected to
a 220-240V / 50Hz, 20-amp fused grounded
outlet.
• The use of a time-delay fuse or time-delay
circuit breaker is recommended.
• All wiring must comply with local and national
electrical regulations and be installed by a
qualified electrician. If you have any questions,
contact a qualified electrician.
Use your power supply cord:
Plug power supply cord into a grounded outlet.
NOTES:
• A damaged power supply cord must be replaced
with a new power supply cord obtained from
the product manufacturer and must not be
repaired.
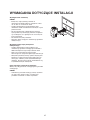
INSTALLATION REQUIREMENTS

15
Unpack the Air Conditioner
Remove packaging materials
• Remove and dispose of/recycle packaging materials. Remove tape and glue residue from surfaces before
turning on the air conditioner. Rub a small amount of liquid dish soap over the adhesive with your
fingers. Wipe with warm water and dry.
• Do not use sharp instruments, rubbing alcohol, flammable fluids, or abrasive cleaners to remove tape or
glue. These products can damage the surface of your air conditioner.
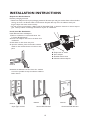
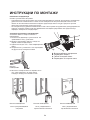
Install Local Air Conditioner
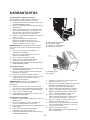
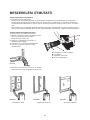
Install Exhaust Hose and Adapter
1. Roll air conditioner to selected location. See
"Location Requirements."
2. Insert hose adapter into slot on the back of air
conditioner.
3. Slide down to lock hose into place.
4. open the window, place the window exhaust
nozzle to the window down to lock hose into
place.
5. Extend the Exhaust hose and close the window
as much as possible to trap the exhaust nozzle as
below shown.
INSTALLATION INSTRUCTIONS
A. Evaporator air intake
B. Hose adapter
C. Flexible exhaust hose
D. Window exhaust adapter
INDOOR
INDOOR
Open Type window
INDOOR
Vertical Slide Window
INDOOR
Horizontal Slide Window

16
AFTER SALES SERVICE
Before contacting the Customer Care Centre:
1. Try to solve the problem yourself based on the
descriptions given in the "Troubleshooting".
2. Turn the appliance off and restart it to see if the
fault persists.
If after carrying out the above checks, the
fault persists, contact the Customer Care
Centre.
Please give:
• a short description of the fault;
• the exact model of the air conditioner;
• the service number (this is the number found
after the word Service on the rating plate),
located on the back of the appliance. The
service number can also be found in the
warranty booklet;
• your full address;
• your telephone number.
If repair work has to be carried out, contact the
Customer Care Centre (Use of original spare
parts and a proper repair is guarenteed).
You will need to present the original invoice.
Failure to comply with these instructions
could compromise the safety and quality of
your product.

17
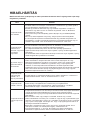
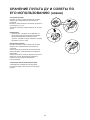
ŚRODKI OSTROŻNOŚCI
• Nie instalować urządzenia, jeśli jest ono
podłączone do źródeł zasilania.
• Zarówno instalowanie, jak i wszelkie naprawy
powinny być wykonywane przez personel
posiadający odpowiednie kwalifikacje, zgodnie ze
wskazówkami wytwórcy i według miejscowych
przepisów bhp. Nie naprawiać ani nie zmieniać
samowolnie żadnej części urządzenia, chyba że
jest to przewidziane w podręczniku użytkownika.
• Obowiązkowo podłączyć urządzenie z
uziemieniem.
• Upewnić się, czy sznur zasilający ma odpowiednią
długość umożliwiającą prawidłowe połączenie. Nie
stosować do zasilania żadnych przedłużaczy.
• Nie pociągać za sznur zasilający w celu wyjęcia
wtyczki z gniazdka wtykowego.
• Nie skręcać ani przyciskać sznura zasilającego;
sprawdzić czy nie jest uszkodzony.
• Instalować urządzenie w taki sposób, by po
zakończeniu prac elektryczne komponenty nie były
dla użytkownika dostępne.
• Nie dotykać roboczych przycisków wilgotnymi
rękami i nie posługiwać się urządzeniem jeśli jest
się boso.
• Osoby niepełnosprawne fizycznie lub psychicznie
oraz dzieci i osoby nie posiadające żadnej
znajomości produktu mogą posługiwać się
urządzeniem wyłącznie po specyficznym
dotyczącym urządzenia przeszkoleniu,
przeprowadzonym przez osobę odpowiedzialną za
ich bezpieczeństwo i dobre samopoczucie. Osoby
niepełnosprawne ani dzieci nie mogą posługiwać
się urządzeniem bez nadzoru, gdyż urządzenie nie
jest do tego przeznaczone.
ŚRODKI OSTROŻNOŚCI DOTYCZĄCE
KLIMATYZATORA
Zaleca się ścisłe przestrzeganie poniższych
wskazówek:
• Długie i bezpośrednie oddziaływanie zimnego
powietrza może być szkodliwe dla zdrowia. Zaleca
się odpowiednie nakierowanie żaluzji w
pomieszczeniu, aby uniknąć bezpośredniego
nawiewu zimnego powietrza.
• Strumień powietrza nie powinien docierać do
fajerek gazowych ani pieca.
• W przypadku wadliwego działania urządzenia
należy najpierw wyłączyć je przyciskiem włączenia
/wyłączenia (ON/OFF) na zdalnym sterowaniu, a
następnie rozłączyć z siecią zasilania.
• Niniejszy wyrób zawiera fluorowe gazy cieplarniane
uwzględnione przez Protokół Kioto; gaz chłodniczy
jest w hermetycznie zamkniętym obwodzie. Gaz
chłodniczy: R-410a ma moc globalnego ocieplenia
(WOG/GWP) 1975.
• Niniejsze urządzenie jest skonstruowane z
materiałów pochodzących z recyklingu lub
nadających się do ponownego użytku. Złom należy
umieszczać zgodnie z miejscowymi przepisami w
przedmiocie odpadów. Przed oddaniem na złom
urządzenie należy doprowadzić do stanu
nieużywalności odcinając sznury zasilające.
• Po dodatkowe szczegółowe informacje w
przedmiocie manewrowania i recyklingu
niniejszego wyrobu należy zwrócić się do
miejscowych władz zajmujących się zbiorem
oddzielnych rodzajów odpadków lub do
sprzedawcy, u którego urządzenie zostało
zakupione.
ZŁOMOWANIE OPAKOWANIA
• Opakowanie nadaje się do recyklingu w 100%,
czego potwierdzeniem jest odnośny symbol. Nie
wolno wyrzucać na śmietnik poszczególnych
części opakowania, lecz należy je paczkować
zgodnie z zaleceniami miejscowych przepisów
ZŁOMOWANIE URZĄDZENIA
• Niniejsze urządzenie posiada oznaczenia zgodnie
z Dyrektywą Europejską 2002/96/EC w sprawie
zużytego sprzętu elektrycznego i elektronicznego
(WEEE).
• Przestrzegając zasad poprawnego złomowania
niniejszego wyrobu przyczyniamy się do
zapobiegania ujemnym skutkom, jakie może ono
wywrzeć na otaczające środowisko i zdrowie
człowieka.
• Symbol , którym jest oznakowany wyrób lub
towarzysząca wyrobowi dokumentacja wskazuje,
że niniejsze urządzenie nie wolno traktować jak
zwykłe odpadki gospodarstwa domowego, i że
powinno ono być przekazane do odpowiedniego
miejscowego zbioru, gdzie jest składany
elektryczny i elektroniczny sprzęt do recyklingu.
PORADY DOTYCZĄCE OCHRONY
ŚRODOWISKA

18
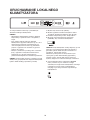
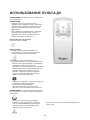
URUCHAMIANIE LOKALNEGO
KLIMATYZATORA
Ta sekcja zawiera informacje o prawidłowym
działaniu lokalnego klimatyzatora.
UWAGA:
• Wyświetlacz klimatyzatora pokazuje aktualną
temperaturę w pomieszczeniu i 24 godzinny
zegar.
• Przy zmianie trybów podczas działania
klimatyzatora sprężarka zatrzyma się na 3 do 5
minut przed ponownym uruchomieniem się.
Jeśli w międzyczasie wciśnie się jakikolwiek
przycisk, sprężarka nie uruchomi się jeszcze
przez 3 do 5 minut.
• W trybie „chłodzenia" (Cooling) albo "suszenia"
(Dry), sprężarka i wentylator kondensatora
zatrzymają się, jak tylko temperatura w
pomieszczeniu dojdzie do nastawionej wielkości.
UWAGA: W przypadku przerwy w dopływie energii
elektrycznej, po przywróceniu dopływu klimatyzator
będzie działał według poprzedniej nastawy.
1. Wybrać tryb. Patrz "Tryb" (Mode).
2. Wybrać prędkość obrotów wentylatora. Patrz
"Prędkość obrotów wentylatora" (Fan Speed)
3. Nastawić temperaturę. Patrz "Temperatura".
4. Wcisnąć przycisk włączenia/ wyłączenia
(ON/OFF), aby uruchomić klimatyzator.
UWAGA: Kiedy klimatyzator zostaje włączony po raz
pierwszy, to po pierwszym wetknięciu wtyczki w
gniazdko, będzie działał w trybie sterowania na
zasadzie 6. zmysłu (6th Sense).
Natomiast po włączeniu we wszystkich innych
sytuacjach, będzie działał według poprzedniej
nastawy. Tryb 6. zmysłu (6th Sense) może być
wybrany wyłącznie w ramach zdalnego sterowania.
5. Jeśli wskaźnik pełnego napełnienia (WATER
FULL) zaświeci się na czerwono, nastąpi
automatyczne wyłączenie klimatyzatora. Instrukcje
pozwalające usunąć wodę z klimatyzatora
znajdują się w sekcji “Konserwacja lokalnego
klimatyzatora”.
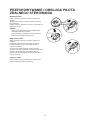
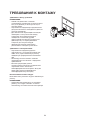
Timer
Swing
RapidCool
Adjust
Fan
Speed
Mode
On/Off
Filter
Reset
Wat e r
Full
On
Off

19
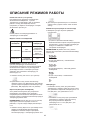
OPIS TRYBÓW PRACY
Tryby pracy:
1. Naciskać i zwalniać przycisk MODE (TRYB),
dopóki nie podświetli się symbol żądanego
ustawienia
2. Wybrać Chłodzenie, Osuszanie lub Tylko
wentylator.
• Tryb chłodzenia - powoduje chłodzenie
pomieszczenia. Nacisnąć przycisk FAN SPEED
(Prędkość wentylatora), aby wybrać jedno z
następujących ustawień: Auto, High (Wysoka),
Mid (Średnia) lub Low (Niska). Nacisnąć
przycisk regulacji w górę lub w dół, aby
dostosować temperaturę.
• Tryb osuszania - powoduje osuszanie powietrza
w pomieszczeniu. Klimatyzator automatycznie
wybiera temperaturę. Wentylator pracuje tylko z
niską prędkością.
UWAGA: Trybu osuszania nie należy używać do
chłodzenia pomieszczenia.
• Tryb "Tylko wentylacja" - Działa tylko wentylator.
Nacisnąć przycisk FAN SPEED (Prędkość
wentylatora), aby wybrać jedno z następujących
ustawień: High (Wysoka), Mid (Średnia) lub Low
(Niska).
UWAGA: W trybie pracy samej wentylacji nie można
wybrać automatycznej prędkości wentylatora.
Prędkość wentylatora
1. Nacisnąć i zwolnić przycisk FAN SPEED
(Prędkość wentylatora), aby wybrać żądaną
prędkość wentylatora.
2. Wybrać jedno z następujących ustawień: Auto,
High (Wysoka), Mid (Średnia) lub Low (Niska).
• Auto - automatycznie steruje prędkością
wentylatora w zależności od bieżącej
temperatury panującej w pomieszczeniu i
ustawienia temperatury.
UWAGA: W trybie pracy samej wentylacji nie można
wybrać automatycznej prędkości wentylatora.
• Wysoka - pozwala uzyskać maksymalne
chłodzenie
• Średnia - pozwala uzyskać standardowe
chłodzenie
• Niska - pozwala uzyskać minimalne chłodzenie
Reset filtra
1. Gdy kontrolka resetu filtra jest podświetlona,
należy wyjąć, oczyścić i ponownie zamontować
filtr powietrza. Patrz punkt "Czyszczenie filtra
powietrza".
2. Po ponownym zamontowaniu filtra powietrza
nacisnąć i zwolnić przycisk FILTER RESET
(Reset filtra).
UWAGA: Kontrolka filtra zapala się po 360
godzinach pracy wentylatora. Pozostanie ona
włączona przez 180 godzin lub dopóki nie zostanie
naciśnięty przycisk FILTER RESET (Reset filtra). Po
upływie 180 godzin kontrolka samoczynnie zgaśnie.
Temperatura
• Nacisnąć przycisk regulacji "w górę", aby
podnieść temperaturę. Jednokrotne naciśnięcie
przycisku regulacji "w górę" powoduje wzrost
ustawionej temperatury o 1 °C, natomiast jego
dwukrotne naciśnięcie powoduje wzrost
temperatury o 2° C.
• Nacisnąć przycisk regulacji "w górę", aby
podnieść temperaturę. Jednokrotne naciśnięcie
przycisku regulacji "w górę" powoduje wzrost
ustawionej temperatury o 1 °C, natomiast jego
dwukrotne naciśnięcie powoduje wzrost
temperatury o 2° C.

20
UWAGI:
• W trybie Chłodzenie temperaturę można ustawić
w zakresie od 18º C do 32º C.
• W trybie Tylko wentylator zmysł nie można
ustawić temperatury.
• Aby zmienić wyświetlanie temperatury ze skali
Celsjusza ( ºC) na Fahrenheita ( ºF) lub
odwrotnie, należy równocześnie nacisnąć
przyciski regulacji w górę i w dół.
Funkcja zegara
Istnieje możliwość ustawienia zegara czasu
rzeczywistego poprzez równoczesne naciśnięcie
przycisków Timer On (Timer wł.) i Timer Off (Timer
wył.) na panelu sterowania lub przycisku Clock
(Zegar) na pilocie. Nacisnąć przycisk regulacji w
górę lub w dół, aby ustawić prawidłową godzinę.
Ponownie nacisnąć równocześnie przyciski Timer
On (Timer wł.) i Timer Off (Timer wył.) - teraz czas
rzeczywisty jest ustawiony.
Timer On/Off (Timer Wł./Wył.)
Ustawić czas rzeczywisty w celu włączenia
klimatyzatora.
1. Nacisnąć przycisk Timer On (Timer wł.) - zacznie
migać wskaźnik timera ustawiony na godzinę
12:00.
2. Nacisnąć przycisk regulacji w górę lub w dół, aby
ustawić żądaną godzinę włączenia urządzenia.
• Nacisnąć przycisk regulacji w górę lub w dół
jednokrotnie, aby zwiększyć lub zmniejszyć
ustawienie czasu o 1 minutę.
• Nacisnąć przycisk regulacji w górę lub w dół i
przytrzymać go przez półtorej sekundy, aby
zwiększyć lub zmniejszyć ustawienie czasu o 10
minut.
• Nacisnąć przycisk regulacji w górę lub w dół i
przytrzymać go dłużej, aby zwiększyć lub
zmniejszyć ustawienie czasu o 1 godzinę.
3. Gdy żądany czas pojawi się na wyświetlaczu
LCD, należy nacisnąć przycisk TIMER ON (Timer
wł.) i potwierdzić ustawienie, po czym kontrolka
zegara "WŁ." przestanie migać, a żądany czas
pozostanie ustawiony.
4. Po upływie 5 sekund wyświetlania żądanego
czasu na wyświetlaczu LCD ponownie pojawi się
zegar.
UWAGA: Jeżeli czas nie zostanie ustawiony w ciągu
10 sekund od naciśnięcia przycisku TIMER ON
(Timer wł.), urządzenie automatycznie zamknie tryb
TIMER ON (Timer wł.).
Anulowanie funkcji Timer On (Timer wł.)
Nacisnąć ponownie przycisk Timer On (Timer wł.) -
wskaźnik zniknie, a ustawienie timera włączającego
zostanie anulowane.
UWAGA: Podobnie ustawia się funkcję Timer Off
(Timer wył.), dzięki której można zaprogramować
samoczynne wyłączenie urządzenia o żądanej
godzinie.
Tryb Szybkie chłodzenie
Stosowany do szybkiego chłodzenia. Klimatyzator
samoczynnie ustawi prędkość wentylatora na
wysoką, a temperaturę na 18º C.
UWAGA: Przycisk funkcji 6-ty zmysł nie działa, gdy
wybrany jest tryb Szybkiego chłodzenia.
1. Nacisnąć przycisk Szybkie chłodzenie.
Klimatyzator samoczynnie ustawi prędkość
wentylatora na wysoką, a temperaturę na 18º C.
2. W celu wyłączenia Szybkiego chłodzenia należy
nacisnąć dowolny przycisk, oprócz przycisków
Timer On/Off (Timer wł./wył.) oraz Swing
(Nadmuch zmienny).
Strona się ładuje...
Strona się ładuje...
Strona się ładuje...
Strona się ładuje...
Strona się ładuje...
Strona się ładuje...
Strona się ładuje...
Strona się ładuje...
Strona się ładuje...
Strona się ładuje...
Strona się ładuje...
Strona się ładuje...
Strona się ładuje...
Strona się ładuje...
Strona się ładuje...
Strona się ładuje...
Strona się ładuje...
Strona się ładuje...
Strona się ładuje...
Strona się ładuje...
Strona się ładuje...
Strona się ładuje...
Strona się ładuje...
Strona się ładuje...
Strona się ładuje...
Strona się ładuje...
Strona się ładuje...
Strona się ładuje...
Strona się ładuje...
Strona się ładuje...
Strona się ładuje...
Strona się ładuje...
Strona się ładuje...
Strona się ładuje...
Strona się ładuje...
Strona się ładuje...
-
 1
1
-
 2
2
-
 3
3
-
 4
4
-
 5
5
-
 6
6
-
 7
7
-
 8
8
-
 9
9
-
 10
10
-
 11
11
-
 12
12
-
 13
13
-
 14
14
-
 15
15
-
 16
16
-
 17
17
-
 18
18
-
 19
19
-
 20
20
-
 21
21
-
 22
22
-
 23
23
-
 24
24
-
 25
25
-
 26
26
-
 27
27
-
 28
28
-
 29
29
-
 30
30
-
 31
31
-
 32
32
-
 33
33
-
 34
34
-
 35
35
-
 36
36
-
 37
37
-
 38
38
-
 39
39
-
 40
40
-
 41
41
-
 42
42
-
 43
43
-
 44
44
-
 45
45
-
 46
46
-
 47
47
-
 48
48
-
 49
49
-
 50
50
-
 51
51
-
 52
52
-
 53
53
-
 54
54
-
 55
55
-
 56
56


Whirlpool AMD 084/1 instrukcja
- Typ
- instrukcja
- Niniejsza instrukcja jest również odpowiednia dla
Powiązane artykuły
Inne dokumenty
-
TechniSat TECHNIPOLAR 2 M Instrukcja obsługi
-
Hyundai AIR 953 Instrukcja obsługi
-
-
Electrolux EXP11CKEWI Instrukcja obsługi
-
Gorenje KAM26PDAH Instrukcja obsługi
-
Electrolux EXP09HN1WI Instrukcja obsługi
-
Woods AC Venezia 18K Smart Home Operating Instructions Manual
-
LG PC12SQ Instrukcja obsługi
-
Sharp CV-P10PR Instrukcja obsługi
-
Dometic MCS T6, MCS T12, MCS T16 Instrukcja obsługi