Silvercrest SHGB 50 A1 Operating Instructions Manual
- Typ
- Operating Instructions Manual

HAIR STRAIGHTENING BRUSH
Operating instructions
PLATTBORSTE
Bruksanvisning
PLAUKŲ TIESINIMO ŠEPETYS
Vartotojo vadovas
SUORISTAVA HIUSHARJA
Käyttöohje
SZCZOTKA DO WYGŁADZANIA
WŁOSÓW
Instrukcja obsługi
HAARGLÄTTUNGSBÜRSTE
Bedienungsanleitung
HAIR STRAIGHTENING BRUSH SHGB 50 A1
IAN 280615
Nas280615_Haarglättungsbürste_Cover_LB3.indd 2 26.10.16 11:35

English .................................................................................... 2
Suomi ................................................................................... 12
Svenska ............................................................................... 20
Polski ................................................................................... 28
Lietuviškai ............................................................................ 38
Deutsch ................................................................................ 48
,'6+*%$BB9
BB1$6B+DDUEXHUVWHB%ERRN6HLWH'RQQHUVWDJ2NWREHU

12 4 635
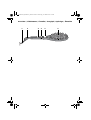
Overview / Yleiskatsaus / Översikt / Przeglâd / Apžvalga /
Übersicht
BB1$6B+DDUEXHUVWHB%ERRN6HLWH'RQQHUVWDJ2NWREHU

2
GB
Contents
1. Overview ........................................................................................ 2
2. Intended purpose ............................................................................ 3
3. Safety instructions ........................................................................... 3
4. Items supplied ................................................................................. 5
5. Operation ........................................................................................ 6
5.1 Switching on/off and adjusting temperature............................................. 6
5.2 Styling................................................................................................. 7
6. Cleaning .......................................................................................... 7
7. Storage ........................................................................................... 7
8. Disposal .......................................................................................... 8
9. Troubleshooting ............................................................................... 8
10.Technical specifications .................................................................... 8
11.Warranty of the HOYER Handel GmbH ............................................. 9
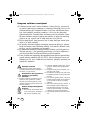
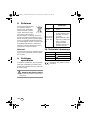
1. Overview
1 Power cable with mains plug
2 360° rotating cable joint with hanging loop
3 On/off button
4+/– Buttons for temperature setting (100 °C - 180 °C in 10 °C steps)
5 Display
6 Brush insert with ceramic coating
BB1$6B+DDUEXHUVWHB%ERRN6HLWH'RQQHUVWDJ2NWREHU

3
GB
Thank you for your trust!
Congratulations on the purchase of your
new hair straightening brush.
For a safe handling of the product and in or-
der to get to know the entire scope of fea-
tures:
• Thoroughly read these user in-
structions prior to initial use.
• Above all, observe the safety in-
structions!
• The device should only be used
as described in these user in-
structions.
• Keep these user instructions for
reference.
• If you pass the device on to
someone else, please include
this copy of the user instructions.
We hope you enjoy using your new hair
straightening brush!
Symbols on your device
Do not use this device in the vicinity
of bathtubs, showers, washbasins
or other vessels containing water.
2. Intended purpose
The hair straightening brush is intended ex-
clusively for the purpose of styling your own
real human head hair.
The device is designed for private home use
and must not be used for commercial pur-
poses.
The device must only be used indoors.
Foreseeable misuse
WARNING! Risk of injury!
~ Do not use the hair straightening brush
for styling any other body parts, ani-
mals or objects. Do not use the device
for artificial hair or hair extensions.
3. Safety instructions
Warnings
If necessary, the following warnings will be
used in these user instructions:
DANGER! High risk: failure to ob-
serve this warning may result in in-
jury to life and limb.
WARNING! Moderate risk: failure to ob-
serve this warning may result in injury or se-
rious material damage.
CAUTION: low risk: failure to observe this
warning may result in minor injury or mate-
rial damage.
NOTE: circumstances and specifics that
must be observed when handling the de-
vice.
BB1$6B+DDUEXHUVWHB%ERRN6HLWH'RQQHUVWDJ2NWREHU

4
GB
Instructions for safe operation
~ This device can be used by children from the age of 8 and peo-
ple with restricted physical, sensory or intellectual abilities or
people without adequate experience and/or understanding, if
they are supervised or instructed on how to use this device safely
and if they are aware of the resulting danger. Children must not
play with the device. Cleaning and user maintenance must not
be performed by children unless they are older than 8 years and
supervised.
~ Keep children under the age of 8 away from the device and the
power cable.
~ If you use the hair straightening brush in a bathroom, always pull
out the mains plug afterwards. The proximity of water represents
a hazard even when the device is switched off.
~ If the mains power cable of this device should become dam-
aged, it must be replaced by the manufacturer, the manufactur-
er's customer service department or a similarly qualified
specialist, in order to avoid any hazards.
~ Installation of a residual current device (FI/RCD) with a rated re-
sidual operating current of no more than 30 mA is recommended
to provide additional protection. Ask your electrician for advice.
The installation should only be carried out by a qualified electri-
cian.
DANGER for children
~ Children must not play with packing
material. Do not allow children to play
with plastic bags. There is a risk of suf-
focation.
DANGER to and from pets
and livestock
~ Electrical devices can represent a haz-
ard to pets and livestock. In addition,
animals can also cause damage to the
device. For this reason you should keep
animals away from electrical devices at
all times.
DANGER! Risk of electric
shock due to moisture
~ Do not use this device in the vi-
cinity of bathtubs, showers,
washbasins or other vessels
containing water.
~ Never place the device anywhere that it
could fall into water while plugged in.
~ Protect the device from moisture, water
drops and water splashes.
~ The device, the cable and the mains
plug must not be immersed in water or
any other liquids.
~ If liquid gets into the device, remove the
mains plug immediately. Have the de-
vice checked before reusing.
BB1$6B+DDUEXHUVWHB%ERRN6HLWH'RQQHUVWDJ2NWREHU

5
GB
~ If the device has fallen into water, pull
out the mains plug immediately, and
only then remove the device from the
water. Do not use the device again,
and have it checked by a specialist
workshop.
~ Never touch the device with wet hands.
DANGER! Risk of electric shock
~
Do not use the device if the device or the
power cable has any visible damage, or
if the device has previously been
dropped.
~ Lay the power cable such that no one
can step on it, get caught on it, or trip
over it.
~ Only connect the mains plug to a prop-
erly installed and easily accessible wall
socket whose voltage corresponds to
the specifications on the rating plate.
The wall socket must continue to be eas-
ily accessible after the device is
plugged in.
~ Ensure that the power cable cannot be
damaged by sharp edges or hot points.
Do not wrap the power cable around
the device (Danger! Risk of cable dam-
age!).
~ Ensure that the power cable cannot be
trapped or crushed.
~ To pull the mains plug out of the wall
socket, always pull on the mains plug,
and never on the power cable.
~ Disconnect the mains plug from the wall
socket…
… after every use,
… if there is a fault,
… when you are not using the device,
… before you clean the device and
… during thunderstorms.
~ To avoid any risk, do not make modifi-
cations to the product. You also must
not replace the power cable yourself.
Repairs must be carried out by a spe-
cialist workshop or the Service Centre.
~ Never attempt to remove dust or foreign
bodies from inside the device using a
pointed object (e.g. with a tail comb).
DANGER! Fire hazard
~ Never leave the device unattended
while it is plugged in.
~ Never cover the device or place it on
soft objects (e.g. towels). As long as the
device is switched on and/or hot, al-
ways place it on a stable, flat, heat-re-
sistant surface.
DANGER! Risk of injury
through burning
~ Do not touch the hot surfaces of the de-
vice.
~ Allow the device to cool down com-
pletely before you clean it or put it
away.
WARNING! Risk of material damage
~ Use the original accessories only.
~ Never place the device on hot surfaces
(e.g. hot plates) or near heat sources or
open fire.
~ Do not use any astringent or abrasive
cleaning agents.
~ Do not expose the device to tempera-
tures below -10 °C or above +40 °C.
4. Items supplied
1 hair straightening brush
1 user instructions
Before using for the first time
• Remove all packing material.
• Check that the device is undamaged.
BB1$6B+DDUEXHUVWHB%ERRN6HLWH'RQQHUVWDJ2NWREHU

6
GB
5. Operation
DANGER! - Fire hazard!
~ Never cover the device or place it on
soft objects (e.g. towels). As long as the
device is switched on and/or hot, al-
ways place it on a stable, flat, heat-re-
sistant surface.
DANGER! Risk of injury
through burning!
~ Never touch the hot brush insert with
ceramic coating|6.
NOTE:
• Before using it for the first time, switch
the device on for a few minutes and set
it to the highest temperature (180 °C).
As a result of the manufacturing pro-
cess, you may notice a slight odour.
This is normal and only occurs during
first use. Ensure that the room is well
ventilated.
5.1 Switching on/off and
adjusting temperature
1. Place the device on a heat-resistant sur-
face.
2. Connect the mains plug|1 to a properly
installed and easily accessible wall
socket whose voltage corresponds to
the specifications on the rating plate.
The wall socket must continue to be eas-
ily accessible after the device is
plugged in.
3. Press the on/off button |3 for ap-
prox. 2 seconds to switch the device
on. The display|5 shows 150.
4. Use the +/–|4 buttons to set the desired
temperature between 100 °C and
180 °C in 10 °C steps. LED segments
moving clockwise in the display|5 will
indicate that the device is heating up.
NOTE: LED segments running anticlockwise
indicate that the device is cooling down.
Wait until the desired temperature appears
in the display before straightening your hair.
5. In order to avoid changing the tempera-
ture by accidentally pressing the
+/-|4 buttons, you can lock these but-
tons.
- Press one of the
+
/
-
|
4
buttons for ap-
prox. 2 seconds. The buttons are now
locked. The display|
5
shows .
- Press one of the +/-|4 buttons again
for approx. 2 seconds. The buttons
are now unlocked. The display|5
stops showing .
6. Press the on/off button |3 for ap-
prox. 2 seconds to switch the device
off.
7. Allow the device to cool down on the
heat-resistant surface.
Switching off automatically
If you do not press a button on the switched-
on device for 45 minutes, it will switch off
automatically. Before this happens, the tem-
perature display will flash in the display|5.
Press the on/off button |3 for approx. 2
seconds to switch the device back on.
BB1$6B+DDUEXHUVWHB%ERRN6HLWH'RQQHUVWDJ2NWREHU

7
GB
5.2 Styling
The right temperature
WARNING!
~ Hair can be damaged by excessive
temperature, excessively long contact
or too frequent straightening. Particular-
ly at higher temperatures, you should
not treat the same strand of hair more
than once.
• Start with the lowest temperature that is
recommended for the hair texture to be
treated.
• Increase the temperature in small steps
if the straightening process is taking too
long.
Straightening
1. Dry your hair.
2. Comb the hair well.
3. Start with the lowest temperature that is
recommended for the hair texture to be
treated (see table).
4. Separate one strand and brush it
smooth. Brush evenly from the hairline
to the tips of the hair. Do not stay in any
one spot for too long. Ensure that you
keep a sufficient distance from your
scalp!
5. Straighten all of your hair in this way,
strand by strand.
6. Switch the device off using the on/off
button |3, and allow the device to
cool down.
7. Disconnect the mains plug|1 from the
wall socket.
8. Allow the hair to briefly cool before you
treat it further e.g. with styling or care
products.
6. Cleaning
DANGER! Risk of electric shock!
~ Pull out the mains plug|1 from the wall
socket before cleaning the hair straight-
ening brush.
~ Allow the device to cool down before
cleaning.
WARNING! Risk of material dam-
age!
~ Do not use any astringent or abrasive
cleaning agents.
• Hairs that are tangled in the bristles
should ideally be pulled off using your
fingers.
• Clean the device regularly. Wipe down
the housing of the device with a damp
cloth.
7. Storage
WARNING! Risk of material damage!
~ Do not wrap the cable around the de-
vice (risk of cable damage!).
• Allow the device to cool down.
• You can use the hook loop|2 to safely
and practically hang up the device for
storage purposes.
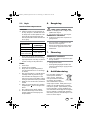
Hair texture
Recommended
temperature
bleached, dyed
blonde
100 - 120 °C
fine, dyed 120 - 140 °C
normal to strong, not
chemically treated
140 - 180 °C
BB1$6B+DDUEXHUVWHB%ERRN6HLWH'RQQHUVWDJ2NWREHU

8
GB
8. Disposal
This product is subject to the
provisions of European Direc-
tive 2012/19/EC. The sym-
bol showing a wheelie bin
crossed through indicates
that the product requires sep-
arate refuse collection in the European Un-
ion. This applies to the product and all
accessories marked with this symbol. Prod-
ucts identified with this symbol may not be
discarded with normal household waste, but
must be taken to a collection point for recy-
cling electric and electronic appliances. Re-
cycling helps to reduce the consumption of
raw materials and protect the environment.
Packaging
When disposing of the packaging, make
sure you comply with the environmental reg-
ulations applicable in your country.
9. Troubleshooting
If your device fails to function as required,
please try this checklist first. Perhaps there is
only a minor problem, and you can solve it
yourself.
DANGER! Risk of electric shock!
~ Do not attempt to repair the device
yourself under any circumstances.
10. Technical
specifications
Subject to technical modification.
Fault
Possible causes /
Action
None
Function
• Has the device been
connected to the
power supply?
Error messages
on the display
(E1, E2, E3, E4)
1. Disconnect the mains
plug|1 from the wall
socket.
2. Allow the device to
cool down.
3. Connect the mains
plug|
1
with the wall
socket and put the de-
vice into operation. If
the device cannot be
switched on, contact
the Service Centre.
Model: SHGB 50 A1
Mains voltage: 220-240 V ~50/60 Hz
Protection class: II
Power rating: 50 W
BB1$6B+DDUEXHUVWHB%ERRN6HLWH'RQQHUVWDJ2NWREHU

9
GB
11. Warranty of the
HOYER Handel GmbH
Dear Customer,
your device is provided with a 3 year war-
ranty starting with the purchase date. In the
event of product defects, you are entitled to
statutory rights against the vendor. These
statutory rights are not restricted by our war-
ranty presented in the following.
Warranty conditions
The warranty period starts with the purchase
date. Please keep the original purchase re-
ceipt in a safe place. This document is re-
quired to verify the purchase.
If within three years from the purchase date
of this product a material or factory defect
occurs, the product will be repaired or re-
placed by us – at our discretion – free of
charge to you. This warranty implies that
within the period of three years the defective
device and the purchase receipt are present-
ed, including a brief written description of
the defect and the time it occurred.
If the defect is covered by our warranty, the
repaired or a new product will be returned
to you. No new warranty period starts with
a repair or replacement of the product.
Warranty period and statutory
claims for defects
The warranty period is not extended when
the warranty has been claimed. This also ap-
plies to replaced and repaired parts. Any
damages and defects already existing at the
time of purchase must be reported immedi-
ately upon unpacking. Repairs arising after
the expiration of the warranty period are
subject to a charge.
Warranty coverage
The device was produced carefully according
to strict quality guidelines and tested diligent-
ly prior to delivery.
The warranty applies to material or factory
defects.
Excluded from the warranty are
wear parts subject to normal wear
and damages to fragile parts, e.g.
switches, batteries, lamps or other
parts manufactured from glass.
This warranty expires if the product is dam-
aged, not used as intended or not serviced.
For the proper operation of the product, all in-
structions listed in the operating instructions
must be observed carefully. Any form of use
and handling that is advised against in the
operating instructions or warned against
must always be avoided.
The product is only intended for private and
not for commercial use. In the case of incor-
rect and improper treatment, use of force and
interventions not performed by our author-
ised Service Centre, the warranty shall cease.
Handling in case of a warranty
claim
In order to ensure prompt processing of your
matter, please observe the following notes:
• Please keep the article number
IAN: 280615
and the purchase receipt
as a purchase verification for all inquiries.
• The article number can be found on the
rating plate, an engraving, the title
page of your instructions (in the bottom
left), or as a label on the rear or under-
side of the device.
• If faulty operation or other defects occur,
first contact the Service Centre listed in
the following by telephone or email.
• Then, you are able to send a product re-
ported as defective free of charge to the
service address specified to you, includ-
ing the purchase receipt and the infor-
mation on the defect and when it
occurred.
Please visit www.lidl-service.com to
download this and many other
manuals, product videos and soft-
ware.
BB1$6B+DDUEXHUVWHB%ERRN6HLWH'RQQHUVWDJ2NWREHU

10
GB
Service Centre
Service Great Britain
Tel.: 0871 5000 720 (£ 0.10/Min.)
E-Mail: [email protected]
Service Ireland
Tel.: 1890 930 034
(0,08 EUR/Min., (peak))
(0,06 EUR/Min., (off peak))
E-Mail: [email protected]
IAN: 280615
Supplier
Please note that the following address is no
service address. First contact the afore-
mentioned Service Centre.
HOYER Handel GmbH
Tasköprüstraße 3
22761 Hamburg
Germany
GB
IE
BB1$6B+DDUEXHUVWHB%ERRN6HLWH'RQQHUVWDJ2NWREHU

11
GB
BB1$6B+DDUEXHUVWHB%ERRN6HLWH'RQQHUVWDJ2NWREHU

12
FI
Sisältö
1. Yleiskatsaus ................................................................................12
2. Määräystenmukainen käyttö .......................................................13
3. Turvaohjeita ................................................................................13
4. Toimituksen sisältö ......................................................................15
5. Käyttö .........................................................................................16
5.1 Kytkeminen päälle/pois päältä ja lämpötilan säätö ..............................16
5.2 Muotoilu .........................................................................................17
6. Puhdistus .....................................................................................17
7. Säilytys .......................................................................................17
8. Osien hävittäminen .....................................................................17
9. Häiriötapauksessa .......................................................................18
10.Tekniset tiedot .............................................................................18
11.Takuun antaja on HOYER Handel GmbH ......................................18
1. Yleiskatsaus
1 Liitosjohto verkkopistokkeella
2 360° kierrettävä kaapeliyhteys ripustuslenkillä
3 Painike päälle/pois
4+
/
–
Painikkeet lämpötilan säätelyyn (100 °C - 180 °C, säädettävissä 10 °C:n askelin)
5 Näyttö
6 Harjan keraamipinnoitteinen osa
BB1$6B+DDUEXHUVWHB%ERRN6HLWH'RQQHUVWDJ2NWREHU

13
FI
Sydämellinen kiitos
luottamuksestasi!
Onnittelemme sinua uudesta hiusten suoris-
tusharjastasi.
Tuotteen turvallista käyttöä ja kaikkiin toimin-
toihin tutustumista varten on huomioitava
seuraavaa:
• Ennen ensimmäistä käyttöönot-
toa on tämä käyttöohje luettava
huolellisesti läpi.
• Turvaohjeita on välttämättä
noudatettava!
• Laitetta saa käyttää vain tässä
käyttöohjeessa kuvatulla taval-
la.
• Tämä käyttöohje on säilytettä-
vä huolellisesti.
• Jos laite annetaan toiselle henki-
lölle, tulisi tämän käyttöohjeen
olla mukana.
Toivomme, että sinulla on paljon iloa uudes-
ta hiusten suoristusharjastasi!
Symbolit laitteessa
Älä käytä laitetta kylpyammeiden,
suihkujen, pesualtaiden tai muiden
vettä sisältävien astioiden läheisyy-
dessä.
2. Määräystenmukainen
käyttö
Hiusten suoristusharja on tarkoitettu ainoas-
taan aitojen ja omien ihmishiusten muotoi-
luun.
Laite on suunniteltu yksityisessä kotitaloudes-
sa käytettäväksi eikä sitä saa käyttää kau-
pallisiin tarkoituksiin.
Laitetta saa käyttää vain sisätiloissa.
Ennakoitava väärinkäyttö
VAROITUS loukkaantumisista!
~
Älä muotoile hiusten suoristusharjalla
muita ruumiinosia, eläimiä tai esineitä.
Älä käytä laitetta keinotekoisiin hiuksiin
tai hiusten pidennyksiin (extensions).
3. Turvaohjeita
Varoituksiin liittyvää
Tarpeen mukaan käytetään tässä käyttöoh-
jeessa seuraavia varoitusmerkintöjä:
VAARA! Suuri riski: varoituksen
laiminlyönnistä voi aiheutua tapa-
turman vaara.
VAROITUS! Keskimääräinen riski: varoi-
tuksen huomiotta jättämisestä voi seurata
loukkaantumisia tai vakavia aineellisia va-
hinkoja.
VARO: alhainen riski: varoituksen huomiot-
ta jättämisestä voi seurata lieviä loukkaantu-
misia tai aineellisia vahinkoja.
OHJE: seikkoja ja erityiskohtia, jotka on
huomioitava laitteen käytön yhteydessä.
BB1$6B+DDUEXHUVWHB%ERRN6HLWH'RQQHUVWDJ2NWREHU

14
FI
Ohjeita turvallista käyttöä varten
~ Tätä laitetta voivat käyttää vähintään 8 vuotta täyttäneet lapset
ja sellaiset henkilöt, joiden fyysiset, sensoriset tai henkiset kyvyt
tai kokemus ja/tai tiedot ovat riittämättömät, jos heitä valvotaan
tai mikäli heidät on opastettu käyttämään laitetta turvallisesti ja
ymmärtämään sen käyttöön liittyvät vaarat. Lapset eivät saa leik-
kiä laitteella. Lapset eivät saa suorittaa laitteen puhdistusta ja
käyttäjähuoltoa, elleivät he ole yli 8-vuotiaita ja valvonnan alaisi-
na.
~ Laite ja liitosjohto on pidettävä 8 vuotta nuorempien lasten ulottu-
mattomissa.
~ Jos hiusten suoristusharjaa käytetään kylpyhuoneessa, on pistoke
irrotettava käytön jälkeen. Veden läheisyys on vaara, vaikka lai-
te olisikin poiskytkettynä.
~ Jos laitteen verkkoliitosjohto vaurioituu, on se vaihdettava valmis-
tajan tai tämän asiakaspalvelun tai vastaavasti pätevän henkilön
toimesta vaaratilanteiden välttämiseksi.
~ Lisäsuojaksi suositellaan virtapiiriin vikavirtasuojalaitteen (RCD)
asentamista, jonka mitoituksen laukaisuvirta on enintään 30 mA.
Kysy neuvoa sähköasentajaltasi. Asennuksen saa antaa ainoas-
taan ammattitaitoisten sähköasentajan suoritettavaksi.
VAARA lapsille
~ Pakkausmateriaali ei kuulu lasten leik-
keihin. Lasten ei pidä antaa leikkiä
muovipusseilla. Niistä voi aiheutua tu-
kehtumisvaara.
VAARA koti- ja hyötyeläimille
ja niiden kautta
~ Sähkölaitteista voi aiheutua vaaraa ko-
ti- ja hyötyeläimille. Lisäksi eläimet voi-
vat myös vaurioittaa laitetta. Siksi
eläimet on periaatteessa pidettävä loi-
tolla sähkölaitteista.
VAARA sähköiskusta
kosteuden takia
~ Älä käytä laitetta kylpyammei-
den, suihkujen, pesualtaiden tai
muiden vettä sisältävien astioi-
den läheisyydessä.
~ Älä aseta laitetta koskaan siten, että se
voi pudota veteen ollessaan kytkettynä.
~ Laite on suojattava kosteudelta sekä tip-
pu- ja roiskevedeltä.
~
Laitetta, johtoa ja verkkopistoketta ei saa
upottaa veteen tai muihin nesteisiin.
~ Jos laitteeseen pääsee nestettä, on verk-
kopistoke irrotettava välittömästi. Sen
jälkeen laite on annettava tarkastaa,
ennen kuin se otetaan uudelleen käyt-
töön.
BB1$6B+DDUEXHUVWHB%ERRN6HLWH'RQQHUVWDJ2NWREHU

15
FI
~ Jos laite on päässyt putoamaan veteen,
irrota verkkopistoke välittömästi ja ota
laite vasta tämän jälkeen ylös vedestä.
Älä ota laitetta tällöin enää käyttöön,
vaan anna se ensin ammattimaisen kor-
jaamon tarkastettavaksi.
~ Älä käytä laitetta märin käsin.
VAARA sähköiskusta
~
Älä ota laitetta käyttöön, jos laitteessa tai
liitosjohdossa on näkyviä vaurioita tai jos
laite on aiemmin päässyt putoamaan.
~ Asettele liitosjohto siten, ettei kukaan
voi astua sen päälle, jäädä siihen kiinni
tai kompastua siihen.
~ Liitä verkkopistoke vain säännönmukai-
sesti asennettuun ja helposti saavutetta-
vaan pistorasiaan, jonka jännite vastaa
tyyppikilvessä olevaa arvoa. Pisto-
rasian on oltava myös liittämisen jäl-
keen hyvin saavutettava.
~ Pidä huolta siitä, ettei liitosjohto pääse
vaurioitumaan terävien kulmien tai kuu-
mien paikkojen takia. Älä kierrä liitos-
johtoa laitteen ympärille (vaara johdon
murtumisesta!).
~ Pidä huolta siitä, ettei liitosjohto joudu
puristuksiin eikä litistetyksi.
~ Irrottaaksesi verkkopistokkeen pisto-
rasiasta, vedä aina verkkopistokkees-
ta, äläkä koskaan liitosjohdosta.
~ Irrota verkkopistoke pistorasiasta, …
… jokaisen käyttökerran jälkeen,
… jos sattuu häiriö,
… kun et käytä laitetta,
… ennen kuin puhdistat laitteen ja
… aina ukonilmalla.
~ Turvateknisistä syistä tuotteen rakentee-
seen ei saa tehdä muutoksia. Myös-
kään liitäntäjohtoa ei pidä uusia itse.
Vie laite kunnostettavaksi aina ammatti-
taitoiseen korjaamoon tai valmistajan
huoltokeskukseen.
~ Älä koskaan yritä poistaa laitteen sisäl-
tä pölyä tai vieraita aineita terävien esi-
neiden (esim. varsikamman) avulla.
VAARA palovaara
~ Älä koskaan jätä sähköverkkoon liitet-
tyä laitetta ilman valvontaa.
~ Laitetta ei saa peittää eikä asettaa peh-
meälle alustalle (esim. pyyhkeiden pääl-
le). Laske päälle kytketty/kuuma laite
aina kiinteälle, tasaiselle, lämmönkestä-
välle pinnalle.
VAARA palovammoista
~ Älä koske laitteen kuumiin pintoihin.
~ Anna laitteen jäähtyä kokonaan ennen
sen puhdistamista tai säilytyspaikkaan
asettamista.
VAROITUS aineellisista vahingoista
~ Käytä vain alkuperäisiä varusteita.
~ Älä koskaan aseta laitetta kuumille pin-
noille (esim. liesilevyille) tai lämmönläh-
teiden tai avotulen läheisyyteen.
~ Väkeviä tai hankaavia puhdistusaineita
ei saa käyttää.
~ Älä aseta laitetta alttiiksi alle -10 °C tai
yli +40 °C asteen lämpötiloille.
4. Toimituksen sisältö
1 hiusten suoristusharja
1 käyttöohje
Ennen ensimmäistä käyttöä
• Poista kaikki pakkausmateriaalit lait-
teesta.
• Tarkasta, ettei laitteessa ole vaurioita.
BB1$6B+DDUEXHUVWHB%ERRN6HLWH'RQQHUVWDJ2NWREHU

16
FI
5. Käyttö
VAARA - palovaara!
~ Laitetta ei saa peittää eikä asettaa peh-
meälle alustalle (esim. pyyhkeiden pääl-
le). Laske päälle kytketty/kuuma laite
aina kiinteälle, tasaiselle, lämmönkestä-
välle pinnalle.
VAARA palovammoista!
~ Älä koske harjan kuumaan keraamipin-
noitteiseen osaan|6.
OHJE:
• Kytke laite päälle ennen ensimmäistä
käyttöä ja anna sen olla kytkettynä
muutama minuutti korkeimmalla lämpö-
tilalla (180 °C). Valmistussyistä johtuen
saattaa tällöin esiintyä hieman hajun-
muodostusta. Tämä on vaaratonta ja il-
maantuu vain ensimmäisen käytön
yhteydessä. Huolehdi huoneen hyvästä
tuuletuksesta.
5.1 Kytkeminen päälle/pois
päältä ja lämpötilan
säätö
1. Aseta laite lämmönkestävälle alustalle.
2. Liitä verkkopistoke|1 vain määräysten
mukaisesti asennettuun ja helposti saa-
vutettavaan pistorasiaan, jonka jännite
vastaa tyyppikilvessä olevaa arvoa. Pis-
torasian on oltava myös liittämisen jäl-
keen hyvin saavutettava.
3. Paina n. 2 sekunnin ajan päälle-/
poispainiketta |3 laitteen käynnistä-
miseksi. Näyttöön|5 ilmaantuu 150.
4. Säädä painikkeilla +/–|4 toivottu läm-
pötila välille 100 °C ja 180 °C,
10 °C:n askelin. Pian tämän jälkeen
näytöllä myötäpäivään juoksevat LED-
segmentit osoittavat|5 sen, että laite
lämpenee.
OHJE: vastapäivään juoksevat LED-seg-
mentit osoittavat laitteen jäähtymisen.
Aloita suoristus vasta kun toivottu lämpötila
näkyy näytöllä.
5. Voit välttää lämpötilan vaihtamisen va-
hingossa +/–|4 lukitsemalla tämän pai-
nikkeen.
- Paina n. 2 sekunnin ajan jompaa-
kumpaa painiketta +/–|4. Nyt pai-
nikkeet on lukittu. Näyttöön|5
ilmaantuu .
- Paina uudelleen n. 2 sekunnin ajan
jompaakumpaa painiketta +/–|4.
Nyt painikkeet eivät ole lukittuina.
Näytössä|5 sammuu .
6. Paina painiketta |3 n. 2 sekunnin
ajan sammuttaaksesi laitteen.
7. Anna laitteen jäähtyä lämmönkestäväl-
lä alustalla.
Automaattinen sammuminen
Laite sammuu automaattisesti, jos sen pai-
nikkeisiin ei kosketa 45 minuuttiin. Tätä en-
nen vilkkuu näytöllä|5 lämpötilailmoitus.
Paina n. 2 sekunnin ajan päälle-/pois pääl-
tä-painiketta |3 laitteen käynnistämiseksi
uudelleen.
BB1$6B+DDUEXHUVWHB%ERRN6HLWH'RQQHUVWDJ2NWREHU

17
FI
5.2 Muotoilu
Oikea lämpötila
VAROITUS!
~ Liian korkea lämpötila, liian pitkä kon-
takti hiuksiin tai liian usein toistuva suo-
ristus voivat vaurioittaa hiuksia. Samoja
hiuksia ei pidä käsitellä toistuvasti use-
aan kertaan varsinkaan korkeilla läm-
pötiloilla.
• Aloita matalimmalla lämpötilalla, jota
suositellaan käsitellylle hiusrakenteelle.
• Nosta lämpötilaa vähitellen, jos suoris-
tus kestää erityisen kauan.
Suoristus
1. Kuivaa hiukset.
2. Kampaa hiukset huolellisesti.
3. Aloita matalimmalla lämpötilalla, jota
suositellaan käsitellylle hiusrakenteelle
(katso taulukko).
4. Erota yksi hiussuortuva ja harjaa tämä
suoraksi. Harjaa tasaisesti hiusten juu-
rista latvoihin. Älä viivy yhdessä kohtaa
liian pitkään. Huomaa pitää riittävä
etäisyys päänahkaan!
5. Suorista näin suortuvittain kaikki hiuk-
set.
6. Sammuta laite päälle-/pois päältä -
painikkeella |3 ja anna laitteen jääh-
tyä.
7. Irrota verkkopistoke|1 pistorasiasta.
8. Anna hiusten jäähtyä hetki, ennen kuin
käsittelet niitä muotoilu- tai hoitotuotteil-
la.
6. Puhdistus
VAARA sähköiskusta!
~
Irrota verkkopistoke|
1
pistorasiasta ennen
hiusten suoristusharjan puhdistamista.
~
Anna laitteen jäähtyä ennen puhdistusta.
VAROITUS aineellisista vahingoista!
~ Väkeviä tai hankaavia puhdistusaineita
ei saa käyttää.
• Harjaan takertuneet hiukset on paras ir-
rottaa sormin.
• Puhdista laite säännöllisesti. Pyyhi laite
kevyesti kostutetulla liinalla.
7. Säilytys
VAROITUS aineellisista vahingoista!
~ Älä kierrä johtoa laitteen ympärille
(vaara johdon murtumisesta!).
• Anna laitteen jäähtyä.
• Ripustuslenkin|2 avulla voit varmasti ja
kätevästi ripustaa laitteen säilytykseen.
8. Osien hävittäminen
Tämä tuote on eurooppalai-
sen direktiivin 2012/19/EU
alainen. Yliviivattu jätekontti
on kaikissa EU-maissa käytet-
ty symboli, joka merkitsee,
että kyseinen tuote ei kuulu
kotitalousjätteiden joukkoon vaan on hävitet-
tävä erikseen. Ohjeet koskevat sekä itse tuo-
tetta että samalla symbolilla varustettuja
lisätarvikkeita. Näin merkittyjä tuotteita ei
saa heittää kotitalousjätteiden joukkoon,
vaan ne on vietävä keräyspisteeseen, joka
on tarkoitettu sähköisen ja elektronisen ro-
mun kierrätykseen. Kierrätys auttaa vähentä-
mään jätteiden määrää ja suojelemaan
ympäristöä.
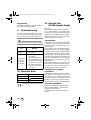
Hiusrakenne
Suositeltu
lämpötila
vaaleaksi värjätyt, valkaistut 100 - 120 °C
ohuet, värjätyt 120 - 140 °C
normaalista vahvaan, kemi-
allisesti käsittelemättömät
140 - 180 °C
BB1$6B+DDUEXHUVWHB%ERRN6HLWH'RQQHUVWDJ2NWREHU

18
FI
Pakkaus
Pakkausmateriaalien hävittämisessä on nou-
datettava maakohtaisia asetuksia ja ympä-
ristönsuojelumääräyksiä.
9. Häiriötapauksessa
Mikäli laite ei sattuisi toimimaan normaalisti,
käy ensin läpi seuraava tarkastuslista. Ehkä
kyseessä on pieni ongelma, jonka pystyy rat-
kaisemaan itse.
VAARA sähköiskusta!
~ Laitetta ei pidä missään tapauksessa
yrittää korjata itse.
10. Tekniset tiedot
Oikeudet teknisiin muutoksiin pidä-
tetään.
11. Takuun antaja on
HOYER Handel GmbH
Arvoisa asiakas,
tällä laitteella on 3 vuoden takuu ostopäi-
västä lukien. Jos tämä tuote on viallinen, si-
nulla on lakisääteisiä oikeuksia tuotteen
myyjää vastaan. Näitä lakisääteisiä oikeuk-
sia ei rajoiteta seuraavassa esitellyn takuum-
me puitteissa.
Takuuehdot
Takuuaika alkaa ostopäivästä. Säilytä alku-
peräinen ostokuitti huolellisesti. Tätä kuittia
tarvitaan kaupan todisteena.
Jos kolmen vuoden sisällä tämän tuotteen os-
topäivästä lukien ilmaantuu materiaali- tai
valmistusvirhe, tulemme valintamme mukaan
maksutta joko korjaamaan tai korvaamaan
tuotteen. Tämä takuu edellyttää viallisen lait-
teen ja ostotositteen (ostokuitti) esittämisen
kolmen vuoden määräajan sisällä ja lyhyttä
kirjallista kuvausta siitä, mikä laitteessa on
vikana ja milloin vika ilmaantui.
Jos vika kuuluu myöntämämme takuun pii-
riin, saat korjatun tai uuden tuotteen takai-
sin. Korjauksen tai tuotteen vaihtamisen
seurauksena takuuaika ei ala uudelleen.
Takuuaika ja lakisääteiset
vaatimukset
Takuuaika ei pitene takuusuorituksen seu-
rauksena. Tämä koskee myös vaihdettuja ja
korjattuja osia. Mahdollisesti jo oston yhtey-
dessä olemassa olevat vauriot ja viat on il-
moitettava heti pakkauksen avaamisen
jälkeen. Takuuajan päättymisen jälkeen suo-
ritettavat korjaukset ovat maksullisia.
Takuun laajuus
Laite on valmistettu tarkkoja laatuvaatimuk-
sia noudattaen ja tarkastettu huolellisesti en-
nen toimitusta.
Takuu kattaa materiaali- tai valmistusvirheet.
Vika
Mahdollinen syy /
apukeino
Ei ole
Toiminto
• Onko virransyöttö var-
mistettu?
Virheilmoi-
tukset näy-
töllä (E1, E2,
E3, E4)
1. Irrota verkkopistoke|1
pistorasiasta.
2. Anna laitteen jäähtyä.
3. Aseta verkkopistoke|
1
pistorasiaan ja ota laite
käyttöön. Jos laitetta ei
voi ottaa käyttöön, ota
yhteyttä palvelukeskuk-
seen.
Malli: SHGB 50 A1
Verkkojännite: 220-240 V ~ 50/60 Hz
Suojaluokka: II
Teho: 50 W
BB1$6B+DDUEXHUVWHB%ERRN6HLWH'RQQHUVWDJ2NWREHU
Strona się ładuje...
Strona się ładuje...
Strona się ładuje...
Strona się ładuje...
Strona się ładuje...
Strona się ładuje...
Strona się ładuje...
Strona się ładuje...
Strona się ładuje...
Strona się ładuje...
Strona się ładuje...
Strona się ładuje...
Strona się ładuje...
Strona się ładuje...
Strona się ładuje...
Strona się ładuje...
Strona się ładuje...
Strona się ładuje...
Strona się ładuje...
Strona się ładuje...
Strona się ładuje...
Strona się ładuje...
Strona się ładuje...
Strona się ładuje...
Strona się ładuje...
Strona się ładuje...
Strona się ładuje...
Strona się ładuje...
Strona się ładuje...
Strona się ładuje...
Strona się ładuje...
Strona się ładuje...
Strona się ładuje...
Strona się ładuje...
Strona się ładuje...
Strona się ładuje...
Strona się ładuje...
Strona się ładuje...
Strona się ładuje...
Strona się ładuje...
Strona się ładuje...
Strona się ładuje...
-
 1
1
-
 2
2
-
 3
3
-
 4
4
-
 5
5
-
 6
6
-
 7
7
-
 8
8
-
 9
9
-
 10
10
-
 11
11
-
 12
12
-
 13
13
-
 14
14
-
 15
15
-
 16
16
-
 17
17
-
 18
18
-
 19
19
-
 20
20
-
 21
21
-
 22
22
-
 23
23
-
 24
24
-
 25
25
-
 26
26
-
 27
27
-
 28
28
-
 29
29
-
 30
30
-
 31
31
-
 32
32
-
 33
33
-
 34
34
-
 35
35
-
 36
36
-
 37
37
-
 38
38
-
 39
39
-
 40
40
-
 41
41
-
 42
42
-
 43
43
-
 44
44
-
 45
45
-
 46
46
-
 47
47
-
 48
48
-
 49
49
-
 50
50
-
 51
51
-
 52
52
-
 53
53
-
 54
54
-
 55
55
-
 56
56
-
 57
57
-
 58
58
-
 59
59
-
 60
60
-
 61
61
-
 62
62


Silvercrest SHGB 50 A1 Operating Instructions Manual
- Typ
- Operating Instructions Manual
w innych językach
- Deutsch: Silvercrest SHGB 50 A1
- svenska: Silvercrest SHGB 50 A1
- English: Silvercrest SHGB 50 A1
- suomi: Silvercrest SHGB 50 A1
Powiązane artykuły
-
Silvercrest SHGB 50 C1 Instrukcja obsługi
-
Silvercrest 101393 Operating Instructions Manual
-
Silvercrest SKMK 1200 A1 Operating Instructions Manual
-
-
-
-
-
-
Inne dokumenty
-
Dometic Frigo Instrukcja obsługi
-
-
ULTIMATE SPEED UAMM 12 A1 Operating Instructions Manual
-
Dometic CoolAir SP950T Instrukcja instalacji
-
-
-
-
-
LIVARNO 499334 Instrukcja obsługi