
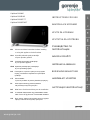
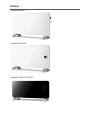
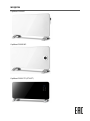
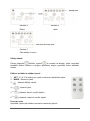
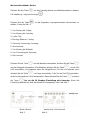
OptiHeat 2000MP
OptiHeat 2000EWP
OptiHeat 2000GTPT
OptiHeat 2000GTWPT
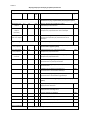
EN Please read these instructions before installing
or using this appliance for the first time
SLO Navodila preberite pred postavitvijo
ali prvo uporabo grelnika.
HR Pročitajte upute prije postavljanja
ili prve uporabe grijalice.
SRB Uputstva pročitajte pre postavljanja
ili prve upotrebe grejača.
RU Пожалуйста, прочтите данную инструкцию
перед установкой и первой эксплуатацией
прибора.
CZ Před instalací
či prvním použitím si prosím přečtěte tyto pokyny.
PL Przeczytać instrukcję przed montażem
lub pierwszym użyciem grzejnika
DE Bitte lesen Sie diese Anleitung vor der Installation
HU A készülék felszerelése vagy használatba vétele
előtt olvassa el figyelmesen a használati utasítást.
UA Будь ласка, уважно прочитайте дану інструкцію
перед початком експлуатації пристрою
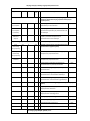
EN
SL
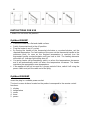
INSTRUCTIONS FOR USE
NAVODILA ZA UPORABO
UPUTE ZA UPORABU
UPUTSTVA ZA UPOTREBU
РУКОВОДСТВО ПО
ЭКСПЛУАТАЦИИ
NÁVOD K POUŽITÍ
INSTRUKCJA OBSŁUGI
BEDIENUNGSANLEITUNG
HASZNÁLATI UTASÍTÁS
ІНСТРУКЦІЯ З ЕКСПЛУАТАЦІЇ
SRB
HR
SL
RUS
CZ
PL
DE
HUN
UA
www.gorenje.com
www.g

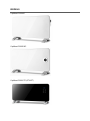
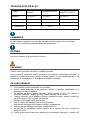
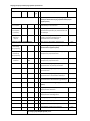
MODELS
OptiHeat 2000MP
OptiHeat 2000EWP
OptiHeat 2000GTP(GTWPT)

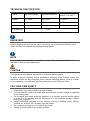
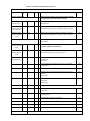
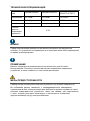
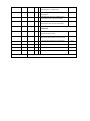
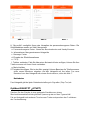
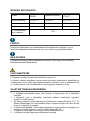
TECHNICAL SPECIFICATION
Details
OptiHeat 2000MP
OptiHeat 2000EWP
OptiHeat
2000GTP(GTWPT)
Voltage
220-240V~
220-240V~
220-240V~
Frequency
50/60Hz
50/60Hz
50/60Hz
Power
1000/2000W
1000/2000W
1000/2000W
IP Waterproof
IP24
IMPORTANT
Before plugging the unit into the mains, ensure by visual inspection that the unit is
intact and has not suffered any damage during transit.
NOTE
These heaters are intended for domestic use only. They can be used either as
portable or wall-mounted appliances.
CAUTION
The appliance must always be placed on a flat and stable surface.
In order to avoid a hazard due to inadvertent resetting of the thermal cutout, this
appliance should not be connected via an external switching device, such as a timer,
or connected to a circuit that is regularly switched on and off by the utility.
FOR YOUR OWN SAFETY
1. Read all the instructions before using the heater.
2. Only connect the heater to a single-phase socket with a mains voltage as specified
on the rating plate.
3. Do not leave your home while the appliance is in function: ensure that the switch
is in the OFF (0) position and the thermostat is in the minimum position. Always
unplug the appliance.
4. Keep combustible materials such as furniture, cushions, bedding, paper, clothes,
curtains etc. at least 100 cm away from the heater.
5. Do not place anything on or in front of the heater.
6. Always use the heater in an upright position.

7. Do not place the heater against walls, furniture, curtains, etc.
8. Do not use the appliance in rooms with a surface area of less than 4 m².
9. Always unplug the heater when not in use. Do not pull the cord to unplug the heater.
10. Keep the air inlet and outlet free from objects at least 1 m in front of and 50 cm
behind the heater.
11. Do not install the heater immediately under a socket outlet.
12. Do not let animals or children touch or play with the heater. Please note that the
air outlet becomes hot during operation.
13. Do not cover. If covered, overheating may occur.
14. Do not use this heater in the vicinity of showers, bath tubs, wash basins or a
swimming pool etc.
15. Do not use the heater in rooms containing explosive gas, flammable solvents,
varnish or glue.
16. Keep the heater clean. Do not allow any objects to enter any ventilation or exhaust
opening as this may cause electric shock, fire or damage to the heater.
17. If the heater has been dropped or damaged it should not be used until it has been
inspected by a qualified service center.
18. Close supervision is necessary when the heater is being used by or near children,
persons suffering from any physical impairment or pets.
19. Do not use to dry clothes or other textiles.
20. Do not use the heater to dry your laundry. Never obstruct the intake and outlet
grilles (overheating hazard).
21. Do not move the appliance while it is functioning in order to avoid overheating or a
fire.
22. If any part of the heater or power supply cord becomes damaged, it must be
replaced by a qualified electrician in order to avoid a hazard.
23. The heater must not be placed immediately under a socket outlet.
24. Do not use this heater with a programmer, timer or any other device that switches
the heater on automatically, since a fire risk exists if the heater is covered or
positioned incorrectly.
25. Do not leave the heater switched on when leaving your home or going to sleep.
26. Children should be supervised to ensure that they do not play with the appliance.
27. This appliance can be used by children aged from 8 years and above and by
persons with reduced physical, sensory or mental capabilities or lack of experience
or knowledge if they have been given supervision or instruction concerning the use
of the appliance in a safe way and understand the hazards involved.
28. Children shall not play with the appliance. Cleaning and user maintenance shall
not be made by children without supervision.
29. Children younger than 3 years should be kept away unless continuously
supervised.
30. Children aged from 3 years and less than 8 years shall only switch on/off the
appliance provided that it has been placed or installed in its intended normal
operating position and they have been given supervision or instruction concerning
use of the appliance in a safe way and understand the hazards involved.
31. Children aged from 3 years to 8 years shall not plug in, regulate and clean the
appliance or perform user maintenance.
Do not leave the heater unattended when plugged into the mains. Some parts of
the heater can become very hot and cause burns. Do not touch hot surfaces.
Particular attention must be paid where children and vulnerable people are
present.

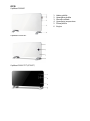
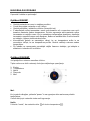
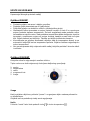
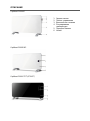
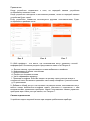
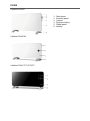
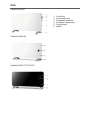
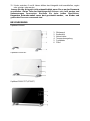
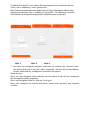
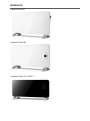
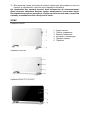
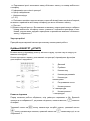
DESCRIPTION
OptiHeat 2000MP
1. Back panel
2. Control Panel
3. Power switch
4. Temperature control
5. Front panel
6. Feet
OptiHeat 2000EWP
OptiHeat 2000GTPT(GTWPT)

PRODUCT FEATURES
• Elegant glass panel (OptiHeat 2000GTPT(GTWPT))
• High quality aluminium heating element – quick heating with higher energy
savings
• Touch control (OptiHeat 2000EWP and 2000GTPT(GTWPT))
• Timer
• Thermostat
• Mechanical control (OptiHeat 2000MP)
• LED display (OptiHeat 2000EWP and 2000GTPT(GTWPT))
• WIFI (OptiHeat 2000EWP)
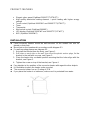
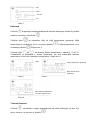
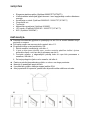
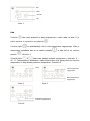
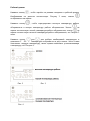
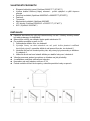
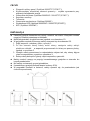
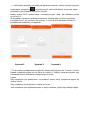
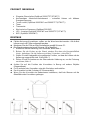
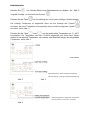
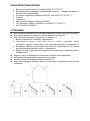
INSTALLATION
⚫ Panel convector heaters should be wall-mounted. All the models can also be
placed on their feet.
⚫ Mount feet on the baseboard in accordance with diagram G1.
⚫ For wall mounting please see diagram G2.
1. Uninstall the bracket from the body, see Figure 1.
2. Drill holes on each side on the wall, then insert the plastic anchor plugs, fix the
bracket in the wall with a screw, see Figure 2.
3. Place the heater into a suitable position ensuring that the holes align with the
bracket, see Figure 3.
4. Tighten the screw on top of the bracket, see Figure 4.
⚫ Pay attention to the position of the convector heater with regard to other objects.
⚫ It is forbidden to place the heater under a socket.
⚫ The convector heater has an IP rating of IP24
⚫ If you place the heater in a bathroom, make sure it is protected from water.
G1

G2
INSTRUCTIONS FOR USE
Caution! Do not cover the product!
OptiHeat 2000MP
• Place the heater on a flat and stable surface.
• Switch thermostat knob in the off position.
• Plug the heater in an AC socket.
• By turning the handle of the thermostat clockwise or counterclockwise, set the
required temperature. For fast heating of the room set the thermostat handle to the
maximum level. As soon as the required temperature is reached, turn the
thermostat handle counterclockwise until you hear a click. The heating elements
will switch off. Indicator light will be also off.
• Convector heater will automatically switch on when the temperatures decreases
and it will automatically switch off when the temperature increases. The heater
maintains the appropriate room temperature.
• If the appliance will not be used for a longer period of time, switch it off using the
power switch and pull the cable out of the plug.
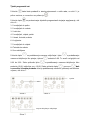
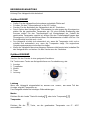
OptiHeat 2000EWP
Insert the plug in a suitable power socket.
The touch screen buttons located on the product correspond to the remote control
functions:
1. display
2. temperature
3. mode
4. timer
5. power

Power
When the heater is connected to the mains, press “power” . The upper part of the
display shows the temperature.
The heater is working at a low power.
Mode
Press “mode” to set low , or high temperature .
Temperature
Press the button to select the desired temperature within the range of 5°- 40°C.
Timer
The timer button can be set to start or stop the appliance at the desired time, with a
time interval between 1 hour and 24 hours.
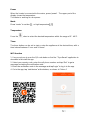
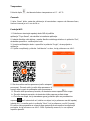
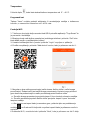
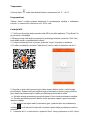
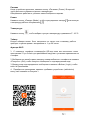
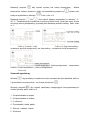
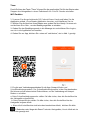
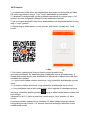
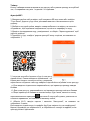
WiFi function
1. Use your phone to scan the QR code below or find the “Tuya Smart” application to
download and install the app.
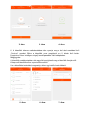
2. Select your country code, enter the cell phone number and tap “Get” to get a
message containing the verification code.
3. Enter the verification code in the message and tap“Login” to log in to the app.
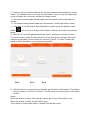
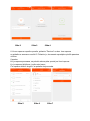
4. Go to the app, tap “add device” at the bottom, as shown in Picture 1

5. There are two connection methods for the app (hotspot mode and quick connect
mode). The default mode is the quick connect mode. Users can tap the upper right
corner to switch the connection method to hotspot mode.
a. For quick connect mode, please make sure the device’s control light flashes
quickly.
b. For hotspot mode, please make sure the device’s control light flashes slowly.
c. If the light is not flashing as described above, please press the device’s reset
button for 5 seconds or longer until it flashes correctly as shown in the picture
below.
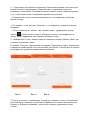
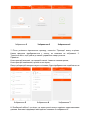
6. Select Wi-Fi, enter the password and tap “Next”, as shown in Picture 2 below.
For quick connect mode, the App interface will go through the changes during the
network configuration of the process as shown in Picture 3. Picture 4 shows the
interface when the device is connected successfully.
Pic 2 Pic 3 Pic 4
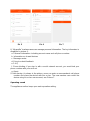
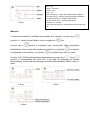
6. After the device is connected successfully, tap “Devices” at the bottom. The device
name is shown on the list in Picture 5. Tap it to enter the control panel of the smart
socket.
Notes:
When the device is online, there will be a green dot in front of the device icon;
When the device is offline, the dot will be grey;
If the device is shared with others, a double loop will be shown.

Pic 5 Pic 6 Pic 7
8. “My profile” is where users can manage personal information. The key informaton is
displayed in picture 6:
a. Personal information: including account name and cell phone number
b. Information on shared devices
c. Message center
d. Entry to submit feedback
e.F.A.Q
f. Phone binding: if you sign in with a social network account, you must bind your
phone number with your account
g. About
9. Add sharing: As shown in the picture, users can enter a new member’s cell phone
number and share the device with him or her. The new member can control the
device using his or her own account, see Picture 7.
Operating sound
The appliance emits a beep upon each operation setting.

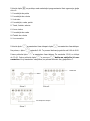
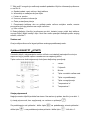
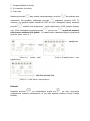
OptiHeat 2000GTPT(GTWPT)
Insert the plug into a suitable AC socket with the same voltage as shown on its rating
plate.
The touch screen buttons located on the product correspond to the remote control
functions:
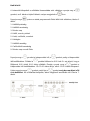
Standby Mode
First switch on the heater using the switch on the side. The display is as shown in
image 1, i.e. standby mode, no heating, is shown on the display.
To set the hours, hold the button, to set minutes hold the button, to set the
day, hold the button, see image 1.
Image 1
1. Display
2. Receiver
3. Minutes button
4. Mode button
5. Setting button
6. Heating button
7. Temperature“+“ button
8. Temperature“-“ button

Work Mode
Press to switch from standby mode to work mode, the display is shown below in
image 2, is displayed on the screen.
Press the button to set a higher or lower temperature of heating. A lower
temperature is set when is shown on the screen, and a higher temperature is set
when is shown on the screen. See image 2.
Press or button to select the desired temperature from a range of 5° - 40°C.
The temperature is shown by means of two numbers. The two numbers on the left
show the current temperature, while the numbers on the right show the set temperature,
see image 3.
Image 2 Image 3
Image 4
Weekly timer Mode
Press to change the mode from standby mode to work mode, image 5 shows the
display. is displayed on the screen.
Press the button to select between the following pre-programmed heating periods.
See image 6.

1. Mon. to Fri.
2. Mon. to Sat.
3. Every day
4. Mon., Wed., Fri.
5. Tues., Thur., Sat.
6. Weekend
7. Mon. to Wed.
8. Thur. to Sat.
9. All normal.
Press the button to set the start time, and press the button to set the stop
time. For example, press button to set the clock to 9:00. This means the heater
will operate from 0:00 to 9:00. Then press the button to set the stop time. If you
set the time to 12:00, the heater will switch off at 12:00. Then press and
again until the 24 hour setting is finished. When the setting is completed, the current
time will be displayed. See image 7.
Image 5 Image 6
Image 7

Child lock
Hold the button until is displayed on the screen and the device can no longer
be operated. To terminate the child lock function, repeat the process.
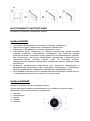
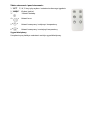
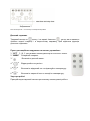
Remote control and control panel:
1. “
SET
” P, W, S are three modes to select and set the current week.
2. “
MODE
” Select week.
3. “ ” Set child lock.
4.
“ ”
Adjust the power.
5. “ ” Set the operation time and increase the temperature.
6. “ ” Set the operation time and decrease temperature.
Operating sound
The appliance emits a beep upon each operation setting.
CLEANING
• Before cleaning the appliance pull the plug out of the socket and wait until it cools
down.
• Do not use abrasives and solvents. Wipe the product with a soft damp cloth.
• Remove dust from the surface regularly.
• Do not wash the product or place it in water!
• If you are not going to use the heater for a long period of time, wipe it clean and
store it in a box.
• The appliance should be placed in a dry and ventilated room. Avoid high humidity
and mechanical impacs on the appliance
Attention! The manufacturer does not assume any liability for any damage
caused directly or indirectly by not following this instruction manual, general
safety rules, or interference in the construction of the product.
This marking indicates that this product should not be disposed with other household
wastes throughout the EU. To prevent possible harm to the environment or
human health from uncontrolled waste disposal, recycle it responsibly to
promote the sustainable reuse of material resources. To return your used
device, please use the return and collection systems or contact the retailer
where the product was purchased. They can take this product for environmental safe
recycling.

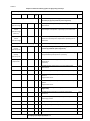
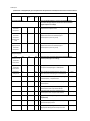
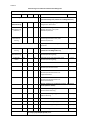
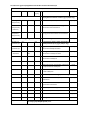
Table 2
Requirements for electric local space heaters
Model identifier(s): OptiHeat 2000 MP
Item
Symbol
Value
Unit
Item
Unit
Heat output
Tpye of heat input, for electric storage local space heaters
only (select one)
Nominal heat
output
Pnom
2.0
kW
manual heat charge control, with integrated
thermostat
[no]
Minimum
heat output
(indicative)
Pmin
1.0
kW
manual heat charge control with room
and/or outdoor temperature feedback
[no]
Maximum
continuous
heat output
Pmax,c
2.0
kW
electronic heat charge control with room
and/or outdoor temperature feedback
[no]
Auxiliary electricity consumption
fan assisted heat output
[no]
At nominal
heat output
elmax
2.0
kW
Type of heat output/room temperature control (select
one)
At minimum
heat output
elmin
1.0
kW
single stage heat output and no room
temperature control
[no]
In standby
mode
elSB
0
kW
Two or more manual stages, no room
temperature control
[no]
with mechanic thermostat room
temperature control
[yes]
with electronic room temperature control
[no]
electronic room temperature control plus
day timer
[no]
electronic room temperature control plus
week timer
[no]
Other control options (multiple selections possible)
room temperature control, with presence
detection
[no]
room temperature control, with open
window detection
[no]
with distance control option
[no]
with adaptive start control
[no]
with working time limitation
[no]
with black bulb sensor
[no]
Contact details
Gorenje gospodinjski aparati, d.o.o.

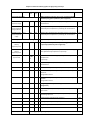
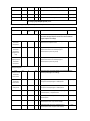
Requirements for electric local space heaters
Model identifier(s): OptiHeat 2000 EWP
Item
Symbol
Value
Unit
Item
Unit
Heat output
Tpye of heat input, for electric storage local space heaters
only (select one)
Nominal heat
output
Pnom
2.0
kW
manual heat charge control, with integrated
thermostat
[no]
Minimum
heat output
(indicative)
Pmin
0.001
kW
manual heat charge control with room
and/or outdoor temperature feedback
[no]
Maximum
continuous
heat output
Pmax,c
2.0
kW
electronic heat charge control with room
and/or outdoor temperature feedback
[no]
Auxiliary electricity consumption
fan assisted heat output
[no]
At nominal
heat output
elmax
0
kW
Type of heat output/room temperature control (select
one)
At minimum
heat output
elmin
0
kW
single stage heat output and no room
temperature control
[no]
In standby
mode
elSB
0.001
kW
two or more manual stages, no room
temperature control
[no]
with mechanic thermostat room
temperature control
[no]
with electronic room temperature control
[no]
electronic room temperature control plus
day timer
[no]
electronic room temperature control plus
week timer
[yes]
Other control options (multiple selections possible)
room temperature control, with presence
detection
[no]
room temperature control, with open
window detection
[no]
with distance control option
[yes]
with adaptive start control
[no]
with working time limitation
[no]
with black bulb sensor
[no]
Contact details
Gorenje gospodinjski aparati, d.o.o.

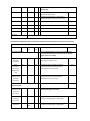
Requirements for electric local space heaters
Model identifier(s): OptiHeat 2000 GTPT / OptiHeat 2000 GTWPT
Item
Symbol
Value
Unit
Item
Unit
Heat output
Tpye of heat input, for electric storage local space heaters
only (select one)
Nominal heat
output
Pnom
2.0
kW
manual heat charge control, with integrated
thermostat
[no]
Minimum
heat output
(indicative)
Pmin
0
kW
manual heat charge control with room
and/or outdoor temperature feedback
[no]
Maximum
continuous
heat output
Pmax,c
2.0
kW
electronic heat charge control with room
and/or outdoor temperature feedback
[no]
Auxiliary electricity consumption
fan assisted heat output
[no]
At nominal
heat output
elmax
--
kW
Type of heat output/room temperature control (select
one)
At minimum
heat output
elmin
--
kW
single stage heat output and no room
temperature control
[no]
In standby
mode
elSB
0.0017
42
kW
two or more manual stages, no room
temperature control
[no]
with mechanic thermostat room
temperature control
[no]
with electronic room temperature control
[no]
electronic room temperature control plus
day timer
[no]
electronic room temperature control plus
week timer
[yes]
Other control options (multiple selections possible)
room temperature control, with presence
detection
[no]
room temperature control, with open
window detection
[no]
with distance control option
[no]
with adaptive start control
[yes]
with working time limitation
[yes]
with black bulb sensor
[no]
Contact details
Gorenje gospodinjski aparati, d.o.o.

MODELI
OptiHeat 2000MP
OptiHeat 2000EWP
OptiHeat 2000GTP(GTWPT)

TEHNIČNE SPECIFIKACIJE
Podatki
OptiHeat
2000MP
OptiHeat 2000EWP
OptiHeat
2000GTP(GTWPT)
Napetost
220-240 V~
220-240 V~
220-240 V~
Frekvenca
50/60 Hz
50/60 Hz
50/60 Hz
Moč
1000/2000 W
1000/2000 W
1000/2000 W
IP Vodotesnost
IP24
POMEMBNO
Preden napravo priključite na omrežje, opravite vizualni pregled, če je v dobrem
stanju in če je morda bila poškodovana med transportom.
OPOMBA
Ti grelniki so namenjeni le uporabi v gospodinjstvu. Uporabljate jih lahko kot
prenosne naprave ali jih namestite na steno.
PREVIDNO
Grelnik vedno postavite na ravno in stabilno površino.
Da bi preprečili nevarnost zaradi nenamerne ponastavitve toplotnega prekinjala, te
naprave ne priključujte preko zunanje stikalne priprave, kot je programska ura in ne
priključujte je na napeljavo, ki se pogosto priklaplja in izklaplja.
ZA VAŠO VARNOST
1. Pred uporabo grelnika preberite vsa navodila.
2. Grelnik lahko priključite le na enofazno vtičnico z omrežno napetostjo, ki je
navedena na napisni ploščici.
3. Ko odidete od doma, grelnik izklopite: stikalo obrnite na OFF (0) (izklop) in
termostat nastavite v najnižji položaj. Vedno izvlecite vtič iz vtičnice.
4. Vnetljivi materiali, kot je pohištvo, blazine, posteljnina, papir, obleke, zavese itd.
naj bodo najmanj 100 cm stran od grelnika.
5. Ničesar ne polagajte na ali pred grelnik.
6. Grelnik vedno uporabljajte v pokončnem položaju.
7. Grelnika ne obračajte proti stenam, pohištvu, zavesam itd.
8. Grelnika ne uporabljajte v prostorih, manjših od 4 m
2
.
9. Ko grelnika ne uporabljate, vedno izvlecite vtič iz vtičnice. Pri tem ne vlecite za
priključni vrvico.
10. Pustite prost pretok zraka (brez kakršnih koli predmetov) najmanj 1 m pred in 50

cm za grelnikom.
11. Grelnika ne nameščajte neposredno pod električno vtičnico.
12. Otroci ali živali se naj ne dotikajo in se naj ne igrajo z grelnikom. Pazite, med
delovanjem se zelo segreje področje, kjer izhaja zrak.
13. Grelnika ne pokrivajte. Če je pokrit, lahko pride do pregrevanja.
14. Grelnika ne uporabljajte v bližini tušev, kopalnih kadi, umivalnikov, bazena itd.
15. Ne uporabljajte ga v prostorih, kjer so eksplozivni plin, vnetljiva topila, lak ali lepilo.
16. Grelnik naj bo vedno čist. Pazite, da v prezračevalne ali izpušne odprtine ne pride
kakšen predmet, ker bi lahko povzročil električni udar, požar ali poškodbe na
grelniku.
17. Če grelnik pade ali če je poškodovan, ga ne uporabljajte, dokler ga ne pregleda
osebje strokovno usposobljenega servisa.
18. Bodite pozorni, če grelnik uporabljajo ali so v njegovi bližini otroci, osebe s fizičnimi
okvarami ali domače živali.
19. Ne uporabljajte ga za sušenje oblačil ali kakršnih koli tkanin.
20. Grelnika ne uporabljajte za sušenje perila. Pazite, da vstopne in izstopne mreže
niso prekrite (možnost pregrevanja).
21. Med delovanjem grelnika ne premikajte, da ne pride do pregrevanja in s tem do
dodatne nevarnosti požara.
22. Če se kateri koli del grelnika ali priključna vrvica poškoduje, jo mora zamenjati
strokovno usposobljeni električar, da preprečite nevarnosti.
23. Grelnika ne postavljajte neposredno pod vtičnico.
24. Tega grelnika ne uporabljajte s programatorjem, programsko uro ali katerokoli
napravo, ki samodejno vklaplja grelnik, ker obstaja nevarnost požara, če je grelnik
pokrit ali nepravilno postavljen.
25. Ko odhajate od doma ali ko se odpravljate spat, grelnika ne pustite vklopljenega.
26. Pazite, da se otroci ne igrajo s tem izdelkom.
27. Ta izdelek lahko uporabljajo otroci od 8 leta starosti naprej. Osebe z zmanjšanimi
fizičnimi, zaznavnimi in psihičnimi sposobnostmi ali osebe brez izkušenj ali
poznavanja izdelka lahko izdelek uporabljajo, če so pod nadzorom ali če dobijo
ustrezna navodila za uporabo izdelka na varen način in če razumejo nevarnosti,
povezane z uporabo le-tega.
28. Pazite, da se otroci ne igrajo s tem izdelkom. Otroci ne smejo čistiti ali vzdrževati
izdelka brez nadzora.
29. Otroci, mlajši od 3 let, ne smejo biti bližini aparata oz. morajo biti vedno pod
nadzorom.
30. Otroci od 3 do 8 let lahko le vklopijo/izklopijo grelnik, če je zagotovljeno, da je
postavljen ali instaliran v predvideni normalni delovni položaj in če so pod
nadzorom ali če ste jih poučili o varni uporabi naprave in če razumejo morebitne
nevarnosti.
31. Otroci od 3 do 8 let ga ne smejo priključiti na električno omrežje, nastavljati ali čistiti
ter opravljati uporabniškega vzdrževanja.
Grelnika ne puščajte brez nadzora, ko je priključen na električno napajanje.
Nekateri deli tega grelnika se lahko zelo segrejejo in povzročijo opekline. Ne
dotikajte se vročih površin. Bodite posebej pozorni, če so v bližini otroci ali
ranljive osebe.
Strona się ładuje...
Strona się ładuje...
Strona się ładuje...
Strona się ładuje...
Strona się ładuje...
Strona się ładuje...
Strona się ładuje...
Strona się ładuje...
Strona się ładuje...
Strona się ładuje...
Strona się ładuje...
Strona się ładuje...
Strona się ładuje...
Strona się ładuje...
Strona się ładuje...
Strona się ładuje...
Strona się ładuje...
Strona się ładuje...
Strona się ładuje...
Strona się ładuje...
Strona się ładuje...
Strona się ładuje...
Strona się ładuje...
Strona się ładuje...
Strona się ładuje...
Strona się ładuje...
Strona się ładuje...
Strona się ładuje...
Strona się ładuje...
Strona się ładuje...
Strona się ładuje...
Strona się ładuje...
Strona się ładuje...
Strona się ładuje...
Strona się ładuje...
Strona się ładuje...
Strona się ładuje...
Strona się ładuje...
Strona się ładuje...
Strona się ładuje...
Strona się ładuje...
Strona się ładuje...
Strona się ładuje...
Strona się ładuje...
Strona się ładuje...
Strona się ładuje...
Strona się ładuje...
Strona się ładuje...
Strona się ładuje...
Strona się ładuje...
Strona się ładuje...
Strona się ładuje...
Strona się ładuje...
Strona się ładuje...
Strona się ładuje...
Strona się ładuje...
Strona się ładuje...
Strona się ładuje...
Strona się ładuje...
Strona się ładuje...
Strona się ładuje...
Strona się ładuje...
Strona się ładuje...
Strona się ładuje...
Strona się ładuje...
Strona się ładuje...
Strona się ładuje...
Strona się ładuje...
Strona się ładuje...
Strona się ładuje...
Strona się ładuje...
Strona się ładuje...
Strona się ładuje...
Strona się ładuje...
Strona się ładuje...
Strona się ładuje...
Strona się ładuje...
Strona się ładuje...
Strona się ładuje...
Strona się ładuje...
Strona się ładuje...
Strona się ładuje...
Strona się ładuje...
Strona się ładuje...
Strona się ładuje...
Strona się ładuje...
Strona się ładuje...
Strona się ładuje...
Strona się ładuje...
Strona się ładuje...
Strona się ładuje...
Strona się ładuje...
Strona się ładuje...
Strona się ładuje...
Strona się ładuje...
Strona się ładuje...
Strona się ładuje...
Strona się ładuje...
Strona się ładuje...
Strona się ładuje...
Strona się ładuje...
Strona się ładuje...
Strona się ładuje...
Strona się ładuje...
Strona się ładuje...
Strona się ładuje...
Strona się ładuje...
Strona się ładuje...
Strona się ładuje...
Strona się ładuje...
Strona się ładuje...
Strona się ładuje...
Strona się ładuje...
Strona się ładuje...
Strona się ładuje...
Strona się ładuje...
Strona się ładuje...
Strona się ładuje...
Strona się ładuje...
Strona się ładuje...
Strona się ładuje...
Strona się ładuje...
Strona się ładuje...
Strona się ładuje...
Strona się ładuje...
Strona się ładuje...
Strona się ładuje...
Strona się ładuje...
Strona się ładuje...
Strona się ładuje...
Strona się ładuje...
Strona się ładuje...
Strona się ładuje...
Strona się ładuje...
Strona się ładuje...
Strona się ładuje...
Strona się ładuje...
Strona się ładuje...
Strona się ładuje...
Strona się ładuje...
Strona się ładuje...
Strona się ładuje...
Strona się ładuje...
Strona się ładuje...
Strona się ładuje...
-
 1
1
-
 2
2
-
 3
3
-
 4
4
-
 5
5
-
 6
6
-
 7
7
-
 8
8
-
 9
9
-
 10
10
-
 11
11
-
 12
12
-
 13
13
-
 14
14
-
 15
15
-
 16
16
-
 17
17
-
 18
18
-
 19
19
-
 20
20
-
 21
21
-
 22
22
-
 23
23
-
 24
24
-
 25
25
-
 26
26
-
 27
27
-
 28
28
-
 29
29
-
 30
30
-
 31
31
-
 32
32
-
 33
33
-
 34
34
-
 35
35
-
 36
36
-
 37
37
-
 38
38
-
 39
39
-
 40
40
-
 41
41
-
 42
42
-
 43
43
-
 44
44
-
 45
45
-
 46
46
-
 47
47
-
 48
48
-
 49
49
-
 50
50
-
 51
51
-
 52
52
-
 53
53
-
 54
54
-
 55
55
-
 56
56
-
 57
57
-
 58
58
-
 59
59
-
 60
60
-
 61
61
-
 62
62
-
 63
63
-
 64
64
-
 65
65
-
 66
66
-
 67
67
-
 68
68
-
 69
69
-
 70
70
-
 71
71
-
 72
72
-
 73
73
-
 74
74
-
 75
75
-
 76
76
-
 77
77
-
 78
78
-
 79
79
-
 80
80
-
 81
81
-
 82
82
-
 83
83
-
 84
84
-
 85
85
-
 86
86
-
 87
87
-
 88
88
-
 89
89
-
 90
90
-
 91
91
-
 92
92
-
 93
93
-
 94
94
-
 95
95
-
 96
96
-
 97
97
-
 98
98
-
 99
99
-
 100
100
-
 101
101
-
 102
102
-
 103
103
-
 104
104
-
 105
105
-
 106
106
-
 107
107
-
 108
108
-
 109
109
-
 110
110
-
 111
111
-
 112
112
-
 113
113
-
 114
114
-
 115
115
-
 116
116
-
 117
117
-
 118
118
-
 119
119
-
 120
120
-
 121
121
-
 122
122
-
 123
123
-
 124
124
-
 125
125
-
 126
126
-
 127
127
-
 128
128
-
 129
129
-
 130
130
-
 131
131
-
 132
132
-
 133
133
-
 134
134
-
 135
135
-
 136
136
-
 137
137
-
 138
138
-
 139
139
-
 140
140
-
 141
141
-
 142
142
-
 143
143
-
 144
144
-
 145
145
-
 146
146
-
 147
147
-
 148
148
-
 149
149
-
 150
150
-
 151
151
-
 152
152
-
 153
153
-
 154
154
-
 155
155
-
 156
156
-
 157
157
-
 158
158
-
 159
159
-
 160
160
-
 161
161
-
 162
162
-
 163
163
-
 164
164
-
 165
165


Gorenje OPTIHEAT 2000GTPT Instrukcja obsługi
- Typ
- Instrukcja obsługi
- Niniejsza instrukcja jest również odpowiednia dla
w innych językach
- slovenčina: Gorenje OPTIHEAT 2000GTPT Návod na obsluhu
Powiązane artykuły
Inne dokumenty
-
Vonroc CH513AC Convector Heater Instrukcja obsługi
-
MILL CO2200MECMAX Instrukcja obsługi
-
 MALTEC Grzejnik Olejowy Termostat ProOil2500W WiFi Instrukcja obsługi
-
MILL MAX WIFI 1500W GULVVARMER Instrukcja obsługi
-
Vonroc EH516AC Instrukcja obsługi
-
Master HL 200 Instrukcja obsługi
-
MILL CUS1800MECWA Instrukcja obsługi
-
-
-
ECG TK 1510 Instrukcja obsługi
