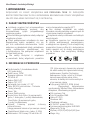
FLASH F7100751 Instrukcja obsługi
- Kategoria
- Sztuczne oświetlenie
- Typ
- Instrukcja obsługi

User Manual
Instrukcja Obsługi
F7100751
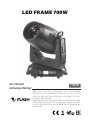
LED FRAME 700W
(EN) THANK YOU FOR PURCHASING THIS FLASH-BUTRYM
PRODUCT. BEFORE BEGINNING TO OPERATE THIS UNIT, PLEASE
READ THE INSTRUCTIONS CAREFULLY TO ENSURE THE BEST
POSSIBLE PERFORMANCE.
(PL) DZIĘKUJEMY ZA ZAKUP PRODUKTU FLASH-BUTRYM. PRZED
ROZPOCZĘCIEM OBSŁUGI TEGO URZĄDZENIA NALEŻY UWAŻNIE
PRZECZYTAĆ INSTRUKCJĘ, ABY ZAPEWNIĆ NAJLEPSZĄ MOŻLIWĄ
WYDAJNOŚĆ.

Please keep this User Manual for future
consultation. If you sell the xture to another
user, be sure that they also receive this
instruction booklet.
Unpack and check carefully there is no
transportation damage before using the xture.
Before operating, ensure that the voltage and
frequency of power supply match the power
requirements of the xture.
It’s important to ground the yellow/green
conductor to earth in order to avoid electric
shock.
Disconnect main power before servicing and
maintenance.
Use safety chain when xes this xture. Don’t
handle the xture by taking its head only, but
always by taking its base.
Maximum ambient temperature is: 40°C Don’t
operate it where the temperature is higher than
this.
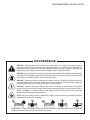
WARNING! The Led Moving Head (LMH) has a powerful pan motor. The torque reaction when
the head is panned suddenly can cause the base to move if the fixture is standing unsecured on
a surface. Do not apply power to the LMH unless the baase is securely fastened to a surface or to
rigging hardware.
WARNING! Use 2 clamps to rig the fixture. Do not hang the fixture from only one clamp. Lock
each clamp with both 1/4-turn fasteners. Fasteners are locked only when turned a full 90 clockwise.
WARNING! When clamping the fixture to a truss or other structure at any other angle than with
the yoke hanging vertically downwards, use two clamps of half-coupler type. Do not use any type of
clamp that does not completely encircle the structure when fastened.
WARNING! Position or shade the head so that the front lens will not be exposed to sunlight or any
other strong light source from any angle - even for a few seconds. See Figure 1. The LMH lens
can focused the sun's rays, creating a potential fire hazard and causing damage.
IMPORTANT! Do not point strong light output from other fixtures at the LMH, as intense
illumination can damaged the display.
In the event of serious operating problem,
stop using the xture immediately. Never try
to repair the xture by yourself. Repairs carried
out by unskilled people can lead to damage
or malfunction. Please contact the nearest
authorized technical assistance center. Always
use the same type spare parts.
Do not connect the device to any dimmer
pack.
Do not touch any wire during operation and
there might be a hazard of electric shock.
To prevent or reduce the risk of electrical
shock or re, do not expose the xture to rain
or moisture.
The housing must be replaced if they are
visibly damaged.
Do not look directly at the LED light spot while
the xture is on.
2. SAFETY INFORMATION
1. INTRODUCTION
THANK YOU FOR PURCHASING LED FRAME 700W. FOR SAFETY REASONS AND TO
ENSURE THE TROUBLE-FREE OPERATION, CAREFULLY READ THE INSTRUCTIONS.
User Manual • Instrukcja Obsługi
Figure 1. Lenses can focused sunlight and strong light, presenting a risk of fire and damage to the fixture.
Shield or shade the head if necessary.
WARNING

LED FRAME 700W • Art No F7100751
The unit should be mounted via its screw
holes on the bracket. Always ensure that
the unit is firmly fixed to avoid vibration
and slipping while operating. Always
ensure that the structure to which you are
attaching the unit is secure and is able to
support a weight of 10 times of the unit’s
5.1 Connecting DMX signal
The connection is performed using cable with
XLR-female -> XLR-Male plugs.
4. INSTALLATION
5. CONNECTION
3. PRODUCT INFORMATION
weight. Also always use a safety cable
that can hold 12 times of the weight of
the unit when installing the fixture. The
equipment must be fixed by professionals.
And it must be fixed at a place where is
out of the touch of people and has no one
pass by or under it.
The device is equipped with the following
interfaces:
1. DMX (in/out): XLR 3(5)-pin socket
2. Power (in/out): powerCON socket
CAUTION! At the last xture, the
DMX signal has to be terminated with
a terminator. Solder a resistor
between signal (-) and signal (+) into a
XLR plug and plug it in the DMX output of
the last xture.
1
3
22
FEMALE
XLR
GROUND
DMX +
DMX -
MALE
XLR
3
1
3-pin XLR
1
FEMALE
XLR
GROUND
DMX +
DMX -
MALE
XLR
2
3
4
5
1
2
3
45
5-pin XLR
Light Source: 1 Standard LED (Single color)
Power consumption: 700W
Power supply voltage: 110-240V,
50/60Hz AC
PAN range: 540°
TILT range: 270°
Beam angle (min/max): 5°-55°
Color: 8000K, Color wheel - 7 colors
+ white (open)
Zoom: Yes
Focus: Electronic
Gobo wheel: Roto Gobo: (6 interchangeable
gobos, 1 xed gobo, 1 empty) indexed,
Fixed Gobo: (8 interchangeable gobos,
1 empty) indexed
Prism: 3-wall prism, 6-sided linear prism
(can work together at the same time)
Flash frequency min./max: 0-20Hz
Features: Linear CRI lter from 68 to 90
CRI. Animation wheel: Dynamic ame or
water effect with no rotation limit,
indexed. CTO.
Framing: 4 knives + 90 degrees rotation
mounted close to each other, which
means that you can sharpen each knife at
the same time
Operating modes: DMX 512, RDM, Artnet
(Optional), Auto-running, Master/Salve,
Sound active, Built-in program
Frost lter: Yes
36 DMX channel mode.
IP Rating: IP20
Housing made: ABS
Cooling: Active
AC IN/OUT: powerCON IP65
3-Pin XLR DMX Input/Output
Net Weight: 36kg
Dimensions: H(90,5)xW(56)xD(45,5) cm
Weight: 6 kg

The connection is performed using
power cable with PowerCon connector
(included). The device must be
operated by qualified personnel.
1. Press „Menu” to „Set DMX Address”,
and press „ENTER” keys to enter into.
2. Show „Set DMX Address DMX Address:
001”, Press the „UP and DOWN” keys to
amended.
5.2 Voltage specification
5.5 Set DMX Address Code
Input Voltage Total Power Frequency
110~240V AC 700W 50/60Hz
5.3 Connecting power supply
CAUTION! In the case of cable damage do not attempt to repair.
Replacement or repair can be made only on the manufacturer or by
a person with appropriate permissions.
Make sure that the power grid supply
parameters are consistent with device
parameters and limitations are not exceeded.
Using lamp, the change rate of power voltage should be within
±10%, if the voltage is too high, it will shorten the light’s life; if it’s not
enough, the lamp will be dark. Please restart it after turning off light
for 20 minutes until full-cooling. Frequent switching will reduce the
life span of lamps and bulbs; intermittent using will improve the life
of bulbs and lamps.
3. Press „ENTER” keys to save and Exit,
Press the „MENU” Keys does not save
and Exit.
DMX
Controller DMX 512 DMX 512 120
Ω
User Manual • Instrukcja Obsługi

6. DMX CHANNELS
36 CH Mode
CH Function Value Description
1PAN 0-255 0-540
2 PAN Fine 0-255 0-2
3 Tilt 0-255 0-270
4 Tilt Fine 0-255 0-1
5 Pan/Tilt Speed 0-255 From Fast » Slow
6 Strobe 0-3 OFF
4-127 Pulse Strobe from Slow » Fast
128-191 Gradual Strobe from Slow » Fast
192-251 Random Strobe from Slow » Fast
252-255 ON
7 Dimmer 0-255 0-100% Linear Dimmer
8 C 0-255
9 M 0-255
10 Y 0-255
11 CTO 0-255
12 Color 0-127 Linear Color
128-137 Red
138-146 Green
147-155 Blue
156-164 Yellow
165-173 Magenta
174-182 Orange
183-191 Pink
192-222 Clockwise color effect Fast » Slow
223-224 STOP
225-255 Anticlockwise color effect from Slow » Fast
13 CRI 0-79 Mover away
80-255 Insert
LED FRAME 700W • Art No F7100751

CH Function Value Description
14 Fixed Gobo 0-9 White (OPEN)
10-19 Gobo 1
20-29 Gobo 2
30-39 Gobo 3
40-49 Gobo 4
50-59 Gobo 5
60-69 Gobo 6
70-79 Gobo 7
80-89 Gobo 8
90-99 Gobo 1 (Shake)
100-109 Gobo 2 (Shake)
110-119 Gobo 3 (Shake)
120-129 Gobo 4 (Shake)
130-139 Gobo 5 (Shake)
140-149 Gobo 6 (Shake)
150-159 Gobo 7 (Shake)
160-169 Gobo 8 (Shake)
170-212 Gobo rotation Clockwise Fast >> Slow
213-215 STOP
216-255 Gobo rotation Anticlockwise Slow >> Fast
15 Rotation Gobo 0-9 White (Open)
10-19 Rot. Gobo 1
20-29 Rot. Gobo 2
30-39 Rot. Gobo 3
40-49 Rot. Gobo 4
50-59 Rot. Gobo 5
60-69 Rot. Gobo 6
70-79 Rot. Gobo 1 (Shake)
80-89 Rot. Gobo 2 (Shake)
90-99 Rot. Gobo 3 (Shake)
100-109 Rot. Gobo 4 (Shake)
User Manual • Instrukcja Obsługi

CH Function Value Description
110-119 Rot. Gobo 5 (Shake)
120-129 Rot. Gobo 6 (Shake)
130-190 Rot. Gobo rotation Anticlockwise Fast>>Slow
191-192 STOP
193-255 Rot. Gobo rotation Anticlockwise Slow>>Fast
16 Indexed Gobo Rot. 0-127 Indexde Gobo Rotation
128-190 Clockwise Rotation Fast >> Slow
191-192 STOP
193-255 Anticlockwise Rotation Slow >> Fast
17 Effect Insert 0-255
18 Effect Rotation 0-128 Anticlockwise Eff. Rotation Slow >> Fast
129-255 Clockwise Eff. Rotation Slow >> Fast
19 Focus 0-255
20 Focus ne 0-255
21 Zoom 0-255
22 Prism 1 0-63 Empty
64-127 Prism 1
128-191 Prism 2
192-255 Prism 1 + Prism 2
23 Prism 1 Rotation 0-127 Prism Indexed
128-187 Prism Rotation Clockwise Fast >> Slow
188-195 STOP
196-255 Prism Rot. Anticlockwise Slow >> Fast
24 Prism 2 Rotation 0-127 Prism Indexed
128-187 Prism Rotation Clockwise Fast >> Slow
188-195 STOP
196-255 Prism Rot. Anticlockwise Slow >> Fast
25 Frost 0-127 Frost OFF
128-255 Frost ON
26 Blade 1 0-255 Linear Insert - Left Top
27 Blade 2 0-255 Linear Insert - Left Down
LED FRAME 700W • Art No F7100751

User Manual • Instrukcja Obsługi
CH Function Value Description
28 Blade 3 0-255 Linear Insert - Right Down
29 Blade 4 0-255 Linear Insert - Right Top
30 Blade 5 0-255 Linear Insert - Top Left
31 Blade 6 0-255 Linear Insert - Top Right
32 Blade 7 0-255 Linear Insert - Down Left
33 Blade 8 0-255 Linear Insert - Down Right
34 Blade wheel 0-255 Blades Rotation Anticlockwise
35 Iris 0-127 Indexed Open >> Close
128-255 Speed Pulse Close >> Open (Slow >> Fast)
36 Function 0-209 Empty
210-219 Reset XY after 3 sec.
220-235 Reset effect motor after 4 sec.
240-255 Reset whole unit after 5 sec.

LED FRAME 700W • Art No F7100751

User Manual • Instrukcja Obsługi

OSTRZEŻENIE
UWAGA!
UWAGA!
UWAGA!
UWAGA!
Patrz rysunek 1.
Rysunek 1.
LED FRAME 700W • Art No F7100751

2. ZASADY BEZPIECZEŃSTWA
1. WPROWADZENIE
3. INFORMACJE O PRODUKCIE
DZIĘKUJEMY ZA ZAKUP URZĄDZENIA LED PROFILOWA 700W. ZE WZGLĘDÓW
BEZPIECZEŃSTWA ORAZ W CELU ZAPEWNIENIA BEZAWARYJNEJ PRACY URZĄDZENIA
NALEŻY DOKŁADNIE ZAPOZNAĆ SIĘ Z INSTRUKCJĄ.
Instalacja powinna być przeprowadzana
przez wykwalikowany personel, aby
zminimalizować ryzyko przypadkowego
porażenia prądem.
Przed instalacją urządzenia należy odłączyć
urządzenie od sieci.
Przed podłączeniem urządzenia do sieci
energetycznej należy sprawdzić, czy nie
jest ono uszkodzone mechanicznie. Jeżeli
widoczne są jakiekolwiek ślady uszkodzenia
należy niezwłocznie skontaktować się
z dystrybutorem. Nie podłączać urządzenia
do sieci elektrycznej.
Nie należy korzystać z urządzenia
w warunkach dużej wilgotności powietrza
oraz w temperaturze powyżej 40°C
Aby uniknąć uszkodzeń nie należy
stosować rozpuszczalników organicznych do
czyszczenia powłoki urządzenia.
Urządzenie należy instalować na stabilnych
konstrukcjach.
Urządzenie powinno być zainstalowane
w dobrze wentylowanym pomieszczeniu,
w odległości co najmniej 15cm od najbliższej
powierzchni (ściany, sutu itp). Jednocześnie
należy upewnić się, że otwory wentylacyjne
nie są zatkane oraz wentylatory działają
poprawnie.
User Manual • Instrukcja Obsługi
Źródło światła: 1 standardowa dioda
LED (jeden kolor)
Pobór mocy: 700W
Napięcie zasilania: 110-240V,
50/60Hz AC
Zakres PAN: 540°
Zakres TILT: 270°
Kąt wiązki (min./maks.): 5°-55°
Kolor: 8000 K, koło kolorów - 7 kolorów
+ biały (otwarty)
Zoom: Tak
Focus: Elektroniczny
Tarcza Gobo: Roto Gobo: (6 wymiennych)
gobo, 1 stałe gobo, 1 puste) indeksowane,
Fixed Gobo: (8 wymiennych gobo,
1 pusty) zindeksowany
Pryzmat: 3-ścienny pryzmat, 6-stronny
pryzmat liniowy
(mogą pracować razem w tym samym czasie)
Częstotliwość błysku min./maks.: 0-20Hz
Właściwości: Filtr liniowy CRI od 68 do 90
CRI. Koło animacji: dynamiczny płomień
lub efekt wodny bez ograniczenia rotacji,
indeksowane. Dyrektor Techniczny.
Kadrowanie: 4 noże + obrót o 90 stopni
zamontowane blisko siebie, które
oznacza, że każdy nóż można ostrzyć w
o tym samym czasie
Tryby pracy: DMX 512, RDM, Artnet
(Opcjonalnie), Automatyczne
uruchamianie, Master/Salve, Aktywowanie
dźwiękiem, Wbudowany program
Filtr mrozowy: Tak
Tryb 36 kanałów DMX.
Ocena IP: IP20
Obudowa: ABS
Chłodzenie: aktywne
AC IN/OUT: powerCON IP65
3-pinowe wejście/wyjście XLR DMX
Waga netto: 36 kg
Wymiary: W(90,5)xS(56)xG(45,5)cm
Waga: 6 kg

2. POŁĄCZENIA
4.INSTALACJA
Po wyjęciu urządzenia z opakowania należy
sprawdzić czy nie zostało ono uszkodzone
podczas transportu. Przed podłączeniem
do sieci elektrycznej należy upewnić się,
że urządzenie zamocowane jest stabilnie.
Producent nie ponosi odpowiedzialności za
uszkodzenia spowodowane niestabilnym
zamocowaniem urządzenia.
Podczas korzystania z urządzenia należy zadbać
o poprawne podłączenie go do sieci elektrycznej
oraz prawidłowe uziemienie. Należy upewnić
się, że parametry sieci elektrycznej są zgodne z
wymaganiami urządzenia. Wszelkie czynności
obejmujące obsługę w zakresie podłączania
urządzenia do sieci elektrycznej powinny być
wykonywane przez wykwalikowany personel.
Połączenie odbywa się przy użyciu przewodu
z wtyczkami XLR-Żeński -> XLR-Męski
Urządzenie wyposażone jest w następujące
interfejsy:
1. DMX (wejście/wyjście) – złącza: XLR 3(5)-pin
2. Zasilanie (wejście/wyjście) – złącze:
powerCON
1
3
22
FEMALE
XLR
GROUND
DMX +
DMX -
MALE
XLR
3
1
3-pin XLR
1
FEMALE
XLR
GROUND
DMX +
DMX -
MALE
XLR
2
3
4
5
1
2
3
45
5-pin XLR
Na ostatnim urządzeniu
sygnał DMX musi być zakończony
terminatorem. Wlutuj rezystor
między sygnał (-) a sygnał (+) do wtyczki
XLR i podłącz go do wyjścia DMX
ostatniego urządzenia.
LED FRAME 700W • Art No F7100751
DMX
Controller DMX 512 DMX 512 120
Ω
5.2 Specyfikacja zasilania
Napięcie Zasilania Pobór Mocy Częstotliwość zasilania
100~240V AC 700W 50/60Hz

User Manual • Instrukcja Obsługi
Połączenie odbywa się przy użyciu
przewodu zakończonego z jednej strony
wtyczką sieci elektrycznej i wtyczką typu
powerCON z drugiej strony (w zestawie).
Urządzenie musi być obsługiwane przez
UWAGA! W przypadku uszkodzenia przewodu nie należy dokonywać
samodzielnej naprawy. Wymiana lub naprawa może być wykonana jedynie
w serwisie producenta lub przez osobę z odpowiednimi uprawnieniami.
wykwalifikowany personel techniczny.
Należy upewnić się, że parametry
zasilania sieci energetycznej są zgodne
z parametrami urządzenia i nie zostają
przekroczone ograniczenia dotyczące
poboru energii elektrycznej z sieci.

6. LISTA KANAŁÓW DMX
Tryb 36 CH
LED FRAME 700W • Art No F7100751
CH Function Value Description
1PAN 0-255 0-540
2 PAN Fine 0-255 0-2
3 Tilt 0-255 0-270
4 Tilt Fine 0-255 0-1
5 Pan/Tilt Speed 0-255 From Fast » Slow
6 Strobe 0-3 OFF
4-127 Pulse Strobe from Slow » Fast
128-191 Gradual Strobe from Slow » Fast
192-251 Random Strobe from Slow » Fast
252-255 ON
7 Dimmer 0-255 0-100% Linear Dimmer
8 C 0-255
9 M 0-255
10 Y 0-255
11 CTO 0-255
12 Color 0-127 Linear Color
128-137 Red
138-146 Green
147-155 Blue
156-164 Yellow
165-173 Magenta
174-182 Orange
183-191 Pink
192-222 Clockwise color effect Fast » Slow
223-224 STOP
225-255 Anticlockwise color effect from Slow » Fast
13 CRI 0-79 Mover away
80-255 Insert

User Manual • Instrukcja Obsługi
CH Function Value Description
14 Fixed Gobo 0-9 White (OPEN)
10-19 Gobo 1
20-29 Gobo 2
30-39 Gobo 3
40-49 Gobo 4
50-59 Gobo 5
60-69 Gobo 6
70-79 Gobo 7
80-89 Gobo 8
90-99 Gobo 1 (Shake)
100-109 Gobo 2 (Shake)
110-119 Gobo 3 (Shake)
120-129 Gobo 4 (Shake)
130-139 Gobo 5 (Shake)
140-149 Gobo 6 (Shake)
150-159 Gobo 7 (Shake)
160-169 Gobo 8 (Shake)
170-212 Gobo rotation Clockwise Fast >> Slow
213-215 STOP
216-255 Gobo rotation Anticlockwise Slow >> Fast
15 Rotation Gobo 0-9 White (Open)
10-19 Rot. Gobo 1
20-29 Rot. Gobo 2
30-39 Rot. Gobo 3
40-49 Rot. Gobo 4
50-59 Rot. Gobo 5
60-69 Rot. Gobo 6
70-79 Rot. Gobo 1 (Shake)
80-89 Rot. Gobo 2 (Shake)
90-99 Rot. Gobo 3 (Shake)
100-109 Rot. Gobo 4 (Shake)

LED FRAME 700W • Art No F7100751
CH Function Value Description
110-119 Rot. Gobo 5 (Shake)
120-129 Rot. Gobo 6 (Shake)
130-190 Rot. Gobo rotation Anticlockwise Fast>>Slow
191-192 STOP
193-255 Rot. Gobo rotation Anticlockwise Slow>>Fast
16 Indexed Gobo Rot. 0-127 Indexde Gobo Rotation
128-190 Clockwise Rotation Fast >> Slow
191-192 STOP
193-255 Anticlockwise Rotation Slow >> Fast
17 Effect Insert 0-255
18 Effect Rotation 0-128 Anticlockwise Eff. Rotation Slow >> Fast
129-255 Clockwise Eff. Rotation Slow >> Fast
19 Focus 0-255
20 Focus ne 0-255
21 Zoom 0-255
22 Prism 1 0-63 Empty
64-127 Prism 1
128-191 Prism 2
192-255 Prism 1 + Prism 2
23 Prism 1 Rotation 0-127 Prism Indexed
128-187 Prism Rotation Clockwise Fast >> Slow
188-195 STOP
196-255 Prism Rot. Anticlockwise Slow >> Fast
24 Prism 2 Rotation 0-127 Prism Indexed
128-187 Prism Rotation Clockwise Fast >> Slow
188-195 STOP
196-255 Prism Rot. Anticlockwise Slow >> Fast
25 Frost 0-127 Frost OFF
128-255 Frost ON
26 Blade 1 0-255 Linear Insert - Left Top
27 Blade 2 0-255 Linear Insert - Left Down

User Manual • Instrukcja Obsługi
CH Function Value Description
28 Blade 3 0-255 Linear Insert - Right Down
29 Blade 4 0-255 Linear Insert - Right Top
30 Blade 5 0-255 Linear Insert - Top Left
31 Blade 6 0-255 Linear Insert - Top Right
32 Blade 7 0-255 Linear Insert - Down Left
33 Blade 8 0-255 Linear Insert - Down Right
34 Blade wheel 0-255 Blades Rotation Anticlockwise
35 Iris 0-127 Indexed Open >> Close
128-255 Speed Pulse Close >> Open (Slow >> Fast)
36 Function 0-209 Empty
210-219 Reset XY after 3 sec.
220-235 Reset effect motor after 4 sec.
240-255 Reset whole unit after 5 sec.

LED FRAME 700W • Art No F7100751

www.ash-butrym.pl
F7100751
-
 1
1
-
 2
2
-
 3
3
-
 4
4
-
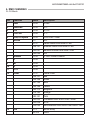 5
5
-
 6
6
-
 7
7
-
 8
8
-
 9
9
-
 10
10
-
 11
11
-
 12
12
-
 13
13
-
 14
14
-
 15
15
-
 16
16
-
 17
17
-
 18
18
-
 19
19
-
 20
20


FLASH F7100751 Instrukcja obsługi
- Kategoria
- Sztuczne oświetlenie
- Typ
- Instrukcja obsługi
w innych językach
- English: FLASH F7100751 User manual
Powiązane artykuły
Inne dokumenty
-
Cameo OPUS® SP5+ Instrukcja obsługi
-
Flash-Butrym Flash-Butrym F7100770 Moving Head LED 150W Spot Instrukcja obsługi
-
Cameo Auro Spot 200 Instrukcja obsługi
-
-
-
Beamz Fuze75S Spot 75W LED Moving Head Instrukcja obsługi
-
Beamz Pro IGNITE180B Instrukcja obsługi
-
CHAUVET DJ Intimidator Spot LED 350 instrukcja obsługi
-