
MÖJLIG
GB
PL
PL


PL
PL
ENGLISH 4
POLSKI 17
Language, JĠzyk
Country, Kraj

Contents
Safety information 4
Safety instructions 5
Product description 7
Daily use 7
Helpful hints and tips 8
Care and cleaning 8
What to do if… 9
Technical data 9
noitallatsnI11
Energy efficiency 14
Environment concerns 14
IKEA GUARANTEE 15
Subject to change without notice.
Safety information
Before the installation and use of the appliance, carefully read
the supplied instructions. The manufacturer is not responsible if
an incorrect installation and use causes injuries and damages.
Always keep the instructions with the appliance for future refer-
ence.
Children and vulnerable people safety
Warning! Risk of suffocation, injury or permanent disability.
This appliance can be used by children aged from 8 years
and above and persons with reduced physical, sensory or
mental capabilities or lack of experience and knowledge if
they are supervised by an adult or a person who is responsi-
ble for their safety.
Do not let children play with the appliance.
Keep all packaging away from children.
Keep children and pets away from the appliance when it op-
erates or when it cools down. Accessible parts are hot.
Cleaning and user maintenance shall not be made by chil-
dren without supervision.
General Safety
The appliance and its accessible parts become hot during
use. Do not touch the heating elements.
Do not operate the appliance by means of an external timer
or separate remote-control system.
ENGLISH 4

• Unattended cooking on a hob with fat or oil can be danger-
ous and may result in fire.
• Never try to extinguish a fire with water, but switch off the
appliance and then cover flame e.g. with a lid or a fire blan-
ket.
• Do not store items on the cooking surfaces.
• Do not use a steam cleaner to clean the appliance.
• Metallic objects such as knives, forks, spoons and lids should
not be placed on the hob surface since they can get hot.
Safety instructions
Installation
Warning! Only a qualified person must
install this appliance.
• Remove all the packaging.
• Do not install or use a damaged appli-
ance.
• Obey the installation instruction supplied
with the appliance.
•Always be careful when you move the
appliance because it is heavy. Always
wear safety gloves.
• Seal the cut surfaces with a sealant to
prevent moisture to cause swelling.
• Protect the bottom of the appliance from
steam and moisture.
• Do not install the appliance adjacent to a
door or under a window. This prevents
hot cookware to fall from the appliance
when the door or the window is opened.
• Keep the minimum distance from the oth-
er appliances and units. Refer to the as-
sembly instructions.
• If the appliance is installed above draw-
ers make sure that the space, between
the bottom of the appliance and the up-
per drawer, is sufficient for air circulation.
Refer to the assembly instructions.
• The bottom of the appliance can get hot.
We recommend to install a non-combus-
tile separation panel under the appliance
to prevent access to the bottom.
Electrical connection
Warning! Risk of fire and electrical
shock.
• All electrical connections must be made
by a qualified electrician.
• The appliance must be earthed.
• Before carrying out any operation make
sure that the appliance is disconnected
from the power supply.
• Use the correct electricity mains cable.
• Do not let the electricity mains cable tan-
gle.
• Make sure the mains cable or plug (if ap-
plicable) does not touch the hot appli-
ance or hot cookware, when you connect
the appliance to the near sockets
• Make sure the appliance is installed cor-
rectly. Loose and incorrect electricity
mains cable or plug (if applicable) can
make the terminal become too hot.
• Make sure that a shock protection is in-
stalled.
• Use the strain relief clamp on cable.
• Make sure not to cause damage to the
mains plug (if applicable) or to the mains
cable. Contact the Service or an electri-
cian to change a damaged mains cable.
• The electrical installation must have an
isolation device which lets you disconnect
the appliance from the mains at all poles.
The isolation device must have a contact
opening width of minimum 3 mm.
ENGLISH 5

• Use only correct isolation devices: line
protecting cut-outs, fuses (screw type
fuses removed from the holder), earth
leakage trips and contactors.
Gas connection
• All gas connections should be made by a
qualified person.
• Make sure that there is air circulation
around the appliance.
• The information about the gas supply is
on the rating plate.
• This appliance is not connected to a de-
vice, which evacuates the products of
combustion. Make sure to connect the
appliance according to current installa-
tion regulations. Pay attention to require-
ments regarding adequate ventilation.
Use
Warning! Risk of injury, burns or
electric shock.
• Use this appliance in a household envi-
ronment.
• Do not change the specification of this
appliance.
• Do not let the appliance stay unattended
during operation.
• Do not operate the appliance with wet
hands or when it has contact with water.
• Do not put cutlery or saucepan lids on the
cooking zones. They become hot.
• Set the cooking zone to “off” after use.
• Do not use the appliance as a work or as
a storage surface.
Warning! Risk of fire or explosion.
• Fats and oil when heated can release
flammable vapours. Keep flames or heat-
ed objects away from fats and oils when
you cook with them.
• The vapours that very hot oil releases can
cause spontaneous combustion.
• Used oil, that can contain food remnants,
can cause fire at a lower temperature
than oil used for the first time.
• Do not put flammable products or items
that are wet with flammable products in,
near or on the appliance.
Warning! Risk of damage to the
appliance.
• Do not keep hot cookware on the control
panel.
• Do not let cookware to boil dry.
• Do not activate the cooking zones with
empty cookware or without cookware.
• Do not put aluminium foil on the appli-
ance.
• Do not let acid liquids, for example vine-
gar, lemon juice or limescale remover
touch the hob. This can cause matt patch-
es.
• Provide good ventilation in the room
where the appliance is installed.
• Make sure that the ventilation openings
are not blocked.
• Use only stable cookware with the correct
shape and diameter larger than the di-
mensions of the burners. There is a risk of
overheating and rupture of the glass
plate (if applicable).
• Make sure the flame does not go out
when you quickly turn the knob from the
maximum to the minimum position.
• Make sure pots are centrally positioned
on the rings and do not stick out over
edges of the cooking surface.
• Use only the accessories supplied with
the appliance.
• Do not install a flame diffuser on the
burner.
Care and Cleaning
Warning! Risk of damage to the
appliance.
• Clean regularly the appliance to prevent
the deterioration of the surface material.
• Do not use water spray and steam to
clean the appliance.
• Do not clean the burners in the dishwash-
er.
• Clean the appliance with a moist soft
cloth. Only use neutral detergents. Do not
use abrasive products, abrasive cleaning
pads, solvents or metal objects.
ENGLISH 6

Disposal
Warning! Risk of injury or suffocation.
• Contact your municipal authority for in-
formation on how to discard the appli-
ance correctly.
• Disconnect the appliance from the mains
supply.
• Cut off the mains cable and discard it.
• Flat the external gas pipes.
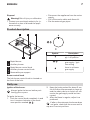
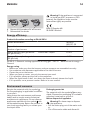
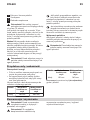
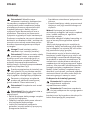
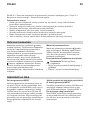
Product description
1 2
5
3
4
1
Rapid burner
2
Auxiliary burner
3
Rapid burner control knob
4
Auxiliary burner control knob
5
Removable pan support
Burner control knob
The hob burner control knob is situated on
the front of the hob .
Symbol Description
there is no gas sup-
ply / off position
there is maximum
gas supply / igni-
tion setting
there is minimum
gas supply
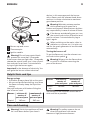
Daily use
Ignition of the burner
Always ignite the burner before posi-
tioning pots or pans.
To ignite the burner:
1. Push the control knob completely in and
turn it counter-clockwise to the maxi-
mum position marked
.
2. Keep the knob pushed for about 5 sec;
this will allow thermocouple to heat up,
and the safety device to switch off, oth-
erwise the gas supply would be inter-
rupted.
3. After the flame is regular, adjust it as
preferred.
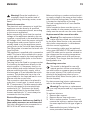
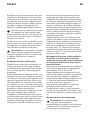
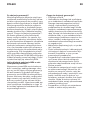
If after a few attempts the burner does
not ignite, check that the crown and its
cap are in correct positions.
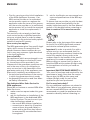
ENGLISH 7

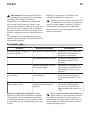
1
2
3
1
Burner cap and crown
2
Thermocouple
3
Ignition candle
Warning! Do not keep control knob
pressed for more than 15 seconds.
If the burner does not light after 15 seconds,
release the control knob, turn it into off posi-
tion and wait for at least 1 minute before
trying to light the burner again.
Important! In the absence of electricity You
can ignite the burner without electrical
device; in this case approach the burner
with a flame, push the relevant knob down
and turn it counter-clockwise to maximum
gas release position.
Warning! Maintain extreme caution
while operating with open fire in
kitchen environment. Manufacturer declines
any responsibility in case of misuse of flame.
If the burner accidentally goes out, turn
the control knob to the off position and
wait for at least 1 minute before trying to
light it again.
When switching on the mains, after in-
stallation or a power cut, it is quite nor-
mal for the spark generator to be activated
automatically.
Turning the burners off
To put the flame out, turn the relevant con-
trol knob to the symbol
.
Warning! Always turn the flame down
or switch it off before removing the
pans of the burner.
Helpful hints and tips
Energy savings
• If possible, always place lids on the pans.
• As soon as liquid starts boiling, turn down
the flame to barley keep the liquid sim-
mering.
Use pots and pans with bottom fitting the
size of burner used.
Burner minimum di-
ameter of
pots and pans
maximum di-
ameter of
pots and pans
Rapid 160 mm 260 mm
Burner minimum di-
ameter of
pots and pans
maximum di-
ameter of
pots and pans
Auxili-
ary
80 mm 160 mm
The bottom of the cookware should be as
thick and flat as possible.
Care and cleaning
Warning! Switch the appliance off and
let it cool down before you clean it.
Warning! For safety reasons, do not
clean the appliance with steam
blasters or high-pressure cleaners.
ENGLISH 8

Warning! Do not use abrasive
cleaners, steel wool pads or acids, they
will damage the appliance.
To remove any food remains wash the
enamelled elements, "caps" and "crowns",
with warm soapy water.
Stainless steel elements wash with water,
and then dry with a soft cloth.
This model is equipped with electrical igni-
tion, it is obtained through ceramic "candle"
with electrode.
Keep them well clean to avoid difficult light-
ning.
Periodically ask your local Service Cen-
tre to check the conditions of the gas
supply pipe and the pressure adjuster, if it is
fitted (this service is not free of charge).
After cleaning, be sure to wipe dry with a
soft cloth.
What to do if…
Problem Possible cause Remedy
There is no spark when
lighting the gas
There is no electrical supply Check that the unit is plug-
ged in and the electrical
supply is switched on.
There is no electrical supply Check the house electric in-
stallation fuse.
Burner cap and Crown are
placed uneven
Check the burner cap and
crown have been replaced
correctly, e.g. after cleaning.
The flame is blowing out im-
mediately after lightning
Thermocouple is not heated
enough
After lightning the flame,
keep the knob pushed for
about 5 sec.
The gas ring burns unevenly Burner crown is blocked with
food residues
Check the main injector is
not blocked and the burner
crown is clear of food parti-
cles.
If there is a fault, first try to find a solution to
the problem yourself. If you cannot find a
solution to the problem yourself, contact
your dealer or the After Sales Service.
If you operated the appliance wrongly,
or the installation was not carried out
by a registered engineer, the visit from the
customer service technician or dealer may
not take place free of charge, even during
the warranty period.
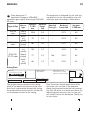
Technical data
Hob dimensions
width 290 mm
depth 520 mm
built in height 45 mm
ENGLISH 9

Class Appliance: 3
Appliance Category: II2ELs3B/P
Appliance gas supply: Natural gas G20 (2E)
20 mbar
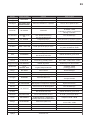
This appliance is designed for use with nat-
ural gas but can be converted for use with
other gas type according to table below.
Type of Gas
Burner
type
Injectors
1/100
mm
Nominal
Power
kW
Nominal
Flow g/h
Reduced
Power kW
by-pass
1/100 mm
G20 20
mbar
Rapid
(large)
120X 2.9 - 0.75 45
Auxili-
ary
(small)
70 1.0 - 0.33 26
G2.350 13
mbar
Rapid
(large)
181 2.9 - 0.75 45
Auxili-
ary
(small)
105 1.0 - 0.33 26
G30/G31
37-37 mbar
Rapid
(large)
77 2.7 196 0.95 45
Auxili-
ary
(small)
46 1.0 73 0.33 26
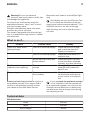
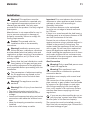
Rating Plate
949738218 H3VF20-G/VI
230 V
~
50 Hz
ZO
0694
PL
S.N.
MÖJLIG HGA2K
II2ELs3B/P (PL)
G20 20 mbar = 3.9 kW
G2.350 13 mbar = 3.9 kW
G30/G31 37/37 mbar = 269 g/h
802-371-50
Made In Italy
© Inter IKEA Systems B.V. 1999
21552
PQM
The graphic above represents the rating
plate of the appliance (without serial num-
ber which is generated dynamically during
the production process), which is located at
its underneath surface of the casing.
Dear Customer, please apply here aside
the sticker you can find in the dedicate
plastic bag inserted inside the hob packag-
ing. This will allow us to assist you better, by
identifying precisely your hob, in case you
will need in future our assistance. Thank you
for your help!
ENGLISH 10

Installation
Warning! This appliance must be
installed, connected or repaired only
by a registered competent person to the
relevant gas standard. Use only parts
provided with the product. Use only original
spare parts.
Manufacturer is not responsible for any in-
jury to persons and pets or damage to
property caused by failure to comply fol-
lowing requirements.
Caution! To proceed with the
installation refer to the assembly
instructions.
Warning! Installation process must
follow the laws, ordinances, directives
and standards (electrical safety rules and
regulations, proper recycling in accordance
with the regulations, etc.) in force in the
country of use!
Ensure that the local distribution condi-
tions (nature of the gas and gas pres-
sure) and the adjustment of the appliance
are compatible before proceeding with the
installation.
The parameters of adjustment setting
for this appliance are stated on the
rating plate (refer to the Technical data
chapter).
Warning! The appliance must be
earthed!
Warning! Risk of injury from electrical
current.
• The electrical mains terminal is live.
• Make electrical mains terminal free of
voltage.
• Loose and inappropriate plug and socket
connections can make the terminal over-
heat.
• Have the clamping connections correctly
installed.
• Use strain relief clamp on cable.
Important! You must observe the minimum
distances to other appliances and furniture
cabinets or other units according to
Assembly Instruction.
The minimum distance to be maintained
from the cut out edge to lateral wall must
be 100 mm.
If there is no oven beneath the hob insert a
dividing panel at a minimum distance of 20
mm from the bottom of the hob.
Protect the cut surfaces of the worktop
against moisture using a suitable sealant in-
cluded in the product in fitting bag. The
sealant seals the appliance to the work top
with no gap. Do not use silicon sealant be-
tween the appliance and the worktop.
Avoid installing the appliance next to doors
and under windows as hot cookware may
be knocked off the pan support when doors
and windows are opened.
Gas Connection
Warning! Only a qualified person must
install this appliance.
Warning! This appliance is not
connected to a combustion products
evacuation device.
Installation must comply with current local
regulation.
The connection of the cooktop to the gas
pipe network or gas cylinder must be made
by means of a rigid copper or steel pipe
with fittings complying with local regula-
tions, or by means of a continuous surface
stainless steel hose complying with local
regulations.
If you see any abnormalities do not re-
pair the pipe, contact local After Sales
Service (refer to the Service chapter).
The connection must be installed correctly,
fixed into hob connection pipe. Otherwise it
will cause leakage of gas
ENGLISH 11

Warning! Once the installation is
complete, check the perfect seal of
every pipe fixing. Use soapy water, never
flame.
Electrical connection
The electrical work necessary to install the
appliance must be done by a qualified
electrician or competent person, according
to the current regulations.
Before connecting, check that the nominal
voltage of the appliance stated on the rat-
ing plate, corresponds to the available sup-
ply voltage. Also, check the power rating of
the appliance and ensure that the wire is
suitably sized to suit the appliance power
rating (refer to the Technical data chapter).
The rating plate is located on the lower cas-
ing of the hob.
The appliance is supplied with a connection
cable. This has to be provided with a prop-
er plug, able to support the load marked on
the identification plate (refer to the Techni-
cal data chapter).
The plug has to be fitted in a proper socket.
If connecting the appliance directly to the
electric system, it is necessary that you in-
stall a double pole switch between the ap-
pliance and the electricity supply, with a
minimum gap of 3 mm between the switch
contacts. The double pole has to be of a
type suitable for the required load in com-
pliance with the current rules.
The connection cable has to be placed in
order that, in each part, it cannot reach a
90 °C temperature. The blue neutral cable
must be connected to the terminal block
marked with "N". The brown (or black)
phase cable (fitted in the terminal block
contact marked with "L") must always be
connected to the live phase.
Electrical Requirements
The manufacturer declines any liability if
these safety measures are not observed.
This hob is designed to be connected to a
230 V 50 Hz AC electrical supply.
Before switching on, make sure the electrici-
ty supply voltage is the same as that indica-
ted on the hob rating plate. The rating plate
is located on the bottom of the hob.
The hob is supplied with a 3 core flexible
supply cord.
Upon completion there must be no cut, or
stray strands of wire present and the cord
clamp must be secure over the outer sheath.
Replacement of the connection cable.
Warning! The replacement of electric
cable must be carried out exclusively
by the After Sales Service or by personnel
with similar competencies, in accordance
with the current regulations.
If the connection cable must be replaced,
only a type H05V2V2-F T90 cable must be
used. The cable section must be suitable to
the voltage and the working temperature.
The yellow/green earth wire must be ap-
proximately 2 cm longer than the brown (or
black) phase wire.
Gas setting conversion
This model is designed for use with
natural gas but can be converted for
use with butane or propane gas providing
the correct injectors. The injectors not sup-
plied with the appliance have to be or-
dered from After Sales Service (refer to the
Service chapter).
For data concerning injector replacement,
refer to the chapter Technical data
Warning! Conversion or replacement
can only be performed by a registered
installer.
To replace injectors:
1. Remove pan support.
2. Remove burner cap and crown.
3. With a socket spanner 7 unscrew and
remove the injectors, replace them with
the ones required for the type of gas in
use.
4. Reassemble the parts, following the
same procedure backwards.
ENGLISH 12

Important! Replace the rating label (placed
near gas supply pipe) with relevant one for
the new type of gas supply before sealing
the appliance. If the appliance is already
sealed please stick it directly on the user
manual booklet after Technical data
chapter close to the rating plate drawing.
You can find this label in package sup-
plied with appliance
If the feeding gas pressure will be dif-
ferent or variable, comparing with the
required, you must install an appropriate
pressure adjuster, which is not supplied with
the product and if needed must be ordered
separately from the local After Sales Service
(refer to the Service chapter). The pressure
adjuster must be fitted on gas supply pipe,
in compliance with the rules of the force.
The rating plate is located on the lower cas-
ing of the hob.
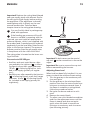
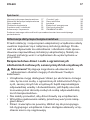
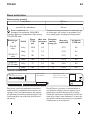
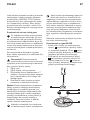
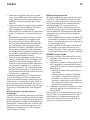
Conversion to G2.350 gas
• Auxiliary and semi-rapid burner: after
you assembly the injectors (
3
in follow-
ing figure), screw their cages (diameter
10 mm,
1
in following figure) on, inclu-
ded in the supply (primary air regula-
tors) ;
• Rapid burner: after assembly the injectors
(
3
in following figure), screw their cages
(diameter 16 mm,
2
in following figure)
on, included in the supply (primary air
regulators) ;
1
2
4
3
Important! In both cases use the special
cap tool
4
and a screwdriver to secure the
cages.
Important! Be sure to remove the cap tool
before reassembling the burners.
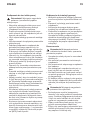
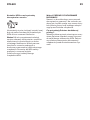
Adjusting flame level
When hob has been fully installed, it is nec-
essary to check the minimum flame setting:
1. Turn the gas tap to the maximum posi-
tion and ignite.
2. Set the gas tap to the minimum flame
position then turn the control knob from
minimum to maximum several times. If
the flame is unstable or extinguished,
follow the procedure further.
3. Re-ignite the burner and set to mini-
mum.
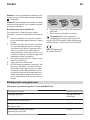
4. Remove the control knob.
5. To adjust, use a thin bladed screwdriver
and turn the adjustment screw until the
flame is steady and does not extin-
guish, when the knob is turned from
minimum to maximum, and vice versa
(see following picture).
ENGLISH 13

6. Repeat this procedure for all burners.
7. Reassemble the knobs.
Warning! If the appliance is connected
to liquid gas (G31 propane or G30
butane), the regulation screw must be
fastened as tightly as possible.
IKEA of Sweden AB
SE-34381 Älmhult
Energy efficiency
Product information according to EU 66/2014
Model identification MÖJLIG
802.371.50
Type of hob Built-in hob
Number of gas burners 1
Energy efficiency per gas burner
(EE gas burner)
Centre rear - Rapid 61.3%
Energy efficiency for the gas hob
(EE gas hob)
61.3%
EN 30-2-1: Domestic cooking appliances burning gas - Part 2-1 : Rational use of energy -
General
Energy saving
Before use, make sure that the burners and pan supports are assembled correctly.
Use cookware with diameters applicable to the size of burners.
Center the pot on the burner.
When you heat up water, use only the amount you need.
If it is possible, always put the lids on the cookware.
When the liquid starts to boil, turn down the flame to barely simmer the liquid.
If it is possible, use a pressure cooker. Refer to its user manual.
Environment concerns
Recycle the materials with the symbol .
Put the packaging in applicable containers
to recycle it.
Help protect the environment and human
health and to recycle waste of electrical
and electronic appliances. Do not dispose
appliances marked with the symbol
with
the household waste. Return the product to
your local recycling facility or contact your
municipal office.
Packaging materials
The materials with the symbol
are recy-
clable. Dispose the packaging in a suitable
collection containers to recycle it.
Before disposal of appliance
Warning! Do these steps to dispose
the appliance:
Pull the mains plug out of the mains sock-
et.
Cut off the mains cable and discard it.
ENGLISH 14

IKEA GUARANTEE
How long is the IKEA guarantee valid?
This guarantee is valid for five (5) years
from the original date of purchase of Your
appliance at IKEA, unless the appliance is
named LAGAN in which case two (2) years
of guarantee apply. The original sales re-
ceipt is required as proof of purchase. If
service work is carried out under guarantee,
this will not extend the guarantee period for
the appliance,
Which appliances are not covered by the
IKEA five (5) years guarantee?
The range of appliances named LAGAN
and all appliances purchased in IKEA be-
fore 1st of August 2007
Who will execute the service?
IKEA service provider will provide the serv-
ice through its own service operations or
authorized servi
ce pa
rtner network.
What does this guarantee cover?
The guarantee covers faults of the appli-
ance, which have been caused by faulty
construction or material faults from the date
of purchase from IKEA. This guarantee ap-
plies to domestic use only. The exceptions
are specified under the headline “What is
not covered under this guarantee?” Within
the guarantee period, the costs to remedy
the fault e.g. repairs, parts, labour and trav-
el will be covered, provided that the appli-
ance is accessible for repair without special
expenditure. On these conditions the EU
guidelines (Nr. 99/44/EG) and the respec-
tive local regulations are applicable. Re-
placed parts become the property of IKEA.
What will IKEA do to correct the problem?
IKEA appointed service pr
ovide
r will exam-
ine the product and decide, at its sole dis-
cretion, if it is covered under this guarantee.
If considered covered, IKEA service provider
or its authorized service partner through its
own service operations, will then, at its sole
discretion, either repair the defective prod-
uct or replace it with the same or a compa-
rable product.
What is not covered under this
guarantee?
Normal wear and tear.
Deliberate or negligent damage, dam-
age caused by failure to observe operat-
ing instructions, incorrect installation or by
connection to the wrong voltage, dam-
age caused by chemical or electro-chem-
ical reaction, rust, corrosion or water
damage including but not
limited to dam-
age caused by excessive lime in the wa-
ter supply, damage caused by abnormal
environmental conditions.
Consumable parts including batteries
and lamps.
Non-functional and decorative parts
which do not affect normal use of the ap-
pliance, including any scratches and pos-
sible color differences.
Accidental damage caused by foreign
objects or substances and cleaning or un-
blocking of filters, drainage systems or
soap drawers.
Damage to the following parts: ceramic
glass, accessories, crockery and cutlery
baskets, feed and drainage pipes, seals,
lamps and lamp covers, screens, knobs,
casings and parts of casings. Unless such
damages can be proved to have been
caused by production faults.
Cases where no fault could be found dur-
ing a technician’s visit.
Repairs not carried out by our appointed
s
ervice pr
oviders and/or an authorized
service contractual partner or where non-
original parts have been used.
Repairs caused by installation which is
faulty or not according to specification.
The use of the appliance in a non-domes-
tic environment i.e. professional use.
Transportation damages. If a customer
transports the product to their home or
other address, IKEA is not liable for any
damage that may occur during transport.
However, if IKEA delivers the product to
the customer's delivery address, then
damage to the product that occurs during
this delivery will be covered by this guar-
antee.
ENGLISH 15

Cost for carrying out the initial installation
of the IKEA appliance. However, if an
IKEA service provider or its authorized
service partner repairs or replaces the
appliance under the terms of this guaran-
tee, the service provider or its authorized
service partner will re-install the repaired
appliance or install the replacement, if
necessary.
This restriction do not apply to fault-free
work carried out by a qualified specialist
using our original parts in order to adapt
the appliance to the technical safety specifi-
cations of another EU country.
How country law applies
The IKEA guarantee gives You specific legal
rights, which covers or exceed local de-
mands. However these conditions do not
limit in any way consumer
rights described
in
the local legislation
Area of validity
For appliances which are purchased in one
EU country and taken to another EU coun-
try, the services will be provided in the
framework of the guarantee conditions nor-
mal in the new country. An obligation to
carry out services in the framework of the
guarantee exists only if the appliance com-
plies and is installed in accordance with:
the technical specifications of the country
in which the guarantee claim is made;
the Assembly Instructions and User Man-
ual Safety Information;
The dedicated After Sales Service for
IKEA appliances:
Please do not hesitate to contact IKEA After
Sales Service to:
1. make a service request under this guar-
antee;
2. ask for clarification on installation of the
IKEA appliance in the dedicated IKEA
kitchen furniture. The servi
ce
won’t pro-
vide clarifications related to:
– the overall IKEA kitchen installation;
– connections to electricity (if machine
comes without plug and cable), to
water and to gas since they have to
be executed by an authorized serv-
ice engineer.
3. ask for clarification on user manual con-
tents and specifications of the IKEA ap-
pliance.
To ensure that we provide you with the best
assistance, please read carefully the As-
sembly Instructions and/or the User Manual
section of this booklet before contacting us.
How to reach us if You need our service
Please refer to the last page of this manual
for the full list of IKEA appointed contacts
and relative national phone numbers.
Important! In order to provide You with a
quicker service, we recommend that You
use the specific phone numbers listed at the
end of this manual. Always refer to the
numbers listed in the booklet of the specific
appliance You need an assistance for.
Before calling us, assure that You have to
hand the IKEA article number (8 digit code)
for the appliance of which you need our
assistance.
Important! SAVE THE SALES RECEIPT! It is
Your proof of purchase and required for the
guarantee to apply. Note that the receipt
reports also the IKEA article name and
number (8 digit code) for each of the
appliances you have purchased.
Do You need extra help?
For any additional questions not
related
to
After Sales of your appliances, please con-
tact our nearest IKEA store call centre. We
recommend you read the appliance docu-
mentation carefully before contacting us.
ENGLISH 16

Spis treści
Informacje dotyczĐce bezpieczeņstwa 17
Wskazówki dotyczĐce bezpieczeņstwa 18
Opis urzĐ 12 ainezd
Codzienna eksploatacja 21
Przydatne rady i wskazówki 22
Konserwacja i czyszczenie 22
Co zrobiĈ, gdy… 23
42 enzcinhcet enaD
52 ajcalatsnI
28(IHNW\ZQRśĈHQHUJHW\F]QD
Ochrona środowiska 29
GWARANCJA IKEA 29
Producent zastrzega sobie moŹliwośĈ wprowadzenia zmian bez wcześniejszego
powiadomienia.
Informacje dotyczĐce bezpieczeņstwa
Przed instalacjĐ i rozpoczĠciem eksploatacji urzĐdzenia naleŹy
uwaŹnie zapoznaĈ siĠ z zaãĐczonĐ instrukcjĐ obsãugi. Produ-
cent nie odpowiada za uszkodzenia i obraŹenia ciaãa spowo-
dowane nieprawidãowĐ instalacjĐ i eksploatacjĐ. NaleŹy za-
chowaĈ instrukcjĠ wraz z urzĐdzeniem do wykorzystania w
przyszãości.
Bezpieczeņstwo dzieci i osób o ograniczonych
zdolnościach ruchowych, sensorycznych lub umysãowych
OstrzeŹenie! WystĠpuje zagroŹenie uduszeniem lub
odniesieniem obraŹeņ mogĐcych skutkowaĈ trwaãym
kalectwem.
UrzĐdzenie mogĐ obsãugiwaĈ dzieci po ukoņczeniu ósmego
roku Źycia oraz osoby o ograniczonych zdolnościach fizycz-
nych, sensorycznych lub umysãowych bĐdŷ nieposiadajĐce
odpowiedniej wiedzy i doświadczenia, jeśli bĠdĐ one nad-
zorowane przez dorosãĐ osobĠ lub osobĠ odpowiedzialnĐ
za ich bezpieczeņstwo.
Nie naleŹy pozwalaĈ, aby dzieci bawiãy siĠ urzĐdzeniem.
Wszystkie opakowania naleŹy przechowywaĈ poza zasiĠ-
giem dzieci.
Dzieci i zwierzĠta nie powinny zbliŹaĈ siĠ do pracujĐcego
lub stygnĐ
cego urzĐdzenia. âatwo dostĠpne
elem
en
ty urzĐ-
dzenia mocno siĠ nagrzewajĐ.
IKSLOP17

• Czyszczeniem i konserwacjĐ nie mogĐ zajmowaĈ siĠ dzieci
bez nadzoru dorosãych.
Ogólne zasady bezpieczeņstwa
• UrzĐdzenie oraz jego nieosãoniĠte elementy nagrzewajĐ siĠ
podczas pracy do wysokiej temperatury. Nie dotykaĈ ele-
mentów grzejnych.
• Nie sterowaĈ urzĐdzeniem za pomocĐ zewnĠtrznego zegara
ani niezaleŹnego ukãadu zdalnego sterowania.
• Pozostawienie bez nadzoru potraw zawierajĐcych tãuszcz
lub olej na wãĐczonej pãycie grzejnej moŹe byĈ przyczynĐ
poŹaru.
•Nie gasiĈ poŹaru wodĐ – naleŹy wyãĐczyĈ urzĐdzenie, a na-
stĠpnie przykryĈ pãomieņ pokrywĐ lub kocem gaśniczym.
• Nie przechowywaĈ Źadnych przedmiotów na powierzchni
gotowania.
•Nie czyściĈ urzĐdzenia za pomocĐ myjek parowych.
•Na powierzchni pãyty grzejnej nie wolno kãaśĈ przedmiotów
metalowych, takich jak sztuĈce lub pokrywki do garnków, po-
niewaŹ
mogĐ one bardzo siĠ rozgrzaĈ.
Wskazówki dotyczĐce bezpieczeņstwa
Instalacja
OstrzeŹenie! UrzĐdzenie moŹe
zainstalowaĈ wyãĐcznie
wykwalifikowana osoba.
•UsunĐĈ wszystkie elementy opakowania.
•Nie instalowaĈ ani nie uŹywaĈ uszkodzo-
nego urzĐdzenia.
•PostĠpowaĈ zgodnie z instrukcjĐ instala-
cji zaãĐczonĐ do urzĐdzenia.
•ZachowaĈ ostroŹnośĈ podczas przeno-
szenia urzĐdzenia, poniewaŹ jest ono
ciĠŹkie. Zawsze uŹywaĈ rĠkawic ochron-
nych.
•Po przyciĠciu zabezpieczyĈ krawĠdzie
blatu przed wilgociĐ za pomocĐ odpo-
wiedniego uszczelniacza.
•ZabezpieczyĈ spód urzĐdzenia przed
dostĠpem pary i wilgoci.
•Nie instalowaĈ urzĐdzenia przy drzwiach
ani pod oknem. Zapobiegnie to moŹli-
wości strĐcenia gorĐcego naczynia z
urzĐdzenia przy otwieraniu okna lub
drzwi.
•ZachowaĈ minimalne odstĠpy od innych
urzĐdzeņ i mebli. NaleŹy zapoznaĈ siĠ z
instrukcjĐ montaŹu.
• InstalujĐc urzĐdzenie nad szufladami na-
leŹy zapewniĈ wystarczajĐco duŹo miejs-
ca miĠdzy dolnĐ czĠściĐ urzĐdzenia a
górnĐ szufladĐ, aby umoŹliwiĈ prawidão-
wy obieg powietrza. NaleŹy zapoznaĈ
siĠ z instrukcjĐ montaŹu.
• Spód urzĐdzenia moŹe siĠ mocno na-
grzewaĈ. Zaleca siĠ zamontowanie pod
urzĐ
dzeniem niepalnej pãyty uniemoŹli-
wiajĐcej dostĠp do urzĐdzenia od spodu.
POLSKI 18

PodãĐczenie do sieci elektrycznej
OstrzeŹenie! WystĠpuje zagroŹenie
poŹarem i poraŹeniem prĐdem
elektrycznym.
•Wszystkie poãĐczenia elektryczne musi
wykonaĈ wykwalifikowany elektryk.
•UrzĐdzenie musi byĈ uziemione.
• Przed wykonaniem jakiejkolwiek czyn-
ności upewniĈ siĠ, Źe urzĐdzenie jest od-
ãĐczone od zasilania.
•UŹyĈ odpowiedniego przewodu zasilajĐ-
cego.
• Nie dopuszczaĈ do splĐtania przewodów
elektrycznych.
•Podczas podãĐczania urzĐdzenia do
gniazda sieciowego upewniĈ siĠ, Źe
przewód zasilajĐcy lub jego wtyczka (je-
śli dotyczy) nie bĠdzie dotykaĈ rozgrza-
nych elementów urzĐdzenia lub naczyņ.
•UpewniĈ siĠ, Źe urzĐdzenie jest prawid-
ãowo zainstalowane. Luŷny lub niewãa
ści-
wy przewód zasilajĐcy bĐdŷ wtyczka (je-
śli dotyczy) moŹe byĈ przyczynĐ prze-
grzania styków.
•UpewniĈ siĠ, Źe zostaão zainstalowane
zabezpieczenie przed poraŹeniem prĐ-
dem.
•Przewód zasilajĐcy naleŹy przymocowaĈ
obejmĐ w celu jego mechanicznego od-
ciĐŹenia.
•NaleŹy uwaŹaĈ, aby nie uszkodziĈ wtycz-
ki (jeśli dotyczy) ani przewodu zasilajĐce-
go. WymianĠ uszkodzonego przewodu
zasilajĐcego naleŹy zleciĈ przedstawicie-
lowi serwisu lub wykwalifikowanemu
elektrykowi.
• W instalacji elektrycznej naleŹy zastoso-
waĈ wyãĐcznik obwodu umoŹliwiajĐcy
odãĐczenie urzĐdzenia od zasilania na
wszystkich biegunach. WyãĐcznik obwo-
du musi mieĈ rozwarcie styków wynoszĐ-
ce minimum 3 mm.
• Konieczne jest zastosowanie odpowied-
nich wyãĐczników obwodu zasilania: wy-
ãĐczniki automatyczne, bezpieczniki topi-
kowe (typu wykrĠcanego — wyjmowane
z oprawki), wyãĐczniki róŹnicowo-prĐdo-
we (RCD) oraz styczniki.
PodãĐczenie do instalacji gazowej
•Wszystkie poãĐczenia instalacji gazowej
powinna wykonaĈ wykwalifikowana oso-
ba.
•ZapewniĈ cyrkulacjĠ powietrza wokóã
urzĐdzenia.
• Informacje dotyczĐce dopãywu gazu
znajdujĐ siĠ na tabliczce znamionowej.
•Omawiane urzĐdzenie nie jest podãĐczo-
ne do wyciĐgu gazów spalinowych.
UrzĐdzenie naleŹy podãĐczyĈ zgodnie z
aktualnie obowiĐzujĐcymi przepisami
dotyczĐcymi instalacji. ZwróciĈ uwagĠ na
wymagania dotyczĐce odpowiedniej
wentylacji.
Przeznaczenie
OstrzeŹenie! Niebezpieczeņstwo
odniesienia obraŹeņ ciaãa, oparzenia,
poraŹenia prĐdem.
•UrzĐdzenie naleŹy uŹywaĈ w warunkach
domowych.
• Nie zmieniaĈ parametrów technicznych
urzĐdzenia.
• Nie pozostawiaĈ wãĐ
czonego urzĐdzenia
bez nadzoru.
•Nie obsãugiwaĈ urzĐdzenia mokrymi rĠ-
kami lub jeśli ma ono kontakt z wodĐ.
•Nie kãaśĈ sztuĈców ani pokrywek naczyņ
na polach grzejnych. Pola grzejne mocno
siĠ nagrzewajĐ.
•Po kaŹdym uŹyciu wyãĐczyĈ pole grzejne.
•Nie uŹywaĈ urzĐdzenia jako powierzchni
roboczej lub miejsca do przechowywa-
nia.
OstrzeŹenie! WystĠpuje zagroŹenie
poŹarem lub wybuchem.
•Pod wpãywem wysokiej temperatury
tãuszcze i olej mogĐ uwalniaĈ ãatwopalne
opary. Podczas podgrzewania tãuszczów
i oleju nie wolno zbliŹaĈ do nich ŷródeã
ognia ani rozgrzanych przedmiotów.
• Opary uwalniane przez gorĐcy olej mo-
gĐ ulec samoczynnemu zapãonowi.
•ZuŹyty olej zawierajĐcy pozostaãoś
ci pro-
duktów spo
Źywczych ma niŹszĐ tempera-
turĠ zapãonu niŹ świeŹy olej.
POLSKI 19

• Nie umieszczaĈ w urzĐdzeniu, na nim ani
w jego pobliŹu ãatwopalnych substancji
ani przedmiotów nasĐczonych ãatwopal-
nymi substancjami.
OstrzeŹenie! WystĠpuje zagroŹenie
uszkodzenia urzĐdzenia.
•Nie stawiaĈ gorĐcych naczyņ na panelu
sterowania.
• Nie dopuszczaĈ do wygotowania siĠ po-
traw.
•Nie wãĐczaĈ pól grzejnych bez naczyņ
ani z pustymi naczyniami.
•Nie kãaśĈ na urzĐdzeniu folii aluminiowej.
• Nie dopuszczaĈ do kontaktu pãyty grzej-
nej z pãynami o odczynie kwaśnym, taki-
mi jak ocet, sok cytrynowy czy środki do
usuwania kamienia. Mogãoby to spowo-
dowaĈ jej zmatowienie.
•ZapewniĈ odpowiedniĐ wentylacjĠ w po-
mieszczeniu, w którym zainstalowane jest
urzĐdzenie.
•UpewniĈ siĠ, Źe otwory wentylacyjne nie
sĐ zablokowane.
•StosowaĈ wyãĐcznie stabilne naczynia o
prawid
ãowym ksztaãcie i średnicy wiĠkszej
od średnicy palników. WystĠpuje zagro-
Źenie przegrzania i uszkodzenia szklanej
pãyty (jeśli dotyczy).
•NaleŹy uwaŹaĈ, aby pãomieņ nie zgasã
podczas szybkiego obracania pokrĠtãa z
poãoŹenia pãomienia maksymalnego do
minimalnego.
•UpewniĈ siĠ, Źe naczynia umieszczono
centralnie nad palnikami; naczynia nie
powinny wystawaĈ poza krawĠdŷ po-
wierzchni gotowania.
•UŹywaĈ wyãĐcznie akcesoriów dostarczo-
nych z urzĐdzeniem.
•Nie instalowaĈ na palniku dyfuzora pão-
mienia.
Konserwacja i czyszczenie
OstrzeŹenie! WystĠpuje ryzyko
uszkodzenia urzĐdzenia.
• Aby zapobiec uszkodzeniu powierzchni
urzĐdzenia, naleŹy regularnie jĐ czyściĈ.
• Do czyszczenia urzĐdzenia nie wolno
uŹywaĈ wody pod ciśnieniem ani pary
wodnej.
•Nie myĈ palników w zmywarce.
•CzyściĈ urzĐdzenie za pomocĐ wilgotnej
szmatki. UŹywaĈ wyãĐcznie neutralnych
detergentów. Nie stosowaĈ produktów
ściernych, myjek do szorowania, rozpusz-
czalników ani metalowych przedmiotów.
Utylizacja
OstrzeŹenie! WystĠpuje zagroŹenie
odniesienia obraŹeņ ciaãa lub
uduszenia.
•Aby uzyskaĈ informacje dotyczĐce pra-
widãowej utylizacji urzĐdzenia, nale
Źy
skontaktowaĈ siĠ z lokalnymi wãadzami.
•OdãĐczyĈ urzĐdzenie od ŷródãa zasilania.
•OdciĐĈ i wyrzuciĈ przewód zasilajĐcy.
•SpãaszczyĈ zewnĠtrzne rury gazowe.
POLSKI 20
Strona się ładuje...
Strona się ładuje...
Strona się ładuje...
Strona się ładuje...
Strona się ładuje...
Strona się ładuje...
Strona się ładuje...
Strona się ładuje...
Strona się ładuje...
Strona się ładuje...
Strona się ładuje...
Strona się ładuje...
Strona się ładuje...
Strona się ładuje...
Strona się ładuje...
Strona się ładuje...
-
 1
1
-
 2
2
-
 3
3
-
 4
4
-
 5
5
-
 6
6
-
 7
7
-
 8
8
-
 9
9
-
 10
10
-
 11
11
-
 12
12
-
 13
13
-
 14
14
-
 15
15
-
 16
16
-
 17
17
-
 18
18
-
 19
19
-
 20
20
-
 21
21
-
 22
22
-
 23
23
-
 24
24
-
 25
25
-
 26
26
-
 27
27
-
 28
28
-
 29
29
-
 30
30
-
 31
31
-
 32
32
-
 33
33
-
 34
34
-
 35
35
-
 36
36


w innych językach
- English: IKEA MHGA2K User manual
Powiązane artykuły
-
IKEA LOV3 Instrukcja obsługi
-
IKEA FHGA1K Instrukcja obsługi
-
-
-
-
-
-
-
IKEA LHGA4K Instrukcja obsługi
-