Zelmer ZMM4198X Instrukcja obsługi
- Kategoria
- Roboty kuchenne
- Typ
- Instrukcja obsługi

ZMM4198X
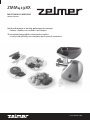
MASZYNKA DO MIELENIA
ZMM4198X
meat mincer
INSTRUKCJA UŻYTKOWANIA
MASZYNKA DO MIELENIA
USER MANUAL
MEAT MINCER
6–10
11–14
PL
EN

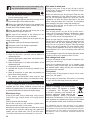
MASZYNKA DO MIELENIA
ZMM4198X
Idealne krojenie w kostkę gotowanych warzyw
– łatwo, szybko, na co dzień i od święta.
Slice cooked vegetables into perfect cubes
– easily and quickly, on everyday and special occasions.
www.zelmer.com
meat mincer

A
B
2 31
2
6 5 4 3
8
1
1a
1b
12
11
9
10
7a
7b

1 2 3
4 5 6
1 2 3
D
F
E
14 5
6
7
1
3
2
„click”
„click”
10
9
8
C
1 2 3

21 3
4 5 6
I
„click”
4 5 6
H
1 2 3
„click”
1 2 3
G

6
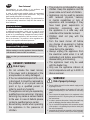
Szanowni Klienci!
Gratulujemy wyboru naszego urządzenia i witamy wśród
użytkowników produktów Zelmer.
W celu uzyskania najlepszych rezultatów rekomendujemy
używanie tylko oryginalnych akcesoriów rmy Zelmer.
Zostały one zaprojektowane specjalnie dla tego produktu.
Prosimy o uważne przeczytanie niniejszej instrukcji obsługi.
Szczególną uwagę należy poświęcić wskazówkom bezpie-
czeństwa. Instrukcję obsługi prosimy zachować, aby mogli
Państwo z niej korzystać również w trakcie późniejszego
użytkowania.
Charakterystyka urządzenia
Maszynka do mielenia produktów spożywczych służy do
użytku w gospodarstwie domowym. Jest urządzeniem wie-
loczynnościowym, przy pomocy którego można zemleć
szybko i bez zbytniego wysiłku: mięso, ser, jarzyny mak
a także wytwarzać kiełbasy i wędliny. Przy zastosowaniu
dodatkowego wyposażenia maszynki – szatkownicy można
rozdrabniać warzywa na: surówki, sałatki i przetwory.
Wskazówki dotyczące bezpieczeństwa
iwłaściwego użytkowania maszynki
Przed rozpoczęciem użytkowania urządzenia zapoznaj
się z treścią całej instrukcji obsługi.
Należy upewnić się, że poniższe wskazówki zostały
zrozumiane.
NIEBEZPIECZEŃSTWO! /
OSTRZEŻENIE!
Nieprzestrzeganie grozi
obrażeniami
● Nie uruchamiaj urządzenia, jeśli
przewód zasilający jest uszkodzony
lub obudowa jest w sposób widoczny
uszkodzona.
● Jeżeli przewód zasilający nieodłą-
czany ulegnie uszkodzeniu, to powi-
nien on być wymieniony u wytwórcy
lub w specjalistycznym zakładzie
naprawczym albo przez wykwaliko-
waną osobę w celu uniknięcia zagro-
żenia.
● Napraw urządzenia może dokony-
wać jedynie przeszkolony personel.
Nieprawidłowo wykonana naprawa
może spowodować poważne zagro-
żenia dla użytkownika. W razie
wystąpienia usterek zwróć się do
specjalistycznego punktu serwiso-
wego ZELMER.
● Zachowaj szczególną ostrożność
podczas pracy z maszynką w obec-
ności dzieci.
● Urządzenie nie powinno być uży-
wane przez dzieci. Przechowuj urzą-
dzenie wraz z przewodem przyłą-
czeniowym poza zasięgiem dzieci.
● Urządzenie może być używane
przez osoby o ograniczonej zdolno-
ści zycznej, czuciowej i psychicz-
nej, lub nie mające doświadczenia
lub znajomości sprzętu, ale wyłącz-
nie pod nadzorem lub po wcześniej-
szym zrozumiałym objaśnieniu moż-
liwych zagrożeń i poinstruowaniu
dotyczącym bezpiecznego korzysta-
nia z urządzenia.
● Należy zapewnić, aby dzieci nie
bawiły się urządzeniem.
● Przed wymianą wyposażenia lub
zbliżaniem się do części porusza-
jących się podczas użytkowania,
należy wyłączyć sprzęt i odłączyć od
zasilania.
● Zawsze odłączaj urządzenie od
zasilania gdy jest pozostawione bez
nadzoru, a także przed montażem,
demontażem lub czyszczeniem.
● Urządzenie musi być używane tylko
z misą zasypową.
● Urządzenie wolno używać tylko
w pomieszczeniach, w temperaturze
pokojowej i na wysokości nie więk-
szej niż 2000 m n.p.m.
PL

7
UWAGA!
Nieprzestrzeganie grozi
uszkodzeniem mienia
●
Nie wyciągaj wtyczki z gniazdka sieci pociągając za
przewód.
●
Urządzenie zawsze podłączaj do gniazdka sieci elek-
trycznej (jedynie prądu przemiennego) o napięciu
zgodnym z podanym na tabliczce znamionowej urzą-
dzenia.
●
Nie narażaj maszynki i wyposażenia na działanie tem-
peratury powyżej 60°C. Możesz uszkodzić maszynkę.
●
Do popychania stosuj tylko popychacz. Używanie innych
przedmiotów grozi uszkodzeniem maszynki i napędu.
●
Nie przeciążaj urządzenia nadmierną ilością produktu,
ani zbyt silnym jego popychaniem (popychaczem).
●
Dokładnie montuj zespół mielący, gdyż źle skręcony
zespół mielący powoduje niewłaściwą jakość miele-
nia, jak również może być przyczyną stępienia nożyka
i sitka. Stępiony nożyk i sitko wymień na nowe.
●
Podczas pracy maszynki nie zasłaniaj otworów wenty-
lacyjnych w obudowie. Maszynki nie stawiaj na mięk-
kim podłożu.
●
Nie zanurzaj napędu maszynki w wodzie, ani nie myj
go pod bieżącą wodą.
●
Nie myj wyposażenia zamontowanego na napędzie.
●
Do mycia obudowy nie używaj agresywnych detergen-
tów w postaci emulsji, mleczka, past itp. Mogą one
między innymi usunąć naniesione informacyjne sym-
bole graczne, takie jak: podziałki, oznaczenia, znaki
ostrzegawcze, itp.
●
Przed użyciem umyć wszystkie akcesoria w wodzie
z dodatkiem płynu do mycia naczyń. Starannie opłukać
i osuszyć.
●
Sitka i nożyk dwustronny powinny pozostać natłusz-
czone. Nasmarować je olejem jadalnym.
●
Nie uruchamiać pustego urządzenia, jeśli sitka nie
zostały natłuszczone.
WSKAZÓWKA
Informacje o produkcie i wska-
zówki dotyczące użytkowania
●
Urządzenie jest przeznaczone wyłącznie do użytku
w gospodarstwie domowym i podobnych otoczeniach.
●
Po zakończeniu pracy wyjmij wtyczkę przewodu przy-
łączeniowego z gniazdka sieci. Schowaj przewód
lekko wysuwając go w otwór z którego jest wprowa-
dzony, a wtyczkę przewodu włóż do schowka.
●
Gdy maszynka nie daje się uruchomić – oddaj ją do
serwisu.
●
Mięso przeznaczone do mielenia oddziel od kości,
ścięgien, chrząstek i żył.
Dane techniczne
Parametry techniczne podane są na tabliczce znamionowej
wyrobu.
Dopuszczalny czas nieprzerwanej pracy 10 minut
Czas przerwy przed ponownym użyciem 30 minut
Hałas urządzenia (L
WA
): 77 dB(A)
MBP – Moc zablokowania silnika 1900 W
Opis urządzenia
Maszynka do mielenia produktów spożywczych składa się z:
1
Napędu maszynki – każdy napęd maszynki przystoso-
wany jest do montażu każdego zespołu mielącego i szat-
kownicy produkcji ZELMER. W tylnej wnęce schowka
napędu znajdują się otwory wentylacyjne
1a
Wyłącznik
1b
Przycisk blokady
Zespołu mielącego, w którego skład wchodzi:
2
Komora mielenia
3
Ślimak z zamontowanym sprzęgłem
4
Nożyk dwustronny
5
Sitko z otworami 4 mm
6
Nakrętka
7a
Adapter
7b
Misa szatkownicy
8
Popychacz
Wyposażenia, w którego skład wchodzi:
9
Sitko z otworami 8 mm
10
Sitko z otworami 2,7 mm
11
Nasadka masarska
12
Wkładka dystansowa
Mechaniczne zabezpieczenie silnika
1
Ślimak
2
Sprzęgło
3
Wkręt M5x20
Maszynka posiada mechaniczne zabezpieczenie, które
chroni silnik przed zniszczeniem – zęby sprzęgła napędo-
wego ślimaka wyłamują się, gdy maszynka jest przeciążona
(np. gdy do środka dostały się kości).
A
B
●
Przed mieleniem większe produkty potnij na kawałki.
●
Nie miel suchego maku. Przed mieleniem mak musi być
wcześniej sparzony i namoczony – do kilkunastu godzin.
●
Do mycia metalowych części używaj miękkiej szczo-
teczki.
●
Nie myj metalowych części w zmywarkach. Agresywne
środki czyszczące stosowane w tych urządzeniach
powodują ciemnienie w/w części. Myj je ręcznie, z uży-
ciem tradycyjnych płynów do naczyń.

8
Zniszczone sprzęgło wymień na nowe:
●
w ślimaku ze zniszczonym sprzęgłem odkręć wkręt (3),
●
usuń uszkodzone sprzęgło (2),
●
załóż nowe sprzęgło (2) i dokręć je wkrętem (3).
Przygotowanie maszynki do pracy
i jej uruchomienie
Wyciągnij ze schowka napędu (1) odpowiednią długość
przewodu przyłączeniowego i odpowiednie akcesoria.
1
Napęd (1) postaw w pobliżu gniazdka sieci na twardym
podłożu tak, aby nie zasłaniać otworów wentylacyjnych
w obudowie.
●
Przed pierwszym użyciem maszynki umyj elementy
wyposażenia.
●
Zmontuj odpowiednie wyposażenie i dołącz do napędu.
2
Włóż przewód przyłączeniowy do gniazdka sieciowego.
3
Przyciskiem wyłącznika (1a) uruchom maszynkę.
Praca z zespołem mielącym
Do komory mielenia (2) włóż kolejno:
1
Ślimak (3) sprzęgłem do środka.
2
Na trzpień ślimaka (3) nożyk (4).
3
Sitko (np.5) tak, aby występ komory (2) wszedł w rowek
na obwodzie sitka.
4
Dokręć wszystkie elementy zespołu mielącego – mocno
do oporu.
5
Załóż zmontowany zespół mielący, na napęd (1) i obróć
do pozycji, przy której usłyszysz „click” blokady.
6
Włóż adapter
7a
do misy
7b
. Nałóż misę wraz z ada-
pterem na komorę mielenia.
Praca z nasadką masarską
Do komory mielenia (2) włóż kolejno:
1
Ślimak (3) sprzęgłem do środka.
2
Na trzpień ślimaka (3) wkładkę dystansową (12).
3
Nasadkę masarską (11).
4
Dokręć wszystkie elementy nakrętką (6) – mocno do
oporu.
5
Załóż zmontowany zespół mielący, na napęd (1) i obróć
do pozycji, przy której usłyszysz „click” blokady.
6
Włóż adapter
7a
do misy
7b
. Nałóż misę wraz z ada-
pterem na komorę mielenia.
Przed nałożeniem kiełbaśnicy (osłonki z jelita) namocz ją
w ciepłej wodzie przez ok. 10 min.
●
Na nasadkę masarską (11) nałóż mokrą kiełbaśnicę,
zwróć uwagę, aby nie zatkać otworów odpowietrzają-
cych w nasadce.
Masa mięsna, wypełniająca jelito nie może być
„zbyt rzadka”. Duża zawartość płynów może
spowodować ich wyciek i przedostawanie się
do wnętrza maszynki.
C
D
H
Szatkownica z krajarką do warzyw
1
Tarka do drobnych wiórek
2
Tarka do grubych wiórek
3
Tarka do przecierania
4
Zatrzask
5
Komora
6
Miska zasypowa
7
Popychacz
W przypadku korzystania z szatkownicy zdej-
mij adapter.
Szatkownica ma dwie tarki do rozdrabniania na drobne
i grube wiórki (sera żółtego, marchwi, selerów, gotowanych
buraków, itp.). Trzecia tarka służy do krojenia warzyw na pla-
stry (ziemniaków, ogórków, cebuli, itp.). Czwarta tarka służy
do przecierania (ziemniaków, buraków, owoców itp.
8
Bęben krajarki
9
Wkładka krajarki
10
Popychacz krajarki
Krajarka do warzyw stanowi dodatkowe wyposażenie szat-
kownicy. Służy do krojenia w kostkę tylko gotowanych
warzyw: ziemniaków, buraków ćwikłowych, marchewki,
selera, pietruszki itp. Przed rozpoczęciem użytkowania
należy warzywa ugotować. Po ugotowaniu duże warzywa
należy wstępnie pokroić aby mieściły się wewnątrz
wkładki (9).
Praca z szatkownicą
1
Odchyl zatrzask (4) i włóż jedną z tarek sprzęgłem do
środka komory.
2
Zatrzaśnij zatrzask (4).
3
Połącz komorę szatkownicy (5) tak, jak komorę mielenia
maszynki.
●
Produkty duże pokrój wcześniej na kawałki, które bez
trudu włożysz do komory.
●
Nie rozdrabniaj miękkich owoców zawierających twarde
pestki.
●
Po zakończeniu pracy wyłącz maszynkę i wyjmij prze-
wód przyłączeniowy z gniazdka sieci.
●
Usuń drewnianą łyżką resztki produktów pozostałe
wewnątrz tarki lub w komorze.
Ostrza tarek nie wymagają regeneracji.
Praca z krajarką do warzyw
Ostrza bębna krajarki są bardzo ostre, należy
zachować ostrożność.
1
Odchyl zatrzask (4) i włóż bęben (8) sprzęgłem do
środka komory.
●
Zatrzaśnij zatrzask.
EE
F
G

9
2
Załóż komorę szatkownicy na napęd maszynki i obróć
do pozycji, przy której usłyszysz „click” blokady.
3
Zamontuj misę zasypową (6) i włóż wkładkę krajarki (9).
●
Po włożeniu warzywa należy dociskać popychaczem (10).
Popychacz nr 10 stosuj tylko z wkładką kra-
jarki. Zabronione jest używanie popychacza
nr 10 bez umieszczonej wkładki krajarki (9)
w komorze (5).
Produkty duże pokrój wcześniej na kawałki,
które bez trudu włożysz do wkładki krajarki (9).
●
Po zakończeniu pracy wyłącz maszynkę i wyjmij prze-
wód przyłączeniowy z gniazdka sieci.
●
Usuń drewnianą łyżką resztki produktów pozostałe
wewnątrz bębna krajarki lub we wkładce.
●
Rozłóż elementy krajarki.
Wkładkę krajarki (9) wyciągniesz demontując
misę zasypową (6).
Zabronione jest krojenie surowych warzyw.
Przy zastosowaniu zbyt miękko ugotowanych
produktów efekt krojenia w kostkę może być
mniej zadowalający.
Po zakończeniu pracy
●
Wyłącz maszynkę i wyjmij przewód przyłączeniowy
z gniazdka sieci.
1a
Wyjmij popychacz (8) i zdejmij miskę z komory mielenia
(2) lub komory szatkownicy.
1b
Wyjmij popychacz (8) i zdejmij misę szatkownicy wraz
z adapterem (7b) z komory mielenia (2) lub misę szatkow-
nicy z komory szatkownicy.
2
Naciśnij przyciski blokady (1b), zespół, mielący lub
komorę szatkownicy obróć w prawo i zdejmij ją.
3
Rozłóż elementy zespołu mielącego, komory z nasadką
masarską lub szatkownicę.
Schowaj przewód, jak również umyte i wysuszone części do
schowka.
4
Umieszczanie sprzęgła we wnęce.
5
Umieszczanie sitka we wnęce.
6
Chowanie całego przewodu przyłączeniowego.
Czyszczenie i konserwacja
●
Napęd przetrzyj wilgotną szmatka zwilżoną płynem do
mycia naczyń.
●
Części z tworzywa myj w ciepłej wodzie z dodatkiem
płynu do mycia naczyń.
●
Części metalowe myj w gorącej wodzie z dodatkiem
płynu do mycia naczyń.
I
●
Dokładnie wysusz umyte części.
●
Suche części komory mielenia lub szatkownicy zmontuj
w całość.
●
Przed użyciem umyć wszystkie akcesoria w wodzie
z dodatkiem płynu do mycia naczyń. Starannie opłukać
i osuszyć.
●
Sitka i nożyk dwustronny powinny pozostać natłusz-
czone. Nasmarować je olejem jadalnym.
Potrawy z mięsa, warzyw i owoców
W celu zachowania jak największych wartości odżywczych
potraw z warzyw i owoców, zapoznaj się ze sposobami ich
sporządzania. Warzyw i owoców nie przetrzymuj w wodzie
i rozdrabniaj bezpośrednio przed spożyciem.
Kotlety wieprzowe mielone
50 dag wieprzowiny, 6 dag czerstwej bułki, 5 dag cebuli,
2 dag tłuszczu, 1 jajo, 4 dag tartej bułki, tłuszcz do smażenia,
sól i pieprz.
Bułkę namoczyć w wodzie i osączyć.
Cebulę pakrajać w krążki, usmażyć na jasnozłoty kolor.
Mięso opłukać, pokrajać na kawałki.
Bułkę, cebulę, mięso zemleć 2 razy w maszynce z sitkiem
o średnicy oczek 4 mm. Dadać jajo, sól, pieprz i starannie
wyrobić na jednolitą masę. Uformować 8 owalnych kotletów
o grubości 1,5 cm, które otaczać w bułce tartej. Smażyć na
rozgrzanym tłuszczu.
Pasztet z mięsa mieszanego
50 dag wieprzowiny, 50 dag cielęciny, 40 dag słoniny, 50 dag
wątroby wieprzowej, 30 dag cebuli, 20 dag bułki pszennej,
4 jaja, sól i pieprz, gałka muszkatołowa.
Mięso udusić ze słoniną i cebulą.
Wątrobę opłukać, obrać z błon, pokroić w kostkę. Gdy mięso
jest miękkie, dodać wątrobę, bułkę i krótko razem poddusić,
ostudzić i zemleć dwukrotnie w maszynce z sitkiem o śred-
nicy oczek 4 mm.
Do przygotowanej masy dodać jaja, sól, pieprz, gałkę musz-
katołową i starannie wyrobić.
Foremkę wysmarować smalcem, przełożyć masę paszte-
tową i piec około 40 minut.
Kiełbasa domowa
Mięso wieprzowe średnio tłuste 4,5 kg, słonina 0,5 kg, wywar
z kości – 1 szklanka, sól 6-7 łyżeczek, saletra 1 płaska
łyżeczka, pieprz 1 łyżeczka (pieprz mielony), ziele angielskie
12-15 ziarenek (zemleć), czosnek 5-6 ząbków (posiekać),
kiełbaśnica 7 m.
Mięso zemleć w maszynce z sitkiem o średnicy otworów
8 mm. Sól wymieszać z saletrą i przyprawami, dodać do
mięsa, wymieszać i wyrobić jak ciasto, dodając stopniowo
wywar. Odstawić w chłodne miejsce na 24 godz. Na komorę
mielenia maszynki założyć nasadkę masarską. Napełnić
kiełbaśnicę o długości około 1 m, formując odcinki 30-40 cm.
Należy zwrócić uwagę, aby całkowicie nie zatkać otworów
odpowietrzających nasadki.
Osuszyć kiełbasę przez 6 godz. Wędzić dymem ciepłym 14
godzin lub gorącym 2,5 godziny.

10
Surówka z czerwonej kapusty
40 dag czerwonej kapusty, 20 dag jabłek, 2 łyżki oleju, sok
z cytryny, sól, cukier.
Kapustę oczyścić i rozdrobnić w szatkownicy za pomocą
tarki do plastrów lub do grubych wiórek. Jabłka obrać i roz-
drobnić na tarce na grube wiórki. Poszatkowaną kapustę
wymieszać z rozdrobnionymi jabłkami doprawiając do smaku
olejem, sokiem z cytryny, solą i cukrem.
Surówka z selera
40 dag selera, 20 dag jabłek, 2 łyżki oleju lub śmietany, sok
z cytryny, sól, cukier.
Seler zetrzeć na drobne wiórki. Doprawić do smaku śmie-
taną lub olejem. Dodać cukier, sok z cytryny i sól.
Ekologiczna utylizacja
To urządzenie jest oznaczone zgodnie z Dyrek-
tywą Europejską 2012/19/UE oraz polską
Ustawą z dnia 11 września 2015 r. „O zużytym
sprzęcie elektrycznym i elektronicznym” (Dz.U.
z dn. 23.10.2015 poz. 1688) symbolem prze-
kreślonego kontenera na odpady. Takie ozna-
kowanie informuje, że sprzęt ten, po okresie jego użytkowa-
nia nie może być umieszczany łącznie z innymi odpadami
pochodzącymi z gospodarstwa domowego. Użytkownik jest
zobowiązany do oddania go prowadzącym zbieranie zuży-
tego sprzętu elektrycznego i elektronicznego. Prowadzący
zbieranie, w tym lokalne punkty zbiórki, sklepy oraz gminne
jednostka, tworzą odpowiedni system umożliwiający oddanie
tego sprzętu. Właściwe postępowanie ze zużytym sprzętem
elektrycznym i elektronicznym przyczynia się do uniknię-
cia szkodliwych dla zdrowia ludzi i środowiska naturalnego
konsekwencji, wynikających z obecności składników niebez-
piecznych oraz niewłaściwego składowania i przetwarzania
takiego sprzętu.
Producent nie odpowiada za ewentualne szkody spowodowane
zastosowaniem urządzenia niezgodnie z jego przeznaczeniem lub
niewłaściwą jego obsługą.
Producent zastrzega sobie prawo modykacji wyrobu w każdej chwili,
bez wcześniejszego powiadamiania, w celu dostosowania do prze-
pisów prawnych, norm, dyrektyw albo z przyczyn konstrukcyjnych,
handlowych, estetycznych i innych.

11
Dear Customer!
Congratulations on your choice of our appliance, and
welcome among the users of Zelmer products.
In order to achieve best possible results we recommend
using exclusively original Zelmer accessories. They have
been specially designed for this product.
Please read this user manual carefully. Pay special attention
to important safety instructions. Keep this user manual for
future reference.
Appliance features
The meat mincer is to be used within the house-hold. It is
a multifunctional appliance, which can be used for quick
and effortless mincing of: meat, cheese, vegetables, poppy,
as well as for manufacturing sausages and meat products.
When an additional appliance of the meat mincer is used –
that is the shredder, it is possible to slice vegetables into:
salads, fresh vegetable salads and preserves.
Safety precautions and instructions for
proper use of the appliance
Before starting to use the appliance, become familiar
with the whole content of this user manual.
Make sure that you understand the instructions given
below.
DANGER! / WARNING!
Risk of injury
● Do not actuate the meat mincer,
if the power cord is damaged or the
encapsulation is visibly damaged.
● If the non-detachable part of the cord
is damaged, it should be replaced by
the producer or at a proper service
point or by a qualied person in
order to avoid any hazards.
● The appliance can only be repaired by
qualied service personnel. Improper
servicing may cause a serious hazard
to the user. In case of defects please
contact a qualied service center.
● Be extremely careful when operating
the appliance in the presence of
children.
● This product is not intended for use by
children. Keep the appliance and the
power cable out of reach of children.
● Appliances can be used by persons
with reduced physical, sensory
or mental capabilities or lack of
experience and knowledge if they
have been given supervision or
instruction concerning use of
the appliance in a safe way and
understand the hazards involved.
● Children shall not play with the
appliance.
● Turn the meat mincer off before
any change of equipment or before
bringing near any parts being in
move during the operation.
● Always unplug the appliance from
the electrical outlet when it is left
unattended and before assembling,
disassembling and cleaning.
● The appliance must only be used
with the feeder tray.
● Only use the appliance indoors at
room temperature and up to 2000 m
above sea level.
WARNING!
Risk of property damage
●
Do not pull the plug out from the network supply socket
by pulling the cord.
●
Always plug the appliance to the mains (AC only) with
voltage corresponding to that indicated on the rating
plate.
●
Do not expose the meat mincer or its equipment to the
temperature over 60°C. By doing that you can damage
the meat mincer.
●
In order to push use the pusher. Using other staffs may
result in damaging the meat mincer and its drive.
●
Do not overload the appliance with excessive amount
of the product, or by pushing the product too hard (with
the use of the pusher).
●
Assemble the mincing set accurately, as the improperly
screwed mincing set can result in poor mincing quality,
EN

12
as well as it can cause blunting of the cutter knife and
the screen. Blunt cutter knife and blunt screen should
be replaced with a new one.
●
When the meat mincer is operating, do not cover the
ventilation holes in the casing. Do not place the meat
mincer on soft surfaces.
●
Never immerse the drive unit of the meat mincer in
water. Never wash it under the running water.
●
Do not wash the equipment assembled within the drive
unit.
●
Do not use aggressive detergents in the form of
emulsion, milk, paste, etc. in order to wash the casing.
Among others, they can remove the informative
graphic symbols placed on the meat mincer, such as:
scales, marks, warning signs, etc.
●
Wash all accessories in warm water and washing up
liquid. Rinse and dry carefully.
●
The screens and double-side cutter must be kept
lubricated. Apply a little culinary oil to them before
using.
●
Do not run the appliance empty if the screen has not
been oiled.
HINT
Information on the product and
hints on its use
●
This appliance is intended for domestic use only.
●
Unplug the appliance after operation. Put away the
cord, pushing it gently through the opening and place
the plug in the compartment.
●
When the machine does not start – contact the service
point and leave the machine for servicing.
●
Separate the meat, which is to be minced, from bones,
tendons, cartilages and veins.
●
Before mincing, cut bigger parts into smaller elements.
●
Do not mince dry poppy. Before mincing, the poppy
needs to be washed with hot water and soaked in
water – up to several hours (a dozen or so).
●
Use a soft brush in order to wash the metal parts.
●
Do not wash the metal parts in the dishwasher.
Aggressive cleaning agents used in these appliances
can cause darkening of the above-mentioned parts.
Wash them manually, with the means of traditional
dishwashing liquids.
Technical data
Technical parameters are given on the product’s data plate.
Allowed time of continuous work of the meat mincer
10 minutes
Required break before following use of the meat mincer
30 minutes
Noise level (L
WA
): 77 dB/A
MBP – Motor Blocked Power 1900 W
Description
The meat mincer consists of:
1
Drive unit – each drive of the machine is adjusted to the
assembly of each of the mincing set and the shredder
produced by ZELMER. There are ventilation inlets inside
of the rear cavity of the motor compartment.
1a
Switch
1b
Lock button
Mincing set, which consists of:
2
Mincing chamber
3
Feed screw with assembled coupling
4
Double-side cutter
5
Screen with 4mm holes
6
Ring collar
7a
Adaptor
7b
Shredder bowl
8
Pusher
Equipment, which includes:
9
Screen with 8 mm holes
10
Screen with 2.7 mm holes
11
Sausage stuffer
12
Separator
Mechanical safety device for the motor
1
Scroll
2
Clutch
3
Screw M5x20
The meat mincer is equipped with mechanical protection,
which secures the motor against any damage – teeth of
the coupling break, when the meat mincer is overloaded
(f. ex. when bones have entered into the mincing chamber).
The broken coupling should be replaced with a new one:
●
unscrew the coupling from the feed screw,
●
remove the broken coupling,
●
put on the new coupling and screw it.
Preparing the meat mincer to work
andtheactuation of the appliance
Take out a sufcient length of the supply cord and the
appropriate accessories from the compartment.
1
Place the drive unit close to the power network socket,
on a rm surface so as not to cover the ventilation holes
within the casing.
●
Before the rst use of the meat mincer, wash the
equipment elements.
●
Assemble the appropriate equipment and join it with the
drive unit.
2
Put the power cord into the supply network socket.
3
Turn the meat mincer on with the main switch.
A
B
C

13
Operating the mincing set
Put the following elements into the mincing chamber:
1
Feed screw with the coupling towards the middle.
2
Fit the knife (4) onto the pin of the scroll (3).
3
Put the screen so that the chamber’s protrusion enters
the rut of the screen.
4
Tighten all the elements of the mincing set – until home.
5
Put the assembled unit onto the drive unit and turn into
the position, when you hear click of the safety lock.
6
Insert the adaptor
7a
into the bowl
7b
. Mount the bowl
and the adaptor on the mincing chamber.
Operating the sausage stuer
Put the following elements into the mincing chamber:
1
Feed screw with the coupling towards the middle.
2
Separator on the feed screw end.
3
The sausage stuffer.
4
Tighten all the elements of the mincing set – until home.
5
Put the assembled unit onto the drive unit and turn into
the position, when you hear click of the safety lock.
6
Insert the adaptor
7a
into the bowl
7b
. Mount the bowl
and the adaptor on the mincing chamber.
Before placing the sausage intestine (intestine wrapper)
soak it in warm water for about 10 minutes.
●
Put the wet sausage intestine onto the sausage stuffer,
paying attention not to cover the venting holes within the
sausage stuffer.
The meat mass lling the intestine cannot be
“too rare”. Large amount of uids can cause
their leakage and permeating to the interior of
the mincing machine.
Shredder with vegetable cutter
1
Fine grating disc
2
Coarse grating disc
3
Pureeing disc
4
Locking tab
5
Body
6
Tray
7
Pusher
Remove the adaptor when using the shredder.
The shredder is equipped with two drums to grate into small
and bigger chips (cheese, carrot, celery, baked beetroots,
etc.). The third grating drum (slicing drum) is used to grate
vegetables (potatoes, onion, cucumbers, etc.). The fourth
grating drum (pulping drum) is used to mash vegetables
(potatoes, beetroots, etc) and fruit.
D
H
E
8
Drum
9
Dicing insert
10
Pusher
The vegetable cube cutter is the shredder’s additional
accessory. It is used for dicing cooked vegetables, such as
potatoes, beetroots, carrots, celery, parsley, etc. Cook all
vegetables before dicing. When cooked, cut large vegetables
into smaller pieces so that they t into the dicing insert (9).
Operating the shredder
1
Recline the catch and put one of the drums with the
clutch facing the middle of the chamber.
2
Snap the catch.
3
Assemble the chamber of the shredder just as like
mincing chamber.
●
Cut large products into smaller elements, which you can
easily put into the mincing chamber.
●
Do not mash soft fruits containing stones.
●
When the work is nished pull the power cord out from
the network supply socket.
●
Remove the food remaining in the shredder chamber or
on the grater with a wooden spoon.
Blades of the drums do not require any
regeneration.
Vegetable cutter operation
The blades of the cube cutter drum are
extremely sharp. Handle carefully.
1
Release the locking tab (4) and t the drum (8) with the
coupling facing the inside of the body.
●
Snap the locking tab.
2
Fit the shredder body onto the mincer drive and turn until
it clicks into place.
3
Fit the feed tray (6) and the dicing insert (9).
●
Guide the vegetables through the feed tube using the
pusher (10).
The pusher (10) is intended for use only with the
dicing insert. Never use the pusher (10) without
the dicing insert (9) placed on the body (5).
Cut large products into smaller pieces that can
easily t into the dicing insert (9).
●
When nished, turn off and unplug the appliance.
●
Remove any food remaining in the drum or dicing insert
using a wooden spoon.
●
Disassemble the cube cutter.
To remove the dicing insert (9) rst pull out the
feed tray (6).
Never use the appliance for dicing any raw
vegetables.
F
G

14
If the products are too soft (overcooked), they
may not be diced as well as intended.
After the work has been nished
●
Turn the meat mincer off and pull the power cord out
from the network supply socket.
1a
Remove the pusher (8) and remove the food tray off the
mincing chamber (2) or the shredder chamber.
1b
Remove the pusher (8) and remove the shredder bowl
with an adaptor (7b) off the mincing chamber (2) or the
shredder bowl off the shredder chamber.
2
Press the safety lock and turn the mincing set or the
grating chamber into right and take it off.
3
Take apart all the elements of the mincing set, the
chamber with the sausage stuffer or the shredder.
Put the cord as well as cleaned and dried parts into the
storage compartment.
4
Putting the coupling in the storage compartment.
5
Putting the screen in the storage compartment.
6
Hiding the whole power cord.
Cleaning and maintenance
●
Clean the drive with a wet cloth, with an addition of
dishwashing liquid.
●
Wash the plastic parts in warm water, with addition of the
dishwashing liquid.
●
Wash the metal parts in hot water, with addition of the
dishwashing liquid.
●
Carefully dry the washed elements.
●
Assemble the dry parts of the mincing chamber or the
shredder.
●
Wash all accessories in warm water and washing up
liquid. Rinse and dry carefully.
●
The screens and double-side cutter must be kept
lubricated. Apply a little culinary oil to them before using.
Meat, vegetable and fruit dishes
In order to maintain the most of the nutrition value of the
vegetable and fruit dishes, familiarise yourself with the
methods of preparing them. Do not hold vegetables or fruits
in water and mash them just before serving and eating.
Minced pork chops
50 dag of pork meat, 6 dag of stale bread, 5 dag of onion,
2 dag of fat, 1 egg, 4 dag of crumbs, oil for frying, salt and
pepper.
Soak the bread in water and drain.
Cut the onion in slices, fry until it reaches a golden colour.
Rinse the meat with water, cut into pieces.
Mince bread, onion and meat twice in the meat mincer, using
the screen with 4 mm holes. Add the egg, salt, pepper and
carefully mix into unied mass. Form 8 oval pork chops,
1,5 cm thick, which then cover with crumbs. Fry on hot oil.
I
Pâté made of mixed meat
50 dag of pork meat, 50 dag of veal, 40 dag of pork fat,
50 dag of liver, 30 dag of onion, 20 dag of wheat bun, 4 eggs,
salt and pep per, nutmeg.
Braise the meat with pork fat and onion. Clean the liver,
peel the membranes off, dice. When the meat is soft, add
the liver, bun and braise together for a short time. Let the
ingredients cool down and mince them twice in the meat
mincer, using the strainer with 4 mm holes. To the prepared
mass add eggs, salt, peppr, nutmeg and carefully mix.
Grease the form with lard, put the pâté into the form and
bake for abour 40 minutes.
Homemade sausage
Semi fat pork meat 4,5 kg, pork fat 0,5 kg, bone stock –
1 glass, salt 6-7 teaspoons, saltpetre 1 at teaspoon, pepper
1 teaspoon (ground pepper), allspice 12-15 grains (grind),
garlic 5-6 cloves (mince), sausage intestine 7 m.
Mince the meat using the strainer with 8 mm holes. Mix
the salt with the saltpetre and spices, and add them to the
minced meat, and mix them, gradually adding the bone
stock. Put it in a cool place for 24 hours. Place the sausage
stuffer on the mincing chamber. Fill in the intestine, about
1 m long, forming segments, which are 30–40cm long. Pay
special attention not to cover the venting holes within the
attachment.
Dry the sausage for about 6 hours. Smoke with warm smoke
for about 14 hours or hot smoke for about 2,5 hours.
Red cabbage fresh salad
40 dag of red cabbage, 20 dag of apples, 2 teaspoons of oil,
lemon juice, salt and sugar.
Clean the red cabbage and slice it in a shredder, using
the drum for slicing or thick chips. Mix the sliced cabbage
with mashed apples, adding oil lemon juice, salt and sugar,
according to one’s own taste.
Celery salad
40 dag of celery, 20 dag of apples, 2 spoons of oil or cream,
lemon juice, salt, pepper.
Slice the celery into small chips. Add cream or oil according
to one’s own taste. Add sugar, lemon juice and salt.
Disposal
Dispose of packaging in an environmentally-
friendly manner. This appliance is labelled
in accordance with European Directive
2012/19/EU concerning used electrical and
electronic appliances (waste electrical and
electronic equipment – WEEE). The guideline
determines the framework for the return and recycling of
used appliances as applicable throughout the EU. Please
ask your specialist retailer about current disposal facilities.
The manufacturer does not accept any liability for any damages
resulting from unintended use or improper operation of the appliance.
The manufacturer reserves the right to modify the product at any time,
without prior notice, in order to adjust it to legal regulations, standards
and directives or due to constructional, commercial, aesthetic and
other reasons.

PL
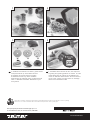
1. Szatkownica z tarkami na cienkie, grube wiórka
oraz przecierania np. ziemniaków lub sera
2.
Krajarkadokrojeniawarzywwkostkę
3. Nierdzewne sita. Trzy sita w zestawie
dostosowanedomieleniamięsa,atakżeseralub
maku 4.Nasadkamasarska.Możliwośćmycia
w zmywarce
1 2
4
Zelmer dba o środowisko. Ta instrukcja użytkowania została wydrukowana na papierze pochodzącym w100% z recyklingu.
Zelmer takes care of the environment. This user manual has been printed on 100% recycled paper.
www.zelmer.com
BSH Sprzęt Gospodarstwa Domowego Sp. z o.o.
Al. Jerozolimskie 183, 02-222 Warszawa, POLAND
EN
1. Shredder with 3 barrows for thin, tick chips and
to grating and grinding potatoes or cheese 2. Cube
cutter attachment for cutting the vegetables into
cubes 3.
Stainless steel screens. Three screens to
mince meat, cheese or poppy seeds 4. Sausage
attachment. Dishwasher safe
3
-
 1
1
-
 2
2
-
 3
3
-
 4
4
-
 5
5
-
 6
6
-
 7
7
-
 8
8
-
 9
9
-
 10
10
-
 11
11
-
 12
12
-
 13
13
-
 14
14
-
 15
15


Zelmer ZMM4198X Instrukcja obsługi
- Kategoria
- Roboty kuchenne
- Typ
- Instrukcja obsługi
w innych językach
- English: Zelmer ZMM4198X User manual
Powiązane dokumenty
-
Zelmer ZMM5688X Instrukcja obsługi
-
Zelmer ZMM3501B Instrukcja obsługi
-
Zelmer ZMM1520B Instrukcja obsługi
-
-
-
-
-
Inne dokumenty
-
eta GRATUS Instructions For Use Manual
-
-
eta Gustus Gulliver 1128 90010 Instrukcja obsługi
-
eta 0028 Instructions For Use Manual
-
Silvercrest SGR 150 A1 Operating Instructions Manual
-
NutriChef NCKNS13 Instrukcja obsługi
-
Ronco Veg-o-Matic Instrukcja obsługi
-
Lund TO-67961 Instrukcja obsługi
-
BROWIN 311005 Instrukcja obsługi
-