
SBS-DL-123 | SBS-DL-123L
BEDIENUNGSANLEITUNG
DATENLOGGER FÜR TEMPERATUR UND LUFTFEUCHTIGKEIT
USER MANUAL
TEMPERATURE & HUMIDITY DATA LOGGER
INSTRUKCJA OBSŁUGI
REJESTRATOR TEMPERATURY I WILGOTNOŚCI
MANUEL D´UTILISATION
DATALOGGER POUR LA TEMPÉRATURE ET L‘HUMIDITÉ
ISTRUZIONI PER L’USO
DATA LOGGER DI TEMPERATURA E UMIDITÀ
MANUAL DE INSTRUCCIONES
MEDIDOR DE TEMPERATURA Y HUMEDAD
NÁVOD K POUŽITÍ
DATALOGGER NA TEPLOTU A VLHKOST VZDUCHU
DE | EN | PL | CZ | FR | IT | ES

2 3
Das Produkt erfüllt die geltenden
Sicherheitsnormen.
Gebrauchsanweisung beachten.
Recycling-Produkt
INHALT | CONTENU | CONTENT | CONTENUTO | CONTENIDO | TREŚĆ | OBSAH
2
Deutsch
English
Polski
Česky
Français
Italiano
Español
3
6
9
12
15
18
21
NAZWA PRODUKTU REJESTRATOR TEMPERATURY I WILGOTNOŚCI
PRODUKTNAME DATENLOGGER FÜR TEMPERATUR UND LUFTFEUCHTIGKEIT
PRODUCT NAME TEMPERATURE & HUMIDITY DATA LOGGER
NOM DU PRODUIT DATALOGGER POUR LA TEMPÉRATURE ET L'HUMIDITÉ
NOME DEL PRODOTTO DATA LOGGER DI TEMPERATURA E UMIDITÀ
NOMBRE DEL PRODUCTO MEDIDOR DE TEMPERATURA Y HUMEDAD
NÁZEV VÝROBKU DATALOGGER NA TEPLOTU A VLHKOST VZDUCHU
MODEL PRODUKTU
SBS-DL-123
SBS-DL-123L
MODELL
PRODUCT MODEL
MODÈLE
MODELLO
MODELO
MODEL VÝROBKU
NAZWA PRODUCENTA
EXPONDO POLSKA SP. Z O.O. SP. K.
NAME DES HERSTELLERS
MANUFACTURER NAME
NOM DU FABRICANT
NOME DEL PRODUTTORE
NOMBRE DEL FABRICANTE
NÁZEV VÝROBCE
ADRES PRODUCENTA
UL. DEKORACYJNA 3, 65-155 ZIELONA GÓRA | POLAND, EU
ANSCHRIFT DES HERSTELLERS
MANUFACTURER ADDRESS
ADRESSE DU FABRICANT
INDIRIZZO DEL FORNITORE
DIRECCIÓN DEL FABRICANTE
ADRESA VÝROBCE
BEDIENUNGSANLEITUNG
DE
Rev. 05.06.2018
Rev. 05.06.2018
1. ALLGEMEINE BESCHREIBUNG
Diese Anleitung ist als Hilfe bei der sicheren und
zuverlässigen Nutzung gedacht. Das Produkt wurde strikt
nach den technischen Vorgaben und unter Verwendung
modernster Technologien und Komponenten sowie unter
Wahrung der höchsten Qualitätsstandards entworfen und
angefertigt.
HINWEIS! In der vorliegenden Anleitung sind
Beispielbilder vorhanden, die von dem tatsächlichen
Aussehen der Maschine abweichen können.
Parameter
– Beschreibung
Parameter-Wert
Produktname Datenlogger für Temperatur
und Luftfeuchtigkeit
Modell SBS-DL-123 SBS-DL-123L
Batterietyp Lithium -
Batterie 3,6V
2 x 1,5V AAA
Messbereich für
Temperatur [°C]
-35 ÷ 80 -30 ÷ 70
Temperatur-
Messgenauigkeit [%]
± 0,3 ± 0,5
Messbereich der
Luftfeuchtigkeit [%]
0-100
Feuchtemessgenau-
igkeit [%]
± 3
Schutzklasse IP IP64 IP54
Größe des
Auslesespeichers
32000
Abtastzeit 2 [s] ÷ 24 [h]
Abmessungen
H x B x T [mm]
23x37x123 25x75x120
Gewicht [kg] 0,048 0,13
TECHNISCHE DATEN
VOR INBETRIEBNAHME MUSS DIE ANLEITUNG
GENAU DURCHGELESEN
UND VERSTANDEN WERDEN.
Die originale Anweisung ist die deutschsprachige Fassung.
Sonstige Sprachfassungen sind Übersetzungen aus der
deutschen Sprache.
2. Nutzungsbedingungen
Der Datenlogger ist eine Vorrichtung zur Messung und
Aufzeichnung von Temperatur- und Luftfeuchtigkeitswerten.
Für alle Schäden bei nicht sachgemäßer Verwendung haftet
allein der Betreiber.
2.1 Gerätebeschreibung
SBS-DL-123
1. Taste
2. LED-Kontrollleuchte
3. USB-Stecker
4. USB-Abschirmung
5. LED-Kontrollleuchte
Für einen langen und zuverlässigen Betrieb des Geräts
muss auf die richtige Handhabung und Wartung
entsprechend den in dieser Anleitung angeführten
Vorgaben beachtet werden. Die in dieser Anleitung
angegebenen technischen Daten und die Spezikation sind
aktuell. Der Hersteller behält sich das Recht vor, im Rahmen
der Verbesserung der Qualität Änderungen vorzunehmen.
Unter Berücksichtigung des technischen Fortschritts und
der Geräuschreduzierung wurde das Gerät so entworfen
und produziert, dass das infolge der Geräuschemission
entstehende Risiko auf dem niedrigsten Niveau gehalten
wird.
Erläuterung der Symbole
1
25
4
3
SBS-DL-123L
1. Display
2. On/O-Taste | Auswahl
der Einheit
3. Start/Stop-Taste | Max/
Min
4. LED-Kontrollleuchte
1. Status der
Speicherbelegung
2. Temperaturmesseinheit
3. Temperaturanzeige
4. Feuchtigkeitsmesseinheit
5. Anzeige des
Feuchtigkeitswertes
6. Stunden/Jahr/Monat und
Tag
7. USB-Anschlussanzeige
8. Batterie-Ladezustandsanzeige
9. Überschreitung des Feuchtegrenzwertes
- Alarmsymbol
10. Alarmsymbol bei Überschreitung des
Temperaturgrenzwertes
11. Minimaler Wert
12. Maximaler Wert
13. Symbol, das anzeigt, dass der
Datenerfassungsmodus aktiv ist
1
4
3
2
11 12 13 1
2
3
4
59
10
8 7
6

4 5
„LOG“ (13) auf dem Display erscheint, bei der
gewählten Option „Overwrite When Full/By Button“
wird die Datenerfassung dadurch beendet, dass die
Taste gedrückt und gedrückt gehalten wird.
• C/F/ON/OFF – Die gleiche Funktion wie im
Anzeigemodus.
Werden die im Programm eingestellten Alarmschwellen
überschritten, ertönt ein Piepton.
HINWEIS: Bei beiden Modellen können Daten nur dann
gespeichert werden, wenn das Gerät an einen USB-
Anschluss Ihres Computers angeschlossen ist. Die Geräte
verfügen nicht über internen Speicher, Speicherkartenslots,
etc.
Software bedienen
• Vergewissern Sie sich, dass der Akku im Gerät nicht
entladen ist. Schließen Sie das Messgerät an den USB-
Anschluss des Computers an, auf dem die Software
Data Logger Graph und der Messgerätetreiber
installiert sind.
• Starten Sie Data Logger Graph aus dem Systemmenü
oder klicken Sie zweimal auf das Anwendungssymbol
auf dem Desktop.
• Nach dem Start der Anwendung klicken Sie auf
die Schaltäche „Start“, die sich in der linken
oberen Ecke des Dialogfensters der Anwendung
bendet. Das Fenster Data Logger Device erscheint
mit Informationen über das angeschlossene
Gerät. Wenn Sie keine Informationen über das
Messgerät im Fenster sehen, vergewissern Sie sich,
dass es ordnungsgemäß an den USB-Anschluss
angeschlossen ist und dass sich die Batterie in einem
ordnungsgemäßen Zustand bendet.
SICHERE ENTSORGUNG VON AKKUMULATOREN UND
BATTERIEN
Im Gerät werden folgende Batterien verwendet AAA 1,5V
oder Lithium 3,6V.
Demontieren Sie verbrauchte Batterien aus dem Gerät,
indem Sie die gleiche Vorgehensweise wie bei der
Installation befolgen.
Zur Entsorgung, die Batterien an die hierfür zuständige
Einrichtung / Firma weiterleiten.
ENTSORGUNG GEBRAUCHTER GERÄTE
Dieses Produkt darf am Ende seiner Nutzungsdauer nicht
über den normalen Hausmüll entsorgt werden, sondern
muss an die Sammel - und Recyclinganlage für Elektro- und
Elektronikgeräte zurückgegeben werden.
Darüber informiert Sie das Symbol auf dem Produkt, auf
der Bedienungsanleitung oder der Verpackung. Die im
Gerät verwendeten Materialien sind entsprechend ihrer
Bezeichnung recyclebar. Mit der Wiederverwendung,
erneuten Nutzung von Materialien oder anderen
Formen des Gebrauchs von Gebrauchtgeräten leisten
Sie einen wichtigen Beitrag zum Schutz unserer Umwelt.
Informationen über die entsprechenden Entsorgungspunkte
erteilen Ihnen Ihre lokalen Behörden.
DE DE
Nach dem Aktivieren des Gerätes hat die Taste eine
Funktion, die von den Benutzereinstellungen abhängig ist,
die im Fenster „Data Logger Setup“ im Reiter „Start and
Stop Method“ gewählt wurden:
• Start by Button -- Drücken Sie die Taste und halten
Sie die Taste gedrückt, um die Datenerfassung zu
starten;
• Overwrite When Full/By Button „- Beenden Sie die
Erfassung, indem Sie die Taste drücken und dann
gedrückt halten.
Die obigen Einstellungen sind Werkseinstellungen.
In anderen Fällen startet bzw. unterbricht das Gerät
automatisch die Erfassung der Messungen gem. den
Benutzereinstellungen.
Beschreibung der Bedeutung der Signale, die durch Dioden
auf dem Gerät angezeigt werden.
• Keine Signale – Gerät im Standby-Zustand; Batterie
fehlt oder ist entladen;
• Eine grüne LED blinkt alle 10 Sekunden
– Datenerfassung;
• Zwei grüne LEDs blinken alle 10 Sekunden
– Datenerfassung abgeschlossen;
• Eine rote LED blinkt alle 10 Sekunden
– Datenerfassung, Alarm auf mindestens einem
Kanal;
• Zwei rote LEDs blinken alle 10 Sekunden
– Datenerfassung abgeschlossen, Alarm auf
mindestens einem Kanal;
• Eine gelbe LED blinkt alle 60s – niedrige
Batterieladung, Datenerfassung läuft, Batterie
wechseln;
• Eine gelbe LED blinkt je 1 s – richtig angeschlossenes
USB-Gerät
• gelbe und grüne Diode blinken nacheinander
– Meldung nach Anschluss des Messgeräts an den
Computer, Batterie und Stromversorgung korrekt
• gelbe und rote Diode blinken nacheinander
– Meldung nach Anschluss des Messgerätes an einen
Computer, eingelegte Batterie und Stromversorgung
sind nicht korrekt.
SBS-DL-123L
Das Messgerät wird mit zwei Tasten bedient. Im
Anzeigemodus, ohne Datenspeicherung, haben die Tasten
folgende Funktionen:
• MAX/MIN/START/STOP – Ein einziger Tastendruck
zeigt einen Minimal – oder Maximalwert des zuletzt
erfassten Wertes auf dem Display an;
• C/F/ON/OFF – einmaliges Drücken wechselt die
Temperatureinheit, ein langes Drücken der Taste
schaltet die Anzeige aus.
Hinweis: Das Messgerät zeigt das Datum und die Uhrzeit
erst an, nachdem es an Ihren Computer angeschlossen und
der Modus „LOG“ aktiviert wurde. Jede Unterbrechung der
Stromversorgung (Herausziehen der Batterie, Ausschalten
des Displays) führt dazu, dass das Messgerät wieder an den
Computer anzuschließen ist.
Im Datenspeicherungsmodus haben die Tasten folgende
Funktionen:
• MAX/MIN/START/STOP – einmaliger Tastendruck
zeigt auf dem Display Minimalanzeige oder den
Maximalwert der zuletzt gelesenen Werte an. Wenn
der Benutzer im Programm „Start by Button“ gewählt
hat – wird die Datenerfassung dadurch gestartet,
dass diese Taste gedrückt und gedrückt gehalten
wird (Taste so lange gedrückt halten, bis die Meldung
2.2 Vorbereitung zum Betrieb
Einbau der Batterie
SBS-DL-123
Beachten Sie beim Einsetzen der Batterie die Anweisungen
in den folgenden Abbildungen. Legen Sie die Batterie
entsprechend den Polmarkierungen ein.
• Alle Anwendungsfunktionen und Einstellungen
sind in der Programmhilfe ausführlich
beschrieben. Um auf die Anwendungshilfe
zuzugreifen, wählen Sie im Menü "Hilfe"
den Punkt "DGraph Software Guide" aus der
angezeigten Liste.
Hinweis: Vermeiden Sie es, das Messgerät an dem
USB-Anschluss zu hinterlassen. Wenn das Messgerät
an einen USB-Anschluss angeschlossen bleibt, erhöht
sich der Verbrauch der Batterie zur Versorgung des
Messgeräts erheblich.
2.4 Reinigung und Wartung
• Verwenden Sie zum Reinigen der Oberäche
ausschließlich Mittel ohne ätzende
Inhaltsstoe.
• Die Batterie im Gerät nicht hinterlassen,
wenn der weitere Betrieb für längere Zeit
unterbrochen wird.
2
1 3
4
5
SBS-DL-123L
Entfernen Sie die Klappe auf der Rückseite des Geräts,
legen Sie die Batterien gemäß den Markierungen und
Zeichnungen in das Gerät ein. Dann bitte die Klappe
schließen.
Beide Modelle von Temperatur – und Feuchtemessgeräten
sind zur Wandmontage geeignet. Das Modell SBS-DL-123
ist mit einer Montagebefestigung ausgestattet, die an
die Wand geschraubt werden kann. Das Messgerät wird
anschließend in der Steckbefestigung installiert. Beim
Modell SBS-DL-123L gibt es im Gehäuse eine Bohrung für
die Befestigung des Messgerätes an einer Wandschraube.
Dieses Modell besitzt zudem eine verstellbare Stütze.
Installation der Software und des Treibers
Hardware-Voraussetzungen: Windows XP/Vista/7/8 (32bit
oder 64bit); USB-Anschluss; CD-ROM-Laufwerk.
Der Benutzer muss über Administratorrechte auf dem
Computer verfügen, auf dem das Programm und der
Treiber installiert werden.
1. Legen Sie die mitgelieferte CD in das CD-ROM-
Laufwerk Ihres Computers ein.
2. Wenn das Programm nicht automatisch startet,
bitte doppelklicken auf die Datei „setup.exe“ im
Ordner CD->Software. Der Installationsvorgang des
Programms beginnt.
3. Folgen Sie den weiteren Anweisungen aus den Pop-
up-Fenstern auf Ihrem Computerbildschirm. Nach
Abschluss der Installation erscheint auf dem Desktop
das Symbol „Data Logger Graph“.
4. Um das Auslesen der Parameter des Zählers zu
ermöglichen, muss der Treiber installiert sein, der
ebenfalls auf der CD enthalten ist.
5. Um den Treiber zu installieren, bitte doppelklicken
auf die Datei „USBpressInstaller.exe“ im Ordner CD-
>Driver directory.
6. Führen Sie weitere Anweisungen aus, die in den
Popup-Fenstern auf dem Computerbildschirm
angezeigt werden. Wenn die Treiberinstallation
abgeschlossen ist, sollte der Bildschirm
Informationen über die korrekte Treiberinstallation
anzeigen.
2.3 Arbeit mit dem Gerät
SBS-DL-123
Das Messgerät wird mit einer Taste bedient. Die Daten
können nur über den Data Logger Graph gelesen werden,
da keine Anzeige im Gerät vorhanden ist.
Rev. 05.06.2018
Rev. 05.06.2018

6 7
The product satises the relevant safety
standards.
Read the instructions before use.
The product must be recycled.
1. GENERAL DESCRIPTION
The user manual is designed to assist in the safe and
trouble-free use of the device. The product is designed
and manufactured in accordance with strict technical
guidelines, using state-of-the-art technologies and
components. Additionally, it is produced in compliance
with the most stringent quality standards.
Parameter description Parameter Value
Product name Temperature &
Humidity Data Logger
Model SBS-DL-123 SBS-DL-123L
Battery type Lithium 3,6V 2 x 1,5V AAA
Temperature
measurement range
[°C]
-35 ÷ 80 -30 ÷ 70
Accuracy of
temperature
measurement [%]
± 0,3 ± 0,5
Humidity measurement
range [%]
0-100
Accuracy of humidity
measurement [%]
± 3
IP protection class IP64 IP54
Memory size of
readings
32000
Sampling time 2 [s] ÷ 24 [h]
Dimensions
H x W x D [mm]
23x37x123 25x75x120
Weight [kg] 0,048 0,13
TECHNICAL DATA
DO NOT USE THE DEVICE UNLESS YOU HAVE
THOROUGHLY READ AND UNDERSTOOD
THIS USER MANUAL.
The original operation manual is in German. Other language
versions are translations from German.
2. Use guidelines
The temperature and humidity data logger is a device
designed to perform measurements of temperature and air
humidity.
The user is liable for any damage resulting from non-
intended uses of the device!
2.1 Device description
SBS-DL-123
1. Button
2. Diode
3. USB plug
4. USB cover
5. Diode
To increase the product life of the device and to ensure
a trouble-free operation, use it in accordance with this user
manual and regularly perform the maintenance tasks. The
technical data and specications in this user manual are
up to date. The manufacturer reserves the right to make
changes associated with quality improvement. Taking
into account technological progress and noise reduction
opportunities, the device was designed to reduce noise
emission risks to the minimum.
Legend
1
25
4
3
SBS-DL-123L
1. Display
2. On/O button |of unit
selection
3. Start/Stop button | Max/
Min
4. Diode
1. Status of memory usage
2. Temperature
measurement unit
3. Reading of temperature
value
4. Moisture measurement
unit
5. Reading of humidity
value
6. Hour/Year/Month and
day
7. USB connection indicator
8. Battery charge indicator
9. Alarm symbol for exceeding the limits of humidity
values
10. Alarm symbol for exceeding the limits of
temperature values
11. Minimum reading
12. Maximum reading
13. Symbol informing about the active mode of data
recording
1
4
3
2
11 12 13 1
2
3
4
59
10
8 7
6
The above settings are factory settings. In other cases, the
device automatically starts/stops recording according to
user settings.
Description of the meaning of the signals displayed by the
diodes on the device.
• No signals – device in inaction mode; lack of battery
or discharged battery;
• One green diode blinking every 10s – data recording;
• Two green diodes blinking every 10s – data recording
nished
• One red diode blinking every 10s – data recording,
alarm on at least one channel;
• Two red diodes blinking every 10s – data recording
nished, alarm on at least one channel;
• One yellow diode blinking every 60s – poorly
charged battery, data recording is in progress, the
battery must be replaced;
• One yellow diode blinking every 1 second – USB
correctly connected
• Blinking of yellow and green diode one after
another – message after connecting the meter to the
computer, battery and power supply correct;
• Blinking of yellow and red diode one after another –
message after connecting the meter to the computer,
battery mounted, incorrect power supply.
SBS-DL-123L
The meter is operated by two buttons. In the mode of
display only, without data recording, the buttons have the
following functions:
• MAX / MIN / START / STOP – a single press shows on
the display a minimum or maximum reading from the
last read values;
• C / F / ON / OFF – single press causes the change of
the temperature unit, holding down the button turns
o the display
Note: The meter will display the date and time only after
connecting it to the computer and activating the „LOG“
mode. Every break in power supply (removing the battery,
turning o the display) makes it necessary to connect the
meter to the computer again.
In the mode of data recording, the buttons have the
following functions:
• MAX / MIN / START / STOP – a single press shows
on the display a minimum or maximum reading
from the last read values. If the user has selected the
„Start by Button“ option in the program – pressing
and holding the button causes the start of data
recording (hold down the button until the message
„LOG“ (13) appears on the display); in the selected
„OverwriteWhen Full / By Button“ option, pressing
and holding the button causes the end of data
recording.
• C/F/ON/OFF – the function the same as in the case of
the display mode.
In the case of exceeding the alarm thresholds set in the
program, the device releases the sound signal.
NOTE: In both models, data recording it is only possible
after connecting the device to the computer‘s USB port. The
devices do not have own internal memory, slots of memory
cards, etc.
SBS-DL-123L
Remove the ap located on the back of the device, insert
the batteries according to the markings and drawings on
the device. Close the ap.
Both models of temperature and humidity meters are
adapted for wall mounting.
The model SBS-DL-123 has a mounting bracket included in
the set which should be screwed to the wall, the meter is
mounted in the holder in the pluggable manner.
The model SBS-DL-123L has a hole in the housing
for hanging the meter on a bolt screwed to the wall,
additionally this model has an adjustable support.
Program and controller installation
Hardware requirements: Windows XP / Vista / 7/8 (32bit or
64bit) operating system; USB port; CD-ROM drive.
The user must have administrator rights on a given
computer where the program and driver will be installed.
1. Place the CD attached to the set in the CD-ROM
drive of the computer.
2. If the program does not start automatically, it is
necessary to double click on the le „setup.exe“
located in the catalogue CD – > Software directory.
The program installation process will start.
3. Execute subsequent commands displayed in
boxes on the computer screen. After nishing the
installation, the „Data LoggerGraph“ program icon
will appear on the desktop.
4. In order to enable parameter readings from the
meter it is necessary to install the controller also
placed on the attached CD.
5. In order to install the controller, it is necessary
to double click on the „USBpressInstaller.exe“ le
located in the catalogue CD – > Software directory.
6. Execute the subsequent commands displayed in the
boxes on the computer screen. After nishing the
installation of the controller, information about the
correct installation of the controller should appear
on the screen.
2.3 Device use
SBS-DL-123
The meter is operated with a single button. Data reading is
possible only through the Data LoggerGraph program due
to the lack of display in the device.
After switching on the device, the button has the function
depending on user settings selected in the „Start and Stop
Method“ tab of the „Data Logger Setup“ window:
• „Start by Button – the start of data recording takes
place after pressing and holding the button;
• „OverwriteWhen Full / By Button“ – stoppage of data
recording after pressing and holding the button.
2
1 3
4
5
PLEASE NOTE! Drawings in this manual are for
illustration purposes only and in some details may
dier from the actual machine.
2.2 Preparing for use
Battery installation
SBS-DL-123
Follow the activities shown in the gures below in order to
install the battery. Insert the battery in accordance with the
markings of the poles.
USER MANUAL
EN EN
Rev. 05.06.2018
Rev. 05.06.2018

8 9
Program support
• Make sure that the battery in the device is not
discharged. Connect the meter to the USB port of the
computer in which the Data LoggerGraph software
and the meter controller have been installed.
• Start the Data LoggerGraph program (by selecting
from the system menu or by double-clicking the
program icon on the desktop).
• After starting the program, click the „Start“ button
located in the upper left corner of the dialog window
of the program. The Data Logger Device window will
appear with information about the connected one.
• If no data about the meter appears in the window,
it is necessary to verify whether it is properly
connected to the USB port and whether the battery
is in proper condition.
• All program functions and settings have
been described in detail in the program help.
In order to enter the guide of the program
support it is necessary to expand the „Help“
menu and choose the „DGraph Software
Guide“ position from the expanded list.
Note: Avoid leaving the meter connected to the USB
port. While the meter is connected to the USB port,
the consumption of the battery supplying the meter
increases signicantly.
2.4 Cleaning and maintenance
• Use cleaners without corrosive substances to
clean each surface.
• Do not leave the battery in the device, if it will
not be used for a longer period of time.
SAFE REMOVAL OF BATTERIES AND RECHARGEABLE
BATTERIES
1.5V AA or 3.6V lithium batteries are installed in the
devices.
Worn batteries must be removed from the device
proceeding analogously to their installation.
Recycle batteries
DISPOSING OF USED DEVICES
Do not dispose of this device to municipal waste
systems. Hand it over to electric and electrical device
recycling and collection point. See symbol on the
product, user manual and packaging. The plastics
used to construct the device can be recycled in
accordance with their markings. By recycling you are
making a signicant contribution to the protection
of our environment. Contact local authorities for
information on your local recycling facility.
Produkt spełnia wymagania odpowiednich norm
bezpieczeństwa.
Przed użyciem należy zapoznać się z instrukcją.
Produkt podlegający recyklingowi.
1. OGÓLNY OPIS
Instrukcja przeznaczona jest do pomocy w bezpiecznym
i niezawodnym użytkowaniu. Produkt jest zaprojektowany
i wykonany ściśle według wskazań technicznych przy
użyciu najnowszych technologii i komponentów oraz przy
zachowaniu najwyższych standardów jakości.
Opis parametru Wartość parametru
Nazwa produktu Rejestrator temperatury
i wilgotności
Model SBS-DL-123 SBS-DL-123L
Typ baterii Litowa 3,6V 2 x 1,5V AAA
Zakres pomiaru
temperatury [°C]
-35 ÷ 80 -30 ÷ 70
Dokładność pomiaru
temperatury [%]
± 0,3 ± 0,5
Zakres pomiaru
wilgotności [%]
0-100
Dokładność pomiaru
wilgotności [%]
± 3
Klasa ochrony IP IP64 IP54
Rozmiar pamięci
odczytów
32000
Czas próbkowania 2 [s] ÷ 24 [h]
Wymiary W x S x G
[mm]
23x37x123 25x75x120
Ciężar [kg] 0,048 0,13
DANE TECHNICZNE
PRZED PRZYSTĄPIENIEM DO PRACY NALEŻY
DOKŁADNIE PRZECZYTAĆ I ZROZUMIEĆ
NINIEJSZĄ INSTRUKCJĘ.
Instrukcją oryginalną jest niemiecka wersja instrukcji.
Pozostałe wersje językowe są tłumaczeniami z języka
niemieckiego.
2. Zasady użytkowania
Rejestrator temperatury i wilgotności jest urządzeniem
przeznaczonym do wykonywania pomiarów temperatury
i wilgotności powietrza.
Odpowiedzialność za wszelkie szkody powstałe
w wyniku użytkowania niezgodnego z przeznaczeniem
ponosi użytkownik.
2.1 Opis urządzenia
SBS-DL-123
1. Przycisk
2. Dioda
3. Wtyk USB
4. Osłona USB
5. Dioda
Dla zapewnienia długiej i niezawodnej pracy urządzenia
należy dbać o jego prawidłową obsługę oraz konserwację
zgodnie ze wskazówkami zawartymi w tej instrukcji. Dane
techniczne i specykacje zawarte w tej instrukcji obsługi są
aktualne. Producent zastrzega sobie prawo dokonywania
zmian związanych z podwyższeniem jakości. Uwzględniając
postęp techniczny i możliwość ograniczenia hałasu,
urządzenie zaprojektowano i zbudowano tak, aby ryzyko
jakie wynika z emisji hałasu ograniczyć do najniższego
poziomu.
Objaśnienie symboli
1
25
4
3
SBS-DL-123L
1. Wyświetlacz
2. Przycisk On/O | wyboru
jednostki
3. Przycisk Start/Stop | Max/
Min
4. Dioda
1. Status zapełnienia
pamięci
2. Jednostka pomiaru
temperatury
3. Odczyt wartości
temperatury
4. Jednostka pomiaru
wilgotności
5. Odczyt wartości
wilgotności
6. Godzina/Rok/Miesiąc
i dzień
7. Wskaźnik podłączenia USB
8. Wskaźnik naładowania baterii
9. Symbol alarmu przekroczenia limitów wartości
wilgotności
10. Symbol alarmu przekroczenia limitów wartości
temperatury
11. Minimalny odczyt
12. Maksymalny odczyt
13. Symbol informujący o aktywnym trybie zapisu
danych
1
4
3
2
11 12 13 1
2
3
4
59
10
8 7
6
UWAGA! Ilustracje w niniejszej instrukcji obsługi
mają charakter poglądowy i w niektórych
szczegółach mogą różnić się od rzeczywistego
wyglądu produktu.
EN PL
INSTRUKCJA OBSŁUGI
Rev. 05.06.2018
Rev. 05.06.2018

10 11
UWAGA: W obydwu modelach zapis danych możliwy jest
tylko po podłączeniu urządzenia do portu USB komputera.
Urządzenia nie posiadają wewnętrznej pamięci, slotów na
karty pamięci itp.
Obsługa programu
• Upewnić się, że bateria w urządzeniu nie jest
rozładowana. Podłączyć miernik do portu USB
komputera w którym zostało zainstalowane
oprogramowanie Data Logger Graph oraz sterownik
miernika.
• Uruchomić program Data Logger Graph (wybierając
z menu systemowego, lub poprzez podwójne
kliknięcie ikony programu na pulpicie).
• Po uruchomieniu się programu, kliknąć przycisk
„Start” znajdujący się w lewym górnym rogu okna
dialogowego programu. Pojawi się okno Data
Logger Device z informacjami o podłączonym. Jeśli
w oknie nie pojawią się żadne dane o mierniku należy
zwerykować, czy jest on prawidłowo podłączony do
portu USB oraz czy jego bateria jest w należytym
stanie.
• Wszystkie funkcje programu oraz ustawienia
zostały szczegółowo opisane w pomocy
programu. Aby wejść w przewodnik obsługi
programu należy rozwinąć Menu „Help” oraz
wybrać z rozwiniętej listy pozycję „DGraph
Software Guide”.
UWAGA: Unikać pozostawiania miernika
podłączonego do portu USB. W czasie gdy miernik
jest podłączony do portu USB, znacznie wzrasta
zużycie baterii zasilającej miernik.
2.4 Czyszczenie i konserwacja
• Do czyszczenia powierzchni należy stosować
wyłącznie środki niezawierające substancji
żrących.
• Nie pozostawiać baterii w urządzeniu, gdy nie
będzie ono używane przez dłuższy czas.
INSTRUKCJA BEZPIECZNEGO USUNIĘCIA
AKUMULATORÓW I BATERII
W urządzeniach zamontowane są baterie AAA 1,5V
lub litowe 3,6V.
Zużyte baterie należy zdemontować z urządzenia
postępując analogicznie do ich montażu.
Baterie przekazać komórce odpowiedzialnej za
utylizację tych materiałów.
USUWANIE ZUŻYTYCH URZĄDZEŃ
Po zakończeniu okresu użytkowania nie wolno
usuwać niniejszego produktu poprzez normalne
• „Start by Button” – rozpoczęcie zapisu danych
odbywa się po przyciśnięciu i przytrzymaniu
przycisku;
• „Overwrite When Full/By Button” – zatrzymanie
zapisu danych po przyciśnięciu i przytrzymaniu
przycisku.
Powyższe ustawienia są ustawieniami fabrycznymi. W innych
przypadkach urządzenie automatycznie rozpoczyna/
przerywa zapis pomiarów wg. ustawień użytkownika.
Opis znaczenia sygnałów wyświetlanych przez diody na
urządzeniu.
• Brak sygnałów– urządzenie w trybie bezczynności;
brak lub rozładowana bateria;
• Jedna mrugająca co 10s zielona dioda – zapis danych;
• Dwie mrugające co 10s zielone diody – zapis danych
zakończony
• Jedna mrugająca co 10s czerwona dioda – zapis
danych, alarm na co najmniej jednym kanale;
• Dwie mrugające co 10s czerwone diody – zapis
danych zakończony, alarm na co najmniej jednym
kanale;
• Jedna mrugająca co 60s żółta dioda – słabo
naładowana bateria, zapis danych trwa, należy
wymienić baterię;
• Jedna mrugająca co 1s żółta dioda – prawidłowo
podłączone USB
• Mrugnięcie jedna po drugiej diody żółtej i zielonej –
komunikat po podłączeniu miernika do komputera,
bateria i zasilanie prawidłowe
• Mrugnięcie jedna po drugiej diody żółtej i czerwonej
– komunikat po podłączeniu miernika do komputera,
bateria zamontowana, nieprawidłowe zasilanie.
SBS-DL-123L
Miernik obsługiwany jest dwoma przyciskami. W trybie
samego wyświetlania, bez zapisu danych przyciski mają
następujące funkcje:
• MAX / MIN / START / STOP – a single press shows on
the display a minimum or maximum reading from the
last read values;
• C / F / ON / OFF – single press causes the change of
the temperature unit, holding down the button turns
o the display
Uwaga: Miernik wyświetli datę i godzinę dopiero po
podłączeniu go do komputera i włączeniu trybu „LOG”.
Każda przerwa w zasilaniu (wyciągnięcie baterii, wyłączenie
wyświetlacza) powoduje, że na nowo należy podłączyć
miernik do komputera.
W trybie zapisu danych przyciski mają następujące funkcje:
• MAX/MIN/START/STOP – pojedyncze przyciśnięcie
pokazuje na wyświetlaczu minimalny lub
maksymalny odczyt z ostatnio odczytanych
wartości. Jeśli użytkownik wybrał w programie opcję
„Start by Button” – przyciśnięcie i przytrzymanie
przycisku powoduje rozpoczęcie zapisu danych
(przytrzymywać przycisk do momentu pojawienia się
komunikatu „LOG” (13) na wyświetlaczu, w wybranej
opcji „Overwrite When Full/By Button” przyciśnięcie
i przytrzymanie przycisku powoduje zakończenie
zapisu danych.
• C/F/ON/OFF – funkcja taka sama jak w przypadku
trybu wyświetlania.
W przypadku przekroczenia progów alarmów ustawionych
w programie urządzenie wydaje sygnał dźwiękowy.
SBS-DL-123L
Zdemontować klapkę znajdującą się z tyłu urządzenia,
włożyć baterie zgodnie z oznaczeniami i rysunkami na
urządzeniu. Zamknąć klapkę.
Obydwa modele mierników temperatury i wilgotności są
przystosowane do montażu na ścianie. Model SBS-DL-123
posiada w zestawie uchwyt montażowy, który należy
przykręcić do ściany, miernik mocuje się w uchwycie na
wcisk. W modelu SBS-DL-123L w obudowie znajduje się
otwór do zawieszenia miernika na śrubie przykręconej
do ściany, dodatkowo model ten posiada regulowaną
podpórkę.
Instalacja programu oraz sterownika
Wymagania sprzętowe: system operacyjny Windows XP/
Vista/7/8(32bit lub 64bit); port USB; napęd CD-ROM.
Użytkownik musi posiadać uprawnienia administratora na
danym komputerze, gdzie zostaną zainstalowane program
oraz sterownik.
1. Umieścić załączoną do zestawu płytę CD w napędzie
CD-ROM komputera.
2. Jeśli pogram nie uruchomi się automatycznie, należy
dwukrotnie kliknąć plik „setup.exe” znajdujący się
w katalogu CD->Software directory. Rozpocznie się
proces instalacji programu.
3. Wykonywać kolejne polecenia wyświetlające się
w okienkach na ekranie komputera. Po zakończeniu
instalacji na pulpicie pojawi się ikona programu
„Data Logger Graph”.
4. Aby umożliwić odczyt parametrów z miernika należy
zainstalować sterownik, również zamieszczony na
dołączonej płycie CD.
5. W celu zainstalowania sterownika dwukrotnie
kliknąć plik „USBpressInstaller.exe” znajdujący się
w katalogu CD->Driver directory.
6. Wykonywać kolejne polecenia wyświetlające się
w okienkach na ekranie komputera. Po zakończeniu
instalacji sterownika na ekranie powinna pojawić się
informacja o poprawnym zainstalowaniu sterownika.
2.3 Praca z urządzeniem
SBS-DL-123
Miernik obsługiwany jest jednym przyciskiem. Odczyt
danych jest możliwy tylko poprzez program Data Logger
Graph ze względu na brak wyświetlacza w urządzeniu.
Po włączeniu urządzenia przycisk ma funkcję zależną od
ustawień użytkownika wybranych w zakładce „Start and
Stop Method” okna „Data Logger Setup”:
2
1 3
4
5
2.2 Przygotowanie do pracy
Montaż baterii
SBS-DL-123
W celu zamontowania baterii postępować zgodnie
z czynnościami pokazanymi na poniższych rysunkach.
Baterię umieścić zgodnie z oznaczeniami biegunów.
odpady komunalne, lecz należy go oddać do punktu zbiórki
i recyklingu urządzeń elektrycznych i elektronicznych.
Informuje o tym symbol, umieszczony na produkcie,
instrukcji obsługi lub opakowaniu. Zastosowane
w urządzeniu tworzywa nadają się do powtórnego
użycia zgodnie z ich oznaczeniem. Dzięki powtórnemu
użyciu, wykorzystaniu materiałów lub innym formom
wykorzystania zużytych urządzeń wnoszą Państwo
istotny wkład w ochronę naszego środowiska. Informacji
o właściwym punkcie usuwania zużytych urządzeń udzieli
Państwu lokalna administracja.
PL PL
Rev. 05.06.2018
Rev. 05.06.2018

12 13
Výrobek splňuje požadavky příslušných
bezpečnostních norem.
Před použitím se seznamte s návodem.
Recyklovatelný výrobek.
1. VŠEOBECNÝ POPIS
Návod slouží jako nápověda pro bezpečné a spolehlivé
používání. Výrobek je navržen a vyroben přesně podle
technických údajů s použitím nejnovějších technologií
a komponentů a se zachováním nejvyšších jakostních
standardů.
Popis parametru Hodnota parametru
Název výrobku Datalogger na teplotu
a vlhkost vzduchu
Model SBS-DL-123 SBS-DL-123L
Typ baterie lithiová 3,6V 2 x 1,5V AAA
Rozsah měření teploty
[°C]
-35 ÷ 80 -30 ÷ 70
Přesnost měření teploty
[%]
± 0,3 ± 0,5
Rozsah měření vlhkosti
[%]
0-100
Přesnost měření
vlhkosti [%]
± 3
Stupeň krytí IP IP64 IP54
Velikost krátkodobé
paměti
32000
Doba vzorkování 2 [s] ÷ 24 [h]
Rozměry V x Š x H [mm] 23x37x123 25x75x120
Hmotnost [kg] 0,048 0,13
TECHNICKÉ ÚDAJE
PŘED ZAHÁJENÍM PRÁCE SI DŮKLADNĚ PŘEČTĚTE
TENTO NÁVOD A SNAŽTE SE JEJ POCHOPIT.
Originálním návodem je německá verze návodu. Ostatní
jazykové verze jsou překladem z německého jazyka.
2. Zásady používání
Datalogger na teplotu a vlhkost vzduchu je zařízení určené
pro měření teploty a vlhkosti vzduchu.
Odpovědnost za veškeré škody vzniklé v důsledku
použití zařízení v rozporu s určením nese uživatel.
2.1 Popis zařízení
SBS-DL-123
1. Spínač
2. LED-Kontrolka
3. USB konektor
4. Kryt na USB konektor
5. LED-Kontrolka
Pro zajištění dlouhého a spolehlivého fungování zařízení
provádějte pravidelný servis a údržbu v souladu s pokyny
uvedenými v tomto návodu. Technické údaje a specikace
uvedené v návodu k obsluze jsou aktuální. Výrobce si
vyhrazuje právo provádět změny pro zvýšení kvality.
Vzhledem k technickému pokroku a možnosti omezení
hluku bylo zařízení navrženo a vyrobeno tak, aby nebezpečí
vyplývající z emise hluku bylo omezeno na nejnižší úroveň.
Vysvětlení symbolů
1
25
4
3
SBS-DL-123L
1. Displej
2. Tlačítko On/O | výběru
jednotky
3. Tlačítko Start/Stop | Max/
Min
4. LED-Kontrolka
1. Status zaplnění paměti
2. Jednotka měření teploty
3. Ukazatel hodnoty teploty
4. Jednotka měření vlhkosti
5. Ukazatel hodnoty
vlhkosti
6. Čas/Rok/Měsíc a den
7. Ukazatel připojení USB
8. Ukazatel nabití baterie
9. Symbol alarmu
překročení limitních
hodnot vlhkosti
10. Symbol alarmu překročení limitních hodnot teploty
11. Minimální hodnota
12. Maximální hodnota
13. Symbol indikující aktivní režim evidence údajů
2.2 Příprava k práci
Vložení baterie
SBS-DL-123
Chcete-li vložit baterii, postupujte podle znázorněného
poskupu níže. Baterii vložte s dodržením polarity.
1
4
3
2
11 12 13 1
2
3
4
59
10
8 7
6
POZOR! Obrázky v tomto návodu jsou ilustrační.
V některých detailech se od skutečného vzhledu
stroje mohou lišit.
• Jedna žlutá kontrolka blikající každých 60 vteřin
– téměř vybitá baterie, uložení údajů trvá, vyměňte
baterii;
• Jedna žlutá kontrolka blikající každou 1 vteřin
– správně připojené USB;
• Bliknutí žluté a zelené kontrolky po sobě – zpráva
o připojení měřiče k počítači, baterie a polarita jsou
správné;
• Bliknutí žluté a červené kontrolky po sobě – zpráva
o připojení měřiče k počítači, baterie vložená,
nesprávná polarita.
SBS-DL-123L
Měřič se ovládá dvěma tlačítky. V režimu samotného
zobrazování, bez uložení údajů mají tlačítka následující
funkce:
• MAX/MIN/START/STOP – jedno stisknutí zobrazí
na displeji minimální nebo maximální načtení
z naposledy načtených hodnot;
• C/F/ON/OFF – jedno stisknutí způsobí změnu
jednotky teploty, přidržení tlačítka vypne displej.
UPOZORNĚNÍ: Měřič zobrazí datum a čas teprve po
připojení k počítači a zapnutí režimu „LOG“. Každá přestávka
v napájení (vytažení baterie, vypnutí displeje) způsobí, že je
třeba znovu připojit měřič k počítači.
V režimu uložení údajů mají tlačítka následující funkce:
• MAX/MIN/START/STOP – jedno stisknutí zobrazí
na displeji minimální nebo maximální načtení
z naposledy načtených hodnot. Pokud si zvolíte
v programu nabídku „Start by Button“ – stisknutí
a přidržení tlačítka spustí uložení údajů (přidržujte
tlačítko do okamžiku zobrazení zprávy „LOG“ (13) na
displeji, ve vybrané nabídce „Overwrite When Full/By
Button“ stisknutí a přidržení tlačítka ukončí uložení
údajů.
• C/F/ON/OFF – funkce stejná jako v případě režimu
zobrazování.
Při překročení alarmových hodnot nastavených v programu
zazní zvukový signál.
UPOZORNĚNÍ: U obou modelů je uložení údajů možné
pouze po připojení zařízení k USB portu počítače. Zařízení
nemají vnitřní paměť, sloty na paměťové karty atp.
Obsluha programu
• Ujistěte se, že baterie v zařízení není vybitá. Měřič
připojte k USB portu počítače, ve kterém byl
nainstalován software Data Logger Graph a ovladač
měřiče.
• Spusťte program Data Logger Graph (výběrem
ze systémového menu nebo dvojklikem na ikonu
programu na panelu).
• Po spuštění programu klikněte na tlačítko „Start“
umístěné v levém horním rohu dialogového okna
programu. Zobrazí se okno Data Logger Device
s informacemi o připojení. Pokud se v okně nezobrazí
žádné údaje měřiče, zkontrolujte, zda je měřič
správně připojen k USB portu a zda je baterie nabitá.
SBS-DL-123L
Vytáhněte víčko na zadní straně zařízení, vložte baterii
podle označení a obrázků na zařízení. Nasaďte zpět víčko.
Oba modely měřičů teploty a vlhkosti jsou přizpůsobeny
montáži na stěnu. Model SBS-DL-123 má v sadě montážní
držák, který přišroubujte na stěnu, měřič zasuňte tlakem do
držáku. U modelu SBS-DL-123L se v krytu nachází otvor pro
zavěšení měřiče na šroub zašroubovaný do stěny, navíc má
tento model nastavitelnou vzpěru.
Instalace programu a ovladače
Hardwarové požadavky: operační systém Windows XP/
Vista/7/8 (32 bit nebo 64 bit); USB port; mechanika CD-
ROM.
Uživatel musí mít oprávnění administrátora pro daný
počítač, ve kterém budou nainstalovány program a ovladač.
1. CD disk přiložený v sadě vložte do mechaniky CD-
ROM počítače.
2. Pokud se program automaticky nespustí, klikněte
dvakrát na soubor „setup.exe“ umístěný v adresáři
CD->Software directory. Zahájí se proces instalace
programu.
3. Provádějte další pokyny zobrazující se v oknech
na obrazovce počítače. Po ukončení instalace se
na panelu zobrazí ikona programu „Data Logger
Graph“.
4. Chcete-li načíst parametry z měřiče, nainstalujte
ovladač, který je také na přiloženém CD disku.
5. Chcete-li nainstalovat ovladač, klikněte dvakrát na
soubor „USBpressInstaller.exe“ umístěný v adresáři
CD->Driver directory.
6. Provádějte další pokyny zobrazující se v oknech na
obrazovce počítače. Po ukončení instalace ovladače
se na obrazovce musí zobrazit zpráva o správné
instalaci ovladače.
2.3 Práce se zařízením
SBS-DL-123
Měřič se ovládá jedním tlačítkem. Údaje můžete načíst
pouze pomocí programu Data Logger Graph, protože
v zařízení není displej. Po zapnutí zařízení má tlačítko funkci
závislou na uživatelském nastavení vybraném v záložce
„Start and Stop Method“ okna „Data Logger Setup“:
• „Start by Button – údaje budou uloženy po stisknutí
a přidržení tlačítka;
• „Overwrite When Full/By Button“ – uložení údajů se
zastaví po stisknutí a přidržení tlačítka.
Výše uvedená nastavení jsou tovární nastavení. V jiných
případech zařízení automaticky zahájí/přeruší uložení
výsledků měření podle uživatelského nastavení.
Popis významu signálů indikovaných kontrolkami na
zařízení.
• Není signál – zařízení je nečinné; baterie chybí nebo
je vybitá;
• Jedna zelená kontrolka blikající každých 10 vteřin
– uložení údajů;
• Dvě zelené kontrolky blikající každých 10 vteřin
– uložení údajů ukončeno;
• Jedna červená kontrolka blikající každých 10 vteřin
– uložení údajů, alarm alespoň na jednom kanále;
• Dvě červené kontrolky blikající každých 10
vteřin uložení údajů ukončeno, alarm alespoň na
jednom kanále;
2
1 3
4
5
NÁVOD K OBSLUZE
CZ CZ
Rev. 05.06.2018
Rev. 05.06.2018

14 15
• Všechny funkce programu a nastavení byly
podrobně popsány v nápovědě programu. Chcete-
li vstoupit do průvodce obsluhy programu, rozbalte
Menu „Help“ a z rozbalené nabídky vyberte položku
„DGraph Software Guide“.
Upozornění: Nenechávejte měřič připojený k USB portu. Po
dobu, kdy je měřič připojený k USB portu, značně se vybíjí
baterie napájející měřič.
2.4 Čištění a údržba
• K čištění povrchu používejte výhradně prostředky
neobsahující žíravé látky.
• Pokud zařízení nebudete používat delší dobu,
vytáhněte z něj baterii.
NÁVOD K BEZPEČNÉMU ODSTRANĚNÍ AKUMULÁTORŮ
A BATERIÍ
V zařízeních se používají baterie AAA 1,5 V nebo lithiové
3,6 V.
Vybité baterie vyjměte ze zařízení, postupujte v opačném
pořadí než při vkládání.
Baterie odevzdejte do sběrny odpadů.
LIKVIDACE OPOTŘEBENÝCH ZAŘÍZENÍ
Po ukončení doby používání nevyhazujte tento výrobek
společně s komunálním odpadem, ale odevzdejte jej
k recyklaci do sběrny elektrických a elektronických zařízení.
O tom informuje symbol umístěný na zařízení, v návodě
k obsluze nebo na obalu. Komponenty použité v zařízení
jsou vhodné pro zužitkování v souladu s jejich označením.
Díky zužitkování, recyklaci nebo jiným způsobům využití
opotřebených zařízení významně přispíváte k ochraně
životního prostředí. Informace o příslušné sběrně
opotřebených zařízení poskytne místní obecný nebo
městský úřad.
Le produit est conforme aux normes de sécurité
en vigueur.
Veuillez lire attentivement ces instructions
d'emploi.
Produit recyclable.
1. DESCRIPTION GÉNÉRALE
Le manuel est conçu comme un guide pour une utilisation
sûre et able. Le produit a été strictement conçu et
fabriqué selon les spécications techniques établies et
avec l‘utilisation des technologies et des composants les
plus modernes, ainsi qu’en conformité avec les plus hauts
standards de qualité.
ATTENTION! Certaines illustrations, présentes
dans cette notice, peuvent diérer de la véritable
apparence de l‘appareil.
Description
des paramètres
Valeur de paramètre
Nom du produit Enregistreur de données pour
la température et l‘humidité
Modèle SBS-DL-123 SBS-DL-123L
Type de pile Pile au lithium
3,6V
2 x 1,5V AAA
Plage de mesure de
la température [°C]
-35 ÷ 80 -30 ÷ 70
Précision de mesure
de la température [%]
± 0,3 ± 0,5
Plage de mesure
de l‘humidité [%]
0-100
Précision de mesure
de l‘humidité [%]
± 3
Classe de protection
IP
IP64 IP54
Taille de la mémoire
de lecture
32000
Temps de
prélèvement
2 [s] ÷ 24 [h]
Dimensions
H x B x T [mm]
23x37x123 25x75x120
Poids [kg] 0,048 0,13
DÉTAILS TECHNIQUES
AVANT LA MISE EN SERVICE, LES INSTRUCTIONS
D’UTILISATION DOIVENT ÊTRE LUS ET COMPRISES
DE FAÇON PRÉCISE.
La version originale de ce manuel a été rédigée en allemand.
Les autres versions sont des traductions de l‘allemand.
2. CONDITIONS D‘UTILISATION
L‘enregistreur de données pour la température et
l‘humidité est un appareil de mesure de la température et
de l‘humidité.
L‘utilisateur est seul responsable de tout dommage causé
par une mauvaise utilisation.
2.1 Description de l‘appareil
SBS-DL-123
1. Touche
2. Achage LED
3. Connecteur USB
4. Protection USB
5. Achage LED
Pour garantir un fonctionnement durable et able de
l‘appareil, une attention particulière doit être portée
à la manipulation et à l‘entretien correct, conformément
aux instructions données dans ce manuel. Les données
techniques et spécications présentes dans ce manuel
sont actuellement en vigueur. Le fabricant se réserve
le droit d‘apporter des modications dans le cadre de
l‘amélioration de la qualité. En prenant en compte les
progrès techniques et la réduction des bruits, l‘appareil
a été conçu et fabriqué de façon à maintenir le niveau le
plus bas possible des risques causés par l‘émission de bruit.
Explication des symboles
1
25
4
3
SBS-DL-123L
1. Écran
2. Touche Marche/Arrêt
(On/O)| Sélection de
l‘unité
3. Touche Démarrage/Arrêt
(Start/Stop) | Max/Min
4. Achage LED
1. Statut d‘utilisation de
mémoire
2. Unité de mesure de la
température
3. Achage de la
température
4. Unité de mesure de
l‘humidité
5. Achage de l‘humidité
6. Heures/année/mois et
jour
7. Achage du connecteur USB
8. Achage de l‘état de charge des piles
9. Symbole d‘alarme de dépassement de la valeur
limite de l‘humidité
10. Symbole d‘alarme de dépassement de la valeur
limite de la température
11. Valeur minimale
12. Valeur maximale
13. Symbole montrant que le mode de saisie des
données est actif
1
4
3
2
11 12 13 1
2
3
4
59
10
8 7
6
CZ FR
MANUEL D‘UTILISATION
Rev. 05.06.2018
Rev. 05.06.2018

16 17
touche appuyée jusqu‘à ce que le message «LOG»
(13) apparaisse sur l‘écran, dans le cas de l‘option
«Overwrite When Full/By Button», la saisie des
données est achevée en appuyant sur la touche et
en la maintenant enfoncée.
• C/F/ON/OFF – La même fonction qu‘en mode
d‘achage.
Si les seuils d‘alarmes réglés dans le programme sont
dépassés, un bip sonore retentit.
INDICATION: pour les deux modèles, les données ne
peuvent être sauvegardées que si l‘appareil est connecté
à un connecteur USB de votre ordinateur. Les appareils ne
disposent pas de mémoire interne, de logement pour carte
mémoire, etc.
Utiliser le logiciel
• Assurez-vous que l‘accumulateur dans l‘appareil
n‘est pas déchargé. Connectez l‘appareil de mesure
au connecteur USB de l‘ordinateur sur lequel le
logiciel Data Logger Graph et le pilote de l‘appareil
de mesure sont installés.
• Lancez Data Logger Graph depuis le menu système
ou cliquez deux fois sur le symbole d‘utilisation sur
l‘environnement de bureau (Desktop).
• Une fois l‘application lancée, cliquez sur le bouton
«Start» qui se trouve dans le coin gauche supérieur
de la boîte de dialogue de l‘application. La fenêtre
Data Logger Device apparaît avec des informations
sur l‘appareil connecté. Si vous ne voyez pas
d‘informations sur l‘appareil de mesure dans
la fenêtre, assurez-vous qu‘il est correctement
connecté au connecteur USB et que la pile se trouve
dans un état normal.
ÉLIMINATION SÛRE DES ACCUMULATEURS ET PILES
Dans l‘appareil, les piles suivantes sont utilisées: AAA 1,5V
ou lithium 3,6V.
Retirez les piles usagées de l‘appareil en suivant la même
procédure que pour l‘installation.
Pour l‘élimination, remettez les piles à l‘organisme/
l‘entreprise compétent(e) en la matière.
ÉLIMINATION DES APPAREILS USAGÉS
A la n de sa durée d‘utilité, ce produit ne doit pas être
jeté dans les ordures ménagères normales, mais il doit
être rendu à l‘installation de collecte et de recyclage pour
appareils électriques et électroniques.
Le symbole sur le produit, sur la notice d‘utilisation ou sur
l‘emballage vous informe à ce sujet. Les matériaux utilisés
dans l‘appareil sont recyclables conformément à leur
désignation. En réutilisant ou en utilisant à nouveau des
matériaux ou par d‘autres formes d‘utilisation d‘appareils
usagés, vous contribuez de manière importante à la
protection de notre environnement. Les administrations
locales vous fournissent les informations concernant les
centres d‘élimination.
• Toutes les fonctions de l‘application et tous les
réglages sont décrits de façon détaillée dans
l‘aide générale du programme. Pour accéder
à l‘aide de l‘application, choisissez dans le
menu «Aide» le point «DGraph Software
Guide» de la liste achée.
Indication: Évitez de laisser l‘appareil de mesure
connecté au connecteur USB. Si l‘appareil de
mesure reste connecté à un connecteur USB, la
consommation de la pile pour l‘approvisionnement
de l‘appareil est considérablement augmentée.
2.4 Nettoyage et entretien
• Pour nettoyer la surface, utilisez exclusivement
des produits sans substances caustiques.
• Ne pas laisser la pile dans l‘appareil si le
fonctionnement est interrompu pour une plus
longue période.
Suite à l‘activation de l‘appareil, la touche a une fonction
dépendante des réglages utilisateur qui ont été choisis
dans la fenêtre « Data Logger Setup » dans l‘onglet « Start
and Stop Method »:
• Start by Button -- Appuyez sur la touche et
maintenez-la enfoncée pour lancer la saisie des
données;
• Overwrite When Full/By Button – Arrêtez la saisie en
appuyant sur la touche et en la maintenant enfoncée.
Les réglages ci-dessus sont des réglages par défaut.
Dans d‘autres cas, l‘appareil lance ou interrompt
automatiquement la saisie des mesures conformément aux
réglages utilisateur.
Description de l‘importance des signaux qui sont indiqués
sur l‘appareil par des diodes.
• Pas de signaux – Appareil en état de veille; pile
manque ou est déchargée;
• Une LED verte clignote toutes les 10 secondes
– Saisie des données;
• Deux LED vertes clignotent toutes les 10 secondes
– Saisie des données achevée;
• Une LED rouge clignote toutes les 10 secondes
– Saisie des données, alarme sur au moins un canal;
• Deux LED rouges clignotent toutes les 10 secondes
– Saisie des données achevée, alarme sur au moins
un canal;
• Une LED jaune clignote toutes les 60 secondes
– Niveau de charge de la pile faible, la saisie est en
cours, changer la pile;
• Une LED jaune clignote chaque seconde – Appareil
USB correctement connecté.
• Les diodes jaune et verte clignotent l‘une après
l‘autre – signal après connexion de l‘appareil de
mesure à l‘ordinateur, pile et alimentation électrique
corrects.
• Les diodes jaune et rouge clignotent l‘une après
l‘autre – signal après connexion de l‘appareil de
mesure à un ordinateur, pile insérée et alimentation
électrique incorrects.
SBS-DL-123L
L‘appareil de mesure est commandé avec deux touches. En
mode d‘achage, sans stockage des données, les touches
ont les fonctions suivantes:
• MAX/MIN/START/STOP – Une pression unique sur la
touche indique sur l‘écran une valeur minimale ou
maximale de la valeur saisie en dernier;
• C/F/ON/OFF – Une pression unique change l‘unité de
température, une longue pression de la touche éteint
l‘achage.
Indication: l‘appareil de mesure n‘indique la date et l‘heure
qu‘après avoir été connecté à votre ordinateur et après
que le mode « LOG » a été activé. Chaque interruption
de l‘alimentation en courant (pile retirée, écran éteint)
conduit à la nécessité de reconnecter l‘appareil de mesure
à l‘ordinateur.
En mode de stockage des données, les touches ont les
fonctions suivantes:
• MAX/MIN/START/STOP – Une pression unique
indique sur l‘écran la valeur la plus basse ou la plus
élevée des valeurs lues en dernier. Si l‘utilisateur
a choisi dans le programme « Start by Button », la
saisie des données est lancée en appuyant sur la
touche et en la maintenant enfoncée (Laisser la
2.2 Préparation au fonctionnement
Installation de la pile
SBS-DL-123
Lors de l‘installation de la pile, veuillez suivre les instructions
représentées dans les illustrations suivantes. Insérez la pile
selon les marques de polarité.
2
1 3
4
5
SBS-DL-123L
Enlevez le couvercle au dos de l‘appareil, insérez la pile
dans l‘appareil conformément au marquage et aux signes.
Refermez ensuite le couvercle.
Les deux modèles d‘appareils de mesure de la température
et de l‘humidité sont adaptés pour un montage mural. Le
modèle SBS-DL-123 est équipé d‘une xation de montage
qui peut être vissée au mur. L‘appareil de mesure est
ensuite installé sur la xation enchable. Dans le modèle
SBS-DL-123L, il y a un trou dans le boîtier pour la xation
de l‘appareil de mesure à une vis murale. De plus, ce
modèle possède un support réglable.
Installation du logiciel et du pilote informatique
Conditions du matériel informatique: Windows XP/
Vista/7/8 (32bit ou 64bit); Connecteur USB; Lecteur de CD-
ROM.
L‘utilisateur doit disposer des droits d‘administration
sur l‘appareil dans lequel le programme et le pilote
informatique sont installés.
1. Insérez le CD fourni dans le lecteur de CD-ROM de
votre ordinateur.
2. Si le programme ne démarre pas automatiquement,
veuillez double-cliquer sur le chier «setup.exe» dans
le classeur CD->Software. Le processus d‘installation
du programme est démarré.
3. Suivez les instructions de la fenêtre pop-up sur votre
écran d‘ordinateur. Une fois l‘installation terminée, le
symbole « Data Logger Graph » apparaît sur l‘écran.
4. Pour permettre la lecture des paramètres du
compteur, le pilote également contenu sur le CD
doit être installé.
5. Pour installer le pilote, veuillez double-cliquer sur le
chier «USBpressInstaller.exe» dans le classeur CD-
>Driver directory.
6. Exécutez les instructions achées dans les fenêtres
pop-up sur l‘écran de l‘ordinateur. Lorsque
l‘installation du pilote est terminée, l‘écran devrait
montrer des informations concernant l‘installation
correcte du pilote.
2.3 Travail avec l‘appareil
SBS-DL-123
L‘appareil de mesure est commandé au moyen d‘une
touche. Les données ne peuvent être lues qu‘au moyen
du graphe d‘enregistrement des données (Data Logger
Graph), car il n‘y a pas d‘achage dans l‘appareil.
FR FR
Rev. 05.06.2018
Rev. 05.06.2018

18 19
Il prodotto soddisfa le attuali norme di
sicurezza.
Leggere attentamente le istruzioni
Prodotto riciclabile.
1. DESCRIZIONE GENERALE
Queste istruzioni sono intese come ausilio per un uso sicuro
e adabile. Il prodotto è stato rigorosamente progettato
e realizzato secondo le disposizioni tecniche e l‘utilizzo
delle tecnologie e componenti più moderne, seguendo gli
standard di qualità più elevati.
ATTENZIONE! Le immagini in questo manuale
sono puramente dimostrative per cui i singoli
dettagli possono dierire dall‘aspetto reale
dell‘apparecchio.
Parametro
– Descrizione
Parametro – Valore
Nome del prodotto Data logger per
temperatura e umidità
Modello SBS-DL-123 SBS-DL-123L
Tipo di batteria Batteria al
litio 3,6V
2 x 1,5V AAA
Intervallo di
misurazione per la
temperatura [°C]
-35 ÷ 80 -30 ÷ 70
recisione di
misurazione
dell‘umidità [%]
± 0,3 ± 0,5
Intervallo di
misurazione
dell‘umidità [%]
0-100
Precisione di misu-
razione dell‘umidità
[%]
± 3
Classe di protezione
IP
IP64 IP54
Dimensione della
memoria di lettura
32000
Tempo di scansione 2 [s] ÷ 24 [h]
Dimensioni
(A x L x P) [mm]
23x37x123 25x75x120
Peso [kg] 0,048 0,13
DATI TECNICI
PRIMA DELLA MESSA IN FUNZIONE È NECESSARIO
LEGGERE E COMPRENDERE LE ISTRUZIONI D‘USO.
Il manuale originale è stato scritto in tedesco. Le versioni in
altre lingue sono traduzioni dalla lingua tedesca.
2. Condizioni d‘uso
Il data logger per temperatura e umidità è uno strumento
per la misurazione della temperatura e dell‘umidità dell‘aria.
L‘operatore è responsabile di tutti i danni derivanti da un
uso improprio.
2.1 Descrizione del dispositivo
SBS-DL-123
1. Tasto
2. Indicatore al LED
3. Attacco USB
4. Schermatura USB
5. Indicatore al LED
Per un funzionamento duraturo e adabile del
dispositivo bisogna assicurarsi di maneggiarlo e curarne
la manutenzione secondo le disposizioni presentate in
questo manuale. I dati e le speciche tecniche indicati in
questo manuali sono attuali. Il fornitore si riserva il diritto di
apportare delle migliorie nel contesto del miglioramento dei
propri prodotti. Prendendo in considerazione il progresso
tecnico e la riduzione di rumore, l‘apparecchiatura è stata
progettata e realizzata in maniera tale da mantenere al
minimo il livello di rumore e di conseguenti rischi.
Spiegazione dei simboli
1
25
4
3
SBS-DL-123L
1. Schermo
2. Pulsante On/O |
Selezione dell‘unità
3. Tasto Start/Stop |
Max/Min
4. Indicatore al LED
1. Stato di utilizzo della
memoria
2. Unità di misura della
temperatura
3. Visualizzazione
temperatura
4. Misuratore di umidità
5. Indicazione del valore
dell‘umidità
6. Ora/anno/mese e giorno
7. Indicatore di connessione
USB
8. Indicatore livello di carica della batteria
9. Superamento del valore limite di umidità – simbolo
di allarme
10. Simbolo di allarme in caso di superamento del
valore limite di temperatura
11. Valore minimo
12. Valore massimo
13. Simbolo che indica che la modalità di raccolta dati
è attiva
1
4
3
2
11 12 13 1
2
3
4
59
10
8 7
6
• Avviare con il pulsante (start by button) – Tenere
premuto il pulsante per avviare la raccolta dati;
• Sovrascrivi quando è pieno (Overwrite when full)
– Per terminare la raccolta, tenere premuto il tasto.
Le impostazioni indicate sopra sono quelle di fabbrica. Negli
altri casi, lo strumento avvia o interrompe automaticamente
la registrazione delle misurazioni in base alle impostazioni
dell‘utente.
Descrizione del signicato dei segnali mostrati sul
dispositivo tramite i diodi.
• Nessun segnale – dispositivo in standby; la batteria
è assente o scarica;
• Ogni 10 secondi lampeggia un LED verde
– Acquisizione dei dati;
• Due LED verdi lampeggiano ogni 10 secondi
– Acquisizione dati completata;
• Un LED rosso lampeggia ogni 10 secondi
– Acquisizione dati, allarme su almeno un canale;
• Due LED rossi lampeggiano ogni 10 secondi
– Acquisizione dati completata, allarme su almeno
un canale;
• Un LED giallo lampeggia ogni 60 secondi – batteria
scarica, acquisizione dati in corso, sostituire la
batteria;
• Un LED giallo lampeggia ogni 1 secondo – dispositivo
USB collegato correttamente.
• I diodi giallo e verde lampeggiano uno dopo l‘altro,
indicando che lo strumento è collegato al computer,
che la batteria e l‘alimentazione sono corrette.
• I diodi giallo e rosso lampeggiano uno dopo l‘altro
– indicazione dopo aver collegato lo strumento a un
computer, la batteria inserita e l‘alimentazione non
sono corretti.
SBS-DL-123L
Lo strumento funziona con due pulsanti. Nella modalità
di visualizzazione, senza memorizzazione dei dati, i tasti
hanno le seguenti funzioni:
• MAX/MIN/START/START/STOP – Una singola
pressione di un tasto mostra sul display un valore
minimo o massimo dell‘ultimo valore acquisito;
• C/F/ON/OFF – Premendo una volta si cambia l‘unità
di temperatura, premendo a lungo il tasto si spegne
il display.
Avvertenza: lo strumento non indicherà la data
e l‘ora nché non sarà collegato al computer e non verrà
attivata la modalità „LOG“. Dopo qualsiasi interruzione
dell‘alimentazione elettrica (estrazione della batteria,
spegnimento del display), lo strumento deve essere
reinserito nel computer.
Nella modalità di memorizzazione dei dati, i tasti hanno le
seguenti funzioni:
• MAX/MIN/START/START/STOP – Una singola
pressione di un tasto mostra sul display un valore
minimo o massimo dell‘ultimo valore acquisito; se
l‘utente ha selezionato nel programma l’opzione
“Avvia tramite pulsante” („Start by Button“),
l‘acquisizione dei dati viene avviata premendo
e tenendo premuto questo tasto (tenere premuto il
tasto nché sul display non appare la scritta „LOG“
(13); con l‘opzione „Sovrascrivi quando completo“
(“Overwrite when full”) selezionata, l‘acquisizione dei
dati termina premendo e tenendo premuto il tasto.
2.2 Preparazione al funzionamento
Installazione della batteria
SBS-DL-123
Per l‘installazione della batteria seguire le istruzioni
riportate nelle seguenti illustrazioni. Inserire la batteria
seguendo i contrassegni dei poli.
2
1 3
4
5
SBS-DL-123L
Rimuovere il coperchio sul retro dell‘unità, inserire le
batterie nell‘unità seguendo le indicazioni e i disegni. Poi
chiudere con il coperchio.
Entrambi i modelli di misurazione della temperatura
e dell‘umidità sono adatti al montaggio a parete. Il modello
SBS-DL-123 è dotato di un supporto che può essere avvitato
alla parete. In seguito collegare il dispositivo alla presa.
Nel modello SBS-DL-123L c‘è un foro nell‘alloggiamento
per il ssaggio del dispositivo di misurazione ad una vite
da muro. Questo modello possiede inoltre un supporto
regolabile.
Installazione del software e del driver.
Requisiti hardware: Windows XP/Vista/7/8 (32bit o 64bit);
attacco USB; lettore CD-ROM.
L‘utente deve avere i diritti amministrativi sul computer su
cui sono installati il programma e il driver.
1. Inserire il disco nel lettore CD del computer.
2. Se il programma non si avvia automaticamente, fare
doppio clic sul le „setup.exe“ nella cartella CD>
Software. L‘installazione del programma comincia.
3. Seguire le istruzioni fornite dalle nestre pop-up sullo
schermo del computer. Al termine dell‘installazione,
sul desktop viene visualizzata l‘icona „Data Logger
Graph“.
4. Per poter leggere i parametri del contatore,
è necessario installare il driver, anch‘esso incluso nel
CD.
5. Per installare il driver, fare doppio clic sul le
„USBpressInstaller.exe“ nella cartella CD->Driver
directory.
6. Seguire le istruzioni visualizzate nelle nestre pop-up
sullo schermo del computer. Una volta completata
l‘installazione del driver, lo schermo dovrebbe
mostrare le informazioni sulla corretta installazione
del driver.
2.3 Lavorare con il dispositivo
SBS-DL-123
Lo strumento funziona con un pulsante. I dati possono
essere letti solo tramite il Data Logger Graph perché non vi
è alcuna visualizzazione sul dispositivo. Dopo l‘attivazione
del dispositivo, il tasto ha una funzione che dipende
dalle impostazioni utente selezionate nella nestra
„Impostazione Data Logger“ (Data logger setup) della
scheda „Avvio e arresto“ (Start and stop method):
ISTRUZIONI PER L’USO
IT IT
Rev. 05.06.2018
Rev. 05.06.2018

20 21
• C/F/ON/OFF – Stessa funzione della modalità di
visualizzazione.
Se le soglie di allarme impostate nel programma vengono
superate, viene emesso un segnale acustico.
AVVERTENZA: in entrambi i modelli, i dati possono essere
memorizzati solo quando il dispositivo è collegato a una
porta USB del computer. I dispositivi non dispongono di
memoria interna, slot per schede di memoria, ecc.
Utilizzo del software
• Assicurarsi che la batteria del dispositivo non sia
scarica. Collegare il dispositivo alla porta USB del
computer su cui sono installati il software Data
Logger Graph e il driver dello strumento.
• Avviare Data Logger Graph dal menu “Sistema” o fare
doppio clic sull‘icona dell‘applicazione sul desktop.
• Dopo aver avviato l‘applicazione, fare clic sul
pulsante „Avvia“ situato nell‘angolo superiore
sinistro della nestra di dialogo dell‘applicazione.
Viene visualizzata la nestra Data Logger Device con
le informazioni sul dispositivo collegato. Se non si
vedono informazioni sullo strumento nella nestra,
assicurarsi che sia collegato correttamente alla porta
USB e che la batteria sia in condizioni corrette.
SMALTIMENTO DELLE ATTREZZATURE USATE
Smaltimento dei dispositivi utilizzati. Questo prodotto,
se non più funzionante, non deve essere smaltito
insieme ai normali riuti, ma deve essere consegnato ad
un’organizzazione competente per lo smaltimento dei
dispositivi elettrici e elettronici.
Maggiori informazioni sono reperibili sull‘etichetta del
prodotto, sul manuale di istruzioni o sull‘imballaggio.
I materiali utilizzati nel dispositivo possono essere riciclati
secondo indicazioni. Con il riutilizzo di materiali o mediante
altre forme di riciclaggio di dispositivi usati si contribuisce
alla tutela dell‘ambiente. Informazioni sui punti di
smaltimento sono reperibili presso le autorità locali.
• Tutte le funzioni e le impostazioni
dell‘applicazione sono descritte
dettagliatamente nella guida del programma.
Per accedere alla guida dell‘applicazione,
selezionare nel menù „Aiuto“ il punto „DGraph
Software Guide“ dalla lista mostrata.
Avvertenza: evitare di lasciare lo strumento collegato
alla porta USB. Se lo strumento rimane collegato
a una porta USB, il consumo di energia della batteria
per alimentare lo strumento aumenta in modo
signicativo.
2.4 Pulizia e manutenzione
• Per pulire la supercie utilizzare solo
detergenti senza ingredienti corrosivi.
• Non lasciare la batteria nel dispositivo se il
funzionamento viene interrotto per un lungo
periodo di tempo.
SMALTIMENTO SICURO DELLE BATTERIE E DELLE
PILE
Nel dispositivo vengono utilizzate le seguenti
batterie: AAA 1.5V o al litio 3,6V.
Rimuovere le batterie usate dall‘unità seguendo la
stessa procedura utilizzata per l‘installazione.
Rivolgersi all‘organizzazione/azienda locale
responsabile dello smaltimento.
El producto cumple con las normas de
seguridad vigentes.
Respetar las instrucciones de uso.
Producto reciclable.
1. DESCRIPCIÓN GENERAL
Este manual ha sido elaborado para favorecer un empleo
seguro y able. El producto ha sido estrictamente diseñado
y fabricado conforme a las especicaciones técnicas y para
ello se han utilizado las últimas tecnologías y componentes,
manteniendo los más altos estándares de calidad.
¡ADVERTENCIA! En este manual se incluyen fotos
ilustrativas, que podrían no coincidir exactamente
con la apariencia real del dispositivo.
Parámetros
– descripción
Parámetros-valor
Nombre del
producto
Data logger para temperatura
y humedad del aire
Modelo SBS-DL-123 SBS-DL-123L
Tipo de batería Batería de
litio de 3,6V
2 x 1,5V AAA
Rango de medición
de la temperatura
[°C]
-35 ÷ 80 -30 ÷ 70
Precisión de
medición de la
temperatura [%]
± 0,3 ± 0,5
Gama de medición
de la humedad del
aire [%]
0-100
Precisión de
medición de la
humedad [%]
± 3
Clase de protección
IP
IP64 IP54
Tamaño de la
memoria de lectura
32000
Tiempo de muestreo 2 [s] ÷ 24 [h]
Dimensiones
(A x A x L) [mm]
23x37x123 25x75x120
Peso [kg] 0,048 0,13
DATOS TÉCNICOS
ANTES DE LA PUESTA EN FUNCIONAMIENTO,
LEA LAS INSTRUCCIONES MINUCIOSAMENTE Y
ASEGÚRESE DE COMPRENDERLAS.
El texto en alemán corresponde a la versión original. Los
textos en otras lenguas son traducciones del original en
alemán.
2. Instrucciones de uso
Este data loger es un aparato concebido para la medición
de la temperatura y la humedad del aire.
El usuario es responsable de los daños derivados de un uso
inadecuado del aparato.
2.1 Descripción del aparato
SBS-DL-123
1. Tecla
2. Indicador LED
3. USB
4. Protector para el USB
5. Indicador LED
Para garantizar un funcionamiento duradero y able del
aparato, el manejo y mantenimiento deben llevarse a cabo
de acuerdo con las instrucciones de este manual. Los
datos técnicos y las especicaciones de este manual están
actualizados. El fabricante se reserva el derecho de realizar
modicaciones para mejorar la calidad. Teniendo en cuenta
los avances técnicos en materia de reducción del ruido,
el equipo ha sido diseñado y fabricado para mantener el
riesgo de emisiones sonoras al nivel más bajo posible.
Explicación de los símbolos
1
25
4
3
SBS-DL-123L
1. Pantalla
2. Tecla de encendido/
apagado | Selección de
unidad
3. Tecla de comienzo/
parada | Máx./Mín.
4. Indicador LED
1. Estado de consumo de
memoria
2. Medición de temperatura
3. Indicador de temperatura
4. Medidor de humedad
5. Indicador de valor de
humedad
6. Hora, año, mes y día
7. Indicador de conexión
USB
8. Indicador de carga de la
batería
9. Exceso de humedad – símbolo de alarma
10. Símbolo de alarma al sobrepasar el nivel de
temperatura máximo
11. Valor mínimo
12. Valor máximo
13. Símbolo, que indica que el modo de recogida de
datos está activo
1
4
3
2
11 12 13 1
2
3
4
59
10
8 7
6
IT
MANUAL DE INSTRUCCIONES
ES
Rev. 05.06.2018
Rev. 05.06.2018

22 23
Si se exceden los umbrales de alarma ajustados en el
programa, suena una señal acústica.
NOTA: En ambos modelos los datos solo se pueden
almacenar cuando el dispositivo está conectado
a un puerto USB del ordenador. Los dispositivos no tienen
memoria interna, ranuras para tarjetas de memoria, etc.
Manejo del software
• Asegúrese de que la batería del dispositivo no esté
descargada. Conecte el medidor al puerto USB del
ordenador en el que está instalado el software Data
Logger Graph y el controlador del medidor.
• Inicie Data Logger Graph desde el menú Sistema
o haga doble clic en el icono de la aplicación en el
escritorio.
• Después de iniciar la aplicación, haga clic en el botón
„Start“ situado en la esquina superior izquierda
del cuadro de diálogo de la aplicación. Aparece
la ventana Data Logger Device con información
sobre el dispositivo conectado. Si no ve ninguna
información sobre el aparato en la ventana,
asegúrese de que esté correctamente conectado al
puerto USB y de que la batería esté en condiciones
adecuadas.
ELIMINACIÓN DE DISPOSITIVOS USADOS
Eliminación de aparatos usados. Tras su vida útil, este
producto no debe tirarse al contenedor de basura
doméstico, sino que debe entregarse en el punto limpio
correspondiente para recolección y reciclaje de aparatos
eléctricos. Sobre esto informa el símbolo colocado sobre el
producto, instrucciones de uso o embalaje. Los materiales
utilizados en este aparato son reciclables conforme
a su designación. La reutilización de los equipos usados, el
reciclaje de sus materiales y otras formas de aprovecharlos
contribuyen de forma importante a proteger el medio
ambiente. Los puntos de reciclaje y las administraciones
locales le darán información al respecto.
• Todas las funciones y ajustes de aplicación
se describen detalladamente en la ayuda
del programa. Para acceder a la ayuda de
la aplicación, seleccione en el menú „Hilfe“
(ayuda) el punto „“DGraph Software Guide“
de la lista.
NOTA: Evite dejar el medidor conectado al puerto
USB. Si el medidor permaneciera conectado, el
consumo de batería aumentaría signicativamente.
2.4 Limpieza y mantenimiento
• Para limpiar la supercie, utilice solo productos
que no contengan sustancias corrosivas.
• No deje la batería en la unidad si el
funcionamiento continuado se interrumpe
durante mucho tiempo.
ELIMINACIÓN SEGURA DE ACUMULADORES Y
BATERÍAS
En el aparato se utilizan baterías AAA 1,5V o de litio
3,6V.
Retire las baterías usadas de la unidad siguiendo el
mismo procedimiento que para la instalación.
Para deshacerse de las baterías acuda a las
instalaciones/empresas de eliminación de residuos
autorizadas.
anteriormente por el usuario en la ventana „Data Logger
Setup“, pestaña „Start and Stop Method“.
• Start by Button – Presione la tecla y manténgala
pulsada para comenzar la grabación de datos;
• Overwrite When Full/By Button – Finaliza la grabación
al presionar la tecla y mantenerla pulsada.
Los ajustes indicados anteriormente son los de fábrica. En
otros casos, el aparato iniciará o detendrá automáticamente
las mediciones de registro según la conguración
establecida por el usuario.
Descripción del signicado de las señales indicadas por los
diodos del dispositivo.
• Ninguna señal – Dispositivo en estado de espera;
falta o se ha descargado la batería;
• Un LED verde parpadea cada 10 segundos
– Grabación de datos;
• Dos LEDs verdes parpadean cada 10 segundos
– Grabación de datos nalizada;
• Un LED rojo parpadea cada 10 segundos – Grabación
de datos, alarma en al menos un canal;
• Dos LEDs rojos parpadean cada 10 segundos
– Grabación de datos nalizada, alarma al menos en
un canal;
• Un LED amarillo parpadea cada 60 segundos – carga
de batería baja, grabación de datos en marcha,
cambiar batería;
• Un LED amarillo parpadea cada 1 s – Dispositivo USB
conectado correctamente
• Los diodos amarillo y verde parpadean uno tras
otro – Mensaje después de conectar el medidor al
ordenador, la batería y la fuente de alimentación
correctamente.
• Los diodos amarillo y rojo parpadean uno tras
otro – Mensaje después de conectar el medidor
a un ordenador, la batería insertada y la fuente de
alimentación de forma incorrecta.
SBS-DL-123L
El medidor se maneja con una tecla. En el modo de
visualización, sin almacenamiento de datos, las teclas
poseen las siguientes funciones:
• MAX/MIN/START/START/STOP – Una sola pulsación
de tecla indica un valor mínimo o máximo del último
valor adquirido en la pantalla;
• C/F/ON/OFF – Pulsando una vez se cambia la
unidad de temperatura, pulsando la tecla de forma
continuada se apaga el display.
NOTA: El medidor no mostrará la fecha y la hora hasta
que se conecte a su ordenador y se active el modo“LOG“.
Cualquier interrupción de la alimentación de tensión
(extracción de la batería, apagado de la pantalla) hace que
el medidor deba volver a conectarse al ordenador.
En el modo de almacenamiento de datos las teclas poseen
las siguientes funciones:
• MAX/MIN/START/START/STOP – Presione la tecla
una vez para visualizar el valor mínimo o máximo
de los valores leídos más recientemente. Si el
usuario hubiera seleccionado „Start by Button“ en el
programa, la grabación de datos se iniciaría pulsando
y manteniendo presionada esta tecla (hasta que en el
display aparezca el mensaje „LOG“ (13), con la opción
seleccionada „Overwrite When Full/By Button“).
• C/F/ON/OFF – La misma función que en el modo de
visualización.
2.2 Preparación para el funcionamiento
Instalación de la batería
SBS-DL-123
Cuando instale la batería, siga las instrucciones de las
ilustraciones siguientes. Inserte la batería según las marcas
de los polos.
2
1 3
4
5
SBS-DL-123L
Retire la tapa de la parte posterior e inserte las pilas en la
unidad de acuerdo con las marcas e indicaciones. Después
cerrar la cubierta.
Ambos instrumentos de medición de temperatura
y humedad son aptos para montar a la pared. El modelo
SBS-DL-123 está equipado con un soporte de jación
que se puede atornillar a la pared. Así, el dispositivo de
medición se puede jar en el soporte a conectar al enchufe.
El modelo SBS-DL-123L dispone de un oricio en la carcasa
para montar el calibrador a una jación de pared. Este
modelo también se sirve con un soporte ajustable.
Instalación del software y del controlador
Requisitos de hardware: Windows XP/Vista/7/8 (32 bits
o 64 bits); puerto USB; unidad de CD-ROM.
El usuario debe tener derechos administrativos en el
ordenador en el que están instalados el programa y el
controlador.
1. Inserte el CD suministrado en la unidad de CD-ROM
de su ordenador.
2. Si el programa no se inicia automáticamente, haga
doble clic en el archivo „setup.exe“ en la carpeta
CD->Software. Se inicia el proceso de instalación del
programa.
3. Siga las instrucciones de las ventanas emergentes
en la pantalla del ordenador. Una vez nalizada la
instalación, aparece el icono „Data Logger Graph“ en
el escritorio.
4. Para poder leer los parámetros del medidor es
necesario instalar el driver, que también se incluye
en el CD.
5. Para instalar el controlador, haga doble clic en el
archivo „USBpressInstaller.exe“ en la carpeta CD-
>Driver.
6. Ejecute las instrucciones que vayan apareciendo
en las ventanas emergentes de la pantalla del
ordenador. Cuando nalice la instalación del
controlador, la pantalla mostrará la información
sobre la instalación correcta nalizada.
2.3 Manejo del aparato
SBS-DL-123
El medidor se maneja con una tecla. Los datos solamente
se pueden leer mediante el Data Logger Graph, ya que no
hay ninguna pantalla en el dispositivo. Tras la activación del
dispositivo, la tecla tendrá la función congurada
DE
Hiermit bestätigen wir, dass die hier in dieser Anleitung
aufgeführten Geräte CE
-
konform sind.
EN
We hereby certify that the appliances listed in this manual
are CE compliant.
FR
Par la présente, nous conrmons que les appareils présentés
dans ce mode d´emploi sont conformes aux normes CE.
PL
Niniejszym potwierdzamy, że urządzenia opisane w tej
instrukcji są zgodne z deklaracją CE.
IT
Con la presente documentazione si certica che i dispositivi
descritti all´interno del manuale sono conformi alle vigenti
norme CE.
ES
Por la presente conrmamos que los dispositivos detallados
en este manual son conformes con las normativas de la CE.
CZ
Tímto potvrzujeme, že všechy produkty uvedené v této
uživatelské příručce disponují CE prohlášním o shodě.
ES ES
Rev. 05.06.2018
Rev. 05.06.2018

expondo.de
Hersteller an Verbraucher
Sehr geehrte Damen und Herren,
gebrauchte Elektro – und Elektronikgeräte dürfen gemäß europäischer Vorgaben [1] nicht zum unsortierten Siedlungsabfall
gegeben werden, sondern müssen getrennt erfasst werden. Das Symbol der Abfalltonne auf Rädern weist auf die Notwendigkeit
der getrennten Sammlung hin. Helfen auch Sie mit beim Umweltschutz. Sorgen Sie dafür, dieses Gerät, wenn Sie es nicht mehr
weiter nutzen wollen, in die hierfür vorgesehenen Systeme der Getrenntsammlung zu geben.
In Deutschland sind Sie gesetzlich [2] verpichtet, ein Altgerät einer vom unsortierten Siedlungsabfall getrennten Erfassung
zuzuführen. Die öffentlich – rechtlichen Entsorgungsträger (Kommunen) haben hierzu Sammelstellen eingerichtet, an denen
Altgeräte aus privaten Haushalten ihres Gebietes für Sie kostenfrei entgegengenommen werden. Möglicherweise holen die
rechtlichen Entsorgungsträger die Altgeräte auch bei den privaten Haushalten ab.
Bitte informieren Sie sich über Ihren lokalen Abfallkalender oder bei Ihrer Stadt – oder Gemeindeverwaltung über die in Ihrem
Gebiet zur Verfügung stehenden Möglichkeiten der Rückgabe oder Sammlung von Altgeräten.
[1] RICHTLINIE 2002/96/EG DES EUROPÄISCHEN PARLAMENTS UND DES RATES
ÜBER ELEKTRO – UND ELEKTRONIK – ALTGERÄTE
[2] Gesetz über das Inverkehrbringen, die Rücknahme und die umweltverträgliche Entsorgung
von Elektro – und Elektronikgeräten (Elektro – und Elektronikgerätegesetz – ElektroG).
Umwelt – und Entsorgungshinweise
Utylizacja produktu
Produkty elektryczne i elektroniczne po zakończeniu okresu eksploatacji wymagają segregacji i oddania ich do wyznaczo-
nego punktu odbioru. Nie wolno wyrzucać produktów elektrycznych razem z odpadami gospodarstwa domowego. Zgodnie
z dyrektywą WEEE 2012/19/UE obowiązującą w Unii Europejskiej, urządzenia elektryczne i elektroniczne wymagają segre-
gacji i utylizacji w wyznaczonych miejscach. Dbając o prawidłową utylizację, przyczyniasz się do ochrony zasobów naturalnych
i zmniejszasz negatywny wpływ oddziaływania na środowisko, człowieka i otoczenie. Zgodnie z krajowym prawodawstwem,
nieprawidłowe usuwanie odpadów elektrycznych i elektronicznych może być karane!
For the disposal of the device please consider and act according to the national and local rules and regulations.
CONTACT
expondo Polska sp. z o.o. sp. k.
ul. Dekoracyjna 3
65-155 Zielona Góra | Poland, EU
e-mail: [email protected]
-
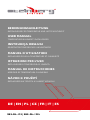 1
1
-
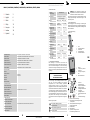 2
2
-
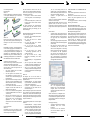 3
3
-
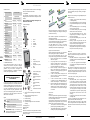 4
4
-
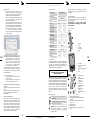 5
5
-
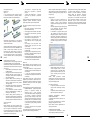 6
6
-
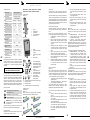 7
7
-
 8
8
-
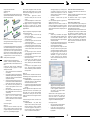 9
9
-
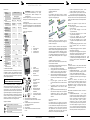 10
10
-
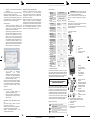 11
11
-
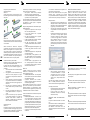 12
12
-
 13
13


Steinberg SBS-DL-123L Instrukcja obsługi
- Typ
- Instrukcja obsługi
- Niniejsza instrukcja jest również odpowiednia dla
w innych językach
- čeština: Steinberg SBS-DL-123L Uživatelský manuál
- español: Steinberg SBS-DL-123L Manual de usuario
- italiano: Steinberg SBS-DL-123L Manuale utente
- Deutsch: Steinberg SBS-DL-123L Benutzerhandbuch
- français: Steinberg SBS-DL-123L Manuel utilisateur
- English: Steinberg SBS-DL-123L User manual
Powiązane artykuły
-
Steinberg SBS-KW-1000/10O Instrukcja obsługi
-
-
-
-
Steinberg SBS-PT-50/2 Instrukcja obsługi
-
-
-
Steinberg 3141 SBS-LW-500/10 Instrukcja obsługi
