Panasonic SDRH20EP Instrukcja obsługi
- Kategoria
- Kamery
- Typ
- Instrukcja obsługi
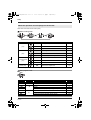
Niniejsza instrukcja jest również odpowiednia dla

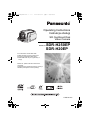
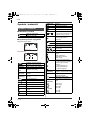
Operating Instructions
Instrukcja obsługi
SD Card/Hard Disk
Video Camera
Model No.SDR-H250EP
SDR-H20EP
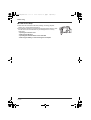
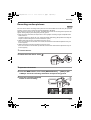
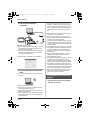
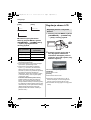
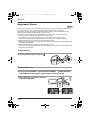
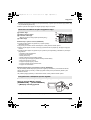
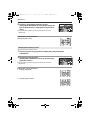
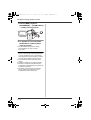
≥ The illustration shows SDR-H250.
≥ SDR-H20 does not have a video light.
≥ Ilustracja przedstawia SDR-H250.
≥ Model SDR-H20 nie jest wyposażony w
lampę.
Before use, please read these instructions
completely.
Przed pierwszym włączeniem kamery prosimy o
dokładne przeczytanie instrukcji obsługi.
LSQT1210 A
LSQT1210_EP(EN).book 1 ページ 2007年2月9日 金曜日 午後6時0分

2
LSQT1210
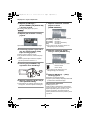
Information for Your Safety
∫ EMC Electric and magnetic
compatibility
This symbol (CE) is located on the rating plate.
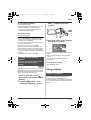
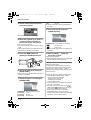
Use only the recommended accessories.
≥ Do not use any other AV/S cables and USB
cables except the supplied one.
≥ When you use the cable which are sold
separately, please make sure to use the one
whose length is less than 3 meters.
WARNING:
TO REDUCE THE RISK OF FIRE,
ELECTRIC SHOCK OR PRODUCT
DAMAGE,
≥ DO NOT EXPOSE THIS APPARATUS TO
RAIN, MOISTURE, DRIPPING OR
SPLASHING AND THAT NO OBJECTS
FILLED WITH LIQUIDS, SUCH AS VASES,
SHALL BE PLACED ON THE
APPARATUS.
≥ USE ONLY THE RECOMMENDED
ACCESSORIES.
≥ DO NOT REMOVE THE COVER (OR
BACK); THERE ARE NO USER
SERVICEABLE PARTS INSIDE. REFER
SERVICING TO QUALIFIED SERVICE
PERSONNEL.
CAUTION!
≥ DO NOT INSTALL OR PLACE THIS UNIT
IN A BOOKCASE, BUILT-IN CABINET OR
IN ANOTHER CONFINED SPACE.
ENSURE THE UNIT IS WELL
VENTILATED. TO PREVENT RISK OF
ELECTRIC SHOCK OR FIRE HAZARD
DUE TO OVERHEATING, ENSURE THAT
CURTAINS AND ANY OTHER
MATERIALS DO NOT OBSTRUCT THE
VENTILATION VENTS.
≥ DO NOT OBSTRUCT THE UNIT’S
VENTILATION OPENINGS WITH
NEWSPAPERS, TABLECLOTHS,
CURTAINS, AND SIMILAR ITEMS.
≥ DO NOT PLACE SOURCES OF NAKED
FLAMES, SUCH AS LIGHTED CANDLES,
ON THE UNIT.
≥ DISPOSE OF BATTERIES IN AN
ENVIRONMENTALLY FRIENDLY
MANNER.
The socket outlet shall be installed near the
equipment and easily accessible.
The mains plug of the power supply cord shall
remain readily operable.
To completely disconnect this apparatus from
the AC Mains, disconnect the power supply
cord plug from AC receptacle.
Product Identification Marking is located on
the bottom of units.
LSQT1210_EP(EN).book 2 ページ 2007年2月9日 金曜日 午後6時0分

3
LSQT1210
Information on Disposal for Users of Waste
Electrical & Electronic Equipment (private
households)
This symbol on the products
and/or accompanying
documents means that used
electrical and electronic
products should not be mixed
with general household waste.
For proper treatment, recovery
and recycling, please take
these products to designated collection points,
where they will be accepted on a free of
charge basis. Alternatively, in some countries
you may be able to return your products to
your local retailer upon the purchase of an
equivalent new product.
Disposing of this product correctly will help to
save valuable resources and prevent any
potential negative effects on human health
and the environment which could otherwise
arise from inappropriate waste handling.
Please contact your local authority for further
details of your nearest designated collection
point.
Penalties may be applicable for incorrect
disposal of this waste, in accordance with
national legislation.
For business users in the European Union
If you wish to discard electrical and electronic
equipment, please contact your dealer or
supplier for further information.
Information on Disposal in other Countries
outside the European Union
This symbol is only valid in the European
Union.
If you wish to discard this product, please
contact your local authorities or dealer and
ask for the correct method of disposal.
ENGLISH
LSQT1210_EP(EN).book 3 ページ 2007年2月9日 金曜日 午後6時0分

4
LSQT1210
∫ Indemnity concerning recording
content
The manufacturer shall in no event be liable for
the loss of recordings due to malfunction or
defect of this unit, its accessories or recordable
media.
∫ Carefully observe copyright laws
Recording of pre-recorded tapes or discs or
other published or broadcast material for
purposes other than your own private use
may infringe copyright laws. Even for the
purpose of private use, recording of certain
material may be restricted.
≥ SDHC Logo is a trademark.
≥ miniSD Logo is a trademark.
≥ The Movie Camera uses copyright-protected
technologies and is protected by the patented
technologies and intellectual properties of
Japan and the U.S. To use these copyright-
protected technologies, authorization of the
Macrovision Company is required. It is
prohibited to disassemble or modify the Movie
Camera.
≥ Manufactured under license from Dolby
Laboratories.
Dolby and the double-D symbol are
trademarks of Dolby Laboratories.
≥ LEICA is a registered trademark of Leica
Microsystems IR GmbH and DICOMAR is a
registered trademark of Leica Camera AG.
≥ Microsoft
®
, Windows
®
and DirectX
®
are either
registered trademarks or trademarks of the
Microsoft Corporation in the United States and/
or other countries.
≥ IBM and PC/AT are registered trademarks of
International Business Machines Corporation
of the U.S.
≥ Celeron
®
,
Intel
®
and Pentium
®
are the
registered trademarks or trademarks of the
Intel Corporation in the United States and other
countries
≥ AMD Athlon and AMD Duron are trademarks of
Advanced Micro Devices, Inc.
≥ Sound Blaster is a trademark of Creative
Technology Ltd.
≥ Microsoft product screen shot(s) reprinted with
permission from Microsoft Corporation.
≥ Other names of systems and products
mentioned in these instructions are usually the
registered trademarks or trademarks of the
manufacturers who developed the system or
product concerned.
These operating instructions are designed for
use with models SDR-H250 and SDR-H20.
Pictures may be slightly different from the
original.
≥ The illustrations used in these operating
instructions show model SDR-H250, however,
parts of the explanation refer to different
models.
≥ Depending on the model, some functions are
not available.
≥ Features may vary, so please read carefully.
LSQT1210_EP(EN).book 4 ページ 2007年2月9日 金曜日 午後6時0分

5
LSQT1210
Information for Your Safety...................2
Before using
Features ..................................................7
Accessories............................................9
Parts identification and handling .........9
Using the LCD monitor .............................12
Using the remote control (SDR-H250) .....13
HDD and SD card .................................15
Concerning the internal HDD and cards
that can be used on this unit ....................15
Concerning SD cards ...............................15
HDD handling precautions .......................17
Access lamp.............................................17
Setup
Power supply........................................19
Charging the battery.................................19
Connecting to the AC outlet .....................22
Turning the unit on/off...............................22
Inserting/removing an SD card...........23
Selecting a mode..................................24
How to use the joystick .......................24
Switching the language.......................28
Using the menu screen........................28
Setting date and time...........................30
Adjusting the LCD monitor .................31
Recording
Before recording ..................................33
Recording motion pictures .................35
Recording modes and recordable time
available for the motion picture ................37
Recording still pictures .......................38
Number of pixels and picture quality
for still picture recording ...........................41
Various recording functions ...............42
Zoom in/out function.................................42
Recording yourself ...................................43
Recording with the video light
(SDR-H250)..............................................43
Backlight compensation function..............44
Fade in/fade out function..........................44
Soft skin mode ......................................... 45
Tele macro function (SDR-H250)............. 46
Colour night view function........................ 46
Self-timer recording.................................. 47
Recording guideline function.................... 47
Wide mode............................................... 48
Image stabilizer function .......................... 48
Wind noise reduction function.................. 48
Manual recording functions................49
Scene mode............................................. 49
Manual focus adjustment ......................... 50
White balance .......................................... 50
Manual shutter speed/aperture
adjustment ............................................... 52
Playback
Motion picture playback......................54
Still picture playback ...........................58
Editing
Editing scenes......................................60
Deleting scenes ....................................... 60
Locking motion picture scenes................. 61
Using playlists......................................61
What is a playlist?.................................... 61
Creating a new playlist............................. 62
Playing back a playlist.............................. 63
Editing a playlist....................................... 63
Editing still pictures.............................65
Deleting still picture files .......................... 65
Locking still picture files ........................... 66
DPOF setting ........................................... 67
Copying still picture files .......................... 68
HDD and card management
HDD management ................................69
Formatting HDD....................................... 69
Displaying HDD information..................... 69
Card management................................69
Formatting an SD card............................. 69
With other products
With a TV...............................................71
Playback on TV........................................ 71
Contents
LSQT1210_EP(EN).book 5 ページ 2007年2月9日 金曜日 午後6時0分

6
LSQT1210
With a DVD recorder ............................72
Dubbing recordings
onto a DVD recorder ................................72
With a VCR............................................72
Dubbing images
onto other video devices ..........................72
With a printer (PictBridge)...................73
With a computer
Before using with a computer.............76
What you can do with a computer............76
Operating environment.............................77
Installation ............................................80
Installing ImageMixer3 for Panasonic ......80
Reading the software help........................81
Software uninstallation .............................81
Connection and recognition ...............81
Connection and recognition
procedures ...............................................81
About the computer display......................82
To disconnect USB cable safely ...............83
Using the recorded images on a
computer...............................................83
DVD COPY function.................................83
Playing back and importing images..........84
Creating DVD-Video discs with the
selected images .......................................86
Others
Menus....................................................88
Menu list ...................................................88
Other menus.............................................89
Indications ............................................91
Indications ................................................91
Messages .................................................93
Functions that cannot be used
simultaneously .....................................95
Frequently asked questions................96
Troubleshooting...................................98
Cautions for use.................................103
Explanation of terms..........................105
Specifications.....................................108
Number of recordable pictures
on the HDD or an SD card ..................... 111
LSQT1210_EP(EN).book 6 ページ 2007年2月9日 金曜日 午後6時0分

Before using
7
LSQT1210
Before using
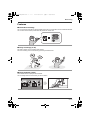
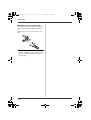
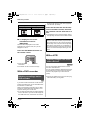
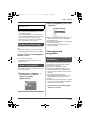
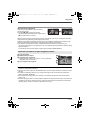
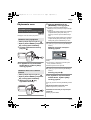
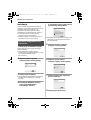
Features
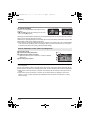
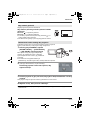
∫ Extended recording!
You can record the equivalent of approximately twenty-two 8 cm DVD discs on the 30 GB internal HDD.
You can also record motion pictures and still pictures on an SD card.
∫ Easy recording! (l 35)
No need to search for the recording start position.
The new recording will not overwrite any previously recorded scene.
∫ Easy playback! (l 54)
Recorded scenes are displayed as thumbnails.
You can easily search for the scenes you want to watch.
HDD
HDDHDD
LSQT1210_EP(EN).book 7 ページ 2007年2月9日 金曜日 午後6時0分

Before using
8
LSQT1210
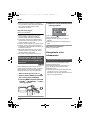
∫ Editing scenes! (l 60, 61)
You can create an original video (playlist) by collecting together your favourite scenes recorded on the
HDD.
∫ Using with a computer! (l 76)
If you use the supplied software, you can create a backup DVD of the scenes recorded on this unit with
just one button.
You can also make an original DVD-Video by exporting the scenes to a computer and then editing
them.
LSQT1210_EP(EN).book 8 ページ 2007年2月9日 金曜日 午後6時0分

9
LSQT1210
Before using
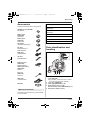
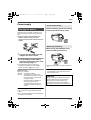
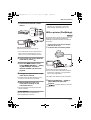
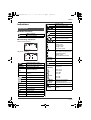
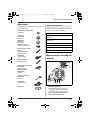
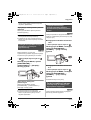
Accessories
Check the accessories before using this unit.
Some optional accessories may not be available
in some countries.
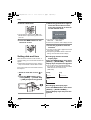
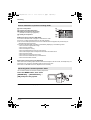
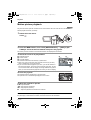
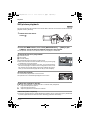
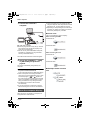
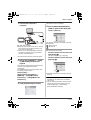
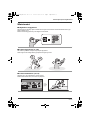
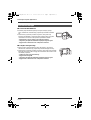
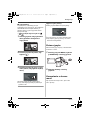
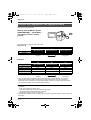
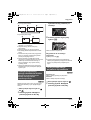
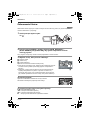
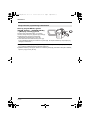
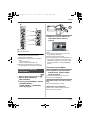
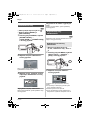
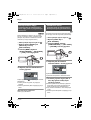
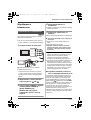
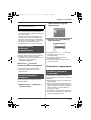
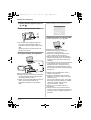
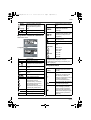
Parts identification and
handling
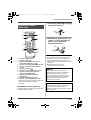
1 Lens (LEICA DICOMAR) (SDR-H250)
Lens (SDR-H20)
≥ Do not attach a conversion lens or a filter
to this unit as it will cause vignetting.
2 Lens cover (SDR-H250)
3 Video light (SDR-H250) (l 43)
4 White balance sensor (l 51)
Remote control sensor (SDR-H250) (l 14)
5 Microphone (built-in, stereo)
SD Memory Card (512 MB)
RP-SDR512
Battery pack
(SDR-H250)
CGA-DU12
Battery pack
(SDR-H20)
CGR-DU06
AC adaptor
VSK0651B (DE-974GC)
DC cable
K2GJ2DC00011 or
K2GJ2DC00015
AV/S cable
K2KZ9CB00001
AC cable
K2CR2DA00004
Remote control
(SDR-H250)
N2QAEC000023
Button-type battery
(SDR-H250)
CR2025
Lens cap
(SDR-H20)
LSYK2113
USB cable
K1HA05CD0010
CD-ROM
Optional accessories
AC adaptor (VW-AD11E)
Battery pack (lithium/CGR-DU06/640 mAh)
(SDR-H20)
Battery pack (lithium/CGA-DU07/680 mAh)
(SDR-H20)
Battery pack (lithium/CGA-DU12/1150 mAh)
Battery pack (lithium/CGA-DU14/1360 mAh)
Battery pack (lithium/CGA-DU21/2040 mAh)
Tripod (VW-CT45E)
3
4
5
2
1
LSQT1210_EP(EN).book 9 ページ 2007年2月9日 金曜日 午後6時0分

10
LSQT1210
Before using
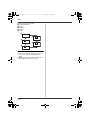
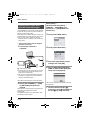
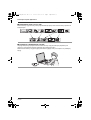
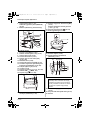
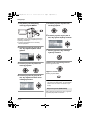
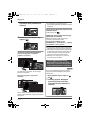
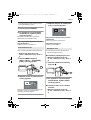
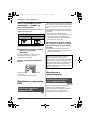
6 Terminal cover
7 Menu button [MENU] (l 28)
8 DC input terminal [DC/C.C. IN] (l 22)
9 LCD monitor open part (l 12)
10 Battery holder (l 19)
11 Audio-video output terminal [A/V]
(l 71, 72)
12 Status indicator (l 22)
13 Power switch [OFF/ON] (l 22)
14 HDD/computer access lamp [ACCESS/
PC] (l 17, 82)
15 Mode dial (l 24)
16 Joystick (l 24)
17 Delete button [ ] (l 60, 64, 65)
18 USB terminal [ ] (l 73, 81)
19 Recording start/stop button (l 35)
20 Lens cover open/close ring (SDR-H250)
(l 11)
21 When recording: Zoom lever [W/T] (l 42)
When playing back: Volume lever
[sVOLr] (l 56)
22 Photoshot button [ ] (l 38)
23 Illumination LED (l 90)
24 Card slot (l 23)
25 Tripod receptacle (l 12)
26 Battery release lever [BATTERY] (l 19)
27 LCD monitor (l 12)
28 Card slot open lever (l 23)
29 DVD COPY button [DVD COPY] (l 83)
30 Speaker
31 Power LCD plus button
[POWER LCD PLUS] (l 31)
32 Video light button [LIGHT] (SDR-H250)
(l 43)
33 Reset button [RESET] (l 101)
34 Mode select switch [AUTO/MANUAL/
FOCUS] (l 34, 49, 50)
35 Card slot cover [SD CARD] (l 23)
36 Card access lamp [ACCESS] (l
18, 82)
11
12
14
13
15
1
6
18
6
7
8
9
10
1
7
19
21 22
23
20
Due to limitations in LCD production
technology, there may be some tiny bright
or dark spots on the LCD monitor screen.
However, this is not a malfunction and
does not affect the recorded picture.
25
26
24
27
29 30
31
36
35
33
32
28
34
LSQT1210_EP(EN).book 10 ページ 2007年2月9日 金曜日 午後6時0分

11
LSQT1210
Before using
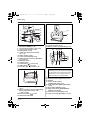
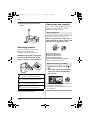
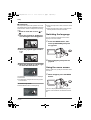
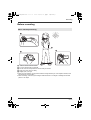
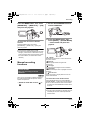
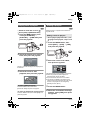
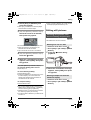
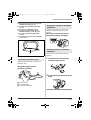
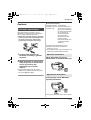
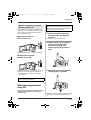
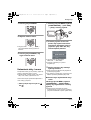
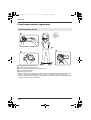
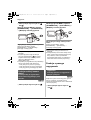
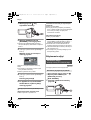
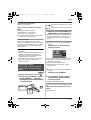
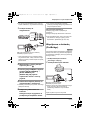
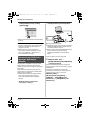
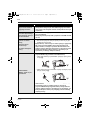
37 Grip belt (l 11)
Adjust the belt length so it fits your hand.
Adjust the belt length and the pad
position.
1 Flip the belt.
2 Adjust the length.
3 Replace the belt.
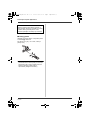
For the lens protection, be sure to close the lens
cover when not in use.
Rotate the lens cover open/close
ring.
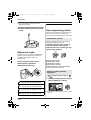
Attach the lens cap to protect the surface of the
lens.
1 Pass the end of the lens cap cord
through the belt.
2 Pass the lens cap through the
loop.
3 To attach or remove the lens cap,
hold both sides of the lens cap
with the tips of your finger and
thumb.
Using grip belt
Using the lens cover (SDR-H250)
37
3
1
2
Attaching the lens cap (SDR-H20)
LSQT1210_EP(EN).book 11 ページ 2007年2月9日 金曜日 午後6時0分

12
LSQT1210
Before using
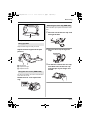
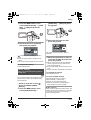
During recording
The removed lens cap can be attached to the
lens cap fixture.
This is a hole for attaching the unit to the optional
tripod.
(Please carefully read the operating instructions
for how to attach the unit to the tripod.)
≥ When the tripod is used, the card slot cover
cannot be opened. Insert an SD card before
attaching this unit to the tripod. (l 23)
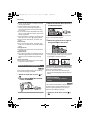
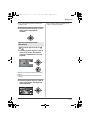
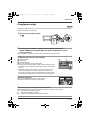
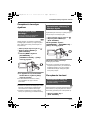
You can record the image while viewing it on the
LCD monitor.
1 Place your finger on the LCD
monitor open part A and pull the
LCD monitor out in the direction
of the arrow.
≥ It can open up to 90o.
2 Adjust the angle of the LCD
monitor as desired.
≥ It can rotate up to 180o A towards the lens or
90o B towards the opposite direction.
≥ The brightness and colour level of the LCD
monitor can be adjusted from the menu.
(l 31)
≥ The unit may be damaged or fail if the LCD
monitor is forcibly opened or rotated.
Tripod receptacle
Using the LCD monitor
A
AB
LSQT1210_EP(EN).book 12 ページ 2007年2月9日 金曜日 午後6時0分

13
LSQT1210
Before using
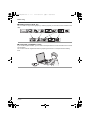
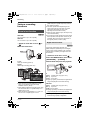
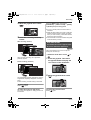
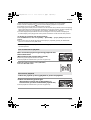
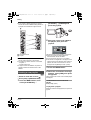
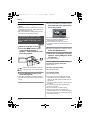
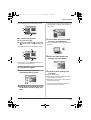
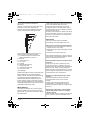
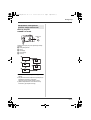
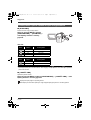
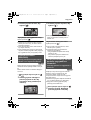
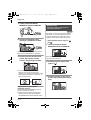
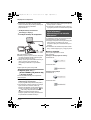
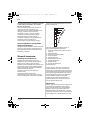
1 Photoshot button [PHOTO SHOT, ]*
2 On-screen display button [EXT DISPLAY]
(l 72)
3 Date/time button [DATE/TIME] (l 30)
4 Playback operation buttons (l 55)
5 Delete button [ ]*
6 Direction buttons [3,4,2,1] (l 29)
7 Recording start/stop button [START/
STOP]*
8 Zoom/volume buttons [ZOOM, VOL]*
9 Menu button [MENU]* (l 29)
10 Enter button [ENTER] (l 29)
* means that these buttons function in the same
manner as the corresponding buttons on the
unit.
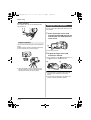
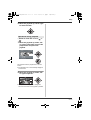
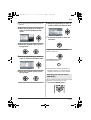
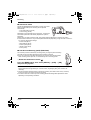
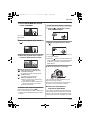
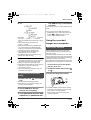
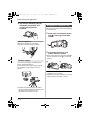
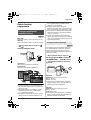
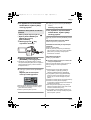
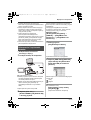
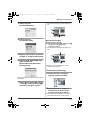
∫ Install a button-type battery
Install the supplied button-type battery in the
remote control before using it.
1 While pressing the stopper A,
pull out the battery holder.
2 Set the button-type battery with
its (r) mark facing upward and
then put the battery holder back
in place.
∫ Concerning the button-type battery
≥ When the button-type battery runs down,
replace it with a new battery (part number:
CR2025). The battery should normally last
about 1 year, however this depends on how
frequently the unit is used.
≥ Keep the button-type battery out of the reach of
children.
Using the remote control
(SDR-H250)
ZOOM
START/
STOP
PHOTO
SHOT
EXT
DISPLAY
DATE/
TIME
VOL
PLAY
STOPSKIP SKIP
MENU
ENTER
PAU SE
SEARCH
STILL ADV STILL ADV
SEARCH
1
2
3
4
6
7
8
9
1
0
5
CAUTION
Danger of explosion if battery is incorrectly
replaced. Replace only with the same or
equivalent type recommended by the
manufacturer. Dispose of used batteries
according to the manufacturer’s instructions.
Warning
Risk of fire, explosion and burns. Do not
recharge, disassemble, heat above 60 xC or
incinerate.
Warning
Keep the Button-Type battery out of the reach
of children. Never put Button-Type battery in
mouth. If swallowed call your doctor.
A
LSQT1210_EP(EN).book 13 ページ 2007年2月9日 金曜日 午後6時0分

14
LSQT1210
Before using
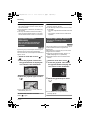
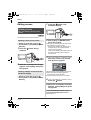
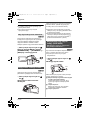
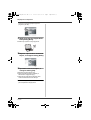
∫ Remote control usable range
The distance between the remote control and the
unit’s remote control sensor A: Within approx.
5m
Angle: Approx. 10o up and 15o down, left, and
right
≥ The remote control is intended for indoor
operation. Outdoors or under strong light, the
unit may not operate properly even within the
usable ranges.
AA
LSQT1210_EP(EN).book 14 ページ 2007年2月9日 金曜日 午後6時0分

Before using
15
LSQT1210
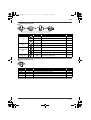
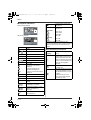
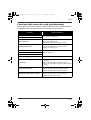
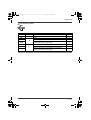
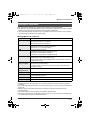
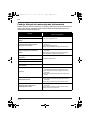
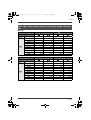
HDD and SD card
This unit can be used for recording motion pictures and still pictures to the internal HDD and an SD
card.
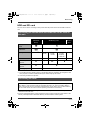
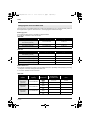
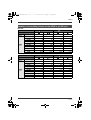
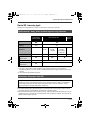
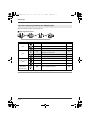
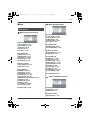
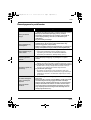
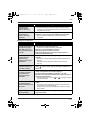
*1 The 30 GB hard drive utilizes a portion of the storage space for formatting, file management and
other purposes. 30 GB is 30,000,000,000 bytes. Usable capacity will be less.
*2 Cannot be guaranteed in operation.
≥ For the purposes of these operating instructions, SD Memory Card and SDHC Memory Card are
referred to as the “SD card”.
≥ This unit supports SD Memory Cards formatted in FAT12 system and FAT16 system based on SD
Memory Card Specifications and SDHC Memory Cards formatted in FAT32 system.
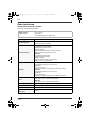
Concerning the internal HDD and cards that can be used on
this unit
Internal HDD
(Hard Disk
Drive)
SD Memory Card
SDHC
Memory
Card
Display on the
screen
Indication in these
instructions
[HDD] [SD]
Capacity 30 GB
*1
8MB/
16 MB
32 MB/
64 MB/
128 MB
256 MB/
512 MB
(supplied)/
1GB/2GB
4GB
Functions
Recording motion
pictures
¥ – ¥
*2
¥
Recording still
pictures
¥¥
Creating playlists ¥ –
¥: available –: not available
Concerning SD cards
This unit is compatible with both SD Memory cards and SDHC Memory cards. You can only use
SDHC Memory cards on devices that are compatible with them. You cannot use SDHC Memory
cards on devices that are only compatible with SD Memory cards. (When using an SDHC Memory
card on another device, be sure to read the operating instructions for that device.)
LSQT1210_EP(EN).book 15 ページ 2007年2月9日 金曜日 午後6時0分

Before using
16
LSQT1210
≥ Use this unit to format SD cards. If an SD card is formatted on other products (such as a computer),
the time spent for recording may become longer and you may not be able to use the SD card. (l 69)
≥ When using an SD card on which data has been written many times, the remaining time left for
recording may be reduced.
≥ Keep the Memory Card out of reach of children to prevent swallowing.
≥ A MultiMediaCard cannot be used on this unit.
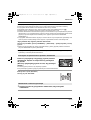
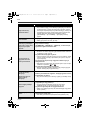
≥ When the write-protect switch A on SD card is locked, no recording, deletion or
editing will be possible on the card.
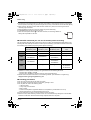
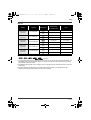
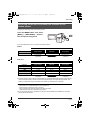
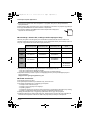
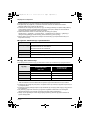
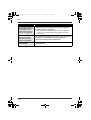
∫ About SD cards that you can use for motion picture recording
We recommend using SD cards conforming to Class 2 or higher of the SD Speed Class Rating or the
following SD cards made by Panasonic for motion picture recording. (If another kind of SD card is used,
the recording may suddenly stop during motion picture recording.)
*
No longer made.
≥ Operation in motion picture recording is not guaranteed with the following SD cards.
jSD cards from 32 MB to 128 MB
jSD cards from 256 MB to 4 GB other than the ones mentioned above
≥ Please confirm the latest information on the following website. (This website is in English only.)
http://panasonic.jp/support/global/cs/e_cam
∫ Handling precautions
≥ Do not touch the terminals on the back of the card.
≥ Do not expose the terminals of the card to water, garbage or dust.
≥ Do not place the card in the following areas:
jIn direct sunlight.
jIn very dusty or humid areas.
jNear a heater.
jLocations susceptible to significant difference in temperature (condensation can occur).
jWhere static electricity or electromagnetic waves occur.
≥ Put the card back in its bag or case for protection when not using it.
≥ Electrical noise, static electricity or failure of this unit or the SD card may damage or erase the data
stored on the SD card. We recommend saving important data on a computer.
Pro High Speed
SD Memory Card
Super High Speed
SD Memory Card
High Speed
SD Memory Card
SDHC Memory
Card
256 MB – RP-SDH256 RP-SDR256 –
512 MB RP-SDK512 RP-SDH512
*
RP-SDR512 –
1GB
RP-SDK01G
RP-SDV01G
RP-SDH01G
*
RP-SDQ01G
*
RP-SDR01G
–
2GB
RP-SDK02G
RP-SDV02G
–
RP-SDQ02G
*
RP-SDR02G
RP-SDM02G
–
4GB –––
RP-SDR04G
RP-SDM04G
RP-SDV04G
A
LSQT1210_EP(EN).book 16 ページ 2007年2月9日 金曜日 午後6時0分

Before using
17
LSQT1210
This unit has an internal HDD. The HDD is a precision instrument so take care when handling it.
∫ Do not cause any vibrations or impacts to this unit.
The HDD may no longer be recognised or recording or playback may no longer be possible. In
particular, do not cause any vibrations or impacts during recording or playback.
∫ Do not drop this unit.
The HDD may be damaged if this unit receives a strong impact due it to being dropped etc.
This unit has a drop detection function to protect the HDD from impact if this unit is dropped. If it detects
that this unit has been dropped during motion picture recording, the HDD protection operation sound
may be recorded. Also if it detects that the unit is being continuously dropped, recording or playback
may stop.
∫ Take note of the temperature of this unit
It may no longer be possible to record or playback if the temperature of this unit is too high or low. A
warning message will appear on this unit’s LCD monitor if an irregularity in the temperature is detected.
(l 93)
∫ Do not use the unit in a low pressure area
The HDD may be damaged if you use this unit where the altitude is more than 3000 m.
∫ Back up important recorded data to protect it.
Save recorded data periodically on a computer, DVD disc, etc. for backup purposes.
If the HDD fails, the recorded data cannot be repaired.
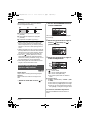
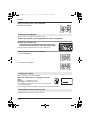
∫ ACCESS/PC lamp
≥ When this unit accesses the HDD (reading, recording, playback,
erasing, etc.), the ACCESS/PC lamp lights up.
≥ If the following operations are performed when the ACCESS/PC
lamp is lit, then the HDD or the recorded data may be damaged or
this unit may malfunction.
sCausing strong vibrations or impacts to this unit
sOperating the OFF/ON switch or the mode dial
sRemoving the battery or disconnecting the AC adaptor
HDD handling precautions
∫ Indemnity concerning recorded content
Panasonic does not accept any responsibility for damages directly or indirectly due to any type of
problems that result in loss of recording or edited content, and does not guarantee any content if
recording or editing does not work properly. Likewise, the above also applies in a case where any
type of repair is made to the unit (including any other non-HDD related component).
Access lamp
LSQT1210_EP(EN).book 17 ページ 2007年2月9日 金曜日 午後6時0分

Before using
18
LSQT1210
∫ Card access lamp
≥ When this unit accesses the SD card (reading, recording, playback,
erasing, etc.), the access lamp lights up.
≥ If the following operations are performed when the access lamp is lit, then
the SD card or the recorded data may be damaged or this unit may
malfunction.
sOpening the card slot cover
sRemoving the SD card
sOperating the OFF/ON switch or the mode dial
sRemoving the battery or disconnecting the AC adaptor
LSQT1210_EP(EN).book 18 ページ 2007年2月9日 金曜日 午後6時0分

19
LSQT1210
Setup
Setup
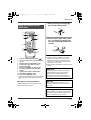
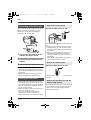
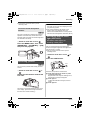
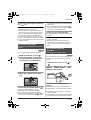
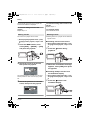
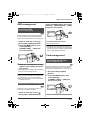
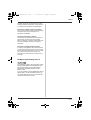
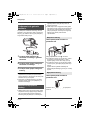
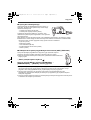
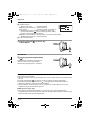
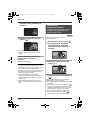
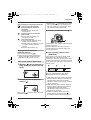
Power supply
When this unit is purchased, the battery is not
charged. Charge the battery before using this
unit.
≥ If the DC cable is connected to the AC
adaptor, then the battery will not be
charged. Remove the DC cable from the AC
adaptor.
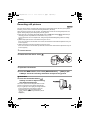
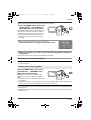
1 Connect the AC cable to the AC
adaptor and the AC outlet.
2 Put the battery on the battery
mount by aligning the mark, and
then securely plug it in.
≥ The output plug of the AC cable is not
completely connected to the AC adaptor
socket. As shown in A, there is a gap.
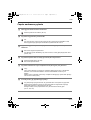
∫ Charging lamp
≥ Battery charging time (l 20)
≥ We recommend using Panasonic batteries.
(l 9)
≥ If you use other batteries, we cannot guarantee
the quality of this product.
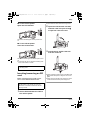
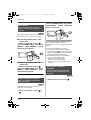
Push the battery against the battery
holder and slide it until it clicks.
While sliding the BATTERY lever,
slide the battery to remove it.
≥ Hold the battery with your hand so it does not
fall.
≥ Before removing the battery, be sure to set the
OFF/ON switch to OFF and check that the
status indicator is off.
Charging the battery
Lights up: Charging
Goes off: Charging completed
Flashing: The battery is over discharged
(discharged excessively). In a while,
the lamp will light up and normal
charging will start.
When the battery temperature is
excessively high or low, the
CHARGE lamp flashes and the
charging time will be longer than
normal.
A
Inserting the battery
Removing the battery
CAUTION
Danger of explosion if battery is incorrectly
replaced. Replace only with the same or
equivalent type recommended by the
manufacturer. Dispose of used batteries
according to the manufacturer’s instructions.
LSQT1210_EP(EN).book 19 ページ 2007年2月9日 金曜日 午後6時0分

Setup
20
LSQT1210
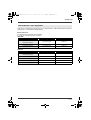
The times shown in the tables below are for when the temperature is 25 oC and the humidity is 60%. If
the temperature is higher or lower than 25 oC, the charging time will become longer.
∫ Charging time
≥ The charging time shown in the table are approximations.
≥ “2 h 25 min” indicates 2 hours 25 minutes.
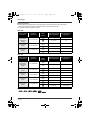
SDR-H250:
SDR-H20:
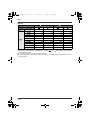
∫ Recordable time
≥ The actual recordable time refers to the recordable time when repeatedly starting/stopping recording,
turning the unit on/off, moving the zoom lever, etc.
≥ “2 h 5 min” indicates 2 hours 5 minutes.
SDR-H250:
Charging time and recordable time
Battery model number Voltage/capacity Charging time
Supplied battery/
CGA-DU12 (optional)
7.2 V/1150 mAh 2 h 25 min
CGA-DU14 (optional) 7.2 V/1360 mAh 2 h 45 min
CGA-DU21 (optional) 7.2 V/2040 mAh 3 h 55 min
Battery model number Voltage/capacity Charging time
Supplied battery/
CGR-DU06 (optional)
7.2 V/640 mAh 1 h 40 min
CGA-DU07 (optional) 7.2 V/680 mAh 1 h 30 min
CGA-DU12 (optional) 7.2 V/1150 mAh 2 h 25 min
CGA-DU14 (optional) 7.2 V/1360 mAh 2 h 45 min
CGA-DU21 (optional) 7.2 V/2040 mAh 3 h 55 min
Battery model
number
Voltage/
capacity
Recording
destination
Maximum
continuously
recordable time
Actual recordable
time
Supplied battery/
CGA-DU12
(optional)
7.2 V/1150 mAh
[HDD] 2h5min 55min
[SD] 2h20min 1h
CGA-DU14
(optional)
7.2 V/1360 mAh
[HDD] 2h30min 1h5min
[SD] 2h45min 1h15min
CGA-DU21
(optional)
7.2 V/2040 mAh
[HDD] 3h45min 1h40min
[SD] 4h10min 1h50min
LSQT1210_EP(EN).book 20 ページ 2007年2月9日 金曜日 午後6時0分
Strona się ładuje...
Strona się ładuje...
Strona się ładuje...
Strona się ładuje...
Strona się ładuje...
Strona się ładuje...
Strona się ładuje...
Strona się ładuje...
Strona się ładuje...
Strona się ładuje...
Strona się ładuje...
Strona się ładuje...
Strona się ładuje...
Strona się ładuje...
Strona się ładuje...
Strona się ładuje...
Strona się ładuje...
Strona się ładuje...
Strona się ładuje...
Strona się ładuje...
Strona się ładuje...
Strona się ładuje...
Strona się ładuje...
Strona się ładuje...
Strona się ładuje...
Strona się ładuje...
Strona się ładuje...
Strona się ładuje...
Strona się ładuje...
Strona się ładuje...
Strona się ładuje...
Strona się ładuje...
Strona się ładuje...
Strona się ładuje...
Strona się ładuje...
Strona się ładuje...
Strona się ładuje...
Strona się ładuje...
Strona się ładuje...
Strona się ładuje...
Strona się ładuje...
Strona się ładuje...
Strona się ładuje...
Strona się ładuje...
Strona się ładuje...
Strona się ładuje...
Strona się ładuje...
Strona się ładuje...
Strona się ładuje...
Strona się ładuje...
Strona się ładuje...
Strona się ładuje...
Strona się ładuje...
Strona się ładuje...
Strona się ładuje...
Strona się ładuje...
Strona się ładuje...
Strona się ładuje...
Strona się ładuje...
Strona się ładuje...
Strona się ładuje...
Strona się ładuje...
Strona się ładuje...
Strona się ładuje...
Strona się ładuje...
Strona się ładuje...
Strona się ładuje...
Strona się ładuje...
Strona się ładuje...
Strona się ładuje...
Strona się ładuje...
Strona się ładuje...
Strona się ładuje...
Strona się ładuje...
Strona się ładuje...
Strona się ładuje...
Strona się ładuje...
Strona się ładuje...
Strona się ładuje...
Strona się ładuje...
Strona się ładuje...
Strona się ładuje...
Strona się ładuje...
Strona się ładuje...
Strona się ładuje...
Strona się ładuje...
Strona się ładuje...
Strona się ładuje...
Strona się ładuje...
Strona się ładuje...
Strona się ładuje...
Strona się ładuje...
Strona się ładuje...
Strona się ładuje...
Strona się ładuje...
Strona się ładuje...
Strona się ładuje...
Strona się ładuje...
Strona się ładuje...
Strona się ładuje...
Strona się ładuje...
Strona się ładuje...
Strona się ładuje...
Strona się ładuje...
Strona się ładuje...
Strona się ładuje...
Strona się ładuje...
Strona się ładuje...
Strona się ładuje...
Strona się ładuje...
Strona się ładuje...
Strona się ładuje...
Strona się ładuje...
Strona się ładuje...
Strona się ładuje...
Strona się ładuje...
Strona się ładuje...
Strona się ładuje...
Strona się ładuje...
Strona się ładuje...
Strona się ładuje...
Strona się ładuje...
Strona się ładuje...
Strona się ładuje...
Strona się ładuje...
Strona się ładuje...
Strona się ładuje...
Strona się ładuje...
Strona się ładuje...
Strona się ładuje...
Strona się ładuje...
Strona się ładuje...
Strona się ładuje...
Strona się ładuje...
Strona się ładuje...
Strona się ładuje...
Strona się ładuje...
Strona się ładuje...
Strona się ładuje...
Strona się ładuje...
Strona się ładuje...
Strona się ładuje...
Strona się ładuje...
Strona się ładuje...
Strona się ładuje...
Strona się ładuje...
Strona się ładuje...
Strona się ładuje...
Strona się ładuje...
Strona się ładuje...
Strona się ładuje...
Strona się ładuje...
Strona się ładuje...
Strona się ładuje...
Strona się ładuje...
Strona się ładuje...
Strona się ładuje...
Strona się ładuje...
Strona się ładuje...
Strona się ładuje...
Strona się ładuje...
Strona się ładuje...
Strona się ładuje...
Strona się ładuje...
Strona się ładuje...
Strona się ładuje...
Strona się ładuje...
Strona się ładuje...
Strona się ładuje...
Strona się ładuje...
Strona się ładuje...
Strona się ładuje...
Strona się ładuje...
Strona się ładuje...
Strona się ładuje...
Strona się ładuje...
Strona się ładuje...
Strona się ładuje...
Strona się ładuje...
Strona się ładuje...
Strona się ładuje...
Strona się ładuje...
Strona się ładuje...
Strona się ładuje...
Strona się ładuje...
Strona się ładuje...
Strona się ładuje...
Strona się ładuje...
Strona się ładuje...
Strona się ładuje...
Strona się ładuje...
Strona się ładuje...
Strona się ładuje...
Strona się ładuje...
Strona się ładuje...
Strona się ładuje...
Strona się ładuje...
Strona się ładuje...
Strona się ładuje...
Strona się ładuje...
Strona się ładuje...
Strona się ładuje...
Strona się ładuje...
Strona się ładuje...
Strona się ładuje...
Strona się ładuje...
Strona się ładuje...
Strona się ładuje...
Strona się ładuje...
Strona się ładuje...
Strona się ładuje...
Strona się ładuje...
Strona się ładuje...
Strona się ładuje...
Strona się ładuje...
Strona się ładuje...
-
 1
1
-
 2
2
-
 3
3
-
 4
4
-
 5
5
-
 6
6
-
 7
7
-
 8
8
-
 9
9
-
 10
10
-
 11
11
-
 12
12
-
 13
13
-
 14
14
-
 15
15
-
 16
16
-
 17
17
-
 18
18
-
 19
19
-
 20
20
-
 21
21
-
 22
22
-
 23
23
-
 24
24
-
 25
25
-
 26
26
-
 27
27
-
 28
28
-
 29
29
-
 30
30
-
 31
31
-
 32
32
-
 33
33
-
 34
34
-
 35
35
-
 36
36
-
 37
37
-
 38
38
-
 39
39
-
 40
40
-
 41
41
-
 42
42
-
 43
43
-
 44
44
-
 45
45
-
 46
46
-
 47
47
-
 48
48
-
 49
49
-
 50
50
-
 51
51
-
 52
52
-
 53
53
-
 54
54
-
 55
55
-
 56
56
-
 57
57
-
 58
58
-
 59
59
-
 60
60
-
 61
61
-
 62
62
-
 63
63
-
 64
64
-
 65
65
-
 66
66
-
 67
67
-
 68
68
-
 69
69
-
 70
70
-
 71
71
-
 72
72
-
 73
73
-
 74
74
-
 75
75
-
 76
76
-
 77
77
-
 78
78
-
 79
79
-
 80
80
-
 81
81
-
 82
82
-
 83
83
-
 84
84
-
 85
85
-
 86
86
-
 87
87
-
 88
88
-
 89
89
-
 90
90
-
 91
91
-
 92
92
-
 93
93
-
 94
94
-
 95
95
-
 96
96
-
 97
97
-
 98
98
-
 99
99
-
 100
100
-
 101
101
-
 102
102
-
 103
103
-
 104
104
-
 105
105
-
 106
106
-
 107
107
-
 108
108
-
 109
109
-
 110
110
-
 111
111
-
 112
112
-
 113
113
-
 114
114
-
 115
115
-
 116
116
-
 117
117
-
 118
118
-
 119
119
-
 120
120
-
 121
121
-
 122
122
-
 123
123
-
 124
124
-
 125
125
-
 126
126
-
 127
127
-
 128
128
-
 129
129
-
 130
130
-
 131
131
-
 132
132
-
 133
133
-
 134
134
-
 135
135
-
 136
136
-
 137
137
-
 138
138
-
 139
139
-
 140
140
-
 141
141
-
 142
142
-
 143
143
-
 144
144
-
 145
145
-
 146
146
-
 147
147
-
 148
148
-
 149
149
-
 150
150
-
 151
151
-
 152
152
-
 153
153
-
 154
154
-
 155
155
-
 156
156
-
 157
157
-
 158
158
-
 159
159
-
 160
160
-
 161
161
-
 162
162
-
 163
163
-
 164
164
-
 165
165
-
 166
166
-
 167
167
-
 168
168
-
 169
169
-
 170
170
-
 171
171
-
 172
172
-
 173
173
-
 174
174
-
 175
175
-
 176
176
-
 177
177
-
 178
178
-
 179
179
-
 180
180
-
 181
181
-
 182
182
-
 183
183
-
 184
184
-
 185
185
-
 186
186
-
 187
187
-
 188
188
-
 189
189
-
 190
190
-
 191
191
-
 192
192
-
 193
193
-
 194
194
-
 195
195
-
 196
196
-
 197
197
-
 198
198
-
 199
199
-
 200
200
-
 201
201
-
 202
202
-
 203
203
-
 204
204
-
 205
205
-
 206
206
-
 207
207
-
 208
208
-
 209
209
-
 210
210
-
 211
211
-
 212
212
-
 213
213
-
 214
214
-
 215
215
-
 216
216
-
 217
217
-
 218
218
-
 219
219
-
 220
220
-
 221
221
-
 222
222
-
 223
223
-
 224
224
-
 225
225
-
 226
226
-
 227
227
-
 228
228
-
 229
229
-
 230
230
-
 231
231
-
 232
232
-
 233
233
-
 234
234
-
 235
235
-
 236
236


Panasonic SDRH20EP Instrukcja obsługi
- Kategoria
- Kamery
- Typ
- Instrukcja obsługi
- Niniejsza instrukcja jest również odpowiednia dla
w innych językach
Powiązane artykuły
-
Panasonic VDRD160EP Instrukcja obsługi
-
-
-
-
-
Panasonic VDRD310EP Instrukcja obsługi
-
Panasonic NVGS11EGE Instrukcja obsługi
-
-
-
Inne dokumenty
-
Overmax Camroad 6.1 Instrukcja obsługi
-
-
Philips KEY019/00 Instrukcja obsługi
-
-
LARK freecam 1.0 Instrukcja obsługi
-
Sonel KT-128 Instrukcja obsługi
-
Pioneer BDR-XS07TUHD Instrukcja obsługi
-
Sonel MPI-540-PV Solar Instrukcja obsługi
-
Sonel MPI-536 Instrukcja obsługi
-
Polaroid 430 Instrukcja obsługi