Planet GSW-1601 Instrukcja obsługi
- Kategoria
- Przełączniki sieciowe
- Typ
- Instrukcja obsługi
Niniejsza instrukcja jest również odpowiednia dla

16-/24-Port 10/100/1000BASE-T
Gigabit Ethernet Switch
GSW-1601/GSW-2401
User's Manual

Table of Contents
1. Package Contents ................................................................................. 3
2. Product Features .................................................................................. 4
3. ProductSpecications ........................................................................... 5
4. Switch Front Panel................................................................................ 6
5. Switch Rear Panel ................................................................................ 8
6. Installing the Switch ............................................................................. 9
Customer Support .................................................................................... 12

3
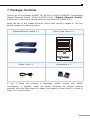
1. Package Contents
Thank you for purchasing PLANET 16-/24-Port 10/100/1000BASE-T Unmanaged
Gigabit Ethernet Switch, GSW-1601/GSW-2401. “Gigabit Ethernet Switch”
mentioned in this User’s Manual refers to the GSW-1601/GSW-2401.
Open the box of the Gigabit Ethernet Switch and carefully unpack it. The box
should contain the following items:
Gigabit Ethernet Switch x 1 Quick Code Sheet x 1
Let’s get started with your PLANET product
GSW-1601
EN Please scan the QR code to browse our online User’s Manual or Quick
Installation Guide and follow the instructions to complete the setup.
User's Manual
DE
Bitte scannen Sie den QR Code sie werden per Browser zur
Bedienungsanleitung oder Schnellanleitung weiter geleitet. Folgen Sie den
Anweisungen um die Installation abzuschließen.
FR
Veuillez scanner le code QR pour obtenir notre Notice d’Utilisation en
ligne ou notre Guide d’Installation Rapide et suivez les instructions pour
compléter la conguration
ES
Escanee el código QR para encontrar el Manual del Usuario en línea o
la Guía de Instalación Rápida y siga las instrucciones para completar la
conguración.
IT Scansiona il codice QR per consultare online il Manuale utente o la Guida di
installazione rapida e segui le istruzioni per completare la congurazione.
PT Por favor, escaneie o QR code para navegar no Manual do Usuário ou Guia
de Instalação Rápida. Siga as instruções para completar a conguração.
PL
Zeskanuj kod QR, aby otworzyć naszą internetową instrukcję obsługi
lub instrukcję szybkiej instalacji. Postępuj zgodnie z instrukcjami, aby
zakończyć poprawną kongurację.
RU
One word modify: Отсканируйте QR-код, чтобы просмотреть наше
онлайн-руководство пользователя или руководство по быстрой
настройке, и следуйте инструкциям для завершения настройки
RO Te rugam sa scanezi codul QR, pentru a descarca User’s Manual sau Quick
Installation Guide si a urmari instructiunile necesare in nalizarea instalarii
AR
Need more help?
PLANET online FAQs:
http://www.planet.com.tw/en/support/faq
Technical Support: [email protected]
Copyright © PLANET Technology Corp. 2023.
Contents are subject to revision without prior notice.
PLANET is a registered trademark of PLANET Technology Corp.
All other trademarks belong to their respective owners.
Part No. 2361-A50140-001
Power Cord x 1 Accessories x 1
If any of these are missing or damaged, please contact your dealer
immediately; if possible, retain the carton including the original packing
material, and use them again to repack the product in case there is a need to
return it to us for repair.

4
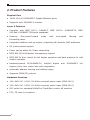
2. Product Features
Physical Port
● 16/2410/100/1000BASE-TGigabitEthernetports
● SupportsautoMDI/MDI-Xfunction
Layer 2 Features
● Complies with IEEE 802.3, 10BASE-T, IEEE 802.3u 100BASE-TX, IEEE
802.3ab 1000BASE-T Ethernet standards
● Features Store-and-Forward mode with wire-speed ltering and
forwarding rates
● Integratedaddresslook-upengine,supporting8KabsoluteMACaddresses
● 9Kjumbopacketsupport
● PowersavingabilityforGreennetworking
● IEEE802.1QVLANpackettransparencysupport
● IEEE802.3x owcontrol forfull duplexoperationand backpressure forhalf
duplex operation
● Hardware-based 10/100BASE-TX, half/full duplex and 1000BASE-T full
duplexmode,owcontrolandauto-negotiation
● Automaticaddresslearningandaddressaging
● SupportsCSMA/CDprotocol
Hardware Features
● 100~240VAC,0.15A,50~60Hzuniversalpowerinput(GSW-1601)
● 100~240VAC,0.22A,50~60Hzuniversalpowerinput(GSW-2401)
● DIPswitchforstandard/VLAN/PortTrunk/owcontroloselection
● FCC,CEclassAcompliant

5
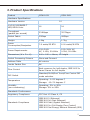
3.ProductSpecications
Product GSW-1601 GSW-2401
HardwareSpecications
HardwareVersion 10
10/100/1000BASE-T
MDI/MDIXPorts 16 24
Throughput
(packetpersecond) 23.8Mpps 35.7Mpps
Switch Fabric 32Gbps 48Gbps
Weight 1.6kg 1.7kg
Power
Consumption/Dissipation 7.6 watts/25 BTU 10.8 watts/36 BTU
Power Requirements 100~240V
AC,0.15A,50-60Hz
100~240VAC,
0.22A,50-60Hz
Dimensions(WxDxH) 440 x 180 x 44mm, 1U height
Switch Processing Scheme Store-and-Forward
Address Table 8Kentries
JumboPacketSize 9K
Flow Control Back pressure for half duplex, IEEE 802.3x
Pause Frame for full duplex
DIPSwitch Standard/VLAN/PortTrunk/FlowControlO
mode selection
Temperature Operating:0~50degreesC
Storage:-10~70degreesC
Humidity
(non-condensing)
Operating: 5% to 95%
Storage: 5% to 95%
Standards Conformance
Regulatory Compliance FCC Part 15 Class A, CE
Standards Compliance
IEEE802.3(Ethernet)
IEEE802.3u(FastEthernet)
IEEE802.3ab(GigabitEthernet)
IEEE802.3x(Full-DuplexFlowControl)
IEEE802.3azEnergyEcientEthernet(EEE)

6
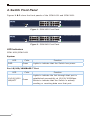
4. Switch Front Panel
Figures 1 & 2 show the front panels of the GSW-1601 and GSW-2401.
PWR
Standard
VLAN
Flow Control Off
Port Trunk
2 4 6 81 3 5 7 10 12 14 169 11 13 15
GSW-1601
16-Port 10/100/1000T Gigabit Ethernet Switch
VLAN Up Link/
Port Trunk
10/100/1000
10/100/1000 LNK
ACT
Figure 1: GSW-1601 Front Panel
PWR
Standard
VLAN
Flow Control Off
Port Trunk
2 4 6 81 3 5 7 10 12 14 169 11 13 15 18 20 22 2417 19 21 23
10/100/1000
10/100/1000 LNK
ACT
GSW-2401
24-Port 10/100/1000T Gigabit Ethernet Switch
VLAN Up Link/
Port Trunk
Figure 2: GSW-2401 Front Panel
LED Indicators
GSW-1601/GSW-2401
System
LED Color Function
PWR Green Lights to indicate that the Switch has power.
Per 10/100/1000BASE-T Port
LED Color Function
10/100/1000
LNK/ACT Green
Lights to indicate the link through that port is
established successfully at 10/100/1000Mbps.
BlinkstoindicatethattheSwitchisactively
sendingorreceivingdataoverthatport.

7
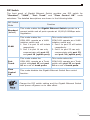
DIP Switch
The front panel of Gigabit Ethernet Switch provides one DIP switch for
“Standard”, “VLAN”, “Port Trunk” and “Flow Control O” mode
selections. The detailed descriptions are shown in the following table.
DIPSwitch
Mode Function
Standard
(default)
This mode makes the Gigabit Ethernet Switch operate as a
general switch and all ports operate at 10/100/1000Mbps auto-
negotiation.
VLAN
This mode makes the
GSW-1601operateasaVLAN
isolation switch and
1. Port 1 to port 14 will isolate
respectively.
2. Port 1 to port 14 can only
communicate with port 15
and port 16 (uplink port).
This mode makes the
GSW-2401operateasaVLAN
isolation switch and
1. Port 1 to port 22 will isolate
respectively.
2. Port 1 to port 22 can only
communicate with port 23
and port 24 (uplink port).
Port
Trunk
This mode makes the
GSW-1601 operate as a Trunk
switch with port 15 and port
16 as a set of trunk ports.
This mode makes the
GSW-2401 operate as a Trunk
switch with port 23 and port
24 as a set of trunk ports.
Flow
Control
O
ThismodedisablestheGigabitEthernetSwitchowcontrol
function.
Change the DIP switch setting and the Gigabit Ethernet Switch
must power off/power on to take effect.

8
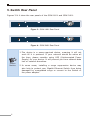
5. Switch Rear Panel
Figures 3 & 4 show the rear panels of the GSW-1601 and GSW-2401.
100-240V , 0.15A max.
50/60Hz
Figure 3: GSW-1601 Rear Panel
100-240V , 0.22A max.
50/60Hz
Figure 4: GSW-2401 Rear Panel
Power
Notice
1.The device is a power-required device, meaning it will not
work till it is powered. If your network should be active all
the time, please consider using UPS (Uninterrupted Power
Supply)foryourdevice.Itwillpreventyoufromnetworkdata
loss or network downtime.
2.In some areas, installing a surge suppression device may
also help to protect your Gigabit Ethernet Switch from being
damaged by unregulated surge or current to the Switch or
the power adapter.

9
6. Installing the Switch
This part describes how to install your Gigabit Ethernet Switch and make
connections to it. Please follow the procedure below:
This Gigabit Ethernet Switch does not need software configura-
tion.
Desktop Installation
To install the Gigabit Ethernet Switch on the desktop, simply follow these
steps:
Step 1: Attach the rubber feet to the recessed areas on the bottom of the
Gigabit Ethernet Switch.
Step 2: Place the Gigabit Ethernet Switch on the desktop near an AC power
source.
Step 3: Keep enough ventilation space between the Gigabit Ethernet Switch
andthesurroundingobjects.
When choosing a location, please keep in mind the environ-
mental restrictions discussed in Section 3 under Product Speci-
fications.
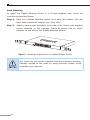
Step 4: ConnectyourGigabitEthernetSwitchtonetworkdevices.
A. Connect one end of a standard network cable to the 10/100/1000BASE-T
RJ45 ports on the front of the Gigabit Ethernet Switch.
B. Connect the other end of the cable to the network devices such as
printerservers,workstationsorrouters,etc.
Step 5: Supply power to the Gigabit Ethernet Switch.
A. Connect one end of the power cable to the Gigabit Ethernet Switch.
B. Connect the power plug of the power cable to a standard wall outlet.
When the Gigabit Ethernet Switch receives power, the Power LED should
remain solid Green.

10
Rack Mounting
To install the Gigabit Ethernet Switch in a 19-inch standard rack, follow the
instructions described below:
Step 1: Place your Gigabit Ethernet Switch on a hard at surface, with the
front panel positioned towards your front side.
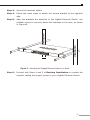
Step 2: Attach a rack-mount bracket to each side of the Switch with supplied
screws attached to the package. Figure 5 shows how to attach
brackets to one side of the Gigabit Ethernet Switch.
PWR
Standard
VLAN
Flow Control Off
Port Trunk
2 4 6 81 3 5 7 10 12 14 169 11 13 15 18 20 22 2417 19 21 23
10/100/1000
10/100/1000 LNK
ACT
GSW-2401
24-Port 10/100/1000T Gigabit Ethernet Switch
VLAN Up Link/
Port Trunk
Figure 5: Attaching the brackets to the Gigabit Ethernet Switch
You must use the screws supplied with the mounting brackets.
Damage caused to the parts by using incorrect screws would
invalidateyourwarranty.

11
Step 3: Secure the brackets tightly.
Step 4: Follow the same steps to attach the second bracket to the opposite
side.
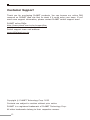
Step 5: After the brackets are attached to the Gigabit Ethernet Switch, use
suitable screws to securely attach the brackets to the rack, as shown
in Figure 6.
PWR
Standard
VLAN
Flow Control Off
Port Trunk
2 4 6 81 3 5 7 10 12 14 169 11 13 15 18 20 22 2417 19 21 23
10/100/1000
10/100/1000 LNK
ACT
GSW-2401
24-Port 10/100/1000T Gigabit Ethernet Switch
VLAN Up Link/
Port Trunk
Figure 6: Mounting the Gigabit Ethernet Switch in a Rack
Step 6: Proceed with Steps 4 and 5 of Desktop Installation to connect the
network cabling and supply power to your Gigabit Ethernet Switch.

12
Customer Support
Thank you for purchasing PLANET products. You can browse our online FAQ
resource on PLANET Web site rst to check if it could solve your issue. If you
need more support information, please contact PLANET switch support team.
PLANET online FAQs:
http://www.planet.com.tw/en/support/faq
Switch support team mail address:
Copyright © PLANET Technology Corp. 2023
Contentsaresubjecttorevisionwithoutpriornotice.
PLANET is a registered trademark of PLANET Technology Corp.
Allothertrademarksbelongtotheirrespectiveowners.
-
 1
1
-
 2
2
-
 3
3
-
 4
4
-
 5
5
-
 6
6
-
 7
7
-
 8
8
-
 9
9
-
 10
10
-
 11
11
-
 12
12


Planet GSW-1601 Instrukcja obsługi
- Kategoria
- Przełączniki sieciowe
- Typ
- Instrukcja obsługi
- Niniejsza instrukcja jest również odpowiednia dla
w innych językach
- English: Planet GSW-1601 User manual
Powiązane artykuły
Inne dokumenty
-
3com Switch 4500 PWR 50-Port Getting Started Manual
-
3com 4200G 48-Port Instrukcja obsługi
-
Interlogix IFS MC252-4P-1S and NS2052-4P-1T Instrukcja obsługi
-
-
Yamaha SWP2 Instrukcja obsługi
-
Tenda TEF1126P-24-410W Instrukcja instalacji
-
Sea Ray 2000 310 SUNDANCER Parts Manual