
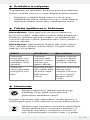
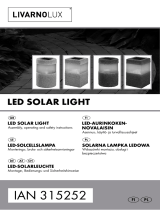
IAN 273525
LED SOLAR LIGHTS
LED-AURINKOKENNOV ALAISIN
Käyttö- ja turvaohjeet
LED SOLAR LIGHTS
Operation and Safety Notes
LED-SOLARLEUCHTEN
Bedienungs- und Sicherheitshinweise
LED ŽIBINTAI SU SAULĖS BATERIJA
Nurodymai dėl valdymo ir saugumo
LED-SOLCELLSLAMPOR
Bruksanvisning och säkerhetsanvisningar
LEDOWE LAMPY SOLARNE
Wskazówki dotyczące obsługi i bezpieczeństwa

GB / IE Operation and Safety Notes Page 5
FI Käyttö- ja turvaohjeet Sivu 12
SE Bruksanvisning och
säkerhetsanvisningar Sidan 19
PL Wskazówki dotyczące obsługi
i bezpieczeństwa Strona 26
LT Nurodymai dėl valdymo ir saugumo Puslapis 34
DE / AT / CH Bedienungs- und Sicherheitshinweise Seite 41

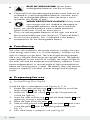
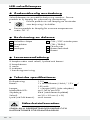
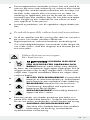
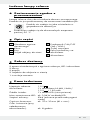
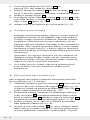
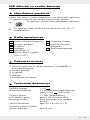
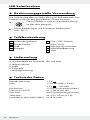
ON OFF
A
C D
B
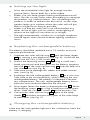
1
1
2
3
4
6
2
5
7
8


5 GB/IE
Proper use ............................................................ Page 6
Description of parts and features ..... Page 6
Scope of delivery............................................ Page 6
Technical data .................................................... Page 6
Safety instructions
Product-specific safety instructions ........................... Page 7
Safety instructions for rechargeable batteries ......... Page 7
Functioning ........................................................... Page 8
Preparing for use
Installing the light ...................................................... Page 8
Setting up the light .................................................... Page 9
Replacing the rechargeable battery ........................ Page 9
Charging the rechargeable battery ......................... Page 9
Maintenance and care ............................... Page 10
Troubleshooting .............................................. Page 10
Disposal .................................................................. Page 10
Warranty ............................................................... Page 11

6 GB/IE
LED solar lights
Proper use
The solar lights are intended for outdoor use. The product is
not intended for commercial use.
Not suitable for ordinary lighting in household
room illumination.
This product is suitable for extreme temperature below
-20°C.
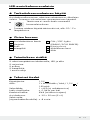
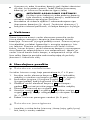
Description of parts and features
1 Solar cell housing
2 Lamp shade
3 Pole
4 Ground stake
5 On / off switch
6 Fastening screws
7 Battery compartment lid
8 Rechargeable battery
Scope of delivery
5 Lamp heads with solar cell, LED and rechargeable
battery
5 Lamp shades
5 Poles
5 Ground stakes
1 Assembly instruction
Technical data
Operating voltage: 1.2 V
Rechargeable battery: 1 x Ni-MH rechargeable battery /
AAA / 1.2 V / 150 mAh
Bulb: 1 x LED (not replaceable)
Rated power LED: approx. 0.06 W per LED
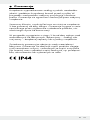
Protection type: IP44 (splash proof)
Solar cell: approx. 30 x 30 mm (L x W)
Lighting Duration
(with full charge): approx. 8 hours

7 GB/IE
Safety instructions
YOU SHOULD STORE ALL SAFETY INFORMATION AND
INSTRUCTIONS IN A SAFE PLACE IN CASE YOU NEED
TO REFER TO THEM AGAIN IN THE FUTURE!
This appliance can be used by children aged from 8 years
and above and persons with reduced physical, sensory or
mental capabilities or lack of experience and knowledge
if they have been given supervision or instruction concern-
ing use of the appliance in a safe way and understand
the hazards involved. Children shall not play with the
appliance. Cleaning and user maintenance shall not be
made by children without supervision.
Do not use the article if you detect any kind of damage.
Product-specific safety instructions
Make sure that the solar cell is free of dirt and free of
snow and ice in winter. Otherwise the performance of the
solar cell will diminish.
Cold temperatures have a negative influence on the oper-
ating life of the rechargeable battery. If the solar garden
lights are not going to be used for a long time, e.g. in win-
ter, they should be taken up, cleaned and stored in a dry,
warm room.
Safety instructions for
rechargeable batteries
DANGER TO LIFE AND
RISK OF ACCIDENTS FOR INFANTS
AND CHILDREN! Keep batteries out of the
reach of children. Do not leave the batteries lying around.
There is a risk of children or animals swallowing them.
Consult a doctor immediately if a battery is swallowed.
CAUTION! DANGER OF EXPLOSION!
Use only rechargeable batteries of the recom-
mended type. Other rechargeable or single-
use batteries could explode during charging.
FIRE HAZARD! Do not allow rechargeable
batteries to short-circuit. Otherwise the re-
chargeable batteries may overheat, become a
fire hazard or explode.

8 GB/IE
RISK OF EXPLOSION! Never throw
rechargeable batteries into fire or water.
Chemical fluids that damage the product may leak out of
outdated or used rechargeable batteries. Remove, there-
fore, the rechargeable battery when the lamp is not re-
quired for any length of time.
WEAR PROTECTIVE GLOVES! If they come
into contact with skin, leaked or damaged re-
chargeable batteries could cause chemical
burns; you should therefore wear suitable protective
gloves at all times if such an event occurs.
Only use rechargeable batteries of the right size and of
the recommended type (see section on ”Technical data”).
Ensure correct polarity. This is indicated in the battery
compartment for the rechargeable battery.
Functioning
The solar cell installed in the article converts sunlight into elec-
trical energy and stores it in 1 Ni-MH battery. Switches on the
light as it begins to get dark. The in-built light-emitting diodes
are a very long-life and energy-saving light source. The light du-
ration depends on the amount of sunlight, the angle of light on
the solar cell and the temperature (the battery capacity is tem-
perature-dependent). A vertical angle of light at temperatures
above the freezing point is ideal. The battery does not achieve
maximum capacity until after several charge and discharge
cycles.
Preparing for use
Installing the light
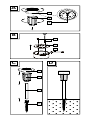
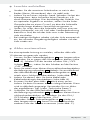
Install the light in accordance with Figures A, C, D:
1. Rotate the solar cell housing 1 anticlockwise out of the
lamp shade 2 (see Fig. A).
2. Move the ON / OFF switch 5 into the ON position to
switch the light on.
3. Insert the solar cell housing 1 into the lamp shade 2 and
tighten by turning it clockwise.
4. Place the light on to the pole 3.
5. Take out the ground stake 4 from the pole 3 and insert
it into the pole 3 with the tip facing downwards (see
Fig. C).
6. Your solar lamp is ready for use (see Fig. D).

9 GB/IE
Setting up the light
Insert the assembled solar light far enough into the
ground (lawn, flower bed) for it to be stable.
Make sure you keep proper footing and balance at all
times. Do not use any force when assembling or setting-up
the product, e.g. hammer blows. This will damage the
product. In order to achieve the best result, set the solar
garden lamp up in a place where the solar cell will get
direct sunlight for as long as possible.
Make sure that the solar cell is not influenced by any
other source of light such as yard or street lighting as
otherwise the light will not come on in twilight.
The light automatically switches on in twilight conditions
and off again when normal outdoor lighting conditions
return.
Replacing the rechargeable battery
The battery should be replaced every 12 months to ensure
optimum performance.
1. Separate the solar cell housing 1 from the lamp shade
2 by moving it anti-clockwise (see Fig. A). Switch off the
lamp with the ON- / OFF-switch 5.
2. Loosen the fastening screws 6 by using a small cross
head screwdriver and then lever out the battery compart-
ment lid 7 of the solar cell housing 1 with the help of a
slot screwdriver (see Fig. B).
3. Take care not to damage the cables and cable connec-
tions (see Fig. B).
4. Exchange the old rechargeable battery 8 to a new one.
Take care to the correct polarity, when inserting the new
rechargeable battery. The polarity is indicated in the bat-
tery compartment. The new rechargeable battery has to
have the same technical data like the old one.
5. Now again fasten the battery compartment lid 7, fasten
the fastening screws 6 by using a small cross head screw-
driver. Slide the On / Off switch 5 to the position ON.
6. Connect the solar cell housing 1 again to the lamp
shade 2 and then connect every part of the solar lamp
to each other (see Fig. C).
Charging the rechargeable battery
Note that the solar garden light must be switched on when the
battery is charging.

10 GB/IE
The charging time of the battery when the solar cell is used
depends on the intensity of the sunlight and the angle of
incidence of the light on the solar cell. Place the solar cell as
perpendicular as possible to the angle of incidence of the
light. In this way you will receive the highest light levels.
Maintenance and care
The light-emitting diodes cannot be replaced. The solar lamp is
maintenance-free, except for any necessary change of battery.
Clean the solar lamp regularly with a dry, lint-free cloth. Use
a slightly dampened cloth to remove more stubborn dirt.
Troubleshooting
Note: This appliance has delicate electronic components.
This means that if it is placed near an object that transmits
radio signals, it could cause interference. If you notice that the
device is malfunctioning, remove any sources of interference
from the area of the device.
Note: Electrostatic discharges may cause device to malfunc-
tion. In the event of such malfunctions, remove the batteries
briefly and reinsert them.
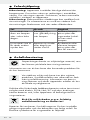
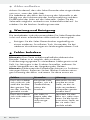
Error Cause Solution
The light will not
switch on even
though the sun
shone on the
lamp all day.
Artificial sources
of light, e.g. street
lighting, are inter-
fering with the
lamp.
Mount the lamp in a
place where it cannot
be disturbed by other
sources of light.
The light does
not come on or
comes on only
briefly.
The rechargeable
battery is broken
or there was not
enough daylight.
Replace the recharge-
able battery or mount
the lamp in a place
where it can receive
more sunlight.
Disposal
The packaging is made entirely of recyclable mate-
rials, which you may dispose of at local recycling
facilities.
Contact your local refuse disposal authority for more details
of how to dispose of your worn-out product.

11 GB/IE
To help protect the environment, please dispose of
the product properly when it has reached the end
of its useful life and not in the household waste. In-
formation on collection points and their opening
hours can be obtained from your local authority.
Defective or exhausted rechargeable batteries must be
recycled in accordance with Directive 2006 / 66 / EC and its
amendments. Return the battery and / or the device through
the appropriate collection facilities.
Improper disposal of rechargeable
batteries can damage the environment!
Rechargeable batteries must not be disposed of with the
household refuse. They may contain toxic heavy metals and
require to be handled as special waste. The chemical symbols
of heavy metals are: Cd = cadmium, Hg = mercury, Pb = lead.
That is why you should dispose of used batteries at a local
collection point.
Warranty
The device has been manufactured to strict quality guidelines
and meticulously examined before delivery. In the event of
product defects you have legal rights against the retailer of
this product. Your legal rights are not limited in any way by
our warranty detailed below.
The warranty for this device is 3 years from the date of pur-
chase. Should this device show any fault in materials or manu-
facture within 3 years from the
date
of purchase, we will repair or
replace it – at our
choice – free of charge to you.
The warranty period begins on the date of pur
chase.
Please
keep the original sales receipt in a safe location.
This document is
required as your proof of purchase. This warranty becomes
void if the device has been damaged or improperly used or
maintained.
The warranty applies to faults in material or manufacture. This
warranty does not cover product parts subject to normal wear,
thus possibly considered con
sumables (e.g. batteries) or for dam-
age to fragile
parts, e.g. switches, rechargeable batteries or
glass parts.

12 FI
Tarkoituksenmukainen käyttö ............. Sivu 13
Osien kuvaus .......................................................Sivu 13
Toimituksen sisältö ..........................................Sivu 13
Tekniset tiedot ..................................................... Sivu 13
Turvallisuusohjeet
Tuotekohtaiset turvaohjeet ..........................................Sivu 14
Akkuja koskevat turvallisuusohjeet .............................Sivu 14
Toimintatapa ........................................................Sivu 15
Käyttöönotto
Valaisimen asennus ..................................................... Sivu 15
Valaisimen sijoittaminen ..............................................Sivu 15
Akun vaihtaminen ........................................................Sivu 16
Akun lataus .................................................................. Sivu 16
Huolto ja puhdistus ......................................... Sivu 17
Vikojen korjaaminen ....................................Sivu 17
Hävittäminen .......................................................Sivu 17
Takuu ..........................................................................Sivu 18

13 FI
LED-aurinkokennovalaisin
Tarkoituksenmukainen käyttö
Aurinkokennolla toimivan valaisimen tehtävänä on ulkotilojen
valaisu. Tuotetta ei ole tarkoitettu ammattimaiseen käyttöön.
Tämä tuote ei sovellu kodin normaaliin
huonevalaistukseen.
Tuotetta voidaan käyttää äärimmäisissä, alle -20 °C:n
lämpötiloissa.
Osien kuvaus
1 Aurinkokeräimen kotelo
2 Varjostin
3 Putki
4 Maapiikki
5 ON- / OFF -kytkin
(PÄÄLLE / POIS PÄÄLTÄ)
6 Kiinnitysruuvit
7 Akkulokeron kansi
8 Akku
Toimituksen sisältö
5 valaisimenpäätä aurinkokennolla, LED ja akku
5 varjostinta
5 putkea
5 maapiikkiä
1 asennusohje
Tekniset tiedot
Käyttöjännite: 1,2 V
Akku: 1 x Ni-MH-akku / AAA / 1,2 V /
150 mAh
Valonlähde: 1 x LED (ei vaihdettavissa)
Ledin nimellisteho: n. 0,06 W per ledi
Kotelointiluokka: IP44 (roiskevesisuojattu)
Aurinkokenno: n. 30 x 30 mm (P x L)
Valaisuaika
(täyteenladatulla akulla): n. 8 tuntia

14 FI
Turvallisuusohjeet
SÄILYTÄ KAIKKI TURVALLISUUS- JA KÄYTTÖOHJEET
MYÖHEMPÄÄ TARVETTA VARTEN!
Laitetta voivat käyttää 8 vuotta täyttäneet lapset ja henki-
löt, jotka ovat fyysisiltä tai psyykkisiltä kyvyiltääntai aisteil-
taan rajoittuneita tai joilla ei ole kokemusta tai tietoa
laitteen käytöstä, jos he käyttävät laitettavalvonnan alai-
sina tai heitä on opastettu laitteen turvallisessa käytössä ja
he ovat tietoisia laitteeseen liittyvistä vaaroista. Lapset ei-
vät saa leikkiä laitteella. Lapset eivät saa puhdistaa tai
huoltaa laitetta ilman valvontaa.
Älä käytä tuotetta, jos havaitset siinä vaurioita.
Tuotekohtaiset turvaohjeet
Huolehdi siitä, että aurinkokenno ei ole likainen ja että se
ei ole talvella lumen ja jään peitossa. Nämä heikentävät
aurinkokennon tehoa.
Alhaiset lämpötilat vaikuttavat negatiivisesti akun kestoai-
kaan. Jos et käytä aurinkokennovalaisinta pitkään aikaan,
esim. talvella, se tulisi puhdistaa ja säilyttää kuivassa,
lämpimässä tilassa.
Akkuja koskevat
turvallisuusohjeet
LAPSIA UHKAAVA
HENGEN- JA TAPATURMANVAARA!
Pidä akut lasten ulottumattomissa. Älä jätä
akkuja ilman valvontaa. Lapset tai lemmikkieläimet voivat
vahingossa nielaista ne. Akun nielaisseen henkilön on
välittömästi otettava yhteyttä lääkäriin.
VARO! RÄJÄHDYSVAARA! Käytä vain
suositellun tyyppisiä akkuja. Muut akut /
paristot voivat räjähtää ladattaessa.
TULIPALON VAARA! Akkuja ei saa oikosul-
kea. Siitä voi seurata ylikuumeneminen, tulipa-
lon vaara tai akkujen halkeaminen.
RÄJÄHDYSVAARA! Älä koskaan heitä
akkuja tuleen tai veteen.
Vanhoista tai kuluneista akuista voi vuotaa kemiallisia
aineita, joka vaurioittavat tuotetta. Poista sen vuoksi akku

15 FI
tuotteesta, jos et käytä aurinkokennovalaisinta pitkään
aikaan.
KÄYTÄ SUOJAKÄSINEITÄ! Vuotaneet tai
vaurioituneet akut voivat ihokosketuksessa
syövyttää ihoa; käytä siksi tässä tapauksessa
ehdottomasti aina sopivia suojakäsineitä!
Käytä vain oikeankokoisia ja suositellun tyyppisiä akkuja
(katso kappale ”Tekniset tiedot”).
Tarkista, että akut on asetettu oikeinpäin, oikea napaisuus
on merkitty akkulokeroon.
Toimintatapa
Tuotteeseen integroitu aurinkokenno muuntaa auringon paista-
essa valon sähköenergiaksi ja varastoi tämän Ni-MH-akkuun.
Valo syttyy päivänvalon hämärtyessä. Integroidut valodiodit
ovat erittäin pitkäikäinen ja energiaasäästävä valonlähde.
Valaistuksen kesto on riippuvainen auringonsäteilystä, valon
tulokulmasta aurinkokennoon ja lämpötilasta (akun kapasitee-
tin lämpötilan riippuvaisuudesta johtuen). Parasta olisi valon
pystysuora tulokulma lämpötilan ollessa jäätymispisteen ylä-
puolella. Akku saavuttaa vasta useamman lataus- ja purkaus-
jakson jälkeen suurimman mahdollisen kapasiteettinsa.
Käyttöönotto
Valaisimen asennus
Asenna valaisin kuvien A, C ja D osoittamalla tavalla:
1. Irrota aurinkokeräimen kotelo 1 varjostimesta 2 vasta-
päivään kiertämällä (kuva A).
2. Aseta ON- / OFF-kytkin 5 asentoon ON, kun haluat
kytkeä valaisimen päälle.
3. Aseta aurinkokeräimen kotelo 1 varjostimeen 2 ja
kierrä se kiinni myötäpäivään.
4. Aseta valaisin putkeen 3.
5. Ota maapiikki 4 putkesta 3 ulos ja aseta maapiikki 4
putkeen 3 kärki alaspäin osoittaen (kuva C).
6. Aurinkokennovalaisin on nyt käyttövalmis (kuva D).
Valaisimen sijoittaminen
Pistä asennettu aurinkokennovalaisin niin syvälle maahan
(nurmikkoon, kukkapenkkiin), että se seisoo tukevasti.
Tarkista, että se on tukevasti pystyasennossa. Älä käytä lii-
kaa voimaa kun asennat tai pystytät valaisimen, älä

16 FI
esimerkiksi lyö sitä vasaralla. Tämä vaurioittaa tuotteen.
Jotta valaisin toimisi optimaalisesti, aseta aurinkokennova-
laisin sellaiseen paikkaan, jossa aurinkokenno saa mahdol-
lisimman paljon suoraa auringonvaloa.
Varmista, ettei aurinkokennoon pääse vaikuttamaan mi-
kään muu valonlähde kuten esim. piha- tai katuvalaistus,
koska siinä tapauksessa valo ei syty päivän hämärtyessä.
Päivänvalon hämärtyessä valo kytkeytyy
automaattisesti päälle, normaalissa valaistuksessa, valo
taas sammuu.
Akun vaihtaminen
Optimaalisen tehon saavuttamiseksi akku tulisi vaihtaa aina
12 kuukauden välein.
1. Irrota aurinkokeräimen kotelo 1 varjostimesta 2 kiertä-
mällä sitä vastapäivään (kuva A). Kytke valaisin pois
päältä ON- / OFF-kytkimestä 5 asettamalla kytkin
asentoon „OFF“.
2. Irrota kiinnitysruuvit 6 pienellä ristipäisellä ruuvimeisse-
lillä. Nosta sitten akkulokeron kansi 7 aurinkokeräimen
kotelosta 1 tasapäistä ruuvimeisseliä apuna käyttäen
(kuva B).
3. Huomioi, ettet vahingoita mitään johtoa tai johtoliitosta
(kuva B).
4. Vaihda vanha akku 8 uuteen. Tarkista oikea napaisuus
akkua asettaessasi. Se on merkitty akkulokeroon. Käytä
vain suositeltua akkutyyppiä (katso „Tekniset tiedot“).
5. Sulje akkulokeron kansi 7 ja kiristä kiinnitysruuvit 6 pie-
nellä ristipäisellä ruuvimeisselillä. Aseta ON-/OFF-kytkin
5 asentoon „ON“.
6. Liitä aurinkokeräimen kotelo 1 jälleen varjostimeen 2.
Liitä sitten muut valaisimen osat toisiinsa (kuva C).
Akun lataus
Tarkista, että aurinkokennovalaisin on päällekytketty akkuja
ladattaessa.
Akkujen latauksen kesto aurinkokennoa käytettäessä on riippu-
vainen auringonsäteilyn voimakkuudesta ja valon tulokulmasta
aurinkokennoon. Aseta aurinkokenno mahdollisimman pysty-
suoraan valon tulokulmaan. Näin saavutat parhaimman
säteilytehon.

17 FI
Huolto ja puhdistus
Valodiodeja ei voi vaihtaa. Aurinkokennovalaisin ei tarvitse
muuta huoltoa kuin tarvittaessa akkujen vaihdon.
Puhdista aurinkokennovalaisin säännöllisesti kuivalla,
nukkaamattomalla liinalla. Käytä puhdistukseen hieman
kostutettua liinaa, jos tuote on erittäin likainen.
Vikojen korjaaminen
Huomautus: Laite sisältää herkkiä elektronisia rakenneosia.
Tästä syystä voi olla mahdollista, että välittömässä läheisyy-
dessä olevat radiolähetinlaitteet häiritsevät laitetta. Mikäli to-
teat häiriöitä toiminnassa, poista tällaiset häiriölähteet laitteen
ympäristöstä.
Huomautus: Sähköstaattiset purkaukset voivat aiheuttaa toi-
mintahäiriöitä. Poista tällaisten toimintohäiriöiden esiintyessä
akut hetkeksi ja aseta ne sitten takaisin paikoilleen.
Vika Syy Ratkaisu
Valo ei kytkeydy
päälle, vaikka
aurinko on koko
päivän paistanut
valaisimeen.
Keinotekoiset va-
lolähteet, kuten
esim. katuvalaistus,
häiritsevät valaisin-
ta.
Asenna valaisin
paikkaan, jossa
muut valolähteet ei-
vät voi sitä häiritä.
Valo ei syty tai se
palaa vain hetken.
Akku on rikki tai
päivänvaloa ei
ollut riittävästi.
Vaihda akku
uuteen tai aseta
valaisin sellaiseen
paikkaan, jossa
se saa enemmän
auringonvaloa.
Hävittäminen
Pakkaus on valmistettu ympäristöystävällisistä
materiaaleista, jotka voidaan hävittää paikallisen
kierrätyspisteen kautta.
Lisätietoja käytettyjen tuotteiden hävittämismahdollisuuksista
saat kunnan tai kaupungin virastoista.
Älä heitä käytettyä tuotetta kotitalousjätteisiin.
Hävitä tuote ympäristöystävällisesti toimittamalla se
asianmukaiseen jätehuoltoon. Lisätietoja kierrätys-

18 FI
pisteistä ja niiden aukioloajoista saat
kuntasi viranomaisilta.
Vialliset ja käytetyt akut on kierrätettävä direktiivin
2006/66/EY ja siihen tehtyjen muutosten mukaisesti. Hävitä
akut ja/tai laite toimittamalla ne paikalliseen kierrätyspisteeseen.
Akkujen vääränlainen hävittämistapa
aiheuttaa ympäristövahinkoja!
Akkuja ei saa hävittää talousjätteenä. Ne voivat sisältää myr-
kyllisiä raskasmetalleja, minkä vuoksi ne kuuluvat ongelmajäte-
käsittelyyn. Raskasmetallien kemialliset merkit ovat seuraavat:
Cd = kadmium, Hg = elohopea, Pb = lyijy. Toimita tästä
syystä vanhat akut kunnalliseen keräyspisteeseen.
Takuu
Laite on valmistettu huolellisesti tiukkojen laatudirektiivien
mukaan ja tarkistettu huolella ennen toimitusta. Jos tuote on vir-
heellinen, sinulla on ostajana lakisääteiset oikeudet esittää vaa-
timuksia tuotteen myyjää kohtaan. Seuraavassa esitetty takuu
ei rajoita lakisääteisiä oikeuksiasi.
Laitteelle myönnetty takuu on voimassa 3 vuotta ostopäivästä
lukien. Takuun voimassaolo alkaa tuotteen ostopäivästä.
Säilytä aina alkuperäinen kassakuitti. Se toimii todisteena
tehdystä ostoksesta.
Jos 3 vuoden sisällä tuotteen ostopäivästä alkaen tuotteesta
löytyy materiaali- tai valmistusvirhe, korjaamme tuotteen
ilmaiseksi tai toimitamme tilalle uuden tuotteen harkintamme
mukaan. Takuu raukeaa, jos tuote on vioittunut asiattoman
käytön tai huollon vuoksi.
Takuu koskee materiaali- ja valmistusvirheitä. Takuu ei kata
tuotteen osia, jotka kuluvat normaalissa käytössä ja siitä syystä
pidetään kuluvina osina (esim. paristot) tai vaurioita särkyvissä
osissa esim. kytkimessä, akuissa tai lasista valmistetuissa
osissa.

19 SE
Ändamålsenlig användning .................Sidan 20
Beskrivning av delarna ...........................Sidan 20
Leveransomfattning ....................................Sidan 20
Tekniska specifikationer ......................... Sidan 20
Säkerhetsinformation ...............................Sidan 20
Produktspecifik säkerhetsinformation ......................Sidan 21
Säkerhetsanvisningar för batterier ..........................Sidan 21
Funktionssätt .....................................................Sidan 22
Idrifttagning
Montering av lampan .............................................. Sidan 22
Placering av lampan ................................................ Sidan 22
Batteribyte ................................................................Sidan 23
Laddning av batteripack ..........................................Sidan 23
Underhåll och rengöring .........................Sidan 23
Felavhjälpning .................................................Sidan 24
Avfallshantering ............................................Sidan 24
Garanti ...................................................................Sidan 25

20 SE
LED-solcellslampor
Ändamålsenlig användning
Solcellslampan är avsedd för belysning utomhus. Denna
produkt är ej lämplig för yrkesmässig användning.
Denna produkt är inte lämplig att användas
som belysning i hushållet.
Denna produkt är lämplig för extrema tempe raturen
under -20°C.
Beskrivning av delarna
1 Solcellens kåpa
2 Lampskärm
3 Stav
4 Jordspett
5 ON- / OFF-strömbrytare
(TILL / FRÅN)
6 Fästskruvar
7 Batterifackslock
8 Batteri
Leveransomfattning
5 lamphuvuden med solcell, lysdiod och batteri
5 lampskärmar
5 stavar
5 jordspett
1 monteringsanvisning
Tekniska specifikationer
Driftspänning: 1,2 V
Batteri: 1 x Ni-MH-batteri/ AAA / 1,2 V /
150 mAh
Lampa: 1 x lampa (LED) (icke utbytbar)
Märkeffekt LED: ca 0,06 W per LED
Skyddstyp: IP44 (stänkvattenskyddad)
Solcell: ca 30 x 30 mm (L x B)
Lystid (vid fullt batteri): ca 8 timmar
Säkerhetsinformation
SPARA ALLA SÄKERHETSANVISNINGAR OCH
INSTRUKTIONER FÖR FRAMTIDA BRUK!
Strona się ładuje...
Strona się ładuje...
Strona się ładuje...
Strona się ładuje...
Strona się ładuje...
Strona się ładuje...
Strona się ładuje...
Strona się ładuje...
Strona się ładuje...
Strona się ładuje...
Strona się ładuje...
Strona się ładuje...
Strona się ładuje...
Strona się ładuje...
Strona się ładuje...
Strona się ładuje...
Strona się ładuje...
Strona się ładuje...
Strona się ładuje...
Strona się ładuje...
Strona się ładuje...
Strona się ładuje...
Strona się ładuje...
Strona się ładuje...
Strona się ładuje...
Strona się ładuje...
Strona się ładuje...
Strona się ładuje...
Strona się ładuje...
-
 1
1
-
 2
2
-
 3
3
-
 4
4
-
 5
5
-
 6
6
-
 7
7
-
 8
8
-
 9
9
-
 10
10
-
 11
11
-
 12
12
-
 13
13
-
 14
14
-
 15
15
-
 16
16
-
 17
17
-
 18
18
-
 19
19
-
 20
20
-
 21
21
-
 22
22
-
 23
23
-
 24
24
-
 25
25
-
 26
26
-
 27
27
-
 28
28
-
 29
29
-
 30
30
-
 31
31
-
 32
32
-
 33
33
-
 34
34
-
 35
35
-
 36
36
-
 37
37
-
 38
38
-
 39
39
-
 40
40
-
 41
41
-
 42
42
-
 43
43
-
 44
44
-
 45
45
-
 46
46
-
 47
47
-
 48
48
-
 49
49


w innych językach
- Deutsch: LIVARNO 273525 Bedienungsanleitung
- eesti: LIVARNO 273525 Omaniku manuaal
- svenska: LIVARNO 273525 Bruksanvisning
- English: LIVARNO 273525 Owner's manual
Powiązane artykuły
-
LIVARNO 385503 Instrukcja obsługi
-
-
-
-
-
-
-
-
-
Inne dokumenty
-
 LIVARNO LUX HG00776C Assembly, Operating And Safety Instructions
-
Anslut 018347 Instrukcja obsługi
-
 Ansult 019718 Instrukcja obsługi
-
-
-
Jula 018346 Instrukcja obsługi
-
Brennenstuhl SOL 14 Instrukcja obsługi
-
Anslut 020490 Instrukcja obsługi
-
Anslut 018354 Instrukcja obsługi
-
Anslut Solar Cell LED Lamp Instrukcja obsługi

