

2 | 99 DE
WARNUNG!
Bitte beachten Sie die Sicherheitshinweise und
regulatorischen Informationen. Diese sind auch abrufbar
unter: www.zeiss.com/hunting/manuals
GEBRAUCHSANLEITUNG
Die Produkte der Marke ZEISS sind geprägt durch hervorragende optische Leistungen,
präzise Verarbeitung und lange Lebensdauer.
Bitte beachten Sie folgende Gebrauchshinweise, damit Sie Ihre Wärmebildkamera
optimal nutzen können und sie Ihnen über viele Jahre ein zuverlässiger Begleiter wird.
Lieferumfang
Produkt Best.-Nr. Lieferumfang
DTI 1/19 527004 Wärmebildkamera
Neoprentrageriemen
Tragetasche inkl. Schulterriemen
USB-Kabel
Optik-Reinigungstuch
DTI 1/25 527005
Funktionsprüfung
• Bitte vergewissern Sie sich vor der Benutzung, dass Ihre Wärmebildkamera keine
sichtbaren Schäden hat.
• Prüfen Sie, ob die Wärmebildkamera ein klares, ungestörtes Bild im Display
anzeigt.
• Prüfen Sie die richtige Einstellung der Wärmebildkamera, siehe hierzu die
Hinweise im Abschnitt Beobachtungsmodus.
Einlegen/Entfernen des Akkus
Die Wärmebildkamera ZEISS DTI 1 ist mit einem festverbauten Akku ausgestattet.
Für den Austausch des Akkus wenden Sie sich bitte an unseren Service. Für
Recyclingzwecke kann der Akku vom Gerät getrennt werden. Bitte beachten Sie dazu
den Absatz „Entsorgung von Akkus“ in den Sicherheitshinweisen.
Beobachten mit und ohne Brille
Durch die exible Augenmuschel kann die Wärmebildkamera sowohl mit als auch ohne
Brille verwendet werden. Sie bietet in beiden Fällen das volle Sehfeld.
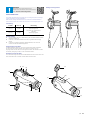
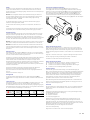
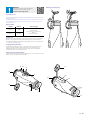
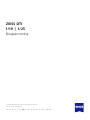
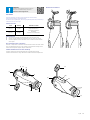
Anbringen des Trageriemens
(1)
(3)
(7)
(4) (5)
(9)
(8)
(6)
(1)
(3)
(11)
(8)
(9)
(10)

3 | 99 DE
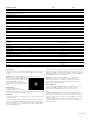
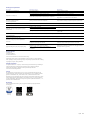
TECHNISCHE DATEN 1/19 1/25
Optik
Brennweite 19 / F1.0 25 / F1.0
Detektionsreichweite
(Objektgröße 1,8 m × 0,5 m; 2 yd × 0,6 yd) m (yd) 1.000 (1.094) 1.300 (1.420)
Subjektiver Sehwinkel °30
Sehfeld auf 100 m (auf 100 yd) m (ft) 24(73) 18(55)
Sehfeld ° horizontal × vertikal 14 × 10 11 × 8
Optische Vergrößerung 1,8 2,5
Maximaler digitaler Zoom 1,0x – 4,0x
Zoom-Schritte 0,5x
Sensor
Auösung Sensor px 384 × 288
Pixelabstand Sensor μm 12
Bildfrequenz Hz 50
NETD mK ≤ 35
Display
Auösung Display px 1.280 × 960
Displaytyp LCOS
Elektronik
Schnittstellen USB: Laden + Datenübertragung
WLAN: Datenübertragung
Akku Lithium-Ionen
Akkulaufzeit h6,5
Externe Spannungsversorgung 5 V / 2 A (USB)
Interner Speicher GB 8
Video / Bild / Live-Stream-Funktion
WLAN-Frequenz GHz 2,4
WLAN-Standard IEEE 802.11b/g/n
Verbindung mit anderen Geräten ZEISS Hunting App, USB
Allgemein
Schutzart IP65
Betriebstemperaturbereich °C (°F) -10 / +50 (+14 / +122)
Länge × Breite × Höhe mm (inch) 175 × 57 × 59
(6,9 × 2,2 × 2,3)
Gewicht g (oz) 360 (12,7)
Änderungen in Ausführung und Lieferumfang, die der technischen Weiterentwicklung dienen, sind vorbehalten.
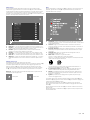
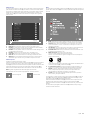
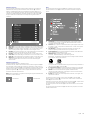
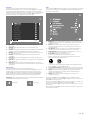
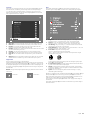
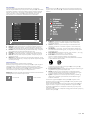
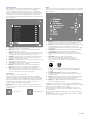
Ein-/Ausschalten
Durch längeres Drücken des Ein-/Ausschaltknopfes(4) schaltet sich das Gerät ein. Durch
nochmaliges längeres Drücken des Ein-/Ausschaltknopfes(4) schaltet sich das Gerät
wieder aus.
Hinweis: Der Ein-/Ausschaltknopf(4) muss so lange gedrückt werden, bis das
AUS-Symbol auf dem Display angezeigt wird. Erst
dann kann der Ein-/Ausschaltknopf(4) losgelassen
werden und das Gerät schaltet sich aus. Wird der
Ein-/Ausschaltknopf(4) vor Anzeige des
AUS-Symbols losgelassen, schaltet sich das Gerät
nicht aus, sondern schaltet sich in den Standby-
Modus.
Standby-Modus
Durch kurzes Drücken des Ein-/
Ausschaltknopfes(4) schaltet sich das Gerät in
den Standby-Modus. Durch nochmaliges kurzes Drücken des Ein-/Ausschaltknopfes(4)
schaltet sich das Gerät wieder in den Beobachtungsmodus.
Kalibrierung
Das Gerät kann automatisch (Auto-Kalibrierung = Ein) oder manuell (Auto-Kalibrierung
= Aus) kalibriert werden.
Im automatischen Modus führt das Gerät durch Schließen und Önen eines internen
Verschlusses selbstständig eine Kalibrierung durch, wenn diese nötig ist. Dabei ist ein
leises Klicken zu vernehmen. In diesem Modus haben Sie zusätzlich die Möglichkeit, die
Kalibrierung manuell durchzuführen, indem Sie gleichzeitig den Aufnahmeknopf(5)
und den Menüknopf(7) drücken.
Als weitere Option können Sie eine manuelle, lautlose Kalibrierung durchführen. Gehen
Sie dazu in das Gerätemenü und stellen Sie die Option „Auto-Kalibrierung“ auf „Aus“.
Gehen Sie anschließend zurück in den Beobachtungsmodus. Schließen Sie manuell den
Objektivschutzdeckel(3). Drücken Sie nun gleichzeitig den Aufnahmeknopf(5) und den
Menüknopf(7). Jetzt ist das Gerät wieder kalibriert.
Hinweis: Decken Sie bei einer manuellen Kalibrierung immer das Objektiv ab.
Ansonsten kann der Sensor nicht richtig kalibrieren und es kommt zu einer
Verschlechterung des Bildes, z. B. Geisterbilder. Sollten Sie vergessen haben, das
Objektiv während der manuellen Kalibrierung abzudecken, wiederholen Sie den
Kalibriervorgang mit abgedecktem Objektiv.
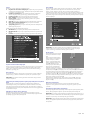
Beobachtungsmodus
Schauen Sie durch den Sucher(8), um die Szene zu beobachten. Drehen Sie an der
Dioptrieneinstellung(9) an der Seite, um den Bildschirm scharf zu stellen.
Drehen Sie am Fokusring(1) des Objektivs, um die Szene scharf zu stellen.
Zoom
Mit den Pfeiltasten(6) besteht im Beobachtungsmodus die Möglichkeit, die Szene
zu vergrößern (rechte Pfeiltaste) und zu verkleinern (linke Pfeiltaste). Zoomen Sie in
0,5er-Schritten zwischen 1,0x und 4,0x. Die Zoom-Funktion ist umlaufend, d. h. wenn
Sie nach einem 4,0x-Zoom noch einmal die rechte Pfeiltaste(6) drücken, gelangen Sie
wieder zu 1,0x zurück.
Die aktuell eingestellte digitale Vergrößerung wird auf dem Display angezeigt. Unter
dem System-Menüpunkt „Max. Zoom-Stufe“ können Sie die maximal gewünschte
Zoom-Stufe einstellen.

4 | 99 DE
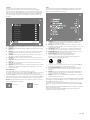
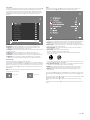
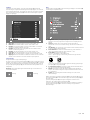
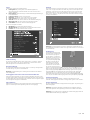
Farbmodi
Die Szene kann in verschiedenen Farbmodi angezeigt werden. Um den
Beobachtungsmodus zu ändern, drücken Sie kurz auf den Menüknopf(7). Bei
Änderung wird der ausgewählte Modus für ca. 2 Sekunden als Text auf dem Display
angezeigt. Unter dem System-Menüpunkt „Farbmodi“ können Sie die gewünschten
Modi aktivieren oder deaktivieren. Bei Änderung durch den Menüknopf(7) werden
nur die aktiven Modi durchgewechselt. Die folgenden Farbmodi stehen Ihnen zur
Verfügung:
Scene Mode
OFF
• White Hot: Hier werden kalte Bereiche in Schwarz und warme Bereiche in Weiß
dargestellt.
• Black Hot: Hier werden kalte Bereiche in Weiß und warme Bereiche in Schwarz
dargestellt.
• Red Hot: Hier werden kalte Bereiche in Schwarz und warme Bereiche in Weiß
dargestellt. Darüber hinaus werden die wärmsten Bereiche in Gelb bis Rot
dargestellt.
• Rainbow: Durch eine bunte Farbpalette werden kalte Bereiche in Schwarz bis
Blau und warme Bereiche in Gelb bis Weiß dargestellt.
• Red Hue: Hier werden kalte Bereiche in Schwarz und warme Bereiche in Rot
dargestellt.
• Green Hue: Hier werden kalte Bereiche in Schwarz und warme Bereiche in Grün
dargestellt.
• Dark Hue: Hier werden kalte Bereiche in einem Sepia-Farbton und warme
Bereiche in Violett dargestellt.
• Night Eye: Dies ist eine Kombination aus White Hot und Black Hot. Hier werden
kalte Bereiche in Schwarz bis Dunkelbraun und warme Bereiche in Sepia bis
Hellbraun dargestellt.
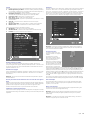
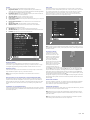
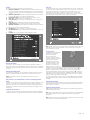
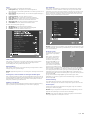
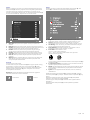
Aufnahmemodus
Sie haben die Möglichkeit, Foto- und Videoaufnahmen zu machen.
Um ein Foto zu machen, drücken Sie den Aufnahmeknopf(5) einmal kurz, es erscheint
ein Fotosymbol auf dem Display. Um ein Video aufzunehmen, drücken Sie den
Aufnahmeknopf(5) lang, es erscheint ein Videosymbol auf dem Display. Während einer
Videoaufnahme können auch Fotos erstellt werden, indem der Aufnahmeknopf(5) kurz
gedrückt wird, zur Bestätigung wechselt das Videosymbol kurz auf das Fotosymbol.
Hinweis: Längere Videoaufnahmen werden beim Speichern automatisch in mehrere
kleinere Dateien à 10 Minuten aufgeteilt.
2X
2X
Fotomodus Videomodus
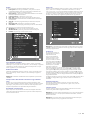
Menü
Durch langes Drücken des Menüknopfes(7) wird das Hauptmenü auf dem Display
angezeigt. Schauen Sie dabei durch den Sucher(8). Im Hauptmenü stehen Ihnen
folgende Auswahlmöglichkeiten zur Verfügung:
• Helligkeit: Stellen Sie hier die Helligkeit des Displays ein. Sie können aus zehn
Helligkeitsstufen wählen. Auf Stufe 1 ist die Helligkeit am geringsten. Auf
Stufe10 ist die Helligkeit am größten.
• Kontrast: Stellen Sie hier den Kontrast der Szene ein. Sie können aus zehn
Kontraststufen wählen. Auf Stufe 1 ist der Kontrast am geringsten. Auf Stufe 10
ist der Kontrast am größten.
• Hot Tracking: Wählen Sie „Hot Tracking“, um im Beobachtungsmodus den
wärmsten Punkt der Szene mit einem kleinen, roten Quadrat hervorzuheben.
• Auto-Kalibrierung: Stellen Sie hier manuelles (Auto-Kalibrierung = Aus) oder
automatisches Kalibrieren (Auto-Kalibrierung = Ein) ein.
• Szenen-Modus: Wählen Sie aus zwei verschiedenen Modi aus.
Universal – Standard Modus für die generelle Beobachtung.
Detektieren – Der Detektieren-Modus erzeugt ein Hochkontrastbild, um
Wärmesignaturen besser sichtbar zu machen.
Universal Detektieren
Sie können auch durch das gleichzeitige Drücken der rechten Pfeiltaste(6) und
des Menüknopfes(7) durch die verschiedenen Modi wechseln.
• P.I.P. (Picture in Picture): Ein zentraler Ausschnitt des Bildes wird um den
Faktor 2 vergrößert und in einem kleinen Vergrößerungsfenster im Display
angezeigt.
• WLAN: Schalten Sie das WLAN ein/aus. Bei eingeschaltetem WLAN stellt das
Gerät einen Hotspot zur Verfügung, um eine Verbindung von einem anderen
Gerät (z. B. Smartphone) zu ermöglichen.
• System: Nehmen Sie hier alle systemrelevanten Einstellungen u. a. zu Sprache,
Uhrzeit und Werkseinstellungen vor.
Die Navigation im Hauptmenü erfolgt durch die Pfeiltasten(6) und den Menüknopf(7).
Drücken Sie die rechte Pfeiltaste(6), um nach unten zu scrollen. Drücken Sie die linke
Pfeiltaste(6), um nach oben zu scrollen.
Durch kurzes Drücken des Menüknopfes(7) wählen Sie einen Menüpunkt aus. Sie
gelangen so in das Untermenü. Nehmen Sie die Einstellungen mit den Pfeiltasten(6)
vor.
Durch kurzes Drücken des Menüknopfes(7) bestätigen Sie die Auswahl und gelangen
wieder in das Hauptmenü zurück.
Durch langes Drücken des Menüknopfes(7) verlassen Sie das Hauptmenü und
gelangen in den Beobachtungsmodus zurück.

5 | 99 DE
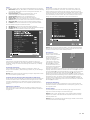
System
Im Untermenü „System“ stehen Ihnen folgende Auswahlmöglichkeiten zur Verfügung:
• Werks-Reset: Wählen Sie „Werks-Reset“, um das Gerät auf die Werkseinstellung
zurückzusetzen. Dabei werden auch alle im Gerät gespeicherten Daten, inkl.
Bilder und Videos, gelöscht.
• Reset-Einstellungen: Wählen Sie „Reset-Einstellungen“, um alle
Geräteeinstellungen auf die Standard-Werte zurückzusetzen.
• Spracheinstellung: Wählen Sie hier eine Menüsprache aus.
• Datum / Zeit: Stellen Sie hier Datum und Uhrzeit des Geräts ein.
• Pixel-Korrektur: Entfernen Sie defekte Pixel für ein perfektes Sichtfeld.
• Auto-Aus: Aktivieren oder deaktivieren Sie die automatische Abschaltfunktion.
• Max. Zoom-Stufe: Hier können Sie den maximalen Zoom-Wert festlegen.
• Farbmodi: Aktivieren oder deaktivieren Sie hier die gewünschten Farbmodi.
Sie können außerdem folgende Informationen einsehen:
• WLAN SSID: Hier wird der Name des WLAN-Hotspots angezeigt.
• WLAN Password: Hier wird das aktuell verwendete WLAN-Passwort angezeigt.
• Firmware: Hier wird die aktuelle Firmwareversion angezeigt.
Scene Mode
OFF
Werks-Reset
Zum Durchführen eines Werks-Resets wählen Sie im Hauptmenü „System“ aus.
Navigieren Sie anschließend zum „Werks-Reset“. Wählen Sie „Ja“ und bestätigen Sie
die Auswahl. Es folgt eine zweite Sicherheitsabfrage, die ebenfalls mit „Ja“ bestätigt
werden muss.
Einstellungen zurücksetzen
Zum Zurücksetzen der Einstellungen wählen Sie im Hauptmenü „System“ aus.
Navigieren Sie anschließend zu „Reset-Einstellungen“. Wählen Sie „Ja“ und bestätigen
Sie die Auswahl.
Hinweis: Damit das Zurücksetzen der Einstellungen erfolgreich abgeschlossen werden
kann, muss das Gerät neu gestartet werden.
Persönliche Daten bei Entsorgung oder Weitergabe Ihres ZEISS Geräts
Denken Sie daran, dass persönliche Fotos und Videos auf dem internen Gerätespeicher
vorhanden sein können. Bevor Sie das Gerät an Dritte weitergeben, führen Sie bitte
die Funktion „Werks-Reset“ aus, um diese Daten zu löschen, und überprüfen Sie
die Löschung. Damit tragen Sie dazu bei, Ihre Privatsphäre und Datensicherheit zu
bewahren.
Mitwirkung an IT-Sicherheit
Bitte wirken Sie aktiv mit, die IT-Sicherheit Ihres Geräts zu schützen, indem Sie die
ZEISS Hunting App verwenden und neue Firmware-Updates installieren, sobald diese
verfügbar sind.
Datum / Zeit
Zum Einstellen von Datum und Uhrzeit wählen Sie im Hauptmenü „System“ aus.
Navigieren Sie anschließend zu „Datum / Zeit“. Nun können Sie Jahr, Monat, Tag,
Stunde und Minute einzeln einstellen. Mit der Einstellung „Zeitformat“ können Sie
zwischen der 24-Stunden- und der 12-Stunden-Darstellung wählen. Achten Sie darauf,
die aktuelle Datums- und Uhrzeiteinstellung vorzunehmen, da Ihre Fotos und Videos
mit einem Zeitstempel versehen werden. Ganz unten im Menüpunkt können Sie die
Anzeige der Uhrzeit auf dem Hauptbildschirm aktivieren oder deaktivieren.
Hinweis: Sollte sich der Akku komplett entladen, verliert das Gerät das eingestellte
Datum und die eingestellte Uhrzeit. Stellen Sie Datum und Uhrzeit erneut ein, damit
Ihre Bilder und Videos einen korrekten Zeitstempel erhalten.
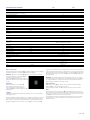
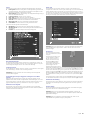
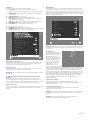
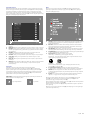
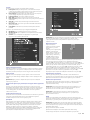
Pixel-Korrektur
Falls einzelne Pixel ausfallen,
können Sie diese hier lokalisieren
und den Fehler beheben.
Um mit der Korrektur zu starten,
wählen Sie im Hauptmenü
„System“ aus. Navigieren Sie zu
„Pixel-Korrektur“ und starten
Sie die Korrektur, indem Sie den
Menüknopf(7) kurz drücken.
Es erscheint ein Fadenkreuz, mit
diesem müssen Sie das betroene
Pixel erfassen. Zur genaueren
Erfassung wird der Bereich um das Fadenkreuz in einem zusätzlichen Fenster vergrößert
angezeigt. Stellen Sie die X-Achse ein: Drücken Sie die linke Pfeiltaste(6) für Minus und
die rechte Pfeiltaste(6) für Plus. Mit jedem Tastendruck springen Sie einen Pixel weiter.
Um mehrere Pixel weiterzuspringen, halten Sie die Pfeiltaste(6) länger gedrückt.
Bestätigen Sie die Einstellung, indem Sie den Menüknopf(7) kurz drücken. Nehmen Sie
jetzt auf die gleiche Weise die Einstellungen für die Y-Achse vor. Wechseln Sie zwischen
der Einstellung für die X- und Y-Achse, indem Sie die Menütaste(7) kurz drücken.
Zum Speichern der Einstellungen, drücken Sie die Menütaste(7) lang. Bestätigen Sie
die Abfrage, ob Sie die Kalibrierung speichern oder verwerfen möchten, indem Sie den
Menüknopf(7) kurz drücken.
Automatische Abschaltung
Um den Akku zu schonen, kann sich die ZEISS DTI 1 nach einer Zeit der Inaktivität
automatisch ausschalten. Die Abschaltdauer kann im Menüpunkt „System“ bei „Auto-
Aus“ angepasst werden.
Firmware-Update
Ein Firmware-Update kann mittels der ZEISS Hunting App vorgenommen werden.
Folgen Sie hierzu den Anweisungen in der ZEISS Hunting App.
Hinweis: Stellen Sie sicher, dass das Gerät vor einem Firmware-Update vollständig
aufgeladen ist. Schalten Sie das Gerät während des Updates nicht aus, da es sonst
beschädigt werden kann.
Hinweis: Wenn Sie ein Update über die ZEISS Hunting App anstoßen, müssen Sie dies
zur Sicherheit am Gerät nochmals bestätigen.

6 | 99 DE
WLAN
Das Gerät ist mit einer WLAN-Funktion ausgestattet. Gehen Sie in das Menü und
schalten Sie die WLAN-Funktion ein. Ein aktiviertes WLAN wird durch ein WLAN-
Symbol unten rechts auf dem Display angezeigt. Verbinden Sie nun Ihr Smartphone per
WLAN mit dem Gerät.
Hinweis: Das voreingestellte Passwort für die WLAN-Verbindung zum Gerät muss
bei Erstverwendung geändert werden, um einen unbefugten Zugri durch Dritte zu
verhindern. Zum Ändern des Passworts ist die ZEISS Hunting App notwendig.
Voreingestelltes Passwort: 12345678
Um den Benutzerkomfort zu erhöhen, synchronisiert die ZEISS Hunting App Ihr
Passwort auf allen angemeldeten Geräten.
Um die Sicherheit der Verbindung zu erhöhen, wird empfohlen, das Passwort zu
ändern.
Zur Verlängerung der Akkulaufzeit wird empfohlen, die WLAN-Funktion im Gerät nur
einzuschalten, wenn Sie die Datenverbindung zur ZEISS Hunting App verwenden.
ZEISS Hunting App
Installieren Sie die ZEISS Hunting App auf Ihrem Smartphone und önen Sie die App.
Befolgen Sie die dort angezeigten Schritte, um sich mit der ZEISS DTI 1 zu verbinden.
Die ZEISS Hunting App ermöglicht Ihnen, Bilder und Videos auf Ihr Smartphone zu
übertragen, das Live-Bild zu sehen, Einstellungen vorzunehmen und weitere Funktionen
zu nutzen. Eine nähere Beschreibung dafür nden Sie in der Hilfefunktion der App.
Hinweis: Um die ZEISS Hunting App und ihre Funktionen nutzen zu können, stellen Sie
sicher, dass Ihr Smartphone mit dem WLAN-Netzwerk der ZEISS DTI 1 verbunden ist.
Hinweis: Bitte beachten Sie, dass Sie nicht über das normale WLAN verbunden sind,
wenn Sie eine WLAN-Verbindung zu Ihrer ZEISS DTI 1 hergestellt haben. Um zurück in
das normale WLAN zu kommen, trennen Sie die Verbindung Ihrer ZEISS DTI 1 zu Ihrem
Smartphone.
USB-Schnittstelle
Verwenden Sie die USB-Schnittstelle(11) auf der Unterseite, um Ihr Gerät aufzuladen
oder um Daten (Fotos und Videos) auf Ihren PC zu transferieren. Um Daten übertragen
zu können, muss die WLAN-Funktion ausgeschaltet sein.
Die ZEISS DTI 1 verbindet sich als MTP-Gerät über die USB-Schnittstelle. Bei Computern
ab Microsoft Windows 10 Betriebssystemsoftware wird das Gerät automatisch
erkannt und kann sofort verwendet werden. Bei Computern mit Apple macOS
Betriebssystemsoftware müssen Sie zusätzliche Software von Drittanbietern installieren,
um auf die im Gerät gespeicherten Daten zugreifen zu können, zum Beispiel
„AndroidTM File Transfer“. ZEISS übernimmt keinerlei Verantwortung oder Garantie für
Software von Drittanbietern.
Microsoft und Windows sind entweder eingetragene Marken oder Marken der
Microsoft Corp. in den Vereinigten Staaten und/oder anderen Ländern.
Apple und macOS sind in den USA und weiteren Ländern eingetragene Marken der
Apple Inc.
Android ist eine Marke von Google LLC.
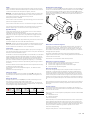
Stativgewinde
Auf der Unterseite des Geräts bendet sich ein 1/4-Zoll-Normgewinde(10) für
Standardstative. Um ruhigere Aufnahmen zu erhalten, schrauben Sie das Gerät auf ein
Stativ.
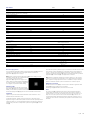
Laden des Geräts
Laden Sie das Gerät über die USB-Schnittstelle(11) auf, sobald der Akku leer ist. Unter
der Abdeckung bendet sich eine LED, die den aktuellen Ladezustand anzeigt.
Der Ladezustand des Akkus wird oben rechts auf dem Display angezeigt. Bei geringem
Ladezustand wechselt die Anzeige im Display auf Rot. In der folgenden Grak erkennen
Sie, wieviel Prozent Ihrer Akkuladung noch vorhanden ist.
<10 % 10–<36 % 36–<63 % 63–<90 % 90–100 %
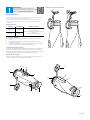
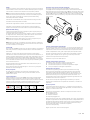
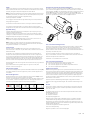
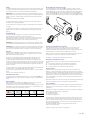
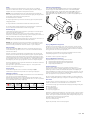
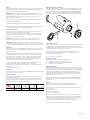
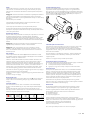
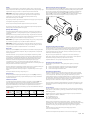
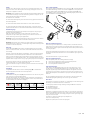
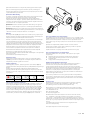
Austausch des Objektivschutzdeckels
Zum Austausch des Objektivschutzdeckels(3) entfernen Sie zunächst den
Fokusring(1). Dieser ist mit einem doppelseitigem Klebeband zusätzlich befestigt.
Drehen Sie nun die Innensechskantschraube(2) mit einem Innensechskantschlüssel
(M1.5) heraus. Entnehmen Sie den defekten Objektivschutzdeckel(3). Setzen Sie
den neuen Objektivschutzdeckel(3) ein. Drehen Sie die Schraube(2) mit einem
Innensechskantschlüssel wieder fest. Ersetzen Sie das doppelseitige Klebeband am
Objektiv durch ein neues und platzieren Sie den Fokusring(1) wieder über das Objektiv.
(1)
(2)
(3)
Pege und Wartung des Geräts
Wischen Sie grobe Schmutzteilchen (z. B. Sand) auf den Linsen nicht ab, sondern
blasen Sie diese weg oder entfernen Sie diese mit einem Haarpinsel! Fingerabdrücke
können nach einiger Zeit die Linsenoberäche angreifen. Anhauchen und mit einem
sauberen Optikreinigungstuch nachreiben, ist die einfachste Art, Linsenoberächen zu
reinigen.
Gegen den – besonders in den Tropen – möglichen Pilzbelag auf der Optik hilft eine
trockene Lagerung und stets gute Belüftung der äußeren Linsenächen.
Ihre ZEISS DTI 1 bedarf keiner weiteren speziellen Pege.
Pege und Wartung des Akkus
Um die Lebensdauer des Akkus zu verlängern, beachten Sie folgende Punkte:
• Vermeiden Sie, das Gerät bei extremen Temperaturen zu lagern.
• Vermeiden Sie, das Gerät mit vollständig aufgeladenem Akku zu lagern.
• Vermeiden Sie eine vollständige Entladung des Geräts.
Software-Updates
Im Rahmen der gesetzlichen Gewährleistung (2 Jahre ab Gefahrübergang der
Ware–nach deutschem Recht) werden wir zur Behebung von Mängeln entsprechende
Updates zur Verfügung stellen. In der Regel betreen Updates sicherheitsrelevante
Aspekte oder die Behebung von Funktionsbeeinträchtigungen und umfassen keine
neuen Funktionen der Software. Insoweit zur Behebung von Sicherheitsaspekten
die Bereitstellung von neuen Funktionen notwendig ist, begründet dies jedoch
grundsätzlich keinen Anspruch auf neue Funktionen als solche.
Nach Ablauf des gesetzlichen Gewährleistungszeitraums sind wir selbstverständlich
bemüht, Ihnen entsprechende weitergehende Updates zur Verfügung zu stellen. Ein
Anspruch hierauf besteht jedoch nicht.
Ersatzteile
Falls Sie Ersatzteile für Ihr Gerät benötigen sollten, wie z. B. den Objektivschutzdeckel,
wenden Sie sich bitte an Ihren Fachhändler, Ihren lokalen Distributor oder unseren
Kundenservice.
Für telefonische Kundenserviceanfragen stehen wir Ihnen gerne Montag bis Freitag
von 08:00 bis 16:30 Uhr (MEZ) zur Verfügung.
Tel.: +49(0) 800 934 77 33
Fax: +49(0) 64 41-4 83 69
service.sportsoptics@zeiss.com
ZEISS steht für ein zuverlässig hohes Qualitätsniveau. Deshalb gewähren wir als
Hersteller, unabhängig von den Gewährleistungsverpichtungen des Verkäufers
gegenüber dem Kunden, für dieses ZEISS Produkt eine Garantie von zwei Jahren, die
bei Registrierung des Produkts um ein weiteres Jahr verlängert werden kann, wenn die
Registrierung innerhalb von vier Wochen nach dem Kauf erfolgt.
Der Garantieumfang ist unter dem folgenden Link einzusehen:
www.zeiss.com/cop/warranty
Registrieren Sie Ihr Produkt unter: www.zeiss.com/cop/register

7 | 99 DE
Fehlerbehebung
Fehler Mögliche Gründe Lösung
Das Gerät startet nicht. Der Akku ist leer. Laden Sie das Gerät auf.
Das Gerät wird nicht geladen.
Das USB-Kabel ist defekt. Tauschen Sie das USB-Kabel aus.
Es besteht keine ausreichende externe Stromzufuhr. Überprüfen Sie die externe Stromzufuhr.
Das USB-Kabel steckt nicht richtig im Gerät.
Stecken Sie das USB-Kabel aus und prüfen Sie, ob der
Stecker und die Buchse unbeschädigt und frei von
Verschmutzung sind.
Das Bild ist undeutlich.
Das Bild weist Streifen auf.
Der Hintergrund ist nicht homogen.
Das Gerät muss neu kalibriert werden. Führen Sie den Kalibriervorgang gemäß den Anweisungen
aus.
Das Bild ist zu dunkel. Die Bildschirmhelligkeit ist zu niedrig eingestellt. Passen Sie die Bildschirmhelligkeit an.
Das Bild im Display ist au. Der Kontrast ist zu niedrig eingestellt. Passen Sie den Kontrast an.
Der Computer erkennt das Gerät (interner Speicher)
nicht.
Das Gerät ist nicht eingeschaltet. Übertragen Sie die Bilder nach Einschalten des Geräts.
Das USB-Kabel ist nicht richtig eingesteckt.
Die erforderliche Software ist nicht installiert. Bitte lesen Sie die Hinweise im Abschnitt „USB-
Schnittstelle“.
Die Zeitangabe auf den Bildern ist fehlerhaft. Die Zeitangabe (Uhrzeit/Datum) im Gerät ist noch nicht
eingestellt. Stellen Sie die Zeitangabe gemäß den Anweisungen ein.
Die Bildqualität ist schlecht.
Der Detektionsbereich ist zu kurz. Eine schlechte Wetterlage kann zu Beeinträchtigungen führen (z. B. starker Schneefall, Regen, Nebel etc.).
Das Smartphone verbindet sich nicht mit meiner
ZEISS DTI 1.
Das WLAN-Passwort ist nicht korrekt. Geben Sie das korrekte Passwort ein.
Es sind zu viele WLAN-Netzwerke in unmittelbarer Nähe
des Geräts. Es kann zu Beeinträchtigungen kommen.
Bringen Sie das Gerät an einen Ort mit wenigen oder gar
keinen unmittelbaren WLAN-Netzwerken.
Das WLAN-Signal geht immer wieder verloren oder
wird unterbrochen.
Die ZEISS DTI 1 ist zu weit entfernt oder es sind zu viele
andere WLAN-Netzwerke in der Nähe. Ändern Sie den Standort des Geräts, sodass ein WLAN-
Signal direkt erkannt wird.
Es bendet sich ein Hindernis zwischen dem Gerät und dem
Empfänger.
Herstelleradresse
Carl Zeiss AG
Carl-Zeiss-Straße 22
D-73447 Oberkochen
www.zeiss.com/nature und www.zeiss.com/hunting
Änderungen in Ausführung und Lieferumfang, die der technischen Weiterentwicklung
dienen, sind vorbehalten. Keine Haftung für Irrtümer und Druckfehler.
Datenschutzhinweis
Bei Verwendung der ZEISS DTI 1 werden personenbezogene Daten verarbeitet.
Unsere Hinweise zum Datenschutz und der Verarbeitung der personenbezogenen
Daten nden Sie in unserem Downloadcenter: www.zeiss.com/hunting/manuals
Lizenzen
Dieses Produkt ist im Rahmen der AVC-Patentportfolio-Lizenz für die persönliche
und nichtkommerzielle Nutzung von Seiten eines Verbrauchers lizenziert, um (i)
Videos in Übereinstimmung mit dem AVC-Standard („AVC VIDEO”) zu codieren und/
oder (ii) AVC-Videos, die von einem Verbraucher zu persönlichen Zwecken codiert
wurden, und/oder Videos, die von einem lizenzierten Videovertreiber bereitgestellt
wurden, zu decodieren. Es wird keine Lizenz, auch keine implizierte, für andere
Verwendungen gewährt. Weitere Informationen erhalten Sie bei MPEG LA, L.L.C., siehe
http://www.MPEGLA.com
Updates
Laden Sie sich die ZEISS Hunting App für aktuellste Updates der Hardware herunter:
Hunting
App


WARNING!
Please note the safety instructions and regulatory
information. They can also be accessed at:
www.zeiss.com/hunting/manuals
Instructions for use
ZEISS products are famous for outstanding optical performance, precision engineering
and a long service life.
Please observe the following instructions for use in order to obtain the best from your
thermal imaging camera and to ensure that it remains your constant companion for
many years to come.
Scope of supply
Product Order no. Scope of supply
DTI 1/19 527004 Thermal imaging camera
Neoprene strap
Carrying case incl. shoulder strap
USB cable
Optics cleaning cloth
DTI 1/25 527005
Function test
• Before use, please ensure that your thermal imaging camera has no visible damage.
• Test to see if the thermal imaging camera displays a clear, undisturbed image.
• Check that the settings for the thermal imaging camera are correct. See the notes in
the section Observation mode.
Installing/removing the battery
The ZEISS thermal imaging camera DTI 1 is equipped with a permanently installed
battery. To replace the battery, please contact our Service. The battery can be
separated from the device for recycling purposes. Please refer to the paragraph
“Disposal of batteries” in the safety instructions.
Observation with and without glasses
Thanks to the exible eyecup, the thermal imaging camera can be used with or without
glasses. It oers a full eld of view in both cases.
Attaching the carrying strap
(1)
(3)
(7)
(4) (5)
(9)
(8)
(6)
(1)
(3)
(11)
(8)
(9)
(10)
9 | 99 EN

TECHNICAL DATA 1/19 1/25
Optics
Focal length 19 / F1.0 25 / F1.0
Detection range
(object size 1.8 m × 0.5 m; 2 yd × 0.6 yd) m (yd) 1,000 (1,094) 1,300 (1,420)
Subjective angle of view ° 30
Field of view at 100 m (at 100 yd) m (ft) 24(73) 18(55)
Field of view ° horizontal × vertical 14 × 10 11 × 8
Optical magnication 1.8 2.5
Maximum digital zoom 1.0 x – 4.0 x
Zoom increments 0.5x
Sensor
Sensor resolution px 384 × 288
Sensor pixel pitch μm 12
Frame rate Hz 50
NETD mK ≤ 35
Display
Display resolution px 1,280 × 960
Display type LCOS
Electronics
Interfaces USB: charging + data transfer
WLAN: data transfer
Battery Lithium-ion
Battery life h6.5
External power supply 5V / 2A (USB)
Internal memory GB 8
Video/image/live-streaming feature
WLAN frequency GHz 2.4
WLAN standard IEEE 802.11/b/g/n
Connection with other devices ZEISS Hunting App, USB
General
Protection type IP65
Operating temperature range °C (°F) -10 / +50 (+14 / +122)
Length × width × height mm (inch) 175 × 57 × 59
(6.9 × 2.2 × 2.3)
Weight g (oz) 360 (12.7)
Subject to changes in design and scope of supply due to technical improvements.
Power on/o
Press and hold the on/o button(4) to switch on the device. Press and hold the on/o
button(4) to switch o the device again.
Note: The on/o button(4) must be pressed until the OFF symbol appears on the
display. Only then can the on/o button(4) be
released and the device switches o. If the on/o
button(4) is released before the OFF symbol is
displayed, the device does not switch o but
switches to standby mode.
Standby mode
Briey press the on/o button(4) to switch the
device to standby mode. Briey press the on/
o button(4) again to switch the device back to
observation mode.
Calibration
The device can be calibrated automatically (Auto Calibration = On) or
manually (Auto Calibration = O).
In automatic mode, the device automatically performs a calibration by closing and
opening an internal shutter when necessary. A gentle click should be heard. In this
mode, you also have the option of performing the calibration manually by pressing the
shutter button(5) and the menu button(7) simultaneously.
There is a further option for performing a manual, silent calibration. Go to the device
menu and set the “Auto Calibration” option to “O”. Then return to the observation
mode. Close the lens cap manually(3). Now press the shutter button(5) and the menu
button(7) simultaneously. The device is now calibrated again.
Note: Always cover the lens when performing a manual calibration. Otherwise the
sensor cannot calibrate correctly and the image will deteriorate, e.g. ghost images.
If you forget to cover the lens during a manual calibration, repeat the calibration
procedure with the lens covered.
Observation mode
Look through the viewnder(8) to observe the scene. Turn the diopter adjustment(9)
on the side to focus the screen.
Turn the focus ring(1) on the lens to focus on the scene.
Zoom
In observation mode, the arrow buttons(6) can be used to zoom in (right arrow
button) and zoom out (left arrow button) the scene. Zoom in increments of 0.5
between 1.0x and 4.0x. The zoom function is circular, i.e. if you press the right arrow
button(6) again after a 4.0x zoom, you will return to 1.0x.
The currently set digital magnication is shown on the display. Under the system menu
item “Max. Zoom Level” you can set the maximum desired zoom level.
10 | 99 EN

Color modes
The scene can be displayed in dierent color modes. Briey press the menu button(7)
to change the observation mode. When changed, the selected mode is shown on
the display as text for about 2 seconds. You can activate or deactivate the desired
modes under the system menu item “Color Modes”. When changing with the menu
button(7), only the active modes are changed. The following color modes are
available:
Scene Mode
OFF
• White Hot: Cold areas are displayed here in black and warm areas in white.
• Black Hot: Cold areas are displayed here in white and warm areas in black.
• Red Hot: Cold areas are displayed here in black and warm areas in white. In
addition, the warmest areas are shown in yellow to red.
• Rainbow: A varied color palette displays cold areas in black to blue and warm areas
in yellow to white.
• Red Hue: Cold areas are displayed here in black and warm areas in red.
• Green Hue: Cold areas are displayed here in black and warm areas in green.
• Dark Hue: Cold areas are displayed here in a sepia tone and warm areas in violet.
• Night Eye: This is a combination of White Hot and Black Hot. Cold areas are
displayed here in black to dark brown and warm areas in sepia to light brown.
Shooting mode
You have the possibility to take photos and make videos.
Briey press the shutter button(5) once to capture a photo; a photo symbol appears
on the display. Press and hold the shutter button(5) to record a video; a video symbol
appears on the display. During a video recording, photos can also be taken by briey
pressing the shutter button(5); to conrm, the video symbol briey switches to the
photo symbol.
Note: Longer video recordings are automatically split into several smaller les of
10minutes each when saved.
2X
2X
Photo mode Video mode
Menu
Press and hold the menu button(7) to show the main menu on the display. Look
through the viewnder(8). The main menu oers the following options:
• Brightness: Set the brightness of the display here. There are ten brightness levels to
choose from. The brightness is lowest at level 1. The brightness is highest at level10.
• Contrast: Adjust the contrast of the scene here. There are ten contrast levels to
choose from. The contrast is lowest at level 1. The contrast is highest at level 10.
• Hot Tracking: In observation mode, select “Hot Tracking” to highlight the warmest
point in the scene with a small red square.
• Auto Calibration: Set manual (Auto Calibration = O) or automatic calibration
(Auto Calibration = On) here.
• Scene Mode: Choose from two dierent modes.
Universal – Standard mode for general observation.
Detect – The Detect mode generates a high-contrast image to make thermal
signatures more visible.
Universal Detect
You can also cycle through the dierent modes by simultaneously pressing the right
arrow button(6) and the menu button(7).
• P.I.P. (Picture in Picture): A central section of the image is enlarged by a factor of
2 and shown in a small magnication window on the display.
• WLAN: Switch WLAN on/o. When WLAN is switched on, the device creates a
hotspot that allows another device (e.g. smartphone) to make a connection.
• System: Make all system-relevant settings here, including language, time and
factory settings.
The arrow buttons(6) and the menu button(7) are used to navigate in the main menu.
Press the right arrow button(6) to scroll down. Press the left arrow button(6) to scroll
up.
Briey press the menu button(7) to select a menu item. This opens the submenu. Make
your settings using the arrow buttons(6).
Briey press the menu button(7) to conrm your selection and return to the main
menu.
Press and hold the menu button(7) to exit the main menu and return to observation
mode.
11 | 99 EN

System
The “System” submenu has the following options:
• Factory Reset: Select “Factory Reset” to reset the device to the factory settings.
This also deletes all data saved on the device, including images and videos.
• Reset Settings: Select “Reset Settings” to reset all settings to the default values for
the device.
• Language Settings: Select a menu language here.
• Date / Time: Set the date and time of the device here.
• Pixel Correction: Remove defective pixels for a perfect eld of view.
• Auto O: Activate or deactivate the automatic switch-o function.
• Max. Zoom Level: Here you can specify the maximum zoom value.
• Color Modes: Activate or deactivate the desired color modes here.
You can also view the following information:
• WLAN SSID: The name of the WLAN hotspot is displayed here.
• WLAN Password: The currently used WLAN password is displayed here.
• Firmware: The current rmware version is displayed here.
Scene Mode
OFF
Factory Reset
To perform a factory reset, select “System” in the main menu. Then navigate to
“Factory Reset”. Select “Yes” and conrm your selection. A second security prompt
follows, which must also be conrmed with “Yes”.
Resetting the settings
To reset the settings, select “System” in the main menu. Then navigate to “Reset
Settings”. Select “Yes” and conrm your selection.
Note: The device must be restarted for the reset of the settings to be completed
successfully.
Personal data when you dispose of or pass on your ZEISS device
Remember that there may be personal photos and videos on the internal device
memory. Before passing on the device to a third party, please perform the factory reset
to delete this data and verify it has been deleted. By doing so, you help maintain your
privacy and data security.
Participating in IT security
Please take an active role in protecting the IT security of your device by using the ZEISS
Hunting App and installing new rmware updates as soon as they become available.
Date / Time
Select “System” in the main menu to set the date and time. Then navigate to
“Date / Time”. You can now set the year, month, day, hour and minute individually. The
“Time Format” setting allows you to choose between 24-hour and 12-hour display. Be
sure to set the current date and time, as your photos and videos will be time stamped.
At the very bottom in the menu item you can activate or deactivate the display of the
time on the main screen.
Note: If the battery is completely discharged, the device loses the set date and time.
Reset the date and time so that your images and videos get a correct timestamp.
Pixel Correction
If individual pixels fail, you can
locate them here and x the error.
Select “System” in the main menu
to start the correction. Navigate
to “Pixel Correction” and start
the correction by briey pressing
the menu button(7). Crosshairs
appear, which you use to capture
the aected pixel. For more precise
detection, the area around the
crosshairs is displayed enlarged in
an additional window. To set the X
axis: press the left arrow button(6) for minus and the right menu button(6) for plus.
Every time you press the button, you move one pixel further. To jump several pixels
further, press and hold the arrow button(6). Conrm the setting by briey pressing
the menu button(7). Now make the settings for the Y axis in the same way. Switch
between the setting for the X and Y axis by briey pressing the menu button(7).
To save the settings, press and hold the menu button(7). Conrm the prompt
whether you would like to save or discard the calibration by briey pressing the menu
button(7).
Auto O
The ZEISS DTI 1 switches o automatically after a time of inactivity in order to save
battery power. The switch-o duration can be adjusted in the menu item “System”
under “Auto O”.
Firmware update
A rmware update can be carried out using the ZEISS Hunting App. Follow the
instructions for this in the ZEISS Hunting App.
Note: Make sure that the device is fully charged before updating the rmware. Do not
switch o the device during the update, otherwise it may be damaged.
Note: If you initiate an update via the ZEISS Hunting App, you must conrm this again
on the device for security reasons.
12 | 99 EN

WLAN
This device is equipped with a WLAN function. Go to the menu and switch on the
WLAN function. When activated, WLAN is indicated by a WLAN symbol in the lower
right corner of the display. You can now connect your smartphone to the device via
WLAN.
Note: When rst used, the preset password for the WLAN connection to the device
needs to be changed to prevent unauthorized access by third parties. The ZEISS Hunting
App is required to change the password.
Default password: 12345678
To increase user comfort, the ZEISS Hunting App synchronizes your password on all
logged-in devices.
To increase the security of the connection, we recommend that you change your
password.
To extend battery life, we recommend that you only switch on the WLAN function in
the device when the device needs to establish a data connection to the ZEISS Hunting
App.
ZEISS Hunting App
Install the ZEISS Hunting App on your smartphone and open the app. Follow the steps
shown there to connect to the ZEISS DTI 1.
The ZEISS Hunting App allows you to transfer images and videos to your smartphone,
view the live image, make settings and use other functions. A more detailed description
can be found in the help function of the app.
Note: To use the ZEISS Hunting App and its functions, ensure that your smartphone is
connected to the ZEISS DTI1 WLAN network.
Note: Please note that you are not connected via the normal WLAN if you have
established a WLAN connection to your ZEISS DTI 1. To return to the normal WLAN,
disconnect your ZEISS DTI 1 from your smartphone.
USB port
Use the USB port(11) on the bottom to charge your device or to transfer data (photos
and videos) to your PC. The WLAN function must be switched o in order to transfer
data.
The ZEISS DTI1 connects as an MTP device using the USB port. The device is
automatically recognized and can be used immediately on computers with Microsoft
Windows 10 operating system software or later. For computers with Apple Mac OS
operating system software, you need to install additional third-party software to access
the data stored on the device, such as “AndroidTM File Transfer”. ZEISS assumes no
responsibility or guarantee for third-party software.
Microsoft and Windows are either registered trademarks or trademarks of Microsoft
Corp. in the United States and/or other countries.
Apple and Mac OS are registered trademarks of Apple Inc. in the USA and other
countries.
Android is a trademark of Google LLC.
Tripod thread
A 1/4-inch standard thread(10) for standard tripods is located on the bottom of the
device. Screw the device onto a tripod for more steady shooting.
Charging the device
Charge the device via the USB port(11) when the battery is empty. An LED is located
under the cover that indicates the current charge level.
The battery charge level is shown in the upper right corner of the display. When the
charge level is low, the display changes to red. In the following graphic you can see
what percentage of your battery charge is still available.
<10% 10–<36% 36–<63% 63–<90% 90 –100%
Replacing the lens cap
To replace the lens cap(3), rst remove the focus ring(1). This is additionally xed with
double-sided adhesive tape. Now unscrew the hexagon socket screw(2) with an Allen
key (M1.5). Remove the defective lens cap(3). Fit the new lens cap(3). Now retighten
the screw(2) with an Allen key. Replace the double-sided adhesive tape on the lens
with a new one and place the focus ring(1) back over the lens.
(1)
(2)
(3)
Care and maintenance of the device
Please do not wipe coarse particles from the lenses (e. g. sand), rather blow them
away or use a ne brush to remove them! Over time, ngerprints can corrode the lens
surface. Breathing on the lens and polishing it with a clean optical cleansing cloth is the
easiest method of cleaning the lens surface.
Dry storage and keeping the outer lens surfaces well ventilated, especially in the
tropics, helps to prevent a possible mold lm forming on the optics.
Your ZEISS DTI1 requires no further special care.
Care and maintenance of the battery
Follow these steps to extend the battery life:
• Avoid storing the device at extreme temperatures.
• Avoid storing the device with a fully charged battery.
• Avoid complete discharging of the device.
Software updates
As part of the statutory warranty (2 years from the transfer of risk of the goods–under
German law), we will provide appropriate updates to correct defects. Generally,
updates are used for security-related aspects or to eliminate functional impairments
and do not include new functions of the software. Insofar as the provision of new
functions is necessary to remedy security aspects, this shall not in principle constitute a
claim to new functions as such.
After the legal warranty period has expired, we will of course endeavor to provide you
with appropriate further updates. However, there is no entitlement to this.
Spare parts
Should you require spare parts for your device, e.g. the lens cap, please contact your
specialist retailer, your local distributor or our after-sales service.
For Customer Service inquiries we are happy to take your calls from Monday to Friday
from 8:00 a.m. to 4:30 p.m. (CET).
Tel.: +49(0) 800 934 77 33
Fax: +49(0) 64 41-4 83 69
service.sportsoptics@zeiss.com
ZEISS is a byword for reliability and a high level of quality. Therefore, quite
independently of the seller's warranty obligations to the customer, we the
manufacturer oer a two year warranty on this ZEISS product, which can be extended
for a further year upon registration of the product if registration is made within four
weeks of purchase.
The scope of the warranty can be seen by accessing the following link:
www.zeiss.com/cop/warranty
Register your product at: www.zeiss.com/cop/register
13 | 99 EN

Troubleshooting
Fault Possible reasons Solution
Will not boot. Battery is empty. Charge the device.
The device is not charging.
The USB cable is defective. Replace the USB cable.
External power supply is not sucient. Check if the external power supply is ne.
The USB cable is not properly connected to the device. Unplug the USB cable and check that the connector and
port are undamaged and free from dirt.
The image is unclear.
The image has streaks.
The background is not uniform.
The device must be recalibrated. Follow the instructions when performing the calibration
procedure.
The image is too dark. The screen brightness is set too low. Adjust the screen brightness.
The image on the display is at. The contrast is set too low. Adjust the contrast.
The computer does not recognize the device
(internal memory).
The device is not switched on. Transfer the images after turning on the power.
The USB cable is not connected properly.
The required software has not been installed. Please read the notes in the section “USB port”.
The time information on the images is incorrect. The time information (time/date) in the device is not yet set. Follow the instructions to set the time information.
Image quality is poor.
The detection range is too short. Poor weather conditions may have adverse eects (e.g. heavy snowfall, rain, fog, etc.).
The smartphone does not connect to my
ZEISS DTI 1.
The WLAN password is incorrect. Enter the correct password.
There are too many WLAN networks in the immediate
vicinity of the device. There may be adverse eects.
Move the device to a location with few or no direct WLAN
networks.
The WLAN signal is repeatedly lost or interrupted.
The ZEISS DTI 1 is too far away or there are too many other
WLAN networks nearby. Change the location of the device so that a WLAN signal is
detected directly.
There is an obstruction between the device and the
receiver.
Manufacturer's address
Carl Zeiss AG
Carl-Zeiss-Straße 22
D-73447 Oberkochen
www.zeiss.com/nature and www.zeiss.com/hunting
Subject to changes in design and scope of supply due to technical improvements. No
liability for mistakes and printing errors.
Data protection notice
Personal data is processed when using the ZEISS DTI 1.
Our information on data protection and the processing of personal data can be found
in our download center: www.zeiss.com/hunting/manuals
Licenses
This product is licensed under the AVC Patent Portfolio License for personal and non-
commercial use by a consumer to (i) encode video in compliance with the AVC standard
(“AVC VIDEO”) and/or (ii) decode AVC video encoded by a consumer for personal
purposes and/or video provided by a licensed video distributor. No license, implied or
otherwise, is granted for any other use. Further information is available from MPEG LA,
L.L.C., see http://www.MPEGLA.com
Updates
Download the ZEISS Hunting app to receive the latest hardware updates:
Hunting
app
14 | 99 EN


AVERTISSEMENT!
Veuillez respecter les consignes de sécurité et
réglementations applicables. Elles sont disponibles sur le
site: www.zeiss.com/hunting/manuals
MODE D’EMPLOI
Les produits ZEISS se distinguent par des performances optiques hors du commun, une
nition impeccable et une longue durée de vie.
Veuillez respecter les instructions d’utilisation suivantes an de pouvoir utiliser votre
caméra thermique de manière optimale, et pour que celle-ci vous accompagne
dèlement pendant de nombreuses années.
Contenu de livraison
Produit Réf. Contenu de livraison
DTI 1/19 527004 Caméra thermique
Courroie de transport en néoprène
Sacoche de transport avec bandoulière
Câble USB
Chion de nettoyage de l’optique
DTI 1/25 527005
Vérication des fonctions
• Avant d'utiliser votre caméra thermique, assurez-vous qu'elle ne présente aucun
dommage visible.
• Vériez que la caméra thermique ache une image claire et nette à l'écran.
• Vériez le bon réglage de la caméra thermique, voir les consignes à la section
«Mode observation».
Insertion/retrait de la batterie
La caméra thermique ZEISS DTI 1 est dotée d'une batterie. Pour le remplacement de
la batterie, veuillez vous adresser à notre service d'assistance technique. La batterie
peut être séparée de l'appareil en vue du recyclage. Reportez-vous à ce propos au
paragraphe «Élimination des batteries» dans les consignes de sécurité.
Observation avec et sans lunettes
Grâce à son œilleton souple, la caméra thermique peut être utilisée aussi bien avec que
sans lunettes. Dans les deux cas, elle ore un champ de vision intégral.
Mise en place de la courroie de transport
(1)
(3)
(7)
(4) (5)
(9)
(8)
(6)
(1)
(3)
(11)
(8)
(9)
(10)
16 | 99 FR

CARACTÉRISTIQUES TECHNIQUES 1/19 1/25
Optique
Distance focale 19 / F1.0 25 / F1.0
Portée de la détection
(taille de l’objet 1,8m × 0,5m; 2yd × 0,6yd) m (yd) 1000 (1094) 1300 (1420)
Angle de vision subjectif °30
Champ de vision sur 100m (sur 100yards) m (pieds) 24(73) 18(55)
Champ de vision ° horizontal × vertical 14 × 10 11 × 8
Grossissement optique 1,8 2,5
Zoom digital maximum 1,0x – 4,0x
Pas du zoom 0,5x
Capteur
Résolution du capteur px 384 × 288
Espacement des pixels du capteur μm 12
Fréquence des images Hz 50
NETD mK ≤ 35
Achage
Résolution d’achage px 1280 × 960
Type d’achage LCOS
Électronique
Interfaces USB: recharge + transmission de données
WLAN: transmission de données
Batterie Lithium-ion
Autonomie h6,5
Alimentation électrique externe 5V / 2A (USB)
Mémoire interne Go 8
Vidéo/Image/Fonction streaming
Fréquence WLAN GHz 2,4
Norme WLAN IEEE 802.11b/g/n
Connexion à d’autres appareils Appli ZEISS Hunting, USB
Généralités
Indice de protection IP65
Plage de température de fonctionnement °C (°F) -10 / +50 (+14 / +122)
Longueur x largeur x hauteur mm (pouces) 175 × 57 × 59
(6,9 × 2,2 × 2,3)
Poids g (onces) 360 (12,7)
Sous réserve de modications du produit et du contenu de livraison, liées aux progrès techniques dans le domaine.
Mise en marche/arrêt
Appuyez longuement sur l’interrupteur(4) pour allumer l’appareil. Par la suite, appuyez
à nouveau longuement sur l’interrupteur(4) pour éteindre l’appareil.
Remarque: appuyez sur l’interrupteur(4) jusqu’à ce que le symbole OFF s’ache à
l’écran. Alors seulement, l’interrupteur(4) peut
être relâché et l’appareil s’éteint. Si
l’interrupteur(4) est relâché avant l’achage du
symbole OFF, l’appareil ne s’éteint pas, mais se met
en veille.
Mode veille
Appuyez brièvement sur l’interrupteur(4)
pour mettre l’appareil en mode veille. Par
la suite, appuyez à nouveau brièvement sur
l’interrupteur(4) pour repasser l’appareil en mode
d’observation.
Calibrage
L’appareil peut être calibré automatiquement (Calibrage auto = On) ou manuellement
(Calibrage auto = O).
En mode automatique, l’appareil eectue seul un calibrage en fermant et en ouvrant un
obturateur interne, lorsque cette procédure est nécessaire. Vous entendez un léger clic.
Dans ce mode, vous avez aussi la possibilité d’eectuer le calibrage manuellement, en
appuyant simultanément sur le bouton de prise de vue(5) et le bouton de menu(7).
En option, vous pouvez eectuer un calibrage manuel silencieux. Pour cela, allez dans
le menu de l’appareil et réglez l’option «Calibrage auto» sur «O». Retournez ensuite
dans le mode observation. Fermez manuellement le cache-objectif(3). Appuyez ensuite
simultanément sur le bouton de prise de vues(5) et le bouton menu(7). L’appareil est
de nouveau calibré.
Remarque: couvrez toujours l’objectif lors d’un calibrage manuel. Sinon, le capteur
ne peut pas procéder à un calibrage correct et la qualité de l’image s’en trouve aectée
(ex.: images fantômes). Si vous avez oublié de couvrir l’objectif pendant le calibrage
manuel, répétez la procédure avec l’objectif couvert.
Mode observation
Regardez dans le viseur(8) pour observer la scène. Tournez la molette de réglage
dioptrique(9) sur le côté pour faire le point à l’écran.
Tournez l’anneau de mise au point(1) de l’objectif pour faire le point sur la scène.
Zoom
En mode observation, les touches èches(6) permettent d’agrandir la scène (touche
èche droite) ou de la réduire (touche èche gauche). Zoomez par pas de 0,5 entre 1,0x
et 4,0x. La fonction zoom est circulaire: si vous appuyez à nouveau sur la touche èche
droite(6) après un zoom 4,0x, vous revenez au zoom 1,0x.
Le grossissement numérique actuellement réglé est aché à l’écran. Sous la rubrique
«Niveau de zoom max» du menu Système, vous pouvez régler le niveau de zoom
maximum souhaité.
17 | 99 FR

Modes couleur
La scène peut être achée dans quatre modes couleur. Pour modier le mode
d’observation, appuyez brièvement sur le bouton menu(7). En cas de modication,
le mode sélectionné s’ache comme texte pendant env. 2secondes. Sous la rubrique
«Modes couleur» du menu Système, vous pouvez activer ou désactiver les modes
souhaités. En cas de modication via le bouton de menu(7), seuls les modes actifs sont
parcourus. Vous disposez des modes couleur suivants:
Scene Mode
OFF
• White Hot: ici, les zones froides sont illustrées en noir et les chaudes en blanc.
• Black Hot: ici, les zones froides sont illustrées en blanc et les chaudes en noir.
• Red Hot: ici, les zones froides sont illustrées en noir et les chaudes en blanc. En
outre, les zones les plus chaudes apparaissent en jaune à rouge.
• Rainbow: grâce à une palette de couleurs variées, les zones froides sont
illustrées en noir à bleu et les chaudes en jaune à blanc.
• Red Hue: ici, les zones froides sont illustrées en noir et les chaudes en rouge.
• Green Hue: ici, les zones froides sont illustrées en noir et les chaudes en vert.
• Dark Hue: ici, les zones froides sont illustrées en sépia et les chaudes en violet.
• Night Eye: il s’agit d’une combinaison de White Hot et Black Hot. Ici, les zones
froides sont illustrées en noir à marron foncé et les chaudes en sépia à marron
clair.
Mode de prise de vues
Cet appareil permet de prendre des photos et des vidéos.
Pour prendre une photo, appuyez brièvement une fois sur le bouton de prise de vue(5),
une icône de photo s’ache. Pour prendre une vidéo, appuyez longuement sur le
bouton de prise de vue(5), une icône de vidéo s’ache. Pendant une prise vidéo,
des photos peuvent être générées en appuyant brièvement sur le bouton de prise de
vue(5), pour conrmation, l’icône de vidéo se change brièvement en icône photo.
Remarque: les longues vidéos sont divisées automatiquement en petits chiers de
10minutes lors de l’enregistrement.
2X
2X
Mode photo Mode vidéo
Menu
Appuyez longuement sur le bouton menu(7) pour acher le menu principal à l’écran.
Ce faisant, regardez dans le viseur(8). Les possibilités de sélection suivantes sont
disponibles dans le menu principal:
• Luminosité: réglez ici la luminosité de l’écran. Vous avez le choix entre dix
niveaux de luminosité. Le niveau 1 est la luminosité la plus faible. Le niveau 10 est
la luminosité la plus forte.
• Contraste: réglez ici le contraste de la scène. Vous avez le choix entre dix
niveaux de contraste. Le niveau 1 est le contraste le plus faible. Le niveau 10 est
le contraste le plus fort.
• Repérage thermique: sélectionnez «Repérage thermique», pour mettre en
évidence le point le plus chaud de la scène en mode observation avec un petit
carré rouge.
• Calibrage auto: réglez ici le calibrage manuel (Calibrage auto = O) ou
automatique (Calibrage auto = On).
• Mode scène: sélectionnez ici parmi deux modes.
Universel – mode par défaut pour l’observation générale.
Détection – le mode Détection génère une image à fort contraste, an de mieux
rendre visibles les signatures thermiques.
Universel Détection
Vous pouvez passer d’un mode à l’autre en appuyant simultanément sur la
touche èche droite(6) et le bouton menu(7).
• P.I.P. (Picture in Picture): une portion centrale de l’image est grossie au
facteur 2 et achée dans une petite fenêtre d’agrandissement à l’écran.
• WLAN: activez/désactivez le WLAN. Avec le WLAN activé, l’appareil met un
point d’accès à disposition pour permettre une connexion à partir d’un autre
appareil (ex.: smartphone).
• Système: procédez à tous les réglages liés au système, tels que la langue,
l’heure et les réglages d’usine.
La navigation dans le menu principal s’eectue à l’aide des touches èches(6) et du
bouton menu(7). Appuyez sur la touche èche droite(6) pour descendre. Appuyez sur
la touche èche gauche(6) pour monter.
Appuyez brièvement sur le bouton menu(7) pour sélectionner une rubrique du
menu. Vous arrivez ainsi dans le sous-menu. Procédez aux réglages avec les touches
èches(6).
Appuyez brièvement sur le bouton menu(7) pour conrmer la sélection et revenir au
menu principal.
Appuyez longuement sur le bouton menu(7) pour quitter le menu principal et revenir
en mode d’observation.
18 | 99 FR

Système
Les possibilités de sélection suivantes sont disponibles dans le sous-menu «Système»:
• Rétablir paramètres par défaut: choisissez «Rétablir paramètres par défaut»
pour réinitialiser le réglage d’usine. Ce faisant, toutes les données enregistrées, y
compris les photos et vidéos, sont aussi eacées.
• Réinitialiser paramètres: choisissez «Réinitialiser paramètres» pour
réinitialiser tous les paramètres de l’appareil sur les valeurs par défaut.
• Choix de la langue: sélectionnez ici la langue des menus.
• Date / Heure: réglez ici la date et l’heure de l’appareil.
• Correction des pixels: supprimez les pixels défectueux pour obtenir un champ
de vision parfait.
• Auto O: vous pouvez activer ou désactiver la fonction de coupure
automatique.
• Niveau de zoom max.: vous pouvez dénir ici la valeur de zoom maximale.
• Modes couleur: activez ou désactivez ici les modes couleur souhaités.
Vous pouvez aussi visualiser les informations suivantes:
• WLAN SSID: ici s’ache le nom du point d’accès WLAN.
• WLAN Password: ici s’ache le mot de passe WLAN actuellement utilisé.
• Firmware: la version actuelle du rmware s’ache ici.
Scene Mode
OFF
Rétablir paramètres par défaut
Pour rétablir les paramètres par défaut, sélectionnez «Système» dans le menu
principal. Naviguez ensuite jusqu’à «Rétablir paramètres par défaut». Choisissez «Oui»
et conrmez votre sélection. Une deuxième demande de conrmation doit alors être
également validée avec «Oui».
Réinitialiser les réglages
Pour la réinitialisation des paramètres, sélectionnez «Système» dans le menu principal.
Naviguez ensuite jusqu’à «Réinitialiser paramètres». Choisissez «Oui» et conrmez
votre sélection.
Remarque: pour terminer correctement la réinitialisation des paramètres, l’appareil
doit être redémarré.
Données personnelles lors de l’élimination ou de la cession de votre appareil
ZEISS
Rappelez-vous que des photos et vidéos personnelles peuvent être stockées dans votre
appareil. Avant de céder l’appareil à un tiers, exécutez la fonction «Rétablir paramètres
par défaut» an de supprimer ces données, puis vériez leur suppression. Vous
contribuez ainsi à préserver votre vie privée et la sécurité de vos données.
Collaboration à la sécurité informatique
Contribuez activement à protéger la sécurité informatique de votre appareil en utilisant
l’application ZEISS Hunting et en installant les mises à jour du rmware dès qu’elles sont
disponibles.
Date/Heure
Pour régler la date et l’heure, sélectionnez «Système» dans le menu principal. Naviguez
ensuite vers «Date / Heure». Vous pouvez maintenant régler séparément l’année, le
mois, le jour, les heures et les minutes. Le paramètre «Format de l’heure» vous permet
de choisir entre l’achage 24heures et l’achage 12heures. Veillez à bien régler la
date et l’heure car vos photos et vidéos sont horodatées. Tout en bas de la rubrique du
menu, vous pouvez activer ou désactiver l’achage de l’heure à l’écran principal.
Remarque: si la batterie se décharge complètement, l’appareil perd le réglage de
la date et de l’heure. Réglez à nouveau la date et l’heure pour que vos photos et vos
vidéos soient correctement horodatées.
Correction des pixels
S’il manque certains pixels, vous
pouvez les localiser ici et supprimer
le défaut.
Pour démarrer la correction,
sélectionnez «Système» dans le
menu principal. Naviguez jusqu’à
«Correction des pixels» et
démarrez la correction en appuyant
brièvement sur le bouton menu(7).
Un réticule apparaît et vous permet
de saisir le pixel concerné. Pour une
saisie plus précise, la zone autour
du réticule est agrandie dans une fenêtre supplémentaire. Réglez l’axe X: appuyez sur
la touche èche gauche(6) pour moins et sur la touche èche droite(6) pour plus. À
chaque appui sur la touche, vous avancez d’un pixel. Pour avancer de plusieurs pixels,
maintenez enfoncée la touche èche(6). Conrmez le réglage en appuyant brièvement
sur le bouton menu(7). Procédez maintenant de la même manière pour régler l’axe
Y. Pour commuter entre le réglage des axes X et Y, appuyez brièvement sur le bouton
menu(7).
Pour enregistrer les réglages, appuyez longuement sur le bouton menu(7). Conrmez
ou non la mémorisation du calibrage en appuyant brièvement sur le bouton menu(7).
Arrêt automatique
Pour économiser la batterie, le ZEISS DTI 1 peut se couper automatiquement après
un délai d’inactivité. Le délai de coupure peut être ajusté dans la rubrique de menu
«Système», sous «Auto O».
Mise à jour du rmware
La mise à jour du rmware peut être eectuée à l’aide de l’appli ZEISS Hunting. Pour
cela, suivez les instructions de l’appli ZEISS Hunting.
Remarque: assurez-vous que l’appareil est entièrement rechargé avant une mise
à jour du rmware. N’arrêtez pas l’appareil pendant la mise à jour, sous peine de
l’endommager.
Remarque: si vous lancez une mise à jour via l’appli ZEISS Hunting, vous devez la
conrmer sur l’appareil pour des raisons de sécurité.
19 | 99 FR

WLAN
L’appareil est équipé d’une fonction WLAN. Allez dans le menu et activez la fonction
WLAN. L’activation du WLAN est matérialisée par une icône WLAN en bas à droite de
l’écran. Reliez maintenant votre smartphone à l’appareil, par WLAN.
Remarque: le mot de passe par défaut pour la connexion WLAN vers l’appareil doit
être modié à la première utilisation an d’éviter un accès non autorisé par des tiers.
Pour modier le mot de passe, l’appli ZEISS Hunting est requise.
Mot de passe par défaut: 12345678
Pour accroître le confort de l’utilisateur, l’appli ZEISS Hunting synchronise votre mot de
passe sur tous les appareils connectés.
Pour accroître la sécurité de la connexion, il est conseillé de changer de mot de passe.
Pour prolonger l’autonomie de la batterie, nous conseillons de n’activer la fonction
WLAN sur l’appareil que si vous utilisez la connexion à l’appli ZEISS Hunting.
Appli ZEISS Hunting
Installez l’appli ZEISS Hunting sur votre smartphone et ouvrez-la. Suivez les étapes
achées, pour vous connecter à la ZEISS DTI 1.
L’appli ZEISS Hunting vous permet de transférer des photos et des vidéos sur votre
smartphone, de visionner l’image en direct, de procéder à des réglages et d’utiliser
d’autres fonctions. La fonction d’aide de l’appli vous en donne une description
détaillée.
Remarque: pour pouvoir utiliser l’appli ZEISS Hunting et ses fonctions, assurez-vous
que votre smartphone est relié au réseau WLAN de la ZEISS DTI 1.
Remarque: notez que vous n’êtes pas connecté(e) via le WLAN classique si vous avez
établi une connexion WLAN avec votre ZEISS DTI 1. Pour revenir au WLAN classique,
coupez la connexion de votre ZEISS DTI 1 avec votre smartphone.
Interface USB
Utilisez l’interface USB(11) sur le dessous de l’appareil, pour pouvoir le recharger ou
pour transférer des données (photos et vidéos) sur votre PC. Pour pouvoir transférer des
données, la fonction WLAN doit être coupée.
La ZEISS DTI 1 se connecte comme appareil MTP, via l’interface USB. Sur les ordinateurs
équipés du système d’exploitation Microsoft Windows 10 ou ultérieur, l’appareil est
détecté automatiquement et peut être utilisé aussitôt. Sur les ordinateurs équipés du
système d’exploitation Apple macOS, vous devez installer en plus les logiciels tiers
pour pouvoir accéder aux données enregistrées dans l’appareil, p.ex.«AndroidTM
File Transfer». ZEISS ne pourra être tenu responsable ou garant des logiciels d’autres
fournisseurs.
Microsoft et Windows sont des marques déposées ou des marques de Microsoft Corp.,
aux États-Unis et/ou dans d’autres pays.
Apple et macOS sont des marques déposées d’Apple Inc., aux États-Unis et dans
d’autres pays.
Android est une marque de Google LLC.
Filetage pour trépied
Sur le dessous de l’appareil se trouve un letage normalisé(10) de 1/4pouce pour
trépied standard. Pour obtenir des prises de vue plus stables, vissez l’appareil sur un
trépied.
Recharge de l’appareil
Rechargez l’appareil via le port USB(11) dès que la batterie est déchargée. Sous le
cache se trouve une LED qui indique l’état de charge actuel.
L’état de charge de la batterie s’ache en haut à droite de l’écran. En cas de charge
faible, l’achage à l’écran devient rouge. Dans le graphique suivant, vous pouvez voir
le pourcentage de charge restante de la batterie.
<10 % 10–<36 % 36–<63 % 63–<90 % 90–100 %
Remplacement du cache-objectif
Pour remplacer le cache-objectif(3), retirez d’abord l’anneau de mise au point(1). Il est
xé avec du ruban adhésif double face. Dévissez maintenant la vis à six pans creux(2)
avec une clé à six pans (M1.5). Déposez le cache-objectif défectueux(3). Installez le
nouveau cache-objectif(3). Serrez la vis(2) avec une clé à six pans. Remplacez le ruban
adhésif double face sur l’objectif par un ruban neuf et replacez l’anneau de mise au
point(1) sur l’objectif.
(1)
(2)
(3)
Maintenance et entretien de l’appareil
Pour déloger de grosses particules de saleté des lentilles (du sable, par exemple), ne
les essuyez pas avec un chion: souez dessus ou utilisez un pinceau souple. Les
traces de doigts risquent d’altérer à la longue la surface des lentilles. Le plus simple
est de souer sur les lentilles pour les embuer, puis de les essuyer avec un chion de
nettoyage spécial pour optiques.
Pour prévenir la formation de moisissures, dans les pays tropicaux notamment,
l’appareil doit être conservé au sec, dans un endroit garantissant la bonne aération de
la surface extérieure des lentilles.
Votre ZEISS DTI 1 ne nécessite aucun autre entretien particulier.
Maintenance et entretien de la batterie
Pour prolonger la durée de vie de la batterie, suivez les instructions suivantes:
• Évitez de stocker l’appareil à des températures extrêmes.
• Évitez de stocker l’appareil avec la batterie entièrement chargée.
• Évitez la décharge complète de l’appareil.
Mises à jour du logiciel
Dans le cadre de la garantie légale (2ans à compter du transfert du risque lié à la
marchandise–conformément au droit allemand), nous mettrons à disposition des
mises à jour permettant de résoudre des défauts. En règle générale, les mises à jour
concernent des aspects liés à la sécurité ou l’élimination de restrictions de fonctions,
et elles n’incluent pas de nouvelles fonctions du logiciel. Dans la mesure où la mise à
disposition de nouvelles fonctions s’avère nécessaire pour l’élimination de problèmes
de sécurité, cela ne justie toutefois pas un droit à de nouvelles fonctions en tant que
tel.
Après l’échéance de la période de garantie légale, nous nous eorçons naturellement
de mettre à votre disposition les mises à jour applicables. Toutefois, elles ne peuvent
être exigées.
Pièces de rechange
Si vous avez besoin de pièces de rechange pour votre appareil, par exemple d’un
cache-objectif, veuillez vous adresser à votre revendeur spécialisé, à votre distributeur
local ou à notre service client.
Notre service client est à votre disposition par téléphone du lundi au vendredi de 8h00
à 16h30 (CET).
Tél.: +49(0) 800 934 77 33
Fax: +49(0) 64 41-4 83 69
www.zeiss.com/hunting
ZEISS est réputée pour la qualité et la abilité élevées de ses produits. C’est pourquoi,
outre les obligations de garantie du vendeur envers le client, nous vous orons une
garantie fabricant de deux ans pour ce produit ZEISS, qui peut être prolongée d’un an
en cas d’enregistrement du produit s’il a lieu dans les quatre semaines suivant l’achat.
Vous pouvez consulter l’étendue de la garantie en cliquant sur le lien suivant:
www.zeiss.com/cop/warranty
Enregistrez votre produit sur: www.zeiss.com/cop/register
20 | 99 FR
Strona się ładuje...
Strona się ładuje...
Strona się ładuje...
Strona się ładuje...
Strona się ładuje...
Strona się ładuje...
Strona się ładuje...
Strona się ładuje...
Strona się ładuje...
Strona się ładuje...
Strona się ładuje...
Strona się ładuje...
Strona się ładuje...
Strona się ładuje...
Strona się ładuje...
Strona się ładuje...
Strona się ładuje...
Strona się ładuje...
Strona się ładuje...
Strona się ładuje...
Strona się ładuje...
Strona się ładuje...
Strona się ładuje...
Strona się ładuje...
Strona się ładuje...
Strona się ładuje...
Strona się ładuje...
Strona się ładuje...
Strona się ładuje...
Strona się ładuje...
Strona się ładuje...
Strona się ładuje...
Strona się ładuje...
Strona się ładuje...
Strona się ładuje...
Strona się ładuje...
Strona się ładuje...
Strona się ładuje...
Strona się ładuje...
Strona się ładuje...
Strona się ładuje...
Strona się ładuje...
Strona się ładuje...
Strona się ładuje...
Strona się ładuje...
Strona się ładuje...
Strona się ładuje...
Strona się ładuje...
Strona się ładuje...
Strona się ładuje...
Strona się ładuje...
Strona się ładuje...
Strona się ładuje...
Strona się ładuje...
Strona się ładuje...
Strona się ładuje...
Strona się ładuje...
Strona się ładuje...
Strona się ładuje...
Strona się ładuje...
Strona się ładuje...
Strona się ładuje...
Strona się ładuje...
Strona się ładuje...
Strona się ładuje...
Strona się ładuje...
Strona się ładuje...
Strona się ładuje...
Strona się ładuje...
Strona się ładuje...
Strona się ładuje...
Strona się ładuje...
Strona się ładuje...
Strona się ładuje...
Strona się ładuje...
Strona się ładuje...
Strona się ładuje...
Strona się ładuje...
Strona się ładuje...
-
 1
1
-
 2
2
-
 3
3
-
 4
4
-
 5
5
-
 6
6
-
 7
7
-
 8
8
-
 9
9
-
 10
10
-
 11
11
-
 12
12
-
 13
13
-
 14
14
-
 15
15
-
 16
16
-
 17
17
-
 18
18
-
 19
19
-
 20
20
-
 21
21
-
 22
22
-
 23
23
-
 24
24
-
 25
25
-
 26
26
-
 27
27
-
 28
28
-
 29
29
-
 30
30
-
 31
31
-
 32
32
-
 33
33
-
 34
34
-
 35
35
-
 36
36
-
 37
37
-
 38
38
-
 39
39
-
 40
40
-
 41
41
-
 42
42
-
 43
43
-
 44
44
-
 45
45
-
 46
46
-
 47
47
-
 48
48
-
 49
49
-
 50
50
-
 51
51
-
 52
52
-
 53
53
-
 54
54
-
 55
55
-
 56
56
-
 57
57
-
 58
58
-
 59
59
-
 60
60
-
 61
61
-
 62
62
-
 63
63
-
 64
64
-
 65
65
-
 66
66
-
 67
67
-
 68
68
-
 69
69
-
 70
70
-
 71
71
-
 72
72
-
 73
73
-
 74
74
-
 75
75
-
 76
76
-
 77
77
-
 78
78
-
 79
79
-
 80
80
-
 81
81
-
 82
82
-
 83
83
-
 84
84
-
 85
85
-
 86
86
-
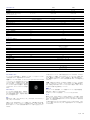 87
87
-
 88
88
-
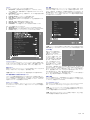 89
89
-
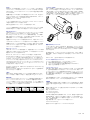 90
90
-
 91
91
-
 92
92
-
 93
93
-
 94
94
-
 95
95
-
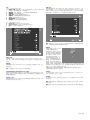 96
96
-
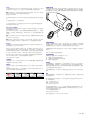 97
97
-
 98
98
-
 99
99


w innych językach
- italiano: Zeiss DTI 1 Istruzioni per l'uso
- Deutsch: Zeiss DTI 1 Bedienungsanleitung
- svenska: Zeiss DTI 1 Bruksanvisningar
- français: Zeiss DTI 1 Mode d'emploi
- 日本語: Zeiss DTI 1 取扱説明書
- English: Zeiss DTI 1 Operating instructions
Powiązane artykuły
-
Zeiss DTI 4 Instrukcja obsługi
-
Zeiss 3-25 GEN 2 instrukcja
-
-
-
-
-
-
-
