Yamaha DGB1KE3 PE Instrukcja obsługi
- Kategoria
- Instrumenty muzyczne
- Typ
- Instrukcja obsługi
Niniejsza instrukcja jest również odpowiednia dla


SPECIAL MESSAGE SECTION
PRODUCT SAFETY MARKINGS: Yamaha electron-
ic products may have either labels similar to the graphics
shown below or molded/stamped facsimiles of these
graphics on the enclosure. The explanation of these
graphics appears on this page. Please observe all cau-
tions indicated on this page and those indicated on the
safety instruction section.
SEE BOTTOM OF ENCLOSURE OR LOWER FRONT
PANEL FOR GRAPHIC SYMBOL MARKINGS
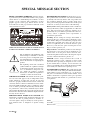
The exclamation point within the equi-
lateral triangle is intended to alert the
user to the presence of important operat-
ing and maintenance (servicing) instruc-
tions in the literature accompanying the
product.
The lightning flash with arrowhead
symbol within the equilateral triangle
is intended to alert the user to the pres-
ence of uninsulated “dangerous volt-
age” within the product’s enclosure
that may be of sufficient magnitude to
constitute a risk of electrical shock.
IMPORTANT NOTICE: All Yamaha electronic prod-
ucts are tested and approved by an independent safety
testing laboratory in order that you may be sure that
when it is properly installed and used in its normal and
customary manner, all foreseeable risks have been elimi-
nated. DO NOT modify this unit or commission others
to do so unless specifically authorized by Yamaha. Prod-
uct performance and/or safety standards may be dimin-
ished. Claims filed under the expressed warranty may be
denied if the unit is/has been modified. Implied warran-
ties may also be affected.
SPECIFICATIONS SUBJECT TO CHANGE: The
information contained in this manual is believed to be
correct at the time of printing. However, Yamaha re-
serves the right to change or modify any of the specifica-
tions without notice or obligation to update existing
units.
ENVIRONMENTAL ISSUES: Yamaha strives to pro-
duce products that are both user safe and environmental-
ly friendly. We sincerely believe that our products and
the production methods used to produce them, meet
these goals. In keeping with both the letter and the spirit
of the law, we want you to be aware of the following:
Battery Notice: This product MAY contain a small non-
rechargeable battery which (if applicable) is soldered in
place. The average life span of this type of battery is ap-
proximately five years. When replacement becomes nec-
cessary, contact a qualified service representative to
perform the replacement.
Warning: Do not attempt to recharge, disassemble, or
incinerate this type of battery. Keep all batteries away
from children. Dispose of used batteries promptly and as
regulated by applicable laws. Note: In some areas, the
servicer is required by law to return the defective parts.
However, you do have the option of having the servicer
dispose of these parts for you.
Disposal Notice: Should this product become damaged
beyond repair, or for some reason its useful life is con-
sidered to be at an end, please observe all local, state,
and federal regulations that relate to the disposal of prod-
ucts that contain lead, batteries, plastics, etc.
NOTICE: Service charges incurred due to lack of
knowledge relating to how a function or effect works
(when the unit is operating as designed) are not covered
by the manufacturer’s warranty, and are therefore the
owners responsibility. Please study this manual carefully
and consult your dealer before requesting service.
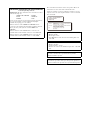
NAME PLATE LOCATION: The graphic below indi-
cates the location of the name plate. The model number,
serial number, power requirements, etc., are located on
this plate. You should record the model number, serial
number, and the date of purchase in the spaces provided
below and retain this manual as a permanent record of
your purchase.
Model _________________________________________
Serial No. ______________________________________
Purchase Date __________________________________
92-469
YAMAHA CORPORATION
MADE IN JAPAN
PATENTS
HS
1

SECTION DE MESSAGE SPÉCIAL
INSCRIPTIONS DE SÉCURITÉ DU PRODUIT: Les
produits électroniques Yamaha peuvent comporter des
étiquettes semblables aux représentations graphiques in-
diquées ci-dessous ou fac-similés moulés/estampés de
ces représentations graphiques sur l’encoffrement. L’ex-
plication de ces représentations graphiques apparaît à
cette page. Veuillez respecter toutes les précautions in-
diquées à cette page et celles indiquées dans la section
des directives de sécurité.
VOIR SOUS L’ENCOFFREMENT OU EN BAS DU
PANNEAU FRONTAL EN CE QUI CONCERNE LES
INSCRIPTIONS DE SYMBOLE GRAPHIQUES
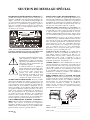
Le point d’exclamation placé dans un tri-
angle équilatéral est destiné à alerter
l’utilisateur de la présence de directives
importantes sur l’utilisation et l’entretien
(dépannage) dans la documentation qui
accompagne le produit.
L’éclair de foudre avec le symbole en
pointe de flèche dans un triangle équi-
latéral est destiné à alerter l’utilisateur
de la présence d’une “tension dan-
gereuse” non isolée circulant dans
l’encoffrement du produit et qui peut
avoir une puissance suffisante pour
constituer un risque d’électrocution.
NOTIFICATION IMPORTANTE: Tous les produits
électroniques Yamaha sont vérifiés et approuvés par un
laboratoire de contrôle de sécurité indépendant pour que
vous puissiez être sûr que quand il est correctement in-
stallé et utilisé de façon normale et habituelle, tous les
risques prévisibles ont été éliminés. NE modifiez PAS
cet appareil ni déléguez d’autres personnes à le faire à
moins d’être autorisé spécifiquement par Yamaha à le
faire. Les performances de ce produit et/ou les normes
de sécurité peuvent être diminuées. Les réclamations
soumises sous les termes de la garantie exprimée peu-
vent être refusées si l’appareil est ou a été modifié. Des
garanties implicites peuvent également être affectées.
CARACTÉRISTIQUES SUJETTES À MODIFICA-
TION: On pense que les informations contenues dans ce
manuel sont correctes au moment de l’impression.
Cependant, Yamaha se réserve le droit de changer ou de
modifier toute caractéristique sans avis préalable ni obli-
gation de mettre à jour les appareils existants.
PUBLICATION SUR L’ENVIRONNEMENT: Yama-
ha s’efforce de produire des appareils qui réunissent à la
fois la sécurité à utilisateur et constituent un environnement
convivial. Nous croyons sincèrement que nos produits et
les méthodes de production les produisaient, atteignent ces
buts. En accord avec la lettre et l’esprit de la loi, nous vou-
lons que vous vous rendiez compte de ce qui suit :
Notification relative à la batterie: Ce produit PEUT con-
tenir une petite batterie non-rechargeable qui (quand ceci
est applicable) est soudée en place. La durée moyenne de
ce type de batterie est approximativement de cinq ans.
Quand le remplacement devient nécessaire, prenez contact
avec un technicien qualifié pour exécuter le remplacement.
Avertissement: N’essayez pas de recharger, démonter
ou incinérer ce type de batterie. Maintenez toutes les bat-
teries hors de la portée des enfants. Mettez les batteries
usées au rebut et promptement conformément aux obli-
gations imposées par les lois applicables. Remarque:
Dans certains secteurs, il est exigé par la loi que le pré-
posé à l’entretien renvoie les pièces défectueuses.
Cependant, vous avez l’option que le préposé à l’entre-
tien mette ces pièces au rebut pour vous.
Notification de mise au rebut: Si ce produit était en-
dommagé au delà de la possibilité du dépannage, ou
pour quelque raison si sa durée de vie utile est con-
sidérée comme arrivant à terme, veuillez respecter la ré-
glementations d’état, locale et fédérale et qui est
associée à la mise au rebut des produits qui contiennent
du plomb, des batteries, des plastiques, etc.
NOTIFICATION: Les frais administratifs encourus en
raison d’un manque de connaissance concernant la façon
dont une fonction ou des effets réagissent (quand l’appa-
reil est utilisé comme conçu) ne sont pas couverts par la
garantie du constructeur, et incombent pour cette raison
la responsabilité des propriétaires. Veuillez étudier at-
tentivement ce manuel et consultez votre distributeur
avant de demander un dépannage.
EMPLACEMENT DE LA PLAQUE SIGNALÉ-
TIQUE: La représentation graphique ci-dessous indique
l’emplacement de la plaque signalétique. Le numéro de
modèle, le numéro de série, les conditions d’alimenta-
tion électrique, etc., sont mentionnées sur cette plaque.
Vous devriez enregistrer le numéro de modèle, le
numéro de série et la date de l’achat dans les espaces
fournis ci-dessous et conserver ce manuel comme relevé
permanent de votre achat.
Modèle ________________________________________
Numéro de série ________________________________
Date d’achat ____________________________________
92-469
YAMAHA CORPORATION
MADE IN JAPAN
PATENTS
HS
1

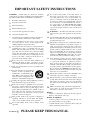
IMPORTANT SAFETY INSTRUCTIONS
WARNING — When using any electrical or electronic
product, basic precautions should always be followed. These
precautions include, but are not limited to, the following:
Read these instructions.
Keep these instructions.
Heed all warnings.
Follow all instructions.
Do not use this apparatus near water.
Clean only with dry cloth.
Do not block any ventilation openings. Install in ac-
cordance with the manufacturer’s instructions.
Do not install near any heat sources such as radia-
tors, heat registers, stoves, or other apparatus (in-
cluding amplifiers) that produce heat.
Do not defeat the safety purpose of the polarized or
grounding-type plug. A polarized plug has two
blades with one wider than the other. A grounding
type plug has two blades and a third grounding
prong. The wide blade or the third prong are pro-
vided for your safety. If the provided plug does not
fit into your outlet, consult an electrician for re-
placement of the obsolete outlet.
Protect the power cord from being walked on or
pinched particularly at plugs, convenience recepta-
cles, and the point where they exit from the apparatus.
Only use attachments/accessories specified by the
manufacturer.
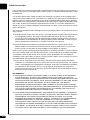
Use only with the cart, stand, tripod,
bracket, or table specified by the
manufacturer, or sold with the appa-
ratus. When a cart is used, use caution
when moving the cart/apparatus com-
bination to avoid injury from tip-over.
Unplug this apparatus during lightning storms or
when unused for long periods of time.
Refer all servicing to qualified service personnel.
Servicing is required when the apparatus has been
damaged in any way, such as power-supply cord or
plug is damaged, liquid has been spilled or objects
have fallen into the apparatus, the apparatus has
been exposed to rain or moisture, does not operate
normally, or has been dropped.
This product shall not be exposed to dripping or
splashing and that no objects filled with liquids,
such as vases, shall be placed on the apparatus.
Do not put burning items, such as candles, on the
apparatus.
Do not place this product or any other objects on
the power cord or place it in a position where any-
one could walk on, trip over, or roll anything over
power or connecting cords of any kind. The use of
an extension cord is not recommended! If you must
use an extension cord, the minimum wire size for a
25’ cord (or less) is 18 AWG. NOTE: The smaller
the AWG number, the larger the current handling
capacity. For longer extension cords, consult a local
electrician.
WARNING — To reduce the risk of fire or electric
shock, do not expose this apparatus to rain or mois-
ture.
Care should be taken that objects do not fall and liq-
uids are not spilled into the enclosure through any
openings that may exist.
This product, either alone or in combination with an
amplifier and headphones or speaker/s, may be ca-
pable of producing sound levels that could cause
permanent hearing loss. DO NOT operate for a long
period of time at a high volume level or at a level
that is uncomfortable. If you experience any hear-
ing loss or ringing in the ears, you should consult an
audiologist. IMPORTANT: The louder the sound,
the shorter the time period before damage occurs.
Some Yamaha products may have benches and/or
accessory mounting fixtures that are either supplied
as a part or the product or as optional accessories.
Some of these items are designed to be dealer as-
sembled or installed. Please make sure that benches
are stable and any optional fixtures (where applica-
ble) are well secured BEFORE using. Benches sup-
plied by Yamaha are designed for seating only. No
other uses are recommended.
This product shall be connected to a MAINS socket
outlet with a protective earthing connection.
This product has a power switch for shutting off all
system. The switch is located on the Power Supply
Unit nearby the entrance of the AC cord. Note that
the switch on the Controller does not shutdown all
system.
Make sure that the plug of the Power Supply Unit’s
power cable can easily be disconnected from the
AC outlet as a measure of precaution.
Battery
– Danger of explosion if battery incorrectly replaced.
Replace only with the same type.
Outlets for Speakers
– Connect speakers of 2A or less of totals. Do not con-
nect other products except speakers.
– Consult Yamaha service technician when using the
outlets outside the purchased area.
92-469-DK
PLEASE KEEP THIS MANUAL
1.
2.
3.
4.
5.
6.
7.
8.
9.
10.
11.
12.
13.
14.
15.
16.
17.
18.
19.
20.
21.
22.
23.
24.
2

INSTRUCTIONS DE SÉCURITÉ IMPORTANTES
AVERTISSEMENT — Lors de l’utilisation de n’importe
quel appareil électrique ou électronique, les précautions
fondamentales devraient toujours être suivies. Ces précau-
tions comprennent, mais ne sont pas limitées à, ce qui suit:
Lisez ces directives.
Conservez ces directives.
Observez tous les avertissements.
Suivez toutes les directives.
N’utilisez pas cet appareil près de l’eau.
Nettoyez seulement avec un tissu sec.
Ne bloquez aucune des ouvertures de ventilation. In-
stallez conformément aux directives du constructeur.
N’installez près d’aucune source de chaleur telle que
des radiateurs, des registres de chaleur, des appareils
de chauffage ou d’autres appareils (amplificateurs y
compris) qui produisent de la chaleur.
N’asservissez pas l’objectif de sécurité de la prise de
type polarisée ou de mise à la terre. Une prise polar-
isée a deux lames avec une plus large que l’autre. Une
prise de type à mise à la terre a deux lames et une
troisième lame de mise à la terre. La lame large ou la
troisième lame est prévue pour votre sécurité. Si la
prise fournie ne s’ajuste pas dans votre prise secteur,
consultez un électricien pour le remplacement de l’an-
cien modèle de prise.
Protégez le cordon d’alimentation de secteur afin que
personne ne puisse marcher ni le pincer en particulier
les prises, les prises de courant et la position où il quit-
te de l’appareil.
Utilisez seulement les équipements ou accessoires in-
diqués par le constructeur.
Utilisez seulement avec le chariot, le
support, le trépied, la platine de fixa-
tion ou la table indiquée par le con-
structeur, ou vendue avec l’appareil.
Quand un chariot est utilisé, faites at-
tention en déplaçant la combinaison
chariot/appareil pour éviter de se
blesser en renversant l’appareil.
Débranchez cet appareil pendant les orages et la fou-
dre ou s’il est inutilisé pendant de longues périodes.
Confiez toutes les opérations d’entretien au personnel
de service qualifié. L’entretien est exigé quand l’appar-
eil a été endommagé de quelque façon que ce soit,
comme par exemple l’endommagement du cordon ou
de la prise d’alimentation secteur, quand du liquide a
été renversé ou que des objets sont tombés dans l’appa-
reil, l’appareil a été exposé à la pluie ou à l’humidité,
ne fonctionne pas normalement ou est tombé par terre.
Ce produit ne doit pas être exposé à un suintement ou
des éclaboussures et aucun objet rempli de liquide, tels
que des vases, ne doit être mis sur l’appareil.
Ne mettez pas des articles brûlants, tels que des bou-
gies, sur l’appareil.
Ne placez ce produit ni aucun autre objet sur le cordon
d’alimentation secteur ou ne le placez pas dans une po-
sition où n’importe qui pourrait marcher dessus,
trébucher dedans ou faire rouler n’importe quoi sur les
cordons d’alimentation en aucune manière. L’utilisa-
tion d’un cordon prolongateur n’est pas recommandée
! Si vous devez utiliser un cordon prolongateur, la taille
minimum du calibre de fil du cordon pour un cordon de
25 pouces (ou moins) est de 18 du calibrage américain
normalisé. REMARQUE: Plus le numéro du calibrage
américain normalisé est petit, plus la capacité de ges-
tion de l’intensité est grande. Pour de plus longs cor-
dons prolongateurs, consultez un électricien local.
AVERTISSEMENT — Pour réduire les risques d’in-
cendie ou de décharge électrique, n’exposez pas cet
appareil à la pluie ou à l’humidité.
Un soin tout particulier devrait être pris pour qu’aucun
objet ne tombe et que des liquides ne soient renversés
dans l’encoffrement par aucune des ouvertures qui
peuvent exister.
Ce produit, individuel ou en combinaison avec un am-
plificateur et des écouteurs ou le ou les haut-parleurs,
risque de produire des niveaux sonores qui pourraient
causer une perte d’auditive permanente. NE PAS
mettre en service pendant une longue période à un
niveau de volume élevé ou à un niveau qui est incon-
fortable. Si vous éprouvez n’importe quelle sorte de
perte auditive ou de sonnerie dans les oreilles, vous
devriez consulter un audiologiste. IMPORTANT :
Plus le son est fort, plus la période de temps avant que
les dégâts se produisent est courte.
Certains produits Yamaha peuvent avoir des supports et/
ou des accessoires d’installation complémentaires qui
sont fournis comme partie du produit ou en tant qu’ac-
cessoires optionnels. Certains de ces articles sont conçus
pour être montés ou installés par le distributeur. Veuillez
vous assurer que les supports sont stables et que tous les
accessoires optionnels (quand ceci est applicable) sont
bien fixés AVANT l’utilisation. Les supports fournis
par Yamaha sont conçus pour un positionnement seule-
ment. Aucune autre utilisation n’est recommandée.
Ce produit doit être connecté à une prise de sortie secteur
munie d’une connexion protectrice par la mise à la terre.
Ce produit est muni d’un interrupteur d’alimentation
permettant de couper l’alimentation de tout le
système. L’interrupteur d’alimentation est installé sur
le bloc d’alimentation tout près l’entrée du cordon
d’alimentation secteur. Notez que l’interrupteur d’ali-
mentation sur le contrôleur n’arrête tout le système.
Assurez-vous que la prise du cordon d’alimentation
électrique du bloc d’alimentation peut facilement être
débranchée de la prise de sortie secteur comme mesure
de précaution.
Batterie
– Risque d’explosion si la batterie n’est pas remplacée comme
il faut. Remplacez seulement par le même type de batterie.
Prises de sortie pour des haut-parleurs
– Connectez des haut-parleurs de 2A ou moins au total. Ne
connectez aucun autre produit excepté des haut-parleurs.
– Consultez le technicien de service Yamaha quand des
prises sont utilisées en dehors du secteur d’achet.
92-469-DK VEUILLEZ CONSERVER CE MANUEL
1.
2.
3.
4.
5.
6.
7.
8.
9.
10.
11.
12.
13.
14.
15.
16.
17.
18.
19.
20.
21.
22.
23.
24.
2

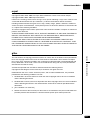
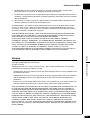
The control unit is classified as a Class 1 laser product. One of the
labels below is located on the inside of the CD drive unit.
L’unité de commande est classée produit laser de Classe 1. Une des
étiquettes ci-dessous ou une étiquette similaire se trouve à l’intérieur
du lecteur de CD.
IMPORTANT NOTICE FOR THE UNITED KINGDOM
Connecting the Plug and Cord
IMPORTANT: The wires in mains lead are coloured in accordance
with the following code:
GREEN-AND-YELLOW : EARTH
BLUE : NEUTRAL
BROWN : LIVE
As the colours of the wires in the mains lead of this apparatus may
not correspond with the coloured markings identifying the
terminals in your plug, proceed as follows:
The wire which is coloured GREEN and YELLOW must be
connected to the terminal in the plug which is marked by the letter
E or by the safety earth symbol or coloured GREEN and
YELLOW.
The wire which is coloured BLUE must be connected to the
terminal which is marked with the letter N or coloured BLACK.
The wire which is coloured BROWN must be connected to the
terminal which is marked with the letter L or coloured RED.
Laser Diode Properties
* Material: GaAIAs
* Wavelength: 783 nm
* Laser Output Power at the lens of the Laser Pickup Unit: max.
130.7 mW
Propriétés de la diode à semi-conducteur
* Matériau : GaAlAs
* Longueur d’ondes : 783 nm
* Puissance de sortie laser à la lentille du capteur laser : 130.7 mW
max.
CAUTION—Use of controls or adjustments or performance of
procedures other than those specified herein may result in
hazardous radiation exposure.
ATTENTION—L’utilisation de commandes ou de réglages, ou
l’exécution de procédures, autres que celles qui sont spécifiées ici
peuvent conduire à une exposition à des rayonnements dangereux.
CLASS 1 LASER PRODUCT
LASER KLASSE 1
1
㉏▔ܝѻક
CAUTION - CLASS 3B VISIBLE AND INVISIBLE LASER RADIATION
WHEN OPEN.
AVOID EXPOSURE TO THE BEAM.
VORSICHT - SICHTBARE UND UNSICHTBARE LASERSTRAHLUNG
KLASSE 3B, WHEN GEÖFFNET.
NICHT DEM STRAHL AUSSETZEN.
⊼ᛣ - ᠧᓔᯊ᳝3B ㉏ৃ㾕ঞϡৃ㾕▔ܝ䕤ᇘ
䙓ܡܝᴳ✻ᇘ

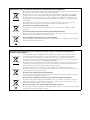
Information for Users on Collection and Disposal of Old Equipment and used Batteries
These symbols on the products, packaging, and/or accompanying documents mean that used electrical and electronic
products and batteries should not be mixed with general household waste.
For proper treatment, recovery and recycling of old products and used batteries, please take them to applicable
collection points, in accordance with your national legislation and the Directives 2002/96/EC and 2006/66/EC.
By disposing of these products and batteries correctly, you will help to save valuable resources and prevent any
potential negative effects on human health and the environment which could otherwise arise from inappropriate
waste handling.
For more information about collection and recycling of old products and batteries, please contact your local
municipality, your waste disposal service or the point of sale where you purchased the items.
[For business users in the European Union]
If you wish to discard electrical and electronic equipment, please contact your dealer or supplier for further
information.
[Information on Disposal in other Countries outside the European Union]
These symbols are only valid in the European Union. If you wish to discard these items, please contact your local
authorities or dealer and ask for the correct method of disposal.
Note for the battery symbol (bottom two symbol examples):
This symbol might be used in combination with a chemical symbol. In this case it complies with the requirement set
by the Directive for the chemical involved.
Information concernant la Collecte et le Traitement des piles usagées et des déchets d’équipements
électriques et électroniques
Les symboles sur les produits, l’emballage et/ou les documents joints signifient que les produits électriques ou
électroniques usagés ainsi que les piles ne doivent pas être mélangés avec les déchets domestiques habituels.
Pour un traitement, une récupération et un recyclage appropriés des déchets d’équipements électriques et
électroniques et des piles usagées, veuillez les déposer aux points de collecte prévus à cet effet, conformément à la
réglementation nationale et aux Directives 2002/96/EC et 2006/66/EC.
En vous débarrassant correctement des déchets d’équipements électriques et électroniques et des piles usagées, vous
contribuerez à la sauvegarde de précieuses ressources et à la prévention de potentiels effets négatifs sur la santé
humaine qui pourraient advenir lors d’un traitement inapproprié des déchets.
Pour plus d’informations à propos de la collecte et du recyclage des déchets d’équipements électriques et
électroniques et des piles usagées, veuillez contacter votre municipalité, votre service de traitement des déchets ou le
point de vente où vous avez acheté les produits.
[Pour les professionnels dans l’Union Européenne]
Si vous souhaitez vous débarrasser des déchets d’équipements électriques et électroniques veuillez contacter votre
vendeur ou fournisseur pour plus d’informations.
[Information sur le traitement dans d’autres pays en dehors de l’Union Européenne]
Ces symboles sont seulement valables dans l’Union Européenne. Si vous souhaitez vous débarrasser de déchets
d’équipements électriques et électroniques ou de piles usagées, veuillez contacter les autorités locales ou votre
fournisseur et demander la méthode de traitement appropriée.
Note pour le symbole « pile » (deux exemples de symbole ci-dessous) :
Ce symbole peut être utilisé en combinaison avec un symbole chimique. Dans ce cas il respecte les exigences établies
par la Directive pour le produit chimique en question.

The above statements apply ONLY to those products distributed by Yamaha Corporation of America or its subsidiaries.
The above statements apply ONLY to those products distributed by Yamaha Corporation of America or its subsidiaries.
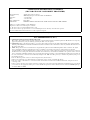
COMPLIANCE INFORMATION STATEMENT
(DECLARATION OF CONFORMITY PROCEDURE)
Responsible Party : Yamaha Corporation of America
Address : 6600 Orangethorpe Avenue, Buena Park, CA 90620 USA
Telephone : 1-714-522-9011
Fax : 1-714-522-9301
Type of Equipment : Player Piano
Model Name : DGB1KE3, DGC1E3, DGC2E3, DC1E3, DC2E3, DU1E3, DYUS1E3, 200E3, 200CSE3
This device complies with Part 15 of the FCC Rules.
Operation is subject to the following two conditions:
1) this device may not cause harmful interference, and
2) this device must accept any interference received including interference that may cause undesired operation.
See user manual instructions if interference to radio reception is suspected.
FCC INFORMATION (U.S.A.)
1. IMPORTANT NOTICE: DO NOT MODIFY THIS UNIT!
This product, when installed as indicated in the instructions contained in this manual, meets FCC requirements. Modifications not expressly
approved by Yamaha may void your authority, granted by the FCC, to use the product.
2. IMPORTANT: When connecting this product to accessories and/or another product use only high quality shielded cables. Cable/s supplied
with this product MUST be used. Follow all installation instructions. Failure to follow instructions could void your FCC authorization to use
this product in the USA.
3. NOTE: This product has been tested and found to comply with the requirements listed in FCC Regulations, Part 15 for Class “B” digital
devices. Compliance with these requirements provides a reasonable level of assurance that your use of this product in a residential
environment will not result in harmful interference with other electronic devices. This equipment generates/uses radio frequencies and, if not
installed and used according to the instructions found in the users manual, may cause interference harmful to the operation of other electronic
devices. Compliance with FCC regulations does not guarantee that interference will not occur in all installations. If this product is found to be
the source of interference, which can be determined by turning the unit “OFF” and “ON”, please try to eliminate the problem by using one of
the following measures:
Relocate either this product or the device that is being affected by the interference.
Utilize power outlets that are on different branch (circuit breaker or fuse) circuits or install AC line filter/s.
In the case of radio or TV interference, relocate/reorient the antenna. If the antenna lead-in is 300 ohm ribbon lead, change the lead-in to
coaxial type cable.
If these corrective measures do not produce satisfactory results, please contact the local retailer authorized to distribute this type of product. If
you can not locate the appropriate retailer, please contact Yamaha Corporation of America, Electronic Service Division, 6600 Orangethorpe
Ave, Buena Park, CA 90620

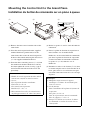
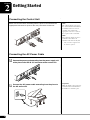
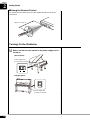
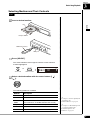
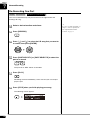
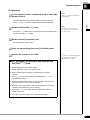
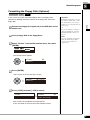
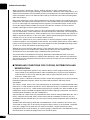
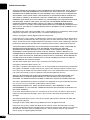
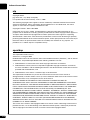
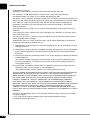
Mounting the Control Unit to the Grand Piano
Installation du boîtier de commande sur un piano à queue
(1) Remove the four screws from the sides of the
control unit.
(2) Place the metal suspension bracket, supplied
with the Disklavier grand model, over the
control unit, then secure the metal suspension
bracket to the control unit using the four screws
(4 10) supplied with the Disklavier.
(3) Insert the three restraining screws (5 12) into
the marked nuts underneath the bass side key
bed, then tighten the screws, leaving a gap of
about 5 mm between head of the screw and
piano body.
(1) Retirer les quatre vis sur les côtés du boîtier de
commande.
(2) Placez la platine de fixation de suspension en
métal, fournie avec le modèle Grand
Disklavier, au-dessus du boîtier de commande,
puis fixez la platine de fixation de suspension
en métal au boîtier de commande en utilisant
les quatre vis (4 10) fournies avec le
Disklavier.
(3) Introduire les trois vis de fixation (5 12) dans
les écrous marqués sous le clavier du côtés de la
basse, puis serrer les vis en laissant un espace
d’environ 5 mm entre la tête de la vis et le corps
du piano.
Leave 5 mm of
the shank
(1) (2) (3)
Notes:
1) Handle the metal suspension bracket and the
control unit carefully to avoid scratches.
2) Screws;
For suspension bracket installation:
Flat head (4
10)
4
For control unit suspension:
Bind head (5
12)
3
3) When mounted correctly, the control unit is
angled approximately 18° above horizontal.
Remarques:
1) Manipuler soigneusement le support
métallique et le boîtier de commande pour
éviter les rayures.
2) Vis de fixation;
Pour l'installation de la platine de fixation de
suspension:
Tête plate (4
10)
4
Pour la suspension du unité de commande:
Tête de grippage (5
12)
3
3) Lorsqu’il est monté correctement, le boîtier
de commande est incliné d’environ 18° sur
l’horizontale.

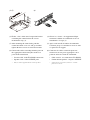
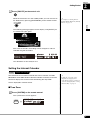
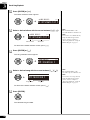
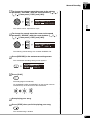
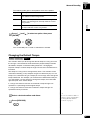
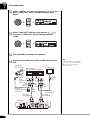
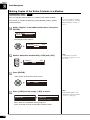
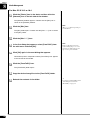
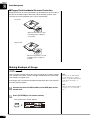
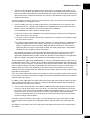
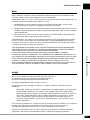
(4) Fit the “slots” of the metal suspension bracket
containing the control unit to the screws
mentioned in step (3).
(5) After mounting the control unit, push the
control unit back as far as it will go and then
tighten the three screws to secure the bracket.
(6) Connect the cables extending from the piano to
the appropriate connectors/jacks on the rear
panel of the control unit.
• Coaxial cable: to the TO PIANO connectors
• Speaker cord*: to the OUTPUT jacks
* Only for models supplied with the monitor speakers.
(4) Glisser les « fentes » du support métallique
contenant le boîtier de commande sur les vis
mentionnées à l’étape (3).
(5) Après avoir installé le boîtier de commande,
l’enfoncer jusqu’à l’extrémité et serrer les trois
vis pour fixer le support.
(6) Connectez les câbles sortant du piano aux
connecteurs ou aux prises appropriées sur le
panneau arrière de l’unité de commande.
• Câble coaxial : aux connecteurs TO PIANO
• Cordon de haut-parleur*: aux prises OUTPUT
* Seulement pour les modèles fournis avec les haut-
parleurs de contrôle.
(4) (5) (6)

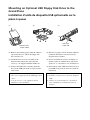
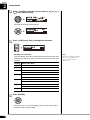
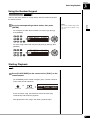
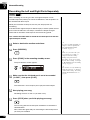
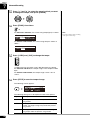
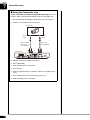
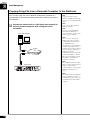
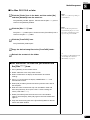
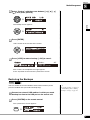
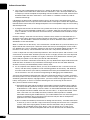
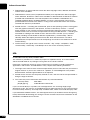
Mounting an Optional USB Floppy Disk Drive to the
Grand Piano
Installation d’unité de disquette USB optionnelle sur le
piano à queue
(1) Remove the backing papers from the adhesive
tape inside the case, and fit the floppy disk
drive into the case.
(2) Attach the drive and case assembly to the
bottom of the control unit, using the four
screws (3 6) supplied with the Disklavier.
(3) Connect the USB cable extending from the
drive to the USB port on the rear panel of the
control unit.
(1) Enlevez les papiers arrière du ruban adhésif à
l’intérieur du boîtier et insérez l’unité de
disquette dans le boîtier.
(2) Fixez l’ensemble de lecteur et de boîtier au
fond de l’unité de commande en utilisant les
quatre vis (3 6) fournies avec le Disklavier.
(3) Raccordez le câble USB sortant du lecteur au
port USB sur le panneau arrière de l’unité de
commande.
USB cable
Câble USB
Adhesive tape
Ruban adhésif
(1) (2) (3)
Notes:
1) The case is supplied with the USB floppy disk
drive.
2) Use the screws (3
6) supplied with the
Disklavier when attaching.
Remarques:
1) Le boîtier est fourni avec l’unité de disquette
USB.
2) Utilisez les vis de fixation (3
6) fournies
avec le Disklavier au moment de faire la
fixation.

English
Operation manual

English
i
Thank you for purchasing the Yamaha Disklavier piano!
The Disklavier is a fascinating instrument that integrates a classic Yamaha acoustic piano with innovative
electronics to suit your entertainment, educational, and creative needs, while retaining the tone, touch and
long-term value that have long made Yamaha pianos the world’s finest.
Before using your Disklavier piano, please read this manual thoroughly and retain it for future reference.
■ Notes on Source Code Distribution
For three years after the factory shipment, you may request from Yamaha the source code for any portions
of the product which are licensed under the GNU General Public License by writing to the following address:
10-1 Nakazawa-cho, Naka-ku, Hamamatsu, Shizuoka, 430-8650, JAPAN
Piano Development Department, Yamaha Corporation
The source code will be provided at no charge; however, we may require you to reimburse Yamaha for the
cost of delivering the source code to you.
The source code download is also available on the following website:
http://download.yamaha.com/sourcecodes/disklavier_e3/
• Note that we shall bear no responsibility whatsoever for any damage arising from changes (additions/
deletions) made to the software for this product by a third party other than Yamaha (or party authorized by
Yamaha).
• Note that re-use of source code released to the public domain by Yamaha is unguaranteed, and Yamaha
shall not bear any responsibility whatsoever for the source code.
■ Trademarks & Copyrights
• The contents of this operation manual and the copyrights thereof are under exclusive ownership by
Yamaha Corporation.
• Yamaha, Disklavier, DisklavierRadio, Silent, PianoSoft, PianoSoft·Plus, and PianoSoft·PlusAudio are
trademarks of Yamaha Corporation.
• SmartKey, CueTIME, and You Are The Artist are trademarks of Yamaha Corporation or Yamaha
Corporation of America.
• Disklavier E3 software, Copyright © 2008 Yamaha Corporation.
• This contains programs licensed under the GNU General Public License, GNU Lesser General Public
License, the BSD Copyright, the Artistic License, and the others.
• This product includes software developed by the OpenSSL Project for use in the OpenSSL Toolkit.
(http://www.openssl.org/)
• Windows is a registered trademark of Microsoft Corporation in the United States and other countries.
• Macintosh and Mac OS are trademarks of Apple Inc., registered in the U.S. and other countries.
• The company names and product names in this operation manual are the trademarks or registered
trademarks of their respective companies.
Welcome to the Yamaha Disklavier
TM
!

ii
Read the following before operating the Disklavier.
■ Warnings
• Do not locate the Disklavier in a place subject to
excessive heat, low temperatures, or direct
sunlight. This could be a fire hazard and may
damage the finish and internal parts.
• Excessive humidity or dust can lead to fire or
electric shock.
• Connect the plug on the Disklavier power cable
to a compatible AC outlet. Failure to do so will
present a fire and electric shock hazard. If the
power cable plug is not compatible with your AC
outlet, consult your dealer.
• Do not plug several devices into the same AC
outlet. This can overload the AC outlet, and lead
to fire and electric shock hazard. It may also
affect the performance of some devices.
• Do not place heavy objects on the power cable.
A damaged power cable is a potential fire and
electric shock hazard. If the power cable runs
under a carpet, make sure heavy objects,
including the Disklavier, are not placed on top of
the cable.
• If the power cable is damaged (i.e. cut or a bare
wire is exposed), ask your dealer for a
replacement. Using the Disklavier in this
condition is a fire and shock hazard.
• When disconnecting the power cable from an
AC outlet, always pull from the plug. Never pull
the cable. Damaging the cable in this way is a
potential fire and electric shock hazard.
• The cover of the unit should be removed only by
qualified service technicians.
• Do not place liquid containers such as vases,
potted plants, glasses, cosmetic bottles,
medicines, etc., on top of the Disklavier.
• Do not try to modify the Disklavier, as this could
lead to fire or electric shock hazard.
• When moving the Disklavier to another location,
turn off the power, remove the power plug from
the AC outlet, and remove all cables connected
to external devices.
■ Cautions
• Turn off all audio devices when connecting to
the Disklavier. Refer to the user’s guide for each
device. Use the correct cables and connect as
specified.
• Set the volume level on all the devices to
minimum before applying power.
• Do not play the Disklavier at a high volume for
extended periods; you may damage your
hearing. This is especially important when using
headphones. If you think your hearing ability is
impaired, consult your doctor.
• If the Disklavier is worked extremely hard —that
is, prolonged playback of very “busy” songs —
the Disklavier’s thermal relay may trip. The
thermal relay will automatically reset when the
Disklavier has cooled down.
• If you notice any abnormality — such as smoke,
odor, or noise — turn off the Disklavier
immediately, and remove the power plug from
the AC outlet. Consult your dealer for repair.
• If a foreign object or water gets inside the
Disklavier turn it off immediately, and remove
the power plug from the AC outlet. Consult your
dealer.
• If you plan not to use the Disklavier for a long
period of time (such as when you are on
vacation), disconnect the electrical mains.
• Always remove the power plug from the AC
outlet before cleaning the Disklavier. Leaving the
power plug connected presents a risk of electric
shock.
• Do not use benzene, thinner, cleaning
detergent, or a chemical cloth to clean the
Disklavier.
• Do not place metal objects with rubber feet on
top of the Disklavier. The color and finish of the
Disklavier can be damaged.
• Do not place heavy objects on the Disklavier.
Doing so can damage the Disklavier.
• Use a soft, dry cloth to clean the Disklavier.
However, if you discover a stain, carefully use a
soft damp cloth to remove it.
Important Precautions

English
iii
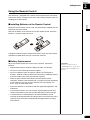
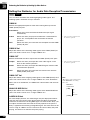
■ Interference
• The Disklavier uses high-frequency digital
circuits that may cause interference to radios
and TVs placed close to it. If interference does
occur, relocate the affected equipment.
■ Handling Batteries
The remote control of this unit is powered by dry
batteries. Improper use or misuse of the dry
batteries can cause the dry batteries to heat up,
leak electrolyte or burst which in turn may result in
a fire, damage to equipment and/or nearby objects
or in burns, injury or other bodily harm. Read
through and familiarize yourself with the following
safety precautions prior to use to ensure correct
usage.
• Do not directly touch the chemicals (electrolyte)
which have leaked from dry batteries.
1. If electrolyte from dry batteries has made
contact with your eyes, rinse your eyes
thoroughly with clean water and seek medical
treatment from a physician immediately.
2. If electrolyte from dry batteries has touched
your skin or clothing, rinse it off immediately
with clean water.
3. If electrolyte from dry batteries has found its
way inside your mouth, gargle immediately
and consult a physician.
• Do not install the dry batteries with the “+” and
“–” poles reversed. Misaligning the poles of dry
batteries can lead the dry batteries to be
charged or shorted or it can cause them to heat
up, leak electrolyte or burst which in turn may
result in a fire, damage to nearby objects or in
burns, injury or other bodily harm.
• Use only the designated batteries. Do not use
used batteries with unused batteries or different
types of batteries together. This can cause them
to heat up, leak electrolyte or burst which in turn
may result in a fire or in burns, injury or other
bodily harm. Replace all the dry batteries at the
same time. Do not use new and old dry batteries
together. Do not use different types of batteries
(alkaline and manganese batteries, batteries
made by different manufacturers or different
battery products made by the same
manufacturer) together: this can cause them to
heat up, ignite or leak electrolyte.
• When the battery-powered unit is not going to be
used for a prolonged period of time, remove the
dry batteries from the unit. Otherwise the
batteries will run down and their electrolyte may
leak, resulting in damage to the unit.
• Remove spent batteries immediately from
equipment. Otherwise, batteries will
overdischarge, causing them to heat up, leak
electrolyte or burst which in turn may result in
damage to nearby objects or in burns, injury or
other bodily harm.
• Dispose of batteries in accordance with the
applicable regulations and ordinances.
• The batteries shall not be exposed to excessive
heat such as sunshine, fire or the like.
Please keep this manual for future reference.

iv
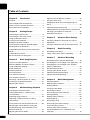
Table of Contents
Chapter 1 Introduction
Features.................................................................1
Items Supplied with the Disklavier .........................1
Names of Parts and Their Functions .....................2
Basic Disklavier Terminology.................................7
Chapter 2 Getting Started
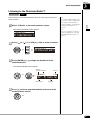
Connecting the Control Unit...................................8
Connecting the AC Power Cable ...........................8
Using the Remote Control......................................9
Turning On the Disklavier ....................................10
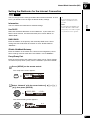
Setting the Internal Calendar ...............................11
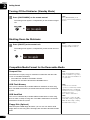
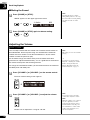
Turning Off the Disklavier (Standby Mode)..........14
Shutting Down the Disklavier ...............................14
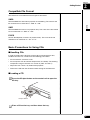
Compatible Media Format for the Removable
Media ...................................................................14
Compatible File Format........................................15
Basic Precautions for Using CDs.........................15
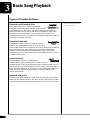
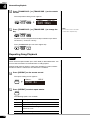
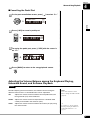
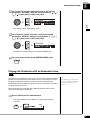
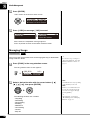
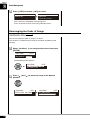
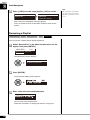
Chapter 3 Basic Song Playback
Types of Playable Software .................................16
Selecting Medium and Their Contents.................17
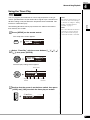
Using the Number Keypad...................................19
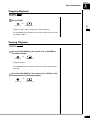
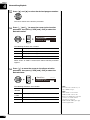
Starting Playback .................................................19
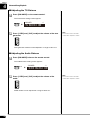
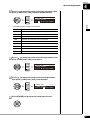
Stopping Playback ...............................................21
Pausing Playback ................................................21
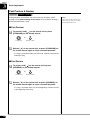
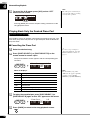
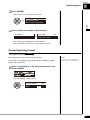
Fast Preview & Review ........................................22
Fast Forward & Reverse ......................................23
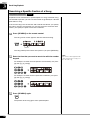
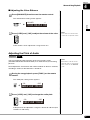
Searching a Specific Section of a Song...............24
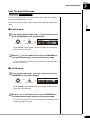
Listening to the DisklavierRadio™ .......................25
Adjusting the Volume ...........................................26
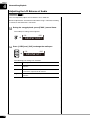
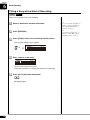
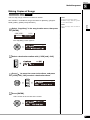
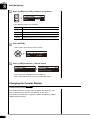
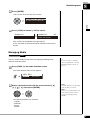
Chapter 4 Advanced Song Playback
Changing the Playback Tempo............................27
Playing Back Songs in a Different Key
(Transposition) .....................................................27
Repeating Song Playback....................................28
Repeating a Specific Section of a Song
(A-B Repeat) ........................................................29
Playing Back Only the Desired Piano Part...........30
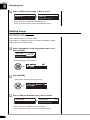
Adjusting the Volume Balance among the
Keyboard Playing, Ensemble Sound, and
Software Playback ...............................................31
Adjusting the Pitch of Audio .................................33
Adjusting the L/R Balance of Audio..................... 34
Using the Timer Play........................................... 35
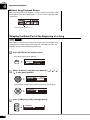
Skipping the Blank Part at the Beginning of a
Song.................................................................... 38
Video Synchronized Playback............................. 39
Adding Disklavier Accompaniment to Commercial
CD Songs (PianoSmart™ Playback)................... 40
SmartKey™ Playback ......................................... 40
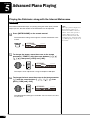
Chapter 5 Advanced Piano Playing
Playing the Disklavier along with the Internal
Metronome .......................................................... 42
Playing the Disklavier with an Ensemble Voice... 43
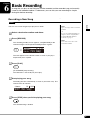
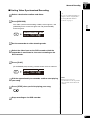
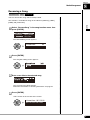
Chapter 6 Basic Recording
Recording a New Song ....................................... 45
Titling a Song at the Start of Recording .............. 46
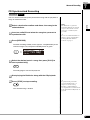
Chapter 7 Advanced Recording
Recording with the Internal Metronome .............. 48
Recording the Left and Right Parts Separately... 50
Recording the Left and Right Parts Together
(Setting a Split Point) .......................................... 52
Re-Recording One Part....................................... 54
Changing the Default Tempo .............................. 55
Video Synchronized Recording........................... 57
CD Synchronized Recording............................... 61
Chapter 8 Media Management
Managing Albums ............................................... 62
Making Copies of Albums ................................... 62
Deleting Albums .................................................. 64
Creating a New Album ........................................ 65
Renaming an Album............................................ 66
Rearranging the Order of Albums ....................... 67
Managing Songs ................................................. 68
Making Copies of Songs ..................................... 69
Deleting Songs.................................................... 70
Renaming a Song ............................................... 71
Rearranging the Order of Songs ......................... 72
Converting Song Format ..................................... 73
Changing the Counter Display ............................ 74
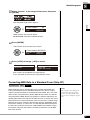
Converting MIDI Data to a Standard Form
(Strip XP)............................................................. 75

English
v
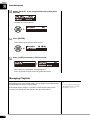
Managing Playlists ...............................................76
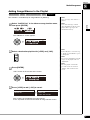
Adding Songs/Albums to the Playlist ...................77
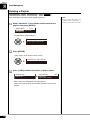
Deleting a Playlist.................................................78
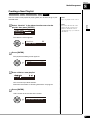
Creating a New Playlist........................................79
Renaming a Playlist .............................................80
Managing Media...................................................81
Making Copies of the Entire Contents in a
Medium ................................................................82
Deleting the Entire Contents in a Medium............83
Copying Song File from a Personal Computer to
the Disklavier........................................................84
Refreshing the Contents in [FromToPC]..............88
Formatting the Floppy Disk (Optional) .................89
Making Backups of Songs....................................90
Restoring the Backups.........................................91
Chapter 9 Internet Direct Connection
(IDC)
What is Internet Direct Connection (IDC)?...........93
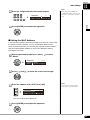
Obtaining an ID and Password for the IDC Service
(IDC Registration) ................................................93
Connecting the Disklavier to the Internet .............93
Accessing the Internet..........................................95
Checking Your Account Information.....................96
Updating the Disklavier Using the Internet...........97
Setting the Disklavier for the Internet
Connection...........................................................99
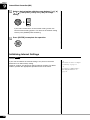
Initializing Internet Settings ................................100
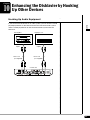
Chapter 10 Enhancing the Disklavier by
Hooking Up Other Devices
Hooking Up Audio Equipment............................101
Setting the Disklavier for Audio Data
Reception/Transmission.....................................102
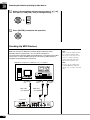
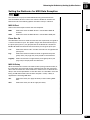
Hooking Up MIDI Devices..................................104
Setting the Disklavier for MIDI Data
Reception...........................................................105
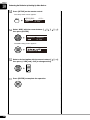
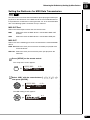
Setting the Disklavier for MIDI Data
Transmission......................................................107
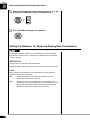
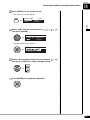
Setting the Disklavier for Keyboard Playing
Data Transmission .............................................108
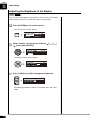
Chapter 11 Other Settings
Tuning the Tone Generator
(TG Master Tune).............................................. 110
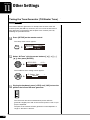
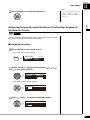
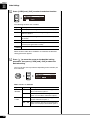
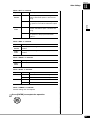
Assigning Frequently-used Functions to the
Number Keypad on the Remote Control ........... 111
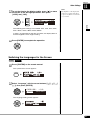
Setting the Passcode to Prevent Unauthorized
Access............................................................... 114
Adjusting the Brightness of the Display............. 116
Switching the Languages for the Screen........... 117
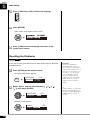
Resetting the Disklavier..................................... 118
Diagnosing the Disklavier
(Maintenance Mode) ......................................... 120
Updating the Disklavier ..................................... 121
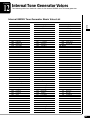
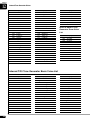
Chapter 12 Internal Tone Generator
Voices
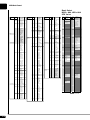
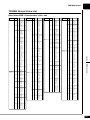
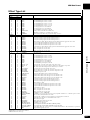
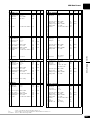
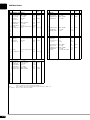
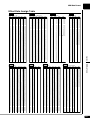
Internal GM/XG Tone Generator Basic Voice
List..................................................................... 123
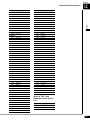
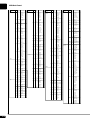
Internal TG3 Tone Generator Basic Voice
List..................................................................... 126
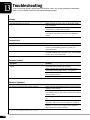
Chapter 13 Troubleshooting .................. 128
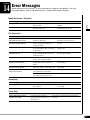
Chapter 14 Error Messages ................... 131
Chapter 15 Glossary................................. 132
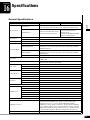
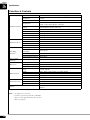
Chapter 16 Specifications
General Specifications ...................................... 135
Function & Controls........................................... 136
Appendix Software License Notice....A-1
MIDI Data Format..............A-21
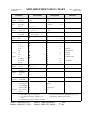
MIDI IMPLEMENTATION CHART

1
English
1
Chapter
Introduction
The Disklavier E3 offers the valuable features that open up your musical possibility to explore. Here are brief
explanations of such features:
Advanced Features for Your Listening Pleasure
• Special music CDs, contain over 17 hours of fantastic music, let you start listening on the day the
Disklavier E3 arrives at your home.
• DisklavierRadio; you can listen to over 11 music channel by streaming broadcasts over the Internet.
Convenient Recording Features to Preserve Your Musical Memories
• Total 128 megabytes of internal memory comes with the Disklavier E3 to preserve your valuable data.
• Connecting external USB devices to the Disklavier E3 allows you to record your performance directly onto
them, or even make backups of your valuable data in the internal memory.
• Video synchronization features offer great listening experience with sights. You can see as well as hear
performances with perfectly synchronized audio and video.
• Your valuable music data on the floppy disk can be played back with the optional floppy disk drive (UD-
FD01).
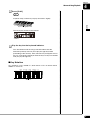
Simple and Easy-to-use Features Enhancing Your Performance
• The remote control, with clear and logical layout of buttons, lets you quickly enjoy the features of the
Disklavier E3.
• The display on the front panel employs an organic electro-luminescent display which makes it brighter
and more easily readable than ever.
Check that the following items are supplied with your Disklavier:
• 1 Control unit
• 1 Control unit suspension bracket*
1
• 4 Screws for control unit suspension bracket
installation (4 10)*
1
• 3 Screws for control unit suspension (5 12)*
1
• 4 Screws for optional USB floppy disk drive
installation (3 6)*
1
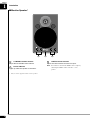
• 2 Monitor speakers*
2
• 1 Monitor speaker installation kit*
2
• 2 Speaker cords*
2
• 1 Remote control
• 2 Batteries for remote control
• 2 Sample PianoSoft CD software
• 1 Quick reference
• 1 Operation manual
• 1 PianoSoft CD song list
• 1 Music book “50 greats for the Piano”
*
1
Only for grand pianos
*
2
Only for models supplied with the monitor speakers
Features
Items Supplied with the Disklavier

Introduction
1
Chapter
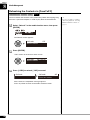
2
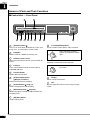
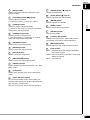
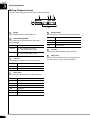
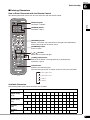
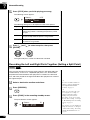
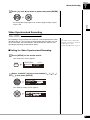
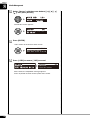
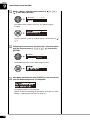
[ON/OFF] button
Turns on or shuts down the Disklavier. Press once
to turn it on, and once again to shut it down.
USB port
Used to connect a USB flash memory, etc.
Remote control sensor
When using the remote control, point it toward this
sensor.
CD drive
Insert a PianoSoft·PlusAudio or other audio or
audio/MIDI CD here.
CD eject button
Used to open the CD drive.
[PLAY/PAUSE] button
(
pages 19 and 21)
Used to start and pause playback.
[STOP] button (
page 21)
Used to stop playback and recording.
[RECORD] button (
page 45)
Used to engage the record standby mode before
recording starts.
[SELECT] button
Used to select media.
Cursor/[ENTER] buttons
Cursor: Used to select options and parameters.
[ENTER]: Used to execute the selection.
Display
Shows various information.
Dial
Used to adjust the volume, and to set parameter
values.
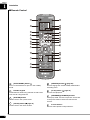
Names of Parts and Their Functions
■ Control Unit — Front Panel
12 63
45
78 910 11 12
1
2
3
4
5
6
7
8
9
10
Press this button inclining
slightly upward/downward/left/
right.
Press straight the center of
this button.
11
12

Introduction
English
1
Chapter
3
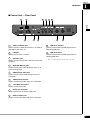
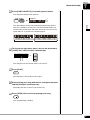
USB TO DEVICE port
Used to connect a USB flash memory, an optional
USB floppy disk drive, etc.
LAN port
Used to connect to the Internet.
OUTPUT jacks
Used to connect the speaker cord from the monitor
speakers*
ANALOG MIDI IN jacks
Used to connect the audio equipment such as an
external CD changer.
OMNI (SYNC) OUT jacks
Used to connect the microphone/line input of a
camcorder.
OMNI (SYNC) IN jacks
Used to connect the audio output of a camcorder.
TO PIANO connectors
Used to connect the piano.
DC-IN 12V connector
Used to connect to the power supply unit.
USB TO HOST port
Used to connect the USB cable from a computer.
MIDI OUT terminal
Used to connect external MIDI equipment for
outputting MIDI data.
MIDI IN terminal
Used to connect external MIDI equipment for
inputting MIDI data.
* Only for models supplied with the monitor speakers.
■ Control Unit — Rear Panel
789 1011
12 4356
1
2
3
4
5
6
7
8
9
10
11
Strona się ładuje...
Strona się ładuje...
Strona się ładuje...
Strona się ładuje...
Strona się ładuje...
Strona się ładuje...
Strona się ładuje...
Strona się ładuje...
Strona się ładuje...
Strona się ładuje...
Strona się ładuje...
Strona się ładuje...
Strona się ładuje...
Strona się ładuje...
Strona się ładuje...
Strona się ładuje...
Strona się ładuje...
Strona się ładuje...
Strona się ładuje...
Strona się ładuje...
Strona się ładuje...
Strona się ładuje...
Strona się ładuje...
Strona się ładuje...
Strona się ładuje...
Strona się ładuje...
Strona się ładuje...
Strona się ładuje...
Strona się ładuje...
Strona się ładuje...
Strona się ładuje...
Strona się ładuje...
Strona się ładuje...
Strona się ładuje...
Strona się ładuje...
Strona się ładuje...
Strona się ładuje...
Strona się ładuje...
Strona się ładuje...
Strona się ładuje...
Strona się ładuje...
Strona się ładuje...
Strona się ładuje...
Strona się ładuje...
Strona się ładuje...
Strona się ładuje...
Strona się ładuje...
Strona się ładuje...
Strona się ładuje...
Strona się ładuje...
Strona się ładuje...
Strona się ładuje...
Strona się ładuje...
Strona się ładuje...
Strona się ładuje...
Strona się ładuje...
Strona się ładuje...
Strona się ładuje...
Strona się ładuje...
Strona się ładuje...
Strona się ładuje...
Strona się ładuje...
Strona się ładuje...
Strona się ładuje...
Strona się ładuje...
Strona się ładuje...
Strona się ładuje...
Strona się ładuje...
Strona się ładuje...
Strona się ładuje...
Strona się ładuje...
Strona się ładuje...
Strona się ładuje...
Strona się ładuje...
Strona się ładuje...
Strona się ładuje...
Strona się ładuje...
Strona się ładuje...
Strona się ładuje...
Strona się ładuje...
Strona się ładuje...
Strona się ładuje...
Strona się ładuje...
Strona się ładuje...
Strona się ładuje...
Strona się ładuje...
Strona się ładuje...
Strona się ładuje...
Strona się ładuje...
Strona się ładuje...
Strona się ładuje...
Strona się ładuje...
Strona się ładuje...
Strona się ładuje...
Strona się ładuje...
Strona się ładuje...
Strona się ładuje...
Strona się ładuje...
Strona się ładuje...
Strona się ładuje...
Strona się ładuje...
Strona się ładuje...
Strona się ładuje...
Strona się ładuje...
Strona się ładuje...
Strona się ładuje...
Strona się ładuje...
Strona się ładuje...
Strona się ładuje...
Strona się ładuje...
Strona się ładuje...
Strona się ładuje...
Strona się ładuje...
Strona się ładuje...
Strona się ładuje...
Strona się ładuje...
Strona się ładuje...
Strona się ładuje...
Strona się ładuje...
Strona się ładuje...
Strona się ładuje...
Strona się ładuje...
Strona się ładuje...
Strona się ładuje...
Strona się ładuje...
Strona się ładuje...
Strona się ładuje...
Strona się ładuje...
Strona się ładuje...
Strona się ładuje...
Strona się ładuje...
Strona się ładuje...
Strona się ładuje...
Strona się ładuje...
Strona się ładuje...
Strona się ładuje...
Strona się ładuje...
Strona się ładuje...
Strona się ładuje...
Strona się ładuje...
Strona się ładuje...
Strona się ładuje...
Strona się ładuje...
Strona się ładuje...
Strona się ładuje...
Strona się ładuje...
Strona się ładuje...
Strona się ładuje...
Strona się ładuje...
Strona się ładuje...
Strona się ładuje...
Strona się ładuje...
Strona się ładuje...
Strona się ładuje...
Strona się ładuje...
Strona się ładuje...
Strona się ładuje...
Strona się ładuje...
Strona się ładuje...
Strona się ładuje...
Strona się ładuje...
Strona się ładuje...
Strona się ładuje...
Strona się ładuje...
Strona się ładuje...
Strona się ładuje...
Strona się ładuje...
Strona się ładuje...
Strona się ładuje...
Strona się ładuje...
Strona się ładuje...
Strona się ładuje...
Strona się ładuje...
Strona się ładuje...
Strona się ładuje...
Strona się ładuje...
Strona się ładuje...
-
 1
1
-
 2
2
-
 3
3
-
 4
4
-
 5
5
-
 6
6
-
 7
7
-
 8
8
-
 9
9
-
 10
10
-
 11
11
-
 12
12
-
 13
13
-
 14
14
-
 15
15
-
 16
16
-
 17
17
-
 18
18
-
 19
19
-
 20
20
-
 21
21
-
 22
22
-
 23
23
-
 24
24
-
 25
25
-
 26
26
-
 27
27
-
 28
28
-
 29
29
-
 30
30
-
 31
31
-
 32
32
-
 33
33
-
 34
34
-
 35
35
-
 36
36
-
 37
37
-
 38
38
-
 39
39
-
 40
40
-
 41
41
-
 42
42
-
 43
43
-
 44
44
-
 45
45
-
 46
46
-
 47
47
-
 48
48
-
 49
49
-
 50
50
-
 51
51
-
 52
52
-
 53
53
-
 54
54
-
 55
55
-
 56
56
-
 57
57
-
 58
58
-
 59
59
-
 60
60
-
 61
61
-
 62
62
-
 63
63
-
 64
64
-
 65
65
-
 66
66
-
 67
67
-
 68
68
-
 69
69
-
 70
70
-
 71
71
-
 72
72
-
 73
73
-
 74
74
-
 75
75
-
 76
76
-
 77
77
-
 78
78
-
 79
79
-
 80
80
-
 81
81
-
 82
82
-
 83
83
-
 84
84
-
 85
85
-
 86
86
-
 87
87
-
 88
88
-
 89
89
-
 90
90
-
 91
91
-
 92
92
-
 93
93
-
 94
94
-
 95
95
-
 96
96
-
 97
97
-
 98
98
-
 99
99
-
 100
100
-
 101
101
-
 102
102
-
 103
103
-
 104
104
-
 105
105
-
 106
106
-
 107
107
-
 108
108
-
 109
109
-
 110
110
-
 111
111
-
 112
112
-
 113
113
-
 114
114
-
 115
115
-
 116
116
-
 117
117
-
 118
118
-
 119
119
-
 120
120
-
 121
121
-
 122
122
-
 123
123
-
 124
124
-
 125
125
-
 126
126
-
 127
127
-
 128
128
-
 129
129
-
 130
130
-
 131
131
-
 132
132
-
 133
133
-
 134
134
-
 135
135
-
 136
136
-
 137
137
-
 138
138
-
 139
139
-
 140
140
-
 141
141
-
 142
142
-
 143
143
-
 144
144
-
 145
145
-
 146
146
-
 147
147
-
 148
148
-
 149
149
-
 150
150
-
 151
151
-
 152
152
-
 153
153
-
 154
154
-
 155
155
-
 156
156
-
 157
157
-
 158
158
-
 159
159
-
 160
160
-
 161
161
-
 162
162
-
 163
163
-
 164
164
-
 165
165
-
 166
166
-
 167
167
-
 168
168
-
 169
169
-
 170
170
-
 171
171
-
 172
172
-
 173
173
-
 174
174
-
 175
175
-
 176
176
-
 177
177
-
 178
178
-
 179
179
-
 180
180
-
 181
181
-
 182
182
-
 183
183
-
 184
184
-
 185
185
-
 186
186
-
 187
187
-
 188
188
-
 189
189
-
 190
190
-
 191
191
-
 192
192
-
 193
193
-
 194
194
-
 195
195
-
 196
196
-
 197
197


Yamaha DGB1KE3 PE Instrukcja obsługi
- Kategoria
- Instrumenty muzyczne
- Typ
- Instrukcja obsługi
- Niniejsza instrukcja jest również odpowiednia dla
w innych językach
- čeština: Yamaha DGB1KE3 PE Návod k obsluze
- español: Yamaha DGB1KE3 PE El manual del propietario
- italiano: Yamaha DGB1KE3 PE Manuale del proprietario
- Deutsch: Yamaha DGB1KE3 PE Bedienungsanleitung
- svenska: Yamaha DGB1KE3 PE Bruksanvisning
- português: Yamaha DGB1KE3 PE Manual do proprietário
- français: Yamaha DGB1KE3 PE Le manuel du propriétaire
- Türkçe: Yamaha DGB1KE3 PE El kitabı
- English: Yamaha DGB1KE3 PE Owner's manual
- dansk: Yamaha DGB1KE3 PE Brugervejledning
- русский: Yamaha DGB1KE3 PE Инструкция по применению
- Nederlands: Yamaha DGB1KE3 PE de handleiding
- română: Yamaha DGB1KE3 PE Manualul proprietarului
Powiązane artykuły
-
Yamaha DKC-850 Instrukcja obsługi
-
-
-
-
Yamaha PDX-B11 Instrukcja obsługi
-
-
Yamaha E3 Instrukcja obsługi
-
-
Yamaha DSR115 Instrukcja obsługi
-
Inne dokumenty
-
Sony NAS-CZ1 Instrukcja obsługi
-
Mitsubishi DX-NV100E Instrukcja obsługi
-
ZENEC ZE-NC3810 Instrukcja obsługi
-
Sony CPF-IX001 Instrukcja obsługi
-
3M Single Touch Displays instrukcja
-
Ditek DTK-110C6APOE Series Instrukcja instalacji
-
Geemarc AMPLICALL 6 instrukcja
-
 Spectra AI155 Instrukcja obsługi
-
Rain Bird TBOS-BT Battery-Operated Bluetooth Controllers Instrukcja obsługi
-
 Semtech SX1276DVK1xAS Development Kit instrukcja

