Avent SCF302/01 Instrukcja obsługi
- Kategoria
- Akcesoria do miksera / robota kuchennego
- Typ
- Instrukcja obsługi

d
e
f
g
h
k
l
n
o
j
a
m
b
p
q
A
1
A1 A2
A3
B
C
2
4
1
1
3
2
c
i
Single Electronic Breast Pump
Laktator elektroniczny
Электронный молокоотсос
Elektronička pumpa
GB
PL
RU
HR
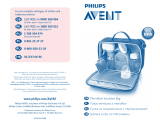
For our complete catalogue of mother and
babycare products
Call FREE on 0800 289 064
GB ONLY (9am–4.30pm Mon-Fri)
Call FREE on 1800 509 021
IRL ONLY (9am–4.30pm Mon-Fri)
1 300 364 474
(Australia National)
0800 104 401
0 801 35 37 37
Teл.
8-800-200-0883
01/333 66 96
HR
PL
RU
GB
AU
IRL
NZ
42133 5413 150
www.philips.com/AVENT
Philips AVENT, a business of Philips Electronics UK Ltd.
Philips Centre, Guildford Business Park, Guildford, Surrey, GU2 8XH
Trademarks owned by the Philips Group.
© Koninklijke Philips Electronics N.V. All Rights Reserved.
BPA is Bisphenol-A. This product uses Polyethersulfone (PES), which is BPA-
Free and has a natural honey-coloured tint.
BPA oznacza Bisfenol A. W tym produkcie zastosowano polieterosulfon
(PES), który nie zawiera BPA i posiada naturalne żółtawe zabarwienie.
BPA - это бисфенол А. При создании данного продукта использован
полиэфирсульфон (ПЭС), не содержащий BPA и имеющий натуральный
оттенок меда.
BPA je Bisphenol-A. Ovaj proizvod je nacinjen od Polyethersulfone ((PES) koji
ne sadrzi BPA te ima boju prirodnog meda.
%3$
% 3$
10740-SElec_GBPLRUHR_cov.indd 1 11/08/2009 11:51

3 4 5
1 2
e
d
c
65
g
D
a
4
f
3
b
7
E
3
2
4
1
j
i
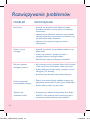
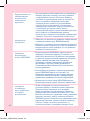
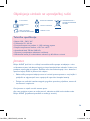
• Izbjegavajte dodir s antibakterijskim ili abrazivnim
deterdžentima/sredstvima za čišćenje jer mogu
oštetiti plastiku. Kombinacija deterdženata, sredstava
za čišćenje, otopine za sterilizaciju, meke vode
i promjene temperature može pod određenim
okolnostima izazvati pucanje plastike. Ako se to
dogodi, nemojte koristiti pumpu. Kućište pumpe i
spremnici za mlijeko mogu se prati u stroju za pranje
posuđa, no boja hrane može obojati dijelove. Slijedite
upute u odjeljku “Čišćenje i sterilizacija elektroničke
pumpe za izdajanje”.
Pucanje ili promjena
boje dijelova pumpe/
bočice
• Provjerite je li pumpa pravilno sastavljena i uključena,
a indikator napajanja svijetli ZELENO.
• Provjerite jesu li kabeli između zidne utičnice ili
kompleta baterija pravilno priključeni.
Pumpa ne reagira
• Indikator pumpe treperi CRVENO uz privremeno
zaustavljanje (3 bljeska, zaustavljanje, 3 bljeska itd.):
Ako pumpa pravilno radi u načinu rada za ručno
upravljanje, ali nema ponavljanja u automatskom
načinu rada, ritam ručice možda je previše brz za
optimalno izdajanje mlijeka. Aparat nije postavljen na
praćenje. Pritisnite upravljački gumb radi povratka
na način rada za ručno upravljanje i usporite ritam
upravljačke ručice.
• Ako to ne pomogne i indikator nastavi treperiti
CRVENO, došlo je do pogreške vezane uz vakuum.
Isključite napajanje te provjerite ometa li nešto
upravljačku ručicu i dijafragmu te jesu li oštećene.
• Indikator pumpe stalno treperi CRVENO: upozorenje
da je baterija pri kraju. Zamijenite baterije.
Indikator pumpe
treperi CRVENO
• Pumpa se mora isključiti upravljačkim gumbom
kako bi se dijelovi mogli odvojiti. Ako se baterije
potpuno isprazne tijekom pumpanja, moglo bi doći
do poteškoća. Zamijenite baterije ili priključite
pumpu na strujno napajanje. Uključite pumpu držeći
upravljački gumb pritisnutim 2 sekunde – indikator
će početi svijetliti ZELENO. Zatim je isključite
držeći gumb pritisnutim 2 sekunde – indikator će
se isključiti. Sada možete isključiti napajanje pumpe i
moći ćete odvojiti dijelove.
Poteškoće prilikom
odvajanja upravljačke
ručice od kućišta
pumpe
58
10740-SElec_GBPLRUHR_cov.indd 2 11/08/2009 11:53

F
G
6
p
q
7
1
2
6
10740-SElec_GBPLRUHR_txt.indd 6 11/08/2009 12:11

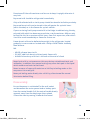
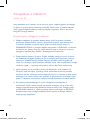
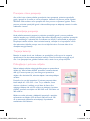
We’ve taken everything women loved about our classic Manual Breast
Pump – the soft petal massager and fingertip sensitive control that
make it feel so gentle, natural and comfortable – and we’ve given it
an electronic memory.
The Single Electronic Breast Pump learns from you. Begin by pumping
manually, then touch the button and let the breast pump quietly
continue your exact pumping rhythm.
If at any time you want to vary the
rhythm, touch the button again
to revert to manual. The Single
Electronic Breast Pump is totally
responsive to your needs.
Relax and enjoy the experience
because you’re always in complete
control. And when you’re relaxed
and comfortable, you express
more milk, faster.
The Single Electronic Breast Pump
is battery or mains powered for
maximum flexibility and portability.
Please take a few minutes to read through the ENTIRE
INSTRUCTION LEAFLET before you use your Philips AVENT
Single Electronic Breast Pump for the first time.
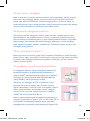
PLEASE SAVE THESE INSTRUCTIONS.
Unless advised otherwise by your health professional it is best
to wait until your breastfeeding routine is established before
expressing – usually around four weeks.
7
10740-SElec_GBPLRUHR_txt.indd 7 11/08/2009 12:11

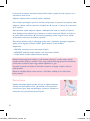
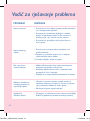
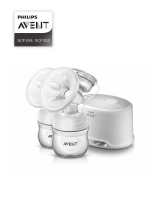
Pump parts (diagram A1)
Breast Pump parts
Dome cap
Extra soft AVENT Teat,
Newborn flow (0m+)
Screw ring
Sealing base
Sealing disc
Control handle
*
Silicone diaphragm and stem
White valve
Pump body
Milk container (125ml/4oz)
Stand (same as )
Let-down Massage Cushion
Funnel cover (same as )
Battery pack
*
Mains power lead*
a
b
c
d
e
f
h
g
h
f
i
j
Control Handle* (diagram B)
Power socket
Control button
Control handle
Light
1
2
3
4
Battery pack* (diagram C)
Power cable
1
Bottle parts (diagram A2)
Only the following batteries are compatible
with the Single Electronic Breast Pump
Battery pack: Duracell Ultra M3, Duracell Plus,
Energizer Ultra Plus, Duracell Accu (NiMH),
Ansmann (NiMH). For Duracell Acc (NiMH) &
Ansmann (NiMH) use/charge in accordance
with manufacturers guidelines. Dispose of
batteries as per manufacturer’s instructions.
Manual parts (diagram A3)
Handle
Pump cover
p
q
*NEVER STERILISE OR IMMERSE IN WATER
k
l
m
n
o
8
10740-SElec_GBPLRUHR_txt.indd 8 11/08/2009 12:11

Important safeguards
READ ALL INSTRUCTIONS BEFORE USING YOUR PHILIPS AVENT SINGLE ELECTRONIC
BREAST PUMP
When using electrical products, especially when children are present, basic safety precautions should always
be followed, including the following.
WARNING – To reduce the risk of fire, electrocution or other personal injury:
• Thebreastpumpisintendedforrepeatedusebyasingleuseronly.
• Alwaysunplugfromtheelectricalwallsocketimmediatelyafteruse.
• Donotusewhilebathing.
• Donotplaceorstoretheproductwhereitcanfallorbepulledintoabathorsink.
• Donotplaceordropthecontrolhandle,batterypackormainspowerleadintowaterorotherliquids.
• Donotreachforaproductthathasfallenintowater.Unplugfromthewallsocketimmediately.
• Donotallowchildrenorpetstoplaywiththecontrolhandle,batterypack,mainspowerleador
accessories as these parts may pose a choking or strangulation danger.
• Beforeeachuseinspecttheproduct,includingmainspowerlead,forsignsofdamage.Neveroperatethis
product if it has a damaged lead or plug, if it is not working properly or if it has been dropped, damaged
or has been submerged in water.
• OnlyuseattachmentsrecommendedbyPhilipsAVENT.
• Donotuseoutdoorswiththemainspowerleadorwhereaerosolsprayproductsarebeingused,orwhere
oxygen is being administered.
• Equipmentnotsuitableforuseinthepresenceofflammableanaestheticmixturewithair,orwithoxygen
or nitrous oxide.
• Onlyusethemainspowerleadandbatterypacksuppliedwiththeproduct.
• Therearenouserserviceablepartsinsidethebreastpump.Donotattempttoopen,serviceorrepairthe
breast pump yourself.
• Keepleadsawayfromheatedsurfaces.
• Thisproductisapersonalcareitemandshouldnotbesharedbetweenmothers.
• Donotattempttoremovethepumpbodyfromyourbreastwhileundervacuum.Turntheunitoffand
break the seal between your breast and the pump funnel with your finger, then remove the pump from
your breast.
• Donotoperateunlesscontrolhandleisconnectedtoapumpbody.
• Neverusewhilepregnant,aspumpingcaninducelabour.
• Neverusewhensleepyordrowsy.
• Thisapplianceisintendedforusebyresponsiblepersons,keepoutofreachofsmallchildrenandtheinfirm.
• Thisapplianceisnotintendedforusebypersonsincludingchildrenwithreducedphysical,sensoryor
mental capabilities, or lack of experience or knowledge, unless they have been given supervision or
instruction concerning use of the appliance by a person responsible for their safety.
• Childrenshouldbesupervisedtoensurethattheydonotplaywiththeappliance.
• Ensuretheunitisnotexposedtoextremeheatorplacedindirectsunlight.
CAUTION – To reduce the risks of injury, device malfunction or failure:
• Theproductshouldnotbeleftunattendedwhenpluggedintoanelectricalwallsocket.
• Neverdroporinsertanyforeignobjectintoanyopening.
• Makesurethevoltageofthemainspowerleadiscompatiblewiththepowersource.
• Plugtheendofthemainspowerleadintothecontrolhandlefirst,thensecurelyattachthewallplug
into the electrical socket.
• AlthoughcompliantwithapplicableEMCdirectives,thisequipmentmaystillbesusceptibletoexcessive
emissions and/or may interfere with more sensitive material.
• Wash,rinseandsterilisetheappropriatepumppartsbeforeeachuse.
• Neverputthecontrolhandle,batterypackorleadinwaterorasteriliserasyoucancausepermanent
damage to the pump.
• Donotcontinuepumpingformorethanfiveminutesatatimeifnoresultisachieved.
• Donotuseantibacterialorabrasivecleaners/detergentswhencleaningbreastpumpparts.
• Ifthepressuregeneratedisuncomfortableorcausingpain,turntheunitoff,breaktheseal
between the breast and the pump body with your finger and remove the pump from your breast.
9
10740-SElec_GBPLRUHR_txt.indd 9 11/08/2009 12:11

d
g
n
h
a j
i
10
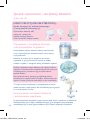
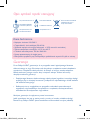
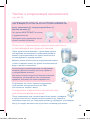
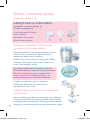
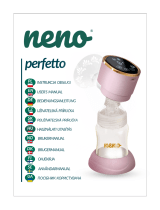
How to clean and sterilise your pump
(see diagram A)
NEVER WASH OR STERILISE…
the control handle (a), battery pack (i)
or mains power lead (j).
These components DO NOT come
into contact with your breast milk.
You can wipe the control
handle clean, using a soft cloth.
Cleaning and sterilising the pump body
and breast milk storage components
Before you use your breast pump for the first time
and every time before use, you must disassemble,
wash and sterilise all the breast pump parts that
come into contact with your breast milk.
You can use the dishwasher (top rack only) or hand
wash in warm, soapy water and then rinse thoroughly.
Do not use antibacterial or abrasive cleaners/
detergents as they may cause the plastic to crack.
To clean the valve, rub gently between your fingers
in warm soapy water – do not insert objects as
this may cause damage.
Sterilise these parts in a steam steriliser (electronic,
electric or microwave), or by boiling in water for
5 minutes.
Keepingyourpumpsterilised
and compact for travel
After sterilising all parts, insert the white valve and diaphragm
into the pump body. Clip the funnel cover (h) over the funnel
and Let-down Massage Cushion (g) and screw the sealing base
(n) onto the pump body (d) in place of the milk container.
10740-SElec_GBPLRUHR_txt.indd 10 11/08/2009 12:11

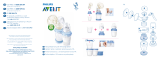
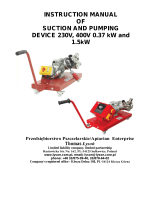
How to assemble your pump
(see diagram D)
1. With clean hands, insert the white valve (c) into the pump body (d) from the
bottom making sure that the pointed side of the valve faces downwards.
2. Twist the milk container (e) onto the pump body (d) until securely in place.
3. To ensure the pump doesn’t topple, insert the 125ml/4oz milk container
into the stand provided (f).
4. Place the silicone diaphragm (b) into the pump body (d), making sure
it fits securely around the edge, to create a seal (this is easier if the
diaphragm is wet).
5. Carefully insert the Let-down Massage Cushion (g) into the pump body
(d), making sure it completely covers the edge of the funnel (this is easier
if the Let-down Massage Cushion is wet).
6. Firmly push the control handle (a) onto the pump body (d) so that it sits
securely on top of the silicone diaphragm (b).
7. For mains use connect the mains power lead (j) to the control handle (a)
and plug into an electrical wall socket.
8. For battery use, open the top of the battery pack (i) and insert 4 x AA
batteries. Connect the power lead to the control handle (a).
11
10740-SElec_GBPLRUHR_txt.indd 11 11/08/2009 12:11

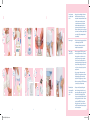
How to use your pump
(see diagram E)
Wash your hands thoroughly and make sure your breasts are clean. Relax in a
comfortable chair, leaning slightly forward (use cushions to support your back).
Make sure you have a glass of water nearby as expressing can be thirsty work.
A photograph of your baby will help too.
To begin pumping
1. Switch on at the wall socket if using mains power. To turn the pump on, press
and hold the control button for 2 seconds. The light on the top of the control
handle will flash ORANGE and then turn to a solid GREEN to indicate that the
pump is ready to use. If at any time the light is flashing red, stop and consult
the ‘Troubleshooting guide’.
2. Bring the assembled pump to your breast. Position the cushion firmly onto
your breast so as to create a perfect seal (ensure no strand of hair or piece
of clothing is trapped). Using the control handle you can find your exact
comfort level. As you press down on the handle, you will feel greater suction
against your breast. You don’t need to squeeze the handle fully, only as far
as feels comfortable for you.
3. Once comfortable, begin by gently squeezing the handle 5 or 6 times quite
quickly, simulating the rapid suckling you usually feel when your baby is first
put to the breast. Your milk will soon begin to flow and you can establish
a slower, comfortable pumping pattern. Many mothers find that holding
down the handle for 2 to 3 seconds at a time imitates the feeling of their
baby breastfeeding.
4. When you have established a comfortable pumping rhythm with at least
2 squeezes, simply press the control button on the handle, and the Electronic
Breast Pump will automatically continue in the same way. The light on the
control handle will turn from solid GREEN to a flashing GREEN. Your pattern
will now be stored in the pump’s memory – even after the pump has been
switched off!
12
10740-SElec_GBPLRUHR_txt.indd 12 11/08/2009 12:11

To change your pumping rhythm
If at any time you want to change your pumping rhythm, press the control
button and the pump will revert to manual pumping. The light will turn back
to solid GREEN. You can now pump manually until you are comfortable again.
Then press the control button again and the Single Electronic Breast Pump will
continue your chosen rhythm.
To stop pumping
When you want to stop pumping, press the control handle and break the seal
between the breast and the pump body with your finger. To switch off the
pump, press and hold the control button for 2 seconds until the light turns off,
then unplug the mains power lead from the wall socket. If you’re using the
battery pack, disconnect from the control handle. If you forget to turn the pump
off, it will switch itself off after 3 minutes to save battery power.
Battery Life
Batteries will last for approximately 6 hours. The light on the control handle
will display a slow pulsing flash to warn you when it is time to replace them.
There will be enough power for approximately 1 more pumping session, with
no drop-off in performance, before the pump switches itself off.
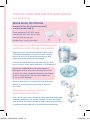
To collect and store your milk
After you have expressed your milk, unscrew the pump
body from the milk container (e). If you’re using AVENT
Breast Milk Containers, insert a sealing disc (o) into the
screw ring (m) and twist it onto the milk container. If you’re
using VIA, unscrew the adaptor and screw a lid onto the cup.
On average you will need to pump for 10 minutes to
express 60-125ml/2-4oz. However, this is just a guide
and varies from woman to woman. If you find that you
regularly express more than 125ml/4oz per session,
you can use a 260ml/9oz AVENT Breast Milk Container
or a 240ml/8oz VIA Cup.
Breast milk can be stored in the fridge or freezer in either
sterile breast milk containers (125ml/4oz or 260ml/9oz
or 330ml fitted with sealing discs) or in pre-sterilised VIA
Cups.
13
10740-SElec_GBPLRUHR_txt.indd 13 11/08/2009 12:11

Do not overfill the milk container and be sure to keep it upright, otherwise it
may leak.
Expressed milk should be refrigerated immediately.
Only milk collected with a sterile pump should be stored to be fed to your baby.
Expressed breast milk can be stored in the refrigerator for up to 48 hours
(not in the door) or in the freezer for up to 3 months.
If you are storing freshly expressed milk in the fridge to add to during the day,
only add milk which has been expressed into a sterile container. Milk can only
be kept like this for a maximum of 48 hours from first expression, after which
it must be used immediately or frozen for future use.
Frozen breast milk can be defrosted overnight in the refrigerator, heated
gradually in warm water or heated with a Philips AVENT Bottle and Baby
Food Warmer.
NB:
•NEVERrefreezebreastmilk.
•DONOTaddfreshbreastmilktoalreadyfrozenmilk.
•ALWAYS discard any milk that is left over at the end of a feed.
Never heat milk in a microwave as this may destroy valuable nutrients and
antibodies. In addition, the uneven heating may cause hot spots in the liquid
which could cause burns to the throat.
Never immerse a frozen milk container or VIA Cup in boiling water as this
may cause it to crack/split.
Never put boiling water directly into a VIA Cup, allow to cool for around
20 minutes before filling.
Disassembly
Ensure the power is switched off at the wall socket
and disconnect the mains power lead or battery pack
from the control handle. Pull the control handle directly
upwards away from the diaphragm then unhook
it from the stem by moving it towards the funnel.
14
10740-SElec_GBPLRUHR_txt.indd 14 11/08/2009 12:12

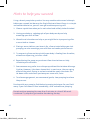
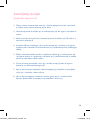
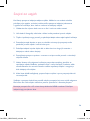
Hints to help you succeed
Using a breast pump takes practice. You may need to make several attempts
before you succeed, but because the Single Electronic Breast Pump is so simple
and comfortable to use, you will soon get used to expressing milk.
1. Choose a quiet time when you’re not rushed and unlikely to be disturbed.
2. Having your baby or a photograph of your baby nearby can help
encourage your milk to flow.
3. Warmth and relaxation can help so you might like to try expressing after
a warm bath or shower.
4. Placing a warm cloth on your breasts for a few minutes before you start
pumping can also encourage your milk flow and soothe painful breasts.
5. Try expressing from one breast while your baby is feeding from the other,
or continue expressing just after a feed.
6. Repositioning the pump on your breast from time to time can help
stimulate your milk ducts.
7. Some women may prefer to use the pump without the Let-down Massage
Cushion. However, it has been shown that, in most cases, the massaging
effect of the petals flexing in and out around the areola stimulates the
let-down reflex and allows you to express more milk, faster.
8. To relieve engorgement, we recommend gentle, slow pumping to relieve
the pressure.
Practice with your pump to find the best pumping techniques for you. Don’t
worry if your milk doesn’t flow immediately, relax and continue pumping.
Do not continue pumping for more than 5 minutes at a time if NO result
is achieved. Try expressing at another time during the day.
15
10740-SElec_GBPLRUHR_txt.indd 15 11/08/2009 12:12

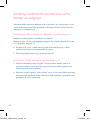
Using your Electronic Pump
as a Manual Breast Pump
Your Electronic Breast Pump can also be used as a manual pump. In this case,
you simply need to replace the control handle with the manual handle (p) and
pump cover (q) provided.
Assembling your Manual Breast Pump (see diagram F)
Ensure you have disassembled, washed and sterilised all the parts.
Follow steps 1-5 as before (see diagram D), then proceed to step 6 and 7
(see diagram F):
6. Position the forked end of the handle (p) under the diaphragm stem (b)
and push down gently on the handle until you hear it ‘click’ into place.
7. Click the pump cover (q) onto the pump body (d).
How to use your Manual Breast Pump (see diagram G)
1. Bring the assembled pump to your breast. Position the Let-down Massage
Cushion firmly onto your breast so as to create a perfect seal (ensure no
strand of hair or piece of clothing is trapped).
2. Once comfortable, gently squeeze the handle 5 or 6 times fairly quickly to
initiate let-down. When you see your milk beginning to flow, establish a
rhythm of pumping to meet your own comfort level.
16
10740-SElec_GBPLRUHR_txt.indd 16 11/08/2009 12:12

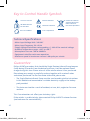
Key to Control Handle Symbols
Technical Specifications
•MainsInputVoltage100–240VAC
•MainsInputFrequency50–60Hz
•Supplyvoltagefluctuationsnotexceeding+/-10%ofthenominalvoltage
•AmbientTemperaturerange:+10˚Cto+40˚C
•AtmosphericPressure:700to1060hPa
•Equipmentratedforcontinuousoperation
•Maximumspeedatmaximumvacuumis60cyclesperminute
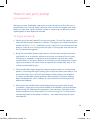
Guarantee
Philips AVENT guarantees that should the Single Electronic Breast Pump become
faulty during 24 months from the date of purchase, it will be replaced free of
charge during this time. Please return it to the retailer where it was purchased.
Please keep your receipt as proof of purchase, together with a note of when
and where purchased. For the Guarantee to be valid, please note:
• TheSingleElectronicBreastPumpmustbeusedaccordingtotheinstructions
in this booklet and connected to a suitable electricity supply or the battery
pack provided.
• Theclaimmustnotbearesultofaccident,misuse,dirt,neglectorfairwear
and tear.
This Guarantee does not affect your statutory rights.
If the retailer is unable to help, please contact Philips AVENT Customer Services
(see back cover for contact details).
TYPE B APPLIED PART
FOLLOW OPERATING
INSTRUCTIONS
ONLY USE INDOORS
CLASS II EQUIPMENT
GENERAL WARNING
EUROPEAN STANDARD
DISPOSE OF THROUGH
SEPARATE COLLECTION
ROUTE FOR WASTE
ELECTRICAL EQUIPMENT
17
10740-SElec_GBPLRUHR_txt.indd 17 11/08/2009 12:12

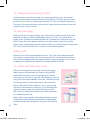
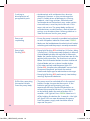
• Checkthatallpumppartshavebeen
assembled correctly and that the valve
is positioned correctly.
• Ensurethatthesiliconediaphragmand
Let-down Massage Cushion are fitted securely
to the pump body and a perfect seal is created.
• Makecertainthatthecontrolhandleisfirmly
in place.
Lack of suction
• Ensure the pump is correctly assembled and
that suction is being created.
• Relax and try again, as expression may improve
after practice.
• Refertothe‘Hints to help you succeed’ section.
No milk being
expressed
• You may be squeezing too hard. You do not need
to use all the suction the pump can generate.
• Try squeezing the handle more gently and
remember the 2-3 second pumping rhythm.
• Consult your health professional/
breastfeeding advisor.
Pain in the
breast area
when expressing
• Remove and re-fit the Let-down Massage Cushion
to ensure it is firmly attached and pushed far
enough down the centre of the funnel.
• Tryleaningslightlyforward.
Milk is drawn
up the Let-down
Massage Cushion
CONCERN SOLUTION
Troubleshooting guide
• ContactPhilipsAVENTCustomerServicesfor
replacements (see back cover for contact details).
Lost or broken parts
18
10740-SElec_GBPLRUHR_txt.indd 18 11/08/2009 12:12

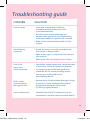
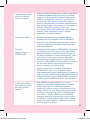
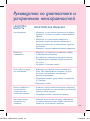
• Avoidcontactwithantibacterialorabrasive
detergents/cleaners as they can damage the
plastic. Combinations of detergents, cleaning
products, sterilising solution, softened water
and temperature fluctuations may, under certain
circumstances, cause the plastic to crack. If this
occurs, do not use. The pump body and breast
milk containers are dishwasher safe but food col-
ourings may discolour them. Follow guidelines in
‘How to clean and sterilise your pump’.
Cracking or
discolouration of
pump/bottle parts
• Ensure the pump is correctly assembled and switched
on with the power indicator illuminated ‘GREEN’.
• Make sure the lead between the electrical wall socket
or battery pack and the pump is correctly connected.
Pump not
responding
• PumplightflashingRED with delays (3 flashes, delay,
3 flashes etc.): If the pump works properly in Manual
Control Mode but does not replicate in Automatic
Mode, the handle rhythm may have been too fast for
optimal milk expression. The machine is set not to
follow. Push the control button to return to Manual
Control Mode and use a slower handle rhythm.
• Ifthisdoesnothelpandthepowerlightstill
flashes RED, the pump has detected a vacuum fault.
Disconnect the power and check the control
handle and diaphragm for obstruction or damage.
• PumplightflashingRED continuously: Low battery
warning. Replace the batteries.
Pump light
flashing RED
• The pump must be switched off via the control
button in order to separate these parts. If the
batteries go flat mid-pumping, you may
experience difficulty. Replace the batteries or
connect the pump to the mains. Turn the pump
on by holding down the control button for 2
seconds – the light will turn GREEN. Now turn it
off by holding the button for 2 seconds – the light
will go off. You can now disconnect the pump
from the power supply and should be able to
separate the parts.
Difficulties separating
the control handle
from the pump body
19
10740-SElec_GBPLRUHR_txt.indd 19 11/08/2009 12:12

Wykorzystaliśmy w nim wszystko to, co spodobało się mamom w
klasycznym laktatorze ręcznym — miękki płatek masujący oraz delikatne
i naturalne sterowanie dotykowe zapewniające komfortowe odciąganie
pokarmu, a ponadto dodaliśmy elektroniczną pamięć.
Pojedynczy laktator elektroniczny uczy się od Ciebie. Zacznij pompować
ręcznie, naciśnij przycisk, a laktator będzie dalej pompował w Twoim rytmie.
Aby zmienić rytm, naciśnij przycisk
ponownie, by powrócić do trybu ręcznego.
Pojedynczy laktator elektroniczny w pełni
dostosowuje się do Twoich potrzeb.
Odpręż się i ciesz się pełną kontrolą
procesu odciągania pokarmu. Kiedy
jesteś odprężona, odciągasz więcej mleka
w krótszym czasie.
Pojedynczy laktator elektroniczny jest zasilany
bateriami lub sieciowo, dzięki czemu możesz
używać go w dowolnym miejscu.
Przed pierwszym użyciem pojedynczego laktatora
elektronicznego AVENT firmy Philips poświęć kilka
minut na lekturę ULOTKI Z INSTRUKCJĄ OBSŁUGI.
ZACHOWAJ INSTRUKCJĘ NA PRZYSZŁOŚĆ.
O ile lekarz nie zaleci inaczej, najlepiej będzie, jeśli poczekasz z
rozpoczęciem korzystania z laktatora do momentu, gdy karmienie
piersią unormuje się (zazwyczaj ok. czterech tygodni od porodu).
20
10740-SElec_GBPLRUHR_txt.indd 20 11/08/2009 12:12

Części pompy (rys. A1)
Części laktatora
Nasadka kopułkowa
Wyjątkowo miękki smoczek AVENT
dla noworodków (0 m+)
Pierścień mocujący
Podstawa uszczelniająca
Pokrywka zamykająca
Rączka sterująca*
Membrana silikonowa z rdzeniem
Biały zawór
Część główna laktatora
Pojemnik na pokarm (125 ml)
Podstawa (taka jak na rys. )
Nakładka masująca
Pokrywka na lejek (taka sama jak )
Zasilacz bateryjny*
Przewód sieciowy*
a
b
c
d
e
f
g
h
i
j
Rączka sterująca* (rys. B)
Gniazdo zasilania
Przycisk sterowania
Rączka sterująca
Wskaźnik
1
2
3
4
Zasilacz bateryjny* (rys. C)
Przewód zasilający
1
Części butelki (rys. A2)
Tylko następujące baterie pasują do zasilacza
bateryjnego pojedynczego laktatora: Duracell
Ultra M3, Duracell Plus, Energizer Ultra Plus,
Duracell Accu (NiMH), Ansmann (NiMH).
Baterie Duracell Acc (NiMH) i Ansmann
(NiMH) należy użytkować oraz ładować
zgodnie ze wskazówkami producenta.
Ze zużytymi bateriami należy postąpić
zgodnie z instrukcją producenta.
Części do obsługi ręcznej (rys. A3)
Rączka
Przykrywka pompki
p
q
*NIE WOLNO STERYLIZOWAĆ ANI ZANURZAĆ W WODZIE
k
l
m
n
o
21
h
f
10740-SElec_GBPLRUHR_txt.indd 21 11/08/2009 12:12

Ważne informacje na temat bezpieczeństwa
PRZED ROZPOCZĘCIEM KORZYSTANIA Z POJEDYNCZEGO LAKTATORA
ELEKTRONICZNEGO PHILIPS AVENT ZAPOZNAJ SIĘ Z INSTRUKCJĄ OBSŁUGI URZĄDZENIA
Podczas korzystania z urządzeń elektronicznych, zwłaszcza w obecności dzieci, należy zawsze przestrzegać
podstawowych zasad bezpieczeństwa, w tym wymienionych poniżej.
OSTRZEŻENIE – Aby zmniejszyć ryzyko pożaru, porażenia prądem elektrycznym lub
odniesienia innych obrażeń:
• Laktator jest przeznaczony do wielokrotnego użytku tylko przez jednego użytkownika.
• Pamiętaj, aby po zakończeniu korzystania z urządzenia wyjąć wtyczkę urządzenia z gniazdka elektrycznego.
• Nie korzystaj z urządzenia podczas kąpieli.
• Nie umieszczaj i nie przechowuj urządzenia w miejscu, z którego może spaść lub zostać zrzucone do wanny lub umywalki.
• Nie wkładaj do wody lub innych płynów rączki sterującej, zasilacza bateryjnego ani przewodu sieciowego.
• Jeżeli urządzenie wpadnie do wody, nie wyciągaj go. Natychmiast odłącz urządzenie od gniazdka elektrycznego.
• Nie pozwól dzieciom ani zwierzętom bawić się rączką sterującą, zasilaczem bateryjnym, przewodem sieciowym
ani innymi elementami, gdyż grozi to zadławieniem lub uduszeniem.
• Przed każdym użyciem sprawdź, czy na urządzeniu i przewodzie sieciowym nie ma uszkodzeń. Nigdy nie
używaj urządzenia z uszkodzonym przewodem lub wtyczką, gdy nie działa poprawnie lub zostało upuszczone,
uszkodzone, bądź zanurzone w wodzie.
• Używaj wyłącznie akcesoriów zalecanych przez firmę Philips AVENT.
• Nie korzystaj z urządzenia z podłączonym przewodem sieciowym na zewnątrz lub w miejscu, gdzie rozpylane
są preparaty w aerozolu lub gdy podawany jest tlen.
• Nie korzystaj z urządzenia w obecności palnej mieszanki anestetyków i powietrza, tlenu lub podtlenku azotu.
• Używaj tylko przewodu sieciowego i zasilacza bateryjnego dołączonych do produktu.
• Laktator nie zawiera żadnych części, które może naprawiać użytkownik. Nie próbuj samodzielnie otwierać ani
naprawiać laktatora.
• Urządzenie przechowuj z dala od gorących powierzchni.
• Niniejsze urządzenie jest produktem użytku osobistego, z którego powinna korzystać tylko jedna osoba.
• Nie odsuwaj laktatora od piersi, gdy jest w nim wytworzone podciśnienie. Wyłącz urządzenie, odczep palcem
lejek od piersi i odsuń laktator.
• Z urządzenia można korzystać tylko wtedy, gdy rączka sterująca jest podłączona do części głównej laktatora.
• Nigdy nie korzystaj z laktatora podczas ciąży, ponieważ może to wywołać poród.
• Nie korzystaj z urządzenia, gdy czujesz się senna.
• Z niniejszego urządzenia mogą korzystać tylko osoby odpowiedzialne. Urządzenie należy chronić przed dziećmi i
osobami chorymi.
• Niniejsze urządzenie nie jest przeznaczone do użytku przez osoby (w tym dzieci) o ograniczonych zdolnościach
fizycznych, sensorycznych lub umysłowych, a także nieposiadające wiedzy lub doświadczenia w użytkowaniu
tego typu urządzeń, chyba że będą one nadzorowane lub zostaną poinstruowane na temat korzystania z tego
urządzenia przez opiekuna.
• Nie pozwalaj dzieciom bawić się urządzeniem.
• Upewnij się, że urządzenie nie jest narażone na działanie wysokich temperatur lub pozostawione w pełnym słońcu.
UWAGA – Aby obniżyć ryzyko obrażeń, nieprawidłowego działania urządzenia lub awarii:
• Nie pozostawiaj urządzenia bez nadzoru, gdy jest podłączone do gniazdka elektrycznego.
• Uważaj, aby nie upuścić urządzenia ani nie wkładaj innych przedmiotów do jego otworów.
• Upewnij się, że napięcie przewodu sieciowego odpowiada napięciu źródła zasilania.
• Najpierw podłącz przewód sieciowy do rączki sterującej, a następnie wtyczkę do gniazdka elektrycznego.
• Chociaż urządzenie jest zgodne z odpowiednimi dyrektywami dotyczącymi zgodności elektromagnetycznej,
urządzenie może wykazywać niewielką czułość na nadmierną emisję i/lub może powodować zakłócenia w
przypadku bardziej czułych urządzeń.
• Przed każdym użyciem urządzenia opłucz i wysterylizuj odpowiednie części laktatora.
• Nigdy nie wkładaj rączki sterującej, zasilacza bateryjnego i przewodu zasilającego do wody ani sterylizatora, gdyż
może to doprowadzić do trwałego uszkodzenia laktatora.
• Jeżeli odciąganie pokarmu nie przynosi efektu, nie przedłużaj tej czynności o więcej niż pięć minut.
• Do mycia części laktatora nie stosuj środków do czyszczenia lub detergentów o właściwościach antybakteryjnych
lub ściernych.
• Jeżeli wytwarzane podciśnienie powoduje dyskomfort lub ból, wyłącz urządzenie, odczep palcem laktator od
piersi i odsuń urządzenie.
22
10740-SElec_GBPLRUHR_txt.indd 22 11/08/2009 12:12

d
g
n
h
a j
i
23
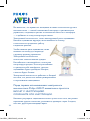
Sposób czyszczenia i sterylizacji laktatora
(patrz rys. A)
NIGDY NIE MYJ ANI NIE STERYLIZUJ...
Rączki sterującej (a), zasilacza bateryjnego
(i) ani przewodu sieciowego (j).
Wymienione elementy NIE
stykają się z pokarmem.
Rączkę sterującą laktatora
można przetrzeć miękką szmatką.
Czyszczenie i sterylizacja laktatora
oraz pojemników na pokarm
Przed każdym użyciem laktatora należy rozmontować,
umyć i wysterylizować wszystkie części, które stykają
się z pokarmem.
Elementy te można myć w zmywarce do naczyń
(wyłącznie w górnym koszu) lub ręcznie w ciepłej
wodzie z mydłem, a następnie należy je dokładnie opłukać.
Podczas czyszczenia części laktatora nie używaj środków
myjących o właściwościach antybakteryjnych lub ściernych
ani detergentów, ponieważ mogą one powodować
pękanie plastiku.
Aby wyczyścić zawór, przetrzyj go delikatnie palcami
zanurzonymi w ciepłej wodzie z mydłem. Nie zanurzaj tych
części w wodzie, ponieważ może dojść do ich uszkodzenia.
Te części można sterylizować w sterylizatorze parowym
(elektronicznym, elektrycznym lub mikrofalowym) lub gotując
je w wodzie przez 5 minut.
Utrzymywanie sterylności laktatora
i przenoszenie urządzenia
Po wysterylizowaniu wszystkich części, zamocuj biały zawór i membranę na laktatorze.
Załóż pokrywkę (h) na lejek i nakładkę masującą (g), a następnie nakręć podstawę
uszczelniającą (n) na część główną laktatora (d) w miejscu pojemnika na pokarm.
10740-SElec_GBPLRUHR_txt.indd 23 11/08/2009 12:12
Strona jest ładowana ...
Strona jest ładowana ...
Strona jest ładowana ...
Strona jest ładowana ...
Strona jest ładowana ...
Strona jest ładowana ...
Strona jest ładowana ...
Strona jest ładowana ...
Strona jest ładowana ...
Strona jest ładowana ...
Strona jest ładowana ...
Strona jest ładowana ...
Strona jest ładowana ...
Strona jest ładowana ...
Strona jest ładowana ...
Strona jest ładowana ...
Strona jest ładowana ...
Strona jest ładowana ...
Strona jest ładowana ...
Strona jest ładowana ...
Strona jest ładowana ...
Strona jest ładowana ...
Strona jest ładowana ...
Strona jest ładowana ...
Strona jest ładowana ...
Strona jest ładowana ...
Strona jest ładowana ...
Strona jest ładowana ...
Strona jest ładowana ...
Strona jest ładowana ...
Strona jest ładowana ...
Strona jest ładowana ...
Strona jest ładowana ...
Strona jest ładowana ...
-
 1
1
-
 2
2
-
 3
3
-
 4
4
-
 5
5
-
 6
6
-
 7
7
-
 8
8
-
 9
9
-
 10
10
-
 11
11
-
 12
12
-
 13
13
-
 14
14
-
 15
15
-
 16
16
-
 17
17
-
 18
18
-
 19
19
-
 20
20
-
 21
21
-
 22
22
-
 23
23
-
 24
24
-
 25
25
-
 26
26
-
 27
27
-
 28
28
-
 29
29
-
 30
30
-
 31
31
-
 32
32
-
 33
33
-
 34
34
-
 35
35
-
 36
36
-
 37
37
-
 38
38
-
 39
39
-
 40
40
-
 41
41
-
 42
42
-
 43
43
-
 44
44
-
 45
45
-
 46
46
-
 47
47
-
 48
48
-
 49
49
-
 50
50
-
 51
51
-
 52
52
-
 53
53
-
 54
54


Avent SCF302/01 Instrukcja obsługi
- Kategoria
- Akcesoria do miksera / robota kuchennego
- Typ
- Instrukcja obsługi
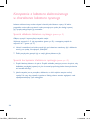
w innych językach
Powiązane dokumenty
-
Avent SCF310/13 Instrukcja obsługi
-
Avent SCD236/00 Instrukcja obsługi
-
 Avent SCF300/12 Instrukcja obsługi
-
Avent SCF290/12 Instrukcja obsługi
-
 Avent SCF158/02 Product Datasheet
-
 Avent SCF300/13 Instrukcja obsługi
-
Avent SCF330/60 Instrukcja obsługi
-
 Avent SCF302/13 Instrukcja obsługi
-
 Avent SCF332/35 Instrukcja obsługi
-
Avent SCF332/31 Instrukcja obsługi


Inne dokumenty
-
Rexel 2101502 Karta katalogowa
-
Medela Swing Instructions For Use Manual
-
 neno Perfetto Instrukcja obsługi
-
Childcare 055270 Instrukcja obsługi
-
-
-
 Lyson W20210GNF Instrukcja obsługi
-
 Lyson W2022NZ Instrukcja obsługi
-
-
Lansinoh 2in1 ELECTRIC BREAST PUMP Instructions For Use Manual


