
CROSS LINE LASER PKLL 7 A1
CROSS LINE LASER
Operating instructions
KORSLINJELASER
Bruksanvisning
RISTILINJALASER
Käyttöohje
IAN 270767
KREUZLINIENLASER
Bedienungsanleitung
LASER KRZYZOWY
Instrukcja obsługi

GB / IE Operating instructions Page 1
FI Käyttöohje Sivu 15
SE Bruksanvisning Sidan 29
PL Instrukcja obsługi Strona 43
DE / AT / CH Bedienungsanleitung Seite 57
Before reading, unfold the page containing the illustrations and familiarise
yourself with all functions of the device.
Käännä ennen lukemista kuvallinen sivu esiin ja tutustu seuraavaksi laitteen
kaikkiin toimintoihin.
Vik ut bildsidan och ha den till hands när du läser igenom anvisningarna och
gör dig bekant med apparatens / maskinens funktioner.
Przed przeczytaniem proszę rozłożyć stronę z ilustracjami, a następnie
proszę zapoznać się z wszystkimi funkcjami urządzenia.
Klappen Sie vor dem Lesen die Seite mit den Abbildungen aus und machen
Sie sich anschließend mit allen Funktionen des Gerätes vertraut.


1
PKLL 7 A1
GB
IE
Contents
Introduction ...................................2
Intended use ...........................................2
Description of components ................................3
Package contents .......................................3
Technical data .........................................4
Safety instructions ..............................5
Risk of injury if batteries are handled incorrectly ...............7
Operation ....................................8
Inserting/replacing the batteries ...........................8
Switching on and off ....................................8
Automatic levelling ......................................9
Working without automatic levelling ........................9
Working procedures ....................................10
Working with the clamp .................................10
Working with a tripod ..................................10
Maintenance and cleaning ......................11
Storage .....................................12
Disposal .....................................12
Disposal of the appliance ................................12
Disposing of the batteries ................................12
Warranty ....................................13
Service ......................................14
Importer .....................................14

GB
IE
2
PKLL 7 A1
CROSS LINE LASER PKLL 7 A1
Introduction
Congratulations on the purchase of your new appliance.
You have selected a high-quality product. The operating
instructions are part of this product. They contain important
information on safety, usage and disposal. Before using the product,
familiarise yourself with all operating and safety instructions. Use the
product only as described and for the specified areas of application.
Please also pass on these operating instructions to any future owner.
Intended use
This measuring tool is intended for determining and checking horizontal
and vertical lines.
This appliance is intended exclusively for operation in enclosed
rooms.
Any other usage of or modification to the appliance is deemed to be
improper and carries a significant risk of accidents.
The manufacturer accepts no responsibility for damage(s) attributable
to misuse.
The appliance is not intended for commercial use.

3
PKLL 7 A1
GB
IE
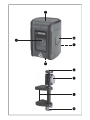
Description of components
LED levelling
Red: levelling off
Green: levelling on
ON/OFF switch / transport lock
Battery compartment (rear)
1/4” tripod thread (bottom)
Laser aperture
1/4” screw
Locking screw
Clamp
Fixing screw
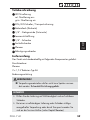
Package contents
The appliance is supplied with the following components as standard:
Cross line laser
Clamp
2 x 1.5 V AA batteries
Operating instructions
WARNING!
■ Do not allow children to play with packaging materials.
There is a risk of suffocation.
NOTE
► Check the package for completeness and for signs of visible
damage.
► If the delivery is incomplete or damage has occurred as a result
of defective packaging or during transport, contact the Service
hotline (see chapter entitled Service).

GB
IE
4
PKLL 7 A1
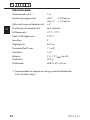
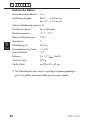
Technical data
Minimum working range
1)
: 7 m
Levelling precision: at 0° : ± 0.8 mm/m
at ± 4° : ± 1.0 mm/m
Self-levelling range (typical): ± 4°
Levelling time (typical): approx. 6 seconds
Operating temperature: +5°C to 35°C
Relative humidity max.: ≤ 90%
Laser category: 2
Wavelength (λ): 637 nm
Maximum power P max: < 1 mW
Tripod adapter: 1/4"
Batteries: 2 x 1.5 V
AA batteries
Weight (appliance): 220 g
Dimensions (appliance): approx. 85 x 65 x 65cm
1) The working range can be reduced due to unfavourable environ-
mental conditions (e.g. direct sunlight).

5
PKLL 7 A1
GB
IE
Safety instructions
■ Do not work with the measuring tool in areas subject to the
risk of explosions, or in areas where flammable liquids, gases
or dusts are located. The appliance can create sparks which
may ignite dust or fumes.
■ This appliance may be used by children of the age of 8 years or
more and by persons with reduced physical, sensory or mental
capabilities or lack of experience and/or knowledge if they are
being supervised or have been instructed with regard to the safe
use of the appliance and have understood the potential risks.
Children must not use the appliance as a plaything. Cleaning and
user maintenance should not be performed by children unless
they are under supervision.
■ Do not leave the appliance unattended when switched on, and
switch the appliance off directly after use. Other people could be
blinded by the laser beam. Risk of eye injuries!
■ Protect the appliance from wetness or direct sunlight.
■ Do not expose the appliance to any extremes of temperature
or temperature fluctuations. For example, do not leave it lying in
a car for extended periods. After exposure to large temperature
fluctuations, allow the appliance to acclimatise before using it
again. The precision of the appliance can be adversely affected
by extreme temperatures or temperature fluctuations.
■ Avoid hefty knocks or dropping the measuring tool. Damage to
the measuring tool may affect its accuracy. After a violent impact
or fall, compare the laser line with a known horizontal or vertical
reference line.
■ Switch the appliance off before transporting it. When switched
off, the pendulum unit is locked as it could otherwise be damaged
by strong movements.

GB
IE
6
PKLL 7 A1
■ Do not use the appliance near cardiac pacemakers. The inside
of the measuring tool creates a field that could impair the func-
tioning of a cardiac pacemaker.
■ Keep the measuring tool away from magnetic data media and
magnetically sensitive devices. The effect of the magnet may
cause irreversible data loss.
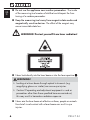
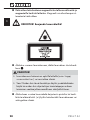
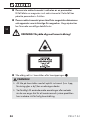
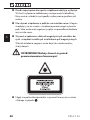
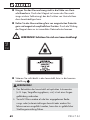
WARNING! Protect yourself from laser radiation!
■ Never look directly into the laser beam or into the laser aperture
.
WARNING!
► Looking at a laser beam through optical instruments (e.g.
magnifying glasses or similar) can cause eye injuries.
► Caution! If operating and adjustment equipment is used or
procedures other than those specified here are carried out,
this may result in hazardous radiation exposure.
■ Never aim the laser beam at reflective surfaces, people or animals.
Even brief visual contact with a laser beam can result in eye
injuries.

7
PKLL 7 A1
GB
IE
Risk of injury if batteries are handled incorrectly
■ Keep batteries out of the reach of children. Children might put
batteries into their mouth and swallow them. If a battery has been
swallowed, seek medical assistance immediately.
■ Do not throw batteries into a fire. Never subject batteries to high
temperatures.
■ Risk of explosion! Do not charge batteries unless they are explicitly
labelled as "rechargeable".
■ Do not open the batteries or short-circuit them.
■ Do not mix different types of batteries.
Due to increased risk of leakage, empty batteries should be re-
moved. The batteries should also be removed from the appliance
if it is not being used for long periods.
■ Battery acid leaking from a battery can cause skin irritation. In
the event of contact with the skin, rinse with plenty of water. If the
liquid comes into contact with your eyes, rinse thoroughly with
water, do not rub and consult a doctor immediately.
■ The chapter entitled Inserting/replacing the batteries describes
how to correctly insert and remove batteries.

GB
IE
8
PKLL 7 A1
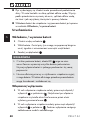
Operation
Inserting/replacing the batteries
♦ Open the battery compartment .
♦
Insert the batteries. Ensure correct polarity as shown on the
diagram inside the battery compartment.
♦
Close the battery compartment
.
NOTE
► With a low battery level, the LED
flashes red.
Always replace all batteries together. Only use batteries
from one manufacturer and with the same capacity.
► If you do not intend to use the appliance for a long time,
remove the batteries. During extended periods of storage,
the batteries can corrode and discharge themselves.
Switching on and off
♦ To turn on the appliance, move the ON/OFF switch into the
position. Immediately after switching on, the appliance emits
two laser lines from the laser aperture .
♦ To turn on the appliance, move the ON/OFF switch
into the
position. The pendulum unit is locked when the appliance
is switched off.

9
PKLL 7 A1
GB
IE
Automatic levelling
■ Place the appliance on a firm horizontal surface to work with auto-
matic levelling or fasten it onto a tripod via the 1/4” thread
.
■ After switching on, the automatic levelling system automatically
compensates for irregularities within the self-levelling range of
± 4°. Levelling is complete as soon as the laser lines no longer
move and the LED
lights up green.
■ If automatic levelling is not possible, e.g. because the underside
of the measuring tool is off the horizontal by more than 4° or be-
cause you are holding the appliance in your hand, then the LED
will light up red and the appliance will work without automatic
levelling. The laser lines will remain lit and flash, but the two
crossed lines will not necessarily run at right angles to each other.
NOTE
► When you are working without automatic levelling, this is
always indicated by the red LED
.
► After vibrations or position changes during operation, the
appliance will always automatically re-level itself. To avoid
errors, always check the position of the horizontal and/or
vertical laser line in relation to reference points after re-
levelling.
Working without automatic levelling
♦ Move the ON/OFF switch into the position.
♦ Press the
button for LED levelling. Immediately after switching
on, the appliance emits two laser lines from the laser aperture
which are not levelled. When you are working without automatic
levelling, this is always indicated by the red LED .

GB
IE
10
PKLL 7 A1
Working procedures
■ Use only the centre of the laser line to make your marking.
The width of the laser line changes with the distance.
Working with the clamp
With the help of the clamp you can attach the measuring tool to
various items, e.g. vertical or horizontal boards or pipes.
♦ Undo the fixing screw
.
♦ Position the clamp
in the desired location and then retighten
the fixing screw .
♦ Now place the appliance with the tripod thread
on the
screw and screw it tight with moderate force. Do not over-
tighten the appliance as it could be damaged.
♦ Align the clamp to roughly the position you require before you
switch on the appliance.
♦ To do this, undo the locking screw
and move the appliance
to a horizontal position at the desired height.
♦ Retighten the locking screw
.
Working with a tripod
A tripod offers a stable, height-adjustable support for taking measure-
ments.
♦ Place the measuring tool with the tripod thread
on the 1/4”
screw of the tripod.

11
PKLL 7 A1
GB
IE
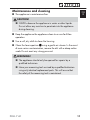
Maintenance and cleaning
■ The appliance is maintenance-free.
CAUTION!
■ NEVER submerse the appliance in water or other liquids.
Do not allow any moisture to penetrate into the appliance
during cleaning.
■ Keep the appliance the appliance clean to ensure fault-free
operation.
■ Use a soft, dry cloth to clean the housing.
■ Clean the laser aperture
using a gentle air stream. In the event
of more serious contamination, remove the dirt with a damp cotton
swab. Do not exert any strong pressure!
WARNING!
■ The appliance should only be opened for repairs by a
qualified technician.
■ Have your measuring tool serviced by a qualified technician
using only identical replacement parts. This will ensure that
the safety of the measuring tool is maintained.

GB
IE
12
PKLL 7 A1
Storage
If you decide not to use the appliance for a long period, remove
the batteries and store them in a clean, dry place away from direct
sunlight.
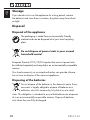
Disposal
Disposal of the appliance
The packaging is made from environmentally friendly
material and can be disposed of at your local recycling
plant.
Do not dispose of power tools in your normal
household waste!
European Directive 2012/19/EU requires that worn-out power tools
be collected separately and recycled in an environmentally compatible
manner.
Your local community or municipal authorities can provide informa-
tion on how to dispose of the worn-out appliance.
Disposing of the batteries
Do not dispose of the batteries in the domestic waste. Every
consumer is legally obliged to dispose of batteries at a
collection site of his community/city district or at a retail
store. This obligation is intended to ensure that batteries are disposed
of in an environmentally responsible manner. Dispose of batteries
only when they are fully discharged.

13
PKLL 7 A1
GB
IE
Warranty
This appliance is provided with a 3-year warranty valid from the
date of purchase. The appliance has been manufactured with care
and inspected meticulously prior to delivery.
Please retain your receipt as proof of purchase. In the event of a war-
ranty claim, please contact your Customer Service unit by telephone.
This is the only way to guarantee free return of your goods.
NOTE
► The warranty only covers claims for material and manufacturing
defects, not for transport damage, worn parts or damage to
fragile components such as buttons or rechargeable batteries.
This appliance is intended solely for private use and not for commercial
purposes. The warranty shall be deemed void in cases of misuse or
improper handling, use of force and modifications/repairs which
have not been carried out by one of our authorised Service centres.
Your statutory rights are not restricted by this warranty. The warranty
period is not prolonged by repairs effected under the warranty. This
also applies to replaced and repaired components.
Any damage and defects present at the time of purchase must be
reported immediately after unpacking, but no later than two days
after the date of purchase.
Repairs carried out after expiry of the warranty period shall be
subject to charge.

GB
IE
14
PKLL 7 A1
Service
Service Great Britain
Tel.: 0871 5000 720 (£ 0.10/Min.)
E-Mail: k[email protected]
IAN 270767
Service Ireland
Tel.: 1890 930 034
(0,08 EUR/Min., (peak))
(0,06 EUR/Min., (off peak))
E-Mail: k[email protected]
IAN 270767
Importer
KOMPERNASS HANDELS GMBH
BURGSTRASSE 21
44867 BOCHUM
GERMANY
www.kompernass.com

15
PKLL 7 A1
FI
Sisällysluettelo
Johdanto ....................................16
Määräystenmukainen käyttö .............................16
Osat ................................................17
Toimitussisältö .........................................17
Tekniset tiedot .........................................18
Turvallisuusohjeet .............................19
Paristojen vääränlaiseen käsittelyyn liittyvä tapaturmavaara .....21
Käyttöönotto .................................22
Paristojen paikoilleen asettaminen ja vaihtaminen .............22
Päälle ja pois päältä kytkeminen ..........................22
Tasausautomatiikka ....................................23
Työskentely ilman tasausautomatiikkaa .....................23
Työskentelyohjeet ......................................24
Puristimen käyttäminen ..................................24
Työskentely jalustan kanssa ..............................24
Huolto ja puhdistus ............................25
Varastointi ...................................26
Hävittäminen .................................26
Laitteen hävittäminen ...................................26
Paristojen hävittäminen ..................................26
Takuu .......................................27
Huolto. . . . . . . . . . . . . . . . . . . . . . . . . . . . . . . . . . . . . . . 28
Maahantuoja .................................28

FI
16
PKLL 7 A1
RISTILINJALASER PKLL 7 A1
Johdanto
Onnittelut uuden laitteen hankinnasta. Olet valinnut laaduk-
kaan tuotteen. Käyttöohje on osa tätä tuotetta. Se sisältää
turvallisuutta, käyttöä ja hävittämistä koskevia tärkeitä ohjei-
ta. Tutustu ennen tuotteen käyttöä kaikkiin käyttö- ja turvallisuusohjei-
siin. Käytä tuotetta vain kuvatulla tavalla ja vain mainittuihin käyttö-
tarkoituksiin. Kun luovutat tuotteen eteenpäin, liitä mukaan kaikki
tuotetta koskevat asiakirjat.
Määräystenmukainen käyttö
Mittauslaite on tarkoitettu vaaka- ja pystysuorien linjojen mittaamiseen
ja tarkistamiseen.
Laite on tarkoitettu käytettäväksi ainoastaan sisätiloissa.
Laitteen muu käyttö tai muuttaminen on määräystenvastaista, ja siihen
liittyy huomattava tapaturmariski.
Valmistaja ei ota mitään vastuuta määräystenvastaisesta käytöstä
aiheutuneista vahingoista.
Laitetta ei ole tarkoitettu kaupalliseen käyttöön.

17
PKLL 7 A1
FI
Osat
LED-tasaus
punainen: Tasaus pois päältä
vihreä: Tasaus päällä
Virtakytkin / kuljetusvarmistin
Paristokotelo (takapuoli)
Jalustan 1/4″ kiinnityskierre (alaosa)
Laserin ulostuloaukko
1/4″ ruuvi
Lukitusruuvi
Puristin
Kiinnitysruuvi
Toimitussisältö
Toimitus sisältää vakiona seuraavat osat:
Ristilinjalaser
Puristin
2 x 1,5 V:n AA-paristoa
Käyttöohje
VAROITUS!
■ Pakkausmateriaaleilla ei saa leikkiä.
On olemassa tukehtumisvaara.
OHJE
► Tarkista, ettei toimituksesta puutu osia eikä tuotteessa ole
näkyviä vaurioita.
► Jos havaitset toimituksessa puutteita tai vaurioita, jotka johtuvat
puutteellisesta pakkauksesta tai ovat syntyneet kuljetuksen
aikana, soita huollon palvelunumeroon (ks. kohta Huolto).
Strona się ładuje...
Strona się ładuje...
Strona się ładuje...
Strona się ładuje...
Strona się ładuje...
Strona się ładuje...
Strona się ładuje...
Strona się ładuje...
Strona się ładuje...
Strona się ładuje...
Strona się ładuje...
Strona się ładuje...
Strona się ładuje...
Strona się ładuje...
Strona się ładuje...
Strona się ładuje...
Strona się ładuje...
Strona się ładuje...
Strona się ładuje...
Strona się ładuje...
Strona się ładuje...
Strona się ładuje...
Strona się ładuje...
Strona się ładuje...
Strona się ładuje...
Strona się ładuje...
Strona się ładuje...
Strona się ładuje...
Strona się ładuje...
Strona się ładuje...
Strona się ładuje...
Strona się ładuje...
Strona się ładuje...
Strona się ładuje...
Strona się ładuje...
Strona się ładuje...
Strona się ładuje...
Strona się ładuje...
Strona się ładuje...
Strona się ładuje...
Strona się ładuje...
Strona się ładuje...
Strona się ładuje...
Strona się ładuje...
Strona się ładuje...
Strona się ładuje...
Strona się ładuje...
Strona się ładuje...
Strona się ładuje...
Strona się ładuje...
Strona się ładuje...
Strona się ładuje...
Strona się ładuje...
Strona się ładuje...
-
 1
1
-
 2
2
-
 3
3
-
 4
4
-
 5
5
-
 6
6
-
 7
7
-
 8
8
-
 9
9
-
 10
10
-
 11
11
-
 12
12
-
 13
13
-
 14
14
-
 15
15
-
 16
16
-
 17
17
-
 18
18
-
 19
19
-
 20
20
-
 21
21
-
 22
22
-
 23
23
-
 24
24
-
 25
25
-
 26
26
-
 27
27
-
 28
28
-
 29
29
-
 30
30
-
 31
31
-
 32
32
-
 33
33
-
 34
34
-
 35
35
-
 36
36
-
 37
37
-
 38
38
-
 39
39
-
 40
40
-
 41
41
-
 42
42
-
 43
43
-
 44
44
-
 45
45
-
 46
46
-
 47
47
-
 48
48
-
 49
49
-
 50
50
-
 51
51
-
 52
52
-
 53
53
-
 54
54
-
 55
55
-
 56
56
-
 57
57
-
 58
58
-
 59
59
-
 60
60
-
 61
61
-
 62
62
-
 63
63
-
 64
64
-
 65
65
-
 66
66
-
 67
67
-
 68
68
-
 69
69
-
 70
70
-
 71
71
-
 72
72
-
 73
73
-
 74
74


Parkside PKLL 7 A1 Operating Instructions Manual
- Typ
- Operating Instructions Manual
- Niniejsza instrukcja jest również odpowiednia dla
w innych językach
- Deutsch: Parkside PKLL 7 A1
- svenska: Parkside PKLL 7 A1
- English: Parkside PKLL 7 A1
- suomi: Parkside PKLL 7 A1
Powiązane artykuły
Inne dokumenty
-
Bosch GLL 3-50P Instrukcja obsługi
-
Bosch GLL 2 Instrukcja obsługi
-
Hilti PS 300-W Instrukcja obsługi
-
Bosch GPL 3 Professional Instrukcja obsługi
-
LIVARNO 427117 Instrukcja obsługi
-
Laserliner MasterCross-Laser 2GP Instrukcja obsługi
-
Bosch GMS 100 M Instrukcja obsługi
-
-
-