Hitachi DH 36DL Instrukcja obsługi
- Kategoria
- Piły łańcuchowe
- Typ
- Instrukcja obsługi
Niniejsza instrukcja jest również odpowiednia dla

Cordless Chain Saw
Akku-Kettensäge
Ασύρματο αλυσοπρίονο
Akumulatorowa Piła łańcuchowa
Akkus Láncfűrész
Akku Řetězová pila
Akülü zincirli testere
Fierastrau cu lant cu acumulator
Akumulatorsk Verižna žaga
Akku Reťazová píla
Акумуляторна ланцюгова пилка
Аккумуляторная цепная пила
Read through carefully and understand these instructions before use.
Diese Anleitung vor Benutzung des Werkzeugs sorgfältig durchlesen und verstehen.
Διαβάστε προσεκτικά και κατανοήσετε αυτές τις οδηγίες πριν τη χρήση.
Przed użytkowaniem należy dokładnie przeczytać niniejszą instrukcję i zrozumieć jej treść.
Használat előtt olvassa el fi gyelmesen a használati utasítást.
Před použitím si pečlivě přečtěte tento návod a ujistěte se, že mu dobře rozumíte.
Aleti kullanmadan önce bu kılavuzu iyice okuyun ve talimatları anlayın.
Înainte de utilizare, citiţi cu atenţie și înţelegeţi prezentele instrucţiuni.
Pred uporabo natančno preberite in razumite ta navodila.
Pred použitím si dôkladne tieto pokyny prečítajte a pochopte ich.
Будь ласка, прочитайте інструкції і перевірте себе, чи все зрозуміло, перш ніж користуватися приладом.
Внимательно прочтите данную инструкцию по эксплуатации прежде чем пользоваться инструментом.
Handling instructions
Bedienungsanleitung
Οδηγίες χειρισμού
Instrukcja obsługi
Kezelési utasítás
Návod k obsluze
CS 36DL
Kullanım talimatları
Instrucţiuni de utilizare
Navodila za rokovanje
Pokyny na manipuláciu
lнструкції щодо поводження з пристроєм
Инструкция по эксплуатации
CS36DL

2
8
7
6
1
$
%
^
$
^
@
§
¶
e
%
$
t
y
u
i
o
p
0
2
1
3
5
4
1
9
6
j
h
!
(
@
•
#
*
&
)
(
!
%
w
@
q
!
•
(
r
1234
5678
9101112
13 14 15 16
17 18 19 20

3
a
s
f
d
g
k
l
;
k
%
%
x
z
z
c
b
v
%
$
z
21 22 23 24
25 26 27 28
29 30 31 32
33 34 35
36 37 38

4
n
#
m
,
,
.
%
/
¢
™
£
∞
¡
3 mm
11.5 mm
39 40 41 42
43 44 45 46
47

5
English Deutsch Ελληνικά Polski
1
36 V Rechargeable
battery
36 V Akkumulator
36V Επαναφορτιζόμενη
μπαταρία
36V Akumulator
2
Latch Schnapper Μάνδαλο Zapadka
3
Ventilation holes Belüftungslöcher Οπές εξαερισμού Otwory wentylacyjne
4
Terminals Anschlüsse Πόλοι Styki
5
Battery cover Akkumulatorabdeckung Κάλυμμα μπαταρίας Pokrywka akumulatora
6
Insert Einsatz Εισχωρήστε Włóż/wprowadź
7
Pull out Herausziehen Τραβήξτε έξω Wyciągnij
8
Rear handle (Top handle) Hinterer Griff (Oberer Griff ) Πίσω λαβή (Πάνω λαβή)
Rękojeść tylna
(Rękojeść górna)
9
Pilot lamp Kontrollampe Δοκιμαστική λάμπα Lampka kontrolna
0
Line Leitung Γρα μμ ή Linia
!
Knob Drehknopf
Κόμβος Pokrętło
@
Tension dial Spannungswählschalter
Επιλογή τάσης
Pokrętło regulacji
naprężenia
#
Side cover Seitliche Abdeckung
Πλευρικό κάλυμμα Pokrywa boczna
$
Saw chain Sägekette
Αλυσίδα πριονιού Łańcuch piły
%
Guide bar Schwert
Λάμα Prowadnica
^
Guide bar tip Schwertspitze
Άκρο της λάμας Końcówka prowadnicy
&
Sprocket Kettenzahnrad
Γραν άζι Koło łańcuchowe
*
Blade direction Sägeblattrichtung
Κατεύθυνση λεπίδας Kierunek ostrza
(
Bolt Schraube
Μπουλόνι Śruba
)
Bolt hole Schraubenloch
Οπή μπουλονιού Otwór na śrubę
q
Increase the tension Spannung erhöhen
Αυξήστε την τάση Zwieszanie naprężenia
w
Decrease the tension Spannung verringern
Μειώστε την τάση Zmniejszanie naprężenia
e
Drive link Antriebsverbindung
Σύνδεσμος οδήγησης Ogniwo napędowe
r
Fasten Festziehen
Στερεώστε Zapięcie
t
Chain brake Kettenbremse
Φρένο αλυσίδας Hamulec łańcucha
y
Pull Ziehen
Τραβήξτε Pociągnąć
u
Chain oil Kettenöl
Λάδι αλυσίδας Olej łańcuchowy
i
Light switch Lichtschalter
Διακόπτης για το φως Włącznik oświetlenia
o
Oil sight glass Öl-Sichtglas
Υαλοδείκτης για το λάδι Wziernik oleju
p
Oil pump adjuster Ölpumpenregler
Ρυθμιστής αντλίας
λαδιού
Regulator pompy oleju
a
Lock-off button Entriegelungsknopf
Κουμπί απασφάλισης Przycisk odblokowania
s
Switch Schalter
Διακόπτης Przełącznik
d
Battery level indicator
switch
Schalter für
Batteriestandanzeige
Διακόπτης ένδειξης της
στάθμης της μπαταρίας
Przełącznik wskaźnika
poziomu naładowania
akumulatora
f
Battery level indicator Batteriestandanzeige
Δείκτης της στάθμης
της
μπαταρίας
Wskaźnik poziomu
naładowania akumulatora
g
Hook Haken
Γάντζος Haczyk
h
Actuation Betätigen
Χειρισμός Uruchamianie
j
Release Loslassen Απελευθέρωση Zwalnianie
k
Spike Dorn Ακίδα Kolec
l
Rear handle (Top handle) Hinterer Griff (Oberer Griff ) Πίσω λαβή (Πάνω λαβή)
Rękojeść tylna
(Rękojeść górna)
;
Front handle Vorderer Griff
Μπροστινή λαβή
Rękojeść przednia

6
English Deutsch Ελληνικά Polski
z
Round fi le Rundfeile
Στρογγυλή λίμα
Pilnik okrągły
x
1/5 of diameter of fi le
1/5 des
Feilendurchmessers
1/5 της διαμέτρου της
λίμας
1/5 średnicy pilnika
c
Depth gage jointer Tiefenanzeigenverbinder
Συναρμογέας μετρητή
βάθους
Łącznik sprawdzianu
głębokości
v
Flat fi le Flachfeile
Επίπεδη λίμα
Pilnik płaski
b
Protruding depth gage
head
Vorstehender
Tiefenanzeigenkopf
Προεξέχουσα κεφαλή
μετρητή βάθους
Wystająca głowica
sprawdzianu głębokości
n
Round off Abrundung
Στρογγυλέψτε Zaokrąglić
m
Brake band chamber Bremsenbandkammer
Θάλαμος της ζώνης του
φρένου
Komora opaski hamulca
,
Chain oil spout Kettenölausguss
Στόμιο έκχυσης του
λαδιού της αλυσίδας
Rynna spustowa oleju
łańcuchowego
.
Groove Auskehlung
Αυλάκωση
Rowek
/
Oil hole Ölloch
Οπή λαδιού
Otwór oleju
¡
Wear limit Verschleißgrenze Όριο φθοράς Ogranicznik zużycia
™
Nail of carbon brush Klaue der Kohlebürste
Καρφί
καρβουνακιού
Końcówka szczotek
węglowych
£
Protrusion of carbon
brush
Krempe der Kohlebürste
Προεξοχή ψήκτρας
καρβουνακιού
Wystająca część szczotki
węglowej
¢
Brush cap Motorsensenaufsatz Κάλυμμα ψήκτρας Pokrywka szczotki
∞
Contact portion of brush
tube
Kontaktfl äche des
Bürstenrohrs
Προεξοχή επαφής του
σωλήνα της ψήκτρας
Część kontaktowa rurki ze
szczotką
§
Chain tensioner hole
Kettenspanneröff nung Οπή τανυστή αλυσίδας
Otwór napinacza
łańcucha
¶
Chain tensioner boss
Kettenspannerbuckel
Εξόγκωμα του τανυστή
αλυσίδας
Piasta napinacza
łańcucha
•
Hexagonal bar wrench
Sechskantinnenschlüssel Εξαγωνικό κλειδί Άλεν
Klucz sześciokątny

7
Magyar Čeština Türkçe Română
1
36V Os tölthető
akkumulátor
36V Akumulátor 36V Şarj edilebilir batarya
36V Acumulator
reîncărcabil
2
Retesz Zámek Mandal Element de blocare
3
Szellózónyílások Větrací otvory Havalandırma delikleri Orifi cii de ventilare
4
Csatlakozók Koncovky Kutuplar Terminale
5
Akkumulátor burkolat Kryt na baterie Batarya kapağı Carcasă acumulator
6
Bedugni Zasunout Yerleştirin Introduceţi
7
Kihúzni Zatáhnout Çekin Trageţi
8
Hátsó fogantyú
(Felső fogantyú)
Zadní držadlo
(horní držadlo)
Arka kabza (üst kabza)
Mânerul din spate
(Mânerul de sus)
9
Jelzőlámpa Indikátor Kılavuz lamba Lampă pilot
0
Vezeték Čára Üçgen işareti Linie
!
Fejes csavar Knofl ík Düğme Buton
@
Feszesség tárcsa Volič napnutí Gergi kadranı Buton de tensionare
#
Oldal burkolat Boční kryt Yan kapak Capac lateral
$
Fűrészlánc Řetězová pila Testere zinciri Lanţul fi erăstrăului
%
Vezető rúd Vodicí lišta Kılavuz çubuk Şina de ghidaj
^
Vezető rúd csúcsa Konec vodicí lišty Kılavuz çubuk ucu Vârful şinei de ghidaj
&
Lánckerék Řetězka Zincir dişlisi Pinion
*
Penge iránya Směr lišty Bıçak yönü Direcţia lamei
(
Csavar Šroub Cıvata Bolţ
)
Csavar furat Otvor pro šroub Cıvata deliğiGaură pentru bolţ
q
Növelje a feszítést Zvýšení napnutí Gergiyi yükseltin Creşteţi tensiunea
w
Csökkenti a feszítést Snížení napnutí Gergiyi azaltınReduceţi tensiunea
e
Vezetőszem Vodicí článek Tahrik halkası Za de antrenare
r
Bekapcsolni Upevnění SıkınStrângeţi
t
Láncfék Brzda řetězu Zincir freni Frâna de lanţ
y
Kihúzni Táhlo Çekin Trageţi
u
Láncolaj Olej pro mazání řetězu Zincir yağı Ulei de lanţ
i
Világítás kapcsoló Spínač sv
ětla Işık anahtarı Comutator de lumină
o
Olajellenőrző üveg Stavoznak oleje Yağ seviyesi kontrol camı Vizor de ulei
p
Olajszivattyú beállító
Nastavení olejového
čerpadla
Yağ pompası ayarlayıcı
Buton de reglare a pompei
de ulei
a
Biztosító gomb Tlačítko odjištění Kilitleme düğmesi Buton de blocare
s
Kapcsoló Spínač Anahtar Comutator
d
Akku töltöttségi szint
jelzés kapcsoló
Spínač indikátoru stavu
baterie
Akü seviyesi gösterge
anahtarı
Comutator al indicatorului
pentru nivelul
acumulatorului
f
Akku töltöttségi szint
jelzés
Indikátor stavu baterie Akü seviye göstergesi
Indicator pentru nivelul
acumulatorului
g
Kampó Hák Kanca Cârlig
h
Meghajtás Spoušť Harekete geçirme Acţionare
j
Kioldó Uvolnění Serbest bırakma Eliberaţi
k
Tüske Trn İri çivi Gheară
l
Hátsó fogantyú
(Felső fogantyú)
Zadní držadlo
(horní držadlo)
Arka kabza (üst kabza)
Mânerul din spate
(Mânerul de sus)
;
Elülső fogantyú Přední držadlo Ön kabza Mânerul din faţă

8
Magyar Čeština Türkçe Română
z
Körreszelő Kulatý pilník Yuvarlak eğePilă rotundă
x
Reszelő átmérőjének 1/5
része
1/5 průměru pilníku Eğe çapının 1/5'i 1/5 din diametrul pilei
c
Mélységmérő illeszték Měrka omezovacího zubu
Derinlik göstergesi
birleştirme parçası
Şablon de avans
v
Lapos reszelő Plochý pilník Düz eğePilă plată
b
Kinyúló mélységmérő fej
Vyčnívající hlava
omezovacího zubu
Çıkıntılı derinlik göstergesi
kafası
Proeminenţă cap limitator
avans
n
Lekerekítés Zaoblit Yuvarlak hale getirin Rotunjiţi
m
Fékszíj kamra Komora brzdového pásu Fren takımı odası Camera benzii de frânare
,
Láncolaj cső
Výtok oleje pro mazání
řetězu
Zincir yağı püskürtme ağ
zı Duză de ulei de lanţ
.
Horony Drážka Oluk Canelură
/
Olaj nyílás Olejový kanálek Yağ deliğiOrifi ciul pentru ulei
¡
Megengedett kopás Mez opotřebení Aşınma sınırı Limită de uzură
™
A szénkefe szöge
Cvoček uhlíkového
kartáčku
Kömür çivisi Cuiul periei de cărbune
£
A szénkefe kinyúlása
Vodící lamely uhlíkového
kartáče
Karbon fırça çıkıntısı Extensie perie cărbune
¢
Kefe sapka Krytka kartáčů motoru Fırça kapağı Capac perie
∞
Kefecső érintkezési
felülete
Kontaktní část trubky
kartáče
Fırça tübünün temas kısmı
Porţiunea de contact a tijei
periei
§
Láncfeszítő nyílás Otvor pro napínání řetězu
Zincir gerdirme aparatı
deliği
Gaura întinzătorului de
lanţ
¶
Láncfeszítő kiemelkedés
Výčnělek pro napínání
řetězu
Zincir gerdirme aparatı
kaidesi
Butucul întinzătorului de
lanţ
•
Hatszögletű dugókulcs
Klíč na vnitřní šestihrany Alyan anahtarı
Cheie hexagonală

9
Slovenščina Slovenčina Український Pyccкий
1
36V Baterija, ki se polni
36V Nabíjateľný
akumulátor
36V В акумуляторна
батарея
36V Аккумуляторная
батарея
2
Zapah
Západka Фіксатор
Фиксатор
3
Ventilacijske odprtine Vetracie otvory Вентиляційні отвори
Вентиляционные
отверстия
4
Sponke Koncovky Клема Полюса
5
Pokrov baterije
Kryt batérie Кришка батареї
Крышка
аккумуляторного отсека
6
Vstavite
VložiťВставити
Вставить
7
Izvlecite
VytiahnuťВитягнути
Вытащить
8
Ročaj zadaj (ročaj zgoraj)
Zadné držadlo
(vrchné držadlo)
Задня ручка
(верхня ручка)
Задняя рукоятка
(Верхняя рукоятка)
9
Kontrolni svetlobni
indikator
Kontrolka Контрольний індикатор
Контрольная лампа
0
Trikotna označba
Čiara Біла лінія
Белая линия
!
Gumb
Otočný regulátor Гвинт
Кнопка
@
Številčnica za napon
Volič napnutia Регулятор натягу
Регулятор натяжения
#
Stranski pokrov
Bočný kryt Бічна кришка
Боковая крышка
$
Veriga žage
Reťaz Ланцюг пилки
Пильная цепь
%
Letev
Vodiaca lišta Шина пилки
Направляющая шина
^
Konica letve
Špička vodiacej lišty
Закруглений кінець
шини
Наконечник
направляющей шины
&
Verižnik
Ozubené koleso Зубчасте колесо
Звездочка
*
Smer rezila
Smer ostria Напрямок леза
Направление лезвия
(
Sornik Skrutka Болт Болт
)
Luknja za sornik Otvor na skrutku Отвір для болта Отверстие
под болт
q
Povečati napon Zvýšenie napnutia Збільшення натягу Увеличить натяжение
w
Zmanjšati napon Zníženie napnutia Зменшення натягу Уменьшить натяжение
e
Gonilni člen Vodiaci článok Привідна ланка Приводной рычаг
r
Pritrditi Dotiahnite Зафіксувати Затянуть
t
Verižna zavora Brzda reťaze Га л ь м о ланцюга Тормоз цепи
y
Potegniti Potiahnite Потягти Потянуть
u
Verižno olje Reťazový olej Мастило для ланцюга Масло для цепи
i
Stikalo za luč Spínač osvetlenia Вимикач підсвітки Переключатель света
o
Kontrolno okence za olje Sklo na kontrolu oleja
Віконце контролю рівня
мастила
Окошко уровня масла
p
Regulator oljne črpalke
Nastavovací prvok
olejového čerpadla
Регулятор мастильної
помпи
Регулятор масляного
насоса
a
Gumb za odklepanje
Tlačidlo odomknutia Кнопка розблокування
Кнопка блокировки
s
Stikalo
SpínačПеремикач
Переключатель
d
Stikalo indikatorja za nivo
baterije
Spínač indikátora úrovne
nabitia batérie
Перемикач індикатора
рівня заряду
акумулятора
Переключатель
указателя уровня
заряда батареи
f
Indikator za nivo baterije
Indikátor úrovne nabitia
batérie
Індикатор рівня заряду
акумулятора
Указатель уровня
заряда батареи
g
Kljuka
Hák Карабін
Крюк
h
Pogon
Uvedenie do chodu Запуск
Запуск
j
Sprostiti Uvoľnite Відпустити Отпустить
k
Špica Hrot Зубчатий упор Острие

10
Slovenščina Slovenčina Український Pyccкий
l
Ročaj zadaj (ročaj zgoraj)
Zadné držadlo
(vrchné držadlo)
Задня ручка
(верхня ручка)
Задняя рукоятка
(Верхняя рукоятка)
;
Ročaj spredaj Predné držadlo Передня ручка Передняя рукоятка
z
Okrogla pila Okrúhly pilník Круглий напилок Круглый напильник
x
1/5 premera pile 1/5 priemeru pilníka 1/5 діаметра напилка
1/5 диаметра
напильника
c
Šablona za globinski zob
Spojka obmedzovača
hĺbky
З’єднувач обмежувачів
глибини
Шаблон глубиномера
v
Ploščata pila Plochý pilník Плаский напилок Плоский напильник
b
Štrleča glava globinskega
zoba
Vyčnievajúca hlava
obmedzovača hĺbky
Виступ
головки
обмежувача глибини
Выступающая головка
глубиномера
n
Zaobliti
Zaoblite Закруглити
Закругление
m
Komora zavornega traku Komora brzdového pásu Відсік гальмівної стрічки
Камера тормозной
ленты
,
Izliv verižnega olja Tryska reťazového oleja
Жолобок змащування
ланцюга
Горл ы ш к о масла для
цепи
.
Utor Drážka Паз Прорезь
/
Luknjica za olje Otvor na olej Отвір для мастила Отверстие для масла
¡
Omejitev obrabe
Hranica opotrebovania Межа зношення
Предел износа
™
Zob grafi tne krtačke
Hrot uhlíkovej kefky
Підпружинений контакт
вугільної щітки
Подпружиненный
контакт угольной щетки
£
Rob grafi tne ščetke
Výčnelok uhlíkovej kefky Виступ вугільної
щітки
Выступ для угольной
щетки
¢
Pokrov ščetke
Kryt kefky Ковпачок щітки
Колпачок щетки
∞
Stični del cevi krtače
Kontaktná časť rúrky kefky
Ділянка контакту зовні
щіткової гільзи
Контактная поверхность
гнезда для щетки
§
Odprtina napenjala verige Otvor napínača reťaze
Отвір для натягування
ланцюга
Отверстие натяжного
устройства цепи
¶
Izboklina napenjala verige Výčnelok napínača reťaze
Контактна ділянка
механізму натягування
ланцюга
Втулка натяжного
устройства цепи
•
Šesterorobni ključ Imbusový kľúč
Гайковий
ключ у вигляді
шестигранного стрижня
Гае ч н ы й ключ в виде
шестигранного стержня

11
English Deutsch Ελληνικά Polski
Symbols
WARNING
The following show
symbols used for the
machine. Be sure that you
understand their meaning
before use.
Symbole
WARNUNG
Die folgenden Symbole
werden für diese
Maschine verwendet.
Achten Sie darauf, diese
vor der Verwendung zu
verstehen.
Σύμβολα
ΠΡΟΣΟΧΗ
Τα παρακάτω δείχνουν
τα σύμβολα που
χρησιμοποιούνται στο
μηχάνημα. Βεβαιωθείτε ότι
κατανοείτε τη σημασίας
τους πριν τη χρήση.
Symbole
OSTRZEŻENIE
Następujące oznaczenia
to symbole używane w
instrukcji obsługi maszyny.
Upewnij się, że rozumiesz
ich znaczenie zanim
użyjesz narzędzia.
Read all safety warnings
and all instructions.
Failure to follow the
warnings and instructions
may result in electric
shock, fi re and/or serious
injury.
Lesen Sie sämtliche
Sicherheitshinweise und
Anweisungen durch.
Wenn die Warnungen
und Anweisungen nicht
befolgt werden, kann es
zu Stromschlag, Brand
und/oder ernsthaften
Verletzungen kommen.
Διαβάζετε όλες τις
προειδοποιήσεις
ασφαλείας και όλες τις
οδηγίες.
Η μη τήρηση των
προειδοποιήσεων και οδηγιών
μπορεί να προκαλέσει
ηλεκτροπληξία, πυρκαγιά
και/ή σοβαρό τραυματισμό.
Należy dokładnie zapoznać się
ze wszystkimi ostrzeżeniami i
wskazówkami bezpieczeństwa.
Nieprzestrzeganie
ostrzeżeń oraz wskazówek
bezpieczeństwa może
spowodować porażenie prądem
elektrycznym, pożar i/lub
odniesienie poważnych obrażeń.
Do not use a power tool in
the rain and moisture or
leave it outdoors when it is
raining.
Verwenden Sie die
Heckenschere nicht im
Regen oder bei Feuchtigkeit,
und belassen sie das Gerät
bei Regen nicht im Freien.
Μην χρησιμοποιείτε
ηλεκτρικό εργαλείο στη
βροχή και υγρασία ούτε να
το αφήνετε σε εξωτερικούς
χώρους, όταν βρέχει.
Nie należy używać
elektronarzędzia podczas
deszczu lub pozostawiać
go na zewnątrz podczas
deszczu.
Only for EU countries
Do not dispose of electric tools
together with household waste
material!
In observance of European
Directive 2002/96/EC
on waste electrical and
electronic equipment and its
implementation in accordance
with national law, electric tools
that have reached the end of
their life must be collected
separately and returned to an
environmentally compatible
recycling facility.
Nur für EU-Länder
Werfen Sie
Elektrowerkzeuge nicht in
den Hausmüll!
Gemäss Europäischer
Richtlinie 2002/96/
EG über Elektro- und
Elektronik- Altgeräte und
Umsetzung in nationales
Recht müssen verbrauchte
Elektrowerkzeuge
getrennt gesammelt und
einer umweltgerechaten
Wiederververtung
zugeführt werden.
Μόνο για τις χώρες της ΕΕ
Μην πετάτε τα ηλεκτρικά
εργαλεία στον κάδο
οικιακών απορριμμάτων!
Σύμφωνα με την
ευρωπαϊκή οδηγία 2002/
96/ΕΚ περί ηλεκτρικών και
ηλεκτρονικών συσκευών
και την ενσωμάτωσή
της στο εθνικό δίκαιο, τα
ηλεκτρικά εργαλεία πρέπει
να συλλέγονται ξεχωριστά
και να επιστρέφονται για
ανακύκλωση με τρόπο
φιλικό προς το περιβάλλον
.
Dotyczy tylko państw UE
Nie wyrzucaj elektronarzędzi
wraz z odpadami z
gospodarstwa domowego!
Zgodnie z Europejską
Dyrektywą 2002/96/WE w
sprawie zużytego sprzętu
elektrotechnicznego i
elektronicznego oraz
dostosowaniem jej do
prawa krajowego, zużyte
elektronarzędzia należy
posegregować i zutylizować
w sposób przyjazny dla
środowiska.
Read, understand and
follow all warnings and
instructions in this manual
and on the unit.
Lesen, verstehen und
befolgen Sie alle Warnungen
und Anweisungen in dieser
Anleitung und am Gerät
selbst.
Διαβάστε, κατανοήστε
και ακολουθήστε όλες τις
προειδοποιήσεις και οδηγίες
αυτού του εγχειριδίου της
συσκευής.
Przeczytać, zrozumieć i
przestrzegać wszystkich
ostrzeżeń oraz instrukcji
zawartych w tym podręczniku i
umieszczonych na urządzeniu.
Always wear eye, head
and ear protectors when
using this unit.
Bei Gebrauch des Geräts
immer Gesichts-, Kopf-
und Gehörschutz tragen.
Φοράτε πάντα προστατευτικά
γυαλιά, κράνος και
προστατευτικά αυτιών όταν
χρησιμοποιείτε τη συσκευή.
Podczas używania
urządzenia zawsze
stosować ochronę oczu,
głowy i słuchu.
It is important that you
wear the protective
clothing for feet, legs,
hands and fore-arms.
Wichtig ist das Tragen
von Schutzkleidung für
Füße, Beine, Hände und
Unterarme.
Είναι σημαντικό να φοράτε
προστατευτική ενδυμασία στα
κάτω άκρα, στα πό δια, στα χέρια
και στους πήχεις των χεριών σας.
Należy nosić odzież
ochronną oraz ochraniacze
na stopy, nogi, dłonie i
przedramiona.
Warning, kickback danger.
Be careful of possible
sudden and accidental
upward and/or backward
motion of the guide bar.
Vorsicht Rückschlaggefahr!
Die Kettensäge kann plötzlich
und unvermittelt mit der
Führungsschiene nach
oben und/oder nach hinten
zurückschlagen.
Προειδοποίηση, κίνδυνος
οπίσθιας κίνησης.
Προσέχετε την πιθανή
ξαφνική και τυχαία άνω
και/ή κάτω κίνηση του
οδηγού της συσκευής.
Ostrzeżenie,
niebezpieczeństwo
odbicia. Uważać na nagły
i niespodziewany ruch
do góry i/lub odrzucenie
prowadnicy.
This chain saw is for use
by trained tree service
operator only.
Diese Kettensäge darf
nur von geschulten
Forstarbeitern benutzt
werden.
Το αλυσοπρίονο αυτό πρέπει
να χρησιμοποιείται μόνο από
χειριστή εκπαιδευμένο στην
παροχή υπηρεσιών στον τομέα
της υλοτομίας.
Niniejsza piła łańcuchowa
przeznaczona jest do
użytku wyłącznie przez
przeszkolonego pracownika
pielęgnacji drzewostanu.
Chain oil fi ll Kettenöl zugeben
Πλήρωση με λάδι
αλυσίδας
Napełnienie oleju
łańcuchowego

12
Magyar Čeština Türkçe Română
Jelölések
FIGYELEM
Az alábbiakban a géphez
alkalmazott jelölések
vannak felsorolva. A gép
használata előtt feltétlenül
ismerje meg ezeket a
jelöléseket.
Symboly
UPOZORNĚNÍ
Následující text obsahuje
symboly, které jsou
použity na zařízení.
Ujistěte se, že rozumíte
jejich obsahu před tím, než
začnete zařízení používat.
Simgeler
DİKKAT
Aşağıda, bu alet için
kullanılan simgeler
gösterilmiştir. Aleti
kullanmadan önce bu
simgelerin ne anlama
geldiğini anladığınızdan
emin olun.
Simboluri
AVERTISMENT
În cele ce urmează sunt
prezentate simbolurile
folosite pentru mașină.
Înainte de utilizare,
asiguraţi-vă că înţelegeţi
semnifi caţia acestora.
Olvasson el minden
biztonsági fi gyelmeztetést
és minden utasítást.
A fi gyelmeztetések
és utasítások be nem
tartása áramütést, tüzet
és/vagy súlyos sérülést
eredményezhet.
Přečtěte si všechna
varování týkající se
bezpečnosti a všechny
pokyny.
Nedodržení těchto varování a
pokynů může mít za následek
elektrický šok, požár a/nebo
vážné zranění.
Tüm güvenlik uyarılarını ve
tüm talimatları okuyun.
Uyarılara ve talimatlara
uyulmaması elektrik
çarpmasına, yangına ve/
veya ciddi yaralanmaya
neden olabilir.
Citiţi toate avertismentele
privind siguranţa și toate
instrucţiunile.
Nerespectarea avertismentelor
și a instrucţiunilor poate avea
ca efect producerea de șocuri
electrice, incendii și/sau
vătămări grave.
Ne használja a
kéziszerszámot esőben vagy
párás körülmények között,
illetve ne tartsa a szabadban,
ha esik az eső.
Nepoužívejte toto
elektrické nářadí v dešti
nebo vlhku a nenechávejte
jej venku v dešti.
Elektrikli aletleri yağmurda
veya nemli ortamda
kullanmayın, yağmur
yağarken dışarıda
bırakmayın.
Nu utilizaţi o motounealtă
în ploaie și umiditate și nu
o lăsaţi în aer liber când
plouă.
Csak EU-országok
számára Az elektromos
kéziszerszámokat
ne dobja a háztartási
szemétbe!
A használt villamos és
elektronikai készülékekről
szóló 2002/96/EK irányelv
és annak a nemzeti jogba
való átültetése szerint az
elhasznált elektromos
kéziszerszámokat
külön kell gyűjteni, és
környezetbarát módon újra
kell hasznosítani.
Jen pro státy EU Elektrické
nářadí nevyhazujte do
komunálního odpadu!
Podle evropské směrnice
2002/96/EG o nakládání
s použitými elektrickými a
elektronickými zařízeními
a odpovídajících
ustanovení právních
předpisů jednotlivých
zemí se použitá elektrická
nářadí musí sbírat
odděleně od ostatního
odpadu a podrobit
ekologicky šetrnému
recyklování.
Sadece AB ülkeleri için
Elektrikli el aletlerini
evdeki çöp kutusuna
atmayınız!
Kullanılmış elektrikli
aletleri, elektrik ve
elektronikli eski cihazlar
hakkındaki 2002/96/EC
Avrupa yönergelerine
göre ve bu yönergeler
ulusal hukuk kurallarına
göre uyarlanarak, ayrı
olarak toplanmalı ve çevre
şartlarına uygun bir şekilde
tekrar değerlendirmeye
gönderilmelidir.
Numai pentru ţările membre UE
Nu aruncaţi această sculă
electrică împreună cu deșeurile
menajere!
În conformitate cu Directiva
Europeană 2002/96/CE referitoare
la deșeurile reprezentând
echipamente electrice și
electronice și la implementarea
acesteia în conformitate cu
legislaţiile naţionale, sculele
electrice care au ajuns la fi nalul
duratei de folosire trebuie colectate
separat și duse la o unitate de
reciclare compatibilă cu mediul
înconjurător.
Olvasson el, értsen meg
és kövessen minden
a kézikönyvben és az
egységen található
fi gyelmeztetést és utasítást.
Čtete, seznamte se
a dodržujte všechna
varování a pokyny v tomto
manuálu i na přístroji.
Bu kılavuzdaki ve ünite
üzerindeki tüm uyarıları ve
talimatları okuyun, anlayın
ve uygulayın.
Citiţi, conştientizaţi
şi urmaţi toate
avertismentele şi
instrucţiunile din acest
manual şi de pe dispozitiv.
Az egység használatakor
mindig viseljen szem-, fej-
és fülvédő eszközöket.
Při práci s tímto zařízením
vždy používejte ochranu
hlavy, zraku i sluchu.
Bu üniteyi kullanırken,
mutlaka emniyet gözlüğü,
koruyucu başlık ve
koruyucu kulaklık takın.
Întotdeauna purtaţi articole
de protecţie a ochilor,
capului şi urechilor, atunci
cînd folosiţi dispozitivul.
Fontos, hogy
védőruházatot viseljen a
lábán, kezén és karján.
Je nutné používat
ochranné prvky rukou,
nohou a předloktí.
Ayaklarınız, bacaklarınız,
elleriniz ve ön kollarınız
için koruyucu elbise
giymeniz önemlidir.
Este important ca dumneavoastră
să purtaţi îmbrăcăminte de
protecţie pentru tălpi, picioare,
mâini şi antebraţe.
Figyelem, visszarúgás
veszély. Óvakodjon a
vezetőrúd esetleges
véletlenszerű, hirtelen
felfelé és/vagy visszafelé
mozgásától.
Varování, nebezpečí
zpětného rázu. Buďte
opatrní na náhlé stranové
nebo výškové výkyvy
vodicí lišty.
Dikkat, geri tepebilir.
Kılavuz kol, kazara aniden
yukarı ve/veya arkaya
doğru hareket edebilir.
Avertisment, pericol de
recul. Fiţi atenţi, se pot
produce mişcări bruşte
şi accidentale în sus şi/
sau spre spate a barei de
ghidare.
Ezt a láncfűrészt csak
képzett famegmunkáló
szakember kezelheti.
Tato řetězová pila je
určena pouze pro použití
personálem vyškoleným k
práci se stromy.
Bu zincirli testere sadece
eğitimli ağaç operatörleri
tarafından kullanılabilir.
Acest fi erăstrău cu lanţ
trebuie utilizat exclusiv de
operatori cu pregătire în
tăierea lemnului.
Lánckenő olajjal való
feltöltés
Olejová náplň karburátoru Zincir yağı doldurma Umplere cu ulei pentru lanţ

13
Slovenščina Slovenčina Український Pyccкий
Simboli
OPOZORILO
V nadaljevanju so
prikazani simboli,
uporabljeni pri stroju. Pred
uporabo se prepričajte, da
jih razumete.
Symboly
VÝSTRAHA
V nasledujúcom sú
zobrazené symboly, ktoré
sú vyobrazené na náradí.
Pred použitím náradia sa
oboznámte s významom
týchto symbolov.
Символи
ПОПЕРЕДЖЕННЯ
Тут показані символи,
використані в
керівництві. Будь ласка,
переконайтеся, що
правильно розумієте
їхнє значення.
Символы
ПРЕДУПРЕЖДЕНИЕ
Ниже приведены символы,
используемые для машины.
Перед началом работы
обязательно убедитесь в
том, что Вы понимаете их
значение.
Preberite vas varnostna
opozorila in navodila.
Z neupoštevanjem
opozoril in navodil tvegate
električni udar, požar in/ali
resne telesne poškodbe.
Prečítajte si všetky
bezpečnostné výstrahy
a všetky pokyny.
Nedodržanie výstrah a pokynov
môže viesť k zasiahnutiu
elektrickým prúdom, požiaru a/
alebo vážnemu poraneniu osoby.
Прочитайте всі правила
безпеки та вказівки.
Невиконання цих правил
та інструкцій може
призвести до удару
струмом, пожежі та/або
серйозної травми.
Прочтите все правила
безопасности и инструкции.
Не выполнение правил и
инструкций может привести
к поражению электрическим
током, пожару и/или
серьезной травме.
Električnega orodja ne
uporabljajte v dežju in
na vlagi oziroma ga ne
puščajte na dežju.
Elektrické náradie
nepoužívajte v daždi a
vlhkom prostredí ani ho
nenechávajte vonku na
daždi.
Не користуйтеся
електроінструментом під дощем
та за умов високої вологості, а
також не залишайте інструмент
на вулиці під дощем.
Не используйте
электроинструмент под
дождем и во влажных
местах, не оставляйте его
вне помещения под дождем.
Samo za države EU
Električnih orodij
ne zavržite skupaj z
gospodinjskimi odpadki!
V skladu z evropsko
direktivo 2002/96/EC
o odpadni električni
in elektronski opremi
in izvedbi v skladu z
državnimi zakoni, je treba
električna orodja, ki so
dosegla življenjsko dobo
ločeno zbirati in vrniti
v z okoljem združljivo
ustanovo za recikliranje.
Iba pre krajiny EÚ Elektrické
náradie nezneškodňujte spolu
s komunálnym odpadom z
domácností!
Aby ste dodržali ustanovenia
európskej smernice 2002/96/
ES o odpadových elektrických
a elektronických zariadeniach
a jej implementáciu v zmysle
národnej legislatívy, je
potrebné elektrické zariadenie
po uplynutí jeho doby životnosti
separovať a doručiť na
environmentálne prijateľné
miesto recyklovania.
Лише для країн ЄС
НЕ викидайте електричні
інструменти із побутовими
відходами!
Згідно Європейської Директиви
2002/96/EC
про відходи електронного та
електричного виробництва і її
запровадження згідно місцевих
законів, електроінструменти,
які відслужили робочий строк
слід утилізувати окремо і
повертати до установ, що
займаються екологічною
переробкою брухту.
Только для стран
ЕС Не выкидывайте
электроприборы вместе с
обоычным мусором!
В соответствии с европейской
директивой 2002/96/ЕС
об утилизации старых
электрических и электронных
приборов и в соответствии
с местными законами
электроприборы, бывщие
в эксплуатации, должны
утилизовываться отдельно
безопасным для окружающей
среды способом.
Preberite, se posvetujte o
dvomih in upoštevajte vsa
opozorila in navodila v tem
priročniku in na enoti.
Prečítajte si, pochopte
a dodržiavajte všetky
výstrahy a pokyny
uvedené v tomto návode a
na jednotke.
Ознайомтеся з усіма
попередженнями та
вказівками, зазначеними
в цьому посібнику або
безпосередньо на інструменті,
і завжди їх дотримуйтесь.
Следует прочитать,
понять и выполнять все
предостережения и
инструкции, указанные
в этом руководстве и на
аппарате.
Pred uporabo te naprave si
mora uporabnik obvezno
namestiti zaščito za oči,
glavo in ušesa.
Počas používania jednotky
používajte prostriedky na
ochranu zraku, hlavy a
sluchu.
На час користування
інструментом завжди
одягайте захисні окуляри,
шолом та шумопоглинальні
навушники.
При эксплуатации
данного аппарата всегда
носить средства защиты
зрения, слуха, а также
головной уборn.
Pomembno je, da nosite
zaščitna oblačila za stopala,
noge, roke in podlakti.
Je dôležité, aby ste používali
ochranný odev a obuv na
ochranu chodidiel, nôh, rúk a
predlaktia.
Необхідно одягати захисне
взуття, рукавиці та захисні
засоби для ніг і передпліч.
Важно носить
спецодежду для защиты
ног и рук.
Opozorilo – nevarnost
udarca nazaj. Previdno
in upoštevajte morebitne
nenadne in nenamerne
gibe vodila gor in/ali nazaj.
Výstraha, nebezpečenstvo
spätného nárazu. Dávajte
pozor na možný náhly a
náhodný pohyb vodiacej lišty
nahor a/alebo dozadu.
Увага: небезпека зворотного
удару. Будьте обережні,
оскільки можливе раптове
відштовхування шини пилки
вгору або назад.
Осторожно, опасность отдачи.
Соблюдать осторожность
при внезапном и случайном
движении направляющей
шины вверх или назад.
To verižno žago sme
uporabljati le usposobljeni
delavec gozdarske službe.
Táto reťazová píla je
určená len pre školených
drevorubačov.
Цю ланцюгову пилку можуть
використовувати тільки
кваліфіковані оператори з
обрізки дерев.
Данная цепная пила
предназначена для
использования только
обученным оператором
по выполнению работ по
уходу за деревьями.
Polnitev z oljem za verigo Plnenie reťazového oleja
Заливання мастила для
ланцюга
Смазка цепи маслом

14
English
(Original instructions)
WHAT IS WHAT?
1. Switch: Device activated by the fi nger.
2. Lock-off button: Button that prevents the accidental
operation of the trigger.
3. Chain brake: Device for stopping or locking the saw
chain.
4. Spiked bumper: Device for acting as a pivot when in
contact with a tree or log.
5. LED light: Light that illuminate the cutting edge.
6. Oil tank cap: Cap for closing the oil tank.
7. Oil sight glass: Window to check chain oil amount.
8. Front handle: Support handle located at or towards the
front of the main body.
9. Battery: Power source to drive the unit.
10. Rear handle (Top handle): Suupport handle located on
the top of the main body.
11. Hook: Tool for hanging the unit with rope etc.
12. Tension dial: Device for adjusting tension of saw chain.
13. Knob: Knob for securing tension dial and side cover.
14. Saw chain: Chain, serving as a cutting tool.
15. Guide bar: The part that supports and guides the saw
chain.
16. Side cover: Protective cover to the guide bar, saw
chain, clutch and sprocket when the chain saw is in use.
17. Charger: For charging the battery.
18. Oil feeder: Container for oil.
19. Chain case: Case for coverring the guide bar and saw
chain when the unit is not being used.
20. File: Tool for sharpening saw chain.
21. Bolt: Bolt for fi xing the side cover in place.
22. Hexagonal bar wrench: Tool for loosening and
tightening the bolt.
8
2
9
6
5
1
3
7
4
10
13
14
16
11
15
12
21
17
18
19
20
22

15
English
WARNING
This chain saw (CS36DL) is designed especially for
tree care and surgery. Only persons trained in tree care
and surgery may use this saw. Observe all literature,
procedures and recommendations from the relevant
professional organization. Failure to do so constitutes a
high accident risk. We recommend always using a rising
platform for sawing in trees. Rappelling techniques are
extremely dangerous and require special training. The
operator must be trained in and familiar with the use of
safety equipment and working and climbing techniques.
Always use the restraining equipment for both the
operator and the saw.
GENERAL POWER TOOL SAFETY WARNINGS
WARNING
Read all safety warnings and all instructions.
Failure to follow the warnings and instructions may result in
electric shock, fi re and/or serious injury.
Save all warnings and instructions for future
reference.
The term “power tool” in the warnings refers to your mains-
operated (corded) power tool or battery-operated (cordless)
power tool.
1) Work area safety
a) Keep work area clean and well lit.
Cluttered or dark areas invite accidents.
b) Do not operate power tools in explosive
atmospheres, such as in the presence of
fl ammable liquids, gases or dust.
Power tools create sparks which may ignite the dust
or fumes.
c) Keep children and bystanders away while
operating a power tool.
Distractions can cause you to lose control.
2) Electrical safety
a) Power tool plugs must match the outlet.
Never modify the plug in any way.
Do not use any adapter plugs with earthed
(grounded) power tools.
Unmodifi ed plugs and matching outlets will reduce
risk of electric shock.
b) Avoid body contact with earthed or grounded
surfaces, such as pipes, radiators, ranges and
refrigerators.
There is an increased risk of electric shock if your
body is earthed or grounded.
c) Do not expose power tools to rain or wet
conditions.
Water entering a power tool will increase the risk of
electric shock.
d) Do not abuse the cord. Never use the cord for
carrying, pulling or unplugging the power tool.
Keep cord away from heat, oil, sharp edges or
moving parts.
Damaged or entangled cords increase the risk of
electric shock.
e) When operating a power tool outdoors, use an
extension cord suitable for outdoor use.
Use of a cord suitable for outdoor use reduces the
risk of electric shock.
f) If operating a power tool in a damp location
is unavoidable, use a residual current device
(RCD) protected supply.
Use of an RCD reduces the risk of electric shock.
3) Personal safety
a) Stay alert, watch what you are doing and use
common sense when operating a power tool.
Do not use a power tool while you are tired or under
the infl uence of drugs, alcohol or medication.
A moment of inattention while operating power tools
may result in serious personal injury.
b) Use personal protective equipment. Always
wear eye protection.
Protective equipment such as dust mask, non-skid
safety shoes, hard hat, or hearing protection used for
appropriate conditions will reduce personal injuries.
c) Prevent unintentional starting. Ensure the
switch is in the off position before connecting
to power source and/or battery pack, picking
up or carrying the tool.
Carrying power tools with your fi nger on the switch
or energising power tools that have the switch on
invites accidents.
d) Remove any adjusting key or wrench before
turning the power tool on.
A wrench or a key left attached to a rotating part of
the power tool may result in personal injury.
e) Do not overreach. Keep proper footing and
balance at all times.
This enables better control of the power tool in
unexpected situations.
f) Dress properly. Do not wear loose clothing or
jewellery. Keep your hair, clothing and gloves
away from moving parts.
Loose clothes, jewellery or long hair can be caught
in moving parts.
g) If devices are provided for the connection of
dust extraction and collection facilities, ensure
these are connected and properly used.
Use of dust collection can reduce dust related hazards.
4) Power tool use and care
a) Do not force the power tool. Use the correct
power tool for your application.
The correct power tool will do the job better and
safer at the rate for which it was designed.
b) Do not use the power tool if the switch does not
turn it on and off .
Any power tool that cannot be controlled with the
switch is dangerous and must be repaired.
c) Disconnect the plug from the power source
and/or the battery pack from the power tool
before making any adjustments, changing
accessories, or storing power tools.
Such preventive safety measures reduce the risk of
starting the power tool accidentally.
d) Store idle power tools out of the reach of
children and do not allow persons unfamiliar
with the power tool or these instructions to
operate the power tool.
Power tools are dangerous in the hands of untrained
users.
e) Maintain power tools. Check for misalignment
or binding of moving parts, breakage of parts
and any other condition that may aff ect the
power toolsʼ operation.
If damaged, have the power tool repaired
before use.
Many accidents are caused by poorly maintained
power tools.
f) Keep cutting tools sharp and clean.
Properly maintained cutting tools with sharp cutting
edges are less likely to bind and are easier to
control.

16
English
g) Use the power tool, accessories and tool bits
etc. in accordance with these instructions,
taking into account the working conditions and
the work to be performed.
Use of the power tool for operations diff erent from
those intended could result in a hazardous situation.
5) Battery tool use and care
a) Recharge only with the charger specifi ed by
the manufacturer.
A charger that is suitable for one type of battery pack
may create a risk of fi re when used with another
battery pack.
b) Use power tools only with specifi cally
designated battery packs.
Use of any other battery packs may create a risk of
injury and fi re.
c) When battery pack is not in use, keep it away
from other metal objects like paper clips,
coins, keys, nails, screws, or other small metal
objects that can make a connection from one
terminal to another.
Shorting the battery terminals together may cause
burns or a fi re.
d) Under abusive conditions, liquid may be ejected
from the battery; avoid contact. If contact
accidentally occurs, fl ush with water. If liquid
contacts eyes, additionally seek medical help.
Liquid ejected from the battery may cause irritation
or burns.
6) Service
a) Have your power tool serviced by a qualifi ed
repair person using only identical replacement
parts.
This will ensure that the safety of the power tool is
maintained.
PRECAUTION
Keep children and infi rm persons away.
When not in use, tools should be stored out of reach
of children and infi rm persons.
CHAIN SAW SAFETY WARNINGS
1. Keep all parts of the body away from the saw chain when
the chain saw is operating. Before you start the chain
saw, make sure the saw chain is not contacting anything.
A moment of inattention while operating chain saws
may cause entanglement of your clothing or body with
the saw chain.
2. Always hold the chain saw with your right hand on the rear
handle and your left hand on the front handle. Holding the
chain saw with a reversed hand confi guration increases
the risk of personal injury and should never be done.
3. Hold the power tool by insulated gripping surfaces only,
because the saw chain may contact hidden wiring. Saw
chains contacting a "live" wire may make exposed
metal parts of the power tool "live" and could give the
operator an electric shock.
4. Wear safety glasses, hearing protection and safety
protective equipment such as jacket, trousers, gloves,
helmet, boots with steel toe-caps and non-slip soles
whenever you use a chain saw. For working in trees the
safety boots must be suitable for climbing techniques.
Do not wear loose clothing, jewelry, short pants,
sandals or go barefoot.
Secure hair so it is above shoulder length. Adequate
protective clothing will reduce personal injury by fl ying
debris or accidental contact with the saw chain.
5. Always stand steady on your feet and operate the chain
saw only on a stationary safe and level surface.
6. When cutting a limb that is under tension be alert for
spring back. When the tension in the wood fi bres is
released the spring loaded limb may strike the operator
and/or throw the chain saw out of control.
7. Use extreme caution when cutting brush and saplings.
The slender material may catch the saw chain and be
whipped toward you or pull you off balance.
8. Carry the chain saw by the front handle with the chain saw
switched off and away from your body. When transporting
or storing the chain saw always fi t the guide bar cover.
Proper handling of the chain saw will reduce the likelihood
of accidental contact with the moving saw chain.
9. Follow instructions for lubricating, chain tensioning
and changing accessories. Improperly tensioned or
lubricated chain may either break or increase the
chance for kickback.
10. Keep handles dry, clean, and free from oil and grease.
Greasy, oily handles are slippery causing loss of control.
11. Cut wood only. Do not use chain saw for purposes not
intended. For example: do not use chain saw for cutting
plastic, masonry or non-wood building materials. Use
of the chain saw for operations diff erent than intended
could result in a hazardous situation.
Causes and operator prevention of kickback: (Fig. 1)
Kickback may occur when the nose or tip of the guide
bar touches an object, or when the wood closes in and
pinches the saw chain in the cut.
Tip contact in some cases may cause a sudden reverse
reaction, kicking the guide bar up and back towards the
operator.
Pinching the saw chain along the top of the guide bar may
push the guide bar rapidly back towards the operator.
Either of these reactions may cause you to lose control
of the saw which could result in serious personal injury.
Do not rely exclusively upon the safety devices built into
your saw. As a chain saw user, you should take several
steps to keep your cutting jobs free from accident or
injury.
Kickback is the result of tool misuse and/or incorrect
operating procedures or conditions and can be avoided
by taking proper precautions as given below:
○ Maintain a fi rm grip, with thumbs and fi ngers encircling
the chain saw handles, with both hands on the saw
and position your body and arm to allow you to resist
kickback forces. Kickback forces can be controlled by
the operator, if proper precautions are taken. Do not let
go of the chain saw.
○ Do not overreach and do not cut above shoulder height.
This helps prevent unintended tip contact and enables
better control of the chain saw in unexpected situations.
○ Only use replacement bars and chains specifi ed by the
manufacturer. Incorrect replacement bars and chains
may cause chain breakage and/or kickback.
○ Follow the manufacturer’s sharpening and maintenance
instructions for the saw chain. Decreasing the depth
gauge height can lead to increased kickback.
ADDITIONAL SAFEY WARNINGS
1. Work without pressure. In addition, always keep your
body warm.
2. Before commencing work, refl ect fully on the work
procedures involved and work to avoid accidents,
otherwise injury may occur.
3. Do not use in the event of bad weather, such as strong wind,
rain, snow, fog, or in areas prone to rockfall or avalanches.
In bad weather, judgment may be impaired and the
vibration may result in disaster.

17
English
4. When visibility is poor, such as during bad weather or
night, do not use the unit. In addition, do not use it in rain
or in a location exposed to rain.
Unstable foothold or loss of balance may result in an
accident.
5. Check the guide bar and saw chain before starting the
unit.
○ If the guide bar or saw chain is cracked, or the product
is scratched or bent, do not use the unit.
○ Check if the guide bar and saw chain are securely
installed. If the guide bar or saw chain is broken or
dislodged, this may result in an accident.
6. Before starting work, check to ensure the switch does
not engage unless the lock-off button is pressed.
If the unit does not working properly, immediately stop
using and request repair from your Hitachi Authorized
Service Center.
7. Install the saw chain properly, in accordance with the
instruction manual.
If installed incorrectly, the saw chain will come off the
guide bar and injury may occur.
8. Never remove any of the safety devices equipped
on the chain saw (brake lever, lock-off button, chain
catcher etc.).
In addition, do not alter or immobilize them.
Injury may occur.
9. In the following cases, switch the unit off and ensure the
saw chain is no longer moving:
○ When not in use or being repaired.
○ When shifting to a new work location.
○ When inspecting, adjusting or replacing the saw chain,
guide bar, chain case and any other part.
○ When refi lling the chain oil.
○ When removing dust etc. from the body.
○ When removing obstacles, trash or sawdust generated
from work from the work area.
○ When you take off the unit, or when you get away from
the unit.
○ Otherwise, if you sense danger or anticipate risk.
If the saw chain is still moving, an accident may occur.
10. Work should generally be performed individually. When
multiple individuals are involved, ensure suffi cient
spacing between them.
In particular, when felling standing trees or working on
a slope, if you anticipate trees falling, rolling or sliding,
ensure there is no danger to other workers.
11. Remain more than 15 m away from other people.
In addition, when working with multiple persons, remain
15 m or more apart.
○ There is a risk of impact with scatters and other accidents.
○ Prepare a whistle alert etc. and determine appropriate
contact method for other workers beforehand.
12. Before felling standing trees, ensure the following:
○ Determine a safe evacuation location prior to felling.
○ Remove obstacles (e.g., branches, shrubs) in advance.
○ Based on a comprehensive evaluation of the state of the
tree to be felled (e.g., trunk bend, tension of branches)
and the surrounding situation (e.g., state of adjacent
trees, presence of obstacles, terrain, wind), decide on
the direction in which the standing tree will fall and then
plan the felling procedure.
Careless felling may result in injury.
13. When felling standing trees, ensure the following:
○ During work, be very careful of the direction in which
trees fall.
○ When working on a slope, ensuring the tree will not roll,
always work from the uphill side of the terrain.
○ When the tree starts falling, switch the unit off , alert
the surroundings, and immediately retreat to a safe
location.
○ During work, if the saw chain or guide bar become
entangled in the tree, switch off and use a wedge.
14. During use, if the unit performance deteriorates, or you
notice any abnormal sound or vibration, immediately
switch off and discontinue use, and return to your
Hitachi Authorized Service Center for inspection or
repair.
If you continue using, injury may occur.
15. If the unit is accidentally dropped or exposed to impact,
inspect carefully for damage or cracks and ensure there
is no deformation.
If the unit is damaged, cracked or deformed, injury may
occur.
16. When transporting the unit by car, secure the unit to
prevent it moving.
There is a risk of accident.
17. Do not switch the unit on while the chain case is
attached.
Injury may occur.
18. Ensure there are no nails and other foreign objects in
the material.
If the saw chain impact on the nail etc., injury may occur.
19. To avoid the guide bar becoming entangled with the
material when chopping on a verge or when subject to
the weight of material while cutting, install a supporting
platform close to the cutting position.
If the guide bar becomes entangled, injury may occur.
20. If the unit is to be transported or stored after use, either
remove the saw chain, or attach the chain cover.
If the saw chain comes into contact with your body,
injury may occur.
21. Adequately care for the unit.
○ To ensure work can be performed safely and effi ciently,
care for the saw chain to ensure it provides optimal
cutting performance.
○ When replacing the saw chain or guide bar, maintaining
the body, fi lling oil etc., follow the instruction manual.
22. Ask the shop to repair the unit.
○ Do not modify this product, since it already complies
with the applicable safety standards.
○ Always refer to your Hitachi Authorized Service Center
for all repairs.
Attempting to repair the unit yourself may result in an
accident or injury.
23. When not using the unit, ensure it is properly stored.
Drain off the chain oil, and keep in a dry place out of
reach of children or a locked location.
24. If the warning label is no longer visible, peels off or is
otherwise unclear, apply a new warning label.
For the warning label, refer to your Hitachi Authorized
Service Center.
25. When working, if local rules or regulations apply,
comply with the same.
PRECAUTIONS FOR BATTERY AND CHARGER
1. Always charge the battery at a temperature of 0°C –
40°C. Charging the battery at temperatures outside the
range of 0°C – 40°C may prevent proper charging and
reduce battery life.
The most suitable temperature for charging is that of
20°C – 25°C.
2. When one charging is completed, leave the charger for
about 15 minutes before the next charging of battery.
Do not charge the battery more than 2 hours.
3. Do not allow foreign matter to enter the hole for
connecting the rechargeable battery.
4. Never disassemble the rechargeable battery and
charger.

18
English
5. Never short-circuit the rechargeable battery. Short-
circuiting the battery will cause a great electric current
and overheat. It results in burn or damage to the battery.
6. Do not dispose of the battery in fi re. If the battery is
burnt, it may explode.
CAUTION ON LITHIUM-ION BATTERY
To extend the lifetime, the lithium-ion battery equips with
the protection function to stop the output.
In the cases of 1 to 3 described below, when using this
product, even if you are pulling the switch, the motor may stop.
This is not the trouble but the result of protection function.
1. When the battery power remaining runs out, the motor
stops.
In such case, charge it up immediately.
2. If the tool is overloaded, the motor may stop. In this
case, release the switch of tool and eliminate causes of
overloading. After that, you can use it again.
3. If the battery is overheated under overload work, the
battery power may stop.
In this case, stop using the battery and let the battery
cool. After that, you can use it again.
F
urthermore, please heed the following warning and
caution.
WARNING
In order to prevent any battery leakage, heat generation,
smoke emission, explosion and ignition beforehand,
please be sure to heed the following precautions.
1. Make sure that swarf and dust do not collect on the battery.
○ During work make sure that swarf and dust do not fall on
the battery.
○ Make sure that any swarf and dust falling on the power
tool during work do not collect on the battery.
○ Do not store an unused battery in a location exposed to
swarf and dust.
○ Before storing a battery, remove any swarf and dust that
may adhere to it and do not store it together with metal
parts (screws, nails, etc.).
2. Do not pierce battery with a sharp object such as a
nail, strike with a hammer, step on, throw or subject the
battery to severe physical shock.
3. Do not use an apparently damaged or deformed battery.
4. Do not use the battery in reverse polarity.
5. Do not connect directly to an electrical outlets or car
cigarette lighter sockets.
6. Do not use the battery for a purpose other than those
specifi ed.
7. If the battery charging fails to complete even when a
specifi ed recharging time has elapsed, immediately
stop further recharging.
8. Do not put or subject the battery to high temperatures or
high pressure such as into a microwave oven, dryer, or
high pressure container.
9. Keep away from fi re immediately when leakage or foul
odor are detected.
10. Do not use in a location where strong static electricity
generates.
11. If there is battery leakage, foul odor, heat generated,
discolored or deformed, or in any way appears abnormal
during use, recharging or storage, immediately remove
it from the equipment or battery charger, and stop use.
CAUTION
1. If liquid leaking from the battery gets into your eyes, do not
rub your eyes and wash them well with fresh clean water
such as tap water and contact a doctor immediately.
If left untreated, the liquid may cause eye-problems.
2. If liquid leaks onto your skin or clothes, wash well with
clean water such as tap water immediately.
There is a possibility that this can cause skin irritation.
3. If you fi nd rust, foul odor, overheating, discolor,
deformation, and/or other irregularities when using the
battery for the fi rst time, do not use and return it to your
supplier or vendor.
WARNING
If an electrically conductive foreign object enters the
terminals of the lithium ion battery, a short-circuit may
occur resulting in the risk of fi re. Please observe the
following matters when storing the battery.
○ Do not place electrically conductive cuttings,
nails, steel wire, copper wire or other wire in the
storage case.
○ Either install the battery in the power tool or store
by securely pressing into the battery cover until
the ventilation holes are concealed to prevent
short-circuits (See Fig. 2).
SPECIFICATIONS
POWER TOOL
Model CS36DL
Saw chain
Type: 91PX-45XJ
Pitch: 9.5 mm (3/8") / Gage: 1.3 mm (0.05")
Guide bar
Type: P012-50CR
Size: 300 mm (Max. cutting legth)
Sprocket Number of teeth: 6 / 9.5 mm (3/8")
No-load chain speed 8.3 m/s (500 m/min)
Chain oil tank capacity 80 ml
LED light White LED
Level indicator Red LED
Battery BSL3620: Li-ion 36 V (2.0 Ah, 10 cells)
Weight* 4.4 kg (With BSL3620 attached)
* Weight: According to EPTA-Procedure 01/2003

19
English
NOTE
For details of the operations, please see the BL36200
instruction manual.
○ Chain oil
○ Depth gage jointer
Optional accessories are subject to change without notice.
APPLICATIONS
○ Cutting of timber/logs
○ Pruning, felling of garden trees
BATTERY REMOVAL/INSTALLATION
1. Battery removal
Hold the housing tightly and push the battery latches to
remove the battery (see Fig. 3).
CAUTION
Never short-circuit the battery.
2. Battery installation
Insert the battery while observing its polarities (see Fig.
3).
CHARGING
Before using the power tool, charge the battery as follows.
1. Connect the charger’s power cord to a receptacle.
When connecting the plug of the charger to
a receptacle, the pilot lamp will blink in red
(At 1-second intervals).
2. Insert the battery into the charger.
Firmly insert the battery into the charger until the line is
visible, as shown in Fig. 4, 5.
3. Charging
When inserting a battery in the charger, charging will
commence and the pilot lamp will light continuously in
red.
When the battery becomes fully recharged, the pilot
lamp will blink in red. (At 1-second intervals) (See
Table 1)
(1) Pilot lamp indication
The indications of the pilot lamp will be as shown in
Table 1, according to the condition of the charger or the
rechargeable battery.
CHARGER
Model UC36YRSL
Charging voltage 14.4 V – 36 V
Weight 0.7 kg
STANDARD ACCESSORIES
CS36DL
LBR NN
1 Charger (UC36YRSL)
1
-
2 Battery (BSL3620)
1
-
3 Battery cover
1
-
4 Chain case
11
5 File set
11
6 Oil feeder
22
7 Hexagonal bar wrench
11
Standard accessories are subject to change without notice.
OPTIONAL ACCESSORIES (sold separately)
○ Battery
(BSL3620) (BSL3626)
○ Back pack power supply
(BL36200)
Table 1
Indications of the pilot lamp
The
pilot lamp
lights or
blinks in
red.
Before
charging
Blinks
Lights for 0.5 seconds. Does not light for 0.5
seconds. (off for 0.5 seconds)
While
charging
Lights
Lights continuously
Charging
complete
Blinks
Lights for 0.5 seconds. Does not light for 0.5
seconds. (off for 0.5 seconds)
Charging
impossible
Flickers
Lights for 0.1 seconds. Does not light for 0.1
seconds. (off for 0.1 seconds)
Malfunction in the
battery or the charger
The
pilot lamp
lights in
green.
Overheat
standby
Lights
Lights continuously
Battery overheated.
Unable to charge
(Charging will commence
when battery cools).

20
English
(2) Regarding the temperatures of the rechargeable
battery
The temperatures for rechargeable batteries are as
shown in Table 2, and batteries that have become hot
should be cooled for a while before being recharged.
Table 2 Recharging ranges of batteries
Rechargeable batteries
Temperatures at
which the battery
can be recharged
BSL3620 0°C – 50°C
(3) Regarding recharging time
Depending on the combination of the charger and
batteries, the charging time will become as shown in
Table 3.
Table 3 Charging time (At 20°C)
Charger
Battery
UC36YRSL
BSL3620 Approx. 60 min.
NOTE
The charging time may vary according to temperature
and power source voltage.
4. Disconnect the charger’s power cord from the
receptacle.
5. Hold the charger fi rmly and pull out the battery.
NOTE
After operation, pull out batteries from the charger fi rst,
and then keep the batteries properly.
How to make the batteries perform longer
(1) Recharge the batteries before they become completely
exhausted.
When you feel that the power of the tool becomes
weaker, stop using the tool and recharge its battery.
If you continue to use the tool and exhaust the electric
current, the battery may be damaged and its life will
become shorter.
(2) Avoid recharging at high temperatures.
A rechargeable battery will be hot immediately after
use. If such a battery is recharged immediately after
use, its internal chemical substance will deteriorate,
and the battery life will be shortened. Leave the battery
and recharge it after it has cooled for a while.
CAUTION
○ If the battery is charged while it is heated because it has
been left for a long time in a location subject to direct
sunlight or because the battery has just been used, the
pilot lamp of the charger lights up green. In such a case,
fi rst let the battery cool, then start charging.
○ When the pilot lamp fl ickers in red (at 0.2-seconds
intervals), check for and take out any foreign objects in
the charger’s battery connector. If there are no foreign
objects, it is probable that the battery or charger is
malfunctioning. Take it to your authorized Service
Center.
○ Since the built-in micro computer takes about 3
seconds to confi rm that the battery being charged
with UC36YRSL is taken out, wait for a minimum of 3
seconds before reinserting it to continue charging. If
the battery is reinserted within 3 seconds, the battery
may not be properly charged.
INSTALLING (REPLACING) SAW CHAIN
WARNING
○ To prevent accidents, always switch the unit off , and
remove the storage battery.
○ Don't use the saw chain or the guide bar other than
those specifi ed in "SPECIFICATIONS".
CAUTION
Wear gloves and be careful to avoid injury with the saw
chain.
NOTE
○ When removing the saw chain, remove sawdust from
the oil spout, oil hole, and guide bar groove.
If sawdust accumulates, this may cause the unit to fail.
○ Use the correct type of saw chain in accordance with
the specifi cations.
If you install the wrong type of guide bar, the saw chain
may come off and injury may occur.
1. Removing the side cover (Fig. 6)
1 Rotate the knob once to loosen it.
2 Rotate the tension dial half a turn to loosen it.
3 Using the supplied hexagonal bar wrench, loosen the
bolt until there is no resistance.
4 Turn the knob and remove the side cover.
2. Removing the saw chain and guide bar (Fig. 7)
Remove the saw chain and guide bar in the direction
indicated by the arrow.
3. Engaging the new saw chain in the sprocket (Fig.
8, 9)
Engage the saw chain at the guide bar tip with attention
to the direction of the saw chain, and then properly
engage the saw chain with the sprocket.
4. Installing the side cover
1 Align the bolt with the bolt hole (Fig. 10)
2 Adjust the tension dial of the side cover so that the
chain tensioner boss is inserted into the guide bar chain
tensioner hole, and attach the side cover. (Fig. 11)
3 Rotate the knob once to temporarily fi x it. (Fig. 12)
5. Adjusting the saw chain tension (Fig. 13)
○ While lifting the guide bar tip, turn the tension dial to
adjust the saw chain tension.
○ Turn the tension dial to the right to increase the saw
chain tension, and to the left to decrease it.
6. Checking the saw chain tension (Fig. 14)
Adjust the saw chain tension so that the gap between
the saw chain drive link and the guide bar is 0.5 to 1 mm
when you lift the saw chain slightly near the center of
the guide bar.
7. Securing the knob (Fig. 15)
1 When adjustment is complete, lift up the guide bar, and
fully tighten the knob.
2 Make sure the bolt is fi rmly tightened.
WARNING
After adjusting the saw chain tension, ensure the knob
is fully tightened.
If it is loose, injury may occur.
INSPECTION AND PREPARATION PRIOR TO
USE
Prior to use, make the following inspection and preparation.
WARNING
○ To prevent accidents, always perform steps 1 to 4
ensuring the storage battery is removed from the body.
○ Do not secure the lock-off button while it is pressed.
If the switch is accidentally engaged, the unit may
unexpectedly start and injury may occur.
Strona się ładuje...
Strona się ładuje...
Strona się ładuje...
Strona się ładuje...
Strona się ładuje...
Strona się ładuje...
Strona się ładuje...
Strona się ładuje...
Strona się ładuje...
Strona się ładuje...
Strona się ładuje...
Strona się ładuje...
Strona się ładuje...
Strona się ładuje...
Strona się ładuje...
Strona się ładuje...
Strona się ładuje...
Strona się ładuje...
Strona się ładuje...
Strona się ładuje...
Strona się ładuje...
Strona się ładuje...
Strona się ładuje...
Strona się ładuje...
Strona się ładuje...
Strona się ładuje...
Strona się ładuje...
Strona się ładuje...
Strona się ładuje...
Strona się ładuje...
Strona się ładuje...
Strona się ładuje...
Strona się ładuje...
Strona się ładuje...
Strona się ładuje...
Strona się ładuje...
Strona się ładuje...
Strona się ładuje...
Strona się ładuje...
Strona się ładuje...
Strona się ładuje...
Strona się ładuje...
Strona się ładuje...
Strona się ładuje...
Strona się ładuje...
Strona się ładuje...
Strona się ładuje...
Strona się ładuje...
Strona się ładuje...
Strona się ładuje...
Strona się ładuje...
Strona się ładuje...
Strona się ładuje...
Strona się ładuje...
Strona się ładuje...
Strona się ładuje...
Strona się ładuje...
Strona się ładuje...
Strona się ładuje...
Strona się ładuje...
Strona się ładuje...
Strona się ładuje...
Strona się ładuje...
Strona się ładuje...
Strona się ładuje...
Strona się ładuje...
Strona się ładuje...
Strona się ładuje...
Strona się ładuje...
Strona się ładuje...
Strona się ładuje...
Strona się ładuje...
Strona się ładuje...
Strona się ładuje...
Strona się ładuje...
Strona się ładuje...
Strona się ładuje...
Strona się ładuje...
Strona się ładuje...
Strona się ładuje...
Strona się ładuje...
Strona się ładuje...
Strona się ładuje...
Strona się ładuje...
Strona się ładuje...
Strona się ładuje...
Strona się ładuje...
Strona się ładuje...
Strona się ładuje...
Strona się ładuje...
Strona się ładuje...
Strona się ładuje...
Strona się ładuje...
Strona się ładuje...
Strona się ładuje...
Strona się ładuje...
Strona się ładuje...
Strona się ładuje...
Strona się ładuje...
Strona się ładuje...
Strona się ładuje...
Strona się ładuje...
Strona się ładuje...
Strona się ładuje...
Strona się ładuje...
Strona się ładuje...
Strona się ładuje...
Strona się ładuje...
Strona się ładuje...
Strona się ładuje...
Strona się ładuje...
Strona się ładuje...
Strona się ładuje...
Strona się ładuje...
Strona się ładuje...
Strona się ładuje...
Strona się ładuje...
Strona się ładuje...
Strona się ładuje...
Strona się ładuje...
Strona się ładuje...
Strona się ładuje...
Strona się ładuje...
Strona się ładuje...
Strona się ładuje...
Strona się ładuje...
Strona się ładuje...
Strona się ładuje...
Strona się ładuje...
Strona się ładuje...
Strona się ładuje...
Strona się ładuje...
Strona się ładuje...
Strona się ładuje...
Strona się ładuje...
Strona się ładuje...
Strona się ładuje...
Strona się ładuje...
Strona się ładuje...
Strona się ładuje...
Strona się ładuje...
Strona się ładuje...
Strona się ładuje...
Strona się ładuje...
Strona się ładuje...
Strona się ładuje...
Strona się ładuje...
Strona się ładuje...
Strona się ładuje...
Strona się ładuje...
Strona się ładuje...
Strona się ładuje...
Strona się ładuje...
Strona się ładuje...
Strona się ładuje...
Strona się ładuje...
Strona się ładuje...
Strona się ładuje...
Strona się ładuje...
Strona się ładuje...
Strona się ładuje...
Strona się ładuje...
Strona się ładuje...
Strona się ładuje...
Strona się ładuje...
Strona się ładuje...
Strona się ładuje...
Strona się ładuje...
Strona się ładuje...
Strona się ładuje...
Strona się ładuje...
Strona się ładuje...
-
 1
1
-
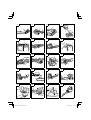 2
2
-
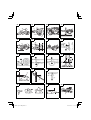 3
3
-
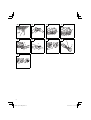 4
4
-
 5
5
-
 6
6
-
 7
7
-
 8
8
-
 9
9
-
 10
10
-
 11
11
-
 12
12
-
 13
13
-
 14
14
-
 15
15
-
 16
16
-
 17
17
-
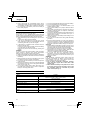 18
18
-
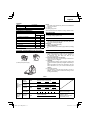 19
19
-
 20
20
-
 21
21
-
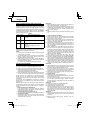 22
22
-
 23
23
-
 24
24
-
 25
25
-
 26
26
-
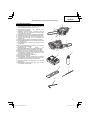 27
27
-
 28
28
-
 29
29
-
 30
30
-
 31
31
-
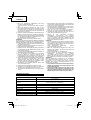 32
32
-
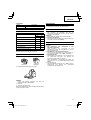 33
33
-
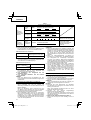 34
34
-
 35
35
-
 36
36
-
 37
37
-
 38
38
-
 39
39
-
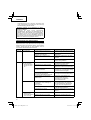 40
40
-
 41
41
-
 42
42
-
 43
43
-
 44
44
-
 45
45
-
 46
46
-
 47
47
-
 48
48
-
 49
49
-
 50
50
-
 51
51
-
 52
52
-
 53
53
-
 54
54
-
 55
55
-
 56
56
-
 57
57
-
 58
58
-
 59
59
-
 60
60
-
 61
61
-
 62
62
-
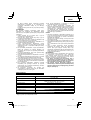 63
63
-
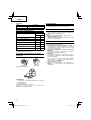 64
64
-
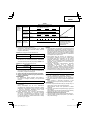 65
65
-
 66
66
-
 67
67
-
 68
68
-
 69
69
-
 70
70
-
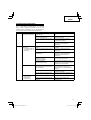 71
71
-
 72
72
-
 73
73
-
 74
74
-
 75
75
-
 76
76
-
 77
77
-
 78
78
-
 79
79
-
 80
80
-
 81
81
-
 82
82
-
 83
83
-
 84
84
-
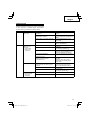 85
85
-
 86
86
-
 87
87
-
 88
88
-
 89
89
-
 90
90
-
 91
91
-
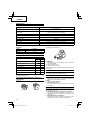 92
92
-
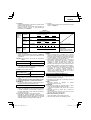 93
93
-
 94
94
-
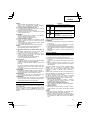 95
95
-
 96
96
-
 97
97
-
 98
98
-
 99
99
-
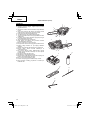 100
100
-
 101
101
-
 102
102
-
 103
103
-
 104
104
-
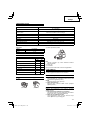 105
105
-
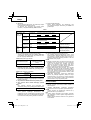 106
106
-
 107
107
-
 108
108
-
 109
109
-
 110
110
-
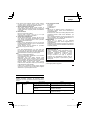 111
111
-
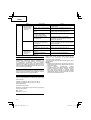 112
112
-
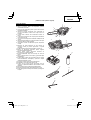 113
113
-
 114
114
-
 115
115
-
 116
116
-
 117
117
-
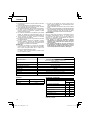 118
118
-
 119
119
-
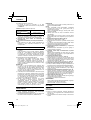 120
120
-
 121
121
-
 122
122
-
 123
123
-
 124
124
-
 125
125
-
 126
126
-
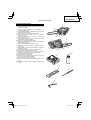 127
127
-
 128
128
-
 129
129
-
 130
130
-
 131
131
-
 132
132
-
 133
133
-
 134
134
-
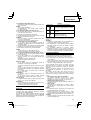 135
135
-
 136
136
-
 137
137
-
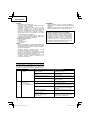 138
138
-
 139
139
-
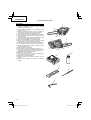 140
140
-
 141
141
-
 142
142
-
 143
143
-
 144
144
-
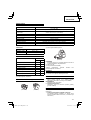 145
145
-
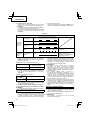 146
146
-
 147
147
-
 148
148
-
 149
149
-
 150
150
-
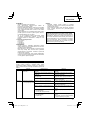 151
151
-
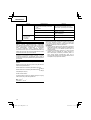 152
152
-
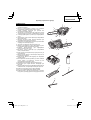 153
153
-
 154
154
-
 155
155
-
 156
156
-
 157
157
-
 158
158
-
 159
159
-
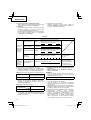 160
160
-
 161
161
-
 162
162
-
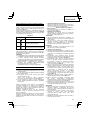 163
163
-
 164
164
-
 165
165
-
 166
166
-
 167
167
-
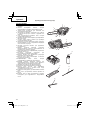 168
168
-
 169
169
-
 170
170
-
 171
171
-
 172
172
-
 173
173
-
 174
174
-
 175
175
-
 176
176
-
 177
177
-
 178
178
-
 179
179
-
 180
180
-
 181
181
-
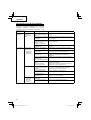 182
182
-
 183
183
-
 184
184
-
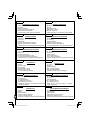 185
185
-
 186
186
-
 187
187
-
 188
188
-
 189
189
-
 190
190
-
 191
191
-
 192
192


Hitachi DH 36DL Instrukcja obsługi
- Kategoria
- Piły łańcuchowe
- Typ
- Instrukcja obsługi
- Niniejsza instrukcja jest również odpowiednia dla
w innych językach
- slovenčina: Hitachi DH 36DL Používateľská príručka
- Türkçe: Hitachi DH 36DL Kullanım kılavuzu
- română: Hitachi DH 36DL Manual de utilizare
Powiązane artykuły
-
Hitachi CS 40Y Handing Instructions
-
Hitachi RB 36DL Handling Instructions Manual
-
Hitachi CH 36DL Instrukcja obsługi
-
Hitachi DH 36DL Instrukcja obsługi
-
-
-
Hitachi CS 33EDT Handling Instructions Manual
-
-
-
Inne dokumenty
-
Skil 0780 AA Instrukcja obsługi
-
Black & Decker Alligator GKC1000L Instrukcja obsługi
-
Worx EC-P115 Instrukcja obsługi
-
Makita DUC306 Instrukcja obsługi
-
Scheppach BPT700-40Li Translation Of Original Operating Manual
-
 XTline XT102872 Instrukcja obsługi
-
Hikoki TCS 33EB Instrukcja obsługi
-
Gardena CST 3518 Instrukcja obsługi
-
AL-KO solo 646 (.325") mit 38 cm Schiene und Kette Instrukcja obsługi
-
Hikoki P14DSL Cordless Li-ion Planer Instrukcja obsługi
