Clatronic WSU 7024 Instrukcja obsługi
- Kategoria
- Budziki
- Typ
- Instrukcja obsługi

Station météo avec horloge
Estación meteorológica con reloj
Weather Station with Clock
Stacja pogodowa z zegarem
WETTERSTATION MIT UHR
WSU 7024
Bedienungsanleitung / Garantie
Mode d’emploi • Manual de instrucciones
Instruction Manual • Instrukcja obsługi / Gwarancja
Display
L’écran • Pantalla • Display • Wyświetlacz
1
WSU7024_IM_CTC_A3 25.01.18
DEUTSCH
Allgemeine Sicherheitshinweise
Lesen Sie vor Inbetriebnahme dieses Gerätes die Bedienungs anleitung
sehr sorgfältig durch und bewahren Sie diese inkl. Garantieschein,
Kassenbon und nach Möglichkeit den Karton mit Innenverpackung
gut auf. Falls Sie das Gerät an Dritte weitergeben, geben Sie auch die
Bedienungsanleitung mit.
• Das Gerät nicht an extrem heißen, kalten, staubigen oder feuchten
Orten verwenden.
• Benutzen Sie das Gerät ausschließlich für den privaten und den dafür
vorgesehenen Zweck. Dieses Gerät ist nicht für den gewerblichen
Gebrauch bestimmt.
• Batterien stets richtig herum einlegen.
• Setzen Sie das Gerät keinem Tropf- oder Spritzwasser aus.
• Niemals das Gehäuse des Gerätes öffnen.
• Benutzen Sie das Gerät längere Zeit nicht, entnehmen Sie die
Batterien.
• Bei Verwendung von externen Netzteilen auf die richtige Polarität und
Spannung achten.
Kinder und gebrechliche Personen
• Zur Sicherheit Ihrer Kinder lassen Sie keine Verpackungs teile (Plastik-
beutel, Karton, Styropor etc.) erreichbar liegen.
WARNUNG:
Lassen Sie kleine Kinder nicht mit Folie spielen. Es besteht Ersti-
ckungsgefahr!
• Dieses Gerät ist nicht dafür bestimmt, durch Personen (einschließlich
Kinder) mit eingeschränkten physischen, sensorischen oder geistigen
Fähigkeiten oder mangels Erfahrung und / oder mangels Wissen be-
nutzt zu werden, es sei denn, sie werden durch eine für ihre Sicherheit
zuständige Person beaufsichtigt oder erhielten von ihr Anweisungen,
wie das Gerät zu benutzen ist.
• Kinder sollten beaufsichtigt werden, um sicherzustellen, dass sie nicht
mit dem Gerät spielen.
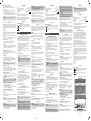
Display
1 Wettervorhersage (FORECAST)
2 Anzeige der Temperatur (TEMPERATURE), der Temperatureinheit
(°C oder °F), aktuell angezeigte Weckzeit (AL1 oder AL2)
3 Raumklimaauswertung (Trend der letzten 12 Stunden)
4 Anzeige der Uhrzeit, des Datums (M = Monat, D = Tag), der Weck-
zeit
5 Wochentag (MON = Montag, TUE = Dienstag, WED = Mittwoch),
THU = Donnerstag, FRI = Freitag, SAT = Samstag, SUN = Sonntag)
6 Anzeige für „Nachmittag“ (PM) bei der 12 Stunden-Anzeige
7 Weckzeit aktiv, Schlummer-Funktion
8 Luftfeuchtigkeit (HUMIDITY)
9 Komfortniveau (COMFORT LEVEL)
10 Anzeige für „Batterie leer“
Inbetriebnahme des Gerätes
Eventuell sind empndliche Flächen mit Folie geschützt. Entfernen Sie
diese Folien.
Batterien einlegen (Batterien nicht im Lieferumfang enthalten)
1. Öffnen Sie das Batteriefach auf der Rückseite.
2. Legen Sie 2 Batterien 1,5 V, Type R03 / AAA ein. Achten Sie auf die
richtige Polarität (siehe Batteriefachboden).
3. Schließen Sie das Batteriefach.
HINWEIS:
Ein Batteriesymbol im Display weist darauf hin, dass die Batterien
getauscht werden sollten.
ACHTUNG:
• Batterien können auslaufen und Batteriesäure verlieren. Wird das
Gerät längere Zeit nicht genutzt, entnehmen Sie die Batterien.
• Ungleiche Batterietypen und neue und gebrauchte Batterien dürfen
nicht zusammen verwenden werden.
• Batterien gehören nicht in den Hausmüll. Geben Sie verbrauchte
Batterien bei zuständigen Sammelstellen oder beim Händler ab.
WARNUNG:
Setzten Sie Batterien keiner hohen Wärme, wie z. B. Sonnenschein,
Feuer oder ähnlichem aus. Es besteht Explosionsgefahr!
Netzteilbetrieb (Netzteil nicht im Lieferumfang enthalten)
Sie haben die Möglichkeit das Gerät auch über ein Steckernetzteil zu
betreiben.
1. Stecken Sie das Steckernetzteil in eine vorschriftsmäßig installierte
Schutzkontakt Steckdose.
2. Stecken Sie den Stecker des Netzteiles in die DC 4.5 V Buchse.
3. Bei der Verwendung eines Netzteils (DC 4,5 - 5 V / 100 mA) achten
Sie bitte auf die richtige Polung gemäß der Aufschriften am Gerät.
HINWEIS:
Bei Betrieb mit Netzteil leuchtet das Display dauerhaft.
Bedienung
Über einen internen Sensor ermittelt das Gerät nicht nur die Raumtem-
peratur und die Luftfeuchtigkeit, sondern zeigt auch eine Raumklimaaus-
wertung an. Die Messung gibt jedoch nicht die tatsächlichen Wetterver-
hältnisse wieder. Um einen ungefähren Wettertrend zu erhalten, stellen
Sie das Gerät in die Nähe eines geöffneten Fensters auf.
MODE Taste
Die normale Uhrzeitanzeige ist die Standardanzeige. Das Gerät wechselt
nach ca. 7 Sekunden automatisch zu dieser Anzeige zurück.
Drücken Sie die MODE Taste wiederholt, um zwischen den folgenden
Anzeigen zu wechseln:
Datum
AL1 (Weckzeit) AL2 normale Uhrzeitanzeige
Einstellungen vornehmen
• Mit den UP / DOWN Tasten nehmen Sie die Einstellungen vor.
• Mit der MODE Taste bestätigen Sie Ihre Einstellungen.
Uhrzeit einstellen
1. Während die Uhrzeit angezeigt wird, halten Sie die MODE Taste
3 Sekunden gedrückt. Die Stunden beginnen zu blinken.
2. Stellen Sie nun nacheinander die Stunden und die Minuten ein.
12 oder 24 Stundenanzeige auswählen
Während die Uhrzeit angezeigt wird, halten Sie die UP Taste 3 Sekunden
gedrückt. Bei der 12 Stunden Anzeige erscheint für „Nachmittags“ die
Anzeige PM.
Datum einstellen
1. Drücken Sie die MODE Taste, um zur Datumsanzeige zu wechseln.
2. Während das Datum angezeigt wird, halten Sie die MODE Taste
3 Sekunden gedrückt. Das Jahr beginnt zu blinken.
3. Stellen Sie nun nacheinander das Jahr, den Monat und den Tag ein.
HINWEIS:
Der richtige Werktag wird automatisch ausgewählt.
Weckzeit einstellen (AL1 / AL2)
1. Wählen Sie die Weckzeit mit der MODE Taste aus.
2. Während die Weckzeit angezeigt wird, halten Sie die MODE Taste
3 Sekunden gedrückt. Die Stunden beginnen zu blinken.
3. Stellen Sie nun nacheinander die Stunden und die Minuten ein.
Weckzeit ein- / ausschalten
Während die Weckzeit angezeigt wird, drücken Sie die UP Taste, um
die Weckzeit ein- bzw. auszuschalten. Bei eingeschalteter Weckzeit
erscheint das Symbol
neben der normalen Uhrzeitanzeige.
HINWEIS:
Sobald die eingestellte Weckzeit erreicht ist, blinkt das Symbol
im Display. Der Intervall des Signaltons steigert sich von langsam zu
schnell.
• Weckzeit bis zum nächsten Tag deaktivieren:
Drücken Sie die UP Taste, oder verwenden Sie die Schlummerfunk-
tion.
• Schlummerfunktion (SNOOZE):
Drücken Sie die SNZ Taste, um den Signalton für ca. 8 Minuten abzu-
schalten. Das Symbol
blinkt.
Temperaturanzeige zwischen °C und °F umschalten
Drücken Sie wiederholt die DOWN Taste, um °C oder °F auszuwählen.
MAX / MIN Taste
Drücken Sie die Taste wiederholt, um sich die maximale, minimalen oder
aktuellen Temperatur / Luftfeuchtigkeit anzeigen zu lassen.
LIGHT Taste (Bei Betrieb mit Netzteil ohne Funktion)
Drücken Sie diese Taste, um die Displaybeleuchtung für kurze Zeit
einzuschalten.
Reinigung
ACHTUNG:
Tauchen Sie das Gerät nicht ins Wasser!
• Äußere Flecken können Sie mit einem leicht feuchten Tuch, ohne
Zusatzmittel, abwischen.
• Wischen Sie mit einem trockenen, weichen Tuch nach.
Technische Daten
Modell: .........................................................................................WSU 7024
Temperaturmessbereich: .............................. 0 °C – 50 °C (32 °F – 122 °F)
Luftfeuchtigkeitsmessbereich: ..................................................20 % – 90 %
Batteriebetrieb: .............................................................. 2 × 1,5 V, AAA / R03
Netzadapter: .........................................DC 4,5 V, 100 mA, Polarität
Nettogewicht: ................................................................................ca. 0,1 kg
Technische und gestalterische Änderungen im Zuge stetiger Produktent-
wicklungen vorbehalten.
Hinweis zur Richtlinienkonformität
Hiermit erklärt der Hersteller, dass sich das Gerät WSU 7024 in Überein-
stimmung mit den folgenden Richtlinien bendet:
• EU-Richtlinie für elektromagnetische Verträglichkeit 2014 / 30 / EU
• RoHS-Richtlinie 2011 / 65 / EU
Garantie
Garantiebedingungen
• Wir übernehmen für das von uns vertriebene Gerät eine Garantie von
24 Monaten ab Kaufdatum (Kassenbon). Als Garantienachweis gilt
der Kaufbeleg.
• Durch Garantieleistungen wird die Garantiezeit nicht verlängert. Es
besteht auch kein Anspruch auf neue Garantieleistungen. Diese
Garantieerklärung ist eine freiwillige Leistung von uns als Hersteller
des Gerätes. Die gesetzlichen Gewährleistungsrechte (Nacherfüllung,
Rücktritt, Schadensersatz und Minderung) werden durch diese
Garantie nicht berührt.
Garantieabwicklung
Im Service- / Garantiefall wenden Sie sich bitte an unseren Dienstleister
SLI (Service Logistik International)
Internet-Serviceportal:
www.sli24.de
Sie können sich dort direkt anmelden und erhalten alle Informationen zur
weiteren Vorgehensweise Ihrer Reklamation.
Über einen persönlichen Zugangscode, der Ihnen direkt nach Ihrer An-
meldung per E-Mail übermittelt wird, können Sie den Bearbeitungsablauf
Ihrer Reklamation auf unserem Serviceportal online verfolgen.
Entsorgung
Umweltschutz
Geben Sie das Gerät am Ende der Lebensdauer nicht in
den normalen Hausmüll. Bringen Sie es zum Recycling zu
einer ofziellen Sammelstelle. Auf diese Weise helfen Sie
die Umwelt zu schonen.
FRANÇAIS
Conseils généraux de sécurité
Lisez attentivement ce mode d’emploi avant de mettre l’appareil en
marche pour la première fois. Conservez le mode d’emploi ainsi que
le bon de garantie, votre ticket de caisse et si possible, le carton avec
l’emballage se trouvant à l’intérieur. Si vous remettez l‘appareil à des
tiers, veuillez-le remettre avec son mode d‘emploi.
• N’utilisez pas l’appareil dans des endroits très humides, poussiéreux,
froids ou chauds.
• Cet appareil est conçu uniquement pour l’utilisation privée et dans la
limite de ce pour quoi il a été conçu. Cet appareil n’est pas destiné à
l’utilisation commerciale.
• Installez toujours les piles dans le bon sens.
• N’exposez pas l’appareil aux éclaboussures ou aux gouttes d’eau.
• Ne jamais ouvrir le coffrage de l’appareil.
• Lorsque vous n’utilisez pas l’appareil pendant un certain temps,
veuillez-en retirer les piles.
• Si vous utilisez une alimentation électrique externe, vériez la polarité
et la tension électrique.
Enfants et personnes fragiles
• Par mesure de sécurité vis-à-vis des enfants, ne laissez pas les em-
ballages (sac en plastique, carton, polystyrène) à leur portée.
AVERTISSEMENT :
Ne pas laisser les jeunes enfants jouer avec le lm. Il y a risque
d’étouffement !
• Le présent appareil n’est pas destiné à être utilisé par des personnes
(y compris les enfants) aux facultés mentales, sensorielles ou phy-
siques limitées ou n’ayant pas l’expérience et / ou les connaissances
requises, à moins d’être sous la surveillance d’une personne respon-
sable de leur sécurité ou d’avoir reçu par elle des instructions sur le
maniement de l’appareil.
• Les enfants doivent être surveillés an de garantir qu’ils ne jouent pas
avec l’appareil.
L’écran
1 Prévisions météo (FORECAST)
2 Afchage de la température (TEMPERATURE), de l’unité de tempé-
rature (°C ou °F), heure d’alarme actuellement afchée (AL1 ou AL2)
3 Évaluation de la température intérieure (tendance sur les 12 der-
nières heures)
4 Afchage de l’heure et de la date actuelle (M = mois, D = jour), de
l’heure d’alarme
5 Jour de la semaine (MON = lundi, TUE = mardi, WED = mercredi,
THU = jeudi, FRI = vendredi, SAT = samedi, SUN = dimanche)
6 Afchage de « l’heure d’après-midi » (PM) en mode d’afchage 12
heures
7 Heure d’alarme active, fonction de report
8 Humidité de l’air (HUMIDITY)
9 Niveau de confort (COMFORT LEVEL)
10 Afchage « Batterie vide »
Avant la première utilisation
Les surfaces sensibles peuvent être protégées par un lm protecteur.
Retirez ce lm.
Pose des piles (non comprises à la livraison)
1. Ouvrez le compartiment a piles a l’arrière.
2. Installez 2 piles de 1,5 V de type R 03 / AAA. Veillez à respecter la
polarité (voir fond du compartiment).
3. Fermez le compartiment à piles.
NOTE :
Le symbole d’une pile sur l’écran indique que les piles doivent être
changées.
ATTENTION :
• L’acide des piles peut fuir. Si vous n’utilisez pas l’appareil pendant
une longue période, retirez les piles.
• Différents types de batterie ou batteries neuves et utilisées ne
doivent pas être utilisés ensemble.
• Ne jetez pas vos piles dans les ordures ménagères. Nous vous
prions de les ramener à un centre de recyclage approprié ou chez
le fabricant.
AVERTISSEMENT :
N’exposez pas les piles à une source intense de chaleur telle que
p.ex. le soleil, le feu ou toute autre source similaire. Il y a un risque
d’explosion !
Fonctionnement avec câble d’alimentation
(Bloc d’alimentation, non fourni)
Vous pouvez également utiliser cet appareil avec un câble d’alimentation.
1. Branchez le câble d’alimentation dans une prise de courant en bon
état de fonctionnement.
2. Insérez la che électrique dans une prise DC 4,5 V.
3. Lorsque vous utilisez un adaptateur secteur (CC 4,5 - 5 V / 100 mA)
veillez à respecter la polarisation correcte, indiquée sur l’étiquette de
l’appareil.
NOTE :
Lorsque vous utilisez l’appareil branché sur un adaptateur secteur,
l’écran reste éclairé en continu.
Fonctionnement
À l’aide d’un capteur intégré, l’appareil peut calculer non seulement la
température et l’humidité de l’air dans la pièce, mais afche également
une évaluation de la température intérieure. Souvenez-vous cependant
que la mesure n’est pas une mesure exacte des conditions météo-
rologiques extérieures. Pour obtenir une mesure approximative des
conditions météo extérieures, positionnez l’appareil proche d’une fenêtre
ouverte.
Bouton MODE
L’afchage de l’heure est le mode d’afchage par défaut. L’appareil
revient à l’afchage de l’heure après un délai d’environ 7 secondes.
Appuyez sur le bouton MODE de manière répétée pour basculer entre
les afchages suivants :
Date
AL1 (Heure d’alarme) AL2 afchage normal de l’heure
Dénir les préférences
• Dénissez les préférences avec les boutons UP / DOWN.
• Conrmez vos préférences avec le bouton MODE.
Régler l’heure
1. En mode d’afchage de l’heure, appuyez sur le bouton MODE et
maintenez-le appuyé pendant 3 secondes. Les heures commencent
à clignoter.
2. Réglez maintenant les heures et les minutes les unes après les
autres.
Sélectionner l’afchage 12 ou 24 heures
En mode d’afchage de l’heure, appuyez sur le bouton UP et mainte-
nez-le appuyé pendant 3 secondes. En mode d’afchage 12 heures, la
mention PM indique les heures pour « l’après-midi ».
Dénir la date
1. Appuyez sur le bouton MODE pour basculer sur l’afchage de la date.
2. En mode d’afchage de la date, appuyez sur le bouton MODE et
maintenez-le appuyé pendant 3 secondes. L’année commence à
clignoter.
3. Réglez maintenant l’année, le mois et la date les uns après les autres.
NOTE :
Le jour de la semaine correct sera automatiquement afché.
Dénir l’alarme (AL1 / AL2)
1. Appuyez sur le bouton MODE pour sélectionner l’alarme.
2. En mode d’afchage de l’alarme, appuyez sur le bouton MODE et
maintenez-le appuyé pendant 3 secondes. Les heures commencent
à clignoter.
3. Réglez maintenant les heures et les minutes les unes après les
autres.
Activer ou désactiver l’heure d’alarme
En mode d’afchage de l’alarme, appuyez sur le bouton UP pour activer
ou désactiver l’alarme. Une fois l’alarme activée, le symbole
apparaît
à côté de l’afchage normal de l’heure.
NOTE :
Une fois l’heure de l’alarme arrivée, le symbole
clignote sur l’écran.
Le rythme de la sonnerie d’alarme accélère graduellement.
• Désactiver l’alarme jusqu’au jour suivant :
Appuyez sur le bouton UP, ou utilisez la fonction Rappel.
• Fonction de rappel (SNOOZE) :
Appuyez sur le bouton SNZ pour désactiver la sonnerie d’alarme
pendant environ 8 minutes. Le symbole
clignote.
Basculer l’afchage de la température entre °C et °F
Appuyez sur le bouton DOWN de manière répétée pour sélectionner
°C ou °F.
Bouton MAX / MIN
Appuyez sur le bouton de manière répétée pour afcher la température
maximum, minimum, ou la température et humidité de l’air actuelle.
Bouton LIGHT (utilisé lorsque l’appareil n’est pas branché sur
l’alimentation secteur)
Appuyez sur ce bouton pour activer brièvement l’éclairage de l’écran.
Nettoyage
ATTENTION :
Ne pas plonger l’appareil dans l’eau.
• Essuyez les taches extérieures avec un chiffon légèrement humide,
sans agent additif.
• Essuyez avec un tissu doux et sec.
Données techniques
Modèle :.......................................................................................WSU 7024
Plage de mesure de la température : ........... 0 °C – 50 °C (32 °F – 122 °F)
Plage de mesure de l’humidité de l’air : ....................................20 % – 90 %
Fonctionnement piles : ..................................................2 × 1,5 V, AAA / R03
Unité d‘alimentation : ............................ CC 4,5 V, 100 mA, polarité
Poids net : ..............................................................................environ 0,1 kg
Nous nous réservons le droit d’apporter des modications techniques
ainsi que des modications de conception dans le cadre du développe-
ment continu de nos produits.
Cet appareil a été contrôlé d’après toutes les directives européennes
actuelles applicables, comme par exemple concernant la compatibilité
électromagnétique et la basse tension. Cet appareil a été fabriqué en
respect des réglementations techniques de sécurité les plus récentes.
Élimination
Protection environnementale
Ne jetez pas l’appareil à la n de sa durée de vie avec les
déchets ménagers. Apportez-le au centre de collecte auto-
risé en vue de son recyclage. Ainsi, vous participez à la pro-
tection de l’environnement.
ESPAÑOL
Indicaciones generales de seguridad
Antes de la puesta en servicio de este aparato lea detenidamente el
manual de instrucciones y guarde éste bien incluido la garantía, el recibo
de pago y si es posible también el cartón de embalaje con el embalaje
interior. En caso de dejar el aparato a terceros, también entregue el
manual de instrucciones.
• No use la unidad en lugares con extremos de calor, frío, polvo o
humedad.
• Esta unidad está destinada exclusivamente a su uso privado y la
aplicación especíca para la que ha sido diseñada. Esta unidad no ha
sido diseñada para nes comerciales.
• Instale siempre las baterías en la dirección correcta.
• No exponga la unidad a goteo ni salpicaduras de agua.
• Jamás se abrirá la carcasa del cuerpo del aparato.
• Si no utiliza el aparato durante un periodo largo, retire las pilas.
• Preste atención a que sea correcta la polaridad cuando se empleen
fuentes de alimentación externas.
Niños y personas débiles
• Para la seguridad de sus niños no deje material de embalaje (Bolsas
de plástico, cartón, poliestireno etc.) a su alcance.
AVISO:
No deje jugar a los niños con la lámina. ¡Existe peligro de asxia!
• Este equipo no está destinado al uso por personas (niños incluidos)
que tengan capacidades físicas, sensóricas o mentales limitadas o
una falta de experiencia y / o conocimientos. Sólo pueden utilizar el
equipo si una persona responsable por su seguridad se les vigile o se
les instruye sobre el uso.
• Los infantiles deberían ser vigilados, para asegurar que no jueguen
con el aparato.
Pantalla
1 Previsión climatológica (FORECAST)
2 Indicación de temperatura (TEMPERATURE), de unidades de
temperatura (ºC o ºF), hora de alarma mostrado actualmente (AL1 o
AL2)
3 Evaluación de temperatura interior (tendencia durante las últimas
12 horas)
4 Indicación de fecha y hora actuales (M = mes, D = día), de hora de
alarma
5 Día de la semana (MON = Lunes, TUE = Martes, WED = Miércoles,
THU = Jueves, FRI = Viernes, SAT = Sábado, SUN = Domingo)
6 Indicación para “tarde” (PM) en la presentación de 12 horas
7 Hora de alarma activa, función de descanso
8 Humedad del aire (HUMIDITY)
9 Nivel de comodidad (COMFORT LEVEL)
10 Indicación para “batería gastada”
Puesta en marcha del aparato
Las supercies sensibles pueden estar protegidas por una película.
Retire esta película.
Introducir baterías (no está incluido en el suministro)
1. Abra la tapa del compartimiento de baterías de la parte posterior.
2. Introduzca 2 baterías de 1,5 V, tipo R03 / AAA. Tenga atención con la
polaridad correcta (vea la indicación en el suelo del compartimento
de baterías).
3. Cierre la cubierta de la pila.
NOTA:
Un símbolo de pila indica que se deberían cambiar las pilas.
ATENCIÓN:
• Las baterías pueden derramar ácido de batería. Si no va a utilizar el
dispositivo durante un periodo prolongado, quite las baterías.
• Tipos de pila desiguales o pilas nuevas y usadas no se pueden
utilizar conjuntamente.
• Las baterías no se deben tirar a la basura doméstica. Por favor
lleve las baterías usadas a sitios especiales de recogida o a su
concesionario.
AVISO:
No exponga las baterías a calor intenso, como la luz del sol, el fuego o
similares.
¡
Riesgo de explosión!

www.ctcgermany.de
Made in P.R.C.
Stand 01 / 2018
WSU 7024
2
WSU7024_IM_CTC_A3 25.01.18
Funcionamiento con adaptador de red
(Bloque de alimentación no forma parte del suministro)
También tiene la posibilidad de poner en marcha su aparato con un
adaptador de red.
1. Introduzca el adaptador de red en una caja de enchufe con toma
tierra e instalada por la norma.
2. Introduzca la toma del adaptador a la conexión DC de 4,5 V.
3. Cuando use un adaptador (CC 4,5 – 5 V / 100 mA) preste atención a
la correcta polarización según la etiqueta del aparato.
NOTA:
Cuando use el aparato con adaptador, la pantalla estará iluminada
continuamente.
Uso
Con el uso de un sensor interno, el aparato calcula no solamente la
temperatura ambiente y la humedad del aire, sino que también muestra
una evaluación de la temperatura interior. Sin embargo, la medición no
reeja las condiciones metereológicas reales. Para recibir una aproxima-
ción de las tendencias meteorológicas, coloque el aparato cerca de una
ventana abierta.
Botón MODE
La indicación de hora normal es la pantalla de hora estándar. El aparato
pasa automáticamente a este indicación aproximadamente cada
7 segundos.
Pulse repetidamente el botón MODE para cambiar entre las indicaciones
siguientes:
Fecha
AL1 (Hora de alarma) AL2 indicación de hora normal
Establecer preferencias
• Establezca las preferencias con los botones UP / DOWN.
• Conrme las preferencias usando el botón MODE.
Ajuste de hora
1. Cuando la indicación de hora esté activa, pulse el botón MODE y
manténgalo pulsado 3 segundos. Las horas comenzarán a parpadear.
2. Ajuste las horas y los minutos consecutivamente.
Selección de indicación de 12 o 24 horas
Cuando la indicación de hora esté activa, pulse el botón UP y man-
téngalo pulsado 3 segundos. En la indicación de 12 horas aparece la
indicación PM para “tarde”.
Establecer fecha
1. Pulse el botón MODE para pasar a la indicación de fecha.
2. Cuando la indicación de fecha esté activa, pulse el botón MODE y
manténgalo pulsado 3 segundos. El año comenzará a parpadear.
3. Ajuste el año, mes y día consecutivamente.
NOTA:
Se mostrará el día de la semana correcto automáticamente.
Establecer alarma (AL1 / AL2)
1. Seleccione la alarma usando el botón MODE.
2. Cuando la indicación de alarma esté activa, pulse el botón MODE y
manténgalo pulsado 3 segundos. Las horas comenzarán a parpadear.
3. Ajuste las horas y los minutos consecutivamente.
Activar / desactivar hora de alarma
Cuando la indicación de alarma esté activa, pulse el botón UP para
activar y desactivar la alarma. Cuando la alarma esté activada aparecerá
el símbolo
al lado de la indicación de hora normal.
NOTA:
En cuanto se alcance la hora de alarma establecida, el símbolo
parpadeará en la pantalla. El intervalo del tono de señal aumentará,
de lento a rápido.
• Desactivar la alarma hasta el día siguiente:
Pulse el botón UP o use la función de descanso.
• Función de descanso (SNOOZE):
Pulse el botón SNZ para apagar el tono de señal durante aproximada-
mente 8 minutos. El símbolo
parpadeará.
Cambiar indicación de temperatura entre ºC y ºF
Pulse repetidamente el botón DOWN para seleccionar °C o °F.
Botón MAX / MIN
Pulse repetidamente el botón para mostrar la temperatura / humedad del
aire máxima, mínima o actual.
Botón LIGHT
(cuando se use con adaptador de alimentación sin funcionamiento)
Pulse este botón para activar brevemente la luz de la pantalla.
Limpieza
ATENCIÓN:
¡No sumerja el dispositivo en agua!
• Las manchas exteriores pueden limpiarse con un paño ligeramente
húmedo, sin detergente adicional.
• Seque con un paño suave y seco.
Datos técnicos
Modelo:........................................................................................WSU 7024
Gama de medición de temperatura: ............. 0 °C – 50 °C (32 °F – 122 °F)
Gama de medición de humedad del aire: ................................20 % – 90 %
Funcionamiento de pila: ................................................2 × 1,5 V, AAA / R03
Adaptador de red: ..............................CC 4,5 V, 100 mA, Polaridad
Peso neto: ................................................................................aprox. 0,1 kg
El derecho de realizar modicaciones técnicas y de diseño en el curso
del desarrollo continuo del producto está reservado.
Este dispositivo cumple con todas las directrices CE actuales, como la
directriz de compatibilidad electromagnética y de bajo voltaje, y está
fabricada según las últimas normas de seguridad.
Eliminación
Protección medioambiental
Al nal de su vida útil, no elimine este dispositivo junto con
los residuos domésticos comunes. Llévelo a un punto de re-
cogida autorizado para su reciclaje. Con ello, contribuirá a
proteger el medio ambiente.
ENGLISH
General Safety Instructions
Read the operating instructions carefully before putting the appliance into
operation and keep the instructions including the warranty, the receipt
and, if possible, the box with the internal packing. If you give this device
to other people, please also pass on the operating instructions.
• Do not use the appliance in extremely hot, cold, dusty, or damp
places.
• The appliance is designed solely for private use and its intended
purpose. This appliance is not designed for commercial use.
• Always install batteries in the correct direction.
• This appliance shall not be exposed to dripping or splashing water.
• Never open the housing of the device.
• If you intend not to use the device for a prolonged period, please
remove the batteries.
• When using external mains supply, pay attention to the correct polarity
and voltage.
Children and Frail Individuals
• In order to ensure your children’s safety, please keep all packaging
(plastic bags, boxes, polystyrene etc.) out of their reach.
WARNING:
Do not allow small children to play with the foil. There is a danger of
suffocation!
• This device is not intended to be used by individuals (including chil-
dren) who have restricted physical, sensory or mental abilities and / or
insufcient knowledge and / or experience, unless they are supervised
by an individual who is responsible for their safety or have received
instructions on how to use the device.
• Children should be supervised at all times in order to ensure that they
do not play with the device.
Display
1 Weather forecast (FORECAST)
2 Display of temperature (TEMPERATURE), of temperature unit (°C or
°F),currently displayed alarm time (AL1 or AL2)
3 Evaluation of indoor temperature (trend during the last 12 hours)
4 Display of current time and date (M = month, D = day), of alarm time
5 Weekday (MON = Monday, TUE = Tuesday, WED = Wednesday,
THU = Thursday, FRI = Friday, SAT = Saturday, SUN = Sunday)
6 Display for “afternoon“ (PM) on the 12-hour display
7 Alarm time active, snooze function
8 Air humidity (HUMIDITY)
9 Comfort level (COMFORT LEVEL)
10 Display for “empty battery”
Commissioning the Device
Sensitive surfaces may be protected by plastic foil. Remove this foil.
Inserting the Batteries (Batteries not Supplied)
1. Open the battery compartment lid on the back.
2. Insert 2 1.5 V R 03 / AAA type batteries. Match the polarities correctly
(see the inside of the battery compartment).
3. Close the battery compartment.
NOTE:
A battery symbol in the display indicates that the batteries need to be
replaced.
CAUTION:
• Batteries can leak battery acid. If the device is out of use for a long
period of time, remove the batteries.
• Different battery types or new and used batteries must not be used
together.
• Batteries are not to be disposed of together with domestic wastes.
Dispose of the used batteries at the relevant collection bin or at
your dealer’s.
WARNING:
The batteries shall not be exposed to excessive heat such as sun-
shine, re or the like. Danger of explosion!
Power Adapter Operation (Power Adaptor not Supplied)
It is possible to operate the device using the mains power adaptor.
1. Insert the plug of the power adaptor into a correctly installed wall
socket.
2. Insert the adaptor plug into the DC 4.5 V socket.
3. When using an adaptor (DC 4.5 - 5 V / 100 mA) please pay attention
to the correct polarisation according to the appliance’s label.
NOTE:
When operating the appliance using the adaptor, the display remains
illuminated continuously.
Operation
With the use of an internal sensor, the appliance calculates not only the
room temperature and air humidity, but also displays an evaluation of the
indoor temperature. However, the measurement does not reect the ac-
tual weather conditions. To receive an approximation of weather trends,
place the appliance near an open window.
MODE Button
The normal time display is the standard time display. The appliance auto-
matically switches back to this display every approx. 7 seconds.
Press the MODE button repeatedly to alternate between the following
displays:
Date
AL1 (Alarm time) AL2 normal time display
Set Preferences
• Set preferences with the UP / DOWN buttons.
• Conrm preferences using the MODE button.
Adjust Time
1. While the time display is active, press the MODE button and hold it
down for 3 seconds. The hours will begin to blink.
2. Now adjust the hours and the minutes one after the other.
Select 12 or 24 Hour Display
While the time display is active, press the UP button and hold it down
for 3 seconds. On the 12-hour display, the PM display appears for
“afternoons”.
Set Date
1. Press the MODE button to switch to the date display.
2. While the date display is active, press the MODE button and hold it
down for 3 seconds. The year will begin to blink.
3. Now adjust the year, month and day, one after the other.
NOTE:
The correct weekday will be automatically displayed.
Set Alarm (AL1 / AL2)
1. Select the alarm using the MODE button.
2. While the alarm display is active, press the MODE button and hold it
down for 3 seconds. The hours will begin to blink.
3. Now adjust the hours and the minutes one after the other.
Turn Alarm Time On / Off
While the alarm display is active, press the UP button to turn the alarm
on and off. While the alarm is activated, the
symbol will appear next to
the normal time display.
NOTE:
As soon as the adjusted alarm time is reached, the
symbol will blink
in the display. The interval of the signal tone will increase from slow
to fast.
• Deactivate alarm until the following day:
Press the UP button, or use the snooze function.
• Snooze Function (SNOOZE):
Press the SNZ button to switch off the signal tone for approx. 8 min-
utes. The
symbol will blink.
Toggle Temperature Display Between °C and °F
Press the DOWN button repeatedly to select °C or °F.
MAX / MIN Button
Press the button repeatedly to display the maximum, minimum, or current
temperature / air humidity.
LIGHT Button (When Operating with Power Adapter without Function)
Press this button to briey turn on the display light.
Cleaning
CAUTION:
Do not immerse the device in water.
• Any marks on the surface can be wiped off with a slightly damp cloth
without any additives.
• Polish with a dry, soft cloth.
Technical Data
Model:..........................................................................................WSU 7024
Temperature measurement range: ............... 0 °C – 50 °C (32 °F – 122 °F)
Air humidity measurement range: .............................................20 % – 90 %
Battery operation: ..........................................................2 × 1.5 V, AAA / R03
Power adapter: .......................................DC 4.5 V, 100 mA, polarity
Net weight: .............................................................................approx. 0.1 kg
The right to make technical and design modications in the course of
continuous product development remains reserved.
This device has been tested according to all relevant current CE
guidelines, such as electromagnetic compatibility and low voltage
directives, and has been constructed in accordance with the latest safety
regulations.
Disposal
Environmental Protection
Do not dispose of the device at the end of its service life
with normal household waste. Bring it to the ofcial collec-
tion point for recycling. By doing this, you help protect the
environment.
JĘZYK POLSKI
Ogólne wskazówki bezpieczeństwa
Przed uruchomieniem urządzenia proszę bardzo dokładnie przeczytać
instrukcję obsługi. Proszę zachować ją wraz z kartą gwarancyjną,
paragonem i w miarę możliwości również kartonem z opakowaniem
wewnętrznym. Przekazując urządzenie innej osobie, oddaj jej także
instrukcję obsługi.
• Urządzenia nie należy używać w bardzo gorących, zimnych, zakurzo-
nych ani wilgotnych miejscach.
• Z urządzenia należy korzystać wyłącznie do celów prywatnych
i zgodnie z przeznaczeniem. Urządzenie to nie jest przeznaczone do
użytku komercyjnego.
• Zawsze instalować baterię we właściwym kierunku.
• Urządzenia nie należy wystawiać na działanie kapiącej ani rozchlapu-
jącej się wody.
• Nigdy nie wolno otwierać obudowy urządzenia.
• Jeżeli urządzenie nie będzie przez dłuższy czas używane, wyjmij
baterie.
• W przypadku używania oddzielnych zasilaczy należy zwrócić uwagę
na biegunowość i napięcie.
Dzieci i osoby niepełnosprawne
• Dla bezpieczeństwa dzieci proszę nie zostawiać swobodnie dostęp-
nych części opakowania (torby plastikowe, kartony, styropian itp.).
OSTRZEŻENIE:
Nie pozwalaj dzieciom bawić się folią. Niebezpieczeństwo udu-
szenia!
• To urządzenie nie może być używane przez osoby (w tym dzieci)
o ograniczonych możliwościach zycznych, motorycznych lub umysło-
wych lub nie posiadające niezbędnego doświadczenia i / lub wiedzy.
Użytkowanie urządzenia przez takie osoby jest możliwe wyłącznie
pod nadzorem opiekuna lub po otrzymaniu wskazówek dotyczących
używania urządzenia.
• Nie pozwalaj dzieciom bawić się urządzeniem.
Wyświetlacz
1 Prognoza pogody (FORECAST)
2 Wyświetlanie temperatury (TEMPERATURE), jednostka temperatury
(°C lub °F), aktualnie wyświetlana godzina budzenia (AL1 lub AL2)
3 Ocena temperatury wewnętrznej (tendencja w ciągu ostatnich 12 go-
dzin)
4 Wyświetlanie aktualnej godziny i daty (M = miesiąc, D = dzień),
godziny budzenia
5 Dzień tygodnia (MON = poniedziałek, TUE = wtorek, WED = środa,
THU = czwartek, FRI = piątek, SAT = sobota, SUN = niedziela)
6 Wyświetlanie „po południu” (PM) przy wyświetlaniu 12-godzinnym
7 Godzina budzenia jest aktywna, funkcja drzemki
8 Wilgotność powietrza (HUMIDITY)
9 Poziom komfortu (COMFORT LEVEL)
10 Wyświetlanie „pustej baterii”
Użytkowanie urządzenia
Delikatne powierzchnie mogą być zabezpieczone plastikową folią. Folię
należy zdjąć.
Wkładanie baterii (nie objęte dostawą)
1. Otwórz pokrywę wnęki na baterie z tyłu urządzenia.
2. Proszę umieścić w środku dwie baterie 1,5 V, typ R 03 / AAA. Proszę
pamiętać o prawidłowej polarności (patrz spód kieszeni na baterie).
3. Zamknij pojemnik na baterie.
WSKAZÓWKA:
Symbol baterii w wyświetlaczu sygnalizuje, że baterie powinny być
wymienione.
UWAGA:
• Z baterii może wyciekać kwas. Dlatego należy wyjąć baterie, jeśli
urządzenie ma być nieużywane przez dłuższy okres czasu.
UWAGA:
• Nie wolno łączyć baterii różnych typów lub baterii nowych z uży-
wanymi.
• Baterii nie należy wrzucać do zwykłych domowych śmieci. Zużyte
baterie proszę oddać do punktu zbiórki odpadów specjalnych lub do
punktu sprzedaży.
OSTRZEŻENIE:
Baterii nie należy wystawiać na działanie silnych źródeł ciepła, takich
jak światło słoneczne, ogień itp. Istnieje ryzyko wybuchu!
Używanie zasilacza (Zasilacza nie ma w komplecie)
Mają Państwo także możliwość zasilania urządzenia poprzez zasilacz
z wtyczką.
1. Proszę włożyć zasilacz z wtyczką do przepisowo zainstalowanego
gniazdka ze stykiem uziemiającym.
2. Włóż wtyczkę zasilacza do gniazdka DC 4,5 V.
3. W przypadku stosowania zasilacza (DC 4,5 - 5 V / 100 mA) należy
zwrócić uwagę na poprawną polaryzację zgodnie z etykietą urzą-
dzenia.
WSKAZÓWKA:
Podczas obsługi urządzenia za pomocą zasilacza, wyświetlacz pozo-
staje cały czas podświetlony.
Działanie
Przy użyciu czujnika wewnętrznego urządzenie oblicza nie tylko tem-
peraturę pokojową i wilgotność powietrza, ale także wyświetla ocenę
temperatury wewnętrznej. Niemniej jednak, pomiar nie odzwierciedla
faktycznych warunków pogodowych. Aby uzyskać przybliżenie tendencji
pogodowych, umieść urządzenie w pobliżu otwartego okna.
Przycisk MODE
Normalna godzina wyświetlania to standardowy tryb wyświetlania.
Wyświetlacz automatycznie przełącza się na pokazywanie godziny po
ok. 7 sekundach.
Naciśnij kilkakrotnie przycisk MODE, aby przełączać między następują-
cymi informacjami:
Data
AL1 (godzina budzenia) AL2 normalna godzina
Ustawianie preferencji
• Ustaw preferencje za pomocą przycisków UP / DOWN.
• Potwierdź ustawienia za pomocą przycisku MODE.
Ustawianie godziny
1. Gdy wyświetlacz pokazuje godzinę, naciśnij przycisk MODE i przytrzy-
maj go przez 3 sekundy. Godziny zaczną migać.
2. Ustaw teraz godziny i minuty jedno po drugim.
Format 12 / 24-godzinny
Gdy wyświetlacz pokazuje godzinę, naciśnij przycisk UP i przytrzymaj go
przez 3 sekundy. W opcji 12-godzinnej na wyświetlaczu pojawia się PM
„po południu”.
Ustawianie daty
1. Naciśnij przycisk MODE, aby przełączyć na wyświetlanie daty.
2. Gdy wyświetlacz pokazuje datę, naciśnij przycisk MODE i przytrzymaj
go przez 3 sekundy. Zacznie migać rok.
3. Ustaw teraz rok, miesiąc i dzień, jedno po drugim.
WSKAZÓWKA:
Poprawny dzień tygodnia zostanie wyświetlony automatycznie.
Ustawianie budzika (AL1 / AL2)
1. Wybierz budzik za pomocą przycisku MODE.
2. Gdy wyświetlacz pokazuje budzik, naciśnij przycisk MODE i przytrzy-
maj go przez 3 sekundy. Godziny zaczną migać.
3. Ustaw teraz godziny i minuty jedno po drugim.
Włączanie / wyłączanie budzika
Gdy wyświetlacz pokazuje budzik, naciśnij przycisk UP, aby włączyć
i wyłączyć budzik. Gdy budzik jest włączony, symbol
pojawi się obok
normalnie wyświetlanej godziny.
WSKAZÓWKA:
Natychmiast po osiągnięciu ustawionego czasu budzenia, symbol
zacznie migać na wyświetlaczu. Przerwa pomiędzy sygnałami dźwię-
kowymi będzie się skracać.
• Wyłączenie budzika do następnego dnia:
Naciśnij przycisk UP lub użyj funkcji drzemki.
• Funkcja drzemki (SNOOZE):
Naciśnij przycisk SNZ, aby wyłączyć sygnał dźwiękowy na ok. 8 mi-
nut. Symbol
będzie migać.
Przełączanie wyświetlenia temperatury między °C a °F
Naciskaj przycisk DOWN, aby wybrać °C lub °F.
Przycisk MAX / MIN
Naciśnij przycisk kilkakrotnie, aby wyświetlić maksymalną, minimalną lub
aktualną temperaturę / wilgotność powietrza.
Przycisk LIGHT (podczas pracy z zasilaczem bez funkcji)
Naciśnij na krótko ten przycisk, aby włączyć wyświetlacz.
Czyszczenie
UWAGA:
Nie wolno zanurzać urządzenia w wodzie.
• Zewnętrzne zabrudzenia mogą Państwo usunąć przy pomocy lekko
wilgotnej ściereczki, bez dodatku środków czyszczących.
• Polerować suchą, miękką szmatką.
Dane techniczne
Model:..........................................................................................WSU 7024
Zakres pomiaru temperatury:........................ 0 °C – 50 °C (32 °F – 122 °F)
Zakres pomiaru wilgotności powietrza:.....................................20 % – 90 %
Zasilanie z baterii: ......................................................... 2 × 1,5 V, AAA / R03
Zasilacz sieciowy: ........................DC 4,5 V, 100 mA, biegunowość
Masa netto: ...................................................................................ok. 0,1 kg
Zastrzegamy sobie prawo wprowadzania zmian technicznych i projekto-
wych w trakcie ciągłego rozwoju produktu.
Niniejsze urządzenie odpowiada wymaganiom normy bezpieczeństwa
użytkowania oraz spełnia wymagania dyrektywy niskonapięciowej i
kompatybilności elektromagnetycznej.
Ogólne warunki gwarancji
Producent / Dystrybutor udziela 24 miesięcy gwarancji na zakupione
urządzenie. Okres gwarancji liczony jest od daty zakupu urządzenia.
W tym okresie uszkodzone urządzenie będzie bezpłatnie wymienione na
wolne od wad. W przypadku, gdy wymiana będzie niemożliwa do zreali-
zowania, Nabywca otrzyma zwrot ceny zakupu urządzenia.
Za uszkodzone urządzenie uważa się takie, które nie spełnia funkcji
określonych w instrukcji obsługi, a przyczyną takiego stanu jest we-
wnętrzna wada fabryczna lub materiałowa.
Gwarancją nie są objęte uszkodzenia mechaniczne, chemiczne,
termiczne, powstałe w wyniku działania sił zewnętrznych (np. przepięcie
w sieci energetycznej czy wyładowania atmosferyczne), jak również
wady powstałe w wyniku obsługi niezgodnej z instrukcją obsługi urzą-
dzenia.
Nabywcy przysługuje prawo do wymiany urządzenia na wolne od wad
lub, jeśli wymiana jest niemożliwa, zwrotu gotówki tylko po dostarczeniu
do punktu zakupu kompletnego urządzenia z oryginalnymi akcesoriami,
instrukcją obsługi i w oryginalnym opakowaniu wraz z dowodem zakupu
i prawidłowo wypełnioną kartą gwarancyjną (pieczątka sklepu, data
sprzedaży urządzenia).
Gwarancja oraz zawarte w niej warunki obowiązują na terenie Rzeczpo-
spolitej Polskiej.
Niniejsza gwarancja nie wyłącza, nie ogranicza ani nie zawiesza upraw-
nień Nabywcy wynikających z przepisów Ustawy z dnia 27 lipca 2002
r. o szczególnych warunkach sprzedaży konsumenckiej oraz o zmianie
kodeksu cywilnego (Dz. U. z 2002 r. Nr 141, poz. 1176).
Dystrybutor:
CTC Clatronic Sp. z o.o
Ul. Brzeska 1
45-960 Opole
Usuwanie
Ochrona środowiska
Nie wyrzucać urządzenia po zakończeniu użytkowania wraz
ze zwykłymi odpadami komunalnymi. Oddać je o punktu
zbiorki odpadów do recyklingu.
Stosowanie się do tego zalecenia pomaga w ochronie
środowiska.
-
 1
1
-
 2
2


Clatronic WSU 7024 Instrukcja obsługi
- Kategoria
- Budziki
- Typ
- Instrukcja obsługi
w innych językach
- español: Clatronic WSU 7024 Manual de usuario
- Deutsch: Clatronic WSU 7024 Benutzerhandbuch
- français: Clatronic WSU 7024 Manuel utilisateur