Bifinett KH 1099 Operating Instructions Manual
- Typ
- Operating Instructions Manual

KOMPERNASS GMBH · BURGSTRASSE 21 · D-44867 BOCHUM
www.kompernass.com
ID-Nr.: KH1099-04/08-V2
ELECTRIC WOK
Operating instructions
ELEKTRYCZNY WOK
Instrukcja obsługi
ELEKTROMOS WOK
Használati utasítás
ELEKTRIČNI WOK
Navodila za uporabo
ELEKTRICKÁ PÁNEV WOK
Návod k obsluze
4
ELECTRIC WOK
ELEKTRICKÁ WOK PANVICA
Návod na obsluhu
ELEKTRIČKI VOK
Upute za upotrebu
ELEKTRISCHER WOK
Bedienungsanleitung
KH 1099
CV_KH1099_E3477_LB4.qxd 10.04.2008 11:28 Uhr Seite 1

KH 1099
q
e
w
t
y
u
i
o
a
r
r
dsf
CV_KH1099_E3477_LB4.qxd 10.04.2008 11:28 Uhr Seite 4

- 1 -
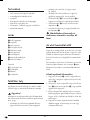
CONTENT PAGE
Intended usage 2
Safety instructions 2
Function 3
Technical data 3
Items supplied 4
Description 4
Placement 4
Before the first use 4
Mounting the lid handle . . . . . . . . . . . . . . . . . . . . . . . . . . . . . . . . . . . . . . . . . . . . . . . . . . . . . .4
Commissioning 5
Heat levels . . . . . . . . . . . . . . . . . . . . . . . . . . . . . . . . . . . . . . . . . . . . . . . . . . . . . . . . . . . . . . . . .5
Using the Wok for keeping food warm 5
Cleaning and care 6
Storage 6
Troubleshooting 6
Disposal 7
Warranty & Service 7
Importer 7
Recipes 8
Chicken with coconut milk . . . . . . . . . . . . . . . . . . . . . . . . . . . . . . . . . . . . . . . . . . . . . . . . . . . . .8
Tagliatelle with vegetables . . . . . . . . . . . . . . . . . . . . . . . . . . . . . . . . . . . . . . . . . . . . . . . . . . . .8
Coloured Thai rice . . . . . . . . . . . . . . . . . . . . . . . . . . . . . . . . . . . . . . . . . . . . . . . . . . . . . . . . . . .9
Fillet of beef with cauliflower . . . . . . . . . . . . . . . . . . . . . . . . . . . . . . . . . . . . . . . . . . . . . . . . . .9
Banana pancakes . . . . . . . . . . . . . . . . . . . . . . . . . . . . . . . . . . . . . . . . . . . . . . . . . . . . . . . . . .10
Recipe tips 11
Read the operating instructions carefully before using the appliance for the first time and preserve this
booklet for later reference. Pass the manual on to whomsoever might acquire the appliance at a later date.
IB_KH1099_E3477_LB4 10.04.2008 12:08 Uhr Seite 1

- 2 -
ELECTRIC WOK KH 1099
Intended usage
The Electrical Wok KH 1099 is intended exclusively …
• for use as a cooking implement
• for use in enclosed spaces
• for non-commercial use in domestic households
Note:
All warranties and liabilities are null and void in the
case of defects with the Electrical Wok and its com-
ponents that may have been caused through improper
use of the appliance!
Safety instructions
To avoid potentially fatal
electric shocks:
• The electricity mains voltage being used must
comply with the details given on the identifica-
tion plate of the appliance.
• Never submerse the thermo-plinth in water. Only
wipe it with a damp cloth. Should fluids penetrate
into the thermo-plinth, there is the risk of receiving
an electric shock!
• Arrange for defective power plugs and/or cables
to be replaced at once by qualified technicians
or our Customer Service Department.
• Arrange for damaged or malfunctioning applian-
ces to be inspected and/or repaired by a quali-
fied specialist or the Customer Service Depart-
ment as soon as possible.
To avoid the risks of fire and
burn injuries
:
• Never leave the appliance unattended whilst in
use.
• This appliance is not intended for use by indivi-
duals (including children) with restricted physical,
physiological or intellectual abilities or deficiences
in experience and/or knowledge unless they are
supervised by a person responsible for their safety
or receive from this person instruction in how the
appliance is to be used. Children should be
supervised to ensure that they do not play with
the appliance.
• Select a safe and stable location to place the
appliance.
• Ensure that the power plug is at all times easily
accessible, and that there is no risk of anyone
tripping over the cable.
• Never use the appliance:
- if individual components, the power plug or the
power cable are damaged,
- if it appears to be malfunctioning, or if it has
otherwise been damaged or dropped. Arrange
for the appliance to be checked and/
or repaired at the Service Centre.
• Do not use an external timing switch or a
separate remote control system to operate the
appliance.
• Plastic bags can be deadly. To avoid the risk of
fatalities through suffocation, keep plastic bags
out of the reach of children.
• Never put other kitchen implements (e.g. cooking
pans) onto the thermo-plinth in place of the Wok.
Other cooking pans could tip during use, as the
thermo-plinth is designed for acceptance of the
supplied cooking implement only.
Always keep safety in mind:
• Immediately remove the electrical plug from the
socket in risk situations.
• Never use the appliance for purposes other than
those for which it was intended.
IB_KH1099_E3477_LB4 10.04.2008 12:08 Uhr Seite 2

- 3 -
• ALWAYS remove the power cable from the power
socket and the appliance when the Wok is not
in use, when removing components and before
cleaning it.
To avoid the risk of property
damage:
• Do not use the Wok as a cooking implement on
other heat sources (e.g. on hotplates), it could
be irreparably damaged.
• Use only wooden implements for stirring and
turning foods in the Wok; if you use metal imple-
ments the anti-stick coating on the Wok will be
scratched and become unusable.
• Do not use the Wok for cutting or slicing ingre-
dients that might be in it. If you do, the anti-stick
coating on the Wok will be scratched and be-
come unusable.
Risk of Burns!
• During use and when serving, grasp the Electrical
Wok and the glass lid with the handles only, as
both parts can become very hot. For the sake of
safety, always use an oven cloth as well.
• Hot steam can escape when lifting the lid! Never
lean closely over the Wok when lifting the lid!
• Do not use the Wok to cook soup! The Wok is
too flat for this, the soup could very quickly boil
over!
Important!
• When cooking, never pour water into heated fat or
oil in the Wok! This would cause a darting flame
and possibly start a fire! Additionally, people close
to the Electrical Wok may be seriously burned!
• Overheated fats and oils can quickly start to burn!
Under no circumstances should you try to extin-
guish burning fats or oils with water!
This would cause a dartflame which could also ignite
furniture and curtains etc! Additionally, people close
to the Electrical Wok may be seriously burned!
To extinguish burning fats and oils…
1. Immediately remove the power plug from the
wall socket.
2. Smother the flames by placing a lid, a dish, a
bowl or a fire blanket over the Wok.
Function
With the Wok …
• you can prepare foods in the traditional Chinese
style with high heat
• vitamins and nutrients are retained in the food
due to short cooking times and high heat
• the foods can be prepared without fat or with
very little of it
Technical data
Mains voltage: 220-240V
~
50Hz
Output level: 1.200 Watt
IB_KH1099_E3477_LB4 10.04.2008 12:08 Uhr Seite 3

- 4 -
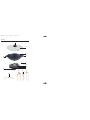
Items supplied
• Wok with heat insulated handles
• Thermo-plinth with temperature controller
• Glass lid
• Heat-insulated lid handle with mounting materials
• removable drip grill
• 2 wooden spatulas, 1 wooden spoon, a pair of
chopsticks
• Operating manual
Description
1 Lid handle
2 Glass lid
3 Wok
4 Heat insulated handles
5 Power cable
6 Heating coil
7 Thermo-plinth
8 Temperature regulator
9 Control lamp
Accessory:
0 Drip grill
q 2 wooden Spatulas
w Wooden spoon
e Chopsticks
Placement
Place the switched-on Wok exclusively on level, firm
and heat-resistant surfaces in a dry environment.
Important!
To avoid the risks of heat damage and fire in the
area adjacent to the switched on Wok, always
ensure that …
• the switched-on Wok is at all times located at a
minimum distance of 50 cm from walls, furniture
and other objects.
• no objects are suspended above the switched-on
Wok (e.g. lamps).
• there are no easily inflammable objects close to
the switched-on Wok (e.g. materials/textiles).
• the power cable 5 and the thermo-plinth 7 are
not located close to hot surfaces or open flames.
• the power cable 5 does not, and cannot, make
contact with the thermo-sockel 7.
• no moisture and/or fluids can permeate into the
thermo-sockel 7.
Non-compliance heightens the risk
of fire or of receiving an electrical
shock!
Before the first use
Remove all components of the Electrical Wok from
the packaging. Remove all remaining protective
foils and clean the packaging/dust residues from
all components that will come into contact with
foodstuffs.
Do not use any abrasive cleaners or scouring pads,
these will destroy the non-stick surfaces of the Wok
3 and impair their effectiveness!
Mounting the lid handle
1. Place the lid handle 1 onto the broad insulating
wafer so that the rectangular retainer protudes
into the lid handle 1.
2. From above, lay the broad insulating wafer with
the lid handle 1 on the glass lid 2, so that the
holes lie one above the other.
3. Firstly, place the metallic washers over the screws.
Then place the rubber washers onto the screws
so that the broad sides lie flat against the metallic
washers.
4. From below, insert the screws with both washers
through the holes and then screw them tight with
a cross-head screwdriver.
IB_KH1099_E3477_LB4 10.04.2008 12:08 Uhr Seite 4

- 5 -
Commissioning
On the first usage, the generation of light smoke
and a slight smell can occur, this is due to produc-
tion residues. This is completely normal and is not
dangerous. Provide for sufficient ventilation, for
example, open a window.
Heat levels
The various heat levels of the temperature regulator 8
are guideline values:
Heating levels 1-2:For keeping foods warm.
Heating levels 3-4:For braising and boiling.
Heating level 5: For roasting.
Important!
NEVER operate the thermo-plinth 7 without the Wok
3 in position. There is a real risk of overheating.
1. Insert the power cable 5 into the thermo-plinth 7.
2. Insert the power cable 5 into a wall power
socket.
3. Now place the Wok 3 onto the thermo plinth 7.
4. Adjust the temperature regulator 8 to the desired
heating level. The control lamp 9 glows.
Ensure that the Wok 3 stands safely and level on
the thermo-plinth 7.
Important!
Do not overfill the Wok 3! The maximum volume
(fluids) amounts to 1.5 l.
Important!
NEVER lay aluminium foil or other materials between
the thermo-plinth 7 and the Wok 3, if you do, irre-
parable damage may be caused to the Electrical
Wok. Additionally, there would be an increased risk
of a fire!
5. Then place the desired ingredients into the Wok 3.
If necessary, add some oil or fat into the Wok 3.
6. Attach the drip grill 0 into the Wok 3, which is
used to collect items that are quickly cooked in
the Wok 3, whilst other items, those requiring
a somewhat longer cooking time, remain in the
Wok 3.
7. For steaming and boiling – depending on the
recipe being used – place the glass lid 2 onto
the Wok 3.
Using the Wok for keeping food
warm
If you wish to use the Wok 3 for serving and keeping
food warm …
1. Firstly, turn the temperature regulator 8 down to
heating level 1.
2. Remove the Wok 3 from the thermo-plinth 7
and place it on a non-heated surface (e.g. a
switched-off, completely cooled down hotplate).
3. Remove the power cable 5 first from the wall
socket and then from the thermo-plinth 7.
4. Place the thermo-plinth 7 at the desired location.
Ensure that the surface at the location is level,
firm and heat-resistant.
5. Insert the power cable 5 first back into the thermo-
plinth 7 and then into a wall socket.
6. Place the Wok 3 with the food to be kept warm
onto the thermo-plinth 7.
IB_KH1099_E3477_LB4 10.04.2008 12:08 Uhr Seite 5

- 6 -
7. Turn the temperature regulator 8 back to hea-
ting level 1 to keep liquid foods warm. Turn the
temperature regulator 8 to heating level 2 for
keeping solid foods warm. Occasionally stir so-
lid foods while they are being kept warm and
mix a small amount of water into them to avoid a
possible spoiling or burning of the food.
Cleaning and care
Important!
First of all, ALWAYS remove the power cable 5
from the wall socket before cleaning the Electrical
Wok and its components! Otherwise, there is the
great risk of receiving an electric shock!
Important!
NEVER submerge the thermo-plinth 7 in water to
clean it! The appliance could become irreparably
damaged!
After using the Electrical Wok always wait until the
thermo-plinth 7 and the Wok 3 have cooled
down completely!
The risk of burns is ever present!
When you have removed the power cable 5 of the
Electrical Wok from the wall socket, and the Wok 3
and the thermo-plinth 7 have cooled down …
1. Using the wooden spoon w, remove the largest
pieces of food remnants from the Wok 3.
2. Wash the Wok 3 thoroughly in warm water
with a mild washing-up detergent. Do not use
any abrasive cleaners or scouring pads, these
will destroy the non-stick surfaces of the Wok 3
and impair their effectiveness!
3. Clean the housing of the themo-plinth 7 with a
moist sponge.
Storage
• Remove the power cable 5 from both the wall
socket and the thermo-plinth 7 when the app-
liance is not being used.
• Allow the Wok and its components to cool down
completely before storing them away.
• For the sake of safety, ALWAYS store the Electrical
Wok out of the reach of children.
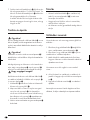
Troubleshooting
Should the Electrical Wok not function or not function
correctly …
1. Check to ensure that the power cable 5 is cor-
rectly connected to the thermo-plinth 7.
2. Check to ensure that the power cable 5 is cor-
rectly connected to the wall socket.
3. Check to ensure that the wall power socket to
which the Electrical Wok is connected is "live",
do this by connecting another appliance to it.
If the malfunction cannot be traced back to one of
these causes …
4. Remove the power cable from the wall socket
and allow the thermo-plinth 7 to cool down
completely.
5. Re-insert the power cable 5 into a wall power
socket.
Should the malfunction not be corrected by the
measures described above, please make contact
with one of our service-partners in your locality.
IB_KH1099_E3477_LB4 10.04.2008 12:08 Uhr Seite 6

- 7 -
Disposal
Do not dispose of the appliance in your
normal domestic waste. This product is
subject to the European directive
2002/96/EG.
Dispose of the appliance through an approved dis-
posal centre or at your community waste facility.
Observe the currently applicable regulations.
In case of doubt, please contact your waste dispo-
sal centre.
Dispose of all packaging materials in an
environmentally friendly manner.
Warranty & Service
The warranty for this appliance is for 3 years from
the date of purchase. The appliance has been
manu-factured with care and meticulously examined
before delivery. Please retain your receipt as proof
of purchase. In the case of a warranty claim, please
make contact by telephone with our service depart-
ment. Only in this way can a post-free despatch for
your goods be assured.
The warranty covers only claims for material and
maufacturing defects, not for wearing parts or for
damage to fragile components. This product is for
private use only and is not intended for commercial
use.
The warranty is void in the case of abusive and im-
proper handling, use of force and internal tampe-
ring not carried out by our authorized service
branch. Your statutory rights are not restricted in
any way by this warranty.
DES Ltd
Units 14-15
Bilston Industrial Estate
Oxford Street
Bilston
WV14 7EG
Tel.: 0870/787-6177
Fax: 0870/787-6168
e-mail: support.uk@kompernass.com
Irish Connection
Harbour view
Howth
Co. Dublin
Tel: 00353 (0) 87 99 62 077
Fax: 00353 18398056
e-mail: support.ie@kompernass.com
Importer
KOMPERNASS GMBH
BURGSTRASSE 21
44867 BOCHUM, GERMANY
www.kompernass.com
IB_KH1099_E3477_LB4 10.04.2008 12:08 Uhr Seite 7

- 8 -
Recipes
Chicken with coconut milk
For 4 people
400 g Orecchiettes
Salt
1 green Chili pepper
1 stick Leek
1 piece Ginger (approx. walnut sized)
200 g Chicken breast
Pepper
100 g Maize (tinned)
1 bunch Chives
4 tsp Groundnut or canola oil
100 ml unsweetened Coconut milk (tinned)
100 ml Stock
Preparation time: 30 min.
Per Portion approx.: 470 kcal
1. Cook the orecchiettes as per the packaging in-
structions in salt water until al dente. Cut the chili
pepper into fine stripes without the seeds. Clean
the leek, slice it lengthways, wash it and slice it
into strips. Peel the ginger and cut it into small
pieces. Cut the chicken breast into 1 1/2 cm
wide strips, spice them with salt and pepper.
Drain the maize. Wash the chives and cut into
fine rolls.
2. First heat the wok, then the oil. Fry the chicken
for approx. 4 mins until gold-brown. Place the
chives in the middle of the Wok and steam for
approx. 2 mins until glassy. Add the chili, ginger
and maize, then cook for approx. 2 mins, stirring
constantly.
Mix everything together.
3. Pour in the stock and coconut milk, cook for ap-
prox. 3 mins whilst covered. Allow the orecchiettes
to become hot in the mix, add salt and pepper.
Serve sprinkled with the chive mini-rolls.
Tagliatelle with vegetables
For 4 people
200 g Rice tagliatelle
Salt
150 g green Beans
1 red Paprika seed
1 red Onion
1 Garlic clove
1 piece Ginger (approx. walnut sized)
4 tsp. olive oil
300 g Broccoli sprigs
100 ml Stock
5 tbsp dark Soya sauce
2 tbsp chopped Cashew nuts
Preparation time: 25 min.
Per Portion approx.: 400 kcal
1. Cook the noodles as per the packaging instruc-
tions in salt water until al dente.
2. Wash and clean the vegetables. Slice the beans
and paprika until small. Peel the onion and slice
into strips. Peel the garlic and ginger and slice
until small.
3. First heat the wok, then the oil. Stir-fry the paprika
in it for 1 min. One after the other, saute the beans,
broccoli and onion.
4. Blend in the garlic and ginger. Allow it to cook
for 1 min. with stock and soya sauce. Turn the
noodles in it. Garnish with nuts.
IB_KH1099_E3477_LB4 10.04.2008 12:08 Uhr Seite 8

- 9 -
Coloured Thai rice
For 4 people
2 Spring onions
1 Carrot
1 red Paprika seed
1 Pineapple
30 g Cashew nuts
2 tbsp Peanut oil
1/4 l Vegetable broth
Salt
Pepper
1 pinch Sugar
600 g cooked Rice
1 tbsp fresh chopped Mint or green Coriander
Preparation time: 30 min.
Per Portion approx.: 320 kcal
1. Clean and wash the vegetables. Of the onions,
cut the white one into strips, the green one into
pieces. Slice the carrot into matchstick thin pieces.
Slice the paprika into thin strips. Peel the pineapple
and, without the stem, cut it into 1 1/2 cm thick
pieces.
2. Heat up the Wok, then roast the nuts in it, with-
out fat, until golden-brown.
3. First heat the wok, then the oil. Fry the white
onion in it until glassy. Roast the carrot and pa-
prika in the middle of the Wok for approx. 4 min.
stirring constantly, until cooked. Boil it up with
the stock and then spice it with salt, pepper and
sugar. Blend the rice in easily and allow it to be-
come hot. Mix in the green onion.
4. Place the pineaple pieces back together as slices.
Spread the rice over them and garnish with
herbs and cashew nuts.
Fillet of beef with cauliflower
For 4 people
400 g Fillet of Beef
3 tbsp Tandoori spice (health-food shop, Asian shop)
1 small Cauliflower
2 Tomates on the vine
1 Zucchini
1 small red Onion
2 Spring onions
4 tsp Sunflower oil
100 ml Stock
150 ml unsweetened Coconut milk (tinned)
Salt
Pepper
Preparation time: 30 min
Per Portion approx.: 190 kcal
1. Slice the fillet into cubes of approx. 1 x 2 cm
and spice with Tandoori. Split the cauliflower
into sprigs, cut the stalks into slices. Dice the
tomatoes. Cut the zucchini into thin slices approx.
2 cm long.
Peel the onion and slice into strips. Half the white
of the spring onions lengthways, slice the green
into pieces.
2. First heat the wok, then add 2 tbsp. of oil. Fry
the meat in there for 2 min. and keep it warm.
Re-heat the Wok, fry the onion in the remaining
oil until glassy. Fry the cauliflower with it for 3
min. Boil it up with the stock and coconut milk,
let it cook for approx. 5 mins. Add salt and pepper.
Mix in the white of the spring onion, zucchini
and tomato. Cook for 3 min. Mix in the meat
and green onion, then check for taste.
IB_KH1099_E3477_LB4 10.04.2008 12:08 Uhr Seite 9

- 10 -
Banana pancakes
For 4 people
1 pinch salt
1 pinch Cinnamon powder
150 g plain flour
250 ml unsweetened Coconut milk (tinned)
2 tbsp. honey
2 Bananas
2 eggs
4 tbsp Peanut oil
Juice of 1/2 Lemon
Preparation time: 40 min.
Standing time: 30 min.-1 hr.
Per Portion approx.: 250 kcal
1. For the pancakes, mix the salt, cinnamon, flour,
coconut milk and honey to a pastry with an
immersion blender and then let it stand for
30 min -1 hr.
2. Peel the bananas. Slice 1 banana into very small
pieces and, with the eggs, mix it into the pastry.
Should the pastry be too thick, blend in some
mineral water. Cut the second banana into slices
and mix it into the pastry.
3. Preheat the oven to 70°. First heat the wok, then
smear it with oil. One after the other, and with
a medium heat setting, fry 8 pancakes on both
sides until golden brown. Keep the pancakes
warm in the oven. Re-coat the wok with the oil
for each pancake. Sprinkle the pancakes with
lemon juice and then serve.
Side dish: Fruit salad
IB_KH1099_E3477_LB4 10.04.2008 12:08 Uhr Seite 10

- 11 -
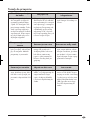
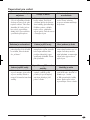
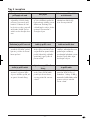
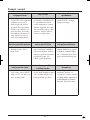
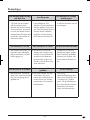
Recipe tips
Items to be cooked keep
sticking to the wok
The oil is smoking
The vegetables are too soft
and overcooked
➧ Heat up the wok, at the same
time use three tablespoons of
salt and the spatula to loosen
all impurities. Then wipe the
wok out with a towel. From
then on clean it only with hot
water, do not use any more
cleaners. Start again with
somewhat more heat.
➧ Smoking oil is not beneficial
to health: Pour the oil into a
heat resistant container to
cool down and then dispose
of it. Cool the overheated
wok with warm water, pour
the water off then wipe the
wok out. Start again with
fresh oil.
➧ Dice some fresh vegetables
and blend them in still raw.
The vegetables are still
raw
The cooked dish is too
spicy
The cooked dish tastes too
insipid
➧ Re-cook the vegetables, ideally
in small portions and with
constant stirring, until they
are al dente.
➧ Blend in small cubes of pine-
apple, mango or tomato and
attenuate with coconut milk
or use smoothly stirred low-fat
yoghurt. Do not re-heat the
cooked dish.
➧ Add in soya sauce, scraped
ginger, pressed garlic, chop-
ped herbs and sesame oil or
another seasoning oil.
The cooked dish is too dry
Too much sauce has
been created
There is too little sauce
➧ Add coconut milk, stock or
soya sauce until sufficient
sauce is created.
➧ Lift the firm ingredients from
the wok, allow the sauce to
boil down quickly and under
high heat, mix the ingredients
back in and make another
taste check.
➧ Mix in 100- 200 g soyabean
shoots or boil up a small-
cubed potato and carrot, as
well as 100 g frozen peas,
then blend them in. Make a
taste check.
IB_KH1099_E3477_LB4 10.04.2008 12:08 Uhr Seite 11

- 12 -
IB_KH1099_E3477_LB4 10.04.2008 12:08 Uhr Seite 12

- 13 -
SPIS TREŚCI STRONA
Zastosowanie zgodnie z przeznaczeniem 14
Wskazówki bezpieczeństwa 14
Funkcja 15
Dane techniczne 15
Zakres dostawy 16
Opis 16
Miejsce stawiania 16
Przed pierwszym użyciem 16
Zamontowanie uchwytu pokrywki . . . . . . . . . . . . . . . . . . . . . . . . . . . . . . . . . . . . . . . . . . . . .16
Uruchomienie 17
Zakresy ogrzewania . . . . . . . . . . . . . . . . . . . . . . . . . . . . . . . . . . . . . . . . . . . . . . . . . . . . . . . .17
Użycie woka do utrzymywania ciepła 17
Czyszczenie i konserwacja 18
Przechowywanie 18
Usterki w działaniu 18
Usuwanie/wyrzucanie 19
Gwarancja i serwis 19
Importer 19
Przepisy 20
Kurczak z mlekiem kokosowym . . . . . . . . . . . . . . . . . . . . . . . . . . . . . . . . . . . . . . . . . . . . . . .20
Makaron wstążki z warzywami . . . . . . . . . . . . . . . . . . . . . . . . . . . . . . . . . . . . . . . . . . . . . . .20
Kolorowy ryż tajski . . . . . . . . . . . . . . . . . . . . . . . . . . . . . . . . . . . . . . . . . . . . . . . . . . . . . . . . .21
Stek wołowy z kalafiorem . . . . . . . . . . . . . . . . . . . . . . . . . . . . . . . . . . . . . . . . . . . . . . . . . . . .21
Naleśniki bananowe . . . . . . . . . . . . . . . . . . . . . . . . . . . . . . . . . . . . . . . . . . . . . . . . . . . . . . . .22
Porady do przepisów 23
Niniejszą instrukcję należy zachować, aby móc także później z niej skorzystać, w przypadku
przekazywania urządzenia osobom trzecim należy przekazać także instrukcję!
IB_KH1099_E3477_LB4 10.04.2008 12:08 Uhr Seite 13

- 14 -
ELEKTRYCZNY WOK
KH 1099
Zastosowanie zgodnie z
przeznaczeniem
Wok elektryczny KH 1099 jest przeznaczony wy-
łącznie …
• użytku jako naczynie do gotowania,
• użytku w pomieszczeniach zamkniętych,
• do użytku prywatnego i niekomercyjnego.
UWAGA:
Producent nie ponosi odpowiedzialności/nie udziela
gwarancji za szkody spowodowane uszkodzeniem
woka elektrycznego z powodu zastosowania niez-
godnie z przeznaczeniem!
Wskazówki bezpieczeństwa
Aby uniknąć zagrożenia życia
przez porażenie prądem elek-
trycznym:
• Napięcie źródła prądu musi zgadzać się z da-
nymi na tabliczce znamionowej urządzenia.
• Podstawy grzewczej nie należy nigdy zanurzać
w wodzie. Można ją tylko przetrzeć za pomocą
wilgotnej szmatki. Gdy do wnętrza podstawy
grzewczej przedostanie się woda, powstaje nie-
bezpieczeństwo porażenia prądem elektrycznym!
• Naprawę uszkodzonej wtyczki lub kabla siecio-
wego zleć niezwłocznie wykwalifikowanemu
personelowi lub serwisowi klienta.
• Urządzenia, które nie działają bez zastrzeżeń
lub zostały uszkodzone, należy niezwłocznie
przekazać do punktu serwisowego w celu prze-
prowadzenia kontroli i naprawy.
Aby uniknąć zagrożenia poparzenia
i odniesienia obrażeń
:
• Pracującego urządzenia nigdy nie należy pozo-
stawiać bez nadzoru.
• To urządzenie nie jest przystosowane do użytkowa-
nia go przez osoby (w tym dzieci) o ograniczonej
sprawności umysłowej, czuciowej lub umysłowej,
bądź w przypadku niedostatecznego doświad-
czenia i / lub wiedzy, chyba że będą one znaj-
dowały się pod opieką odpowiedzialnej osoby
lub też uzyskają od opiekuna instrukcje, jak należy
użytkować urządzenie. Nie można pozwolić
dzieciom na zabawę urządzeniem.
• Należy dbać o prawidłowy stan techniczny urzą-
dzenia.
• Należy zapewnić możliwość szybkiego dostępu
do wtyczki sieciowej aby w razie zagrożenia
oraz wyeliminować zagrożenie potknięciem się
o kabel sieciowy.
• Nie należy nigdy używać urządzenia w nastę-
pujących przypadkach:
- gdy uszkodzone będą poszczególne części
urządzenia, kabel zasilający lub wtyczka sie-
ciowa,
- w razie nieprawidłowego działania lub w razie
uszkodzeń innego rodzaju lub upadku. Urząd-
zenie należy oddać do przeglądu względnie
naprawy w miejscowym serwisie.
• Do sterowania pracą urządzenia nie próbuj uży-
wać żadnych zewnętrznych zegarów sterują-
cych ani żadnego innego systemu zdalnego ste-
rowania.
• Plastikowe torebki mogą stanowić zagrożenie.
Aby nie spowodować zagrożenia uduszenia,
torby plastikowe przechowuj w miejscach niedo-
stępnych dla niemowląt i dzieci.
• Na podstawę grzewczą nigdy nie stawiaj in-
nych naczyń niż wok. Inne naczynia mogłyby
się przechylić podczas pracy, ponieważ podsta-
wa grzewcza jest przystosowana wyłącznie do
mocowania naczynia dołączonego do kompletu.
IB_KH1099_E3477_LB4 10.04.2008 12:08 Uhr Seite 14

- 15 -
Bezpieczeństwo zapewnią Państwo
sobie w następujący sposób:
• W wypadku zagrożenia natychmiast wyciągać
wtyczkę z gniazdka sieciowego.
• Używając urządzenia tylko zgodnie z jego
przeznaczeniem.
• Gdy urządzenie nie jest używane, podczas de-
montażu części i przed czyszczeniem należy
wyciągnąć wtyczkę sieciową oraz przewód
zasilający urządzenia.
Jak uniknąć szkód:
• Woka nigdy nie używać jako naczynia do goto-
wania na innych źródłach grzania (np. na płytach
grzewczych), ponieważ można łatwo trwale
uszkodzić naczynie.
• Do mieszania i odwracania potraw w woku używaj
wyłącznie drewnianych akcesoriów; w przypadku
użycia akcesoriów metalowych, można porysować
i uszkodzić powłokę chroniącą przed przywiera-
niem składników do woka.
• Nigdy nie używaj woka do pokrojenia potraw
ani składników, które chcesz w nim przyrządzić.
Można wtedy porysować i uszkodzić powłokę
chroniącą przed przywieraniem składników do
woka.
Niebezpieczeństwo poparzenia!
• Wok i szklaną pokrywkę podczas gotowania
i serwowania potraw chwytaj zawsze za uchwyty,
ponieważ oba naczynia są bardzo gorące.
W celu zwiększenia bezpieczeństwa dodatkowo
przy chwytaniu naczyń używać rękawicy
ochronnej.
• Przy podnoszeniu pokrywki z naczynia może
ulotnić się gwałtownie gorąca para! Przy pod-
noszeniu pokrywki nigdy nachylaj się bezpoś-
rednio nad wokiem!
• Woka nie używaj do gotowania zup! Jest on
za płytki i przez to zupa mogłaby się wylewać
poza naczynie!
Uwaga!
• W czasie gotowania nigdy nie wlewaj wody do
rozgrzanego tłuszczu wzgl. oleju! Mogłoby to
doprowadzić do powstania pożaru! Poza tym
osoby znajdujące się w pobliżu naczynia mogą
ulec poparzeniom!
• Przegrzany tłuszcz i olej mogą się bardzo szybko
zapalić! Płomieniu palącego się tłuszczu lub oleju
nigdy nie próbować zagasić wodą!
Spowodowało by to powstanie wysokich płomieni
mogących ogarnąć zasięgiem meble, firany itp.!
Poza tym osoby znajdujące się w pobliżu naczynia
mogą ulec poparzeniom!
Jak gasić płomienie zapalonego tłuszczu wzgl.
oleju…
1. Jak najszybciej wyciągnij wtyczkę z gniazdka
sieciowego.
2. Zduś płomiennie nakładając na wok pokrywkę,
miskę metalową lub koc do gaszenia.
Funkcja
Przy użyciu woka …
• możesz przyrządzać potrawy w wysokiej tem-
peraturze według tradycyjnego chińskiego spo-
sobu.
• dzięki krótkiemu czasowi obróbki przy wysokich
temperaturach składniki nie tracą cennych witamin
i substancji odżywczych.
• można przyrządzać potrawy bez lub z minimalną
ilością tłuszczu.
Dane techniczne
Napięcie sieciowe: 220 - 240 V
~
50 Hz
Moc wyjściowa: 1.200 W
IB_KH1099_E3477_LB4 10.04.2008 12:08 Uhr Seite 15

- 16 -
Zakres dostawy
• wok z uchwytami chroniącymi przed oparzeniem
• podstawa grzewcza z regulatorem temperatury
• pokrywka szklana
• uchwyt pokrywki chroniący przed oparzeniem
i element montażowy
• zdejmowana kratka ściekowa
• 2 łopatki drewniane, 1 łyżka drewniana, para
pałeczek
• Instrukcja obsługi
Opis
1 Uchwyt pokrywy
2 Pokrywka szklana
3 Wok
4 Uchwyty chroniące przed oparzeniem
5 Kabel sieciowy
6 Grzałka
7 Podstawa grzewcza
8 Regulator temperatury
9 Lampka kontrolna
Akcesoria:
0 Kratka ściekowa
q 2 Łopatka drewniana
w Łyżka drewniana
e Pałeczki
Miejsce stawiania
Włączony wok stawiaj wyłącznie na płaskim, moc-
nym i żaroodpornym podłożu.
Uwaga!
By uniknąć szkód w wyniku działania wysokiej tem-
peratury i doprowadzenia do pożaru w otoczeniu
włączonego woka pamiętaj o tym, …
• że włączony wok nie może stać przy innych przed-
miotach, ścianach lub meblach w odstępie
mniejszym niż 50 cm.
• że nad włączonym wokiem nie mogą wisieć żadne
przedmioty (np. lampy).
• przy włączonym woku nie można stawiać łatwo-
palnych materiałów.
• że kabel sieciowy 5 i podstawa grzewcza 7
nie mogą się znajdować w pobliżu gorących
powierzchni i otwartych źródeł płomieni.
• że kabel sieciowy 5 nie może dotykać podstawy
grzewczej 7.
• że do wnętrza podstawy grzewczej 7 nie może
się dostać woda.
W przeciwnym wypadku powsta-
je zagrożenie wybuchu pożaru i
porażenia prądem!
Przed pierwszym użyciem
Wyjmij wszystkie elementy woka z opakowania.
W razie potrzeby odklej folie ochronne i umyj po-
wierzchnie, które podczas gotowania mają kontakt
z artykułami spożywczymi.
Nie używaj środków szorujących ani gąbek z warstwą
metalową, ponieważ można zniszczyć powłokę
chroniącą przed przywieraniem do powierzchni
woka 3!
Zamontowanie uchwytu pokrywki
1. Uchwyt pokrywki 1 wsuń w szeroką tarczę izo-
lacyjną tak, by kwadratowy element ustalający
doszedł do uchwytu pokrywki 1.
2. Szeroką tarczę izolacyjną w uchwytem pokryw-
ki 1 położyć od góry na pokrywkę szklaną 2
tak, by pokrywały się ze sobą otwory.
3. Na śrubę najpierw założyć metalową podkładkę.
Następnie na śrubę załóż podkładkę gumową
tak, by szersza strona przylegała płasko do
podkładki metalowej.
4. Śrubę z dwiema podkładkami wsuń od dołu przez
otwory i dokręć ją śrubokrętem z końcówką
krzyżową.
IB_KH1099_E3477_LB4 10.04.2008 12:08 Uhr Seite 16

- 17 -
Uruchomienie
Przy pierwszym uruchomieniu może być wyczuwalny
zapach spalenizny. Jest to spowodowane wypala-
niem się pozostałości środków zastosowanych przy
produkcji urządzenia. Jest to zjawisko całkowicie
normalne i nie stanowi zagrożenia. Pamiętaj o za-
pewnieniu odpowiedniej wentylacji w pomieszcze-
niu, np. poprzez otwarcie okna.
Zakresy ogrzewania
Poszczególne zakresy ogrzewania regulatora
temperatury 8 są wartościami orientacyjnymi:
Zakres ogrzewania 1-2: Do podtrzymywania
ciepłoty potraw.
Zakres ogrzewania 3-4: Do duszenia i gotowania.
Zakres ogrzewania 5: Do pieczenia.
Uwaga!
Podstawy grzewczej 7 nigdy nie używaj bez założo-
nego woka 3. Występuje przez to zagrożenie
przegrzania.
1. Do podstawy grzewczej 7 podłącz kabel sie-
ciowy 5.
2. Włóż wtyczkę kabla sieciowego 5 do gniazdka.
3. Teraz na podstawę grzewczą 7 postaw wok 3.
4. Regulator temperatury 8 ustaw na żądany zakres.
Włącza się lampka kontrolna 9.
Zwróć uwagę na to, czy wok 3 jest pewnie post-
awiony na podstawie grzewczej 7.
Uwaga!
Nigdy nie przepełniaj woka 3! Maksymalnie w woku
można zmieścić 1,5 litra (cieczy) 1,5 l.
Uwaga!
Między podstawę grzewczą 7 a wok 3 nigdy nie
kładź folii aluminiowej ani żadnych innych przed-
miotów. Mogłoby to spowodować nieodwracalne
uszkodzenia urządzenia. Poza tym istnieje niebez-
pieczeństwo pożaru!
5. Do woka włóż wybrane składniki 3. W razie
potrzeby do woka 3 dodaj nieco tłuszczu lub
oleju.
6. Zawieś kratkę 0 na woku 3, by odłożyć na
niej produkty z woka 3, które wymagają krót-
kiego czasu przyrządzania, podczas gdy inne
przyrządzane składniki muszą dłużej pozostać
w woku 3.
7. Do duszenia i gotowania – w zależności od za-
stosowanego przepisu – przykryj wok 3 po-
krywką szklaną 2.
Użycie woka do utrzymywania
ciepła
W jaki sposób można wykorzystywać wok 3 do
serwowania i utrzymywania ciepłoty potraw …
1. Najpierw regulator temperatury 8 ustaw na
wybrany zakres 1.
2. Następnie wok 3 zdejmij z podstawy grzew-
czej 7 i postaw na żaroodpornym podłożu (np.
na wyłączonej, całkowicie zimnej płycie grzew-
czej).
3. Odłącz kabel sieciowy 5, najpierw z gniazdka,
a następnie z podstawy grzewczej 7.
4. Podstawę grzewczą 7 postaw w wybranym
miejscu. Zwróć uwagę, czy wybrane podłoże
jest płaskie i żaroodporne.
5. Ponownie podłącz kabel sieciowy 5, najpierw
do podstawy grzewczej 7, a następnie do gni-
azdka.
IB_KH1099_E3477_LB4 10.04.2008 12:08 Uhr Seite 17

- 18 -
6. Wok 3 z potrawą w środku postaw na podsta-
wę grzewczą 7.
7. W celu utrzymania ciepła potraw płynnych prze-
stawić regulator temperatury 8 ponownie na
stopień grzania 1. Regulator temperatury 8
ustaw na zakres 2 przeznaczony do podtrzymy-
wania ciepłoty potraw. Potrawy stałe w czasie
podtrzymywania ciepłoty od czasu do czasu prze-
mieszaj i dodawaj nieco wody, by uniknąć przy-
palenia potrawy.
Czyszczenie i konserwacja
Uwaga!
Przed przystąpieniem do czyszczenia woka i jego
elementów, zawsze najpierw odłączaj kabel siecio-
wy 5 z gniazdka! W przeciwnym wypadku pow-
staje zagrożenie porażenia prądem elektrycznym!
Uwaga!
Podstawy grzewczej 7 nigdy nie zanurzaj pod
wodę! Mogłoby to doprowadzić do trwałego usz-
kodzenia urządzenia!
Po zakończeniu pracy z wykorzystaniem woka zawsze
najpierw odczekaj, aż podstawa 7 i wok 3 osty-
gną!
Dotknięcie gorącego akumulatora
grozi poparzeniem!
Po odłączeniu kabla sieciowego 5 woka elektrycz-
nego z gniazdka i ostygnięciu woka 3 i podstawy
grzewczej 7 …
1. Łyżką drewnianą usuń z woka 3 resztki jedze-
nia w.
2. Wok 3 umyj dokładnie ciepłą wodą i łagod-
nym płynem do mycia naczyń. Nie używaj środ-
ków szorujących ani gąbek z warstwą metalo-
wą, ponieważ można zniszczyć powłokę
chroniącą przed przywieraniem do powierzchni
woka 3!
3. Obudowę podstawy grzewczej 7 wycieraj wil-
gotną gąbką.
Przechowywanie
• Jeśli nie zamierzasz korzystać z urządzenia,
odłącz kabel sieciowy 5 z gniazdka, a następ-
nie z podstawy grzewczej 7.
• Przed schowaniem urządzenia zaczekaj, aż
wok i wszystkie składniki ostygną.
• Wok elektryczny przechowuj z dala od dzieci.
Usterki w działaniu
Gdy wok elektryczny przestanie działać lub zacz-
nie działać nieprawidłowo …
1. Sprawdź, czy kabel sieciowy 5 jest przyłączo-
ny prawidłowo do podstawy grzewczej 7.
2. Sprawdź, czy kabel sieciowy 5jest przyłączony
prawidłowo do gniazdka.
3. Sprawdź, czy gniazdko, do którego podłączyłeś
wok elektryczny, przewodzi prąd. W tym celu na
chwilę podłącz do tego gniazdka inne urządze-
nie.
Gdy po tych działaniach usterka będzie występo-
wała nadal …
4. Wyciągnij wtyczkę z gniazdka i zaczekaj do
ostygnięcia podstawy grzewczej 7.
5. Kabel sieciowy 5 podłącz ponownie do
gniazdka.
Gdy usunięcie usterki nie będzie możliwe po wy-
konaniu powyższych czynności, zwróć się o pomoc
do autoryzowanego serwisu.
IB_KH1099_E3477_LB4 10.04.2008 12:08 Uhr Seite 18
Strona się ładuje...
Strona się ładuje...
Strona się ładuje...
Strona się ładuje...
Strona się ładuje...
Strona się ładuje...
Strona się ładuje...
Strona się ładuje...
Strona się ładuje...
Strona się ładuje...
Strona się ładuje...
Strona się ładuje...
Strona się ładuje...
Strona się ładuje...
Strona się ładuje...
Strona się ładuje...
Strona się ładuje...
Strona się ładuje...
Strona się ładuje...
Strona się ładuje...
Strona się ładuje...
Strona się ładuje...
Strona się ładuje...
Strona się ładuje...
Strona się ładuje...
Strona się ładuje...
Strona się ładuje...
Strona się ładuje...
Strona się ładuje...
Strona się ładuje...
Strona się ładuje...
Strona się ładuje...
Strona się ładuje...
Strona się ładuje...
Strona się ładuje...
Strona się ładuje...
Strona się ładuje...
Strona się ładuje...
Strona się ładuje...
Strona się ładuje...
Strona się ładuje...
Strona się ładuje...
Strona się ładuje...
Strona się ładuje...
Strona się ładuje...
Strona się ładuje...
Strona się ładuje...
Strona się ładuje...
Strona się ładuje...
Strona się ładuje...
Strona się ładuje...
Strona się ładuje...
Strona się ładuje...
Strona się ładuje...
Strona się ładuje...
Strona się ładuje...
Strona się ładuje...
Strona się ładuje...
Strona się ładuje...
Strona się ładuje...
Strona się ładuje...
Strona się ładuje...
Strona się ładuje...
Strona się ładuje...
Strona się ładuje...
Strona się ładuje...
Strona się ładuje...
Strona się ładuje...
Strona się ładuje...
Strona się ładuje...
Strona się ładuje...
Strona się ładuje...
Strona się ładuje...
Strona się ładuje...
Strona się ładuje...
Strona się ładuje...
Strona się ładuje...
Strona się ładuje...
-
 1
1
-
 2
2
-
 3
3
-
 4
4
-
 5
5
-
 6
6
-
 7
7
-
 8
8
-
 9
9
-
 10
10
-
 11
11
-
 12
12
-
 13
13
-
 14
14
-
 15
15
-
 16
16
-
 17
17
-
 18
18
-
 19
19
-
 20
20
-
 21
21
-
 22
22
-
 23
23
-
 24
24
-
 25
25
-
 26
26
-
 27
27
-
 28
28
-
 29
29
-
 30
30
-
 31
31
-
 32
32
-
 33
33
-
 34
34
-
 35
35
-
 36
36
-
 37
37
-
 38
38
-
 39
39
-
 40
40
-
 41
41
-
 42
42
-
 43
43
-
 44
44
-
 45
45
-
 46
46
-
 47
47
-
 48
48
-
 49
49
-
 50
50
-
 51
51
-
 52
52
-
 53
53
-
 54
54
-
 55
55
-
 56
56
-
 57
57
-
 58
58
-
 59
59
-
 60
60
-
 61
61
-
 62
62
-
 63
63
-
 64
64
-
 65
65
-
 66
66
-
 67
67
-
 68
68
-
 69
69
-
 70
70
-
 71
71
-
 72
72
-
 73
73
-
 74
74
-
 75
75
-
 76
76
-
 77
77
-
 78
78
-
 79
79
-
 80
80
-
 81
81
-
 82
82
-
 83
83
-
 84
84
-
 85
85
-
 86
86
-
 87
87
-
 88
88
-
 89
89
-
 90
90
-
 91
91
-
 92
92
-
 93
93
-
 94
94
-
 95
95
-
 96
96
-
 97
97
-
 98
98


Bifinett KH 1099 Operating Instructions Manual
- Typ
- Operating Instructions Manual
w innych językach
- slovenčina: Bifinett KH 1099
Inne dokumenty
-
Kompernass KH 1099 Instrukcja obsługi
-
Silvercrest SMWS 1000 A1 Instrukcja obsługi
-
Unold 48736 Instrukcja obsługi
-
KALORIK TKG WOK 1001 Instrukcja obsługi
-
Morphy Richards FOOD STEAMER 48780 Instrukcja obsługi
-
WMF Wok ProfiSelect Instrukcja obsługi
-
Philips HD9220/40 Instrukcja obsługi
-
Kenwood FFDP64WH Instrukcja obsługi
-
Kenwood BLP402WH Instrukcja obsługi
-
Kenwood FGP203WG Instrukcja obsługi