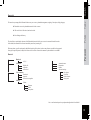
Parrot Car CD MP3 Player Instrukcja obsługi
- Kategoria
- Odtwarzacze CD
- Typ
- Instrukcja obsługi
Niniejsza instrukcja jest również odpowiednia dla

CD/MP3
Hands-free
Receiver
RHYTHM N’BLUE
User manual
For Bluetooth
Mobile Phone
CES
POL
PYC
P.15
P.27
P.39
ENG
P.3

2
Warning
The manufacturer Parrot S.A. and its afliates should not be held liable towards end users or third parties to prejudice caused by misusage of the product, nor for usage that would be in
violation of local trafc regulations and laws.
Disclaimer
The information in this document is subject to change without notice and does not represent a commitment on the part of vendor. No warranty or representation, either expressed or
implied, is made with respect of quality, accuracy or tness for any particular purpose of this document. The associated with it at any time without obligation to notify any person or
organisation of such changes. In no event will the manufacturer to liable for direct, indirect, special, incidental or consequential damages arising out of the use or inability to use this
product or documentation, even if advised of the possibility of such damages. This document contains material protected by copyright. All right are reserved. No part of this manual may
be reproduced or transmitted in any forme, by any means or for any purpose without express written consent. Product names appearing in this document are mentioned for identication
purposes only. All trademarks, product names appearing in this document are registred property of their respective owners.
FCC Compliance Statement
This device complies with part 15 of the FCC rules. Operation is subject to the following two conditions :
(1). this device may not cause harmful interference, and
(2). this device must accept any interference received, including interference that may cause undesired operation.
Note : The manufacturer is not responsible for any radio or tv interference caused by unauthorized modications to this equipment.
Such modications could void the user’s authority to operate the equipment.
Declaration of Conformity
We, Parrot S.A. of 174 quai de Jemmapes, 75010 Paris, France, declare under our sole responsibility that our product, the Parrot Rhythm n’ Blue, to which this declara-
tion relates is in conformity with appropriate standards EN300328, EN301489-17, EN 60950 following the provision of Radio Equipment and Telecommunication
Equipment directive, with requirements covering EMC directive 89/336/EEC and Low Voltage directive 73/23/EEC.
Bluetooth®
The Bluetooth® word mark and logos are owned by the Bluetooth® SIG, Inc. and any use of such marks by Parrot S.A. is under license. Other trademarks and trade names are those of
their respective owners.
Correct Disposal of This Product ( Waste Electrical & Electronic Equipment )
(Applicable in the European Union and other European countries with separate collection systems). This marking shown on the product or its literature, indicates that it
should not be disposed with other household wastes at the end of its working life. To prevent possible harm to the environment or human health from uncontrolled waste
disposal, please separate this from other types of wastes and recycle it responsibly to promote the sustainable reuse of material resources. Household users should contact
either the retailer where they purchased this product, or their local government ofce, for details of where and how they can take this item for environ, mentally safe recy-
cling. Business users should contract their supplier and the terms and conditions of the purchase contract. This product should not be mixed with other commercial wastes for
disposal.

Rhythm n’Blue
Directions for use
Русский Polski Cesky English
3

SAFETY INFORMATION
PRECAUTIONS
Only use on a 12 V electrical system with a negative earth.
When replacing the fuse, use one with the same amp rating. Using a fuse with
a higher amp rating could damage the system.Do not dismantle the system.
The laser beam of the CD player is dangerous for your eyes. Ensure that
foreign objects are not inserted into the system: they could cause the system to
malfunction or jeopardise your safety, such as electrocutions or exposure to the
laser. If your vehicle has been exposed to very high or very low temperatures
for a prolonged period, wait until the inside of the car has returned to a normal
temperature before using the device. The sound volume of the car stereo should
not be too loud: you should be able to hear outside warning signals or sirens.
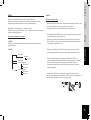
NOTES ON CDs
Playing a damaged or dusty CD could result in the disc jumping during play-
back. Hold CDs as shown in the illustration opposite.
Do not touch the unprinted side. Avoid getting any types of marks on the
readable side of the CD. Do not expose a CD to direct sunlight or excessive
temperatures. Wipe dirty CDs from the centre outwards with an appropriate
cloth. Never use solvents, such as benzene or alcohol. This car stereo cannot
read 3» CDs (8 cm).
Never use 3» CDs or discs with an irregular shape. They could get stuck and
cause the unit to malfunction.
BEFORE SWITCHING ON
Do not set the volume too high - doing so might prevent you from hearing
sounds outside the car. The car must be stationary before working on the
system.
CAUTION
Do not remove the unit’s cover. Do not repair the system yourself. Please
contact your retailer or a specialist technician.
PRESENTATION
Thank you for choosing a Parrot car stereo.
You can now take full advantage of a Bluetooth® CD/MP3 car stereo with a
built-in hands-free kit. All the features sported by a top-of-the-range hands-free
kit are available: phonebook synchronisation, caller ID display, exceptional
audio quality inside the car, dual call management, compatibility with all Blue-
tooth phones, and much more.
YOUR CAR STEREO’S BLUETOOTH® FEATURES
This system is equipped with the Bluetooth® technology, which enables the
wireless exchange of data between electronic systems. In the present case, your
Bluetooth® phone is connected to the car stereo. Depending on your phone
(*), this synchronises the phone’s phonebook in the car stereo’s memory, which
will subsequently allow you to call people directly from the phonebook, see
the caller’s name displayed, and so on. You can also answer calls, hang up and
control the call volume with the car stereo’s green and red buttons and the scroll
wheel. The built-in voice recognition feature allows you to use several functions
without taking your hands off the wheel.
(*): Applies to certain phones.
For further information, visit our website:
«www.parrot.biz, at the section entitled Technical Support, User Guides»
4

Русский Polski Cesky English
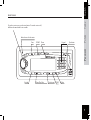
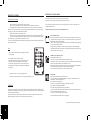
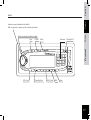
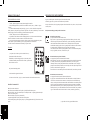
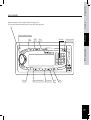
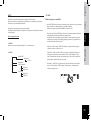
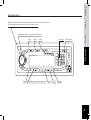
FRONT PANEL
To turn the car stereo on, press the rotary button. To turn the car stereo off,
hold down the same button for two seconds.
Infrared sensor for the remote
Tuner CD/MP3 Phone Keypad Eject button
Rewind Pause/Play/Mute Fast-forward DISP Menu
5

ANTI-THEFT SYSTEME :
Without the detachable front panel, the system cannot be used.
Removing the front panel :
l Press the eject button (in the top right) to tip the front panel.
l Move the panel sideways to the left.
l Pull the right side of the panel away from the car stereo and then the left side.
l Store the panel in the carry case and take it with you.
Replacing the front panel :
l Insert the left side of the front panel into the car stereo.
l Then insert the right side of the panel into the car stereo.
l Push the panel up until you hear a click.
Removing the entire stereo :
l Remove the car stereo’s front panel and casing.
l Insert the keys into the appropriate holes until they remain stuck.
l Pull the stereo towards you.
6

Русский Polski Cesky English
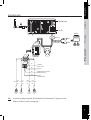
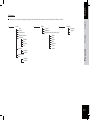
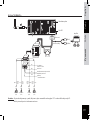
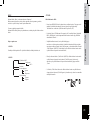
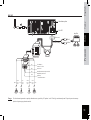
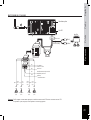
INSTALLATION GUIDE
Note: to ensure that your settings are memorised, check that the ignition 12 V and the constant 12 V supply are not reversed.
Otherwise, you will have to enter all your settings again
7
Rear Line-out (Gray)
R (Red)
Amplifier
Connector
ISO Connector
Red
Black
Blue
Yellow
L (White)
B
B
A
1 3 5 7
2 4 6 8
5 7
2 4 8
A
Ignition key
+ 12 V DC When ON/ACC
Fuse 15A
Ground Lead
Motor/Electric Antenna relay control Lead
Amplifier relay control Lead
To car battety (+)
Continuous + 12V DC
Purple Gray White Green
Gray/
Black
Stripe
White/
Black
Stripe
Green/
Black
Stripe
Purple/
Black
Stripe
Right Speaker
(Rear)
Right Speaker
(Front)
(+) (-) (+) (-)(+) (-)
Left Speaker
(Front)
Left Speaker
(Rear)
(+) (-)
External microphone

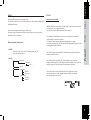
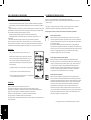
REMOTE CONTROL
Using the remote control :
- The on/off button is used to turn the car stereo on and off.
- Source is used to change from one mode to another: Tuner, CD/MP3 and then Phone.
- In CD/MP3 mode, the fast-forward and rewind arrows let you skip from one track to another by
means of a quick press. They are also used to simply go for wards/backwards in a track. In Tuner mode,
they allow you to skip from one radio station to another.
- The play/pause button is used for playing CDs.
- When you receive an incoming call, press the green button to answer and the red button to hang up.
- You can also dial a phone number on the remote control. To do so, change to Phone mode (via the
Source button or by pressing the Phone button directly on the
car stereo’s front panel) and then dial the number on the keypad. Once the number has been dialled, press
the green button to call.
Note :
The «+» prex can be obtained by pressing the zero button
for two seconds.
Replacing the battery in the remote control
When the remote control no longer works properly or you
experience problems controlling the car stereo with the
remote control, replace the remote control’s battery. Ensure
that the battery is facing the correct polarity when tting the
replacement.
1. Remove the battery cover by pressing the button.
2. Insert the new battery with the (+) side facing you. Replace the cover.
CAUTION :
The battery must be stored out of the reach of children. If a child accidentally swallows the battery, seek
medical advice immediately. Do not recharge, open, heat or throw onto a heat source. Any of these actions
could cause sparks and start a re.
Do not store the battery with other metallic materials. This could cause sparks and start a re. Do not
handle the battery with tweezers. This could cause sparks and start a re.
DIFFERENT FEATURES MODE
First of all, turn the car stereo on. To do so, press the rotary button.
To turn the car stereo off, hold down the same button for two seconds.
There are three major features, which can be accessed directly via the car stereo’s front panel:Tuner,
CD/MP3 and Phone mode
Each mode enables the car stereo to be used in a different way:
Tuner (or Radio) mode :
Press the Tuner button to listen to the radio. The fast-forward and rewind arrows let you
search for stations on a step-by-step basis. If you hold down either arrow, the system will
automatically search for the next station.
When you are tuned into a station, hold down a number on the front panel’s keypad (long
press) to assign a shortcut number.
Subsequently, to go straight to a memorised station, simply press the corresponding
number. When the station is memorised, the assigned shortcut number is displayed at the
same time as the station’s frequency.
CD/MP3 (or disc playback) mode :
Press CD/MP3 to listen to a CD.
You can move from one track on the CD to another by pressing
fast-forward or rewind. To move quickly forwards or backwards in a track, hold down the
fast-forward or rewind button for more than half a second.
When playing an MP3 disc, the LCD screen successively displays the following informa
tion: title of the song, album and artist, and always the time elapsed.
You can also select the track directly on the CD via the keypad.
Phone mode :
Press Phone to change the system to phone mode.
Once connected with your Bluetooth® phone, you will be given information on your
mobile phone’s battery and signal levels.
Your operator is also displayed (*).
You can access your phonebook simply by turning the scroll wheel.
You can then browse through the alphabet.
Select the corresponding letter for the required contacts.
If your contacts have more than one phone number, press the scroll wheel again to access
the numbers and then the green button to call.
To view your call records, press the rotary button.
All the calls made, missed and received are displayed.
(*) These features depend on your phone.
8

Русский Polski Cesky English
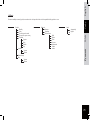
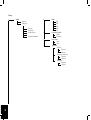
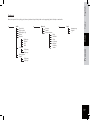
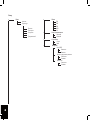
MENUS
Pressing the Menu button opens the Settings menu.
You can fully use all the car stereo’s features and dene the audio settings, backlight and all
the Bluetooth® features.
You can browse through the menus using the scroll wheel.
Pressing the scroll wheel opens the selected menu, allowing you to make any required
adjustments to the selected feature.
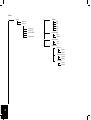
Menu description and structure
- CD/MP3 :
Used to dene the way in which you wish to listen to your CDs:
search, play back options, etc.
- CD/MP3
o MP3 search
Intelligent
A B C…
o Browser
o Repeat mode
Disabled
Repeat one
o Mode aléatoire
Disabled
Enabled
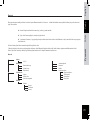
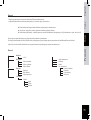
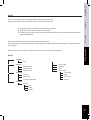
- TUNER :
Some information about RDS:
- The RDS (RDS Scan) option displays the radio station’s name and searches for alterna
tive frequencies if the reception signal fades.
This feature is also called «RDS Alternative Frequencies (AF)».
- Once enabled, the «RDS Region» feature keeps the settings of the current station
when searching for alternative frequencies.
For example, a radio station broadcasting local programmes to a specic
region will not be replaced by the same station broadcasting national program mes when
searching for alternative frequencies.
- The «Trafc Program» indicator (RDS TP) determines whether the radio station can
broadcast trafc information.
- If the «Trafc Alert» feature (RDS TA) is enabled and the current station can
broadcast trafc information («Trafc Program» indicator enabled), the car stereo auto
matically switches to Tuner mode when trafc information is broadcast.
- If the «Trafc Alert» feature is enabled and the current station does not broad
cast trafc information («Trafc Program» indicator disabled), the following
screen is displayed on the car stereo:
9

- Tuner
o Search o Band
Auto-store FM1
By program type FM2
FM3
All Program Types MW1
Pop Music LW
Rock Music o Tuner sensivity
... Local
Documentary Distant
o Stereo - Mono
Stereo
Mono
o RDS options
RDS Scan
Disabled
Enabled
Trafc Alert
Disabled
Enabled
RDS Region
Disabled
Enabled
10

Русский Polski Cesky English
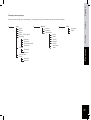
Bluetooth®:
This menu lets you manage all the Bluetooth® features on your car stereo: phonebook management, assigning of voiceprints, display, language.
l Phonebook: access to the phonebook memorised in the car stereo.
l Call records: list of calls missed, made and received.
l In the Settings subdirectory:
The paired devices option displays the name of the Bluetooth® phone with which your car stereo is connected in hands-free mode.
Once enabled, the automatic answer feature immediately answers any incoming call.
With some phones, a specic mode must be enabled before pairing (Pair a phone), so that as many features as possible can be supported.
Once again on specic phones, the Object Push feature is used to receive contacts when automatic synchronisation is not available.
Bluetooth
o Phonebook
A, B, C....
o Call records Automatic answer
Missed calls Information
calls made Hotline
call received Advanced settings
o Voice commands Pair a phone
Phonebook Sort Order
keywords Delete Contacts
Select voice recognition Object push
o Settings
Volume
Ringtone
Phone
Microphone
Note : some functions depend on your phone and might therefore be disabled.
11

FEATURES IN PHONE MODE: hands-free (Bluetooth)
Press Phone to change the system to Phone mode.
Phones compatible with the Bluetooth® technology use either the Hands-free or the Headset
prole for transferring the call to the car stereo. The Hands-free prole offers the most features.
When using your car stereo in Tuner or CD/MP3 mode, the unit automatically switches to Phone
mode if someone calls you. After the call, the car stereo returns to Tuner or CD/MP3 mode. The
driver does not need to take any action. The same applies when you make a call via the car stereo.
Pairing :
Pairing is the rst connection between your Bluetooth® phone and the car stereo. This procedure
is initiated via your phone. Search for any Bluetooth® peripherals. Once «Parrot Car Stereo» is
found, select it and your phone prompts you to enter a four-digit code. Enter 1234 and conrm.
After the necessary data has been exchanged, you are now Bluetooth® connected with the car
stereo.
With some phones, a special mode needs to be enabled prior to pairing for access to more features.
Refer to Bluetooth > Settings > Pair a phone.
Synchronising the phone’s phonebook :
With some Bluetooth phones, the phonebook is automatically synchronised in the kit’s memory. If
your phone does not support automatic synchronisation, you can also use the Object Push feature
on your phone to send contacts from your phone to the car stereo by Bluetooth®.
When synchronising the phonebook, the Bluetooth® icon scrolls over the screen.
Refer to your phone’s user guide or our website for details on how to proceed:
«www.parrot.biz, at the section entitled Technical Support, User Guides»
Answering / Hanging up :
To answer a call, press the green button above the scroll wheel. Once you have nished your
conversation, press the red button to hang up.
Discreet mode :
During a call, press the green button to switch the conversation over to the phone. Press the green
button again to return the call to hands-free mode. This feature is only available on phones with a
Hands-free prole.
Caller ID :
When an incoming call is received, the caller’s name or number is displayed. This feature is only
available on certain phones.
Making a call via the car stereo’s interface :
Two options are available:
Change to Phone mode. Dial the phone number directly via the keypad and then press the green
button. To dial a number with «+» as the prex, quickly press the zero key twice.
You can also use the voice recognition feature (see below).
Voice recognition :
You can make calls using the car stereo’s voice recognition feature. To do so, contacts must be
memorised in the kit’s memory (automatic synchronisation of the phonebook or contacts sent
individually from the phone). You must have rst recorded the keywords: home, work, ofce, and
so on, as well as the magic word «phone».
Once you have recorded the names, keywords and magic word, you can call a contact as
follows :
Say: Phone… (Beep)… Anna… (Beep)… Home… and the car stereo automatically dials Anna’s
home number.
Similarly, if Anna calls you, you will hear «Anna». Press the green button to answer the call. Press
the red button to end the call. The car stereo automatically returns to Tuner, CD/MP3 or Phone
mode.
You can also use the following sequence for using the voice recognition feature, but without
keywords:
Press the green button and the radio or CD is muted. You will hear a beep.
Say the required person’s name after the beep and if necessary, specify house, work or ofce (if
available).
Note: When recording the keywords and magic word, park your vehicle in a quiet
place with the windows closed and the heater/air conditioner off.
This is necessary to obtain a higher recognition rate.
12

Русский Polski Cesky English
- Preferences :
This menu allows you to select your language, the display colour and all the audio features to ne-tune the hearing levels inside the vehicle.
o Audio o Display o Language
Bass Contrast Automatic
Treble Brightness English
Fader balance Backlight colour (sky blue by defau ...
Right/left balance White
Equaliser Blue
Disabled Yellow
Rock Red
Classique sky blue
Pop Violet
Loudness Amber
Disabled
Enabled
Spoken menus
Beep
Disabled
Enabled
13

UPDATING YOUR CAR STEREO
To take advantage of the latest improvements (new compatible phones, new features, etc.), you can update
your car stereo by Bluetooth®.
To do so, enable the option in Bluetooth > Settings > Advanced settings > Software update, and then use
a computer tted with Bluetooth to download the latest version to your car stereo (available from our
website).
For further information, visit our website: www.parrot.biz
TROUBLESHOOTING
In the event of a malfunction, immediately disconnect the car stereo.
This unit must not be used in abnormal conditions, such as if there is no sound or unpleasant smells are
detected from the unit, to avoid any risk of electrocution.
On no account should you try to repair the unit yourself.
General:
l The car stereo does not come on.
The car’s ignition is switched off. Turn the key in the ignition to the ACC position (on).
Check the wiring. The fuse has blown. Replace the fuse.
l No sound:
Check that the car stereo’s volume is not at the lowest setting.
Also ensure that the Mute function has not been enabled (sound cut off).
Radio :
l Excessive noise with a station:
The station that you are listening to is too far away for an optimal signal.
Choose another station with a better signal.
l Preset stations lost:
The car stereo’s power supply is not set up correctly.
Check that the battery wire is correctly tted (ignition 12 V and constant 12 V).
Disc :
l The disc is inserted, but it does not play.
The disc is upside-down.
The disc must be inserted with the name of the artist/CD facing upwards.
The disc is dirty or damaged. Clean the disc or change the CD.
l The CD jumps or the sound quality is poor.
The disc is dirty or damaged. Clean the disc or change the CD.
l Vibrations when driving the car cause the CD to jump.
The angle for tting the car stereo must be less than 30°.
Check that the car stereo has been securely tted in the appropriate place.
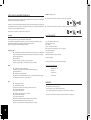
CD/MP3 : error messages.
l The icon below is displayed: this means that there is no CD in the player.
l The icon below is displayed: this means that your CD does not contain any les in MP3 format.
TECHNICAL SPECIFICATIONS
CD / CD-R / CD-RW / MP3, ID3 Tag.
Manual ip-down front panel.
Output power: 4x45W.
Line out: 4 channel x 4V/4ch x 2V
DSP: Classic, rock, pop, at.
Power / Speaker wire: ISO.
Colour screen.
Bluetooth ash updates for the latest version.
External microphone.
Uses your car’s speakers for greater listening comfort.
Bluetooth® proles supported:
- Hands-free 0.96 and 1.0.
- Headset 1.0.
- Object Push 1.0.
- Synch ML 1.0.
HOTLINE
- Our hotline is at your disposal.
You can contact the hotline by email or telephone
(open from Monday to Friday between 9 am and 6 pm - GMT+1).
- For further information, visit our website at www.parrot.biz.
14

Rhythm n’Blue
Návod k použití
Русский Polski Cesky English
15

BEZPEČNOSTNÍ POKYNY
UPOZORNĚNÍ
Používá se výhradně s elektrickým systémem o napětí 12 V se záporným uzemněním.
Při výměně pojistky použijte pojistku, která je dimenzovaná na stejnou hodnotu intenzity
proudu jako měněná pojistka.
Použití pojistky o vyšší intenzitě proudu může mít za důsledek poškození systému.
Neprovádějte demontáž systému. Laser přehrávače je nebezpečný pro Váš zrak.
Zkontrolujte, zda do systému nezasahují nebo nezapadly předměty z vnějšku: mohou
být příčinou dysfunkce systému, nebo ohrozit Vaši bezpečnost a způsobit např. popálení
elektrickým proudem, nebo být zdrojem nebezpečí v souvislosti s vystavením působení
laserového paprsku
Pokud bylo Vaše vozidlo vystaveno po dlouhou dobu vysokým nebo nízkým teplotám,
počkejte s použitím přístroje, dokud se kabina vozu nezahřeje.
Autorádio nepouštějte příliš hlasitě: je třeba, abyste slyšeli vnější výstražnou signalizaci.
POZNÁMKY O CD
Poslech poškozeného nebo zaprášeného CD může způsobit výpadky poslechu.
Ukládejte CD tak, jak je znázorněno na obrázku.
Nedotýkejte se části bez potisku.
Na přehrávací stranu CD si nezapisujte žádné poznámky.
Nevystavujte CD nevystavujte přímému působení slunečních paprsků nebo horka.
Zašpiněná CD otírejte vhodným hadříkem směrem od středu k vnějšímu okraji. K čištění
zásadně nepoužívejte rozpouštědla typu benzen nebo líh.
V tomto autorádiu nelze přehrávat CD 3» (8 cm).
V přístroji nepřehrávejte CD3» nebo disky s nepravidelným tvarem. Mohly by se v přístroji
zablokovat a způsobit dysfunkce.
PŘED PUŠTĚNÍM
Nenastavujte autorádio na příliš velkou hlasitost poslechu, jinak nebudete slyšet vnější
akustický hluk a zvuky. Před jakýmkoliv prováděním zásahu v systému musí být vůz
zastaven.
DŮLEŽITÉ UPOZORNĚNÍ
Nesnímejte kryt přístroje. Systém zásadně neopravujte sami.
V případě potřeby se poraďte s prodejcem nebo s odborným technickým pracovníkem.
PREZENTACE
Děkujeme Vám, že jste se rozhodli pro autorádio značky Parrot.
Máte tak disposici autorádio se systémem Bluetooth® CD/MP3 a s vestavěnou soupravou
hands free. Autorádio má všechny funkce, které nabízí vyšší třída soupravy hands free: syn-
chronizace telefonního seznamu, zobrazování jména osoby, s níž voláte, vynikající kvalita
reprodukce zvuku v kabině vozu, správa opakovaného volání, kompatibilita se všemi
telefony s funkcí Bluetooth. atd.
FUNKCE BLUETOOTH® VAŠEHO AUTORÁDIA
Součástí výbavy tohoto systému je technologie Bluetooth®, která umožňuje bezdrátovou
výměnu dat mezi elektronickými systémy- V tomto konkrétním případě je telefon s funkcí
Bluetooth® připojen k autorádiu. V závislosti na typu Vašeho mobilního telefonu (*) je
tedy možno synchronizovat telefonický seznam ve Vašem mobilním telefonu s pamětí
autorádia. Díky této funkci budete moci volat osoby přímo z tohoto seznamu, zobrazo-
vat jméno volající osoby, atd. Budete moci přijímat hovory, zavěšovat, ovládat hlasitost
telefonického hovoru pomocí zeleného a červeného tlačítka a pomocí kolečka autorádia.
Vestavěné ovládání hlasem umožňuje používání řady funkcí, aniž byste museli pouštět ruce
z volantu.
(*) : Platí pro některé typy telefonů.
Další informace najdete na našich webových stránkách:
„www.parrot.biz, rubrika „Technická podpora“, „Uživatelské příručky“.
16

Русский Polski Cesky English
PANEL
Autorádio se spouští stiskem otáčivého tlačítka.
Rádio se vypíná tak, že stisknete po dobu 2 sekund stejné tlačítko.
Infračervený snímač pro dálkové ovládání
Tuner CD/MP3 Telefon Klávesnice Tlačítko EJECT
REV (Vzad) Pauza/Play/Mute FWD (Vpřed) DISP Menu
17

Systém proti zcizení
Bez snímacího panelu je systém nefunkční.
Sejmutí panelu:
l Pro sklopení panelu stiskněte tlačítko EJECT (vpravo nahoře).
l Panel posuňte do strany směrem vlevo.
l Nejprve sejměte s autorádia pravou a potom levou stranu panelu.
l Panel uložte do pouzdra a nechejte si jej u sebe.
Nasazení panelu:
l Zasuňte levou stranu panelu do autorádia.
l Potom zasuňte do autorádia pravou stranu panelu.
l Panel zvedněte, dokud neuslyšíte, že upevnění zacvaklo.
Vyjmutí kompletního autorádia
l Sejměte panel a rám autorádia.
l Zasuňte klíče do příslušných míst, dokud se nezablokují.
l Vytáhněte autorádio.
18

Русский Polski Cesky English
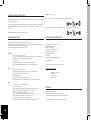
INSTALAČNÍ PŘÍRUČKA
Poznámka: Abyste uchovali parametry v paměti, dbejte na to, abyste nezaměnili svorku napájení 12 V a svorku stálého zdroje napětí 12.
Jinak byste museli provést všechna nastavení znovu.
19
Rear Line-out (Gray)
R (Red)
Amplifier
Connector
ISO Connector
Red
Black
Blue
Yellow
L (White)
B
B
A
1 3 5 7
2 4 6 8
5 7
2 4 8
A
Ignition key
+ 12 V DC When ON/ACC
Fuse 15A
Ground Lead
Motor/Electric Antenna relay control Lead
Amplifier relay control Lead
To car battety (+)
Continuous + 12V DC
Purple Gray White Green
Gray/
Black
Stripe
White/
Black
Stripe
Green/
Black
Stripe
Purple/
Black
Stripe
Right Speaker
(Rear)
Right Speaker
(Front)
(+) (-) (+) (-)(+) (-)
Left Speaker
(Front)
Left Speaker
(Rear)
(+) (-)
External microphone

DÁLKOVÝ OVLADAČ
Používání dálkového ovladače:
- Tlačítko „Zapnuto/Vypnuto“ umožňuje kontrolu napájení autorádia.
- Zdroj umožňuje přecházet z jednoho režimu do druhého: režim „Tuner“, „CD/MP3“ a potom
„Telefon“.
- V režimu CD/MP3 umožňuje krátký stisk šipky „Vpřed“ a „Vzad“ volbu další nebo předchozí
skladby. Rovněž se jich používá pro posunování vpřed nebo vzad v rámci jedné skladby. V režimu Tuner
umožňují šipky posouvání nebo návrat při vyhledávání rozhlasových stanic.
- Tlačítko „Play/Pauza“ slouží k ovládání přehrávání CD.
- Při příchozím volání stiskem zeleného tlačítka přijmete hovor, stiskem červeného tlačítka hovor
ukončíte. Telefonické číslo můžete rovněž navolit z dálkového ovladače.
- Pro volbu čísla telefonu přepněte do režimu „Telefon“ (pomocí zdrojového tlačítka nebo přímo
stiskem „Phone“ na panelu autorádia), potom vy ukejte příslušné číslo na klávesnici.
Po vložení celého čísla stiskněte zelené tlačítko pro vytáčení volání.
Poznámka:
„+“ napíšete tak, že stisknete po dobu 2 sekund klávesu „0“.
Výměna baterie dálkového ovladače:
Pokud dálkový ovladač nefunguje tak, jak má, nebo máte potíže
s ovládáním autorádia pomocí dálkového ovladače, vyměňte slabou
baterii ovládače za novou.
Při výměně zkontrolujte polaritu.
1. Stiskem tlačítka vyjměte držák baterie.
2. Vložte novou baterii tak , aby pól (+) směřoval směrem k Vám. Nasaďte držák na místo.
DŮLEŽITÉ UPOZORNĚNÍ:
Baterii uložte mimo dosah dětí.
Pokud dítě neš astnou náhodou baterii polkne, vyhledejte ihned lékařskou pomoc.
Baterii nedobíjejte, neotevírejte, nezahřívejte ani nevhazujte do ohně. V opačném případě může dojít k
jiskření nebo vzniku požáru.
Baterii neukládejte s jinými kovovými materiály.
V opačném případě může dojít k jiskření nebo vzniku požáru.
S baterií nemanipulujte pomocí epilační pinzety. V opačném případě může dojít k jiskření nebo vzniku
požáru.
JEDNOTLIVÉ FUNKČNÍ REŽIMY
Nejprve autorádio zapněte.Autorádio zapnete stiskem otáčivého tlačítka.
Autorádio vypnete tak, že po dobu 2 sekund stisknete stejné tlačítko.
Existují 3 hlavní funkce, které jsou přístupné přímo z rozhraní autorádia: režim „Tuner“, režim „CD/MP3“
a režim „Phone“.
Každý režim umožňuje specické používání autorádia:
Režim Tuner (nebo Rádio)
Pro poslech rozhlasu stiskněte tlačítko Tuner.
Šipka „Vzad“ a „Vpřed“ umožňuje postupné vyhledávání rozhlasových stanic. Pokud
stisknete bez přerušení jedno nebo druhé tlačítko, systém se automaticky přeladí na další
stanici.Pokud máte naladěnou rozhlasovou stanici, dlouhým stiskem čísla na panelu
autorádia dáte zkratkový příkaz. Chcete-li potom přeladit na rozhlasovou stanici uloženou
do paměti, naladíte ji dlouhým stiskem čísla, pod nímž ji máte uloženou.
Je-li rozhlasová stanice uložená v paměti přijímače, zobrazí se číslo zkratkového příkazu,
které jste jí přidělili, a frekvence, na níž stanice vysílá.
Režim CD/MP3 (nebo přehrávání disků):
Pro přepnutí na poslech CD stiskněte tlačítko CD/MP3.
Stiskem tlačítka „Vzad“ nebo „Vpřed“ můžete nastavit poslech přecházející nebo následu
jící skladby. Pro návrat nebo rychlopřehrávání držte tlačítko „Vzad“ nebo „Vpřed“
stisknutépo dobu 0,5 sekundy. Při přehrávání disku ve formátu MP3 se na LCD displeji
postupně zobrazí následující informace: název skladby, název alba a jméno interpreta a bez
přerušení se bude zobrazovat uplynulý čas.
Pomocí klávesnice rovněž můžete přímo navolit skladbu na CD, kterou chcete poslouchat.
Režim Phone (nebo telefonování):
Pro přepnutí na režim telefonování stiskněte tlačítko Phone.
Po propojení s Vaším mobilním telefonem s funkcí Bluetooth® se zobrazují informace o
stavu baterie a sítě Vašeho telefonu. Rovněž se zobrazuje název Vašeho mobilního ope
rátora (*). Přístup do telefonního seznamu získáte otáčením kolečkem. Procházíte písmena
abecedy. Pro přístup ke kontaktům zvolte příslušné písmeno. Pokud máte ke kontaktům
přiřazeno několik telefonických čísel, stiskněte ještě jednou kolečko, abyste se dostali do
nabídky těchto čísel, pro volání konkrétního čísla stiskněte zelené tlačítko. Pro procházení
výpisu volání stiskněte otáčecí tlačítko. Zobrazí se volané, zmeškané a přijaté hovory.
(*) Tyto funkce závisí na typu mobilního telefonu.
20
Strona się ładuje...
Strona się ładuje...
Strona się ładuje...
Strona się ładuje...
Strona się ładuje...
Strona się ładuje...
Strona się ładuje...
Strona się ładuje...
Strona się ładuje...
Strona się ładuje...
Strona się ładuje...
Strona się ładuje...
Strona się ładuje...
Strona się ładuje...
Strona się ładuje...
Strona się ładuje...
Strona się ładuje...
Strona się ładuje...
Strona się ładuje...
Strona się ładuje...
Strona się ładuje...
Strona się ładuje...
Strona się ładuje...
Strona się ładuje...
Strona się ładuje...
Strona się ładuje...
Strona się ładuje...
Strona się ładuje...
Strona się ładuje...
Strona się ładuje...
Strona się ładuje...
Strona się ładuje...
-
 1
1
-
 2
2
-
 3
3
-
 4
4
-
 5
5
-
 6
6
-
 7
7
-
 8
8
-
 9
9
-
 10
10
-
 11
11
-
 12
12
-
 13
13
-
 14
14
-
 15
15
-
 16
16
-
 17
17
-
 18
18
-
 19
19
-
 20
20
-
 21
21
-
 22
22
-
 23
23
-
 24
24
-
 25
25
-
 26
26
-
 27
27
-
 28
28
-
 29
29
-
 30
30
-
 31
31
-
 32
32
-
 33
33
-
 34
34
-
 35
35
-
 36
36
-
 37
37
-
 38
38
-
 39
39
-
 40
40
-
 41
41
-
 42
42
-
 43
43
-
 44
44
-
 45
45
-
 46
46
-
 47
47
-
 48
48
-
 49
49
-
 50
50
-
 51
51
-
 52
52


Parrot Car CD MP3 Player Instrukcja obsługi
- Kategoria
- Odtwarzacze CD
- Typ
- Instrukcja obsługi
- Niniejsza instrukcja jest również odpowiednia dla
w innych językach
- slovenčina: Parrot Car CD MP3 Player Používateľská príručka
Powiązane artykuły
-
Parrot MINIKIT Instrukcja obsługi
-
Parrot PF150003AA Karta katalogowa
-
Parrot Zik Instrukcja obsługi
-
-
-
-
-
-
Inne dokumenty
-
Renault R-Plug&Radio+ Instrukcja obsługi
-
ECG CD 190 BT Instrukcja obsługi
-
Manta rainbow eye MA417 Instrukcja obsługi
-
Clarion CZ302E Owner's Manual & Installation Manual
-
-
Blaupunkt Bamberg 470 DAB BT Instrukcja obsługi
-
Clarion CZ309E Owner's Manual & Installation Manual
-
Blaupunkt Toronto 410 BT Instrukcja obsługi