HP 9250C DIGITAL SENDER Skrócona instrukcja obsługi
- Typ
- Skrócona instrukcja obsługi

HP 9250C Digital Sender
Getting Started Guide
Instalační příručka
Gyorskalauz
Podręczna instrukcja obsługi
Руководство по началу работы

Copyright and License
© 2007 Copyright Hewlett-Packard
Development Company, LP
Reproduction, adaptation, or translation
without prior written permission is prohibited,
except as allowed under the copyright laws.
The information contained in this document
is subject to change without notice.
The only warranties for HP products and
services are set forth in the express warranty
statements accompanying such products
and services. Nothing herein should be
construed as constituting an additional
warranty. HP shall not be liable for technical
or editorial errors or omissions contained
herein.
CB472-90946
Edition 1, 6/2007
FCC Regulations
This equipment has been tested and found
to comply with the limits for a Class B digital
device, pursuant to Part 15 of the FCC rules.
These limits are designed to provide
reasonable protection against harmful
interference in a residential installation. This
equipment generates, uses, and can radiate
radio frequency energy. If this equipment is
not installed and used in accordance with the
instructions, it can cause harmful
interference to radio communications.
However, there is no guarantee that
interference will not occur in a particular
installation; the presence of interference can
be determined by turning the equipment off
and on.
If this equipment does cause harmful
interference to radio or television
communications, the user is encouraged to
try to correct the interference by one or more
of the following measures: Reorient or
relocate the receiving antenna; increase
distance between equipment and receiver;
connect equipment to an outlet on a circuit
different from that to which the receiver is
located; or consult your dealer or an
experienced radio/television technician.
Note: Any changes or modifications to the
device that are not expressly approved by
HP could void the user's authority to operate
this equipment
Trademark Credits
Microsoft® and Windows® are U.S.
registered trademarks of Microsoft
Corporation.
Pentium® is a registered trademark of Intel
Corporation or its subsidiaries in the United
States and other countries.
English

Install and Setup the Device
Installation environment
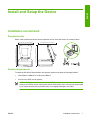
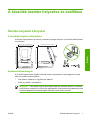
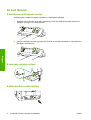
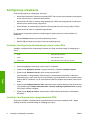
Prepare the site
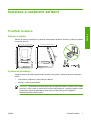
Select a well-ventilated, dust-free area to install the device. Place the device on a sturdy surface.
552.62 mm (17.82 inches) 571.82 mm (22.51 inches)
340.26 mm (13
.40 inches)
340.26 mm (13
.4
0 inches)
System requirements
To install the HP 9250C Digital Sender, the computer system must have the following features:
●
Fast Ethernet 100Base-TX or Ethernet 10Base-T
●
Access to an SMTP e-mail gateway
NOTE HP highly recommends establishing SMTP gateway on your own local area network.
However, the device can be configured for e-mail functionality even if mail services are provided
by an outside Internet service provider (ISP) over a digital subscription line (DSL).
ENWW Installation environment 1
English

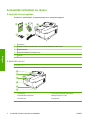
Device components
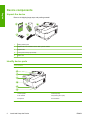
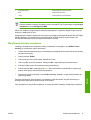
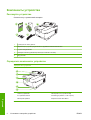
Unpack the device
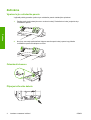
Remove all shipping bags, tape, and packing material.
1
2
4
3
5
1 Getting started guide
2 Digital sender documentation and HP DSS optional software
3 Digital sender
4 Control panel overlays (if included)
5 Power cord
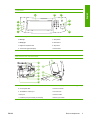
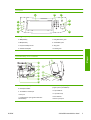
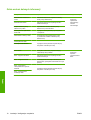
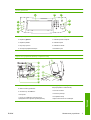
Identify device parts
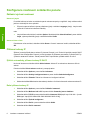
Front of device
5
6
3
4
2
1
1. Control panel
2. Jam release
3. Output bin
4. ADF input tray
5. Keyboard (pull to open)
6. On/off switch
2 Install and Setup the Device ENWW
English

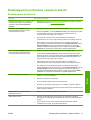
Control Panel
4
3
2
1
10
9
5
6
7
8
1. Attention light
2. Data light
3. Ready light
4. Brightness-adjustment dial
5. Touchscreen graphical display
6. Numeric keypad
7. Sleep button
8. Reset button
9. Stop button
10. Start button
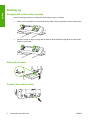
Back of device, lock, and serial number
14
15
13
12
11
10
9
8
7
16
7. ADF cable
8. Control-panel cable
9. 10/100Base-T network port
10. EIO port
11. USB host port (for third-party accessories)
12. USB device port (if needed for firmware upgrades)
13. Power connector
14. Scanner lock
15. Serial number
16. Extra mylar sheets
ENWW Device components 3
English

Starting up
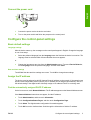
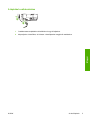
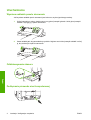
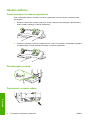
Changing the control panel overlays
Use the following procedure to change the control-panel overlay, if needed.
1. Insert a small, flat-blade tool in the slot at the top edge. Lift the top and pull it off the control panel.
2. Place the overlay to align correctly with the buttons. Slide the bottom edge down first and snap it
onto the control panel
Unlock the scanner
Connect the network cable
4 Install and Setup the Device ENWW
English

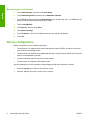
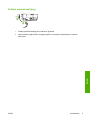
Connect the power cord
2
1
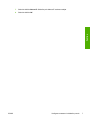
1. Connect the power cord to the device and outlet.
2. Turn on the power switch and follow the prompts on the control panel.
Configure the control-panel settings
Basic default settings
Language settings
After the device warms up, the messages on the control panel appear in English. Change the language
in one of two ways:
●
Select the preferred language from the Language menu the first time the device is turned on. The
language must be selected within 60 seconds after the menu appears.
or
●
Change the language at any time from the Administration menu. First touch Device Behavior,
touch Language, touch the preferred language, and then touch Save.
Date and time settings
Touch Exit if the date and time settings are correct. Touch OK to change these settings.
Assign the IP address
The device must be assigned a valid IP (Internet Protocol) address on the network. If the network uses
dynamic host configuration protocol (DHCP), the IP address can be assigned automatically. DHCP is
the default setting in the digital sender. Manually assign an IP address if DHCP is not being used.
Find the automatically assigned DHCP IP address
On the home screen, touch Network Address. The IP address appears on the Network Address screen.
If the Network Address button does not appear, find the IP address:
●
Touch Administration, and then touch Information.
●
Touch Configuration/Status Pages, and then touch Configuration Page.
●
Touch Show. The digital-sender configuration information appears.
●
Touch OK to see the Jetdirect data. Scroll through the information to find the IP address.
ENWW Configure the control-panel settings 5
English

Manually assign an IP address
1. Touch Administration, and then touch Initial Setup.
2. Touch Networking and I/O, and then touch Embedded Jetdirect.
3. Touch TCP/IP, and then touch either IPV4 Settings (such as http://192.168.1.1) or IPV6 (such as
http://[2001:0ba0:0000.0000.0000.0000.0000:1234]).
4. Touch Config Method.
5. Touch Manual, and then touch Save.
6. Touch Manual settings.
7. Touch IP address. Touch the IP address field, and then type the IP address.
8. Touch OK.
Device configuration
Before configuring, have the following information:
●
The host name or IP address of the simple mail transfer protocol (SMTP) e-mail server that will
send e-mail from the digital sender
●
The host name or IP address of the Lightweight Directory Access Protocol (LDAP) server that will
retrieve e-mail addresses (optional)
●
The preferred folder paths for the send-to-folder feature
●
The host name or IP address of the digital sender
Use the following keys on the keyboard to help navigate through the configuration screens.
●
Press the Escape key to return to the previous screen.
●
Press the Tab key to move the cursor to the next field.
6 Install and Setup the Device ENWW
English

Install and configure Embedded Web Server (EWS)
Install and configure EWS to access the following features:
●
E-mail
●
Folder
●
Addressing
●
Kerberos authentication
●
LDAP authentication
●
Group 1/Group 2 PIN authentication
1. Open a web browser and type the device IP address.
2. Select the Digital Sending tab and complete the General Settings information.
3. Select E-mail Settings and then type the SMTP server address.
If you are using an Internet Service Provider (ISP) for Internet access and e-mail you might need
to contact your ISP to obtain the SMTP server name, and to determine if you need to enter an
account name and password for SMTP authentication.
4. Select E-mail Address Book to enter frequently-used e-mail addresses and e-mail distribution
lists. The Fax Address Book and Fax Speed Dials are located in the left navigation area.
5. Select Send To Folder to set up one or more folder destinations for scanned documents.
Install and configure digital sending software (DSS)
Install and configure digital sending software (optional) to access the following features:
●
Workflow
●
OCR
●
Lanfax
●
Windows authentication
●
Lanfax authentication
●
Netware authentication
Tip If a previous version of HP DSS is already installed, save time by copying settings with the
copy settings feature in the MFP configuration tab when installing the newer device.
The digital sender must be on and connected to the network in order to successfully complete the
software installation process.
Install the software on the server that will be supporting the HP Digital Sending Software (HP DSS)
service. After installation, the HP DSS runs in the background as a service, starting automatically
whenever the server is restarted.
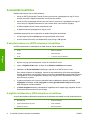
Verify the device installation
Test the installation and configuration using the E-Mail and Network Folder options on the control-
panel display.
1. Place a document face-up in the ADF or face-down on the flatbed glass.
2. Touch E-Mail.
3. Type the user name and password, if prompted.
ENWW Device configuration 7
English

4. If not prompted to log in, touch From: and then type an e-mail address.
5. Touch To: and then type the same e-mail address.
6. Touch OK and then press Start. The device scans the document and sends it to you as an e-mail
attachment.
7. Repeat this process using the Network Folder option, and verify that the file is sent to the correct
folder.
A successful test shows that the device will scan and send documents to the configured e-mail address
or folder.
If the device does not send the file correctly, verify the device installation and configuration.
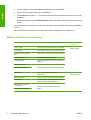
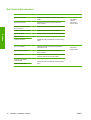
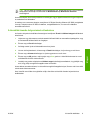
Where to look for more information
Feature Description For more
information
Scan to E-mail Scan a document and send it to any e-mail address
EWS user guide
Scan to Folder Scan a document to one or more network folders
Address Book for E-mail and
Fax
Enter names, e-mail addresses, and fax numbers
User PIN Authentication Requires authorization to use device
LDAP Addressing Search an LDAP directory for names and e-mail
addresses
LDAP Authentication
Require user authentication to use specific features
Kerberos Authentication
DSS LANFax Route fax jobs via an existing LANFax
infrastructure
DSS support guide
DSS Send to Folder
Scan a document to one or more network folders.
DSS Workflow Capture information about scanned documents;
route documents to other applications
DSS Windows Negotiated
Authentication
Requires user authentication to use specific
features
DSS LDAP Authentication
8 Install and Setup the Device ENWW
English

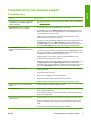
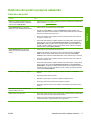
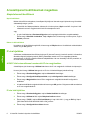
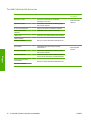
Troubleshooting and customer support
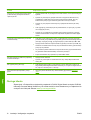
Troubleshooting
Problem Action to take
The digital sender will not scan and is unable
to complete the job. A Please try again error
message is displayed.
●
The scanner head lock is still in the locked position. Switch it to the unlocked position.
See
Unlock the scanner.
The Find Servers button on the E-Mail
Settings screen did not find any servers.
●
Verify that you have a functioning SMTP server on the network.
●
Click the Add… button on the E-Mail Settings screen and type the host name or IP
address of the SMTP server. After typing the address, click the Test button to verify
that the software can contact the server.
●
If testing the server is unsuccessful, contact the network administrator to help
troubleshoot the communication with the server.
●
If you have any other digital senders or MFPs that are using the HP DSS service, use
the Copy Settings button on the MFP Configuration tab of the HP MFP DSS
Configuration Utility to copy the settings from a device that is functioning correctly, and
then use the Paste Settings button to apply those settings to the digital sender.
The Find Servers button on the
Authentication Settings screen did not find any
servers.
●
Verify that there is a functioning LDAP server on the network.
●
Type the host name or IP address of the LDAP server into the LDAP Server text box.
After typing in the address, touch Find Settings to retrieve the server settings. Then
touch Test to verify that the software can contact the server.
●
If testing the server is unsuccessful, contact the network administrator to help
troubleshoot the communication with the server.
●
If there are any other digital senders or MFPs that are using the HP DSS service, use
the Copy Settings button on the MFP Configuration tab of the HP MFP DSS
Configuration Utility to copy the settings from a device that is functioning correctly, and
then use the Paste Settings button to apply those settings to the digital sender.
The digital sender is not working.
●
Verify that the power cord is securely connected to the device and that it is plugged
into the power outlet.
●
Verify that the device is turned on.
●
Clear any error messages on the control-panel display.
●
Verify that the network cable is securely connected to the device.
●
Verify that one of the two green LEDs just above the device network port is on.
Scanned pages are blank or have repeated
patterns.
●
Verify that a page is not already located on the glass.
The image quality is poor.
●
Verify that the document that you are trying to send is placed correctly in the ADF (face-
up) or on the glass (face-down).
●
Try changing some of the scan settings, where possible, such as resolution or file type,
to improve the image quality.
The ADF feeds multiple sheets, skews sheets,
or jams frequently.
●
Adjust the guides so that they are snug against the stack but do not bend the stack.
●
Verify that the ADF input tray or output bin is not overloaded. Each tray can hold a
maximum of 50 pages, but this capacity may be lower when using certain types of
media.
●
Verify that the paper is stacked square and straight in the ADF.
ENWW Troubleshooting and customer support 9
English

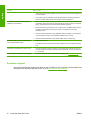
Problem Action to take
●
If the original was previously stapled or three-hole-punched, make sure the pages are
not stuck together.
●
Verify that the type of media that is being loaded meets the required specifications.
See the HP 9250C Digital Sender User Guide for media specifications.
An e-mail transmission did not arrive at the
destination e-mail address.
●
If the e-mail address was manually typed, resend the e-mail message. Re-enter the e-
mail address, and verify that the correct format has been used (no spaces, the required
@ sign, the required period) in both the To: and From: text boxes.
●
Resend the e-mail. Type the name in the correct format in the From: field so that the
message is not rejected and so that you receive a message back if the e-mail
transmission fails.
●
Have the network administrator verify that SMTP Relay is enabled on the mail server
in order to allow sending to e-mail addresses outside of your company.
●
Have the network administrator verify that the SMTP server is functioning.
A document that you sent to a folder did not
arrive at the destination folder.
●
Resend the document.
●
Verify whether the file name might have been modified to resolve a duplicate-file-name
error.
The bottom of a page that you sent is cut off.
●
If the document was sent from the glass, the document page might be too long. The
maximum length for documents scanned from the glass is A4, or 210 x 297 mm (8.27
x 11.69 inches).
The control panel is using the wrong language.
●
Use the control-panel menu to set the correct language. See Language settings.
Customer support
See the HP 9250C Digital Sender User Guide on the CD-ROM. For HP Customer Care information, see
the support flyer that came with the device, or go to
www.hp.com/support/9250c.
10 Install and Setup the Device ENWW
English

Instalace a nastavení zařízení
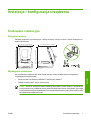
Prostředí instalace
Příprava umístění
Zařízení by mělo být instalováno ve větraném a bezprašném prostředí. Zařízení by mělo být umístěno
na pevném povrchu.
552.62 mm (17.82 inches) 571.82 mm (22.51 inches)
340.26 mm (13
.40 inches)
340.26 mm (13
.4
0 inches)
Systémové požadavky
Instalace zařízení HP 9250C Digital Sender vyžaduje, aby systém v počítači podporoval následující
funkce:
●
Fast Ethernet 100Base-TX nebo Ethernet 10Base-T
●
Přístup k e-mailové bráně SMTP
Poznámka Společnost HP důrazně doporučuje, aby byla brána SMTP umístěna ve vaší vlastní
místní síti. Funkci e-mailu je však možné v zařízení nakonfigurovat, i když jsou poštovní služby
poskytovány vnějším poskytovatelem internetových služeb (ISP) pomocí digitálního
telekomunikačního protokolu (DSL).
CSWW Prostředí instalace 1
Čeština

Součásti zařízení
Vybalení zařízení
Odstraňte všechny přepravní obaly, pásku a balicí materiál.
1
2
4
3
5
1 Instalační příručka
2 Dokumentace k zařízení pro digitální odesílání a volitelný software HP DSS
3 Zařízení pro digitální odesílání
4 Kryty ovládacího panelu (jsou-li součástí)
5 Napájecí kabel
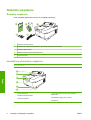
Části zařízení
Přední strana
5
6
3
4
2
1
1. Ovládací panel
2. Tlačítko pro uvolnění uvíznutého papíru
3. Výstupní zásobník
4. Vstupní podavač ADF
5. Klávesnice (otevřete vytáhnutím)
6. Vypínač
2 Instalace a nastavení zařízení CSWW
Čeština

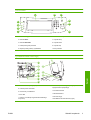
Ovládací panel
4
3
2
1
10
9
5
6
7
8
1. Kontrolka Upozornění
2. Kontrolka Data
3. Kontrolka Připraveno
4. Číselník pro nastavení jasu
5. Grafický displej dotykové obrazovky
6. Číselná klávesnice
7. Tlačítko Úsporný režim
8. Tlačítko Reset
9. Tlačítko Stop
10. Tlačítko Spustit
Zadní strana, zámek a sériové číslo
14
15
13
12
11
10
9
8
7
16
7. Kabel podavače ADF
8. Kabel ovládacího panelu
9. Síťový port 10/100Base-T
10. Port EIO
11. Hostitelský port USB (pro příslušenství od jiných
výrobců)
12. Port USB zařízení (je-li třeba k aktualizaci firmwaru)
13. Napájecí konektor
14. Zámek skeneru
15. Sériové číslo
16. Speciální fólie Mylar
CSWW Součásti zařízení 3
Čeština

Začínáme
Výměna krytu ovládacího panelu
V případě potřeby proveďte výměnu krytu ovládacího panelu následujícím způsobem.
1. Zasuňte malý plochý nástroj do otvoru na horním okraji. Zvedněte horní okraj a sejměte kryt
z ovládacího panelu.
2. Nový kryt zarovnejte podle tlačítek. Nejprve zasuňte spodní okraj a potom kryt přitlačte
k ovládacímu panelu až zaklapne na místo.
Odemknutí skeneru
Připojení síťového kabelu
4 Instalace a nastavení zařízení CSWW
Čeština

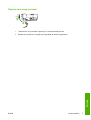
Připojení napájecího kabelu
2
1
1. Zapojte napájecí kabel do zařízení a do zásuvky.
2. Zapněte hlavní vypínač a postupujte podle pokynů na ovládacím panelu.
CSWW Začínáme 5
Čeština

Konfigurace nastavení ovládacího panelu
Základní výchozí nastavení
Nastavení jazyka
Po zahřátí zařízení se budou na ovládacím panelu zobrazovat zprávy v angličtině. Jazyk můžete změnit
jedním z následujících dvou způsobů:
●
Při prvním zapnutí zařízení vyberte požadovaný jazyk v nabídce Language (Jazyk). Jazyk musíte
vybrat do 60 sekund od zobrazení nabídky.
nebo
●
Jazyk můžete změnit kdykoli v nabídce Správa. Stiskněte tlačítko Chování zařízení, potom tlačítko
Jazyk, vyberte požadovaný jazyk a stiskněte tlačítko Uložit.
Nastavení data a času
Pokud datum a čas souhlasí, stiskněte tlačítko Konec. Chcete-li nastavení změnit, stiskněte tlačítko
OK.
Přiřazení adresy IP
Zařízení je nutné přiřadit platnou adresu IP (Internet Protocol) v síti. Pokud síť používá protokol DHCP
(Dynamic Host Configuration Protocol), může být adresa IP přiřazena automaticky. Protokol DHCP je
výchozím nastavením zařízení. Pokud protokol DHCP nepoužíváte, přiřaďte adresu IP ručně.
Zjištění automaticky přiřazené adresy IP DHCP
Na úvodní obrazovce stiskněte tlačítko Síťová adresa. Adresa IP se zobrazí na obrazovce Síťová
adresa.
Pokud se tlačítko Síťová adresa nezobrazí, postupujte takto:
●
Stiskněte tlačítko Správa a potom tlačítko Informace.
●
Stiskněte tlačítko Stránky konfigurace/stavu a potom tlačítko Stránka konfigurace.
●
Stiskněte tlačítko Zobrazit. Zobrazí se informace o konfiguraci zařízení.
●
Stisknutím tlačítka OK zobrazíte data nástroje Jetdirect. V těchto informacích naleznete adresu IP.
Ruční přiřazení adresy IP
1. Stiskněte tlačítko Správa a potom tlačítko Počáteční nastavení.
2. Stiskněte tlačítko Možnosti sítě a V/V a potom tlačítko Vestavěný server Jetdirect.
3. Stiskněte tlačítko TCP/IP a potom stiskněte tlačítko Nastavení IPV4 (např. http://192.168.1.1) nebo
IPV6 (např. http://[2001:0ba0:0000.0000.0000.0000.0000:1234]).
4. Stiskněte tlačítko Způsob konfigurace.
5. Stiskněte tlačítko Ruční a potom stiskněte tlačítko Uložit.
6. Stiskněte tlačítko Ruční nastavení.
6 Instalace a nastavení zařízení CSWW
Čeština

7. Stiskněte tlačítko Adresa IP. Stiskněte pole Adresa IP a adresu zadejte.
8. Stiskněte tlačítko OK.
CSWW Konfigurace nastavení ovládacího panelu 7
Čeština

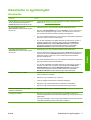
Konfigurace zařízení
Před konfigurací je třeba znát následující informace:
●
název hostitele nebo adresu IP e-mailového serveru SMTP, který bude ze zařízení odesílat e-
maily,
●
název hostitele nebo adresu IP serveru s protokolem LDAP, který bude načítat e-mailové adresy
(volitelné),
●
cesty k upřednostňovaným složkám, které budou nastaveny u funkce odesílání do složky,
●
název hostitele nebo adresu IP zařízení.
Obrazovky konfigurace můžete procházet pomocí následujících kláves na klávesnici.
●
Stisknutím klávesy Escape se vrátíte k předchozí obrazovce.
●
Stisknutím klávesy Tab posunete ukazatel do dalšího pole.
Instalace a konfigurace zabudovaného webového serveru
Instalací a konfigurací zabudovaného webového serveru získáte přístup k následujícím funkcím:
●
E-mail
●
Složka
●
Adresování
●
Ověřování Kerberos
●
Ověřování LDAP
●
Ověřování kódu PIN skupiny 1/skupiny 2
1. Otevřete webový prohlížeč a zadejte adresu IP zařízení.
2. Vyberte kartu Digitální odesílání a doplňte údaje v položce Obecné nastavení.
3. Vyberte položku Nastavení e-mailu a zadejte adresu serveru SMTP.
Používáte-li pro přístup k Internetu a e-mailu poskytovatele internetových služeb (ISP), budete se
pravděpodobně muset obrátit na tohoto poskytovatele, abyste získali název serveru SMTP a zjistili,
zda musíte z důvodu ověření SMTP zadat název účtu a heslo.
4. Pomocí položky Adresář e-mailových adres můžete zadávat často používané e-mailové adresy
a e-mailové distribuční seznamy. Položky Adresář faxových čísel a Faxové rychlé volby se
nacházejí v levé navigační oblasti.
5. Pomocí položky Odeslání do složky můžete nastavit jednu nebo více cílových složek určených
pro naskenované dokumenty.
Instalace a konfigurace softwaru pro digitální odesílání
Instalací a konfigurací volitelného softwaru pro digitální odesílání získáte přístup k následujícím funkcím:
●
Sled prací
●
OCR
●
Fax v síti LAN
●
Ověřování systému Windows
●
Ověřování funkce Fax v síti LAN
●
Ověřování netwaru
8 Instalace a nastavení zařízení CSWW
Čeština
Strona się ładuje...
Strona się ładuje...
Strona się ładuje...
Strona się ładuje...
Strona się ładuje...
Strona się ładuje...
Strona się ładuje...
Strona się ładuje...
Strona się ładuje...
Strona się ładuje...
Strona się ładuje...
Strona się ładuje...
Strona się ładuje...
Strona się ładuje...
Strona się ładuje...
Strona się ładuje...
Strona się ładuje...
Strona się ładuje...
Strona się ładuje...
Strona się ładuje...
Strona się ładuje...
Strona się ładuje...
Strona się ładuje...
Strona się ładuje...
Strona się ładuje...
Strona się ładuje...
Strona się ładuje...
Strona się ładuje...
Strona się ładuje...
Strona się ładuje...
Strona się ładuje...
Strona się ładuje...
Strona się ładuje...
Strona się ładuje...
Strona się ładuje...
Strona się ładuje...
Strona się ładuje...
Strona się ładuje...
Strona się ładuje...
Strona się ładuje...
Strona się ładuje...
Strona się ładuje...
-
 1
1
-
 2
2
-
 3
3
-
 4
4
-
 5
5
-
 6
6
-
 7
7
-
 8
8
-
 9
9
-
 10
10
-
 11
11
-
 12
12
-
 13
13
-
 14
14
-
 15
15
-
 16
16
-
 17
17
-
 18
18
-
 19
19
-
 20
20
-
 21
21
-
 22
22
-
 23
23
-
 24
24
-
 25
25
-
 26
26
-
 27
27
-
 28
28
-
 29
29
-
 30
30
-
 31
31
-
 32
32
-
 33
33
-
 34
34
-
 35
35
-
 36
36
-
 37
37
-
 38
38
-
 39
39
-
 40
40
-
 41
41
-
 42
42
-
 43
43
-
 44
44
-
 45
45
-
 46
46
-
 47
47
-
 48
48
-
 49
49
-
 50
50
-
 51
51
-
 52
52
-
 53
53
-
 54
54
-
 55
55
-
 56
56
-
 57
57
-
 58
58
-
 59
59
-
 60
60
-
 61
61
-
 62
62


HP 9250C DIGITAL SENDER Skrócona instrukcja obsługi
- Typ
- Skrócona instrukcja obsługi
w innych językach
Powiązane artykuły
-
HP (Hewlett-Packard) 9200c Digital Sender Instrukcja obsługi
-
HP 9250C DIGITAL SENDER Instrukcja obsługi
-
-
HP LaserJet M5035 Multifunction Printer series Skrócona instrukcja obsługi
-
-
-
-
HP LaserJet 4100 Multifunction Printer series Skrócona instrukcja obsługi
-
-