Hama 00040072 Instrukcja obsługi
- Kategoria
- Zdalne sterowanie
- Typ
- Instrukcja obsługi

E
SK
F
D
GB
I
S
PL
RUS
H
BG
CZ
TR
FIN
RO
GR
NL
P
Operating Instructions
Bedienungsanleitung
Mode d‘emploi
Instrucciones de uso
Gebruiksaanwijzing
Istruzioni per l‘uso
Instrukcja obsługi
Használati útmutató
Manual de utilizare
Návod kpoužití
Návod na použitie
Manual de instruções
Bruksanvisning
Руководство по эксплуатации
Работна инструкция
Οδηγίες χρήσης
Kullanma kılavuzu
Käyttöohje
2in1Universal Remote Control
Universal Fernbedienung
00040072
X1040072


Exit
MenuAV
AA
2
8
3
4
6
7
12
11
10
9
1
5
2in1
Art.Nr.: 00040072 /X1040072

2
G Operating Instructions
Universal remote control
Thank you for choosing aHama product.
Take your time and read the following instructions and
information in full. Please keep these instructions in a
safe place for later reference.
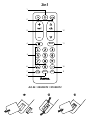
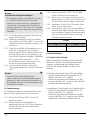
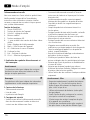
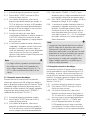
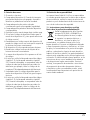
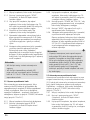
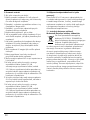
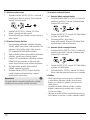
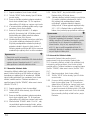
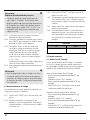
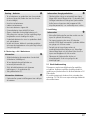
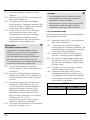
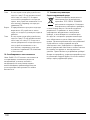
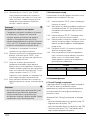
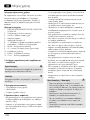
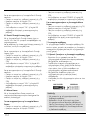
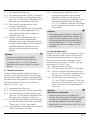
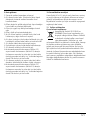
Function buttons
1. ON/OFF /LED indicator
2. Buttons for device selection
3. Vol+/Vol-: Volume control
4. Mute switch
5. Number buttons 0-9
6. -/-- Switch to two-digit channel numbers
7. Setup –Remote control settings
8. Menu –Open device menu
9. AV –Select external AV source
10. Conrm selection
11. Exit –Conrm selection
12. CH +/- –Programme selection
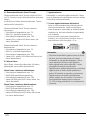
1. Explanation of warning symbols and notes
Warning
This symbol is used to indicate safety instructions or to
draw your attention to specichazards and risks.
Note
This symbol is used to indicate additional information
or important notes.
2. Supplied package
• Universal remote control
• List of codes
• These operating instructions
3. Safety instructions
• Do not use the universal remote control in damp
environments and avoid contact with splashing water.
• Keep the universal remote control away from heat
sources and do not expose it to direct sunlight.
• As with allelectrical products, the universal remote
control should be kept out of the reach of children.
• This product is intended for private, non-commercial
use only.
• Use the product only for the intended purpose.
• Protect the product from dirt, moistureand
overheating and use it in dry rooms only.
• Do not use the product in areas in which electronic
products arenot permitted.
• Do not drop the product and do not expose it to any
major shocks.
• Do not modify the product in any way.Doing so voids
the warranty.
• Keep the packaging material out of the reach of
children due to the risk of suffocation.
• Dispose of packaging material immediately in
accordance with the locally applicable regulations.
• Do not operate the product outside the power limits
specied in the technical data.
• Do not open the device or continue to operate it if it
becomes damaged.
• Do not attempt to service or repair the product
yourself.Leave any and all service work to qualied
experts.
• Only use the article under moderate climatic
conditions.
Warning -Batteries
• When inserting batteries, note the correct polarity
(+ and -markings) and insert the batteries
accordingly.Failure to do so could result in the
batteries leaking or exploding.
• Only use batteries (or rechargeable batteries) that
match the specied type.
• Beforeyou insert the batteries, clean the battery
contacts and the polarity contacts.
• Do not allow children to change batteries without
supervision.
• Do not mix old and new batteries, or batteries of
different types or from different manufacturers.

3
Warning -Batteries
•
Remove the batteries fr
om pr
oducts that ar
enot
being used for an extended period (unless these are
being kept ready for an emergency).
• Do not short-circuit batteries.
• Do not charge batteries.
• Do not burn batteries.
• Keep batteries out of the reach of children.
• Never open, damage or swallow batteries or allow
them to enter the environment. They can contain
toxic, environmentally harmful heavy metals.
• Remove spent batteries from the product and
dispose of them without delay.
• Avoid storing, charging and using in extreme
temperatures and at extremely low atmospheric
pressures (such as at high altitudes).
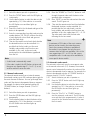
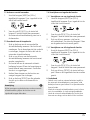
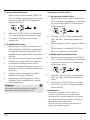
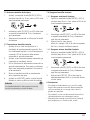
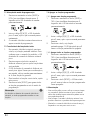
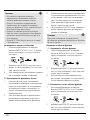
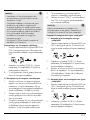
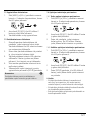
4. First steps -Inserting the batteries
Note
• Alkaline batteries arerecommended. Use two
batteries of the type "AA" (LR6/Mignon).
• Remove the battery cover on the back of the
universal remote control (A).
• Insert the batteries, observing the "+/-" marks for
polarity (B).
• Close the battery compartment (C).
Note: Code memory
• This remote control saves the settings even during
abattery change.
Note: Energy saving function
•
The r
emote contr
ol switches itself off automatically
if abutton is pressed for longer than 15 seconds.
This prolongs the life of the batteries if the remote
control is stuck in aplace wherethe buttons are
pressed permanently,e.g. between sofa cushions.
5. Setup
Note
• Forproper infra-red transmission, always hold the
remote control in the approximate direction of the
device to be operated.
• If no entry is made within 30 seconds, SETUP mode
is automatically terminated. The LED ashes six
times and then goes out.
• Youcannot operate adevice with the universal
remote control while it is in Setup mode. Exit Setup
mode and select the device to be operated using
the device selection buttons.
• Please note that the remote control emits infra-red
signals. These arenot visible to the human eye.
5.1 Direct code entry
Acode list is included in the universal remote control's
extent of delivery.The code list contains four-digit codes
for setting the remote control to work with most TV/STB
equipment manufacturers.
Foreasy orientation, the codes aresorted rst by
type of device (TV,STB)and within the type of device
alphabetically by brand name.

4
5.1.1 Switch the device you wish to operate on.
5.1.2 Press the "SETUP" button until the LED lights up
continuously.
5.1.3 Use the device button to select the device to be
operated (e.g. TV). If the selection is successful,
the LED flashes once and then lights up
permanently.
5.1.4 Search the code list for the brand and type of the
device to be operated.
5.1.5 Enter the corresponding four-digit code using the
number buttons 0-9. The LED confirms the entry
of each digit with ashort flash and goes out
after the fourth digit.
5.1.6 Then test the remote control and check whether
the desired functions can be controlled. It is
possible that the first code is not the most
suitable, and possibly not all functions are
available. In this case, try the next code
mentioned for the selected device type/brand
from the list.
Note
• Avalid code is automatically saved.
• If the code is invalid, the LED ashes six times and
then goes out. Repeat steps 5.1.1 to 5.1.5, or use
another method to enter the code.
5.2 Manual code search
The universal remote control has an internal memory
that already contains up to 350 codes per device type for
the most common AV devices. Youcan go through these
codes until the device to be operated shows aresponse.
Forexample, the device to be operated switches off
("POWER" button) or changes channel ("CH+/CH-"
buttons).
5.2.1 Switch the device you wish to operate on.
5.2.2 Press the SETUP button until the LED lights up
permanently.
5.2.3 Use the device button to select the device to be
operated (e.g. TV). If the selection is successful,
the LED flashes once and then lights up
permanently.
5.2.4 Press the "POWER" or "CH+/CH-" button to scroll
through the preset codes until the device to be
operated shows aresponse.
5.2.5 Press "MUTE" to save the code and exit the code
search. The LED goes out.
5.2.6 Then test the remote control and check whether
the desired functions can be controlled. It is
possible that the first code found is not the
most suitable, and possibly not all functions are
available. In this case, repeat steps 5.2.1. –5.2.5.
The code search starts with the next code
following the last one saved.
Note
• Amaximum of 350 codes of the most common
devices can be stored in the internal memory.
Due to the numerous AV devices available on
the market, it may happen that only the most
common main functions areavailable. If this is the
case, repeat steps 5.2.1 to 5.2.5 to nd amore
compatible code. Acode may not be available for
some specicdevice models.
5.3 Automatic code search
The automatic code search uses the same preset codes
as the manual code search (5.2). However,the universal
remote control automatically searches the codes until the
device to be operated shows aresponse. Forexample, the
device to be operated switches off ("POWER" button) or
changes channel ("CH+/CH-" buttons).
5.3.1 Switch the device you wish to operate on.
5.3.2 Press the "SETUP" button until the LED lights up
continuously.
5.3.3 Use the device button to select the device to be
operated (e.g. TV). If the selection is successful,
the LED flashes once and then lights up
permanently.
5.3.4 Press the "CH+/CH-" or "POWER" button to
start the automatic code search. The LED flashes
once and then lights up permanently. It takes 6
seconds for the universal remote control to start
the first search.

5
Note:
Setting the search speed
• The default setting for the search time per code is
1second. If this does not suit you, you can change
to asearch time of 3seconds per code. To switch
between search times, press "CH+" or "CH-" within
the 6seconds beforethe automatic code search
starts.
5.3.5 The LED confirms the respective code searches
with asingle flash.
5.3.6 As soon as the device to be operated shows a
response, press the "MUTE" button to save the
code and exit the code search. The LED goes out.
5.3.7 Then test the remote control and check whether
the desired functions can be controlled. It is
possible that the first code found is not the
most suitable, and possibly not all functions are
available. In this case, repeat steps 5.3.1.
–5.3.6.
The code search starts with the next code
following the last one saved.
5.3.8 To cancel the automatic search during the search
process, press the "EXIT" button.
Note
• If all codes have been searched without success,
the universal remote control exits the automatic
code search and automatically returns to
operating mode. The currently stored code remains
unchanged.
5.4 Code recognition
Code recognition offers you the ability to determine a
code you have already saved.
5.4.1 Press the "SETUP" button until the LED lights up
continuously.
5.4.2 Use the device button to select the device to be
operated (e.g. TV). If the selection is successful,
the LED flashes once and then lights up
permanently.
5.4.3
Press the "SETUP" button. The LED flashes once
and then lights up permanently.
5.4.4 Press one of the number buttons from 0to9to
search for the first digit. The LED flashes once for
the first digit of the four-digit code number.
5.4.5 Repeat step 5.4.4 for the second, third and fourth
digits respectively.
5.4.6 You can then enter the determined code in the
table below if you need it again at alater time
(e.g. after accidentally deleting the remote control
settings).
CODES
TV STB
6. Special functions
6.1 Channel punch-through
With the channel punch-through function, the CH+
or CH- commands can bypass the currently controlled
device and change the channels of asecond device. All
other commands areunaffected.
To activate the channel punch-through function:
• Press the desired device button (e.g. TV).
• Press and hold the "CH+" button.
• Press the desired device button (e.g. STB).
• Release the "CH+" button again (the LED ashes once
when the setting is activated).
To deactivate the channel punch-through function:
• Press the desired device button (e.g. TV).
• Press and hold the "CH-" button.
• Press the desired device button (e.g. STB).
• Release the "CH-" button again (the LED ashes twice
when the setting is deactivated).

6
6.2 Volume punch-through
With the volume punch-through function, the VOL+ or
VOL-commands can bypass the device currently being
controlled
and adjust the volume of asecond device. All other
commands areunaffected.
To activate the volume punch-through function:
• Press the desired device button (e.g. TV).
• Press and hold the "VOL+" button.
• Press the desired device button (e.g. STB).
• Release the "VOL+" button again (the LED ashes
once when the setting is activated).
To deactivate the channel punch-through function:
• Press the desired device button (e.g. TV).
• Press and hold the "VOL-" button.
• Press the desired device button (e.g. STB).
• Release the "VOL-" button again (the LED ashes
twice when the setting is deactivated).
6.3 Macro Power
MacroPower allows you to switch two AV devices on/
off simultaneously.
To activate the MacroPower function:
• Press the desired device button (e.g. TV).
• Press and hold the "POWER" button.
• Press the desired device button (e.g. STB).
• Release the "POWER" button again (the LED ashes
once when the setting is activated).
To deactivate the MacroPower function:
• Press the desired device button (e.g. TV).
• Press and hold the "POWER" button.
• Press the desired device button (e.g. STB).
• Release the "POWER" button again (the LED ashes
twice when the setting is deactivated)
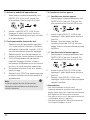
7. Learning function
This remote control is equipped with alearning function.
This allows you to transfer functions from your original
remote control to this universal remote control.
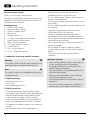
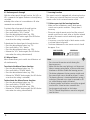
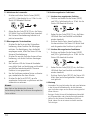
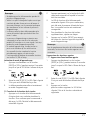
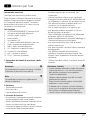
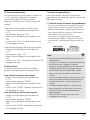
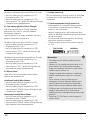
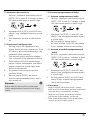
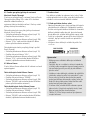
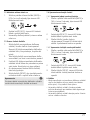
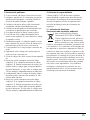
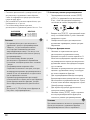
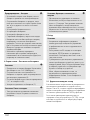
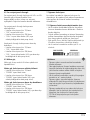
7.1 Before you start the learning function
• Make surethat all batteries used in both remote
controls areinperfect condition. Change them if
necessary.
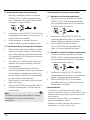
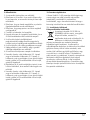
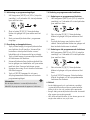
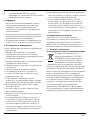
• Place your original remote control and the universal
remote control next to each other so that the infrared
diodes of the remote controls aredirectly opposite
each other.
• If necessary,correct the height of both remote controls
to achieve optimal alignment.
• The distance between the two remote controls should
be approx. 3cm.
BIG ZAPPER
ca. 3cm
ORIGINAL
Note
• Do not move the remote controls during the
learning process.
• Make surethat the room lighting is not uorescent
tubes or energy-saving lamps, as these could cause
interference and thus hinder the learning process.
• The distance between the two remote controls and
the nearest light source should be at least 1metre.
• The learning process is terminated without saving if
no button is pressed or no signal is received for 30
sec. while learning mode is activated.
• In learning mode, each button can only be assigned
one function. Anew function overwrites the
function previously taught on this button.
• The TV,STB andSetup buttons cannot be assigned
new functions.

7
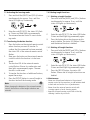
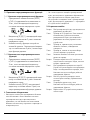
7.2 Activating the learning mode
1. Press and hold the [MUTE] and [VOL+] buttons
simultaneously for approx. 3sec. until the
status LED lights up continuously.
2. Enter the code [9] [8] [0], the status LED ash-
es 2times and then lights up permanently.
3. The universal remote control is now in learn-
ing mode.
7.3 Transferring the button function
1. Press the button on the original remote control
whose function you want to transfer.To
conrm that the command has been received,
the status LED of the universal remote control
ashes.
2. Now press the button on the universal remote
control to which the function is to be trans-
ferred.
3. The function LED of the universal remote
control ashes 3times for conrmation and
then lights up permanently again. The new
function is now saved.
4. To transfer the functions of additional buttons,
repeat these steps.
5. Press the [SETUP] button to save all taught-in
functions and exit the learning mode.
Note
When changing the batteries of the universal remote
control, the functions of the taught-in buttons are
retained.
7.4 Deleting taught functions
7.4.1 Deleting ataught function
1. Press and hold the [MUTE] and [VOL+] buttons
simultaneously for approx. 3sec. until the
status LED lights up continuously.
2.
Enter the code [9] [8] [1], the status LED ashes
2times and then lights up permanently again.
3. Press the button whose function you wish to
want to delete. The status LED ashes 3times
and the desired function is deleted.
7.4.2 Deleting all taught functions
1. Press and hold the [MUTE] and [VOL+] buttons
simultaneously for approx. 3sec. until the
status LED lights up continuously.
2.
Enter the code [9] [8] [2], the status LED ashes
2times and then lights up permanently again.
3. Press the [SETUP] button, the status LED
ashes 3times and all taught-in functions are
deleted.
8. Maintenance
• Never use old and new batteries in the universal
remote control at the same time, as old batteries tend
to leak and can lead to aloss of performance.
• Never clean the universal remote control with
scouring agents or harsh cleaning agents.
• Keep the universal remote control free of dust by
cleaning it with adry soft cloth.

8
9. Troubleshooting
Q.My universal remote control does not work!
A.Check the AV device. If the main switch on the device
is off,the universal remote control cannot operate the
device.
A.Check that the batteries areinserted correctly and that
the polarity has been observed.
A.Check that you have pressed the appropriate device
button for the device.
A.Replace the batteries if the battery level is low.
Q.If thereare multiple device codes listed for the brand
of my AV device, how do Iselect the correct device
code?
A.To determine the correct device code for the AV
device, test the codes one after the other until most of
the buttons work properly.
Q.My AV device only responds to some button
commands.
A.Tryother codes until most of the buttons work
properly.
Q.The brand of my AV device is not mentioned in the
code list.
A.In this case, use the manual code search (Section 5.2)
or the automatic code search (Section 5.3). During
the code search, all codes for adevice type aretested
across manufacturers, e.g. all codes for STBreceivers
regardless of the manufacturer.
Q.Ihave tried all the available codes for the brand of my
AV device from the code list, but none of the codes
mentioned work.
A.In this case, use the manual code search (Section 5.2)
or the automatic code search (Section 5.3). During
the code search, all codes for adevice type aretested
across manufacturers, e.g. all codes for STBreceivers
regardless of the manufacturer.
10.Warranty disclaimer
Hama GmbH &CoKGassumes no liability and provides
no warranty for damage resulting from improper
installation/mounting, improper use of the product or
from failuretoobserve the operating instructions and/
or safety notes.
11. Recycling information
Note on environmental protection:
Following theimplementation of European
Directive 2012/19/EU and 2006/66/EU into
the national legal systems, the following
applies: Electrical and electronic devices
as well as batteries must not be disposed
of with household waste. Consumers areobliged by
law to return electrical and electronic devices as well
as batteries to the designated public collection points
or to the point of sale at the end of their service lives.
Detailed information on this topic is dened in the
national laws of the respective country.This presence of
the above symbol on the product, operating instructions
or package indicates that the product is subject to these
regulations. By recycling, reusing the materials or other
forms of utilising old devices/batteries, you aremaking
an important contribution to protecting our environment.

9
D Bedienungsanleitung
Universal-Fernbedienung
Danke, dass Sie sich für den Kauf eines Hama-Produkts
entschieden haben.
Nehmen Sie sich die Zeit, und lesen Sie die folgenden
Anweisungen und Informationen vollständig durch.
Bitte bewahren Sie diese Anleitung zum späteren
Nachschlagen an einem sicheren Platz auf.
Funktionstasten
1. EIN/AUS /LED Indikator
2. Tasten zur Geräteauswahl
3. Vol+/Vol-: Lautstärkeregulierung
4. Stummschalter
5. Zifferntasten 0-9
6. -/-- Zu zweistelligen Sendernummern wechseln
7. Setup –Einstellungen der Fernbedienung
8. Menu –Gerätemenü öffnen
9. AV –externe AV Quelle wählen
10. Auswahl bestätigen
11. Exit –Auswahl bestätigen
12. CH +/- -Programmauswahl
1. Erklärung von Warnsymbolen und Hinweisen
Warnung
Wirdverwendet, um Sicherheitshinweise zu
kennzeichnen oder um Aufmerksamkeit auf besondere
Gefahren und Risiken zu lenken.
Hinweis
Wirdverwendet, um zusätzlich Informationen oder
wichtige Hinweise zu kennzeichnen.
2. Lieferumfang
• Universal-Fernbedienung
• Codeliste
• Diese Bedienungsanleitung
3. Sicherheitshinweise
• Verwenden Sie die Universal-Fernbedienung nicht in
feuchten Umgebungen, und vermeiden Sie Kontakt
mit Spritzwasser.
• Halten Sie die Universal-Fernbedienung von
Wärmequellen fern, und setzen Sie sie keinem
direkten Sonnenlicht aus.
• Die Universal-Fernbedienung gehört wie alle
elektrischen Geräte nicht in Kinderhände.
• Das Produkt ist für den privaten, nicht-gewerblichen
Gebrauch vorgesehen.
• Verwenden Sie das Produkt ausschließlich für den
dazu vorgesehenen Zweck.
• Schützen Sie das Produkt vor Schmutz, Feuchtigkeit
und Überhitzung und verwenden Sie es nur in
trockenen Räumen.
• Benutzen Sie das Produkt nicht in Bereichen, in denen
elektronische Produkte nicht erlaubt sind.
• Lassen Sie das Produkt nicht fallen und setzen Sie es
keinen heftigen Erschütterungen aus.
• Nehmen Sie keine Veränderungen am
Produkt vor.Dadurch verlieren Sie jegliche
Gewährleistungsansprüche.
• Halten Sie Kinder unbedingt von dem
Verpackungsmaterial fern, es besteht Erstickungsgefahr.
• Entsorgen Sie das Verpackungsmaterial sofort gemäß
den örtlich gültigen Entsorgungsvorschriften.
• Betreiben Sie das Produkt nicht außerhalb
seiner in den technischen Daten angegebenen
Leistungsgrenzen.
• Öffnen Sie das Produkt nicht und betreiben Sie es bei
Beschädigungen nicht weiter.
• Versuchen Sie nicht, das Produkt selbst zu warten
oder zu reparieren. Überlassen Sie jegliche
Wartungsarbeit dem zuständigen Fachpersonal.
• Verwenden Sie den Artikel nur unter moderaten
klimatischen Bedingungen.
Warnung –Batterien
• Beachten Sie unbedingt die korrekte Polarität
(Beschriftung +und -) der Batterien und legen Sie
diese entsprechend ein. Bei Nichtbeachtung besteht
die Gefahr des Auslaufens oder einer Explosion
der Batterien.
• Verwenden Sie ausschließlich Akkus (oder
Batterien), die dem angegebenen Typentsprechen.
• Reinigen Sie vor dem Einlegen der Batterien die
Batteriekontakte und die Gegenkontakte.
• Gestatten Sie Kindern nicht ohne Aufsicht das
Wechseln von Batterien.
• Mischen Sie alte und neue Batterien nicht, sowie
Batterien unterschiedlichen Typs oder Herstellers.

10
Warnung –Batterien
•
Entfernen Sie Batterien aus Pr
odukten, die länger
e
Zeit nicht benutzt werden (außer diese werden für
einen Notfall bereit gehalten).
• Schließen Sie die Batterien nicht kurz.
• Laden Sie Batterien nicht.
• Werfen Sie Batterien nicht ins Feuer.
• Bewahren Sie Batterien außerhalb der Reichweite
von Kindern auf.
• Batterien nie öffnen, beschädigen, verschlucken
oder in die Umwelt gelangen lassen. Sie können
giftige und umweltschädliche Schwermetalle
enthalten.
• Entfernen und entsorgen Sie verbrauchte Batterien
unverzüglich aus dem Produkt.
• Vermeiden Sie Lagerung, Laden und Benutzung
bei extremen Temperaturen und extrem niedrigem
Luftdruck (wie z.B. in großen Höhen).
4. Erste Schritte –Einsetzen der Batterien
Hinweis
• Es werden Alkalibatterien empfohlen. Verwenden
Sie zwei Batterien vom Typ„AA”(LR6/Mignon).
• Entfernen Sie die Batteriefachabdeckung auf der
Rückseite der Universal-Fernbedienung (A).
• Setzen Sie die Batterien unter Berücksichtigung der
„+/-”-Markierungen für die Polarität ein (B).
• Schließen Sie das Batteriefach (C).
Hinweis: Codespeicher
• Diese Fernbedienung speichert die Einstellungen
auch während eines Batteriewechsels.
Hinweis: Energiesparfunktion
•
Die F
ernbedienung schaltet sich automatisch aus,
wenn eine Taste länger als 15 Sekunden gedrückt
wird. Dies verlängert die Lebensdauer der Batterien,
sollte die Fernbedienung an einer Stelle feststecken,
an der die Tasten dauerhaft gedrückt werden, z. B.
zwischen Sofakissen.
5. Setup
Hinweis
• Halten Sie die Fernbedienung für eine
ordnungsgemäße Infrarotübertragung immer in die
ungefähreRichtung des zu bedienenden Geräts.
• Fallsinnerhalb von 30 Sekunden keine Eingabe
erfolgt, wirdder SETUP-Mode automatisch beendet.
Die LED blinkt sechsmal und geht dann aus.
• Sie können mit der Universal-Fernbedienung kein
Gerät bedienen, solange sich diese im Setup-Modus
bendet. Verlassen Sie den Setup-Modus, und
wählen Sie das zu bedienende Gerät über die
Tasten zur Geräteauswahl aus.
• Bitte beachten Sie, dass die Fernbedienung
Infrarotsignale aussendet. Diese sind für das
menschliche Auge nicht sichtbar.
5.1 Direkte Codeeingabe
Im Lieferumfang der Universal-Fernbedienung ist eine
Codeliste enthalten. Die Codeliste enthält vierstellige
Codes für die Einstellung der Fernbedienung auf die
meisten TV/STB-Gerätehersteller.
Zur einfachen Orientierung sind die Codes zuerst
nach Geräteart (TV,STB)und innerhalb der Geräteart
alphabetisch nach Markennamen sortiert.

11
5.1.1 Schalten Sie das zu bedienende Gerät ein.
5.1.2 Drücken Sie die Taste „SETUP”, bis die LED
dauerhaft leuchtet.
5.1.3 Wählen Sie über die Gerätetaste das zu
bedienende Gerät aus (z. B. TV). Bei erfolgreicher
Auswahl blinkt die LED einmal und leuchtet
danach dauerhaft.
5.1.4 Suchen Sie in der Codeliste nach Marke und Typ
des zu bedienenden Geräts.
5.1.5 Geben Sie den entsprechenden vierstelligen Code
über die Zifferntasten 0-9 ein. Die LED bestätigt
die Eingabe der einzelnen Ziffern jeweils mit
einem kurzen Blinken und erlischt nach der
vierten Ziffer.
5.1.6 Testen Sie anschließend die Fernbedienung und
prüfen Sie, ob die gewünschten Funktionen
gesteuert werden können. Möglicherweise ist
der erste Code nicht der geeignetste, ggf. sind
nicht alle Funktionen verfügbar. Probieren Sie
in diesem Fall den nächsten, für die gewählte
Geräteart/-marke genannten Code aus der Liste.
Hinweis
• Ein gültiger Code wirdautomatisch gespeichert.
• Bei einem ungültigen Code blinkt die LED sechsmal
und erlischt anschließend. Wiederholen Sie die
Schritte 5.1.1 bis 5.1.5, oder verwenden Sie eine
andereMethode zur Codeeingabe.
5.2 Manuelle Codesuche
Die Universal-Fernbedienung verfügt über einen internen
Speicher,indem bereits bis zu 350 Codes proGerätetyp
für die gängigsten AV-Geräte enthalten sind. Sie können
diese Codes durchgehen, bis das zu bedienende Gerät
eine Reaktion zeigt. Beispielsweise schaltet sich das zu
bedienende Gerät aus (Taste „POWER”) oder wechselt
den Sender (Taste „CH+/CH–”).
5.2.1 Schalten Sie das zu bedienende Gerät ein.
5.2.2 Drücken Sie die SETUP-Taste, bis die LED
dauerhaft leuchtet.
5.2.3 Wählen Sie über die Gerätetaste das zu
bedienende Gerät aus (z. B. TV). Bei erfolgreicher
Auswahl blinkt die LED einmal und leuchtet
danach dauerhaft.
5.2.4 Drücken Sie die Taste „POWER” oder „CH+/CH–”,
um durch die voreingestellten Codes zu blättern,
bis das zu bedienende Gerät eine Reaktion zeigt.
5.2.5 Drücken Sie „MUTE”, um den Code zu speichern
und die Codesuche zu verlassen. Die LED erlischt.
5.2.6 Testen Sie anschließend die Fernbedienung
und prüfen Sie, ob die gewünschten Funktionen
gesteuert werden können. Möglicherweise ist der
erste gefundene Code nicht der geeignetste, ggf.
sind nicht alle Funktionen verfügbar. Wiederholen
Sie in diesem Fall die Schritte 5.2.1.
–5.2.5. Die
Codesuche startet mit dem nächsten Code, der
auf den zuletzt gespeicherten folgt.
Hinweis
• Im internen Speicher können maximal 350 Codes
der gängigsten Geräte gespeichert werden.
Aufgrund der zahlreichen auf dem Markt
erhältlichen AV-Geräte kann es passieren, dass nur
die gängigsten Hauptfunktionen verfügbar sind. Ist
dies der Fall, wiederholen Sie die Schritte 5.2.1 bis
5.2.5, um einen kompatibleren Code zu nden. Für
einige spezielle Gerätemodelle ist möglicherweise
kein Code verfügbar.
5.3 Automatische Codesuche
Die automatische Codesuche verwendet dieselben
voreingestellten Codes wie die manuelle Codesuche
(5.2). Die Universal-Fernbedienung durchsucht die
Codes jedoch automatisch, bis das zu bedienende Gerät
eine Reaktion zeigt. Beispielsweise schaltet sich das zu
bedienende Gerät aus (Taste „POWER”) oder wechselt
den Sender (Tasten „CH+/CH–”).
5.3.1 Schalten Sie das zu bedienende Gerät ein.
5.3.2 Drücken Sie die Taste „SETUP”, bis die LED
dauerhaft leuchtet.
5.3.3 Wählen Sie über die Gerätetaste das zu
bedienende Gerät aus (z. B. TV). Bei erfolgreicher
Auswahl blinkt die LED einmal und leuchtet
danach dauerhaft.
5.3.4 Drücken Sie die Taste „CH+/CH–” oder „POWER”,
um die automatische Codesuche zu starten. Die
LED blinkt einmal und leuchtet danach dauerhaft.
Es dauert 6Sekunden, bis die Universal-
Fernbedienung mit der ersten Suche beginnt.

12
Hinweis:
Einstellen der Suchgeschwindigkeit
• Die Standardeinstellung für die Suchzeit proCode
ist 1Sekunde. Wenn Ihnen dies nicht zusagt,
können Sie zu einer Suchzeit von 3Sekunden pro
Code wechseln. Um zwischen den Suchzeiten zu
wechseln, drücken Sie „CH+” oder „CH–” innerhalb
der 6Sekunden vor dem Beginn der automatischen
Codesuche.
5.3.5 Die LED bestätigt die jeweiligen Codesuchen mit
einem einzelnen Blinken.
5.3.6 Sobald das zu bedienende Gerät eine Reaktion
zeigt, drücken Sie die Taste „MUTE”, um den Code
zu speichern und die Codesuche zu verlassen. Die
LED erlischt.
5.3.7 Testen Sie anschließend die Fernbedienung und
prüfen Sie, ob die gewünschten Funktionen
gesteuert werden können. Möglicherweise ist der
erste gefundene Code nicht der geeignetste, ggf.
sind nicht alle Funktionen verfügbar. Wiederholen
Sie in diesem Fall die Schritte 5.3.1. –5.3.6.
Die Codesuche startet mit dem nächsten Code,
der auf den zuletzt gespeicherten folgt.
5.3.8 Um die automatische Suche während des
Suchvorgangs abzubrechen, drücken Sie die Taste
„EXIT”.
Hinweis
• Wenn alle Codes ohne Erfolg durchsucht
wurden, verlässt die Universal-Fernbedienung die
automatische Codesuche und kehrt automatisch in
den Betriebsmodus zurück. Der aktuell gespeicherte
Code bleibt unverändert.
5.4 Codeerkennung
Die Codeerkennung bietet Ihnen die Möglichkeit, einen
bereits von Ihnen gespeicherten Code zu ermitteln.
5.4.1 Drücken Sie die Taste „SETUP”, bis die LED
dauerhaft leuchtet.
5.4.2 Wählen Sie über die Gerätetaste das zu
bedienende Gerät aus (z. B. TV). Bei erfolgreicher
Auswahl blinkt die LED einmal und leuchtet
danach dauerhaft.
5.4.3
Drücken Sie die Taste „SETUP”. Die LED blinkt
einmal und leuchtet danach dauerhaft.
5.4.4 Drücken Sie zur Suche der ersten Ziffer eine der
Nummerntasten von 0bis 9. Die LED blinkt einmal
für die erste Ziffer der vierstelligen Codenummer.
5.4.5 Wiederholen Sie den Schritt 5.4.4 jeweils für die
zweite, dritte und vierte Ziffer.
5.4.6 Den ermittelten Code können Sie anschließend in
untenstehender Tabelle eintragen, falls Sie diesen
zu einem späteren Zeitpunkt nochmals benötigen
(z.B. nach einem versehentlichen Löschen der
Fernbedienungseinstellungen).
CODES
TV STB
6. Sonderfunktionen
6.1 Sender-Punch-Through
Mit der Sender-Punch-Through-Funktion können die
Befehle CH+ oder CH– das aktuell gesteuerte Gerät
umgehen, und die Sender eines zweiten Gerätes
wechseln. Alle anderen Befehle sind davon nicht
betroffen.
So aktivieren Sie die Sender-Punch-Through-Funktion:
• Drücken Sie die gewünschte Gerätetaste (z.B. TV).
• Halten Sie die Taste „CH+” gedrückt.
• Drücken Sie die gewünschte Gerätetaste (z.B. STB).
• Lassen Sie die Taste „CH+” wieder los (die LED blinkt
einmal bei aktivierter Einstellung).
So deaktivieren Sie die Sender-Punch-Through-Funktion:
• Drücken Sie die gewünschte Gerätetaste (z.B. TV).
• Halten Sie die Taste „CH–” gedrückt.
• Drücken Sie die gewünschte Gerätetaste (z.B. STB).
• Lassen Sie die Taste „CH–” wieder los (die LED blinkt
zweimal wenn die Einstellung deaktiviert wird).

13
6.2 Lautstärke-Punch-Through
Mit der Lautstärke-Punch-Through-Funktion können die
Befehle VOL +oder VOL-das aktuell gesteuerte Gerät
umgehen, und die Lautstärke eines zweiten Gerätes
einstellen. Alle anderen Befehle sind davon nicht
betroffen.
So aktivieren Sie die Lautstärke-Punch-Through-Funktion:
• Drücken Sie die gewünschte Gerätetaste (z.B. TV).
• Halten Sie die Taste „VOL+” gedrückt.
• Drücken Sie die gewünschte Gerätetaste (z.B. STB).
• Lassen Sie die Taste „VOL+” wieder los (die LED blinkt
einmal bei aktivierter Einstellung).
So deaktivieren Sie die Sender-Punch-Through-Funktion:
• Drücken Sie die gewünschte Gerätetaste (z.B. TV).
• Halten Sie die Taste „VOL-” gedrückt.
• Drücken Sie die gewünschte Gerätetaste (z.B. STB).
• Lassen Sie die Taste „VOL-” wieder los (die LED blinkt
zweimal wenn die Einstellung deaktiviert wird).
6.3 Macro Power
Mit MacroPower können Sie zwei AV-Geräte gleichzeitig
ein-/ausschalten.
So aktivieren Sie die MacroPower-Funktion:
• Drücken Sie die gewünschte Gerätetaste (z.B. TV).
• Halten Sie die Taste „POWER” gedrückt.
• Drücken Sie die gewünschte Gerätetaste (z.B. STB).
• Lassen Sie die Taste „POWER” wieder los (die LED
blinkt einmal bei aktivierter Einstellung).
So deaktivieren Sie die MacroPower-Funktion:
• Drücken Sie die gewünschte Gerätetaste (z.B. TV).
• Halten Sie die Taste „POWER” gedrückt.
• Drücken Sie die gewünschte Gerätetaste (z.B. STB).
• Lassen Sie die Taste „POWER” wieder los (die LED
blinkt zweimal wenn die Einstellung deaktiviert wird)
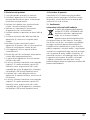
7. Lernfunktion
Diese Fernbedienung ist mit einer Lernfunktion
ausgestattet. Dadurch können Sie Funktionen Ihrer
Originalfernbedienung auf diese Universalfernbedienung
übertragen.
7.1 Bevor Sie die Lernfunktion starten
• Achten Sie auf einen einwandfreien Zustand aller
verwendeten Batterien in beiden Fernbedienungen.
Wechseln Sie diese gegebenenfalls.
• Legen Sie IhreOriginalfernbedienung und die
Universalfernbedienung so nebeneinander,dass
sich die Infrarotdioden der Fernbedienungen direkt
gegenüberliegen.
• Korrigieren Sie, wenn nötig, die Höhe beider
Fernbedienungen, um eine optimale Ausrichtung zu
erzielen.
• Der Abstand beider Fernbedienungen sollte ca. 3cm
betragen.
BIG ZAPPER
ca. 3cm
ORIGINAL
Hinweis
• Bewegen Sie die Fernbedienungen während des
Lernvorgangs nicht.
• Stellen Sie sicher,dass es sich bei der
Raumbeleuchtung nicht um Leuchtstoffröhren oder
Energiesparlampen handelt, da diese Störungen
verursachen und damit den Lernvorgang behindern
könnten.
• Die Entfernung der beiden Fernbedienungen zur
nächsten Lichtquelle sollte mindestens 1Meter
betragen.
• Der Lernvorgang wirdohne Speichern beendet,
wenn während des aktivierten Lernmodus 30 Sek.
lang keine Taste betätigt wirdoder kein Signal
empfangen wird.
• Im Lernmodus kann jede Taste nur mit einer
Funktion belegt werden. Eine neue Funktion
überschreibt die auf dieser Taste bisher angelernte
Funktion.
• Die Tasten TV,STB undSetup können nicht mit
neuen Funktionen belegt werden.

14
7.2 Aktivieren des Lernmodus
1. Drücken und halten Sie die Tasten [MUTE]
und [VOL+] gleichzeitig für ca. 3Sek. bis die
Status-LED dauerhaft leuchtet.
2. Geben Sie den Code [9] [8] [0] ein, die Status-
LED blinkt 2mal und leuchtet dann dauerhaft.
3. Die Universal-Fernbedienung bendet sich
jetzt im Lernmodus.
7.3 Übertragen der Tastenfunktion
1. Drücken Sie die Taste auf der Originalfern-
bedienung, deren Funktion Sie übertragen
möchten. Zur Bestätigung, dass der Befehl
empfangen wurde, blinkt die Status-LED der
Universal-Fernbedienung.
2. Drücken Sie nun die Taste der Universal-Fern-
bedienung, auf die die Funktion übertragen
werden soll.
3. Die Funktions-LED der Universal-Fernbedie-
nung blinkt 3mal zur Bestätigung und leuchtet
anschließend wieder dauerhaft. Die neue
Funktion ist nun gespeichert.
4. Um die Funktionen weiterer Tasten zu übertra-
gen, wiederholen Sie diese Schritte.
5. Drücken Sie die Taste [SETUP], um alle
angelernten Funktionen zu speichern und den
Lernmodus zu verlassen.
Hinweis
Beim Wechsel der Batterien der Universal-
fernbedienung bleiben die Funktionen der angelernten
Tasten erhalten.
7.4 Löschen angelernter Funktionen
7.4.1 Löschen einer angelernten Funktion
1. Drücken und halten Sie die Tasten [MUTE]
und [VOL+] gleichzeitig für ca. 3Sek. bis die
Status-LED dauerhaft leuchtet.
2.
Geben Sie den Code [9] [8] [1] ein, die Status-
LED blinkt 2mal und leuchtet anschließend
wieder dauerhaft.
3. Drücken Sie die Taste, deren Funktion Sie
löschen möchten. Die Status-LED blinkt 3mal
und die gewünschte Funktion ist gelöscht.
7.4.2 Löschen aller angelernten Funktionen
1. Drücken und halten Sie die Tasten [MUTE]
und [VOL+] gleichzeitig für ca. 3Sek. bis die
Status-LED dauerhaft leuchtet.
2.
Geben Sie den Code [9] [8] [2] ein, die Status-
LED blinkt 2mal und leuchtet anschließend
wieder dauerhaft.
3. Drücken Sie die Taste [SETUP], die Status-LED
blinkt 3mal und alle angelernten Funktionen
sind gelöscht.
8. Wartung
• Verwenden Sie nie gleichzeitig alte und neue Batterien
in der Universal-Fernbedienung, da alte Batterien
zum Auslaufen neigen und zu einem Leistungsverlust
führen können.
• Reinigen Sie die Universal-Fernbedienung keinesfalls
mit Scheuermitteln oder scharfen Reinigungsmitteln.
• Halten Sie die Universal-Fernbedienung frei von
Staub, indem Sie sie mit einem trockenen weichen
Tuch reinigen.

15
9. Fehlerbehebung
F. Meine Universal-Fernbedienung funktioniert nicht!
A.Überprüfen Sie das AV-Gerät. Wenn der Hauptschalter
des Geräts ausgeschaltet ist, kann die Universal-
Fernbedienung das Gerät nicht bedienen.
A.Überprüfen Sie, dass die Batterien korrekt eingesetzt
sind und die Polarität beachtet wurde.
A.Überprüfen Sie, ob Sie die entsprechende Gerätetaste
für das Gerät gedrückt haben.
A.Tauschen Sie die Batterien bei niedrigem Batteriestand
aus.
F. Wenn für die Marke meines AV-Geräts mehrere
Gerätecodes aufgelistet sind, wie wähle ich den
korrekten Gerätecode aus?
A.Um den korrekten Gerätecode für das AV-Gerät zu
bestimmen, testen Sie die Codes nacheinander,bis die
meisten Tasten ordnungsgemäß funktionieren.
F. Mein AV-Gerät reagiert nur auf einige Tastenbefehle.
A.Probieren Sie andereCodes, bis die meisten Tasten
ordnungsgemäß funktionieren.
F. Die Marke meines AV-Gerätes ist nicht in der Codeliste
genannt.
A.Verwenden Sie in diesem Fall die manuelle Codesuche
(Kapitel 5.2) oder die automatische Codesuche
(Kapitel 5.3). Beim Codesuchlauf werden alle Codes
für einen Gerätetyp herstellerübergreifend getestet,
also z.B. alle Codes für STBReceiver unabhängig vom
Hersteller.
F. Ich habe alle vorhandenen Codes für die Marke
meines AV-Gerätes aus der Codeliste ausprobiert, aber
keiner der gennannten Codes funktioniert.
A.Verwenden Sie in diesem Fall die manuelle Codesuche
(Kapitel 5.2) oder die automatische Codesuche
(Kapitel 5.3). Beim Codesuchlauf werden alle Codes
für einen Gerätetyp herstellerübergreifend getestet,
also z.B. alle Codes für STBReceiver unabhängig vom
Hersteller.
10.Haftungsausschluss
Die Hama GmbH &CoKGübernimmt keinerlei
Haftung oder Gewährleistung für Schäden, die
aus unsachgemäßer Installation, Montage und
unsachgemäßem Gebrauch des Produktes oder einer
Nichtbeachtung der Bedienungsanleitung und/oder der
Sicherheitshinweise resultieren.
11. Entsorgungshinweise
Hinweis zum Umweltschutz:
Ab dem Zeitpunkt der Umsetzung der
europäischen Richtlinien 2012/19/EU
und 2006/66/EG in nationales Recht gilt
folgendes: Elektrische und elektronische
Geräte sowie Batterien dürfen nicht mit
dem Hausmüll entsorgt werden. Der Verbraucher ist
gesetzlich verpichtet, elektrische und elektronische
Geräte sowie Batterien am Ende ihrer Lebensdauer an
den dafür eingerichteten, öffentlichen Sammelstellen
oder an die Verkaufsstelle zurückzugeben. Einzelheiten
dazu regelt das jeweilige Landesrecht. Das Symbol
auf dem Produkt, der Gebrauchsanleitung oder der
Verpackung weist auf diese Bestimmungen hin. Mit
der Wiederverwertung, der stoichen Verwertung
oder anderen Formen der Verwertung von Altgeräten/
Batterien leisten Sie einen wichtigen Beitrag zum Schutz
unserer Umwelt.

16
F Mode d‘emploi
Télécommande universelle
Nous vous remercions d’avoir acheté un produit Hama.
Veuillez prendreletemps de lirel’ensemble des
instructions et des informations suivantes. Veuillez
conserver ce manuel dans un endroit sûr pour pouvoir
vous yréférer ultérieurement.
Touches de fonction
1. Témoin ON/OFF/LED
2. Touches de sélection de l’appareil
3. Vol+/Vol- :réglage du volume
4. Mise en sourdine
5. Touches numériques 0-9
6. -/-- pour accéder àdes numéros de chaînes àdeux
chiffres
7. Setup –Réglages de la télécommande
8. Menu –Ouvrir le menu de l’appareil
9. AV –Sélectionner la source AV externe
10. Conrmer le choix
11. Exit –Conrmer la sélection
12. CH +/- –Sélection du programme
1. Explication des symboles d’avertissement et
des remarques
Avertissement
Ce symbole est utilisé pour indiquer des consignes
de sécurité ou pour attirer votreattention sur des
dangers et risques particuliers.
Remarque
Ce symbole est utilisé pour indiquer des informations
supplémentaires ou des remarques importantes.
2. Contenu de la livraison
• Télécommande universelle
• Liste des codes
• Le présent mode d’emploi
3. Consignes de sécurité
• Veuillez ne pas utiliser la télécommande universelle
dans des environnements humides et évitez tout
contact avec des éclaboussures d’eau.
• Conservez la télécommande universelleàl’écart de
toutesourcedechaleuretnel’exposezpas àlalumière
directe du soleil.
• La télécommande universellecomme tout appareil
électrique doit êtregardéehorsdeportée desenfants.
• Ce produitest destiné àunusagedomestique non
commercial.
• L’emploi du produit estexclusivement réservéàsa
fonction prévue.
• Protégez le produit de toute saleté, humidité, surchauffe
et utilisez-leuniquement dansdes locaux secs.
• N’utilisez pas le produitdansdes zonesoùles produits
électroniquesnesontpas autorisés.
• Protégez le produitdes secoussesviolentes et évitez tout
chocoutoutechute.
• N’apportez aucune modication au produit. Des
modicationsvousferaient perdrevos droits de garantie.
• Tenez lesemballages d’appareils horsdeportée des
enfants, risqued’étouffement.
• Recyclezles matériaux d’emballage conformément aux
prescriptionslocales en vigueur.
• N’utilisez pas le produitendehors des limitesde
puissance indiquéesdansles caractéristiquestechniques.
• Ne tentezpas d’ouvrir le produitencas de détérioration
et cessez de l’utiliser.
• Ne tentezpas de réparer le produit vous-mêmeni
d’effectuer destravaux d’entretien. Déléguez tous travaux
d’entretien àdes techniciens qualiés.
• Utilisez l’article dans desconditions climatiques modérées
uniquement.
Avertissement -Piles
• Respectez impérativement la polarité des batteries
(indications +et-)lors de leur insertion dans le
boîtier.Risques d’écoulement et d’explosion des
piles si tel n’est pas le cas.
• Utilisez exclusivement des batteries (ou des piles)
du type indiqué.
• Avant d’insérer les piles, nettoyez-en les contacts,
ainsi que les contacts d’accouplement.
• N’autorisez pas des enfants àremplacer les piles
d’un appareil sans surveillance.
• N’utilisez pas simultanément des piles usagées et
des piles neuves ou des piles de différents types.

17
Avertissement -Piles
•
Retir
ez les piles des pr
oduits que vous ne comptez
pas utiliser pendant un certain temps (à l’exception
de ceux qui peuvent êtreutilisés en cas d’urgence).
• Ne court-circuitez pas les piles.
• Ne tentez pas de recharger les piles.
• Ne jetez pas de piles au feu.
• Conservez les piles hors de portée des enfants.
• Ne tentez pas d’ouvrir les piles, faites attention àne
pas les endommager,les jeter dans l’environnement
et àceque des jeunes enfants ne les avalent pas.
Les piles sont susceptibles de contenir des métaux
lourds toxiques et nocifs pour l’environnement.
• Retirez les piles usagées immédiatement du produit
et mettez-les au rebut immédiatement.
• Évitez le stockage, le chargement et l’utilisation
du produit àdes températures extrêmes et àdes
pressions atmosphériques extrêmement basses
(comme en haute altitude par exemple).
4. Première étape -Mise en place des piles
Remarque
• Des piles alcalines sont recommandées. Utilisez
deux piles de type "AA" (LR6/Mignon).
• Retirez le couvercle des piles situé àl’arrièredela
télécommande universelle (A).
• Insérez les piles en respectant les marques "+/-"
pour la polarité (B).
• Fermez le compartiment des piles (C).
Remarque :Mémoiredes codes
• Cette télécommande mémorise les réglages même
en cas de remplacement de la pile.
Remarque :Fonction d’économie
d’énergie
• La télécommande s’éteint automatiquement dès
qu’une touche est maintenue enfoncée pendant
plus de 15 secondes. Cela permet de prolonger la
durée de vie des piles si jamais la télécommande se
retrouvait coincée dans un endroit où les touches
pouvaient rester enfoncées de manièredurable, par
ex. entreles coussins du canapé.
5. Paramétrage
Remarque
• Pour obtenir une transmission infrarouge correcte,
tenez toujours la télécommande en direction de
l’appareil que vous souhaitez fairefonctionner.
• Si dans les 30 secondes, vous n’effectuez aucune
saisie, le mode SETUP (Paramétrage) se termine
automatiquement. La LED clignote six fois puis
s’éteint.
• Vous ne pouvez utiliser aucun appareil avec la
télécommande universelle si elle se trouve en
mode Setup (Paramétrage). Quittez le mode Setup
(Paramétrage) et sélectionnez l’appareil que vous
souhaitez utiliser àl’aide des touches de sélection
de l’appareil.
• Veuillez noter que la télécommande émet des
signaux infrarouges. Ceux-ci ne sont pas visibles à
l’œil humain.
5.1 Saisie directe des codes
Avec la télécommande universelle, vous trouverez
une liste de codes. La liste de codes contient des
codes àquatrechiffres permettant de paramétrer
la télécommande pour la plupart des fabricants
d’équipements de téléviseurs/décodeurs.
Pour une identication plus aisée, les codes sont d’abord
classés par type d’appareil (TV,STB),puis dans le type
d’appareil, par ordrealphabétique de marque.

18
5.1.1 Allumez l’appareil que vous souhaitez utiliser.
5.1.2 Appuyez sur la touche "SETUP" jusqu’à ce que la
LED reste fixe.
5.1.3 Sélectionnez, àl’aide de la touche, l’appareil que
vous souhaitez utiliser (par ex. TV). Si la sélection
est réussie, la LED clignote une fois puis reste
fixe.
5.1.4 Dans la liste des codes, recherchez l’appareil à
utiliser par marque et par type.
5.1.5 Saisissez le code correspondant àquatre chiffres
àl’aide de la touche numérique de 0à9.LaLED
confirme la saisie des différents chiffres par un
bref clignotement et s’éteint après le quatrième
chiffre.
5.1.6 Testez ensuite la télécommande et vérifiez si
vous avez accès aux fonctions souhaitées. Il est
possible que le premier code ne soit pas le plus
adapté ou que toutes les fonctions ne soient pas
disponibles. Dans ce cas, essayez le code indiqué
pour le/la type/marque d’appareil sélectionné(e)
dans la liste.
Remarque
• Un code valide est automatiquement mémorisé.
• Si le code n’est pas valide, la LED clignote six fois
puis s’éteint. Répétez les étapes 5.1.1 à5.1.5 ou
utilisez une autreméthode pour saisir vos codes.
5.2 Recherche manuelle des codes
La commande universelle dispose d’une sauvegarde
interne qui contient jusqu’à 350 codes par type
d’appareils pour les appareils audiovisuels les plus
courants. Vous pouvez fairedéler ces codes jusqu’à ce
que l’appareil que vous souhaitez utiliser réponde. Par
exemple, l’appareil que vous souhaitez utiliser s’éteint
(touche "POWER") ou change de chaîne (touche "CH+/
CH-").
5.2.1 Allumez l’appareil que vous souhaitez utiliser.
5.2.2 Appuyez sur la touche "SETUP" jusqu’à ce que la
LED reste fixe.
5.2.3 Sélectionnez, àl’aide de la touche, l’appareil que
vous souhaitez utiliser (par ex. TV). Si la sélection
est réussie, la LED clignote une fois puis reste
fixe.
5.2.4 Appuyez sur la touche "POWER" OU "CH+/CH–"
pour faire défiler les codes prédéfinis jusqu’à
ce que l’appareil que vous souhaitez utiliser
réponde.
5.2.5 Appuyez sur la touche "MUTE" pour sauvegarder
le code et quitter la recherche de codes. La LED
s’éteint.
5.2.6 Testez ensuite la télécommande et vérifiez si
vous avez accès aux fonctions souhaitées. Il est
possible que le premier code trouvé ne soit pas le
plus adapté ou que toutes les fonctions ne soient
pas disponibles. Dans ce cas, répétez les étapes
5.2.1.–5.2.5. La recherche de codes commence
avec le code suivant qui est le dernier code
mémorisé.
Remarque
• Jusqu’à 350 codes d’appareils les plus courants
peuvent êtremémorisés dans la mémoire
interne. En raison d’un grand nombred’appareils
audiovisuels disponibles sur le marché, il se
peut que seules les fonctions principales les plus
courantes soient disponibles. Si tel est le cas,
renouvelez les étapes 5.2.1 à5.2.5 pour trouver
un code plus compatible. Pour certains modèles
spéciques d’appareils, il se peut qu’aucun code ne
soit disponible.
5.3 Recherche de codes automatique
La recherche automatique de codes utilise les mêmes
codes prédénis que la recherche de codes manuelle
(5.2). La télécommande universelle recherche cependant
les codes de manièreautomatique jusqu’à ce que
l’appareil que vous souhaitez utiliser réponde. Par
exemple, l’appareil que vous souhaitez utiliser s’éteint
(touche "POWER") ou change de chaîne (touche "CH+/
CH–").
5.3.1 Allumez l’appareil que vous souhaitez utiliser.
5.3.2 Appuyez sur la touche "SETUP" jusqu’à ce que la
LED reste fixe.
5.3.3 Sélectionnez, àl’aide de la touche, l’appareil que
vous souhaitez utiliser (par ex. TV). Si la sélection
est réussie, la LED clignote une fois puis reste fixe.
Strona się ładuje...
Strona się ładuje...
Strona się ładuje...
Strona się ładuje...
Strona się ładuje...
Strona się ładuje...
Strona się ładuje...
Strona się ładuje...
Strona się ładuje...
Strona się ładuje...
Strona się ładuje...
Strona się ładuje...
Strona się ładuje...
Strona się ładuje...
Strona się ładuje...
Strona się ładuje...
Strona się ładuje...
Strona się ładuje...
Strona się ładuje...
Strona się ładuje...
Strona się ładuje...
Strona się ładuje...
Strona się ładuje...
Strona się ładuje...
Strona się ładuje...
Strona się ładuje...
Strona się ładuje...
Strona się ładuje...
Strona się ładuje...
Strona się ładuje...
Strona się ładuje...
Strona się ładuje...
Strona się ładuje...
Strona się ładuje...
Strona się ładuje...
Strona się ładuje...
Strona się ładuje...
Strona się ładuje...
Strona się ładuje...
Strona się ładuje...
Strona się ładuje...
Strona się ładuje...
Strona się ładuje...
Strona się ładuje...
Strona się ładuje...
Strona się ładuje...
Strona się ładuje...
Strona się ładuje...
Strona się ładuje...
Strona się ładuje...
Strona się ładuje...
Strona się ładuje...
Strona się ładuje...
Strona się ładuje...
Strona się ładuje...
Strona się ładuje...
Strona się ładuje...
Strona się ładuje...
Strona się ładuje...
Strona się ładuje...
Strona się ładuje...
Strona się ładuje...
Strona się ładuje...
Strona się ładuje...
Strona się ładuje...
Strona się ładuje...
Strona się ładuje...
Strona się ładuje...
Strona się ładuje...
Strona się ładuje...
Strona się ładuje...
Strona się ładuje...
Strona się ładuje...
Strona się ładuje...
Strona się ładuje...
Strona się ładuje...
Strona się ładuje...
Strona się ładuje...
Strona się ładuje...
Strona się ładuje...
Strona się ładuje...
Strona się ładuje...
Strona się ładuje...
Strona się ładuje...
Strona się ładuje...
Strona się ładuje...
Strona się ładuje...
Strona się ładuje...
Strona się ładuje...
Strona się ładuje...
Strona się ładuje...
Strona się ładuje...
Strona się ładuje...
Strona się ładuje...
Strona się ładuje...
Strona się ładuje...
Strona się ładuje...
Strona się ładuje...
Strona się ładuje...
Strona się ładuje...
Strona się ładuje...
Strona się ładuje...
Strona się ładuje...
Strona się ładuje...
Strona się ładuje...
Strona się ładuje...
Strona się ładuje...
Strona się ładuje...
Strona się ładuje...
Strona się ładuje...
Strona się ładuje...
Strona się ładuje...
-
 1
1
-
 2
2
-
 3
3
-
 4
4
-
 5
5
-
 6
6
-
 7
7
-
 8
8
-
 9
9
-
 10
10
-
 11
11
-
 12
12
-
 13
13
-
 14
14
-
 15
15
-
 16
16
-
 17
17
-
 18
18
-
 19
19
-
 20
20
-
 21
21
-
 22
22
-
 23
23
-
 24
24
-
 25
25
-
 26
26
-
 27
27
-
 28
28
-
 29
29
-
 30
30
-
 31
31
-
 32
32
-
 33
33
-
 34
34
-
 35
35
-
 36
36
-
 37
37
-
 38
38
-
 39
39
-
 40
40
-
 41
41
-
 42
42
-
 43
43
-
 44
44
-
 45
45
-
 46
46
-
 47
47
-
 48
48
-
 49
49
-
 50
50
-
 51
51
-
 52
52
-
 53
53
-
 54
54
-
 55
55
-
 56
56
-
 57
57
-
 58
58
-
 59
59
-
 60
60
-
 61
61
-
 62
62
-
 63
63
-
 64
64
-
 65
65
-
 66
66
-
 67
67
-
 68
68
-
 69
69
-
 70
70
-
 71
71
-
 72
72
-
 73
73
-
 74
74
-
 75
75
-
 76
76
-
 77
77
-
 78
78
-
 79
79
-
 80
80
-
 81
81
-
 82
82
-
 83
83
-
 84
84
-
 85
85
-
 86
86
-
 87
87
-
 88
88
-
 89
89
-
 90
90
-
 91
91
-
 92
92
-
 93
93
-
 94
94
-
 95
95
-
 96
96
-
 97
97
-
 98
98
-
 99
99
-
 100
100
-
 101
101
-
 102
102
-
 103
103
-
 104
104
-
 105
105
-
 106
106
-
 107
107
-
 108
108
-
 109
109
-
 110
110
-
 111
111
-
 112
112
-
 113
113
-
 114
114
-
 115
115
-
 116
116
-
 117
117
-
 118
118
-
 119
119
-
 120
120
-
 121
121
-
 122
122
-
 123
123
-
 124
124
-
 125
125
-
 126
126
-
 127
127
-
 128
128
-
 129
129
-
 130
130
-
 131
131
-
 132
132


Hama 00040072 Instrukcja obsługi
- Kategoria
- Zdalne sterowanie
- Typ
- Instrukcja obsługi
w innych językach
- čeština: Hama 00040072 Návod k obsluze
- español: Hama 00040072 El manual del propietario
- italiano: Hama 00040072 Manuale del proprietario
- Deutsch: Hama 00040072 Bedienungsanleitung
- slovenčina: Hama 00040072 Návod na obsluhu
- svenska: Hama 00040072 Bruksanvisning
- português: Hama 00040072 Manual do proprietário
- français: Hama 00040072 Le manuel du propriétaire
- Türkçe: Hama 00040072 El kitabı
- English: Hama 00040072 Owner's manual
- русский: Hama 00040072 Инструкция по применению
- suomi: Hama 00040072 Omistajan opas
- Nederlands: Hama 00040072 de handleiding
- română: Hama 00040072 Manualul proprietarului
Powiązane artykuły
-
Hama 00040074 Instrukcja obsługi
-
-
-
-
-
-
-
-
