Sharp PS-919(BK) Instrukcja obsługi
- Kategoria
- Przenośne głośniki
- Typ
- Instrukcja obsługi

PS-919
User manual
2.1 Party Speaker System
EN ESDE IT FR PL

Trademarks
The Bluetooth® word, mark and logos are registered trademarks
owned by Bluetooth SIG,. Inc.

ENEN
Important safety instructions
CAUTION
RISK OF ELECTRIC SHOCK
DO NOT OPEN
Please, read these safety instructions and respect
the following warnings before the appliance is
operated:
The lightning ash with arrowhead symbol, within an
equilateral triangle, is intended to alert the user to the
presence of uninsulated “dangerous voltage” within the
product’s enclosure that may be of su cient magnitude as to
constitute a risk of electric shock to persons.
The exclamation point within an equilateral triangle is
intended to alert the user to the presence of important
operating and maintenance (servicing) instructions in the
literature accompanying the appliance.
Only use the power supply stated in the user manual.
This symbol means that the product should be disposed of
in an environmentally friendly manner and not with general
household waste.
AC voltage
DC voltage
Class II equipment
For indoor use only
Energy e ciency marking with level VI
Polarity of d.c. power connector
In order to prevent re always
keep candles and other open
ames away from this product.
Warning:
• Always follow basic safety precautions when using this appliance, espe-
cially when children are present.
• Children should be supervised to ensure that they do not play with the
appliance.
• Do not damage the power cord, do not place any heavy objects on it, do
not strech it or bend it and do not attach extension cables. If the supply
cord is damaged, re or electric shock may occur.
• Ensure that the unit is plugged into an AC 220-240V 50Hz power outlet.
Using higher voltage may cause the unit to malfunction or even catch
re.
• If the power plug does not t into the socket, do not force it.
• Connecting or disconnecting the power cord with wet hands may cause
electric shock.
• Ensure that the mains plug is always easily accessible.
• This product does not contain any parts that are serviceable by the
user. In case of a fault, contact the manufacturer or authorised service
department. Exposing the internal parts inside the device may endanger
your life. The manufacturers guarantee does not extend to faults caused
by repairs carried out by unauthorised third parties.
• Do not use this product immediately after unpacking. Wait until it warms
up to room temperature before using it.
• Ensure this product is used in moderate climates only (not in tropical/
subtropical climates).
• Place product on a at, stable surface that is not subject to vibrations.
• Ensure the product and its parts is not overhanging the edge of the
supporting furniture.
• To reduce the risk of fire, electric shock or damage to this product, do
not expose it to direct sunlight, dust, rain and moisture. Never expose it
to dripping or splashing and do not place objects filled with liquids on
or near the product.
• Do not place objects lled with liquids, such as vases, on the apparatus.
• Do not install near any heat sources such as radiators, heat registers,
stoves, or other apparatus (including ampli ers) that produce heat.
• Do not place the product where the humidity is high and ventilation is
poor.
• Don’t mount this product on a wall or ceiling.
• Do not place the unit near TVs, speakers and other objects that generate
strong magnetic elds.
• Do not leave the unit unattended when it is in use.
• Allow at least 30 cm clearance from the rear and the top of the unit
and 5 cm from each side. Do not block any ventilation openings of this
product. Always ensure that the ventilation openings are not covered
with items such as newspapers, table-cloths, curtains, etc.
• NEVER let anyone, especially children, push anything into holes, slots
or any other openings in the unit’s casing as this could result in a fatal
electric shock.
• Storms are dangerous for all electric appliances. If the mains or aerial
wiring is struck by lightning, the appliance might get damaged, even if it
is turned o . You should disconnect all the cables and connectors of the
appliance before a storm.
Maintenance
• Unplug the power cable from the power source before cleaning the
appliance.
• Use a soft and clean rag to clean the outside of the unit. Never clean it
with chemicals or detergent.
Power Adapter
• If the unit will not be used for a period of time it it recommended to
switch the unit o and remove the AC power plug from the mains outlet.
• Only use the supplied mains adaptor as failure to do this may result in a
safety risk and/or damage to the unit.
Built-in Battery Care
• Your product is powered by a built-in rechargeable battery.
• The battery can be charged and discharged hundreds of times, but will
eventually wear out.
• Unplug the charger from the electrical plug and the product when not
in use.
• Do not leave a fully charged battery connected to a charger, since
overcharging may shorten its lifetime.
• If left unused, a fully charged battery will lose its charge over time.
• Leaving the product in hot or cold places, such as in a closed car in the
summer and winter conditions, will reduce the capacity and life time of
the battery.
• Always try to keep your device in a cool, moisture-free environment
that's less than 32°C.
• A product with a hot or cold battery may not work temporarily, even
when the battery is fully charged. Battery performance is particularly
limited in temperatures well below freezing.
• If you plan to store your device for longer than six months, charge the
battery to 50% every six months to keep it fresh. Store the device at
temperatures between 5 °C and 20 °C.

4
Battery warning!
• The battery used in this product may present a risk of re or chemical
burn if mistreated.
• Do not attempt to open the product to replace the battery, it is not
designed to be changed.
• Dispose of batteries according to local regulations. Please recycle when
possible. Do not dispose as household waste or in a re as they may
explode.
• Batteries may explode if damaged.
• Charge the battery using the supplied charger only and follow the
instructions detailed in this manual. Charging the battery under any
other conditions may cause the battery to overhead, emit hydrogen gas,
leak, ignite or burst.
CAUTION!
1. Important safety considerations
• Do not expose batteries to high temperatures and do not place them on
locations where the temperature might increase quickly, e.g. near the
re or on the direct sunshine.
• Do not expose batteries to excessive radiant heat, do not throw them
into the re, do not disassemble them and do not try to recharge un-
rechargeable batteries. They could leak or explode.
2. To prevent deterioration or damage to the battery
• Do not drop or subject to strong physical shock.
3. To ensure long battery life
• Do not discharge completely.
How to remove the battery for disposal
RISK OF INJURY. WEAR GLOVES WHEN WORKING!
The battery should be removed by an authorized Sharp service centre.
Not doing so will invalidate any guarantees and warranties on your
device.
1. Remove the metal speaker grille on the front of the unit by gently prising
it o with a at head screwdriver.
2. Remove the 7 rubber screw covers on the front of the unit and unscrew
the screws using a Philips screwdriver.
3. Remove 1 screw from the bottom of the front half of the cabinet.
4. Open the main casing.
5. Locate the circuit board on the back part of the cabinet.
6. Remove the 4 screws in the corners of the circuit board which are
holding it in place. Lift the circuit board out carefully.
7. Disconnect the battery pack connector from the circuit board.
8. Gently pull the battery pack away from the circuit board by peeling it o
the adhesive pad holding it in place.
Disposal of this equipment and Batteries
• Do not dispose of this product or its batteries as unsorted
municipal waste. Return it to a designated collection point
for the recycling of WEEE in accordance with local law. By
doing so, you will help to conserve resources and protect
the environment.
• Most of the EU countries regulate the disposal of batteries
by law. Contact your retailer or local authorities for more information.
• The shown above appears on electrical and electronivcal equipment
and batteries (or the packaging) to remind users of this. If "Hg" or 'Pb'
appears below the symbol, this mean that the battery cantains traces of
mercury (Hg) or lead (Pb), respectively.
• Users are requested to use existing return facilities for used equipment
and batteries.
CE Statement:
• Hereby, UMC Poland Sp. z o.o. declares that this audio device is in
compliance with the essential requirements and other relevant provi-
sions of RED Directive 2014/53/EU. The full text of the EU declaration of
conformity is available by following the link http://www.sharpconsumer.
eu/documents-of-conformity

ENEN
What is included in the box
1 x PS-919
1 x Power Adapter
1 x EU AC plug for power adapter
1 x UK AC plug for power adapter
1 x User Manual
1 x Quick start guide
1 x Warranty Card
Panels & Controls
1
2
3
4
10
11
5
6
7
8
9
TOP VIEW
1. button – Press the button to turn on the unit. Long press the
button to turn o the unit.
2. button – Short press: changes the front light mode
Long press (2 sec): changes the side light mode
Longer press (4 secs): switch all the lights o
3.
button – Short press the button to toggle between Bass & 3D
surround sound modes:
A. Bass O , 3D O - orange LED is o
B. Bass On, 3D O - orange LED continuously lit
C. Bass O , 3D On - orange LED slowly ashing
A long press of the button will swich o both modes: Bass O , 3D O .
4.
button – Press the button to turn up the volume. Long press the
button to skip to the next playing track.
5. SOURCE button – Press the button repeatedly to switch the playback
mode: Bluetooth, AUX, USB. A long press of the button will activate
the TWS/Duo mode function.
Note that the USB mode can only be selected if a USB stick is plugged
into the unit.
6.
button – Press the button to play or pause the playback. Long
press of the button will disconnect bluetooth connection.
7.
button – Press the button to turn down the playing volume.
Long press the button skip to the previous playing track.
8. SOURCE INDICATOR – Switch to Bluetooth mode, the blue light turns
on and starts ashing when pairing. Once paired, the blue light stops
ashing. Switch to USB mode, the blue light ashes rapidly three
times, then goes o , then two seconds later, three times, and so on.
Switch to AUX mode, the blue light ashes slowly and continuously
9. BATTERY STATUS INDICATORS
10. 3D/Bass indication – When Bass O and 3D surround O LED is O .
When Bass On and 3D surround O orange LED continuously light.
When Bass O and 3D surround On orange LED slowly ashing.
11. RECHARGING INDICATOR – When the charger is connected, red light
turns on. When the device is fully charged, the red light turns o .
1
2
3
REAR VIEW
1. DC 18V – AC Adapter input port.
2. USB PORT – The USB 2.0 5V/1A port allows you to charge your mobile
device from the speakers built-in battery. You can also playback MP3
audio les stored on a USB device up to 32GB which uses a FAT32 le
system.
3. AUX IN JACK – Connect other audio devices via a 3.5mm jack audio
cable.
Operation instruction
Charging the Speaker
This speaker uses a built-in battery pack. Before using it, charge the
batteries by connecting the AC adapter.
Connect the AC power adapter (supplied) to the DC 18V input port on the
rear of the unit, and then to the wall outlet.
DC 18V
CAUTION: Only use the AC adapter supplied with this device. If you do not use
the supplied AC adapter charging performance could be a ected and it may
cause permanent damage.
Power On the Speaker
Press POWER ON/OFF button on the top panel of the unit
to power on.
The rst time you use the speaker, the “Source indicator“ ashes blue,
indicating that the unit is in paring mode.
TIPS:
In order to disable or enable the voice prompts, please press and hold
SOURCE button 3 seconds during power up operation.
When you power on the speaker again after Bluetooth setup, the unit will
search for the previous paired device. Once found, it will pair with that
device automatically.
Power O the Speaker
Press the POWER ON/OFF button to turn o the unit.
After 15 mins with no activity/connection the unit will automatically power
o to conserve the battery.

6
Bluetooth Connection
1. Press the SOURCE button repeatedly until the voice prompt states
"Bluetooth".
2. Make sure that the unit is in pairing mode (blue light ashing)
.
3. Enable Bluetooth on the device to be paired with the unit. Select
‘’Sharp PS-919,, from the available devices (enter the password
‘’0000,, if necessary) to start pairing and connection with the unit.
4. After successful connection the "SOURCE INDICATOR" will turn solid
blue and you will hear a voice prompt ("Connected").
5. This unit is compatible with the voice assistant on your smart device.
NOTES:
This speaker supports automatic connection with a previously paired
device after power o and power on again.
If you want to pair with a new Bluetooth device, you must disconnect the
paired device.
To disconnect the Bluetooth connection, long press
button or you
can turn o the Bluetooth function in your smart device. The voice prompt
will state "disconnected" when complete.
Connect two PS-919 via Bluetooth (TWS)
TWS/True wireless Stereo - Duo Mode
• This allows for two PS-919 party speakers to be connected together as
a left and right stereo speakers for a wider stereo sound-stage. The rst
speaker is the master one (left audio channel) and the second the slave
(right audio channel).
• Press and hold the SOURCE button on the second speaker until the
speaker says “Duo Mode pairing” then release the button.
• Please wait until speakers say “Duo Mode connected”. The speakers are
now connected to each other.
• Pair the master speaker with your phone.
• For Bluetooth pairing to a Bluetooth-out enabled smart device search for
Bluetooth Pairing name “Sharp PS-919” on your device and pair.
• When you will power o one speaker in Duo Mode, both speakers will
power o .
• When you Power on the speakers, they need to be turned on individu-
ally.
• When both speakers are powered on Duo Mode will automatically
reconnect and you will hear “Duo Mode connected”.
• To disconnect Duo Mode press and hold SOURCE button on the slave
speaker until you hear “Duo Mode disconnected”
NOTES:
It takes up to 1 minute to connect to Duo Mode.
When you enjoy Duo Mode, Multi phone pairing is not supported. The
Master speaker connects only one Bluetooth device.
In Duo Mode, you can connect to only the Master speaker with the
Bluetooth device.
To change the Bluetooth device in Duo Mode, press and hold
on Mas-
ter unit for 3 seconds to disconnect current Bluetooth device and connect
to the desired Bluetooth device.
When you connect a Bluetooth device (iOS device etc.) to this unit or
operate the device, the volume level can be synchronized between each
device.
When in Duo Mode, the functions of
, and buttons will be
synchronized with two speakers.
In Duo Mode, make the distance between the speakers as close as possible
each other.
Depending on network environment, the Duo Mode may not work well.
When the Duo Mode is entered, some mobile phones (ex. AptX HD suppor-
ted devices) play music after a brief pause.
Some mobile phones might not play music properly when you try to
connect Duo Mode during playback.
Reset the Duo Mode connection: Disconnect by long press the SOURCE
button on the slave speaker until you hear '' Duo Mode disconnected''.
Connection is reset.
Listening to Music from External Device
The unit can be used to listen to the music from many types of external
device.
1. Connect an auxiliary audio device to the unit through the 3.5mm
audio input port.
2. Press the SOURCE button to repeatedly to switch to AUX mode. The
blue light ashes slowly in Aux mode.
3. Play and control music on the audio device, and use the
and
buttons on the unit to adjust the volume.
USB Playback and Charging functions
The USB port on the rear panel of the unit supports playback and charging.
1. Insert the USB drive into the USB slot on the back of the unit.
2. The speaker will enter USB mode automatically.
3. The speaker will start to play songs from the USB immediately.
NOTES:
The USB mode only can be entered when a USB device is connected.
supports USB devices up to 32GB capacity
supported audio format is MP3
4. Mobile devices can be charged via the USB port.
Adjust the Light E ects
1. Short press the button on the top panel of the unit to change the
ashing mode for the centre light. There are 4 ashing e ects:
Colors gradually ashing.
Dynamic ashing, the lights will ashes with the music.
Color rotating ashing.
Monochrome rotating ashing.
2. Long press (2 sec): changes the side light mode
3. Longer press (4 secs) : switch all the lights o

ENEN
Technical speci cation
Model PS-919
Output Power 2 x 18W + 36W RMS (10% THD)
Max. power consumption: 19W
Total max power output 130W
Frequency Response 70Hz - 12kHz
Battery
Built-in 4x2600mAh, 37,44Wh Li-ion
battery pack
Operating temperature 5 °C to 35 °C
Operating humidity 5 % to 60 %
Water-proof IPX5
Bluetooth
Version V 5.0
Maximum power transmitted <20 dbm
Frequency bands 2402 MHz ~ 2480 MHz
Power Adapter
Model name HP24E-1801000-D
Input 100-240V~ 50/60Hz 0,8A
Output DC 18V, 1000mA
Manufacturer
DONGGUAN HP-POWER TECHNOLOGY.,
LIMITED
NO.8, Shui Lin Road, TangXia
Town,523710 DongGuan City,
Guang Dong Province, China
Notes: Design and speci cations are subject to change without notice.
230mm
224mm 220 mm
2,7kg

8
DE
Wichtige Sicherheitsanweisungen
VORSICHT
GEFAHR AUF STROMSCHLAG
NICHT ÖFFNEN
Bitte lesen Sie sich diese Sicherheitsanweisungen
durch und beachten Sie, bevor Sie das Gerät in
Betrieb nehmen, auf die folgenden Warnhinweise:
Das Dreieckszeichen mit Blitzsymbol verweist auf nicht
isolierte „gefährliche Spannungen“ im Gerätegehäuse, die so
hoch sein können, dass sie eine Gefahr von Stromschlägen
bilden.
Das Dreieckszeichen mit Ausrufungszeichen verweist auf
wichtige Funktions - und Wartungshinweise (Reparatur) in
der dem Gerät beigelegten Bedienungsanleitung.
Benutzen Sie nur die Energieversorgung, die in der
Bedienungsanleitung angegeben ist.
Dieses Symbol bedeutet, dass das Produkt auf
umweltfreundliche Weise und nicht mit dem gewöhnlichen
Haushaltsmüll entsorgt werden sollte.
Wechselspannung
Gleichspannung
Gerät der KlasseII
Nur für den Innenbereich
Energiee zienzkennzeichnung mit Stufe VI
Polarität des Gleichstromsteckers
Halten Sie Kerzen und o enes
Feuer von diesem Produkt fern,
um einen Brand zu vermeiden.
Warnung:
• Halten Sie sich während der Nutzung dieses Geräts immer an die
allgemeinen Sicherheitshinweise, insbesondere, wenn Kinder in der
Nähe sind.
• Kinder sollten beaufsichtigt werden, um sicherzustellen, dass sie nicht
mit dem Gerät spielen.
• Das Stromkabel darf weder beschädigt, noch dürfen schwere Objekte
darauf abgelegt werden, außerdem dürfen Sie es nicht dehnen oder
verbiegen. Schließen Sie auch keine Verlängerungskabel an. Schäden am
Stromkabel können zu einem Feuer oder Stromschlag führen.
• Wenn das Stromversorgungskabel beschädigt ist, muss es vom Her-
steller, einem Servicetechniker oder einer ähnlich quali zierten Person
ausgetauscht werden, um Gefährdungen zu vermeiden.
• Stellen Sie sicher, dass die Einheit an eine AC 220-240V 50Hz Steckdose
angeschlossen wird. Eine höhere Spannung kann zu Fehlfunktionen
oder sogar zu einem Brand führen.
• Wenn der Stecker nicht in die Steckdose passt, dürfen Sie keine Gewalt
anwenden, um einen nicht passenden Stecker in die Steckdose zu
drücken.
• Schalten Sie die Einheit aus, bevor Sie sie von der Stromversorgung
trennen, um sie so vollständig abzuschalten.
• Vermeiden Sie es, das Stromkabel mit nassen Händen anzuschließen
oder zu trennen. Dies könnte andernfalls zu einem Stromschlag führen.
• HINWEIS: Wenn Sie das System für eine längere Nichtbenutzung vom
Strom trennen wollen, trennen Sie den Netzstecker von der Wandsteck-
dose.
• Stellen Sie sicher, dass der Hauptstecker immer leicht zugänglich ist.
• Dieses Produkt enthält keine Teile, die vom Benutzer gewartet werden
können. Setzen Sie sich im Fall eines Defekts mit dem Hersteller oder
der autorisierten Kundenabteilung in Verbindung. Teile aus dem Inneren
des Geräts freizulegen kann lebensgefährlich sein. Die Garantie der
Hersteller gilt nicht für Defekte, die durch von nicht autorisierte Dritten
durchgeführte Reparaturen entstehen.
• Benutzen Sie dieses Produkt nicht direkt nach dem Auspacken. Warten
Sie, bis es sich auf Zimmertemperatur erwärmt hat, ehe sie es einschal-
ten.
• Stellen Sie sicher, dass dieses Produkt ausschließlich in Umgebungen
mit mildem Klima verwendet wird (kein tropisches oder subtropisches
Klima).
• Stellen Sie das Produkt auf eine ache, stabile Ober äche, die keinen
Erschütterungen ausgesetzt ist.
• Das Produkt und dessen Teile dürfen nicht über die Kante delelte tragen-
den Möbelstücks hinausragen.
• Um das Risiko eines Feuers, Stromschlags oder Schäden an diesem
Produkt zu reduzieren, sollten Sie es nicht direktem Sonnenlicht, Staub,
Regen oder Feuchtigkeit aussetzen. Setzen Sie es niemals tropfendem
oder spritzendem Wasser aus und positionieren Sie keine mit Flüssigkei-
ten gefüllten Objekte auf oder neben dem Produkt.
• Setzen Sie keine mit Flüssigkeit gefüllten Objekte wie Vasen auf das
Gerät.
• Installieren Sie das Produkt nicht in der Nähe von Heizquellen, wie etwa
Heizungen, Heizregister, Öfen oder anderen Apparaten (einschließlich
Verstärker), die Hitze produzieren.
• Platzieren Sie das Gerät nicht an Orten mit hoher Feuchtigkeit und
mangelhafter Belüftung.
• Befestigen Sie den Lautsprecher nicht an der Wand oder an der Decke.
• Platzieren Sie den Lautsprecher nicht neben Fernsehern, Lautsprechern
oder anderen Objekten, die starke Magnetfelder erzeugen.
• Lassen Sie den Lautsprecher bei der Verwendung nicht unbeaufsichtigt.
• Lassen Sie hinter und über dem Lautsprecher mindestens 30 cm und
an den Seiten jeweils 5 cm Freiraum. Vermeiden Sie es, Belüftungsö -
nungen an diesem Produkt zu blockieren. Sorgen Sie immer dafür, dass
die Belüftungsö nungen nicht durch Gegenstände, z. B. Zeitungen,
Tischdecken, Gardinen usw. verdeckt sind.
• Lassen Sie NIEMALS jemanden, ganz besonders nicht Kinder, etwas in
die Löcher, Spalten oder anderen Ö nungen des Gerätegehäuses stop-
fen, da dies zu einem folgenschweren Stromschlag führen kann.
• Gewitter sind für alle elektrischen Geräte gefährlich. Wenn das Strom-
oder Antennenkabel vom Blitz getro en wird, kann das Gerät, auch
wenn es ausgeschaltet ist, beschädigt werden. Bei einem herannahen-
den Gewitter sollten Sie alle Kabel und Stecker des Gerätes ausstecken.
• Ein exzessiver Schalldruck von Kopfhörern kann zu einem Hörverlust
führen.
Wartung
• Trennen Sie vor dem Reinigen des Geräts das Stromkabel von der
Stromquelle.
• Verwenden Sie einen weichen und sauberen Lappen, um die Außen-
ächen der Einheit zu reinigen. Verwenden Sie beim Reinigen niemals
Chemikalien oder Reinigungsmittel.
Netzadapter
• Um die Einheit von der Stromversorgung zu trennen, trennen Sie das
Netzkabel von der Steckdose.
• Benutzen Sie nur den mitgelieferten Netzadapter, andernfalls kann es zu
einem Sicherheitsrisiko/einer Beschädigung des Gerätes kommen.

DE
Wartung des eingebauten Akkus
• Ihr Produkt wird durch einen eingebauten Akku mit Strom versorgt.
• Dieser Akku kann Hunderte Male aufgeladen und wieder entladen
werden, aber irgendwann wird er nicht mehr funktionieren.
• Trennen Sie das Ladegerät von der elektrischen Steckverbindung und
vom Lautsprecher, wenn es nicht benutzt wird.
• Sorgen Sie dafür, dass ein vollständig aufgeladener Akku nicht mit dem
Ladegerät verbunden bleibt, da dies seine Lebenszeit verkürzen könnte.
• Wenn Sie einen vollständig aufgeladenen Akku nicht benutzen, verliert
er im Laufe der Zeit seine Ladung.
• Wenn Sie den Lautsprecher an heißen oder kalten Orten lassen – wie
beispielsweise einem geschlossen Fahrzeug im Sommer oder Winter –
wird die Kapazität und die Lebenszeit des Akkus sinken.
• Bewahren Sie Ihren Lautsprecher immer vorzugsweise in einer kühlen,
feuchtigkeitsfreien Umgebung unter 32 °C auf.
• Ein Lautsprecher mit einem heißen oder kalten Akku kann vorüberge-
hend nicht funktionieren, selbst wenn der Akku vollständig geladen
ist. Die Akkuleistung wird vor allem bei Temperaturen weit unter dem
Gefrierpunkt beeinträchtigt.
• Wenn Sie Ihr Gerät länger als sechs Monate lagern möchten, sollten Sie
den Akku alle sechs Monate auf 50% au aden, um seine Funktionsfähig-
keit zu gewährleisten. Lagern Sie das Gerät bei Temperaturen zwischen
5°C und 20°C.
Akkuwarnung!
• Der in diesem Lautsprecher eingebaute Akku kann bei falscher Handha-
bung eine Brandgefahr oder ein chemisches Risiko darstellen.
• Versuchen Sie nicht den Lautsprecher zu ö nen oder den Akku zu erset-
zen. Der Akku ist fest eingebaut und kann nicht ausgetauscht werden.
Die Verwendung eines anderen Akkus/einer anderen Batterie kann eine
Brandgefahr oder ein Explosionsrisiko darstellen und daraufhin erlischt
die Garantie.
• Entsorgen Sie den Akku unter Einhaltung der örtlichen Vorschriften.
Führen Sie ihn, wenn möglich, dem Recycling zu. Entsorgen Sie den
Akku nicht als Haushaltsabfall und werfen Sie ihn nicht in ein Feuer, da er
explodieren könnte.
• Akkus können explodieren, wenn sie beschädigt werden.
• Laden Sie den Akku mit dem mitgelieferten Ladegerät oder unter den
in der Anleitung angegebenen Ladebedingungen. Wenn Sie den Akku
unter anderen Bedingungen laden, kann der Akku überhitzen, Wasser-
sto gas abgeben, auslaufen, sich entzünden oder aufplatzen.
VORSICHT!
1. Wichtige Sicherheitshinweise
• Setzen Sie Batterien keinen hohen Temperaturen aus und legen Sie sie
nicht an Stellen ab, wo sich die Temperatur schnell erhöht, z. B. neben
einem Feuer oder in die direkte Sonneneinstrahlung.
• Setzten Sie Batterien keiner übermäßigen Strahlungswärme aus, werfen
Sie sie nicht ins Feuer oder bauen sie auseinander und versuchen Sie
nicht, nicht au adbare Batterien aufzuladen. Sie könnten undicht
werden oder explodieren.
2. Zur Vermeidung von Verschlechterungen oder Schäden am Akku
• Lassen Sie den Akku nicht fallen und setzen ihn keinen schweren
Erschütterungen aus.
3. Um eine lange Akkulaufzeit zu garantieren
• Der Akku darf sich nicht vollständig entladen.
Entfernen des Akkus zur Entsorgung
VERLETZUNGSRISIKO. TRAGEN SIE HANDSCHUHE BEIM ARBEITEN!
er Akku sollte nur durch einen autorisierten Servicebetrieb entfernt
werden.
1. Entfernen Sie das Lautsprechergitter an der Vorderseite des Geräts,
indem Sie es vorsichtig mit einem Flachschraubendreher abheben.
2. Entfernen Sie die 7Gummischraubenabdeckungen an der Vorderseite
des Geräts und lösen Sie die Schrauben mit einem Kreuzschlitzschrau-
bendreher.
3. Entfernen Sie 1Schraube von der Unterseite der vorderen Gehäuse-
hälfte.
4. Ö nen Sie das Hauptgehäuse.
5. Suchen Sie auf der Rückseite des Gehäuses die Leiterplatte.
6. Entfernen Sie die 4Schrauben in den Ecken der Leiterplatte, mit denen
sie befestigt wird. Heben Sie die Leiterplatte vorsichtig heraus.
7. Trennen Sie die den Akkusatz von der Leiterplatte.
8. Ziehen Sie den Akkusatz vorsichtig von der Leiterplatte ab– ziehen Sie
ihn dabei von der Klebe äche ab, durch die er befestigt ist.
Entsorgung dieses Geräts und von Batterien
• Entsorgen Sie dieses Produkt oder dessen Batterien
niemals über den normalen Hausmüll. Geben Sie es ent-
sprechend den gesetzlichen Regelungen vor Ort bei dem
für das Recycling von WEEE vorgesehenen Sammelpunkt
ab. Damit helfen Sie, Ressourcen einzusparen und die
Umwelt zu schützen.
• In den meisten EU-Ländern gelten für die Entsorgung von Batterien
besondere Gesetze und Vorschriften. Weitere Informationen erhalten Sie
von Ihrem Händler oder den örtlichen Behörden.
• Der oben aufgeführte Text erscheint auf elektrischen und elektronischen
Geräten und Batterien (oder der Verpackung), um Nutzer entsprechend
zu erinnern. Wenn unter dem Symbol „Hg“ oder „Pb“ erscheint, bedeutet
dies, dass die Batterie jeweils Spuren von Quecksilber (Hg) oder Blei (Pb)
enthält.
• Nutzer werden darum gebeten, für gebrauchte Geräte und Batterien
bestehende Rückgabeeinrichtungen zu nutzen.
CE-Konformitätserklärung:
• Die Universal Media Corporation sp. z o.o. erklärt hiermit, dass dieses Au-
diogerät die wesentlichen Anforderungen und weitere entsprechende
Vorschriften der RED-Verordnung 2014/53/EU einhält. Der vollständige
Text der EU-Konformitätserklärung ist unter folgender Internetadresse
erhältlich: https://www.sharpconsumer.eu/documents-of-conformity/

10
DE
Lieferumfang
1 x PS-919
1 x Netzadapter
1 x Wechselstromstecker für Netzadapter (Europäische Union)
1 x Wechselstromstecker für Netzadapter (Vereinigtes Königreich)
1 x Benutzerhandbuch
1 x Schnellstart-Handbuch
1 x Garantiekarte
Panels und Bedienelemente
1
2
3
4
10
11
5
6
7
8
9
ANSICHT VON OBEN
1. Taste – Drücken Sie die Taste, um das Gerät einzuschalten. Drücken
Sie lange auf die Taste, um das Gerät auszuschalten.
2. Taste – Kurz drücken: Ändert den Lichtmodus vorne
Lang drücken (2Sekunden): Ändert den Lichtmodus an der Seite
Lang drücken (4Sekunden): Schaltet alle Lichter aus
3. Taste
– Taste kurz drücken, um zwischen den Modi Bass und
3D-Umgebung umzuschalten:
A. Bass aus, 3D aus - Orange LED ist aus
B. Bass ein, 3D aus - Orange LED leuchtet dauerhaft
C. Bass aus, 3D ein - Orange LED blinkt langsam
Ein langes Drücken der Taste schaltet beide Modi aus: Bass aus, 3D aus.
4. Taste
– Drücken Sie die Taste, um die Wiedergabelautstärke des
Geräts zu erhöhen. Drücken Sie die Taste lange, um zum nächsten
Wiedergabetitel zu springen.
5. Taste SOURCE (Quelle) – Drücken Sie die Taste wiederholt, um den
Wiedergabemodus zu wechseln: Bluetooth, AUX, USB. Ein langer
Druck auf die Taste aktiviert die Funktion TWS/Duo-Modus.
Beachten Sie, dass der USB-Modus nur ausgewählt werden kann,
wenn ein USB-Stick an das Gerät angeschlossen ist.
6. Taste
– Drücken Sie die Taste, um die Wiedergabe zu starten oder
zu pausieren. Ein langer Druck auf die Taste trennt die Bluetooth-
Verbindung.
7. Taste
– Drücken Sie die Taste, um die Wiedergabelautstärke
zu verringern. Drücken Sie die Taste lange, um zum vorherigen
Wiedergabetitel zu springen.
8. ANZEIGE DER QUELLE– Schalten Sie in den Bluetooth-Modus.
Das blaue Licht leuchtet auf und blinkt beim Koppeln. Nach dem
Koppeln blinkt das blaue Licht nicht mehr. Schalten Sie in den USB-
Modus– Das blaue Licht blinkt schnell dreimal, erlischt dann, blinkt
zwei Sekunden später wieder dreimal usw. Wechseln Sie in den AUX-
Modus– Das blaue Licht blinkt langsam und dauerhaft.
9. AKKUSTATUS-ANZEIGEN
10. 3D/BASS-ANZEIGE – Wenn der Bass und 3D-Surround ausgeschaltet
ist, ist die LED ausgeschaltet.
Wenn der Bass eingeschaltet und der 3D-Surround ausgeschaltet ist,
leuchtet die LED dauerhaft.
Wenn der Bass ausgeschaltet und der 3D-Surround eingeschaltet ist,
blinkt die LED langsam.
11. AUFLADE-ANZEIGE– Wenn das Ladegerät angeschlossen ist, leuchtet
das rote Licht auf. Sobald das Gerät vollständig geladen ist, geht das
rote Licht aus.
1
2
3
RÜCKANSICHT
1. DC 18V – Eingangsanschluss des AC-Adapters.
2. USB-ANSCHLUSS– Der USB 2.0-Anschluss unterstützt Wiedergabe
und Laden. Lesen Sie Audiodateien im MP3-Format ein– von einem
USB-Speichergerät mit einer Kapazität von bis zu 32GB (FAT32). Oder
laden Sie Ihr mobiles Gerät über den USB-Anschluss mit 5V/1A.
3. AUX-IN-ANSCHLUSS– Schließen Sie das 3,5-mm-Kabel an, um
externe Musik zu genießen.
Betriebsanleitung
Au aden des Lautsprechers
Dieser Lautsprecher nutzt eingebaute Akkus. Laden Sie die Akkus vor der
Nutzung auf und schließen Sie dazu das Netzteil an.
Schließen Sie das (beiliegende) Wechselstromnetzteil an den Gleichstrom-
Eingang 18V auf der Rückseite des Geräts und anschließend an die
Steckdose an.
DC 18V
VORSICHT: Benutzen Sie ausschließlich das mit diesem Gerät ausgelieferte
Netzteil. Benutzen Sie nur das mitgelieferte Netzkabel. Wenn Sie diesen
Adapter nicht benutzen, kann das Gerät vielleicht nicht geladen werden oder
die Ladezeit kann variieren. Außerdem kann das Gerät beschädigt werden.
Einschalten des Lautsprechers
Drücken Sie die Taste EIN-/AUSSCHALTEN oben am Gerät,
um es einzuschalten.
Bei der ersten Benutzung blinkt die „Anzeige der Quelle“ blau und zeigt
damit an, dass sich das Gerät im Kopplungsmodus be ndet.
TIPPS:
Um die Sprachmeldungen zu deaktivieren oder zu aktivieren, drücken
und halten Sie die Taste SOURCE (QUELLE) beim Einschaltvorgang
3Sekunden lang.
Wenn Sie den Lautsprecher nach der Bluetooth-Einrichtung erneut
einschalten, sucht das Gerät nach dem zuvor gekoppelten Gerät. Sobald
es gefunden wurde, koppelt es sich automatisch mit diesem Gerät.

DE
Ausschalten des Lautsprechers
Drücken Sie die Taste EIN-/AUSSCHALTEN, um das Gerät auszuschalten.
Nach 15Minuten ohne Aktivität/Verbindung schaltet sich das Gerät
automatisch aus, um den Akku zu schonen.
Bluetooth-Verbindung
1. Drücken Sie wiederholt die Taste SOURCE (QUELLE), um in den
Bluetooth-Modus zu schalten. Das Gerät sagt „Bluetooth“.
2. Vergewissern Sie sich, dass sich das Gerät im Kopplungsmodus
be ndet (blaues Licht blinkt).
3. Aktivieren Sie Bluetooth auf Ihrem Gerät, um es mit diesem Gerät zu
koppeln. Wählen Sie „Sharp PS-919“ aus den verfügbaren Geräten
(geben Sie bei Bedarf das Passwort „0000“ ein), um mit dem Koppeln
und der Verbindung mit dem Gerät zu beginnen.
4. Nach der erfolgreichen Verbindung leuchtet die „Anzeige der Quelle“
dauerhaft blau und Sie hören eine Sprachausgabe („Connected“)
(Verbunden).
5. Dieses Gerät ist mit dem Sprachassistenten auf Ihrem Smartphone
kompatibel.
HINWEISE:
Dieser Lautsprecher unterstützt die automatische Verbindung mit einem
zuvor gekoppelten Gerät, nachdem es aus- und erneut eingeschaltet
wurde.
Wenn Sie es mit einem neuen Bluetooth-Gerät koppeln möchten, müssen
Sie das gekoppelte Gerät trennen.
Um die Bluetooth-Verbindung zu trennen, drücken Sie lange auf die Taste
. Oder schalten Sie die Bluetooth-Funktion auf Ihrem Smart-Gerät aus.
Das Gerät sagt „Disconected“ (Getrennt).
Verbindung zweier PS-919 über Bluetooth
(TWS)
TWS/True-Wireless-Stereo– Duo-Modus
• Hiermit können Sie zwei PS-919-Party-Lautsprecher als linke und rechte
Stereolautsprecher miteinander verbinden, um ein echtes Stereoerlebnis
zu genießen. Der erste angeschlossene Lautsprecher ist der Master und
der zweite der Slave.
• Halten Sie die Taste SOURCE am zweiten Lautsprecher gedrückt, bis der
Lautsprecher „Duo Mode pairing“ (Duo-Modus-Pairing) sagt. Lassen Sie
die Tasten anschließend wieder los.
• Warten Sie, bis zwei Lautsprecher „Duo Mode connected“ (Duo-Modus
verbunden) sagt. Die beiden Lautsprecher sind jetzt miteinander
verbunden.
• Koppeln Sie die Master-Lautsprecher mit Ihrem Telefon.
• Für das Bluetooth-Pairingmit einem Smart-Gerät mit Bluetooth suchen
Sie auf Ihrem Gerät nach „SHARP PS-919“ und führen Sie das Pairing
durch.
• Wenn Sie im Duo-Modus einen der Lautsprecher ausschalten, schalten
sich beide Lautsprecher aus.
• Wenn Sie die Lautsprecher einschalten, müssen Sie die Lautsprecher
einzeln einschalten.
• Wenn beide Lautsprecher eingeschaltet sind, wird sich der Duo-Modus
automatisch neu verbinden und Sie hören „Duo Mode connected“ (Duo-
Modus verbunden).
• Um den Duo-Modus zu trennen, drücken Sie die Taste SOURCE am
Slave-Lautsprecher und halten Sie sie gedrückt, bis Sie „Duo Mode
disconnected“ (Duo-Modus getrennt) hören.
HINWEISE:
Es kann bis zu 1Minute dauern, um den Duo-Modus zu verbinden.
Wenn Sie den Duo-Modus nutzen, wird die Kopplung mehrerer Smart-
phones nicht unterstützt. Der Master-Lautsprecher verbindet sich nur mit
einem Bluetooth-Gerät.
Im Duo-Modus können Sie nur den Master-Lautsprecher mit dem
Bluetooth-Gerät verbinden.
Um das Bluetooth-Gerät im Duo-Modus zu ändern, drücken und halten
Sie die Taste
am Master-Gerät 3Sekunden lang, um das aktuelle
Bluetooth-Gerät zu trennen und das gewünschte Bluetooth-Gerät zu
verbinden.
Wenn Sie ein Bluetooth-Gerät (iOS-Gerät usw.) mit diesem Gerät verbin-
den oder das Gerät bedienen, kann die Lautstärke zwischen den einzelnen
Geräten synchronisiert werden.
Im Duo-Modus werden die Funktionen der Tasten
, und mit
den beiden Lautsprechern synchronisiert.
Stellen Sie die Lautsprecher im Duo-Modus so nah wie möglich zuein-
ander auf.
In Abhängigkeit der Netzwerkumgebung kann der Duo-Modus vielleicht
nicht wunschgemäß funktionieren.
Im aktivierten Duo-Modus spielen einige Mobiltelefone (z.B. AptX-HD-
unterstützte Geräte) die Musik nach einer kurzen Pause ab.
Einige Mobiltelefone können die Musik möglicherweise nicht richtig
abspielen, wenn Sie den Duo-Modus während der Wiedergabe einstellen.
Zurücksetzen der Duo-Modus-Verbindung: Trennen Sie die Verbindung,
indem Sie Taste SOURCE (QUELLE) am Slave-Lautsprecher lange drücken,
bis Sie „Duo Mode disconnected'“ (Duo-Modus getrennt) hören. Die
Verbindung wird zurückgesetzt.
Anhören von Musik vom einem externen Gerät
Sie können das Gerät nutzen, um Musik von vielen Arten von externen
Geräten anzuhören.
1. Schließen Sie ein zusätzliches Audiogerät über den 3,5-mm-
Audioeingang an das Gerät an.
2. Drücken Sie die Taste SOURCE (QUELLE), um in den AUX-Modus zu
schalten. Im AUX-Modus blinkt das blaue Licht langsam.
3. Spielen und steuern Sie die Musik auf dem Audiogerät und
benutzen Sie die Tasten
und am Gerät, um die Lautstärke
einzustellen.
Funktionen USB-Wiedergabe und Au aden
Der USB-Anschluss auf der Rückseite des Geräts unterstützt die
Wiedergabe und das Laden.
1. Stecken Sie den USB-Stick in den USB-Steckplatz auf der Rückseite
des Geräts.
2. Das Gerät wechselt automatisch in den USB-Modus.
3. Beim Einschalten des Geräts werden die Musikstücke sofort über USB
abgespielt.
HINWEISE:
Der USB-Modus lässt sich nur aktivieren, wenn das USB-Gerät eingesteckt
ist.
Es werden USB-Speichersticks mit bis zu 32GB unterstützt.
Das unterstützte Audioformat ist MP3.
4. Über den USB-Anschluss können Sie Mobilgeräte au aden.
Einstellen der Lichte ekte
1. Drücken Sie kurz auf die Taste an der oberen Seite des Geräts, um
den Blinkmodus für das Mittellicht zu ändern. Es gibt 5 Blinke ekte:
Die Farben blinken stufenweise.
Dynamisches Blinken, die Lichter blinken mit der Musik.
Farbe rotiert blinkend.
Monochromes rotierendes Blinken..
2. Lange drücken (2Sekunden): Ändert den Seitenlicht-Modus
3. Länger drücken (4Sekunden): Schaltet alle Lichter aus

12
DE
Technische Daten
Modell PS-919
Ausgangsstrom 2 x 18W + 36W RMS (10% THD)
Max. Stromverbrauch: 19W
Maximale Gesamtleistung 130W
Frequenzbereich
70Hz
- 12kHz
Akku
Eingebaut, 4x2600mAh, 37,44Wh
Li-Ionen-Akkupack
Betriebstemperatur 5 °C bis 35 °C
Betriebsfeuchtigkeit 5 % bis 60 %
Wasserdicht IPX5
Bluetooth
Version V 5.0
Maximaler übertragener Strom <20dbm
Frequenzbänder 2.402 MHz ~ 2.480 MHz
Netzadapter
Modellname HP24E-1801000-D
Eingang 100-240V~ 50/60Hz 0,8A
Leistung DC 18V, 1000mA
Hersteller
DONGGUAN HP-POWER TECHNOLOGY.,
LIMITED
NO.8, Shui Lin Road, TangXia
Town, 523710 DongGuan City,
Guang Dong Province, China
Hinweise: Konstruktion und technische Daten können ohne vorherige
Mitteilung geändert werden.
230mm
224mm 220 mm
2,7kg

ESES
Instrucciones de seguridad importantes
ADVERTENCIA
RIESGO DE DESCARGA ELÉCTRICA
NO ABRIR
Lea estas instrucciones de seguridad y respete las
siguientes advertencias antes de utilizar el aparato:
La nalidad del símbolo del rayo con cabeza de echa, dentro
de un triángulo equilátero, es avisar al usuario de la presencia
de "tensión peligrosa" sin aislamiento dentro de la carcasa del
producto, que puede ser de su ciente magnitud como para
provocar descargas eléctricas para las personas.
La nalidad de la marca de admiración dentro de un triángulo
equilátero es avisar al usuario de la presencia de instrucciones
importantes de uso y mantenimiento (servicio) en el manual
que acompaña al aparato.
Utilice la fuente de alimentación enumerada en el manual
de usuario.
Este símbolo signi ca que el producto debe eliminarse de
manera respetuosa con el medio ambiente y no con los
residuos domésticos generales.
Tensión de CA
Tensión de CC
Equipo de clase II
Solo para uso en interiores
Etiquetado de e ciencia energética de nivel VI
Polaridad del conector de corriente continua
Para evitar incendios mantenga
siempre las velas u otras llamas al
descubierto lejos del producto.
Advertencia:
• Respete siempre las precauciones básicas de seguridad cuando utilice
este electrodoméstico, especialmente cuando si hay niños presentes.
• Los niños deben ser supervisados para asegurarse de que no juegan con
el aparato.
• No dañe el cable de alimentación, no coloque objetos pesados encima,
no lo estire ni lo doble. Asimismo, no conecte alargadores. Los daños
en el cable de alimentación pueden ocasionar incendios o descargas
eléctricas.
• Si el cable de alimentación presenta algún daño, deberá ser sustituido
por el fabricante, el servicio técnico o personas con una cuali cación
similar para evitar que se produzcan situaciones de peligro.
• Asegúrese de que la unidad está conectada a una toma de corriente de
CA de 220-240 V y 50 Hz. El uso de una tensión superior puede causar el
mal funcionamiento de la unidad o incluso presentar riesgo de incendio.
• Si el enchufe no encaja en la toma, no lo fuerce.
• Apague la unidad antes de desenchufarla de la corriente para desconec-
tarla por completo.
• No conecte ni desconecte el cable de alimentación con las manos moja-
das, ya que podría producirse una descarga eléctrica.
• NOTA: Para desconectar el sistema completamente si no se va a utilizar
durante un largo periodo de tiempo, retire el cable de alimentación de
CA de la toma de corriente.
• Asegúrese de que el enchufe de alimentación resulta fácilmente
accesible.
• Este producto no contiene ninguna pieza que pueda ser reparada por
el usuario. En caso de avería, póngase en contacto con el fabricante o el
servicio técnico autorizado. La exposición de ciertas partes internas del
dispositivo puede poner en peligro su vida. La garantía del fabricante
no cubre las averías resultantes de reparaciones llevadas a cabo por
terceros.
• No utilice este producto inmediatamente tras desembalar. Espere a que
se caliente a la temperatura ambiente antes de utilizarlo.
• Asegúrese de utilizar el producto en climas moderados únicamente (no
en climas tropicales o subtropicales).
• Coloque el producto en una super cie plana estable y no expuesta a
vibraciones.
• Asegúrese de que el producto y sus partes no sobresalen de los bordes
del mueble sobre el que se coloca.
• Para reducir el riesgo de incendio, descarga eléctrica o daño en el
producto, no lo exponga directamente a la luz del sol, polvo, lluvia o
humedad. No exponga nunca este producto a gotas o derramamientos y
no coloque objetos llenos de líquido sobre o cerca de este.
• No coloque objetos con líquidos, como jarrones, sobre el aparato.
• No instale el aparato cerca de ninguna fuente de calor, como radiadores,
salidas de aire caliente, estufas u otros aparatos (incluidos ampli cado-
res) que produzcan calor.
• No coloque el producto en espacios húmedos o con ventilación de cien-
te.
• No monte este producto en pared o techo.
• No coloque la unidad cerca de televisores, altavoces y otros objetos que
generen campos magnéticos intensos.
• No deje la unidad sin atender mientras se usa.
• Deje al menos 30 cm de espacio libre en la parte posterior y superior
de la unidad, y 5 cm en los laterales. No obstruya las aberturas de venti-
lación de este producto. Evite siempre la obstrucción de las ranuras de
ventilación con objetos como periódicos, manteles, cortinas, etc.
• No permita que nadie, especialmente los niños, introduzca elementos en
los ori cios, ranuras ni en ninguna apertura de la carcasa de la unidad, ya
que podrían dar lugar a descargas eléctricas mortales.
• Las tormentas son peligrosas para todos los aparatos eléctricos. Si el
cable de alimentación o el cableado de la antena es alcanzado por un
rayo, el aparato puede resultar dañado, incluso si no está encendido.
Debe desconectar todos los cables y conectores del aparato antes de
una tormenta.
• La presión acústica excesiva de los auriculares y los cascos puede causar
la pérdida del sentido auditivo.
Mantenimiento
• Desenchufe el cable de alimentación de la toma de corriente antes de
limpiar la unidad.
• Utilice un paño suave y limpio para limpiar la parte exterior de la unidad.
No utilice nunca productos químicos ni detergentes.
Adaptador de corriente
• Para desconectar la unidad del suministro eléctrico, desenchufe el cable
de la toma de corriente.
• Utilice únicamente el adaptador de red suministrado, de lo contrario
podrían producirse riesgos para la seguridad o daños en la unidad.
Cuidado de la batería interna
• El producto se alimenta mediante una batería recargable interna.
• La batería puede cargarse y descargarse cientos de veces, pero con el
tiempo se desgastará.
• Desenchufe el cargador de la toma eléctrica y el producto cuando no
lo use.
• No deje una batería totalmente cargada conectada a un cargador, ya que
la sobrecarga puede reducir su vida útil.

14
• Si no se usa, una batería totalmente cargada se descargará con el
tiempo.
• Si el producto se deja en lugares calientes o fríos, como un coche
cerrado en verano o en invierno, se reducirá la capacidad y la vida útil
de la batería.
• Intente mantener siempre el dispositivo en un entorno fresco libre de
humedad que tenga menos de 32 C.
• Un producto con una batería caliente o fría puede no funcionar tempo-
ralmente, incluso si la batería está totalmente cargada. El rendimiento de
la batería resulta particularmente limitado en temperaturas por debajo
de 0 C.
• Si tiene previsto almacenar el dispositivo más de seis meses, cargue
la batería un 50% cada seis meses para mantenerla en buen estado.
Almacene el dispositivo a temperaturas entre 5°C y 20°C.
Advertencia relacionada con la batería!
• La batería utilizada en este producto puede presentar riesgo de incendio
o de quemaduras químicas si no se trata de la forma adecuada.
• No intente abrir el producto ni sustituir la batería. Se trata de una batería
interna no intercambiable. El uso de otras baterías puede presentar un
riesgo de incendio o explosión, e invalidar la garantía.
• Elimine las baterías de acuerdo con la normativa local. Recicle cuando
sea posible. No elimine como residuo doméstico o en un fuego, ya que
podrían explotar.
• Las baterías pueden explotar si se dañan.
• Cargue la batería utilizando el cargador suministrado o de acuerdo con
las condiciones de carga especi cadas en el manual de instrucciones.
La carga de cualquier otra forma puede causar que la batería emita gas
hidrógeno, presente fugas, se incendie o explote.
ADVERTENCIA!
1. Consideraciones de seguridad importantes
• No exponga las pilas a altas temperaturas y no las coloque en lugares en
los que la temperatura pueda experimentar cambios bruscos, p. ej., cerca
de un fuente de fuego o en contacto directo con la luz solar.
• No exponga las pilas a calor radiante excesivo, no las arroje al fuego, no
las desmonte y no intente recargar pilas no recargables, ya que podrían
producirse fugas o explotar.
2. Para evitar el deterioro o daño de la batería
• No deje caer la batería ni la someta a golpes fuertes.
3. Para garantizar una larga vida útil de la batería
• No descargue completamente.
Cómo retirar la batería para su eliminación
RIESGO DE LESIONES. PÓNGASE GUANTES AL TRABAJAR!
La batería debe retirarse únicamente en un centro de servicio
autorizado.
1. Retire con cuidado la rejilla de metal de la parte frontal de la unidad
liberándola con ayuda de un destornillador de cabeza plana.
2. Extraiga las siete tapas de goma de los tornillos de la parte frontal ydes-
atornille los tornillos con un destornillador de estrella.
3. Retire el tornillo situado en la parte inferior de la mitad frontal de la
carcasa.
4. Abra la carcasa principal.
5. Busque la placa de circuitos en la parte posterior de la carcasa.
6. Extraiga los cuatro tornillos situados en las esquinas de la placa del cir-
cuito que lo sujetan en su sitio. Levante la placa de circuito con cuidado.
7. Desconecte el conector del paquete de baterías de la placa de circuito.
8. Extraiga con cuidado el paquete de baterías de la placa del circuito
despegando la almohadilla adhesiva que lo sujeta en su sitio.
Eliminación de este equipo y las pilas
• No elimine este producto o sus pilas como residuos urba-
nos no clasi cados. Entréguelos en un punto de recogida
designado para el reciclado de aparatos electrónicos
y eléctricos de acuerdo con la ley local. De esta forma,
ayudará a conservar los recursos y a proteger el medio
ambiente.
• La mayor parte de los países de UE regulan la eliminación de las pilas
mediante leyes. Póngase en contacto con su distribuidor y con las autori-
dades locales para obtener más información.
• Se incluye el símbolo anterior en el equipo eléctrico y electrónico, y las
baterías (o el embalaje) para recordar a los usuarios de esta circunstan-
cia. Si aparece "Hg" o "Pb" debajo del símbolo, eso signi ca que las pilas
contienen trazas de mercurio (Hg) o plomo (Pb), respectivamente.
• Se solicita a los usuarios que utilicen las instalaciones de devolución
existentes para equipos usados.
Declaración CE:
• Por la presente, Universal Media Corporation sp. z o.o. declara que este
dispositivo sonoro cumple los requisitos esenciales y otras disposiciones
pertinentes de la Directiva RED 2014/53/UE. El texto completo de la de-
claración de conformidad de la UE está disponible en el siguiente enlace
https://www.sharpconsumer.eu/documents-of-conformity/

ESES
Contenido de la caja
1 PS-919
1 Adaptador de corriente
1 Enchufe de CA (EU) para el adaptador de corriente
1 Enchufe de CA (UK) para el adaptador de corriente
1 Manual de instrucciones
1 Guía de inicio rápido
1Tarjeta de garantía
Paneles y controles
1
2
3
4
10
11
5
6
7
8
9
VISTA SUPERIOR
1. Botón : pulse este botón para encender la unidad. Púlselo de forma
prolongada para apagar la unidad.
2. Botón : una pulsación breve cambia el modo de iluminación frontal
Una pulsación larga (2 seg.) cambia el modo de iluminación lateral
Una pulsación larga (4 seg.) apaga todas las luces
3. Botón
: una pulsación breve alterna entre los modos envolvente
grave y 3D:
A. Graves apagado, 3D apagado: el LED naranja está apagado
B. Graves encendido, 3D apagado: el LED naranja brilla continuamente
C. Graves apagado, 3D encendido: el LED naranja parpadea
lentamente
Una pulsación larga del botón apagará ambos modos: Graves
apagado, 3D apagado
4. Botón
: pulse este botón para subir el volumen de reproducción.
Pulse de forma prolongada para saltar a la pista de reproducción
siguiente.
5. Botón SOURCE: pulse repetidamente para cambiar el modo de
reproducción: Bluetooth, AUX y USB. Una pulsación larga del botón
activará la función TWS/Modo Duo.
Tenga en cuenta que el modo USB solo se puede seleccionar si se
conecta una memoria USB a la unidad.
6. Botón
: pulse este botón para reproducir o poner en pausa la
reproducción. Una pulsación larga de este botón desconectará la
conexión Bluetooth.
7. Botón
: pulse este botón para bajar el volumen de reproducción.
Pulse de forma prolongada para saltar a la pista de reproducción
anterior.
8. INDICADOR DE FUENTE: cambie al modo Bluetooth; la luz azul se
encenderá y empezará a parpadear cuando se empareja. Una vez
completado el emparejamiento, la luz azul dejará de parpadear.
Cambio a modo USB: la luz azul parpadea rápidamente tres veces y,
luego, se apaga; dos segundos después, parpadea tres veces, yasí
sucesivamente. Cambio al modo AUX: la luz azul parpadea de forma
lenta y continua.
9. INDIADORES DEL ESTADO DE LA BATERÍA
10. Indicación de 3D/Graves: cuando la función de graves está apagada
y la función 3D está apagada, el LED no brilla.
Cuando la función de graves está encendida y la función 3D está
apagada, el LED de color naranja brilla de forma continua.
Cuando la función de graves está apagada y la función 3D está
encendida, el LED de color naranja parpadea de forma lenta.
11. INDICADOR DE RECARGA: cuando el cargado está conectado, se
enciende la luz roja. Cuando el dispositivo está totalmente cargado, la
luz roja de apaga.
1
2
3
VISTA POSTERIOR
1. DC 18V: puerto de entrada del adaptador de carga CA.
2. PUERTO USB: el puerto USB 2.0 permite las funciones de
reproducción y la carga. Lea archivos de audio en formato MP3
almacenados en un dispositivo USB con capacidad para hasta 32GB
(FAT32) O cargue su dispositivo móvil a través del puerto USB 5V/1A.
3. Conector de entrada AUX: permite conectar el cable de audio de
3,5mm para disfrutar de música de audio externa.
Instrucciones de uso
Carga del altavoz
Este altavoz utiliza baterías integradas. Antes de utilizarlo, cargue las
baterías mediante la conexión del adaptador de CA.
Conecte el adaptador de corriente de CA (suministrado) al puerto de
entrada DC18V situado en la parte posterior de la unidad y, luego, a la
toma de corriente.
DC 18V
PRECAUCIÓN: Utilice únicamente el adaptador de CA suministrado con el
dispositivo. Solamente debe utilizar el adaptador suministrado. Si no utiliza
este adaptador, no existirá carga disponible o el tiempo de carga puede variar.
Y el dispositivo puede verse dañado.
Encendido del dispositivo
Pulse el botón de encendido/apagado situado en el panel superior de la
unidad
para encenderla.
La primera vez que lo utilice el indicador de fuente parpadeará en color
azul para indicar que la unidad se encuentra en modo de emparejamiento.
CONSEJO:
Para activar o desactivar los mensajes de voz, mantenga pulsado el
botón SOURCE durante tres segundos mientras se enciende la unidad.

16
Cuando vuelva a encender el altavoz tras con gurar el modo Bluetooth,
la unidad buscará dispositivos previamente emparejados. Una vez encon-
trado, se emparejará con el dispositivo automáticamente.
Apagado del altavoz
Pulse el botón de encendido/apagado para apagar la unidad.
Tras 15 minutos sin actividad o conexión, la unidad se apagará
automáticamente para conservar la batería.
Conexión Bluetooth
1. Pulse el botón SOURCE varias veces para entrar en modo Bluetooth. La
unidad indicará «Bluetooth».
2. Asegúrese de que la unidad está en modo de emparejamiento (luz
azul intermitente).
3. Active el modo Bluetooth en su dispositivo para emparejarlo con
la unidad. Seleccione «Sharp PS-919» en la lista de dispositivos
disponibles (introduzca la contraseña «0000» si fuera necesario) para
iniciar el emparejamiento y la conexión con la unidad.
4. Tras establecer conexión, el indicador de fuente lucirá en color azul
y se oirá un mensaje sonoro indicando la conexión («Connected»)
(Conectado).
5. Esta unidad es compatible con el asistente de voz de su dispositivo
inteligente.
NOTAS:
Este altavoz admite una conexión automática con un dispositivo previa-
mente emparejado tras apagar y encender de nuevo la unidad.
Si desea emparejar la unidad con un dispositivo Bluetooth nuevo, debe
desconectar el dispositivo emparejado.
Para desconectar la conexión Bluetooth, pulse de forma prolongada el
botón
. O bien desactive la función Bluetooth del dispositivo. El dispo-
sitivo indicará de forma sonora «disconected» (desconectado).
Conectar dos unidades PS-919 a través de
Bluetooth (TWS)
Auténtico estéreo inalámbrico (TWS) - Modo Duo
• Esta función permite conectar dos unidades PS-919 como altavoces
izquierdo y derecho para disfrutar una auténtica experiencia estéreo. El
primer altavoz conectado es el principal y el segundo es el esclavo.
• Mantenga pulsados los boton SOURCE del segundo altavoz hasta que
el altavoz diga «Duo Mode pairing» (Emparejamiento en modo Duo) y
libere los botones.
• Espere hasta que dos altavoces digan «Duo Mode connected» (Modo
duo conectado). Los altavoces están ahora conectados entre sí.
• Empareje el altavoz maestro con su teléfono.
• Para un emparejamiento Bluetooth a un dispositivo inteligente de salida
Bluetooth, busque «SHARP PS-919» en el dispositivo y empareje.
• En Modo duo, si apaga un altavoz, ambos altavoces se apagarán.
• Debe encender los altavoces individualmente.
• Cuando ambos altavoces están encendidos, el Modo duo se reconectará
automáticamente y se oirá «Duo Mode connected» (Modo duo conec-
tado).
• Para desconectar el Modo duo, mantenga pulsado el botón SOURCE en
el altavoz esclavo hasta que oiga «Duo Mode disconnected» (Modo duo
conectado).
NOTAS:
Se tarda un minuto en conectar el modo Duo.
En el modo Duo no se pueden emparejar varios teléfonos. El altavoz
maestro se conecta a un único dispositivo Bluetooth.
En el modo Duo solo puede conectar el altavoz maestro con el dispositi-
vos Bluetooth.
Para cambiar el dispositivo Bluetooth a modo Duo, mantenga pulsado
en la unidad maestra durante tres segundos para desconectar el dis-
positivo Bluetooth actual y conectarlo al dispositivo Bluetooth deseado.
Cuando conecta un dispositivo Bluetooth (un dispositivo iOS, etc.) a esta
unidad o utiliza el dispositivo, el nivel de volumen puede sincronizarse
entre ambos dispositivos.
En el modo Duo las funciones de los botones
, y se sincroni-
zarán con dos altavoces.
En el modo Duo reduzca al mínimo la distancia entre los altavoces.
Dependiendo del modo de red, el modo Duo puede no funcionar
correctamente.
Cuando se activa el modo Duo, algunos teléfonos móviles (p.ej., los
dispositivos con compatibilidad AptX HD) realizan una breve pausa antes
de reproducir música.
Algunos teléfonos móviles puede no reproducir música correctamente si
intenta conectar el modo Duo durante la reproducción.
Restablecer la conexión en modo Duo: para desconectar el modo Duo,
pulse de forma prolongada en botón SOURCE en el altavoz esclavo hasta
que oiga «Duo Mode disconnected» (Modo Duo conectado). La conexión
se restablece.
Escuchar música desde un dispositivo externo
Esta unidad puede usarse para escuchar música procedente de distintos
tipos de dispositivo externos.
1. Conecte un dispositivo de audio auxiliar a la unidad a través del
puerto de entrada de audio de 3,5mm.
2. Pulse el botón SOURCE varias veces para cambiar al modo AUX. La luz
azul parpadea lentamente en el modo AUX.
3. Reproduzca y controle la música en el dispositivo de audio y utilice los
botones
y de la unidad para ajustar el volumen.
Reproducción y carga a través de USB
El puerto USB situado en la parte posterior de la unidad permite reproducir
y cargar.
1. Inserte la unidad USB en la ranura USB en la parte posterior de la
unidad.
2. La unidad entrará en modo USB automáticamente.
3. La unidad empezará a reproducir canciones desde el USB de manera
inmediata.
NOTAS:
El modo USB solo está disponible cuando se enchufa un dispositivo USB.
Se admiten memorias USB de hasta 32GB.
Se admiten los formatos de audio MP3
4. Los dispositivos móviles pueden cargarse a través del puerto USB.
Ajuste de los efectos de luz
1. Pulse brevemente el botón situado en el panel superior de la unidad
para cambiar el modo de parpadeo de la luz central. Existen cuatro
efectos de parpadeo:
Colores parpadeando gradualmente
Parpadeo dinámico: las luces parpadean con la música
Parpadeo multicolor en rotación
Parpadeo monocromo en rotación
2. Pulsación larga (2 seg.): cambia el modo de luz lateral
3. Pulsación larga (4 seg): apaga todas las luces

ESES
Especi cación técnica
Modelo PS-919
Potencia de salida 2 x 18W + 36W RMS (10% THD)
Consumo máximo de potencia: 19W
Potencia máxima total de salida 130W
Respuesta de frecuencia
70Hz
- 12kHz
Batería
Paquete integrado de 4 baterías de
ion litio de 2600mAh, 37,44Wh
Temperatura de funcionamiento De 5 °C a 35 °C
Humedad de funcionamiento Entre el 5 y el 60 %
Impermeable IPX5
Bluetooth
Versión V 5.0
Potencia máxima transmitida Menos de 20 dBm
Bandas de frecuencia 2402 MHz ~ 2480 MHz
Adaptador de corriente
Nombre del modelo: HP24E-1801000-D
Entrada 100-240V ~ 50/60Hz, 0,8A máx
Salida CC 18V/ 1000mA
Fabricante
DONGGUAN HP-POWER TECHNOLOGY.,
LIMITED
NO.8, Shui Lin Road, TangXia
Town, 523710 DongGuan City,
Guang Dong Province, China
Notas: Los diseños y las especi caciones están sujetos a cambio sin previo
aviso.
230mm
224mm 220 mm
2,7kg

18
IT
Importanti istruzioni di sicurezza
ATTENZIONE
RISCHIO DI SCOSSA ELETTRICA
NON APRIRE
Vi preghiamo di leggere queste istruzioni di
sicurezza e di rispettare le seguenti avvertenze
prima di mettere in funzione l'apparecchio:
Il simbolo del fulmine con una punta di freccia in un triangolo
equilatero serve ad avvertire la presenza di un voltaggio
pericoloso non isolato all’interno del prodotto di un livello
su ciente a comportare il rischio di shock elettrico per una
persona.
Il punto esclamativo in un triangolo equilatero serve ad
avvertire la presenza di importanti istruzioni operative e
di manutenzione nella documentazione che accompagna
l’apparecchio.
Usare esclusivamente gli alimentatori elencati nel manuale
utente
Questo simbolo signi ca che il prodotto deve essere smaltito
in modo rispettoso dell'ambiente, non insieme ai ri uti
domestici.
Tensione AC
Tensione DC
Apparecchiatura di Classe II
Solo per uso interno
Classi cazione di e cienza energetica livello VI
Polarità del connettore di corrente d.c.
Per evitare incendi, tenete
sempre lontane dall’apparecchio
candele e qualunque
altro tipo di amma.
Avvertenza:
• Seguire sempre le precauzioni di sicurezza basilari quando si utilizza
questo apparecchio, specialmente in presenza di bambini.
• I bambini dovrebbero essere supervisionati per assicurarsi che non
giochino con l’apparecchio.
• Non danneggiare il cavo di alimentazione, né riporvi sopra oggetti
pesanti, tirarlo o piegarlo. Inoltre, non utilizzare prolunghe. Danni al cavo
di alimentazione potrebbero causare incendi o shock elettrici.
• Se il cavo di alimentazione è danneggiato, deve essere sostituito dal
produttore, da un agente di servizio o da persone altrettanto quali cate,
in modo da evitare pericoli.
• Assicurarsi che l’unità sia connessa a una presa di corrente CA 220-240V
50Hz. Usare un voltaggio superiore può provocare un malfunzionamen-
to dell’unità e persino la formazione di amme.
• Non forzare la spina se non si inserisce correttamente nella presa.
• Spegnere completamente l’unità prima di disconnetterla
dall’alimentazione.
• Non disconnettere o connettere il cavo di alimentazione con le mani
bagnate. Può provocare uno shock elettrico.
• NOTA: per disconnettere completamente il sistema quando non verrà
usato per molto tempo, rimuovere la spina di alimentazione AC dalla
presa sulla parete.
• Assicurarsi che la presa di corrente sia sempre facilmente accessibile.
• Questo prodotto non ha componenti che possano essere riparate
dall'utente. In caso di guasto, contattate il produttore o l'agente di ser-
vizio autorizzato. Esporre le parti interne al dispositivo può comportare
un pericolo di vita. La garanzia non copre danni causati da riparazioni
e ettuate da terze parti non autorizzate.
• Non utilizzare questo prodotto immediatamente dopo averlo rimosso
dall’imballaggio. Attendere che si riscaldi no a temperatura ambiente
prima di usarlo.
• Assicurarsi di usare questo prodotto soltanto in un clima temperato (non
in ambienti tropicali o subtropicali).
• Collocare il prodotto su una super cie piana e stabile in modo che non
sia sottoposto a vibrazioni.
• Assicurarsi che il prodotto e le sue parti non pendino dal bordo del
mobilio di supporto.
• Per ridurre il rischio di incendi, shock elettrici o danni al prodotto, non
esporlo direttamente a luce del sole, polvere, pioggia o umidità. Non
esporlo mai a gocciolamenti e schizzi d’acqua e non collocare oggetti
contenenti liquidi sopra o vicino a esso.
• Non collocare oggetti pieni di liquidi, come vasi, sull’apparecchio.
• Non installarlo vicino a fonti di calore come termosifoni, griglie di
ventilazione, stufe o altri apparecchi (inclusi ampli catori) che generano
calore.
• Non collocare il prodotto in punti con elevata umidità e scarsa ventilazio-
ne.
• Non montare questo prodotto su pareti o tetti.
• Non collocare l'unità vicino televisori, altoparlanti e altri oggetti che
generano forti campi magnetici.
• Non lasciare incustodita l'unità quando è in uso.
• Consentire almeno 30 cm di distanza dalla parte posteriore e superiore
dell'unità e 5 cm da ciascun lato. Non ostruire le aperture per la ventila-
zione del prodotto. Assicurarsi che le aperture per la ventilazione siano
sgombere da oggetti come giornali, tovaglie, tendaggi ecc.
• MAI lasciare che qualcuno, specialmente un bambino, inserisca qualcosa
nei fori e nelle aperture dell’involucro dell’unità, in quanto ciò potrebbe
risultare in uno shock elettrico fatale.
• I temporali sono pericolosi per gli apparecchi elettronici. Se i cavi della
rete elettrica o l'antenna vengono colpiti da un fulmine, l'apparecchio
potrebbe risultarne danneggiato, anche se spento. E' opportuno scolle-
gare tutti i cavi e i connettori dell'apparecchio prima di un temporale.
• Un’eccessiva pressione sonora da cu e o auricolari può causare danni
all’udito.
Manutenzione
• Disconnetti il cavo di alimentazione dalla presa elettrica prima di pulire
l’apparecchio.
• Usare un panno morbido e pulito per pulire l’esterno dell’unità. Non
pulire con agenti chimici e detergenti.
Adattatore di corrente
• Per disconnettere l'unità dall'alimentatore, disconnettere il cavo dalla
presa di corrente.
• Usare solo l'adattatore fornitore perché non fare ciò potrebbe mettere a
rischio la sicurezza e/o danneggiare l'unità.
Cura della batteria incorporata
• Il prodotto è alimentato da una batteria ricaricabile incorporata.
• La batteria può essere caricata e scaricata centinaia di volte, ma è
soggetto a usura.
• Disconnettere il caricare dalla presa elettrica e dal prodotto quando non
è in uso.
• Non lasciare una batteria completamente carica connessa a un caricato-
re, poiché un caricamento eccessivo ne potrebbe ridurre la vita utile.

IT
• Se non è utilizzata, una batteria completamente carica perderà la propria
carica nel corso del tempo.
• Lasciare il prodotto in luoghi freddi o caldi, come un'automobile chiusa
in estate o inverno, ridurrà la capacità e la durata della batteria.
• Cercare sempre di mantenere il dispositivo in un ambiente fresco e privo
di umidità a meno di 32°C.
• Un prodotto con una batteria calda o fredda potrebbe non funzionare
temporaneamente, anche se la batteria è completamente carica. Le
prestazioni della batteria sono particolarmente limitate in temperatura
inferiori a quelle di congelamento.
• Se si prevede di conservare il proprio dispositivo per più di sei mesi, rica-
ricare la batteria al 50% ogni sei mesi per mantenerla fresca. Conservare
il dispositivo a temperature tra 5°C e 20°C.
Avvertenza sulla batteria!
• La batteria usata in questo prodotto potrebbe presentare rischio
d'incendio se non trattata correttamente.
• Non cercare di aprire il prodotto o sostituire la batteria. È incorporata
e non sostituibile. L'uso di altre batterie potrebbe potrebbe presentare
rischio d'incendio o esplosione o e la garanzia sarà terminata.
• Smaltire la batteria seguendo le normative locali. Riciclare quando pos-
sibile. Non smaltire come ri uto domestico o nel fuoco poiché potrebbe
esplodere.
• Le batterie potrebbero esplodere se danneggiate.
• Ricaricare la batteria usando il caricatore in dotazione o nelle condizioni
di ricarica speci cate nel manuale di istruzioni. Ricaricare la batteria in
ogni altra condizione potrebbe causare il surriscaldamento, emissione di
gas idrogeno, perdite, incendi, o esplosioni.
ATTENZIONE!
1. Importanti considerazioni sulla sicurezza
• Non esporre le batterie ad alte temperature e non riporle in posti in cui
la temperatura possa aumentare velocemente, per esempio vicino a una
amma o alla luce diretta del sole.
• Non esporre le batterie a un eccessivo calore radiante, non gettarle nel
fuoco, non smontarle e non cercare di ricaricarle se non sono ricaricabili.
Potrebbero avere perdite o esplodere.
2. Per prevenire il deterioramento o danni alla batteria
• Non lasciare cadere o sottoporre a shock sici.
3. Per garantire una durata elevata della batteria
• Non scaricare completamente.
Come rimuovere la batteria per lo smaltimento
RISCHIO DI LESIONI. INDOSSARE GUANTI QUANDO SI LAVORA!
La batteria dovrebbe essere rimossa da un centro assistenza Sharp
autorizzato. In caso contrario, verranno invalidate la garanzia.
1. Rimuovere la griglia di metallo dell'altoparlante davanti all'unità facendo
delicatamente leva con un cacciavite a punta piatta.
2. Rimuovere le sette coperture di gomma delle viti davanti all'unità e svita-
re le viti usando un cacciavite Philips.
3. Rimuovere 1 vite dal fondo della metà anteriore dell'incasso.
4. Aprire l'incasso principale.
5. Localizzare la scheda del circuito nella parte posteriore dell'incasso.
6. Rimuovere le 4 viti agli angoli del circuito che lo ssano al suo posto.
Sollevare la scheda del circuito con delicatezza.
7. Disconnettere il connettore dello scompartimento della batteria dalla
scheda del circuito.
8. Tirare via gentilmente lo scompartimento dalla scheda del circuito
staccando il cuscinetto adesivo che lo tiene fermo.
Smaltimento dell’apparecchio e delle batterie
• Non smaltire questo prodotto insieme a ri uti non dif-
ferenziati. Riconsegnarlo in un punto di raccolta apposito
per il RAEE (Riciclaggio di Apparecchiature Elettriche ed
Elettroniche). Così facendo, contribuirete alla conservazi-
one delle risorse e alla protezione dell'ambiente.
• La maggior parte dei paesi dell'UE regola lo smaltimento delle batterie
a norma di legge. Contattare il fornitore o le autorità locali per ulteriori
informazioni.
• I simboli mostrati in alto appaiono su apparecchi elettrici ed elettronici
e batterie (o sulla relativa confezione) come promemoria per gli utenti.
La presenza di “Hg” o ‘Pb’ sotto il simbolo indica la presenza di tracce di
mercurio (Hg) o piombo (Pb).
• Gli utenti sono tenuti a utilizzare le strutture adeguate per lo smalti-
mento di apparecchi e batterie.
Dichiarazione CE:
• Con la presente, Universal Media Corporation sp. z o.o. dichiara che
questo dispositivo audio soddisfa i requisiti essenziali e le altre dispo-
sizioni rilevanti della direttiva RED 2014/53/UE. Il testo completo della
Dichiarazione di conformità UE è disponibile al link seguente https://
www.sharpconsumer.eu/documents-of-conformity/

20
IT
Cosa è compreso nella confezione
1 x PS-919
1 x Alimentatore
1 x Spina CA UE per l'alimentatore
1 x Spina CA UK per l'alimentatore
1 x Manuale utente
1 x Guida di avvio rapido
1 x Carta di garanzia
Pannelli e controlli
1
2
3
4
10
11
5
6
7
8
9
VISUALE DALL'ALTO
1. Pulsante – Premere il pulsante per accendere l'unità. Tenere
premuto per spegnere l'unità.
2. Pulsante – Pressione breve: cambia la modalità delle luci frontali
Pressione lunga (2 sec): cambia la modalità delle luci laterali
Pressione ancora più lunga (4 sec): spegne le luci
3. Pulsante
– Premere brevemente il pulsante per cambiare modalità
tra Bass e Surround 3D:
A. Bass On, 3D O - il LED arancione è spento
B. Bass On, 3D O - il LED arancione è illuminato sso
C. Bass O , 3D On - il LED arancione lampeggia lentamente
Una pressione prolungata spegnerà entrambe le modalità: Bass O ,
3D O .
4. Pulsante
– Premere il pulsante per aumentare il volume. Tenere
premuto a lungo per passare alla traccia successiva.
5. Pulsante SOURCE – Premere ripetutamente per cambiare modalità
di riproduzione: Bluetooth, AUX, USB. Una pressione prolungata del
pulsante attiverà la funzionalità TWS/Duo mode.
Nota: la modalità USB può essere selezionata solo se una memoria USB
è collegata all'unità.
6. Pulsante
– Premere il pulsante per avviare o mettere in pausa la
riproduzione. Una pressione prolungata del pulsante interromperà la
connessione Bluetooth.
7. Pulsante
– Premere il pulsante per abbassare il volume. Tenere
premuto a lungo per passare alla traccia precedente.
8. SPIA SOURCE (SORGENTE) – Passa in modalità Bluetooth, la luce blu
si accende e inizia a lampeggiare quando è in corso l'accoppiamento.
Una volta completato l'accoppiamento, la luce blu smette di
lampeggiare. Passando in modalità USB, la luce blu lampeggia
rapidamente tre volte, poi si spegne, poi lampeggia nuovamente tre
volte due secondi dopo e così via. Passando in modalità AUX, la luce
blu lampeggia lentamente e continuamente.
9. SPIE STATO BATTERIA
10. Indicatore 3D/Bass – Quando Bass è spento e Surround 3d è spento,
il LED è spento.
Quando Bass è acceso e Surround 3D è spento, il LED è acceso
costantemente.
Quando Bass è spento e Surround 3D è acceso, il LED lampeggia
lentamente.
11. SPIA RICARICA – Quando il caricabatterie è connesso, la luce rossa
si accende. Quando il dispositivo è pienamente carico, la luce rossa
si spegne.
1
2
3
VISUALE POSTERIORE
1. DC 18V – Porta di ingresso per l'adattatore CA.
2. Ingresso USB – L'ingresso USB 2.0 supporta riproduzione e ricarica.
Legge le audio in formato MP3 nella memoria USB con capacità no
a 32GB (FAT32). Oppure è possibile caricare un dispositivo mobile
attraverso la porta USB 5V/1A.
3. Jack AUX IN – Connettere un cavo audio da 3,5mm per utilizzare una
sorgente audio esterna.
Istruzioni d'uso
Ricaricare l'altoparlante
Questo altoparlante utilizza batterie integrate. Prima dell'utilizzo, ricaricare
le batteria connettendo l'alimentatore CA.
Connettere l'alimentatore CA (fornito) all'ingresso DC 18V sul retro
dell'unità e poi alla presa di corrente.
DC 18V
ATTENZIONE: usare solo l'alimentatore CA fornito con questo dispositivo.
Usare solo l'alimentatore in dotazione. Usandone un altro, la ricarica può non
funzionare o richiedere una quantità diversa di tempo. Potrebbero inoltre
veri carsi danni al dispositivo.
Accendere l'altoparlante
Premere il pulsante di ACCENSIONE sul pannello superiore dell'unità
per accenderla.
Al primo uso, la spia della sorgente lampeggia di blu, indicando che l'unità
è in modalità accoppiamento.
SUGGERIMENTI:
Per disattivare o attivare i messaggi vocali, premere e tenere premuto il
pulsante SOURCE per 3 secondi durante l'operazione di accensione.
Quando l'altoparlante viene nuovamente acceso dopo la con gurazione
del Bluetooth, l'unità cercherà il dispositivo accoppiato precedentemente.
Una volta trovato, accoppierà automaticamente il dispositivo.
Spegnere l'altoparlante
Premere il pulsante di ACCENSIONE per spegnere l'unità.
Strona się ładuje...
Strona się ładuje...
Strona się ładuje...
Strona się ładuje...
Strona się ładuje...
Strona się ładuje...
Strona się ładuje...
Strona się ładuje...
Strona się ładuje...
Strona się ładuje...
Strona się ładuje...
Strona się ładuje...
Strona się ładuje...
Strona się ładuje...
Strona się ładuje...
Strona się ładuje...
-
 1
1
-
 2
2
-
 3
3
-
 4
4
-
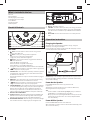 5
5
-
 6
6
-
 7
7
-
 8
8
-
 9
9
-
 10
10
-
 11
11
-
 12
12
-
 13
13
-
 14
14
-
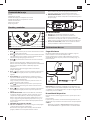 15
15
-
 16
16
-
 17
17
-
 18
18
-
 19
19
-
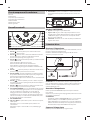 20
20
-
 21
21
-
 22
22
-
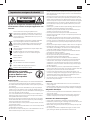 23
23
-
 24
24
-
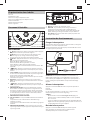 25
25
-
 26
26
-
 27
27
-
 28
28
-
 29
29
-
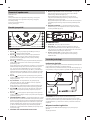 30
30
-
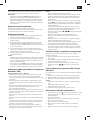 31
31
-
 32
32
-
 33
33
-
 34
34
-
 35
35
-
 36
36


Sharp PS-919(BK) Instrukcja obsługi
- Kategoria
- Przenośne głośniki
- Typ
- Instrukcja obsługi
w innych językach
- español: Sharp PS-919(BK) El manual del propietario
- italiano: Sharp PS-919(BK) Manuale del proprietario
- Deutsch: Sharp PS-919(BK) Bedienungsanleitung
- français: Sharp PS-919(BK) Le manuel du propriétaire
- English: Sharp PS-919(BK) Owner's manual
Powiązane artykuły
Inne dokumenty
-
Samsung EO-SG510 Instrukcja obsługi
-
Silvercrest SBL TW9 A1 Operation and Safety Notes
-
Clatronic BSS 7014 Instrukcja obsługi
-
-
Silvercrest XL Series Operating Instructions And Safety Instructions
-
Bigben PARTYBTHPLH Instrukcja obsługi
-
Microlab MD 312 Instrukcja obsługi
-
ECG BTS K1 Instrukcja obsługi
-
-
Bowers & Wilkins T7 Instrukcja obsługi