Breville BARISTA MAX VCF126X01 Instrukcja obsługi
- Kategoria
- Ekspresy do kawy
- Typ
- Instrukcja obsługi

Breville Barista Max
Espresso Machine With
Integrated Grinder
VCF126X
VCF126X_20MLM1 (EMEA).indd 1VCF126X_20MLM1 (EMEA).indd 1 4/23/20 16:294/23/20 16:29

2
3
EN
Instructions for Use .................................................................................................. 4
FR
Instructions ............................................................................................................. 33
PL
Instrukcja użytkowania ........................................................................................... 67
DE
Bedienungsanleitung ............................................................................................ 103
NL
Gebruiksaanwijzing .............................................................................................. 135
SV
Bruksanvisning ..................................................................................................... 171
ES
Instrucciones de uso ............................................................................................ 201
RO
Instrucţiuni de utilizare .......................................................................................... 237
1422
20
18 16 12
10
8
D
I
S
C
F
O
R
C
L
E
A
N
I
N
G
T
A
B
L
E
T
U
S
E
T
H
I
S
S
I
D
E
U
P
A
C
B
E
D
F
G
M
J
K
L
H
I
S
BARISTA MAX
MANUAL SHOT
TAP & GO
GRINDER
CLEAN
GRINDER
S
P
R
S
O
N
Q
VCF126X_20MLM1 (EMEA).indd 2-3VCF126X_20MLM1 (EMEA).indd 2-3 4/23/20 16:294/23/20 16:29

4
5
intended use. Injury could
occur from misuse.
• Do not immerse the
appliance or power cord
and plug in water or any
other liquid. Wash the
following 10 parts in warm
water with a mild detergent;
milk jug, drip tray grill,
one cup and two cup lter
baskets, group handle/
portalter, drip tray, tamper,
top burr, bean hopper and
water reservoir. Rinse and
dry each part thoroughly
before replacing. Wipe the
steam wand with a damp
cloth. See Care & Cleaning
section for full details.
• This appliance is intended
to be used in household
and similar applications
such as: staff kitchen areas
in shops, ofces and other
working environments; farm
houses; by clients in hotels,
motels and other residential
type environments; bed and
breakfast type environments.
• This appliance can be used
by children aged 8 years
and above and persons with
reduced physical, sensory
or mental capabilities or lack
of experience if they have
been given supervision or
instruction concerning use
of the appliance in a safe
way and understand the
hazards involved. Cleaning
and maintenance shall
not be made by children
unless they are older than
8 and supervised. Keep the
appliance and its cord out of
reach of children aged less
than 8 years. Children shall
not play with the appliance.
• Always place the unit on a
at, level surface.
• Do not operate without water
in reservoir. Fill reservoir with
only clean and cold water.
Observe the maximum lling
volume is 2 litres.
• Do not allow the Power Cord
to come into contact with
the hot parts of the espresso
machine, including the Cup
Warming Plate and the Steam
& Hot Water Wand.
• Do not operate this appliance
with a damaged cord or plug
or if the appliance has been
damaged in any manner. If
the supply cord is damaged
it must be replaced by the
manufacturer, its service
agent or similarly qualied
persons in order to avoid a
hazard.
• Appliances are not intended
to be operated by means of
an external timer or separate
remote control system.
Breville is very safety
conscious when designing
and manufacturing consumer
products, but it is essential
that the product user also
exercise care when using an
electrical appliance. Listed
below are precautions which
are essential for the safe use
of an electrical appliance:
BREVILLE’S SAFETY
PRECAUTIONS
SAFETY PRECAUTIONS FOR
YOUR BREVILLE ESPRESSO
MACHINE
• Read carefully and save all
the instructions provided
with an appliance.
• Do not remove the Group
Handle during the espresso
pour or water ow as the
unit is under pressure.
Removing the Group
Handle during either of
these operations can lead
to a scalding or injury.
• The Steam & Hot Water
Wand becomes very hot
during texturing milk and
water ow. This may cause
burns in case of contact,
therefore avoid any direct
contact with the wand.
• Always disconnect the plug
from the power outlet prior
to cleaning the espresso
machine or if there is any
problem during the coffee
making process.
• Do not place hands directly
under the steam, hot water
or espresso pour as this can
lead to a scalding or injury.
• The temperature of accessible
surfaces may be high when
the appliance is operating.
Even after use, the heating
element surface is subject to
residual heat after use.
• Do not use an appliance for
any purpose other than its
• Always turn the power off
at the power outlet before
you insert or remove a plug.
Remove by grasping the plug
- do not pull on the cord.
• Turn the power off and
remove the plug when the
appliance is not in use and
before cleaning.
• Always use your appliance
from a power outlet of the
voltage (A.C. only) marked
on the appliance.
• Never leave an appliance
unattended while in use.
• Do not use an appliance for
any purpose other than its
intended use.
• Do not place an appliance
on or near a hot gas ame,
electric element or on a
heated oven.
• Do not place on top of any
other appliance.
• Do not let the power cord of
an appliance hang over the
edge of a table or bench top
or touch any hot surface.
If you have any concerns
regarding the performance
and use of your appliance,
please visit the Breville
Website or contact Breville
Consumer Care - details are
on the back page. Ensure the
above safety precautions are
understood.
Do not use any accessory
not recommended by the
manufacturer as this may
result in injury or damage to
the appliance.
EN
VCF126X_20MLM1 (EMEA).indd 4-5VCF126X_20MLM1 (EMEA).indd 4-5 4/23/20 16:294/23/20 16:29

6
7
J. Group Head - 58mm Commercial
Size
The wider size allows more even
extraction of the tamped coffee grinds.
K. Group Handle/ Portalter - 58mm
Commercial Size
The wider size ensures the coffee grinds
are more evenly spread, and easier to
tamp.
L. Steam & Hot Water Wand
Ball joint movement with silicone cover,
allows movement of the Steam Wand to
desired position without burning fingers.
M. Extra Tall Cup Height
A large 105mm space for extracting coffee
directly into tall mugs & glasses.
N. Removable Top Burr
Easily removable by lifting the Burr
handles when cleaning.
O. GRINDER Light
Fully illuminated white when ready.
Flashes whilst attempting to grind to
indicate the Hopper Gates are not
completely open.
Fully illuminated red when Grinder
Motor is in protection mode.
P. Button & Light
Press button to turn on the machine.
The LIGHT will illuminate & pulse to
indicate it is heating up. The LIGHT
stays fully illuminated when ready. The
machine will automatically enter sleep
mode after 20 minutes, the LIGHT
will stop illuminating.
Q. Espresso Extraction Buttons
Button
Allows for shot volumes in addition to
one & two shot presets.
Press button to start extraction, when
desired pour volume is reached press
button again to stop.
Automatically stops after 200mL
ONE CUP Button
Pours 1 shot of espresso - 30mL
then automatically stops.
TWO CUP Button
Pours 2 shots of espresso - 60mL
then automatically stops.
R. DIAL Features & Lights
DIAL Light
Fully illuminated when ready.
Flashes when DIAL needs to be
returned to the vertical position.
Steam Light
Fully illuminated when ready to steam.
Flashes when warming up to
steam temperature & when cooling
down (purging water) to espresso
temperature.
STEAM
Use to heat & texture milk.
HOT WATER
Pours 200mL then automatically stops.
Use for long black coffee, hot drinks
such as tea, instant soups and to warm
cups prior to making espresso.
S. CLEAN Light
Fully illuminated blue when a cleaning
cycle for the Group Head & Shower
Head is required.
A. Removable Bean Hopper
The removable 250g capacity Bean
Hopper features 30 easily adjustable Grind
Settings. Turn the Hopper from coarse to
fine to adjust the Grind Setting & maximise
the taste of your espresso.
B. Illuminated Grind Area
LED illumination starts when grinding
begins. The coffee grinds are illuminated
as they are delivered directly into the Filter
Basket. The light automatically fades when
grinding is complete.
C. Tap & Go™ Grinding Cradle
The unique Tap & Go™ Grinding Cradle
holds the Group Handle to provide
seamless one-touch on-demand grinding.
This helps you to control the amount of
coffee grinds straight into the Filter Basket.
D. Accessories Storage Home
Area behind the Drip Tray, for storing the
One & Two Cup Filter Baskets, Cleaning
Disc, Cleaning Brush & Cleaning Pin.
E. Removable Drip Tray, Grill & Grind
Bin
Includes a Water Level Indicator which
floats through the Stainless Steel Grill to
indicate when the tray is full of water &
requires emptying.
A removable Grind Bin for collecting
overflowed coffee grinds, separate from
the water, is located in the Drip Tray.
Simply remove the Grind Bin & discard
grinds as required.
F. Cord Storage
Conveniently stow excess cord by pushing
the cord inside the machine to keep
benchtop tidy.
G. Non-slip Feet
The non-slip silicone feet ensure that
the Barista Max remains stable on the
benchtop during use.
H. Warming Plate with Tamper Home
Preheats cups & glasses which helps to
retain the essential characteristics of true
espresso aroma & a rich, sweet taste.
Tamper home located on the top of the
Warming Plate for convenient access &
storage.
I. Removable 2.8L Water Reservoir
Push back the lid & fill with cold water, or
remove the Water Reservoir by opening
the Lid, lifting upwards using the Handle
located inside.
FEATURES OF YOUR BREVILLE BARISTA MAX
FEATURES OF YOUR BREVILLE BARISTA MAX
58mm Tamper 460mL Milk Jug
Cleaning Disc
1422
20
18 16 12
10
8
D
I
S
C
F
O
R
C
L
E
A
N
I
N
G
T
A
B
L
E
T
U
S
E
T
H
I
S
S
I
D
E
U
P
Cleaning Brush
1422
20
18 16 12
10
8
D
I
S
C
F
O
R
C
L
E
A
N
I
N
G
T
A
B
L
E
T
U
S
E
T
H
I
S
S
I
D
E
U
P
Dual Wall
Filter Basket
Pin
Steam Wand
Tip Pin
Cleaning Pin
1422
20
18 16 12
10
8
D
I
S
C
F
O
R
C
L
E
A
N
I
N
G
T
A
B
L
E
T
U
S
E
T
H
I
S
S
I
D
E
U
P
S
BARISTA MAX
MANUAL SHOT
TAP & GO
GRINDER
CLEAN
GRINDER
S
S
BARISTA MAX
MANUAL SHOT
TAP & GO
GRINDER
CLEAN
GRINDER
S
S
BARISTA MAX
MANUAL SHOT
TAP & GO
GRINDER
CLEAN
GRINDER
S
S
BARISTA MAX
MANUAL SHOT
TAP & GO
GRINDER
CLEAN
GRINDER
S
S
BARISTA MAX
MANUAL SHOT
TAP & GO
GRINDER
CLEAN
GRINDER
S
S
BARISTA MAX
MANUAL SHOT
TAP & GO
GRINDER
CLEAN
GRINDER
S
S
BARISTA MAX
MANUAL SHOT
TAP & GO
GRINDER
CLEAN
GRINDER
S
S
BARISTA MAX
MANUAL SHOT
TAP & GO
GRINDER
CLEAN
GRINDER
S
S
BARISTA MAX
MANUAL SHOT
TAP & GO
GRINDER
CLEAN
GRINDER
S
S
BARISTA MAX
MANUAL SHOT
TAP & GO
GRINDER
CLEAN
GRINDER
S
1422
20
18 16 12
10
8
D
I
S
C
F
O
R
C
L
E
A
N
I
N
G
T
A
B
L
E
T
U
S
E
T
H
I
S
S
I
D
E
U
P
Two CupOne Cup
58mm Single Wall Filter Baskets
VCF126X_20MLM1 (EMEA).indd 6-7VCF126X_20MLM1 (EMEA).indd 6-7 4/23/20 16:294/23/20 16:29

8
9
Temp° IQ Shot Control™
Optimum temperature
The Temp° IQ Shot Control™ is an
exclusive technology developed by Breville
for your Barista Max. This 3 way system
delivers the accurate & stable water
temperature that is needed for consistently
great tasting coffee.
• Thermoblock Technology
The Thermoblock ensures fast heat
up, and precise water temperature for
the best espresso extraction & milk
steaming. Only the required amount
of water is heated for speed and
efciency. The Thermoblock heats
water so that espresso extracts at 92°C
for the optimum extraction of oils from
the tamped coffee grinds. Temperatures
above or below will result in burnt/bitter
or weak tasting espresso.
• Advanced PID Controller
The PID monitors and controls the
Thermoblock to ensure water is always
delivered to tamped coffee grinds at the
precise temperature needed.
• Gentle Pre-infusion
Small amounts of water are gently
introduced onto the tamped coffee
grinds prior to the steady ow of water,
for a richer avoured espresso.
Café 58mm
Group Head & Handle
Extract the maximum amount of flavour
The Group Head and the Group Handle
are commercial sized, 58mm, just like local
café.
• The wider size ensures the coffee
grinds are more evenly spread in the
Filter Baskets. The coffee grinds are
easier to ll, tamp and remove after
use.
• The 58mm Group Handle allows a more
even extraction of the tamped coffee
grinds, resulting in a true café tasting
coffee.
Tap&Go™
Integrated Grinder
Easy on-demand grinding
experience
• Tap&Go™ Technology
The Tap&Go™ on-demand grinding
technology developed by Breville
delivers coffee grinds directly into the
Group Handle with one touch. Simply
push down on the Group Handle to
activate the Grinder.
• Conical Burr Grinder
The integrated Grinder offers all-in-one
grinding experience. The hardened
Stainless Steel Conical Burr achieves
consistent grind particle sizes, which
minimises heat transfer & reduces
friction due to its gentle & slow rotation.
• Bean Hopper
The 250g Hopper features anti-spill
gates which prevents coffee beans
from escaping onto the benchtop when
removing. The on-board Grinder offers
all-in-one grinding experience with
Grinder integrated in the Espresso
Machine.
Auto Shot & Customisable
Volumetric Control
Right quantity of espresso in your cup
• Auto Shot is the easiest way to create
a great espresso. Press the ONE or
TWO CUP BUTTONS to pour the right
amount.
• All Extraction Buttons can be
customised to deliver the shot volumes
preferred.
Customisable
Extraction Temperature
Temperature just like you want
• The Barista Max allows water
temperature to be changed from the
recommended 92°C (in 2°C increments)
to cater for personal preferences.
58
15 BAR
58
15 BAR
58
15 BAR
58
15 BAR
58
15 BAR
MORE DETAILS ABOUT YOUR BREVILLE BARISTA MAX
Step 1. Remove Packaging
- Ensure all packaging has been removed.
Important: Remove the red plug found at
the base of the Water Reservoir.
Step 2. Position Machine
- Ensure the machine is positioned onto a
dry, stable, flat & horizontal benchtop.
Step 3. Wash & Dry Parts
- Do not immerse appliance, power cord
and plug in water or any other liquid.
Wash the parts listed below in warm
water with a mild detergent:
Stainless Steel Milk Jug
Stainless Steel One Cup Filter Basket
Stainless Steel Two Cup Filter Basket
Hardened Stainless Steel Top Burr
Water Reservoir
Group Handle
Bean Hopper
Tamper
- Rinse & allow thorough air drying.
Step 4. Place Accessories
- Accessories Storage Home behind
the Drip Tray for the Cleaning Brush
& Cleaning Pin. On the left is storage
space for nesting the Cleaning Disc,
One & Two Cup Filter Baskets.
- Insert the Grind Bin in the space
provided on the left side of the Drip Tray.
- Place the Tamper in the detail
provided on the Warming Plate.
Step 5. Insert Parts into the Grinder
• Removable Top Burr
- Using the two handles insert the Top
Burr into the Grinder Collar.
- The arrows on the Top Burr should
align to arrows on the Grinder Collar.
- When correctly seated, the Top Burr
will be flush with the surface of the
Grinder Collar.
- Place handles down, one on each side.
• Removable Bean Hopper
- Align the Hopper Guide with the red
Grinder Interlock.
- Insert Bean Hopper into the Grinder Collar.
- Lightly pushing down, turn the Bean
Hopper in a clockwise direction to lock
the Hopper into place.
- This opens the Hopper Gates (to release
coffee beans onto the Burrs). At Grind
Setting 30, Hopper Gates are fully open.
- Continue to turn the Bean Hopper in
a clockwise direction to set the Grind
Setting.
- As a starting point for espresso extraction
try Grind Setting 20.
- Fill the Bean Hopper with freshly
roasted coffee beans.
BEFORE FIRST USE OF THE BREVILLE BARISTA MAX
BARISTA MAX
GRINDER
MANUAL SHOT
CLEAN
BARISTA MAX
GRINDER
MANUAL SHOT
CLEAN
PLEASE EMPTY TRAY
WIPE COFFEE GRINDS
READY
BARISTA MAX
GRINDER
MANUAL SHOT
CLEAN
MAX
2.8 L
1 L
MIN
MAX
2.8 L
1 L
MIN
TOP BURR
GRINDER
COLLAR
GRINDER
INTERLOCK
HOPPER
GUIDE
2.TURN
3.HOPPER GATES OPEN
1. ALIGN
& INSERT
THERMOBLOCK
58MM CAFÉ GROUP HEAD
CENTRE
INSERT
INSERT
2.TURN
1. ALIGN
& INSERT
BARISTA MAX
GRINDER
MANUAL SHOT
CLEAN
BARISTA MAX
GRINDER
MANUAL SHOT
CLEAN
PLEASE EMPTY TRAY
WIPE COFFEE GRINDS
READY
BARISTA MAX
GRINDER
MANUAL SHOT
CLEAN
MAX
2.8 L
1 L
MIN
MAX
2.8 L
1 L
MIN
TOP BURR
GRINDER
COLLAR
GRINDER
INTERLOCK
HOPPER
GUIDE
2.TURN
3.HOPPER GATES OPEN
1. ALIGN
& INSERT
THERMOBLOCK
58MM CAFÉ GROUP HEAD
CENTRE
INSERT
INSERT
2.TURN
1. ALIGN
& INSERT
VCF126X_20MLM1 (EMEA).indd 8-9VCF126X_20MLM1 (EMEA).indd 8-9 4/23/20 16:294/23/20 16:29

10
11
Step 6. Preparing to Prime Machine
Important: This priming step must be
completed prior to first use.
• Fill Water Reservoir
- Open the Lid and lift upwards using the
Handle inside.
- Fill with cold water from the tap.
- Insert the Water Reservoir into position
& close the Lid.
Note: Make sure that the Water Reservoir
is clean & free of any debris, as any fine
particles can block the water flow.
• Power
- Ensure that the Steam & Hot Water
DIAL is in the vertical position.
- Insert the Power Plug into a 230-240V
AC power outlet & switch the power on.
- Press the BUTTON to turn on the
machine.
- The LIGHT will illuminate & pulse to
indicate the Thermoblock is heating up.
- The GRINDER LIGHT will be fully
illuminated from turn on.
- When the , EXTRACTION
BUTTONS & DIAL LIGHTS are all
fully illuminated, the machine is in the
READY state for EXTRACTION & DIAL
features.
• Insert Group Handle
- Insert the Two Cup Filter Basket in the
Group Handle.
- Align the Group Handle with the
'INSERT' position located on the left of
the Group Head.
- Insert the Group Handle flat against
the Group Head, then turn the Group
Handle right all the way to the centre
position.
Note: Turning the Group Handle to the
centre position might be tight for the first
few uses.
Step 7. Prime Espresso Machine
- Press the BUTTON & water
should start flowing from the Group
Head.
- Allow water to run through until it stops.
- The machine will return to the READY
state.
Note: For the first few seconds the
Pump will make a louder than usual
noise as it begins pumping the water
through.
- Position Steam Wand over the Drip
Tray.
- Turn DIAL to .
- Allow water to run through for 20 sec.
- Return DIAL to vertical position.
- The machine will return to the READY
state.
- Now the Espresso Machine should be
thoroughly primed.
- Wash Group Handle & Filter Basket in
warm water & dry before making your
first coffee.
- If water is not flowing from the Group
Head or Steam Wand, repeat Step 7.
- If water is still not running through,
contact Breville Customer Care. Details
are on the back page.
BARISTA MAX
GRINDER
MANUAL SHOT
CLEAN
BARISTA MAX
GRINDER
MANUAL SHOT
CLEAN
PLEASE EMPTY TRAY
WIPE COFFEE GRINDS
READY
BARISTA MAX
GRINDER
MANUAL SHOT
CLEAN
MAX
2.8 L
1 L
MIN
MAX
2.8 L
1 L
MIN
TOP BURR
GRINDER
COLLAR
GRINDER
INTERLOCK
HOPPER
GUIDE
2.TURN
3.HOPPER GATES OPEN
1. ALIGN
& INSERT
THERMOBLOCK
58MM CAFÉ GROUP HEAD
CENTRE
INSERT
INSERT
2.TURN
1. ALIGN
& INSERT
BEFORE FIRST USE OF THE BREVILLE BARISTA MAX
BARISTA MAX
GRINDER
MANUAL SHOT
CLEAN
BARISTA MAX
GRINDER
MANUAL SHOT
CLEAN
PLEASE EMPTY TRAY
WIPE COFFEE GRINDS
READY
BARISTA MAX
GRINDER
MANUAL SHOT
CLEAN
MAX
2.8 L
1 L
MIN
MAX
2.8 L
1 L
MIN
TOP BURR
GRINDER
COLLAR
GRINDER
INTERLOCK
HOPPER
GUIDE
2.TURN
3.HOPPER GATES OPEN
1. ALIGN
& INSERT
THERMOBLOCK
58MM CAFÉ GROUP HEAD
CENTRE
INSERT
INSERT
2.TURN
1. ALIGN
& INSERT
BARISTA MAX
GRINDER
MANUAL SHOT
CLEAN
BARISTA MAX
GRINDER
MANUAL SHOT
CLEAN
PLEASE EMPTY TRAY
WIPE COFFEE GRINDS
READY
BARISTA MAX
GRINDER
MANUAL SHOT
CLEAN
MAX
2.8 L
1 L
MIN
MAX
2.8 L
1 L
MIN
TOP BURR
GRINDER
COLLAR
GRINDER
INTERLOCK
HOPPER
GUIDE
2.TURN
3.HOPPER GATES OPEN
1. ALIGN
& INSERT
THERMOBLOCK
58MM CAFÉ GROUP HEAD
CENTRE
INSERT
INSERT
2.TURN
1. ALIGN
& INSERT
INSERT
THERMOBLOCK
58MM CAFÉ GROUP HEAD
MAX
2.8 L
1 L
MIN
READY
S
ONE CUP
TWO CUP
OR
RETURN
1 Min
Heat Up
Quarter ll cup with hot water.
Return DIAL to vertical position.
Press
BUTTON.
Barista Tip: For best
espresso results, use ltered
water & freshly roasted
coffee beans.
Cup can be
warmed on the
top of the machine
when it is ON.
Place cup on benchtop and
position Steam Wand.
Turn DIAL to HOT WATER.
Select either:
- One Cup Filter Basket.
- Two Cup Filter Basket.
Press ON/OFF BUTTON, LIGHT
pulses
= heating up. GRINDER
LIGHT fully illuminated =
Grinder ready to use
.
Wipe Filter Basket
with a dry cloth.
Hold Group
Handle under
Group Head while
water ows.
ON/OFF, EXTRACTION BUTTONS
& DIAL LIGHTS all fully illuminated
= Espresso Machine ready to use.
1. Check Water & Beans 2. Start Up
3. Warm Cup - by Hot Water
Warming PlateOR by
4. Select Filter Baskets 5. Warm Group Head, Handle & Filter Basket
BREVILLE BARISTA MAX COFFEE MAKING GUIDE
Empty cup
after 20-30
sec.
VCF126X_20MLM1 (EMEA).indd 10-11VCF126X_20MLM1 (EMEA).indd 10-11 4/23/20 16:294/23/20 16:29

12
13
TAMP FORCE
10-15Kg
TWO CUP
ONE CUP
OR
INSERT
THERMOBLOCK
58MM CAFÉ GROUP HEAD
S
BANG
SLIDE IN
FROM ABOVE
CONICAL BURR GRINDER TEMP IQ SHOT CONTROL
WIPE COFFEE GRINDS
INTO
GRIND BIN
INSERT
2. TURN
1. ALIGN
& INSERT
THERMOBLOCK
58MM CAFÉ GROUP HEAD
CENTRE
INSERT
INSERT
1. TURN
2. REMOVE
PUSH
DOWN
11. Espresso Extraction
Group Handle
should be in the
centre position.
BREVILLE BARISTA MAX COFFEE MAKING GUIDE
Keep Group
Handle at, align,
insert & turn into
Group Head.
Press either:
-
BUTTON = 30mL shot.
-
BUTTON = 60mL shot.
- One Cup = 13-15g coffee grinds.
- Two Cup = 20-22g coffee grinds.
Evenly tamp (press) grinds to level
indicated.
Wipe away any
excess grinds to
clear edges.
Wipe fallen grinds
on the Drip Tray
into the Grind Bin.
Position cup on
Drip Tray, under
Group Handle.
Extraction
begins and will
automatically
stop.
6. Fill Coffee Grinds 7. Tamp
10. Position Cup
9. Insert Group Handle8. Wipe Excess Grinds
12. Remove Coffee Cake
Push down Group
Handle to grind
into Filter Basket.
Group Handle
will sit at,
unsupported, in the
Grinding Cradle.
Insert Group
Handle into
Grinding Cradle.
Remove spent
(used) coffee
cake from Group
Handle.
Turn Group
Handle and
remove from
Group Head.
RETURN
MAX
60-65°C60-65°C
PAUSE
FINGER
WIDTH
12
3
4°C
FILL
MAX
13. Prep Milk Jug 14. Before Texturing Milk
15. Position Steam Wand 16. Start Texturing Milk
17. Milk Texturing
Texturing makes
a smooth hissing
noise.
Check milk is
moving in a
whirlpool action.
Insert Steam Wand Arm at 12
o'clock. Tip at 3 o'clock, nger
width from edge and just below the
surface of the milk.
Some water
may come out of
the Steam Wand.
STEAM LIGHT is
ON = steam ready.
Pause steam by
returning DIAL.
Fill Jug with cold
milk just below the
bottom of the spout.
Turn DIAL to
STEAM. STEAM
LIGHT ashes =
heating up.
Barista Tip:
For best milk
texturing results,
ensure steam
has rst heated
up (STEAM
LIGHT fully ON).
You will hear the
Pump start.
Turn DIAL back to
STEAM position
to start texturing
milk.
Milk ready when
Milk Jug base is
too hot to touch
for 3 sec.
Return DIAL to
vertical position.
As milk level rises,
lower Jug to keep
Tip just below
surface.
When desired
microfoam achieved,
immerse Steam
Wand half way.
Remove Jug from
Steam Wand.
BREVILLE BARISTA MAX COFFEE MAKING GUIDE
VCF126X_20MLM1 (EMEA).indd 12-13VCF126X_20MLM1 (EMEA).indd 12-13 4/23/20 16:294/23/20 16:29

14
15
GRIND BIN
RETURN
WIPE COFFEE GRINDS
CONICAL BURR GRINDER TEMP IQ SHOT CONTROL
PLEASE EMPTY TRAY
CONICAL BURR GRINDER TEMP IQ SHOT CONTROL
KEEP DRIP TRAY IN PLACE
WHILST OPERATING MACHINE
PLEASE EMPTY TRAY
WIPE COFFEE GRINDS
KEEP IN PLACE
KEEP DRIP TRAY IN PLACE
WHILST OPERATING MACHINE
Empty coffee
grinds and wash
Grind Bin in
warm water.
BREVILLE BARISTA MAX COFFEE MAKING GUIDE
18. Purge & Clean Steam Wand
19. Milk Finishing Touches 20. Thermoblock Auto Purge
Pour milk in one
steady motion.
When cooling to espresso
temperature, STEAM LIGHT ashes
and water purges into Drip Tray.
Keep Drip Tray in place.
Tap Jug to
release larger air
bubbles.
Swirl Jug to blend
milk and create a
silky texture.
Return DIAL
to the vertical
position.
Wipe Steam
Wand & Tip with a
damp cloth.
Turn DIAL to HOT
WATER for 1-2
sec.
Milky water will
come out of
Steam Wand.
Barista Tip:
To keep optimum
Steam Wand
performance,
always purge &
clean the Steam
Wand after
texturing milk.
Check if Drip
Tray needs
emptying.
Remove Drip Tray
Grill and separate
Grind Bin from Drip
Tray.
Empty water from
Drip Tray and
wash in warm
water.
Wash parts with
warm water.
21. Wash Parts 22. Drip Tray Clean Up
The Barista Max features Auto Shot
Volumetric Control.
It extracts just the right amount of
espresso then automatically stops.
- Pours 1 shot of espresso = 30mL
- Pours 2 shots of espresso = 60mL
- Pours up to = 200mL
At any point during espresso extraction
you can stop the pour by pressing the
same button again.
You can adjust the default shot volumes to
suit how you like your coffee.
Note: Maximum allowed shot volumes:
BUTTON 100mL
BUTTON 200mL
BUTTON 400mL
Preparing to Customise Shot Volume(s)
• Check Water Reservoir
- Ensure there is enough water in the
Reservoir.
• Check Power
Ensure that:
- The Power Plug is inserted into the
outlet & switched on.
- The DIAL is in the vertical position.
- The machine is on and in the READY
state.
Customise - One Cup Shot Volume
- Insert One Cup Filter Basket into the
Group Handle.
- Fill with coffee grinds then tamp.
- Insert Group Handle into the Group
Head.
- Press & hold the BUTTON for 4
seconds.
- The LIGHT will ash to indicate it is
in custom mode.
- Espresso will start to pour.
- When you reach your desired 1 shot
volume, press the BUTTON.
- The espresso pour will stop.
- The machine will beep & the LIGHT
will stop ashing.
- The new espresso shot volume has
been saved.
- The machine will return to the READY
state.
ONE CUP
TWO CUP
PRESS & HOLD 4 SEC
PRESS & HOLD 4 SEC
ONE CUP
OR
TWO CUP
PRESS & HOLD 4 SEC
PRESS & HOLD TOGETHER 4 SEC
MAX
2.8 L
1 L
MIN
20-22g13-15g
CUSTOMISABLE - SHOT VOLUMES
ONE CUP
TWO CUP
PRESS & HOLD 4 SEC
PRESS & HOLD 4 SEC
ONE CUP
OR
TWO CUP
PRESS & HOLD 4 SEC
PRESS & HOLD TOGETHER 4 SEC
MAX
2.8 L
1 L
MIN
20-22g13-15g
ONE CUP
TWO CUP
PRESS & HOLD 4 SEC
PRESS & HOLD 4 SEC
ONE CUP
OR
TWO CUP
PRESS & HOLD 4 SEC
PRESS & HOLD TOGETHER 4 SEC
MAX
2.8 L
1 L
MIN
20-22g
13-15g
BARISTA MAX
GRINDER
MANUAL SHOT
CLEAN
BARISTA MAX
GRINDER
MANUAL SHOT
CLEAN
PLEASE EMPTY TRAY
WIPE COFFEE GRINDS
READY
BARISTA MAX
GRINDER
MANUAL SHOT
CLEAN
MAX
2.8 L
1 L
MIN
MAX
2.8 L
1 L
MIN
TOP BURR
GRINDER
COLLAR
GRINDER
INTERLOCK
HOPPER
GUIDE
2.TURN
3.HOPPER GATES OPEN
1. ALIGN
& INSERT
THERMOBLOCK
58MM CAFÉ GROUP HEAD
CENTRE
INSERT
INSERT
2.TURN
1. ALIGN
& INSERT
VCF126X_20MLM1 (EMEA).indd 14-15VCF126X_20MLM1 (EMEA).indd 14-15 4/23/20 16:294/23/20 16:29

16
17
CUSTOMISABLE - SHOT VOLUMES
Customise - Two Cup Shot Volume
- Insert Two Cup Filter Basket into the
Group Handle.
- Fill with coffee grinds then tamp.
- Insert Group Handle into the Group
Head.
- Press & hold the BUTTON for 4
seconds.
- The LIGHT will ash to indicate it
is custom mode.
- Espresso will start to pour.
- When you reach your desired 2 shots
volume, press the BUTTON.
- The espresso pour will stop.
- The machine will beep & the
LIGHT will stop ashing.
- The new espresso shot volume
has been saved.
- The machine will return to the READY
state.
Customise - Manual Shot Volume
- Insert your desired Filter Basket into
the Group Handle.
- Fill with coffee grinds then tamp.
- Insert Group Handle into the Group
Head.
- Press & hold the BUTTON for 4
seconds.
- The LIGHT will ash to indicate it is
in custom mode.
- Espresso will start to pour.
- When you reach your desired shot
volume, press the BUTTON.
- The espresso pour will stop.
- The machine will beep & the LIGHT
will stop ashing.
- The new espresso volume has been
saved.
- The machine will return to the READY
state.
ONE CUP
TWO CUP
PRESS & HOLD 4 SEC
PRESS & HOLD 4 SEC
ONE CUP
OR
TWO CUP
PRESS & HOLD 4 SEC
PRESS & HOLD TOGETHER 4 SEC
MAX
2.8 L
1 L
MIN
20-22g13-15g
ONE CUP
TWO CUP
PRESS & HOLD 4 SEC
PRESS & HOLD 4 SEC
ONE CUP
OR
TWO CUP
PRESS & HOLD 4 SEC
PRESS & HOLD TOGETHER 4 SEC
MAX
2.8 L
1 L
MIN
20-22g13-15g
ONE CUP
TWO CUP
PRESS & HOLD 4 SEC
PRESS & HOLD 4 SEC
ONE CUP
OR
TWO CUP
PRESS & HOLD 4 SEC
PRESS & HOLD TOGETHER 4 SEC
MAX
2.8 L
1 L
MIN
20-22g13-15g
ONE CUP
TWO CUP
PRESS & HOLD 4 SEC
PRESS & HOLD 4 SEC
ONE CUP
OR
TWO CUP
PRESS & HOLD 4 SEC
PRESS & HOLD TOGETHER 4 SEC
MAX
2.8 L
1 L
MIN
20-22g
13-15g
Restore - All Default Shot Volumes
- Press & hold all 3 EXTRACTION
BUTTONS at the same time for 4
seconds.
- The machine will beep and all 3
EXTRACTION BUTTON LIGHTS will
ash together.
- The default espresso volumes have
been restored.
- The machine will return to the READY
state.
ONE CUP
TWO CUP
PRESS & HOLD 4 SEC
PRESS & HOLD 4 SEC
ONE CUP
OR
TWO CUP
PRESS & HOLD 4 SEC
PRESS & HOLD TOGETHER 4 SEC
MAX
2.8 L
1 L
MIN
20-22g13-15g
ONE CUP
TWO CUP
PRESS & HOLD 4 SEC
PRESS & HOLD 4 SEC
ONE CUP
OR
TWO CUP
PRESS & HOLD 4 SEC
PRESS & HOLD TOGETHER 4 SEC
MAX
2.8 L
1 L
MIN
20-22g13-15g
The Thermoblock heats water so that
espresso extracts at 92°C. For the best
tasting espresso, balancing bitterness and
acidity.
You can adjust the water temperature used
for espresso extraction, in 2°C increments
between 88°C - 96°C, to cater for different
types of roasted coffee beans and for
personal preference.
- Higher temperatures increase bitterness
and decrease acidity.
- Lower temperatures decrease bitterness
and increase acidity.
• Check Power
Ensure that:
- The Power Plug is inserted into the
outlet & switched on.
- The DIAL is in the vertical position.
- The machine is on and in the READY
state.
• Access Extraction Temperature
Custom Mode
- Simultaneously press & hold the
& BUTTONS for 4 seconds. The
machine will beep and the LIGHT
begins to ash.
Note: The LIGHT will continue to flash
to indicate you are in a custom mode.
Important: If no buttons are pressed
within 1 minute of entering a custom mode,
the machine will exit and go back to the
READY state.
• Adjusting Extraction Temperature
The combination of EXTRACTION
LIGHTS illuminated signals the
temperature selected. The default
setting is:
- 92°C = ONE CUP LIGHT illuminated.
- To adjust extraction temperature press:
- MANUAL SHOT BUTTON = minus
button.
- TWO CUP BUTTON = plus button.
- 94°C = ONE & TWO CUP LIGHTS
illuminated.
- 96°C = TWO CUP LIGHT illuminated.
- 90°C = MANUAL SHOT & TWO CUP
LIGHTS illuminated.
- 88°C = MANUAL SHOT LIGHT
illuminated.
• Conrm Extraction Temperature
- Press the BUTTON to save your
selection. The machine will beep &
exit the custom mode.
- The machine will return to the READY
state.
PRESS & HOLD TOGETHER 4 SEC
92°C
PRESS & HOLD TOGETHER 4 SEC
PRESS & HOLD TOGETHER 4 SEC
PRESS & HOLD TOGETHER 4 SEC
92°C
PRESS & HOLD TOGETHER 4 SEC
PRESS & HOLD TOGETHER 4 SEC
PRESS & HOLD TOGETHER 4 SEC
92°C
PRESS & HOLD TOGETHER 4 SEC
PRESS & HOLD TOGETHER 4 SEC
CUSTOMISABLE - EXTRACTION TEMPERATURE
BARISTA MAX
GRINDER
MANUAL SHOT
CLEAN
BARISTA MAX
GRINDER
MANUAL SHOT
CLEAN
PLEASE EMPTY TRAY
WIPE COFFEE GRINDS
READY
BARISTA MAX
GRINDER
MANUAL SHOT
CLEAN
MAX
2.8 L
1 L
MIN
MAX
2.8 L
1 L
MIN
TOP BURR
GRINDER
COLLAR
GRINDER
INTERLOCK
HOPPER
GUIDE
2.TURN
3.HOPPER GATES OPEN
1. ALIGN
& INSERT
THERMOBLOCK
58MM CAFÉ GROUP HEAD
CENTRE
INSERT
INSERT
2.TURN
1. ALIGN
& INSERT
PRESS & HOLD TOGETHER 4 SEC
92°C
PRESS & HOLD TOGETHER 4 SEC
PRESS & HOLD TOGETHER 4 SEC
PRESS & HOLD TOGETHER 4 SEC
92°C
PRESS & HOLD TOGETHER 4 SEC
PRESS & HOLD TOGETHER 4 SEC
PRESS & HOLD TOGETHER 4 SEC
92°C
PRESS & HOLD TOGETHER 4 SEC
PRESS & HOLD TOGETHER 4 SEC
PRESS & HOLD TOGETHER 4 SEC
92°C
PRESS & HOLD TOGETHER 4 SEC
PRESS & HOLD TOGETHER 4 SEC
VCF126X_20MLM1 (EMEA).indd 16-17VCF126X_20MLM1 (EMEA).indd 16-17 4/23/20 16:294/23/20 16:29

18
19
You can easily reset all settings to the
factory defaults.
Restore All Default Settings
- The machine is on and in the READY
state.
- Press & hold the & all 3 EXTRACTION
BUTTONS at the same time for 4
seconds.
- The machine will beep and the ,
EXTRACTION BUTTONS & DIAL
LIGHTS will all flash together three
times.
- All default settings have been restored.
- The machine will return to the READY
state.
CUSTOMISABLE - EXTRACTION PRE-INFUSION PROFILE
RESTORE ALL DEFAULT SETTINGS
You can select from three Pre-infusion
Profiles to cater for personal preferences.
- Gentle Pre-infusion: Small defined
amounts of water are introduced into
the tamped coffee grinds, gently adding
moisture to bloom the coffee grinds in
preparation for a steady water flow. For
a balanced tasting espresso.This is the
default profile setting.
- Distinct Pre-infusion: A single distinct
dose of water is released into the
tamped coffee grinds, followed by a brief
rest period, then a steady water flow. For
a more bright tasting espresso.
- Constant Pre-infusion: Delivers a
constant, steady water flow from start
to finish. For a more sharp tasting
espresso.
• Access Pre-infusion Custom Mode
- The machine is ON and in the READY
state.
- Simultaneously press & hold the ,
ONE & TWO CUP BUTTONS for 4
seconds. The machine will beep and
the LIGHT begins to flash.
• Selecting Pre-infusion Profiles
The EXTRACTION LIGHT illuminated
signals the Pre-infusion Profile selected.
The default setting is:
- Gentle = BUTTON.
The LIGHT is illuminated.
- To select a Pre-infusion Profile press:
- Distinct = BUTTON.
The LIGHT will illuminate.
- Constant = BUTTON.
The LIGHT will illuminate.
• Confirm Pre-infusion Profile
- Press the BUTTON to save your
selection. The machine will beep & exit
the custom mode.
- The machine will return to the READY
state.
PRESS & HOLD TOGETHER 4 SEC
92°C
PRESS & HOLD TOGETHER 4 SEC
PRESS & HOLD TOGETHER 4 SEC
PRESS & HOLD TOGETHER 4 SEC
92°C
PRESS & HOLD TOGETHER 4 SEC
PRESS & HOLD TOGETHER 4 SEC
PRESS & HOLD TOGETHER 4 SEC
92°C
PRESS & HOLD TOGETHER 4 SEC
PRESS & HOLD TOGETHER 4 SEC
PRESS & HOLD TOGETHER 4 SEC
92°C
PRESS & HOLD TOGETHER 4 SEC
PRESS & HOLD TOGETHER 4 SEC
PRESS & HOLD TOGETHER 4 SEC
92°C
PRESS & HOLD TOGETHER 4 SEC
PRESS & HOLD TOGETHER 4 SEC
PRESS & HOLD TOGETHER 4 SEC
92°C
PRESS & HOLD TOGETHER 4 SEC
PRESS & HOLD TOGETHER 4 SEC
The espresso making process involves
extracting oils out of coffee grinds. Deposits
of grinds & oils build up over time, affecting
the taste of the coffee & operation of the
Espresso Machine.
Purging water through the Group Head &
Steam Wand, before & after making each
coffee, is the easiest way to keep your
Espresso Machine clean.
(See Coffee Making Guide)
Cleaning Accessories & Removable
Parts
- Do not immerse the appliance, power and
plug in water or any other liquid.
- Clean parts in warm water with a mild
detergent, rinse & dry.
Note: Do not use alkaline cleaning agents,
abrasives or metal scourers, as these will
scratch the surfaces of parts.
Dishwasher Safe parts:
- Stainless Steel Milk Jug
- Stainless Steel Drip Tray Grill
- Stainless Steel One Cup Filter Basket
- Stainless Steel Two Cup Filter Basket
- Cleaning Disc
Dishwasher Safe TOP SHELF ONLY parts:
- Hardened Stainless Steel Top Burr
- Grind Bin
NON Dishwasher Safe parts:
- Water Reservoir
- Group Handle / Portafilter
- Bean Hopper
- Drip Tray
- Tamper
- Cleaning Pin
- Cleaning Brush
Cleaning Warming Plate & Exterior
• When Required
Wipe over the machine with a soft
damp cloth with a mild detergent and
wipe dry.
CAUTION: To prevent damage to the
appliance do not use alkaline cleaning
agents, abrasives or metal scourers.
Cleaning Drip Tray & Grind Bin
• When Required
Empty if the red Water Level Indicator
appears through the Stainless Steel
Grill, otherwise water will overow.
Note: Over time it is normal for the
inside of the Drip Tray & Grind Bin to be
stained by the oils in the coffee grinds.
• Weekly
Clean in warm water with a mild
detergent, rinse & dry.
Cleaning Group Handle & Filter Basket
• Every Time
Wash after each use by rinsing them
with warm water under the tap.
• Regular Intervals
In warm soapy water using a mild
detergent, rinse & dry.
Cleaning Shower & Group Head
• Every Time
Run water through before making an
espresso. (See Coffee Making Guide)
• Weekly
- Purge water through the Group head
by pressing the ONE CUP BUTTON.
- Allow water to run through until it stops.
- With the Cleaning Brush remove any
coffee grinds from around the Group
Head inside rim and Silicone Seal.
Wipe the Shower Head with a damp
cloth.
Cleaning Tablet
Espresso Machine Cleaning Tablets can be
purchased online.
T
H
E
R
M
O
B
L
O
C
K
5
8
M
M
C
A
F
É
G
R
O
U
P
H
E
A
D
I
N
S
E
R
T
D
I
S
C
F
O
R
C
L
E
A
N
I
N
G
T
A
B
L
E
T
U
S
E
T
H
I
S
S
I
D
E
U
P
ESPRESSO
MACHINE
CLEANING
TABLETS
MAX
2.8 L
1 L
MIN
SHOWER
HEAD
GROUP HEAD
INSIDE RIM
SILICONE
SEAL
PRESS & HOLD TOGETHER 4 SEC
CARE & CLEANING - ESPRESSO MACHINE
VCF126X_20MLM1 (EMEA).indd 18-19VCF126X_20MLM1 (EMEA).indd 18-19 4/23/20 16:294/23/20 16:29

20
21
Cleaning Cycle
The CLEAN LIGHT will illuminate blue to
indicate a Cleaning Cycle is required.
The Cleaning Cycle takes approximately 7
minutes to complete.
• Preparing for Cleaning Cycle
- Ensure there is at least 1 Litre of water
in the Reservoir.
- Empty the Drip Tray & replace.
- The machine is on and in the READY
state.
- Place the Two Cup Filter Basket & the
Cleaning Disc into the Group Handle.
- Place one Cleaning Tablet in the
middle of the Cleaning Disc in the
space provided.
- Insert Group Handle into the Group
Head.
• Start the Cleaning Cycle
- Simultaneously press & hold the ON/
OFF & MANUAL SHOT BUTTONS for
4 seconds. The machine will beep and
the Cleaning Cycle will start.
Note: The Cleaning Cycle can be exited
at any point by pressing the ON/OFF
BUTTON.
- The ON/OFF & CLEAN LIGHTS will
flash during the cleaning cycle.
- Water will purge into the Drip Tray and
small amounts of water will pour from
the Group Handle spouts.
• Cleaning Cycle Complete
- The machine will beep and the ON/
OFF & CLEAN LIGHTS will stop
ashing.
- The machine will return to the READY
state.
- Remove the Group Handle from the
Group Head. Check tablet has been
dissolved.
Note: If the tablet has not been dissolved,
insert the Group Handle back into the
Group Head, empty the Drip Tray &
replace. Repeat the ‘Start the Cleaning
Cycle’ section.
• Cleaning Cycle Clean Up
- Purge the Group Head by pressing the
ONE CUP BUTTON and water should
ow.
- Allow water to run through until it
stops.
- Wash the Drip Tray, Group Handle &
Cleaning Disc in warm water with a
mild detergent, rinse & dry.
Group Head Silicone Seal
A Silicone Seal is located in the Group
Head and creates a seal against the Filter
Basket when making an espresso.
Important: When not being used, we
recommend not to leave the Group Handle
inserted into the Group Head, as this will
reduce the life of the Silicone Seal.
Over time this Seal loses its elasticity and
may require replacement. The seal may
need replacing when watery espresso
leaks from around the Group Handle during
extraction, or if the Group Handle is loose
when fully turned to the centre position.
Note: Contact Breville should you think
that the Group Head Seal needs replacing.
Do not attempt to change the Silicone Seal
without first consulting Breville.
CARE & CLEANING - ESPRESSO MACHINE
T
H
E
R
M
O
B
L
O
C
K
5
8
M
M
C
A
F
É
G
R
O
U
P
H
E
A
D
I
N
S
E
R
T
D
I
S
C
F
O
R
C
L
E
A
N
I
N
G
T
A
B
L
E
T
U
S
E
T
H
I
S
S
I
D
E
U
P
ESPRESSO
MACHINE
CLEANING
TABLETS
MAX
2.8 L
1 L
MIN
SHOWER
HEAD
GROUP HEAD
INSIDE RIM
SILICONE
SEAL
PRESS & HOLD TOGETHER 4 SEC
T
H
E
R
M
O
B
L
O
C
K
5
8
M
M
C
A
F
É
G
R
O
U
P
H
E
A
D
I
N
S
E
R
T
D
I
S
C
F
O
R
C
L
E
A
N
I
N
G
T
A
B
L
E
T
U
S
E
T
H
I
S
S
I
D
E
U
P
ESPRESSO
MACHINE
CLEANING
TABLETS
MAX
2.8 L
1 L
MIN
SHOWER
HEAD
GROUP HEAD
INSIDE RIM
SILICONE
SEAL
PRESS & HOLD TOGETHER 4 SEC
BARISTA MAX
GRINDER
MANUAL SHOT
CLEAN
BARISTA MAX
GRINDER
MANUAL SHOT
CLEAN
PLEASE EMPTY TRAY
WIPE COFFEE GRINDS
READY
BARISTA MAX
GRINDER
MANUAL SHOT
CLEAN
MAX
2.8 L
1 L
MIN
MAX
2.8 L
1 L
MIN
TOP BURR
GRINDER
COLLAR
GRINDER
INTERLOCK
HOPPER
GUIDE
2.TURN
3.HOPPER GATES OPEN
1. ALIGN
& INSERT
THERMOBLOCK
58MM CAFÉ GROUP HEAD
CENTRE
INSERT
INSERT
2.TURN
1. ALIGN
& INSERT
T
H
E
R
M
O
B
L
O
C
K
5
8
M
M
C
A
F
É
G
R
O
U
P
H
E
A
D
I
N
S
E
R
T
D
I
S
C
F
O
R
C
L
E
A
N
I
N
G
T
A
B
L
E
T
U
S
E
T
H
I
S
S
I
D
E
U
P
ESPRESSO
MACHINE
CLEANING
TABLETS
MAX
2.8 L
1 L
MIN
SHOWER
HEAD
GROUP HEAD
INSIDE RIM
SILICONE
SEAL
PRESS & HOLD TOGETHER 4 SEC
Cleaning Steam Wand
• Every time
- After texturing milk purge the Steam
Wand by turning the DIAL to HOT
WATER for just 1-2 seconds.
- Wipe the Steam Wand with a damp cloth.
(See Coffee Making Guide)
• 2-3 Months
- Soak the Steam Wand overnight in
the Milk Jug with warm water & one
Cleaning Tablet.
- In the morning remove the Jug and
rinse ensuring that all traces of the
solution have been removed.
- Wipe Steam Wand with a damp cloth
ensuring that all traces of the cleaning
tablet have been removed.
- Run Hot Water through the Steam
Wand for 40 seconds.
• Unblocking Steam Wand
If the Steam Wand Tip becomes
clogged with milk residue:
- Insert the thicker 'STEAM' Cleaning
Pin up the Steam Wand Tip hole and
remove.
- Run Hot Water through the Steam
Wand for 40 seconds.
• Steam Wand Remains Blocked:
- Unscrew the Steam Wand Tip and
soak overnight in the Milk Jug with
warm water & one Breville Cleaning
Tablet.
- In the morning rinse the Jug & Steam
Wand Tip under running water
ensuring all traces of the cleaning
tablet have been removed.
- Use the thicker 'Steam' Cleaning Pin
to clean the Steam Wand Tip.
- Ensure red O-ring is present &
undamaged.
- Screw the Steam Wand Tip back into
the Steam Wand Arm.
- Run Hot Water through the Steam
Wand for 40 seconds.
Cleaning Filter Baskets
• 2-3 Months
- Soak the Filter Basket(s) overnight in
the Milk Jug with warm water & one
Cleaning Tablet.
- In the morning rinse the Jug & Filter
Basket(s) under running water
ensuring all traces of the cleaning
tablet have been removed.
- Place a Filter Basket into Group
Handle (without coffee grinds) and
insert into Group Head.
- Press the ONE CUP BUTTON.
- Allow water to run through until it stops.
• Unblocking Dual Wall Filter Baskets
If the Dual Wall Filter Basket (not
supplied with the Barista Max) becomes
clogged with coffee grinds:
- Insert the thinner 'FILTER' Cleaning
Pin in the exit hole and remove.
- Place Filter Basket into Group Handle
(without coffee grinds) and insert into
Group Head.
- Press the ONE CUP BUTTON.
- Allow water to run through until it stops.
- Repeat if needed.
CARE & CLEANING - ESPRESSO MACHINE
D
U
A
L
W
A
L
L
STEAM
FILTER
UNSCREW
INSERT
INSERT
ESPRESSO
MACHINE
CLEANING
TABLETS
ESPRESSO
MACHINE
CLEANING
TABLETS
D
U
A
L
W
A
L
L
STEAM
FILTER
UNSCREW
INSERT
INSERT
ESPRESSO
MACHINE
CLEANING
TABLETS
ESPRESSO
MACHINE
CLEANING
TABLETS
D
U
A
L
W
A
L
L
STEAM
FILTER
UNSCREW
INSERT
INSERT
ESPRESSO
MACHINE
CLEANING
TABLETS
ESPRESSO
MACHINE
CLEANING
TABLETS
D
U
A
L
W
A
L
L
STEAM
FILTER
UNSCREW
INSERT
INSERT
ESPRESSO
MACHINE
CLEANING
TABLETS
ESPRESSO
MACHINE
CLEANING
TABLETS
D
U
A
L
W
A
L
L
STEAM
FILTER
UNSCREW
INSERT
INSERT
ESPRESSO
MACHINE
CLEANING
TABLETS
ESPRESSO
MACHINE
CLEANING
TABLETS
VCF126X_20MLM1 (EMEA).indd 20-21VCF126X_20MLM1 (EMEA).indd 20-21 4/23/20 16:294/23/20 16:29

22
23
Conical Burrs are used to grind coffee
beans to a suitable size for espresso
extraction. Deposits of grinds & oils build up
over time, affecting the taste of the espresso
& operation of the integrated Grinder.
Cleaning Grinding Cradle & Grind Outlet
• Weekly
Remove any coffee grinds from the
Grinding Cradle & Grind Outlet with the
Cleaning Brush and wipe with a damp
cloth, wipe dry.
Cleaning the Bean Hopper
• 2-3 Months
If the Grinder is used frequently
(everyday), the Bean Hopper needs to
be cleaned to ensure best performance.
CAUTION: To prevent damage to the
appliance do not use alkaline cleaning
agents, abrasives or metal scourers.
WARNING: Do not immerse the machine
in water.
• Preparing to Clean Bean Hopper
- Turn off the machine, switch off &
unplug at power outlet.
- Make note of the current Grind Setting
(to use as the starting point after
cleaning).
• Remove and Clean Bean Hopper
- Turn Bean Hopper fully anti-clockwise,
to close the Hopper Gates and unlock
the Bean Hopper.
- Remove the Bean Hopper from
the Grinder Collar and store any
remaining beans in an airtight
container to preserve their freshness.
- Wash the Bean Hopper in warm soapy
water, then rinse & dry. Let the Bean
Hopper stand to allow thorough air
drying before replacing.
• Replace Bean Hopper
- Ensure the Grinder Collar is clear of
coffee beans or grinds.
Note: Coffee grinds caught under the Top
Burr may prevent the Bean Hopper from
seating correctly. If this happens grind off
excess coffee beans.
- Ensure the Hopper Guide is aligned
with the vertical white lines on the
Hopper base.
- Align & insert the Bean Hopper into
the Grinder Collar and rmly pushing
down turn clockwise to lock into place
and open the hopper gates.
- Reset to the Grind Setting noted prior
to cleaning.
Note: After cleaning, the optimum Grind
Setting may have changed. To find the
optimum Grind Setting use the information.
CARE & CLEANING - GRINDER
BARISTA MAX
GRINDER
MANUAL SHOT
BARISTA MAX
GRINDER
GRINDER
OUTLET
1.TURN
AIR TIGHT
CONTAINER
2.REMOVE
REMOVE
TURN
1. ALIGN & INSERT ALIGN HOPPER GUIDE
2.TURN
CLEAR OF
COFFEE BEANS
& GRINDS
S
PUSH DOWN
PUSH DOWN GROUP HANDLE
AT THE SAME TIME
TOP COVER
GRINDER
COLLAR
HOPPER
GUIDE
BARISTA MAX
GRINDER
MANUAL SHOT
BARISTA MAX
GRINDER
GRINDER
OUTLET
1.TURN
AIR TIGHT
CONTAINER
2.REMOVE
REMOVE
TURN
1. ALIGN & INSERT ALIGN HOPPER GUIDE
2.TURN
CLEAR OF
COFFEE BEANS
& GRINDS
S
PUSH DOWN
PUSH DOWN GROUP HANDLE
AT THE SAME TIME
TOP COVER
GRINDER
COLLAR
HOPPER
GUIDE
BARISTA MAX
GRINDER
MANUAL SHOT
BARISTA MAX
GRINDER
GRINDER
OUTLET
1.TURN
AIR TIGHT
CONTAINER
2.REMOVE
REMOVE
TURN
1. ALIGN & INSERT ALIGN HOPPER GUIDE
2.TURN
CLEAR OF
COFFEE BEANS
& GRINDS
S
PUSH DOWN
PUSH DOWN GROUP HANDLE
AT THE SAME TIME
TOP COVER
GRINDER
COLLAR
HOPPER
GUIDE
BARISTA MAX
GRINDER
MANUAL SHOT
BARISTA MAX
GRINDER
GRINDER
OUTLET
1.TURN
AIR TIGHT
CONTAINER
2.REMOVE
REMOVE
TURN
1. ALIGN & INSERT ALIGN HOPPER GUIDE
2.TURN
CLEAR OF
COFFEE BEANS
& GRINDS
S
PUSH DOWN
PUSH DOWN GROUP HANDLE
AT THE SAME TIME
TOP COVER
GRINDER
COLLAR
HOPPER
GUIDE
CARE & CLEANING - GRINDER
Cleaning & Unblocking Grinder Burrs,
Collar, Grind Chamber and Outlet
• 1-2 Months
If the Grinder is used frequently
(everyday), the Burrs need to be cleaned
to ensure best performance of the
integrated Grinder. Regular cleaning helps
the Burrs achieve consistent grinding
results, which is especially important
when grinding coffee beans for espresso.
• Grind Off Excess Coffee Beans
- The machine is on and in the READY
state.
- Make note of the current Grind Setting
(to use as the starting point after
cleaning).
- Insert Two Cup Filter Basket into the
Group Handle.
- Insert Group Handle into Grinding
Cradle.
- Turn Bean Hopper fully anti-clockwise
to close the Hopper Gates and unlock
the Bean Hopper. The Bean Hopper
will pop up slightly.
- Place your hand on top of the Bean
Hopper and push down lightly. At
the same time push down the Group
Handle to activate the Grinder.
Continue grinding until no more coffee
grinds are emitted from the Grinder.
- Remove the Group Handle and
dispose of the waste grinds as these
will be too coarse for espresso coffee.
- Remove the Bean Hopper from
the Grinder Collar and store any
remaining coffee beans in an airtight
container to preserve their freshness.
• Preparing to Clean
- Turn off the machine, switch off &
unplug at power outlet.
CAUTION: Care should be taken when
cleaning Grinder Burrs as they are sharp.
• Cleaning Top Burr
- Fold the two handles up and lift the
Top Burr from the Grinder Collar.
- Wash the Top Burr in warm soapy
water with a mild detergent, rinse & dry.
Note: Spots & marks on the surface of the
Burrs are part of the hardening process (for
extra-long life). These marks do not affect
the performance of the Grinder or the taste
of the espresso.
• Cleaning & Unblocking Bottom Burr
and Grind Chamber
- Use the Cleaning Brush or a Vacuum
Cleaner to thoroughly clear the parts
and surfaces in the Grind Chamber of
ne coffee grinds. A damp cloth can
be used to wipe the inside of the Grind
Collar.
- Allow thorough air drying.
BARISTA MAX
GRINDER
MANUAL SHOT
BARISTA MAX
GRINDER
GRINDER
OUTLET
1.TURN
AIR TIGHT
CONTAINER
2.REMOVE
REMOVE
TURN
1. ALIGN & INSERT ALIGN HOPPER GUIDE
2.TURN
CLEAR OF
COFFEE BEANS
& GRINDS
S
PUSH DOWN
PUSH DOWN GROUP HANDLE
AT THE SAME TIME
TOP COVER
GRINDER
COLLAR
HOPPER
GUIDE
BARISTA MAX
GRINDER
MANUAL SHOT
BARISTA MAX
GRINDER
GRINDER
OUTLET
1.TURN
AIR TIGHT
CONTAINER
2.REMOVE
REMOVE
TURN
1. ALIGN & INSERT ALIGN HOPPER GUIDE
2.TURN
CLEAR OF
COFFEE BEANS
& GRINDS
S
PUSH DOWN
PUSH DOWN GROUP HANDLE
AT THE SAME TIME
TOP COVER
GRINDER
COLLAR
HOPPER
GUIDE
BARISTA MAX
GRINDER
MANUAL SHOT
BARISTA MAX
GRINDER
GRINDER
OUTLET
1.TURN
AIR TIGHT
CONTAINER
2.REMOVE
REMOVE
TURN
1. ALIGN & INSERT ALIGN HOPPER GUIDE
2.TURN
CLEAR OF
COFFEE BEANS
& GRINDS
S
PUSH DOWN
PUSH DOWN GROUP HANDLE
AT THE SAME TIME
TOP COVER
GRINDER
COLLAR
HOPPER
GUIDE
ONE CUP
TWO CUP
PRESS & HOLD 4 SEC
PRESS & HOLD 4 SEC
ONE CUP
OR
TWO CUP
PRESS & HOLD 4 SEC
PRESS & HOLD TOGETHER 4 SEC
MAX
2.8 L
1 L
MIN
20-22g13-15g
BARISTA MAX
GRINDER
MANUAL SHOT
BARISTA MAX
GRINDER
GRINDER
OUTLET
1.TURN
AIR TIGHT
CONTAINER
2.REMOVE
REMOVE
TURN
1. ALIGN & INSERT ALIGN HOPPER GUIDE
2.TURN
CLEAR OF
COFFEE BEANS
& GRINDS
S
PUSH DOWN
PUSH DOWN GROUP HANDLE
AT THE SAME TIME
TOP COVER
GRINDER
COLLAR
HOPPER
GUIDE
BARISTA MAX
GRINDER
MANUAL SHOT
BARISTA MAX
GRINDER
GRINDER
OUTLET
1.TURN
AIR TIGHT
CONTAINER
2.REMOVE
REMOVE
TURN
1. ALIGN & INSERT ALIGN HOPPER GUIDE
2.TURN
CLEAR OF
COFFEE BEANS
& GRINDS
S
PUSH DOWN
PUSH DOWN GROUP HANDLE
AT THE SAME TIME
TOP COVER
GRINDER
COLLAR
HOPPER
GUIDE
VCF126X_20MLM1 (EMEA).indd 22-23VCF126X_20MLM1 (EMEA).indd 22-23 4/23/20 16:294/23/20 16:29

24
25
WARNING: Do not pour water or any other
liquid into the Grind Chamber.
• Cleaning & Unblocking Grind Outlet
- Feed the Cleaning Brush up into the
Grind Outlet from below, wiping &
brushing the inside surfaces.
- If the Grind Outlet is clear the bristles will
be visible inside the Grind Chamber.
• Replace Top Burr
- Ensure the dot on the Top Cover
aligns with the dot on the Grinder
Collar.
- Using the two handles insert the Top
Burr into the Grinder Collar.
- The arrows on the Top Burr should
align to arrows on the Grinder Collar.
- When correctly seated, the Top Burr
will be ush with the surface of the
Grinder Collar.
- Place handles down, one on each
side.
• Replace Bean Hopper
- Ensure the Hopper Guide is aligned
with the vertical white lines on the
Hopper base.
- Align & insert the Bean Hopper into
the Grinder Collar and rmly pushing
down turn clockwise to lock into place
and open the Hopper Guide.
- Reset to the Grinder Setting noted
prior to cleaning.
- Rell the Bean Hopper with coffee
beans.
Note: After cleaning, the optimum Grind
Setting may have changed. To find the
optimum Grind Setting use the information.
Adjusting Bottom Burr
The Conical Burrs are made of hardened
Stainless Steel for extra-long life. However,
after prolonged use, the Bottom Burr may
require adjustment to compensate for wear.
If the coffee grinds are too coarse when the
Grind Setting is below 2 and the espresso
is consistently under extracted, the Bottom
Burr may need adjusting.
Contact Breville (details are on the back
page) should you think that the Bottom Burr
needs adjustment.
Prior to contacting Breville Customer Care,
please ensure that you are using freshly
roasted beans and that the Top Burr is
seated correctly.
Important: Old coffee beans, no matter the
Grind Setting, will have a fast extraction
and will produce an under extracted tasting
espresso.
Important: If the Top Burr is not seated
correctly the Grinder will produce coarse
coffee grinds. Grind off excess coffee
beans and clean the Top Burr & Grind
Chamber.
Note: Breville Customer Care may
determine that Bottom Burr adjustment
shims are required. Do not attempt to add
shims without first consulting Breville.
CARE & CLEANING - GRINDER
BARISTA MAX
GRINDER
MANUAL SHOT
BARISTA MAX
GRINDER
GRINDER
OUTLET
1.TURN
AIR TIGHT
CONTAINER
2.REMOVE
REMOVE
TURN
1. ALIGN & INSERT ALIGN HOPPER GUIDE
2.TURN
CLEAR OF
COFFEE BEANS
& GRINDS
S
PUSH DOWN
PUSH DOWN GROUP HANDLE
AT THE SAME TIME
TOP COVER
GRINDER
COLLAR
HOPPER
GUIDE
BARISTA MAX
GRINDER
MANUAL SHOT
BARISTA MAX
GRINDER
GRINDER
OUTLET
1.TURN
AIR TIGHT
CONTAINER
2.REMOVE
REMOVE
TURN
1. ALIGN & INSERT ALIGN HOPPER GUIDE
2.TURN
CLEAR OF
COFFEE BEANS
& GRINDS
S
PUSH DOWN
PUSH DOWN GROUP HANDLE
AT THE SAME TIME
TOP COVER
GRINDER
COLLAR
HOPPER
GUIDE
BARISTA MAX
GRINDER
MANUAL SHOT
BARISTA MAX
GRINDER
GRINDER
OUTLET
1.TURN
AIR TIGHT
CONTAINER
2.REMOVE
REMOVE
TURN
1. ALIGN & INSERT ALIGN HOPPER GUIDE
2.TURN
CLEAR OF
COFFEE BEANS
& GRINDS
S
PUSH DOWN
PUSH DOWN GROUP HANDLE
AT THE SAME TIME
TOP COVER
GRINDER
COLLAR
HOPPER
GUIDE
BARISTA MAX
GRINDER
MANUAL SHOT
CLEAN
BARISTA MAX
GRINDER
MANUAL SHOT
CLEAN
PLEASE EMPTY TRAY
WIPE COFFEE GRINDS
READY
BARISTA MAX
GRINDER
MANUAL SHOT
CLEAN
MAX
2.8 L
1 L
MIN
MAX
2.8 L
1 L
MIN
TOP BURR
GRINDER
COLLAR
GRINDER
INTERLOCK
HOPPER
GUIDE
2.TURN
3.HOPPER GATES OPEN
1. ALIGN
& INSERT
THERMOBLOCK
58MM CAFÉ GROUP HEAD
CENTRE
INSERT
INSERT
2.TURN
1. ALIGN
& INSERT
TROUBLESHOOTING GUIDE - ESPRESSO MACHINE
Problem Possible Cause What To Do
Group Handle
is tight to turn
in the Group
Head
The Group Head Silicone
Seal is new and needs
bedding in.
Keep using. This Seal will bed in
during the first few uses and become
easier to turn.
Too many coffee grinds used Fill with less coffee grinds.
Group Handle
is loose
or comes
off during
espresso
extraction
Group Handle is not attached
correctly or has not been
tightened sufficiently.
Ensure all three tabs of the Group
Handle are fully inserted into the
Group Head and rotated to the centre
position. See Coffee Making Guide.
No Filter Basket inserted in
the Group Handle.
Ensure a Filter Basket is inserted into
the Group Handle before using in the
Group Head.
Group Head Silicone Seal is
damaged or worn.
See Care & Cleaning.
Contact Breville Customer Care.
Espresso
squirts or
trickles down
the side of
the Group
Head during
extraction
Coffee grind is too fine. Change to a coarser Grind Setting.
Too many coffee grinds used. Fill with less coffee grinds.
Coffee grinds tamped too
hard.
Apply less force during tamping.
Top edge of Filter Basket has
not been cleaned of loose
coffee grinds.
Wipe around top edge of the Filter
Basket before inserting into Group
Head. See Coffee Making Guide.
Group Head inside rim,
Silicon Seal or Shower Head
is dirty.
Clean the parts with the Cleaning
Brush and damp cloth. See Care &
Cleaning.
Group Head Silicone Seal is
damaged or worn.
See Care & Cleaning.
Contact Breville Customer Care.
Espresso is too
cold
Coffee beans being stored in
the fridge or freezer.
Store coffee beans in a dry, airtight
container. Place in a cool dark
cupboard.
Custom extraction
temperature being used.
Use the default 92°C extraction
temperature. See Customisable -
Extraction Temperature.
Cup or glass was cold prior
to espresso pour.
Pour hot water from the Steam
Wand into the cup before extracting
espresso. See Coffee Making Guide.
Group Head or Handle not
warmed before use.
Hold the Group Handle under the
Group Head and press the ONE CUP
BUTTON. Allow water to run through.
See Coffee Making Guide.
VCF126X_20MLM1 (EMEA).indd 24-25VCF126X_20MLM1 (EMEA).indd 24-25 4/23/20 16:294/23/20 16:29

26
27
TROUBLESHOOTING GUIDE - ESPRESSO MACHINE
Problem Possible Cause What To Do
No espresso
pours
No water in the Water
Reservoir.
Fill reservoir with water. Prime water
through the Group Head, press the
ONE CUP BUTTON. Allow water to
run through.
Coffee grind is too fine. Change to a coarser Grind Setting.
Too many coffee grinds used. Fill with less coffee grinds.
Coffee grinds tamped too hard. Apply less force during tamping.
Custom shot volume being
used.
Reset to the default shot volumes.
See Customisable - Shot Volumes
Temperature.
The Filter Basket is blocked. See Care & Cleaning.
Group Head is dirty. A Cleaning Cycle is required. See
Cleaning Cycle.
Group Head is blocked. A Descaling Cycle is required. See
Descaling Cycle.
Espresso
pours out in
drips
(Over
Extracted)
Coffee grinds are too fine. Change to a coarser Grind Setting.
Too many coffee grinds used. Fill with less coffee grinds.
Coffee grinds tamped too hard. Apply less force during tamping.
Espresso Machine has scale
build up.
A Descaling Cycle is required. See
Descaling Cycle.
Espresso
does not have
any crema, or
crema is thin
(Under
Extracted)
Coffee beans are old or dry. Use freshly roasted coffee beans. See
Tips for Grinding.
Coffee grinds too coarse. Change to a finer Grind Setting.
Not enough coffee grinds used. Fill with more coffee grinds.
Grinds not tamped
(compacted) enough.
Tamp more firmly. See Espresso
Extraction Guide section.
Espresso shot
volume too
much or too
little
Custom shot volumes being
used.
Restore to default shot volumes or
change your custom shot volume(s).
See Customisable - Shot Volumes.
Espresso
tastes bitter
Type of coffee beans being
used.
Try different brands of coffee beans.
Custom extraction
temperature being used.
Use the default 92°C extraction
temperature. See Customisable -
Extraction Temperature.
Steam function has been
used just before extracting
espresso.
Allow time for water to purge the
Thermoblock and cool down before
extracting espresso. The STEAM
LIGHT should have finished flashing.
TROUBLESHOOTING GUIDE - ESPRESSO MACHINE
Problem Possible Cause What To Do
Spent (used)
coffee cake is
wet
A little water will remain on
top of the used coffee cake.
Rest Group Handle on the Drip
Tray for 5 sec to allow the water to
dissipate before disposing cake.
Too many coffee grinds used. Fill with less coffee grinds.
Dual Wall Filter Baskets being
used.
Dual Wall Filter Baskets will keep the
coffee cake wetter than Single Wall
Filter Baskets.
Espresso
pours into cup
unevenly
Uneven tamping. Ensure coffee grinds are tamped
evenly.
Obstruction in the Group
Head or Handle.
Check there is nothing obstructing the
Group Head or Handle & clean.
Pump makes
an unusual
noise
No water in the reservoir. Fill reservoir with water.
Let the machine return to the READY
state if it is cooling down after steam.
Prime water through the Group Head,
press the ONE CUP BUTTON. Allow
water to run through.
Water Reservoir is not
correctly positioned.
Insert the Water Reservoir into the
back of the unit.
Red Plug from the packaging
may still be inserted.
Remove the red packaging plug found
at the base of the Water Reservoir.
New Pre-infusion Profiles has
been selected.
Different Pre-infusion Profiles
make different noise at the start
of an espresso extraction. See
Customisable - Pre-infusion Profiles.
Water around
Drip Tray area
or on benchtop
Water overflowing from Drip
Tray.
Empty if the red Water Level Indicator
appears through the Drip Tray
Stainless Steel Grill.
Drip Dray not present when
Thermoblock is auto purging.
Keep Drip Tray in place, when cooling
to espresso temperature. The STEAM
LIGHT flashes and water purges into
Drip Tray. See Coffee Making Guide.
VCF126X_20MLM1 (EMEA).indd 26-27VCF126X_20MLM1 (EMEA).indd 26-27 4/23/20 16:294/23/20 16:29

28
29
TROUBLESHOOTING GUIDE - ESPRESSO MACHINE
Problem Possible Cause What To Do
Milky coffee is
too cold
Milk may not be heated
enough.
Ensure that milk is heated properly
during texturing, but be sure not to
heat too much and boil the milk.
No steam from
the Steam
Wand
Steam Wand Tip is blocked. See Care & Cleaning.
No water in the Water
Reservoir.
Fill reservoir with water. Run hot water
through the Steam Wand to ensure
water flows.
Espresso Machine has scale
build up.
A Descaling Cycle is required. See
Descaling Cycle.
Steam Wand
making a
screeching
noise
Steam Wand Tip too deep. Lower Milk Jug. Ensure the Steam
Wand Tip is positioned correctly when
texturing.
Not enough
foam when
texturing
Milk is not fresh. Ensure the milk being used is fresh.
Milk temperature is too
warm.
Ensure you start texturing with milk
that is around 4°C.
Type of Milk Jug being used. For best texturing results use a chilled
Stainless Steel Milk Jug.
Milk has been boiled. Start again with fresh, chilled milk.
Heat till the Milk Jug can only be held
for approximately 3 second, 60-65°C.
The milk is making bubbles
rather than microfoam.
Ensure the Steam Wand Tip is
positioned correctly when texturing.
Tap the Jug on the benchtop when
finished to release trapped air
bubbles.
Milk is not taking in enough
air.
Keep the Steam Wand Tip just under
the surface of the milk. This will
help introduce air into the milk to
create microfoam.
TROUBLESHOOTING GUIDE - GRINDER
Problem Possible Cause What To Do
Optimum Grind
Setting is
producing an
under extracted
espresso
New Burrs are bedding in.
This is normal for the first
few uses.
Turn the Bean Hopper clockwise
in small increments to a finer Grind
Setting to keep an optimum espresso
extraction. Use the information to
help.
Beans are losing freshness.
Not enough coffee grinds
used.
Fill with more coffee grinds.
Grinds not tamped
(compacted) enough.
Tamp more firmly. See Espresso
Extraction Guide section.
GRINDER
LIGHT does not
illuminate after
pressing ON/
OFF BUTTON
The machine is not plugged
into the power outlet.
Insert in the Power Plug into power
outlet & switch on.
The Bean Hopper is not
seated correctly & not
activating the red Interlock
Pin.
Turn the Bean Hopper in a clockwise
direction to lock into place. See Care
& Cleaning.
GRINDER
LIGHT flashes
when trying to
grind beans.
Hopper Gates are closed or
not fully open.
Turn the Bean Hopper in a clockwise
direction to a Grind Setting between
30-0 to fully open the Hopper Gates.
See Removable Bean Hopper
section.
GRINDER
LIGHT
illuminated red
Grinder Motor in protection
mode to prevent
overheating. Grinder has
been used for long periods
in a short space of time.
Leave the Grinder for 5 minutes.
The GRINDER LIGHT will illuminate
white to indicate normal use can be
resumed.
No coffee grinds
coming from the
Grinder Outlet
No coffee beans in the
Bean Hopper.
Fill the Bean Hopper with freshly
roasted coffee beans.
Hopper Gates are closed or
not fully open.
Turn the Bean Hopper in a clockwise
direction. At Grind Setting 30, Hopper
Gates are fully open. See Removable
Bean Hopper section.
The Grind Chamber or
Outlet is blocked.
Grinder needs cleaning. See Care &
Cleaning.
Coffee grinds
are coarse
when on a fine
Grind Setting
Grind Setting not correct. Adjust the Grind Settings by turning
the Bean Hopper. See Tips for
Grinding, & Extraction.
Top Burr not seated
correctly. Coffee beans or
grinds are caught around &
under the Top Burr.
Top Burr needs cleaning.
See Care & Cleaning.
Bottom Burrs needs
adjusting.
See Adjusting the Bottom Burr
section.
VCF126X_20MLM1 (EMEA).indd 28-29VCF126X_20MLM1 (EMEA).indd 28-29 4/23/20 16:294/23/20 16:29

30
31
TROUBLESHOOTING GUIDE - GRINDER
Problem Possible Cause What To Do
Espresso is
under extracted
even with a fine
coffee grind
Not enough coffee grinds
used.
Fill with more coffee grinds.
Beans are too old. Use freshly roasted beans. Old coffee
beans, no matter the Grind Setting, will
have a fast extraction and will produce
an under extracted tasting espresso.
Bottom Burrs needs
adjusting.
See Adjusting the Bottom Burr section.
Grind Setting
cannot be
adjusted
The Bean Hopper is not
seated correctly.
Remove the Bean Hopper & replace.
See Replace Bean Hopper section.
Coffee beans or grinds are
caught around the Top Burr
or Grinder Collar.
Remove the Bean Hopper & Top Burr.
Use the Cleaning Brush or Vacuum
Cleaner as necessary to clear loose
coffee beans or grinds. See Replace
Bean Hopper section.
Bean Hopper
cannot be
locked into
position
Grinder Collar not aligned
to the Top Cover.
Ensure the dot on the Top Cover aligns
with the dot on the Grinder Collar. See
Replace Top Burr section.
Coffee beans or grinds are
caught in the Top Burr or
Grinder Collar.
Remove the Bean Hopper & Top Burr.
Use the Cleaning Brush or Vacuum
Cleaner as necessary to clear loose
coffee beans or grinds. See Replace
Bean Hopper section.
The Top Burr is not seated
correctly.
Make sure the Top Burr is correctly
aligned and that the two handles are
placed one on each side. See Replace
Top Burr section.
Top Burr does
not sit in the
Grinder Collar
correctly
Grinder Collar not aligned
to the Top Cover.
Ensure the dot on the Top Cover aligns
with the dot on the Grinder Collar. See
Replace Top Burr section.
Coffee beans or grinds are
caught around & under the
Top Burr
Remove the Top Burr and replace
the Bean Hopper. Hold the Bean
Hopper down with your hand, do not
turn. Insert the Group Handle into the
Grinding Cradle and push down to
activate the Grinder. The coffee grinds
will fall out the Grind Outlet.
The Top Burr is not seated
correctly.
Make sure the Top Burr is correctly
aligned and that the two handles are
placed one on each side. See Replace
Top Burr section.
Contact Breville Customer care on:
0800 028 7154
Visit Breville website to see full Espresso Machine range & accessories available.
www.breville.co.uk
One Cup
VCF130
Single Wall
Two Cup
VCF131
Dual Wall
One Cup
VCF128
Two Cup
VCF129
58mm Filter Baskets
Cleaning
ESPRESSO
MACHINE
CLEANING
TABLETS
VCF132
D
U
A
L
W
A
L
L
D
U
A
L
W
A
L
L
ACCESSORIES AVAILABLE FOR PURCHASE
Contact Breville Customer care on:
0800 028 7154 or email [email protected]
Visit Breville website to see full Espresso Machine range & accessories available.
www.breville.co.uk
VCF126X_20MLM1 (EMEA).indd 30-31VCF126X_20MLM1 (EMEA).indd 30-31 4/23/20 16:294/23/20 16:29

32
33
TROUBLESHOOTING
For troubleshooting and FAQs visit:
www.breville.co.uk/faqs
ELECTRICAL SAFETY
This appliance must be earthed.
If the plug is not suitable for the socket
outlets in your home, it can be removed
and replaced by a plug of the correct type.
If the fuse in a moulded plug needs to be
changed, the fuse cover must be retted.
The appliance must not be used without
the fuse cover tted.
If the plug is unsuitable, it should be
dismantled and removed from the supply
cord and an appropriate plug tted as
detailed. If you remove the plug it must not
be connected to a 13 amp socket and the
plug must be disposed of immediately.
If the terminals in the plug are not marked
or if you are unsure about the installation
of the plug please contact a qualied
electrician.
Blue
(Neutral)
Brown
(Live)
13A Fuse
Green/Yellow
(Earth)
Plug should be ASTA approved to BS1363
Fuse should be ASTA approved to BS1362
Ensure that the outer sheath of
the cable is firmly held by the cord grip
AFTER SALES SERVICE &
REPLACEMENT PARTS
In the case the appliance does not
operate but is under warranty, return the
product to the place it was purchased for a
replacement. Please be aware that a valid
form of proof of purchase will be required.
For additional support, please contact our
Consumer Service Department at
0800 028 7154 or
email: [email protected].
WASTE DISPOSAL
Waste electrical products should not be
disposed of with household waste. Please
recycle where facilities exist. E-mail us at
[email protected] for further
recycling and WEEE information.
temps à se refroidir.
• N’utilisez l’appareil pour
aucun autre usage que celui
auquel il est destiné. Une
blessure pourrait résulter
d’une utilisation à mauvais
escient.
• Ne plongez pas l’appareil ou
son cordon d’alimentation
et la prise dans de l’eau ou
tout autre liquide. Lavez
les 10 pièces suivantes à
l’eau chaude et au détergent
doux : le pichet à lait, la
grille du ramasse-gouttes,
les ltres simple et double,
le porte-ltre, le ramasse-
gouttes, le tasseur, le broyeur
supérieur, la trémie à grains
et le réservoir d’eau. Rincez
et séchez complètement
chaque pièce avant de la
remettre en place. Essuyez
la buse à lait avec un chiffon
humide. Voir la section
Entretien et nettoyage pour
obtenir des détails.
• Cet appareil est destiné à
une utilisation domestique
et aux applications
semblables, telles que
les cuisines du personnel
dans les magasins, les
bureaux et d’autres milieux
de travail ; les fermes ; les
cuisines destinées aux
clients dans les hôtels, les
motels, les B&B et d’autres
lieux d’hébergement.
• Cet appareil peut être utilisé
par des enfants à partir de
8 ans, ainsi que par des
personnes aux capacités
CONSIGNES DE SÉCURITÉ
DE BREVILLE
PRÉCAUTIONS À PRENDRE
AVEC VOTRE MACHINE À
EXPRESSO BREVILLE
• Lisez attentivement et
conservez toutes les
instructions fournies avec
l’appareil.
• Ne retirez pas le porte-ltre
pendant que l’expresso est
versé ou que l’eau coule,
car l’appareil est alors sous
pression, et une brûlure ou
une blessure risquerait de
s’ensuivre.
• Quand vous montez une
mousse de lait et lorsque
l’eau coule, la buse à lait et
à eau chaude devient assez
chaude pour causer des
brûlures. Évitez donc tout
contact direct avec la buse
à lait.
• Débranchez toujours la prise
de la prise secteur avant
de nettoyer la machine à
expresso ou si un problème
survient pendant la
préparation du café.
• Ne placez pas les mains
directement sous le ux
de vapeur, d’eau chaude
ou d’expresso, car vous
pourriez ainsi vous brûler
ou vous blesser.
• La température des surfaces
accessibles peut être élevée
en cours de fonctionnement.
Notez aussi qu’après
l’emploi, la surface de
l’élément chauffant prend du
FR
VCF126X_20MLM1 (EMEA).indd 32-33VCF126X_20MLM1 (EMEA).indd 32-33 4/23/20 16:294/23/20 16:29

34
35
physiques, sensorielles
ou intellectuelles réduites,
ou encore des personnes
n’ayant aucune expérience
du produit, à condition
que ces personnes soient
supervisées ou formées à
son utilisation sécuritaire
et qu’elles comprennent
les risques encourus. Les
opérations de nettoyage
et d’entretien ne doivent
pas être effectuées par
des enfants, à moins qu’ils
n’aient plus de 8 ans et
soient surveillés par un
adulte. Tenez l’appareil et son
cordon hors de portée des
enfants de moins de 8 ans.
Les enfants ne doivent pas
jouer avec l’appareil.
• Placez toujours l’appareil
sur une surface plane et
horizontale.
• Ne faites pas fonctionner
le réservoir sans eau.
Remplissez uniquement
le réservoir avec de l’eau
propre et froide. Respectez
la limite de remplissage
maximal, qui est de 2 litres.
• Veillez à ce que le cordon
d’alimentation n’entre pas
en contact avec les parties
chaudes de la machine à
expresso, notamment le
chauffe-tasse et la buse à
lait.
• N’utilisez pas l’appareil si
son cordon d’alimentation
ou prise sont endommagés
ou s’il a été endommagé de
quelque manière que ce soit.
Si le cordon d’alimentation
est endommagé, il doit être
remplacé par le fabricant, son
représentant agréé ou toute
autre personne qualiée an
d’éviter tout danger.
• Les appareils ne sont pas
conçus pour être utilisés
avec un minuteur externe
ou un autre dispositif de
commande à distance.
Breville conçoit et fabrique ses
produits de consommation
dans le plus grand souci de la
sécurité, mais il est essentiel
que l’utilisateur du produit
fasse également preuve
de prudence et prenne les
précautions suivantes lorsqu’il
utilise un appareil électrique.
• Coupez toujours
l’alimentation de la prise
avant d’insérer ou de retirer
une prise. Saisissez la prise
pour la débrancher ; ne tirez
pas sur le cordon d’un coup
sec.
• Coupez l’alimentation et
débranchez prise quand vous
n’utilisez pas l’appareil et
avant de le nettoyer.
• Connectez toujours votre
appareil à une prise de
la tension indiquée sur
l’appareil (c.a. seulement).
• Ne laissez pas l’appareil
sans surveillance au cours
de son utilisation.
• N’utilisez l’appareil pour
aucun autre usage que celui
auquel il est destiné.
• Ne déposez pas l’appareil
sur un brûleur ou un
élément électrique chaud
ou à proximité. Ne l’insérez
pas non plus dans un four
chaud.
• Ne déposez sur aucun autre
appareil.
• Ne laissez pas le cordon
d’alimentation d’un appareil
pendre dans le vide, au
bord d’une table ou d’un
plan de travail, ou toucher
des surfaces chaudes.
Si la performance et
l’utilisation de votre appareil
vous causent des soucis,
consultez le site Web de
Breville ou contactez le
service client de Breville (ces
informations gurent à la
dernière page). Assurez-vous
de comprendre les consignes
de sécurité ci-dessus.
N’utilisez aucun accessoire
non recommandé par le
fabricant, car des blessures
ou des dommages à l’appareil
sont susceptibles d’en
découler.
A. Trémie à grains amovible
La trémie à grains amovible avec une
capacité de 250 g possède 30 réglages de
broyage faciles à ajuster. Tournez la trémie
pour ajuster le réglage d’une mouture
grossière à fine et maximiser la saveur de
votre expresso.
B. Éclairage de la mouture
Quand le broyeur entre en marche, un
éclairage à DEL est dirigé vers le filtre,
dans lequel la mouture tombe directement.
L’éclairage s’éteint automatiquement
lorsque le broyage est terminé.
C. Étrier de broyage Tap & Go™
L’étrier de broyage Tap & Go™ unique
reçoit le porte-filtre et permet d’activer le
moulin d’un seul mouvement. Vous pouvez
ainsi contrôler la quantité de mouture de
café qui est dispensée dans le filtre.
D. Rangement des accessoires
Derrière le ramasse-gouttes, il y a un
rangement pour les filtres simple et
double et le disque, la brosse et la tige de
nettoyage.
E. Ramasse-gouttes, grille et bac
récupérateur de mouture amovibles
Un indicateur du niveau de remplissage
émerge à travers la grille en inox lorsque
le ramasse-gouttes est plein d’eau et a
besoin d’être vidé.
CARACTÉRISTIQUES DE VOTRE BREVILLE BARISTA MAX
Disque de nettoyage
1422
20
18 16 12
10
8
D
I
S
C
F
O
R
C
L
E
A
N
I
N
G
T
A
B
L
E
T
U
S
E
T
H
I
S
S
I
D
E
U
P
Brosse de
nettoyage
1422
20
18 16 12
10
8
D
I
S
C
F
O
R
C
L
E
A
N
I
N
G
T
A
B
L
E
T
U
S
E
T
H
I
S
S
I
D
E
U
P
Tige pour
ltre à double
fond
Tige pour
embout
de la buse
à vapeur
Tige de nettoyage
1422
20
18 16 12
10
8
D
I
S
C
F
O
R
C
L
E
A
N
I
N
G
T
A
B
L
E
T
U
S
E
T
H
I
S
S
I
D
E
U
P
VCF126X_20MLM1 (EMEA).indd 34-35VCF126X_20MLM1 (EMEA).indd 34-35 4/23/20 16:294/23/20 16:29

36
37
Un bac récupérateur de mouture amovible,
qui sert à séparer la mouture du liquide,
est situé dans le ramasse-gouttes. Vous
n’avez qu’à extraire le bac récupérateur de
mouture pour jeter les résidus au besoin.
F. Rangement du cordon
Ce rangement pratique permet de pousser
l’excédent de cordon à l’intérieur de la
machine pour ne pas encombrer la surface
de travail.
G. Patins antidérapants
Les patins antidérapants en silicone
assurent la stabilité de la Barista Max sur
la surface de travail pendant l’utilisation.
H. Chauffe-tasse avec espace pour
tasseur
Préchauffer les tasses et les verres aide à
préserver les caractéristiques essentielles
d’un vrai expresso : son arôme et une
saveur riche et sucrée.
Un espace pour tasseur est prévu dans
le haut du chauffe-tasse pour fournir un
rangement facile d’accès.
I. Réservoir d’eau amovible de 2,8 L
Ouvrez le couvercle et remplissez d’eau
froide ou extrayez le réservoir d’eau en
ouvrant le couvercle et en le soulevant par
la poignée située à l’intérieur.
J. Tête de groupe : format commercial
de 58 mm
Le grand format permet de réaliser une
infusion uniforme de la mouture de café
tassée.
K. Porte-ltre : format commercial de
58 mm
Puisque la mouture de café s’étale plus
uniformément dans une poignée de cette
taille, elle est plus facile à tasser.
L. La buse à lait et à eau chaude
Le joint à rotule et le manchon en silicone
vous permettent de mettre la buse à lait
dans la position désirée sans vous brûler
les doigts.
M. Niche extra-haute pour tasse
Une niche spacieuse de 105 mm permet
de verser le café directement dans les
tasses et les verres hauts.
N. Broyeur supérieur amovible
Levez simplement le broyeur par les
poignées pour le nettoyer.
O. Voyant « MOULIN »
Reste allumé en blanc lorsque
l’appareil est prêt.
Clignote lors d’une tentative de
broyage pour indiquer que les clapets
de la trémie ne sont pas complètement
ouverts.
Reste allumé en rouge lorsque le
moteur du moulin est en mode de
protection.
P. Bouton et voyant
Appuyez sur le bouton pour allumer
l’appareil. Le VOYANT clignote pour
indiquer que l’appareil est en train de
chauffer. Le VOYANT reste allumé
lorsque l’appareil est prêt. L’appareil
passe automatiquement en mode de
veille au bout de 20 minutes, et le
VOYANT s’éteint.
CARACTÉRISTIQUES DE VOTRE BREVILLE BARISTA MAX
S
BARISTA MAX
MANUAL SHOT
TAP & GO
GRINDER
CLEAN
GRINDER
S
S
BARISTA MAX
MANUAL SHOT
TAP & GO
GRINDER
CLEAN
GRINDER
S
S
BARISTA MAX
MANUAL SHOT
TAP & GO
GRINDER
CLEAN
GRINDER
S
Tasseur de
58 mm
Pichet à lait de 460 ml
Q. Boutons d’infusion expresso
Bouton
Vous pouvez contrôler le volume
dispensé au lieu des préréglages d’une
tasse et de deux tasses.
Appuyez sur le bouton pour démarrer
l’infusion. Lorsque le volume désiré
est atteint, appuyez de nouveau sur le
bouton pour arrêter.
Arrêt automatique après 200 ml.
Bouton « UNE TASSE »
Verse 1 tasse d’expresso (30 ml),
puis s’arrête automatiquement.
Bouton « DEUX TASSES »
Verse 2 tasses d’expresso (60 ml),
puis s’arrête automatiquement.
R. Caractéristiques et voyants de la
MOLETTE
Voyant « MOLETTE »
Reste allumé lorsque l’appareil est prêt.
Clignote lorsque la MOLETTE doit être
remise en position verticale.
Témoin de vapeur
Reste allumé lorsque le jet de vapeur
est prêt à utiliser.
Clignote pendant que la température
monte en vue de l’émission de vapeur
et baisse à la température de l’expresso
(de l’eau étant alors évacuée).
VAPEUR
Sert à chauffer le lait et à le monter en
mousse.
EAU CHAUDE
Verse 200 ml, puis s’arrête
automatiquement.
Sert à préparer un café noir long, des
boissons chaudes comme le thé et
des soupes instantanées et permet de
chauffer les tasses avant d’y verser un
expresso.
S. Voyant « NETTOYER »
Reste allumé en bleu lorsqu’un cycle
de nettoyage de la tête de groupe et
de la douchette est nécessaire.
CARACTÉRISTIQUES DE VOTRE BREVILLE BARISTA MAX
S
BARISTA MAX
MANUAL SHOT
TAP & GO
GRINDER
CLEAN
GRINDER
S
S
BARISTA MAX
MANUAL SHOT
TAP & GO
GRINDER
CLEAN
GRINDER
S
S
BARISTA MAX
MANUAL SHOT
TAP & GO
GRINDER
CLEAN
GRINDER
S
S
BARISTA MAX
MANUAL SHOT
TAP & GO
GRINDER
CLEAN
GRINDER
S
S
BARISTA MAX
MANUAL SHOT
TAP & GO
GRINDER
CLEAN
GRINDER
S
S
BARISTA MAX
MANUAL SHOT
TAP & GO
GRINDER
CLEAN
GRINDER
S
S
BARISTA MAX
MANUAL SHOT
TAP & GO
GRINDER
CLEAN
GRINDER
S
1422
20
18 16 12
10
8
D
I
S
C
F
O
R
C
L
E
A
N
I
N
G
T
A
B
L
E
T
U
S
E
T
H
I
S
S
I
D
E
U
P
Filtre doubleFiltre simple
Filtres à fond simple de 58 mm
Temp° IQ Shot Control™
Une température optimale
La technologie
Temp° IQ Shot Control™, conçue
par Breville, est exclusive à votre Barista
Max. Il s’agit d’un système à 3 voies
capable de générer une température
de l’eau précise et stable, car cela est
nécessaire pour toujours réussir son café.
• Technologie du bloc thermique
Le bloc thermique assure un chauffage
rapide de l’eau à une température
précise pour optimiser l’infusion de
l’expresso et l’incorporation d’air dans le
lait. L’opération de chauffage est rapide
et efcace, car elle se limite à la quantité
d’eau requise. Le bloc thermique
chauffe l’eau à 92 °C pour optimiser
l’extraction des huiles de la mouture de
café tassée lors de l’infusion expresso.
Les températures trop faibles ou trop
élevées vous donneront un expresso
faible ou brûlé/amer.
• Régulateur PID avancé
Le régulateur PID surveille et contrôle
le bloc thermique pour que l’eau soit
toujours dispensée sur la mouture de café
tassée à la température exacte requise.
• Pré-infusion délicate
De petites quantités d’eau sont déposées
délicatement sur la mouture tassée avant
d’émettre un ux régulier d’eau, pour
enrichir la saveur de l’expresso.
58
15 BAR
DÉTAILS SUPPLÉMENTAIRES SUR VOTRE BREVILLE BARISTA MAX
VCF126X_20MLM1 (EMEA).indd 36-37VCF126X_20MLM1 (EMEA).indd 36-37 4/23/20 16:294/23/20 16:29

38
39
Tête et le porte-filtre
professionnels de 58mm
Extrayez le maximum de saveur
La tête et le porte-filtre ont un format
commercial de 58 mm, comme dans votre
café local.
• Une poignée de cette taille est plus
facile à remplir. La mouture de café
s’étale plus uniformément dans le
ltre, et elle est plus facile à tasser et à
éliminer après l’emploi.
• Le porte-ltre de 58 mm permet de
réaliser une infusion uniforme de la
mouture de café tassée, ce qui vous
procure la saveur d’un café préparé
dans le commerce.
Moulin intégré
Tap&Go™
Une expérience de broyage
sur demande facile
• Technologie Tap&Go™
Avec la technologie de broyage sur
demande Tap&Go™ conçue par Breville,
vous pouvez dispenser de la mouture
de café directement dans la le porte-
ltre d’un seul mouvement. Appuyez
simplement sur le porte-ltre pour activer
le moulin.
• Moulin à broyeur conique
Le moulin intégré propose une
expérience de broyage tout-en-un.
Grâce à son mouvement doux et lent,
le broyeur conique en inox durci produit
des particules de taille homogène, ce
qui minimise le transfert de chaleur et
réduit la friction.
• Trémie à grains
La trémie de 250 g est munie de clapets
anti-déversement, qui empêchent les
grains de café de se répandre sur la
surface de travail lorsque vous détachez
la trémie. Le moulin intégré à la machine
à expresso propose une expérience de
broyage tout-en-un.
Contrôle automatique du
volume et personnalisation
Recevez la bonne quantité d’expresso
dans votre tasse
• Avec le contrôle automatique, la
préparation d’un expresso fantastique
est un jeu d’enfant. Appuyez sur le
bouton « UNE TASSE » ou « DEUX
TASSES » pour verser tout juste la
bonne quantité.
• Le volume dispensé est personnalisable
pour tous les boutons d’infusion.
Température d’infusion
personnalisable
Fixez la température que vous désirez
• La machine à café Barista Max
vous permet de vous écarter de la
température recommandée de 92 °C
(par pas de 2 °C) en fonction de vos
préférences personnelles.
58
15 BAR
58
15 BAR
58
15 BAR
58
15 BAR
DÉTAILS SUPPLÉMENTAIRES SUR VOTRE BREVILLE BARISTA MAX
Étape 1. Retirez l’emballage
- Assurez-vous que tout l’emballage a été
retiré.
Important : enlevez le bouchon rouge qui
se trouve à la base du réservoir d’eau.
Étape 2. Mettez la machine en place
- Assurez-vous que la machine est placée
sur une surface sèche, stable, plane et
horizontale.
Étape 3. Nettoyez et séchez les pièces
- Ne plongez pas l’appareil, le cordon
d’alimentation et la prise dans de l’eau
ou tout autre liquide. Lavez les pièces
ci-dessous avec de l’eau chaude et un
détergent doux.
Pichet à lait en inox
Filtre simple en inox
Filtre double en inox
Broyeur supérieur en inox durci
Réservoir d’eau
Porte-filtre
Trémie à grains
Tasseur
AVANT LA PREMIÈRE UTILISATION DE LA BREVILLE BARISTA MAX
- Rincez et laissez sécher complètement
à l’air.
Étape 4. Mettez les accessoires à leur
place
- La brosse et la tige de nettoyage se
rangent derrière le ramasse-gouttes.
Les filtres simple et double et le disque
de nettoyage s’imbriquent ensemble
et se placent dans l’espace prévu à
gauche.
- Insérez le bac récupérateur de mouture
dans l’espace prévu à gauche du
ramasse-gouttes.
- Déposez le tasseur à l’emplacement
qui lui est réservé sur le chauffe-
tasse.
Étape 5. Insérez les pièces dans le
moulin
• Broyeur supérieur amovible
- En tenant les deux poignées, insérez
le broyeur supérieur dans la bague du
moulin.
- Alignez les flèches du broyeur
supérieur sur les flèches de la bague
du moulin.
- Lorsque le broyeur supérieur est
correctement monté, il affleure à la
surface de la bague du moulin.
- Abaissez les poignées de chaque côté.
• Trémie à grains amovible
- Alignez le guide de la trémie sur le
dispositif d’interverrouillage rouge du
moulin.
- Insérez la trémie à grains dans la
bague du moulin.
- En pressant légèrement vers le bas,
tournez la trémie à grains dans le sens
horaire pour verrouiller la trémie en place.
- Les clapets de la trémie s’ouvrent
alors, et les grains de café se
déversent sur les broyeurs. Au
réglage 30 du moulin, les clapets de la
trémie sont complètement ouverts.
- Continuez à tourner la trémie à grains
dans le sens horaire pour fixer le
réglage de broyage.
- Pour votre première infusion expresso,
essayez le réglage de broyage 20.
- Remplissez la trémie de grains de café
fraîchement moulus.
AVANT LA PREMIÈRE UTILISATION DE LA BREVILLE BARISTA MAX
BARISTA MAX
GRINDER
MANUAL SHOT
CLEAN
BARISTA MAX
GRINDER
MANUAL SHOT
CLEAN
PLEASE EMPTY TRAY
WIPE COFFEE GRINDS
READY
BARISTA MAX
GRINDER
MANUAL SHOT
CLEAN
MAX
2.8 L
1 L
MIN
MAX
2.8 L
1 L
MIN
TOP BURR
GRINDER
COLLAR
GRINDER
INTERLOCK
HOPPER
GUIDE
2.TURN
3.HOPPER GATES OPEN
1. ALIGN
& INSERT
THERMOBLOCK
58MM CAFÉ GROUP HEAD
CENTRE
INSERT
INSERT
2.TURN
1. ALIGN
& INSERT
BARISTA MAX
GRINDER
MANUAL SHOT
CLEAN
BARISTA MAX
GRINDER
MANUAL SHOT
CLEAN
PLEASE EMPTY TRAY
WIPE COFFEE GRINDS
PRÊT
BARISTA MAX
GRINDER
MANUAL SHOT
CLEAN
MAX
2.8 L
1 L
MIN
MAX
2.8 L
1 L
MIN
BROYEUR
SUPÉRIEUR
BAGUE DU
MOULIN
DISPOSITIF
D’INTERVERROUILLAGE
GUIDE DE
LA TRÉMIE
2.TOURNER
3.OUVERTURE DES
CLAPETS DE LA TRÉMIE
1. ALIGNER
ET INSÉRER
THERMOBLOCK
58MM CAFÉ GROUP HEAD
CENTRE
INSERT
INSERT
1. ALIGNER
ET INSÉRER
2.TOURNER
BARISTA MAX
GRINDER
MANUAL SHOT
CLEAN
BARISTA MAX
GRINDER
MANUAL SHOT
CLEAN
PLEASE EMPTY TRAY
WIPE COFFEE GRINDS
PRÊT
BARISTA MAX
GRINDER
MANUAL SHOT
CLEAN
MAX
2.8 L
1 L
MIN
MAX
2.8 L
1 L
MIN
BROYEUR
SUPÉRIEUR
BAGUE DU
MOULIN
DISPOSITIF
D’INTERVERROUILLAGE
GUIDE DE
LA TRÉMIE
2.TOURNER
3.OUVERTURE DES
CLAPETS DE LA TRÉMIE
1. ALIGNER
ET INSÉRER
THERMOBLOCK
58MM CAFÉ GROUP HEAD
CENTRE
INSERT
INSERT
1. ALIGNER
ET INSÉRER
2.TOURNER
VCF126X_20MLM1 (EMEA).indd 38-39VCF126X_20MLM1 (EMEA).indd 38-39 4/23/20 16:294/23/20 16:29
Strona się ładuje...
Strona się ładuje...
Strona się ładuje...
Strona się ładuje...
Strona się ładuje...
Strona się ładuje...
Strona się ładuje...
Strona się ładuje...
Strona się ładuje...
Strona się ładuje...
Strona się ładuje...
Strona się ładuje...
Strona się ładuje...
Strona się ładuje...
Strona się ładuje...
Strona się ładuje...
Strona się ładuje...
Strona się ładuje...
Strona się ładuje...
Strona się ładuje...
Strona się ładuje...
Strona się ładuje...
Strona się ładuje...
Strona się ładuje...
Strona się ładuje...
Strona się ładuje...
Strona się ładuje...
Strona się ładuje...
Strona się ładuje...
Strona się ładuje...
Strona się ładuje...
Strona się ładuje...
Strona się ładuje...
Strona się ładuje...
Strona się ładuje...
Strona się ładuje...
Strona się ładuje...
Strona się ładuje...
Strona się ładuje...
Strona się ładuje...
Strona się ładuje...
Strona się ładuje...
Strona się ładuje...
Strona się ładuje...
Strona się ładuje...
Strona się ładuje...
Strona się ładuje...
Strona się ładuje...
Strona się ładuje...
Strona się ładuje...
Strona się ładuje...
Strona się ładuje...
Strona się ładuje...
Strona się ładuje...
Strona się ładuje...
Strona się ładuje...
Strona się ładuje...
Strona się ładuje...
Strona się ładuje...
Strona się ładuje...
Strona się ładuje...
Strona się ładuje...
Strona się ładuje...
Strona się ładuje...
Strona się ładuje...
Strona się ładuje...
Strona się ładuje...
Strona się ładuje...
Strona się ładuje...
Strona się ładuje...
Strona się ładuje...
Strona się ładuje...
Strona się ładuje...
Strona się ładuje...
Strona się ładuje...
Strona się ładuje...
Strona się ładuje...
Strona się ładuje...
Strona się ładuje...
Strona się ładuje...
Strona się ładuje...
Strona się ładuje...
Strona się ładuje...
Strona się ładuje...
Strona się ładuje...
Strona się ładuje...
Strona się ładuje...
Strona się ładuje...
Strona się ładuje...
Strona się ładuje...
Strona się ładuje...
Strona się ładuje...
Strona się ładuje...
Strona się ładuje...
Strona się ładuje...
Strona się ładuje...
Strona się ładuje...
Strona się ładuje...
Strona się ładuje...
Strona się ładuje...
Strona się ładuje...
Strona się ładuje...
Strona się ładuje...
Strona się ładuje...
Strona się ładuje...
Strona się ładuje...
Strona się ładuje...
Strona się ładuje...
Strona się ładuje...
Strona się ładuje...
Strona się ładuje...
Strona się ładuje...
Strona się ładuje...
Strona się ładuje...
-
 1
1
-
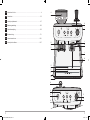 2
2
-
 3
3
-
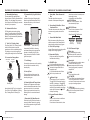 4
4
-
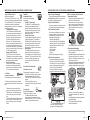 5
5
-
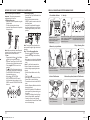 6
6
-
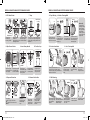 7
7
-
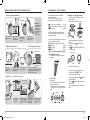 8
8
-
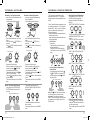 9
9
-
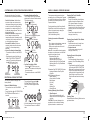 10
10
-
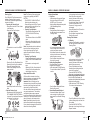 11
11
-
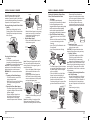 12
12
-
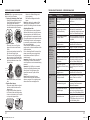 13
13
-
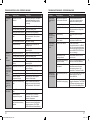 14
14
-
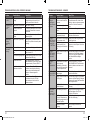 15
15
-
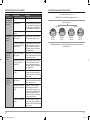 16
16
-
 17
17
-
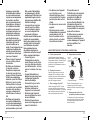 18
18
-
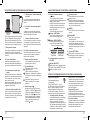 19
19
-
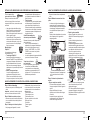 20
20
-
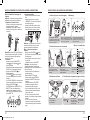 21
21
-
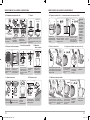 22
22
-
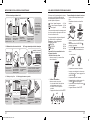 23
23
-
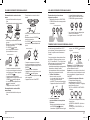 24
24
-
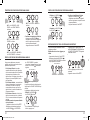 25
25
-
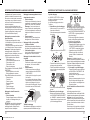 26
26
-
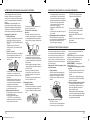 27
27
-
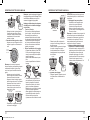 28
28
-
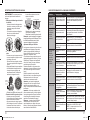 29
29
-
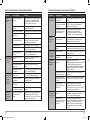 30
30
-
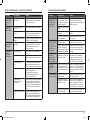 31
31
-
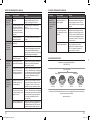 32
32
-
 33
33
-
 34
34
-
 35
35
-
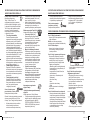 36
36
-
 37
37
-
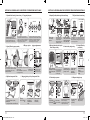 38
38
-
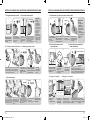 39
39
-
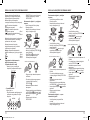 40
40
-
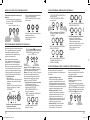 41
41
-
 42
42
-
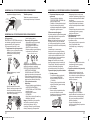 43
43
-
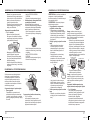 44
44
-
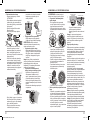 45
45
-
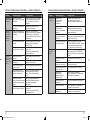 46
46
-
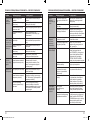 47
47
-
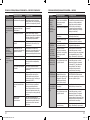 48
48
-
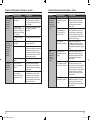 49
49
-
 50
50
-
 51
51
-
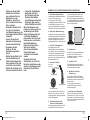 52
52
-
 53
53
-
 54
54
-
 55
55
-
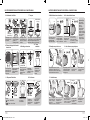 56
56
-
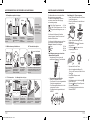 57
57
-
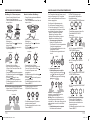 58
58
-
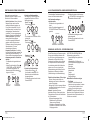 59
59
-
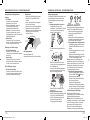 60
60
-
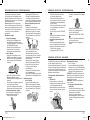 61
61
-
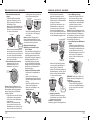 62
62
-
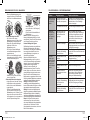 63
63
-
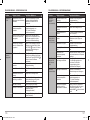 64
64
-
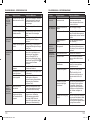 65
65
-
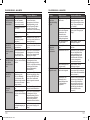 66
66
-
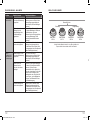 67
67
-
 68
68
-
 69
69
-
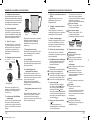 70
70
-
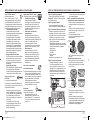 71
71
-
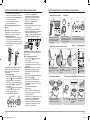 72
72
-
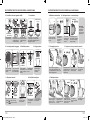 73
73
-
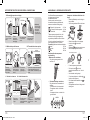 74
74
-
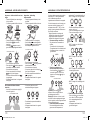 75
75
-
 76
76
-
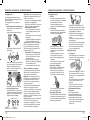 77
77
-
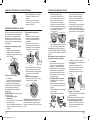 78
78
-
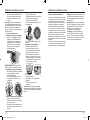 79
79
-
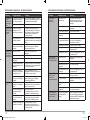 80
80
-
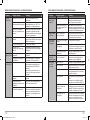 81
81
-
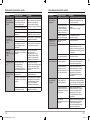 82
82
-
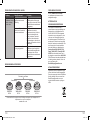 83
83
-
 84
84
-
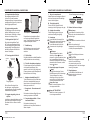 85
85
-
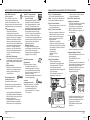 86
86
-
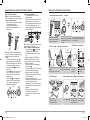 87
87
-
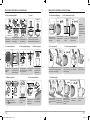 88
88
-
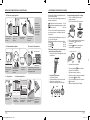 89
89
-
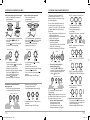 90
90
-
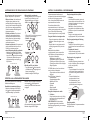 91
91
-
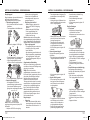 92
92
-
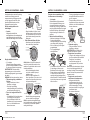 93
93
-
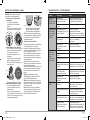 94
94
-
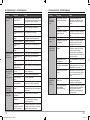 95
95
-
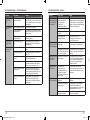 96
96
-
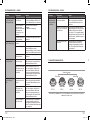 97
97
-
 98
98
-
 99
99
-
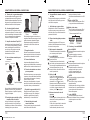 100
100
-
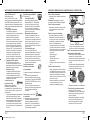 101
101
-
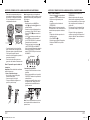 102
102
-
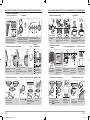 103
103
-
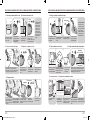 104
104
-
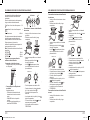 105
105
-
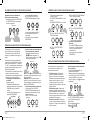 106
106
-
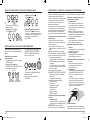 107
107
-
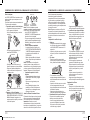 108
108
-
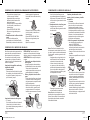 109
109
-
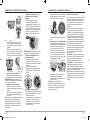 110
110
-
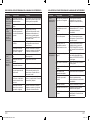 111
111
-
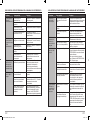 112
112
-
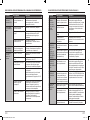 113
113
-
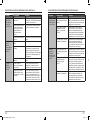 114
114
-
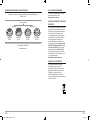 115
115
-
 116
116
-
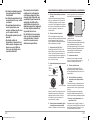 117
117
-
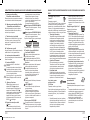 118
118
-
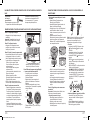 119
119
-
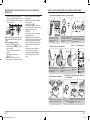 120
120
-
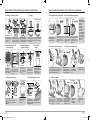 121
121
-
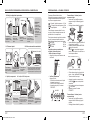 122
122
-
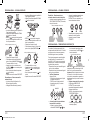 123
123
-
 124
124
-
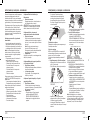 125
125
-
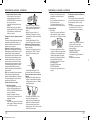 126
126
-
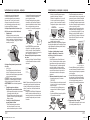 127
127
-
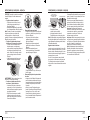 128
128
-
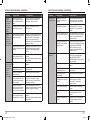 129
129
-
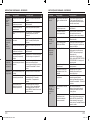 130
130
-
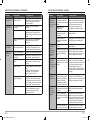 131
131
-
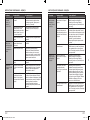 132
132
-
 133
133
-
 134
134


Breville BARISTA MAX VCF126X01 Instrukcja obsługi
- Kategoria
- Ekspresy do kawy
- Typ
- Instrukcja obsługi
w innych językach
- español: Breville BARISTA MAX VCF126X01 El manual del propietario
- Deutsch: Breville BARISTA MAX VCF126X01 Bedienungsanleitung
- svenska: Breville BARISTA MAX VCF126X01 Bruksanvisning
- français: Breville BARISTA MAX VCF126X01 Le manuel du propriétaire
- English: Breville BARISTA MAX VCF126X01 Owner's manual
- Nederlands: Breville BARISTA MAX VCF126X01 de handleiding
- română: Breville BARISTA MAX VCF126X01 Manualul proprietarului
Powiązane artykuły
Inne dokumenty
-
Sage SES881BSS4FEU1 instrukcja
-
 BRG SES500BTR4GUK1 Instrukcja obsługi
-
Sage SES875 the Barista Express Instrukcja obsługi
-
-
SEVERIN KM-3873 Instrukcja obsługi
-
SEVERIN KM3873 Instrukcja obsługi
-
SEVERIN KM 3874 Instrukcja obsługi
-
-
Sage BES920 instrukcja
-
Sage BCG820 instrukcja
