Hitachi CG 14DSDL Handling Instructions Manual
- Kategoria
- Elektronarzędzia
- Typ
- Handling Instructions Manual
Ten podręcznik jest również odpowiedni dla

Cordless Grass Trimmer
Akku-Rasentrimmer
Χλοοκόπτης μπαταρίας
Akumulatorowa kosiarka do trawy
Akkus fűszegélynyíró
Akku seřezávač trávy
Akülü çim kesme
Masina de cosit cu acumulatori
Baterijska kosa
Akku strihač trávy
Аккумуляторный триммер
Read through carefully and understand these instructions before use.
Diese Anleitung vor Benutzung des Werkzeugs sorgfältig durchlesen und verstehen.
Διαβάστε προσεκτικά και κατανοήσετε αυτές τις οδηγίες πριν τη χρήση.
Przed użytkowaniem należy dokładnie przeczytać niniejszą instrukcję i zrozumieć jej treść.
Használat előtt olvassa el fi gyelmesen a használati utasítást.
Před použitím si pečlivě přečtěte tento návod a ujistěte se, že mu dobře rozumíte.
Aleti kullanmadan önce bu kılavuzu iyice okuyun ve talimatları anlayın.
Înainte de utilizare, citiţi cu atenţie și înţelegeţi prezentele instrucţiuni.
Pred uporabo natančno preberite in razumite ta navodila.
Pred použitím si dôkladne tieto pokyny prečítajte a pochopte ich.
Внимательно прочтите данную инструкцию по эксплуатации прежде чем пользоваться инструментом.
Handling instructions
Bedienungsanleitung
Οδηγίες χειρισμού
Instrukcja obsługi
Kezelési utasítás
Návod k obsluze
CG 14DSDL
•
CG 18DSDL
Kullanım talimatları
Instrucţiuni de utilizare
Navodila za rokovanje
Pokyny na manipuláciu
Инструкция по эксплуатации
CG18DSDL

2
1
5
3
2
4
1
2
6
7
8
1
9
1
0
!
@
%
#
&
^
$
*
q
(
)
e
(
w
r
(
s
a
p
o
i
f
a
d
k
h
g
l
j
a
;
x
z
c
v
b
100 mm – 150 mm
,
n
m
b
d
v
v
d
m
1
9
1
0
u
y
t
‡
·
•
‚
°
fl
1234
5678
9101112
13 14 15 16
17 18 19 20

3
d
v
.
¡
™
£
¢
!
∞
%
10 mm
4 mm
⁄
fi
¤
‹
/
l
¶
§
•
•
¶
›
‹
21 22 23
24 25 26 27
28 29 30
31 32 33

4
English
Deutsch
Ελληνικά Polski
1
Rechargeable battery
Akkumulator
Επαναφορτιζόμενη
μπαταρία
Akumulator
2
Latch
Schnapper
Μάνδαλο Zapadka
3
Battery cover
Akkumulatorabdeckung
Κάλυμμα μπαταρίας Pokrywka akumulatora
4
Terminals
Anschlüsse
Πόλοι Styki
5
Ventilation holes
Belüftungslöcher
Οπές εξαερισμού Otwory wentylacyjne
6
Push
Drücken
Σπρώξε Wcisnąć
7
Insert
Einsatz
Εισχωρήστε Włóż/wprowadź
8
Pull out
Herausziehen
Τραβήξτε έξω Wyciągnij
9
Pilot lamp
Kontrollampe
Δοκιμαστική λάμπα Lampka kontrolna
0
After insert
Nach dem Einsetzen
Γραμμή Po wsunięciu
!
Power button
Einschalttaste
Πλήκτρο τροφοδοσίας Przycisk zasilania
@
Remaining battery
indicator lamp
Ladezustand-
Kontrollleuchte
Ενδεικτική λυχνία υπόλοιπου
φορτίου μπαταρίας
Lampka wakaźnika
pozostałej energii baterii
#
Main pipe
Hauptrohr
Κύριος σωλήνας Przewód główny
$
Housing side
Gehäuseseite
Πλευρά περιβλήματος
Strona obudowy
%
Loop handle
Bügelgriff
Χερούλι σχήματος
βρόγχου
Uchwyt w kształcie pętli
^
Handle fi xture
Griff einbau
Μηχανισμός λαβής Mocowanie uchwytu
&
M6 × 43 bolts
M6×43-Schrauben
Μπουλόνια M6 × 43 Śruby M6 × 43
*
M6 nuts
M6-Muttern
Παξιμάδια Μ6Nakrętki M6
(
Cover
Abdeckung
Κάλυμμα Pokrywa
)
Knife
Messer
Μαχαίρι Nóż
q
D5 tapping screw
D5-Blechschraube
D5 λαμαρινόβιδα Wkręt samogwintujący D5
w
Cover bracket
Schutzhalter
Υποστήριγμα καλύμματος Wspornik pokrywy
e
M6 × 25 hex. socket button
bolts
M6×25-Innensechskant-
Rundkopfschrauben
Μπουλόνι εξαγ. κοίλης
κεφαλής M6 × 25
Śruby sześciokątne
M6 × 25
r
Cover holder
Abdeckungshalterung
Στήριγμα καλύμματος Uchwyt pokrywy
t
Flange ass'y
Flanschbaueinheit
Συγκρότημα φλάντζας Zespół kołnierza
y
Wing
Flügel Πτερύγιο Skrzydło
u
Motor case
Motorgehäuse Περίβλημα μοτέρ Obudowa silnika
i
Hex. bar wrench 4mm
4-mm-Sechskant-
Inbusschlüssel
Εξαγ. κλειδί Άλεν 4mm
Klucz sześciokątny 4mm
o
Threaded fastener of the
motor case
Schraubgewinde im
Motorgehäuse
Σπειροειδής συνδετήρας
του περιβλήματος του
κινητήρα
Gwintowany element
mocujący obudowy silnika
p
Hole
Loch
Τρύπα
Otwór
a
Nylon head
Nylonkopf
Νάιλον κεφαλή
Nylonowa główka
s
Screw (left rotation)
Schraube (Linksgewinde)
Βίδα
(αριστερή περιστροφή)
Śruba (obracanie w lewo)
d
Nylon line
Nylonfaden
Νάιλον κλωστή Żyłka nylonowa
f
Tap
Klopfen
Χτυπήστε Zaczep
g
Button
Knopf
Πλήκτρο
Przycisk
h
Tap/release
Tippen/Verlängern
Πώμα/απελευθέρωση
Stuknij/zwolnij
j
Wear limit mark (2 marks)
Verschleißgrenzenmarke
(2 Marken)
Ένδειξη ορίου φθοράς
(2 ενδείξεις)
Znak ogranicznika zużycia
(2 znaki)
k
Extends in 30 mm
increments
Verlängerung à 30 mm
Επεκτείνεται με αυξητικά
βήματα 30 mm
Wydłużanie w przyrostach
30 mm
l
Appropriate length
90 - 110 mm
Ungefähre Länge
90 – 110 mm
Κατάλληλο μήκος
90 - 110 mm
Właściwa długość
90 - 110 mm

5
English
Deutsch
Ελληνικά Polski
;
Cover
Abdeckung
Κάλυμμα Pokrywa
z
Case
Gehäuse
Θήκη Obudowa
x
Hook
Haken
Γάντζος Haczyk
c
Press tabs (2 areas)
Drucklaschen
(2 Bereiche)
Πατήστε τις γλωττίδες
(2 περιοχές)
Naciśnij zaczepy
(2 obszary)
v
Reel
Rolle
Μπομπίνα
Szpula
b
Groove
Nut
Αυλάκωση
Rowek
n
Hole of reel
Loch in Rolle
Οπή μπομπίνας
Otwór szpuli
m
Direction to wind nylon
cord
Wickelrichtung des
Nylonfadens
Κατεύθυνση προς νάιλον
καλώδιο περιέλιξης
Kierunek zwijania
nylonowej linki
,
Secure in the stopper
Im Stopper sichern
Ασφάλισης στο στόπερ
Zamocuj korek
.
Stopper
Stopper
Στόπερ
Ogranicznik
/
Eyelet line guide
Fadenführungsöse
Οδηγός γραμμής
οφθαλμιδίου
Ucho prowadnicy linki
¡
While holding the reel
Während die Rolle
gehalten wird
Κατά τη συγκράτηση
της
μπομπίνας
Podczas trzymania szpuli
™
String the line through the
eyelet line guide
Faden durch die
Fadenführungsöse führen
Περάστε τη γραμμή μέσω
του οδηγού γραμμής του
οφθαλμιδίου
Przeciągnij linkę przez
ucho prowadnicy linki
£
Locking holes of cover
(2 holes)
Rastlöcher in der
Abdeckung (2 Löcher)
Κλείδωμα οπών του
καλύμματος (2 τρύπες)
Otwory blokujace pokrywy
(2 otwory)
¢
Tabs of case (2 tabs)
Laschen am Gehäuse
(2 Laschen)
Γλωττίδες του
καλύμματος (2 γλωττίδες)
Zatrzaski obudowy
(2 zatrzaski)
∞
Power lamp
Betriebsleuchte
Λαμπτήρας ρεύματος Lampka zasilania
§
Handle
Griff
Χερούλι Uchwyt
¶
Lock lever
Verriegelungshebel
Μοχλός κλειδώματος Dźwignia blokady
•
Lever
Hebel
Μοχλός Dźwignia
ª
Forward
Vorwärts
Εμπρός W przód
º
Left side
Linke Seite
Αριστερή πλευρά Lewa strona
⁄
Wear limit
Verschließgrenze
Όριο φθοράς Ogranicznik zużycia
¤
Brush cap
Motorsensenaufsatz
Κάλυμμα ψήκτρας Pokrywka szczotki
‹
Nail of carbon brush
Klaue der Kohlebürste
Καρφί
καρβουνακιού
Końcówka szczotek
węglowych
›
Protrusion of carbon brush
Krempe der Kohlebürste
Προεξοχή ψήκτρας
καρβουνακιού
Wystająca część szczotki
węglowej
fi
Contact portion of brush
tube
Kontaktfl äche des
Bürstenrohrs
Προεξοχή επαφής του
σωλήνα της ψήκτρας
Część kontaktowa rurki ze
szczotką
fl
Spring washer M6
Federring M6
Ροδέλα γκρόβερ M6 Podkładka sprężysta M6
‡
Handle left
Griff links
Αριστερό χερούλι Uchwyt lewy
°
Handle right
Griff rechts
Δεξί χερούλι Uchwyt prawy
·
Handle brace (A)
Griff strebe (A)
Στήριγμα λαβής (A) Złącze uchwytu (A)
‚
M5 × 25 hex. Socket bolts
M5 × 25
Innensechskantschrauben
Μπουλόνια υποδοχής εξ.
M5 × 25
Śruby z łbem
sześciokątnym M5 × 25

6
Magyar Čeština Türkçe Română
1
Os tölthető akkumulátor Akumulátor Şarj edilebilir batarya Acumulator reîncărcabil
2
Retesz Zámek Mandal Element de blocare
3
Akkumulátor burkolat Kryt na baterie Batarya kapağı Carcasă acumulator
4
Csatlakozók Koncovky Kutuplar Terminale
5
Szellózónyílások Větrací otvory Havalandırma delikleri Orifi cii de ventilare
6
Benyomni Stisknout İtin Împingeţi
7
Bedugni Zasunout Yerleştirin Introduceţi
8
Kihúzni Zatáhnout Çekin Trageţi
9
Jelzőlámpa Indikátor Kılavuz lamba Lampă pilot
0
A behelyezés után Po zasunutí Sonra yerleştirin Dupã inserare
!
Főkapcsoló gomb Vypínač Güç düğmesi Buton de alimentare
@
Fennmaradó tőltét jelző
lámpa
Vypínač indikátoru
zbývající energie baterie
Kalan pil göstergesi
lambası
Comutator indicator
acumulator rămas
#
Nyél Hlavní roura Ana boru Tija principală
$
Ház oldala Strana skříně Yuva kısmı Parte carcasă
%
Markolat Smy
čková rukojeť Halka kol Mâner circular
^
Fogantyú Upevnění držadla Kol sabitleyici Fixare mâner
&
M6 × 43 csavarok Šrouby M6 × 43 M6 × 43 cıvatalar Şuruburi M6 × 43
*
M6 anyák Matice M6 M6 somun Piuliţe M6
(
Burkolat Kryt Kapağı Capac
)
Kés Řezný nástroj Bıçak Cuţit
q
D5 önmetsző csavar Samořezný šroub D5 D5 sac vidası Şurub cu fi letare D5
w
Burkolat bilincs Kryt úchytu Kapak braketi Suport capac
e
M6 × 25 hatlapfejű
csavarok
Imbusové šrouby M6 × 25
s kulatou hlavou
M6 × 25 altıgen soket başlı
cıvatalar
Şuruburi hexagonale
M6 × 25
r
Burkolattartó Pojistný kryt Kapak tutucu Portcapac
t
Bordaszerelvény Sestava příruby Kenar bloğuAnsamblu fl anşă
y
Szárny Křídlo Kanat Aripioară
u
Motorház Skříň motoru Motor mahfazası Carcasă motor
i
4 mm-es imbuszkulcs Šestihranný klíč 4 mm Somun anahtarı 4mm Cheie inbus 4 mm
o
Menetes rögzítőelem a
motorházon
Upevňovač skříně motoru
se závitem
Motor kılıfının yivli kilidi
Dispozitiv de fi xare cu fi let
al carcasei motorului
p
Nyílás Otvor Delik Gaură
a
Nejlonfej Nylonová hlava Naylon kafası Cap din nailon
s
Csavar (bal forgásirány) Šroub (otáčení vlevo) Vida (sol rotasyon) Şurub (rotaţie la stânga)
d
Damil Nylonová struna Naylon ip Fir de nailon
f
Megérintés Poklepat Hafi fçe vurun Loviţi
g
Gomb Tlačítko Düğme Buton
h
Érintés/kioldás Uvolnění klepnutím Dokun/bırak Robinet/eliberare
j
Kopási korlát jelölése
(2 jelölés)
Značka meze opotřebení
(2 značky)
Aşınma limiti işareti
(2 işaret)
Marcaj limită de uzură
(2 marcaje)
k
30 mm-es lépésekben
bővíthető
Vysunuje se po částech
30 mm
30 mm artışlarla geniş
ler
Se extinde în trepte de
30 mm
l
A megfelelő hossz
90-110 mm
Vhodná délka 90 - 110 mm Uygun uzunluk 90 - 110 mm
Lungime adecvată
90 - 110 mm
;
Burkolat Kryt Kapağı Capac
z
Ház Skříň
Muhafaza Carcasă
x
Kampó Hák Kanca Cârlig

7
Magyar Čeština Türkçe Română
c
Fülek megnyomása
(2 terület)
Stiskněte jazýčky
(2 oblasti)
Kanatçıklara bas (2 alan) Lamele de presare (2 zone)
v
Orsó Cívka Makara Rolă
b
Horony Drážka Oluk Canal
n
Orsónyílás Otvor cívky Makara deliğiOrifi ciul rolei
m
A nejlonzsinór tekerésének
iránya
Směr navíjení nylonové
struny
Naylon kabloyu sarma
yönü
Direcţie de înfăşurare a
fi rului de nailon
,
Rögzítés az ütközőben Zajistěte v zarážce Tıpayı sabitleyin Fixare în opritor
.
Ütköző Zarážka Tıpa Opritor
/
Fűzőlyuk Vodící otvor struny Delik halka kılavuzu Ghidaj pentru fi r al inelului
¡
Az orsó tartása közben Přidržujte cívku Makarayı tutarken În timp ce ţineţi rola
™
Húzza át a zsinórt a
fűzőlyukon
Provlečte vodícím otvorem
struny
İpi delik halka kılavuzundan
geçirin
Introduceţi fi rul prin
ghidajul pentru
fi r al inelului
£
A fedél zárónyílásai
(2 nyílás)
Zajišťovací otvory krytu
(2 otvory)
Kapak deliklerini kilitleme
(2 delik)
Blocarea găurilor capacului
(2 găuri)
¢
A ház fülei (2 fül) Jazýčky skříně (2 jazýčky)
Muhafaza kanatçıkları
(2 kanatçık)
Lamele carcasă (2 lamele)
∞
Bekapcsolást jelző lámpa Kontrolka zapnutí Güç lambası Lampă electrică
§
Fogantyú Rukojeť Tutamak Ghidaj
¶
Záró kar Zajišťovací páka Kilit kolu Manetă de blocare
•
Kar Páka Kol Manetă
ª
Előre Vpřed İleri Înainte
º
Baloldal Levá strana Sol taraf Partea stângă
⁄
Megengedett kopás Mez opotřebení Aşınma sınırı Limită de uzură
¤
Kefe sapka Krytka kartáčů motoru Fırça kapağı Capac perie
‹
A szénkefe szöge
Cvoček uhlíkového
kartáčku
Kömür çivisi Cuiul periei de cărbune
›
A szénkefe kinyúlása
Vodící lamely uhlíkového
kartáče
Karbon fırça çıkıntısı Extensie perie cărbune
fi
Kefecső érintkezési felülete
Kontaktní část trubky
kartáče
Fırça tübünün temas kısmı
Porţiunea de contact a tijei
periei
fl
Rugós alátét M6
Pérová podložka M6
Yaylı rondela M6 Şaibă elastică M6
‡
Bal fogantyú
Levá rukojeť
Sol kol Mâner stânga
°
Jobb fogantyú
Pravá rukojeť
Sağ kol Mâner dreapta
·
Fogantyú villa (A)
Spona držadla (A)
Kol ara parçası (A) Suport pentru mâner (A)
‚
M5 × 25 hatlapú
Imbuszcsavarok
Šrouby se šestihrannou
hlavou M5 × 25
M5 × 25 altıgen alyan
cıvata
Şuruburi hexagonale
M5 × 25

8
Slovenščina Slovenčina Pyccкий
1
Baterija, ki se polni
Nabíjateľný akumulátor
Аккумуляторная батарея
2
Zapah
Západka
Фиксатор
3
Pokrov baterije
Kryt batérie
Крышка аккумуляторного
отсека
4
Sponke Koncovky Полюса
5
Ventilacijske odprtine Vetracie otvory
Вентиляционные
отверстия
6
Pritisnite
Stlačiť
Нажать
7
Vstavite
Vložiť
Вставить
8
Izvlecite
Vytiahnuť
Вытащить
9
Kontrolni svetlobni
indikator
Kontrolka
Контрольная лампа
0
Potem ko vstavite
Po zasunutí
После вставки
!
Gumb za vklop/izklop
Hlavný vypínač
Кнопка включения
питания
@
Lučka indikatorja preostale
energije baterije
Indikátor zostávajúcej
kapacity akumulátora
Световой индкатор
заряда батареи
#
Glavna cev
Hlavná rúrka
Главная труба
$
Stran ohišja
Bok skrine
Сторона корпуса
%
Krožni ro
čaj
Uzavretá rukoväť
Ручка-скоба
^
Nastavek za
pritrditev ročaja
Úchytka na
upevnenie rukoväte
Крепление ручки
&
M6 × 43 vijaki
Skrutky M6 x 43
Болты M6 × 43
*
M6 matice
Matice M6
Гайки M6
(
Pokrov
Kryt
Крышки
)
Nož
Nôž
Нож
q
D5 nastavitveni vijak
Samorezná skrutka D5
Винт-саморез D5
w
Konzola pokrova
Konzola krytu
Скоба крышки
e
M6 × 25 imbus vijaki
Skrutky s vnútorným
šesťhranom M6 x 25
Болты с торцевой
шестиугольной головкой
M6 × 25
r
Nosilec pokrova
Držiak krytu
Удерживающая скоба
t
Sestav prirobnice Prírubová zostava Фланец
y
Krilce Krídelko Барашек
u
Ohišje motorja Kryt elektromotora Корпус двигателя
i
Šestkotni ključ 4 mm
4 mm šesťhranný
nástrčkový kľúč
Шестигранный торцовый
ключ 4
мм
o
Navojno pritrdilo ohišja
motorja
Závitový upínací prvok
motorovej skrine
Резьбовая крепежная
деталь корпуса
двигателя
p
Odprtina Otvor Отверстие
a
Najlonska glava Nylonová hlava
Головк а с нейлоновой
струной
s
Vijak (vrtenje v levo) Skrutka (ľavotočivá) Винт (левого вращения)
d
Najlonska vrvica
Nylonová struna
Нейлоновый шнур
f
Potapkajte
Poklepte
Ударить
g
Gumb Tlačidlo Кнопка
h
Stresite/sprostite Poklepte/uvoľnite Удар/освобождение
j
Oznaka omejitve obrabe
(2 oznaki)
Značka max.
opotrebovania (2 značky)
Отметка предела износа
(2 отметки)
k
Daljša se v korakih po
30 mm
Vysúva sa v 30 mm
prírastkoch
Увеличение длины на
30 мм

9
Slovenščina Slovenčina Pyccкий
l
Ustrezna dolžina
90–110 mm
Približná dĺžka 90 – 110 mm
Необходимая длина 90-
110 мм
;
Pokrov
Kryt
Крышки
z
Ohišje
Skriňa Корпус
x
Kljuka
Háčik
Карабин
c
Pritisnite jezička
(2 območji)
Výčnelky na zatlačenie
(2 plochy)
Нажать защелки
(в 2 местах)
v
Kolut Cievka Катушка
b
Utor Drážka Выемка
n
Luknja koluta Otvor v cievke Отверстие в катушке
m
Smer navijanja najlonske
vrvice
Smer navíjania nylonovej
struny
Направление
сматывания нейлоновой
струны
,
Zavarujte v zapiralo Zaistite v zarážke
Зафиксировать в
фиксаторе
.
Zapiralo Zarážka Фиксатор
/
Ušesno vodilo za vrvico
Vodiaci prvok struny s
očkom
Направляющая струны
с
отверстием
¡
Medtem ko držite kolut Súčasne držte cievku Удержание катушки
™
Vrvico vstavite skoti
ušesno vodilo za vrvico
Pretiahnite strunu cez
vodiaci prvok struny s
očkom
Уложить струну в
направляющую с
отверстием
£
Zaklepne odprtine pokrova
(2 odprtini)
Poistné otvory krytu
(2 otvory)
Фиксирующие отверстия
крышки
(2 отверстия)
¢
Jezička ohišja (2 jezička)
Výčnelky na puzdre
(2 výčnelky)
Защелки корпуса
(2 защелки)
∞
Lučka za delovanje
Indikátor zapnutia
Лампа питания
§
Ročaj
Rukoväť
Рукоятка
¶
Zapiralni vzvod
Poistná páčka
Запорный рычаг
•
Vzvod
Páčka
Рычаг
ª
Naprej
Dopredu
Вперед
º
Leva stran
Ľavá strana
Левая сторона
⁄
Omejitev obrabe
Hranica opotrebovania
Предел износа
¤
Pokrov ščetke
Kryt kefky
Колпачок щетки
‹
Zob grafi tne krtačke
Hrot uhlíkovej kefky
Подпружиненный
контакт угольной щетки
›
Rob grafi tne ščetke
Výčnelok uhlíkovej kefky
Выступ для угольной
щетки
fi
Stični del cevi krtače
Kontaktná časť rúrky kefky
Контактная поверхность
гнезда для щетки
fl
Vzmetna podložka M6
Pružinová podložka M6
Предохранительная
шайба M6
‡
Ročaj levi
Ľavé držadlo
Рукоятка слева
°
Ročaj desni
Pravé držadlo
Рукоятка справа
·
Spona ročaja (A)
Svorka držadiel (A)
Скоба рукоятки (A)
‚
M5 × 25 šestkotni imbus
vijaki
Skrutky M5 × 25 so
šesťuholníkovou objímkou
M5 × 25 болты с
шестигранным гнездом

10
English Deutsch Ελληνικά Polski
Symbols
WARNING
The following show
symbols used for the
machine. Be sure that you
understand their meaning
before use.
Symbole
WARNUNG
Die folgenden Symbole
werden für diese
Maschine verwendet.
Achten Sie darauf, diese
vor der Verwendung zu
verstehen.
Σύμβολα
ΠΡΟΣΟΧΗ
Τα παρακάτω δείχνουν
τα σύμβολα που
χρησιμοποιούνται στο
μηχάνημα. Βεβαιωθείτε
ότι κατανοείτε τη
σημασίας τους πριν τη
χρήση.
Symbole
OSTRZEŻENIE
Następujące oznaczenia
to symbole używane w
instrukcji obsługi maszyny.
Upewnij się, że rozumiesz
ich znaczenie zanim
użyjesz narzędzia.
Read all safety warnings
and all instructions.
Failure to follow the
warnings and instructions
may result in electric
shock, fi re and/or serious
injury.
Lesen Sie sämtliche
Sicherheitshinweise und
Anweisungen durch.
Wenn die Warnungen
und Anweisungen nicht
befolgt werden, kann es
zu Stromschlag, Brand
und/oder ernsthaften
Verletzungen kommen.
Διαβάζετε όλες τις
προειδοποιήσεις
ασφαλείας και όλες τις
οδηγίες.
Η μη τήρηση των
προειδοποιήσεων και
οδηγιών μπορεί να
προκαλέσει
ηλεκτροπληξία, πυρκαγιά
και/ή σοβαρό τραυματισμό.
Należy dokładnie
zapoznać się ze
wszystkimi ostrzeżeniami
i wskazówkami
bezpieczeństwa.
Nieprzestrzeganie
ostrzeżeń oraz wskazówek
bezpieczeństwa może
spowodować porażenie
prądem elektrycznym,
pożar i/lub odniesienie
poważnych obrażeń.
Always wear eye
protection.
Tragen Sie immer einen
Augenschutz.
Φοράτε πάντα τον
κατάλληλο εξοπλισμό
για την προστασία των
ματιών.
Zawsze nosić okulary
ochronne.
Always wear hearing
protection.
Stets Gehörschutz tragen.
Να φοράτε πάντοτε
προστατευτικά ακοής.
Należy zawsze nosić
ochronę słuchu.
Do not expose to moisture.
Keiner Feuchtigkeit
aussetzen.
Μην το εκθέσετε στην
υγρασία.
Nie narażać urządzenia na
działanie wilgoci.
Keep bystanders away.
Achten Sie darauf, dass
keine unbeteiligten
Personen in der Nähe
sind.
Κρατήστε μακριά τους
παρευρισκόμενους.
Osoby postronne powinny
pozostawać w bezpiecznej
odległości.
Remove battery before
adjusting or cleaning
and before leaving the
machine unattended for
any period.
Entfernen Sie die Batterie
vor dem Einstellen und
der Reinigung sowie
dann, wenn das Gerät
unbeaufsichtigt ist.
Αφαιρέστε τη μπαταρία
πριν από τη ρύθμιση ή
τον καθαρισμό και πριν
αφήσετε το μηχάνημα
χωρίς επίβλεψη για
οποιαδήποτε χρονική
περίοδο.
Akumulator należy
zawsze wyjąć przed
przystąpieniem do
wykonywania regulacji lub
czyszczenia oraz kiedy
urządzenie nie będzie
wykorzystywane przez
dłuższy czas.
Only for EU countries
Do not dispose of electric
tools together with
household waste material!
In observance of European
Directive 2002/96/EC
on waste electrical and
electronic equipment
and its implementation in
accordance with national
law, electric tools that
have reached the end of
their life must be collected
separately and returned
to an environmentally
compatible recycling facility.
Nur für EU-Länder
Werfen Sie
Elektrowerkzeuge nicht in
den Hausmüll!
Gemäss Europäischer
Richtlinie 2002/96/
EG über Elektro- und
Elektronik- Altgeräte und
Umsetzung in nationales
Recht müssen verbrauchte
Elektrowerkzeuge
getrennt gesammelt und
einer umweltgerechaten
Wiederververtung
zugeführt werden.
Μόνο για τις χώρες της ΕΕ
Μην πετάτε τα ηλεκτρικά
εργαλεία στον κάδο
οικιακών απορριμμάτων!
Σύμφωνα με την
ευρωπαϊκή οδηγία 2002/
96/ΕΚ περί ηλεκτρικών και
ηλεκτρονικών συσκευών
και την ενσωμάτωσή
της στο εθνικό δίκαιο, τα
ηλεκτρικά εργαλεία πρέπει
να συλλέγονται ξεχωριστά
και να επιστρέφονται για
ανακύκλωση με τρόπο
φιλικό προς το περιβάλλον
.
Dotyczy tylko państw UE
Nie wyrzucaj
elektronarzędzi wraz z
odpadami z gospodarstwa
domowego!
Zgodnie z Europejską
Dyrektywą 2002/96/WE w
sprawie zużytego sprzętu
elektrotechnicznego i
elektronicznego oraz
dostosowaniem jej
do prawa krajowego,
zużyte elektronarzędzia
należy posegregować
i zutylizować w sposób
przyjazny dla środowiska.

11
Magyar Čeština Türkçe Română
Jelölések
FIGYELEM
Az alábbiakban a géphez
alkalmazott jelölések
vannak felsorolva. A gép
használata előtt feltétlenül
ismerje meg ezeket a
jelöléseket.
Symboly
UPOZORNĚNÍ
Následující text obsahuje
symboly, které jsou
použity na zařízení.
Ujistěte se, že rozumíte
jejich obsahu před tím, než
začnete zařízení používat.
Simgeler
DİKKAT
Aşağıda, bu alet için
kullanılan simgeler
gösterilmiştir. Aleti
kullanmadan önce bu
simgelerin ne anlama
geldiğini anladığınızdan
emin olun.
Simboluri
AVERTISMENT
În cele ce urmează sunt
prezentate simbolurile
folosite pentru mașină.
Înainte de utilizare,
asiguraţi-vă că înţelegeţi
semnifi caţia acestora.
Olvasson el minden
biztonsági fi gyelmeztetést
és minden utasítást.
A fi gyelmeztetések
és utasítások be nem
tartása áramütést, tüzet
és/vagy súlyos sérülést
eredményezhet.
Přečtěte si všechna
varování týkající se
bezpečnosti a všechny
pokyny.
Nedodržení těchto
varování a pokynů může
mít za následek elektrický
šok, požár a/nebo vážné
zranění.
Tüm güvenlik uyarılarını ve
tüm talimatları okuyun.
Uyarılara ve talimatlara
uyulmaması elektrik
çarpmasına, yangına ve/
veya ciddi yaralanmaya
neden olabilir.
Citiţi toate
avertismentele privind
siguranţa și toate
instrucţiunile.
Nerespectarea
avertismentelor și a
instrucţiunilor poate avea
ca efect producerea de
șocuri electrice, incendii
și/sau vătămări grave.
Mindig viseljen
védőszemüveget.
Vždy noste ochranu očí.
Daima koruyucu gözlük
takın.
Purtaţi întotdeauna
protecţie pentru ochi.
Mindig viseljen fülvédőt.
Používejte vždy chrániče
uší.
Daima koruyucu kulaklık
takın.
Purtaţi întotdeauna
protecţie auditivă.
Ne tegye ki a gépet
nedvességnek.
Nevystavujte zařízení
vlhkosti.
Neme maruz bırakmayın. Nu expuneţi la umezeală.
A bámészkodókat tartsa
távol a készüléktől.
Udržujte přítomné osoby v
bezpečné vzdálenosti.
İzleyicileri uzakta tutun.
Nu lăsaţi alte persoane să
se apropie.
Beállítás vagy tisztítás
előtt, illetve abban az
esetben, ha egy kis időre
felügyelet nélkül hagyja
a gépet, vegye ki az
akkumulátort.
Před nastavením
nebo čištěním a před
ponecháním stroje po
delší dobu bez dozoru
vyjměte baterie.
Ayar veya temizlik
yapmadan önce ve
makineyi uzun bir süre
gözetimsiz bırakacaksanız,
aküyü çıkarın.
Scoateţi bateria înainte
de reglare sau curăţare şi
înainte de a părăsi utilajul
pentru o perioadă de timp.
Csak EU-országok
számára Az elektromos
kéziszerszámokat
ne dobja a háztartási
szemétbe!
A használt villamos és
elektronikai készülékekről
szóló 2002/96/EK irányelv
és annak a nemzeti jogba
való átültetése szerint az
elhasznált elektromos
kéziszerszámokat
külön kell gyűjteni, és
környezetbarát módon újra
kell hasznosítani.
Jen pro státy EU Elektrické
nářadí nevyhazujte do
komunálního odpadu!
Podle evropské směrnice
2002/96/EG o nakládání
s použitými elektrickými a
elektronickými zařízeními
a odpovídajících
ustanovení právních
předpisů jednotlivých
zemí se použitá elektrická
nářadí musí sbírat
odděleně od ostatního
odpadu a podrobit
ekologicky šetrnému
recyklování.
Sadece AB ülkeleri için
Elektrikli el aletlerini
evdeki çöp kutusuna
atmayınız!
Kullanılmış elektrikli
aletleri, elektrik ve
elektronikli eski cihazlar
hakkındaki 2002/96/EC
Avrupa yönergelerine
göre ve bu yönergeler
ulusal hukuk kurallarına
göre uyarlanarak, ayrı
olarak toplanmalı ve çevre
şartlarına uygun bir şekilde
tekrar değerlendirmeye
gönderilmelidir.
Numai pentru ţările
membre UE
Nu aruncaţi această sculă
electrică împreună cu
deșeurile menajere!
În conformitate cu
Directiva Europeană
2002/96/CE referitoare la
deșeurile reprezentând
echipamente electrice
și electronice și la
implementarea acesteia în
conformitate cu legislaţiile
naţionale, sculele electrice
care au ajuns la
fi nalul
duratei de folosire trebuie
colectate separat și duse
la o unitate de reciclare
compatibilă cu mediul
înconjurător.

12
Slovenščina Slovenčina Pyccкий
Simboli
OPOZORILO
V nadaljevanju so
prikazani simboli,
uporabljeni pri stroju. Pred
uporabo se prepričajte, da
jih razumete.
Symboly
VÝSTRAHA
V nasledujúcom sú
zobrazené symboly, ktoré
sú vyobrazené na náradí.
Pred použitím náradia sa
oboznámte s významom
týchto symbolov.
Символы
ПРЕДУПРЕЖДЕНИЕ
Ниже приведены
символы, используемые
для машины. Перед
началом работы
обязательно убедитесь
в том, что Вы понимаете
их значение.
Preberite vas varnostna
opozorila in navodila.
Z neupoštevanjem
opozoril in navodil tvegate
električni udar, požar in/ali
resne telesne poškodbe.
Prečítajte si všetky
bezpečnostné výstrahy
a všetky pokyny.
Nedodržanie výstrah a
pokynov môže viesť k
zasiahnutiu elektrickým
prúdom, požiaru a/alebo
vážnemu poraneniu
osoby.
Прочтите все правила
безопасности и
инструкции.
Не выполнение правил
и инструкций может
привести к поражению
электрическим током,
пожару и/или серьезной
травме.
Uporaba zaščite za oči je
obvezna.
Vždy noste ochranu na
oči.
Всегда надевайте
средства защиты глаз.
Vedno uporabljajte zaščito
za ušesa.
Vždy používajte ochranu
sluchu.
Всегда пользуйтесь
средствами для защиты
органов слуха.
Ne izpostavljajte vlagi.
Nevystavujte účinkom
vlhkosti.
Не подвергать
воздействию влаги.
V bližini stroja se naj ne
nahajo druge osebe.
Okolostojacim osobám
nedovoľte vstúpiť do
pracovnej plochy.
Удалите посторонних из
рабочей зоны.
Odstranite baterijo,
preden nastavljate, čistite
ali puščate stroj brez
nadzora.
Akumulátor vyberte
pred nastavovaním,
čistením a pred tým, ako
necháte zariadenie počas
akejkoľvek doby bez
dozoru.
Перед проведением
регулировки и
триммера, а также перед
длительным хранением
триммера, удалите
аккумулятор.
Samo za države EU
Električnih orodij
ne zavržite skupaj z
gospodinjskimi odpadki!
V skladu z evropsko
direktivo 2002/96/EC
o odpadni električni
in elektronski opremi
in izvedbi v skladu z
državnimi zakoni, je treba
električna orodja, ki so
dosegla življenjsko dobo
ločeno zbirati in vrniti
v z okoljem združljivo
ustanovo za recikliranje.
Iba pre krajiny EÚ
Elektrické náradie
nezneškodňujte spolu s
komunálnym odpadom z
domácností!
Aby ste dodržali
ustanovenia európskej
smernice 2002/96/ES o
odpadových elektrických
a elektronických
zariadeniach a jej
implementáciu v zmysle
národnej legislatívy,
je potrebné elektrické
zariadenie po uplynutí
jeho doby životnosti
separovať a doručiť na
environmentálne prijateľné
miesto recyklovania.
Только для стран
ЕС Не выкидывайте
электроприборы вместе
с обоычным мусором!
В соответствии
с европейской
директивой 2002/96/
ЕС об утилизации
старых электрических и
электронных приборов
и в соответствии с
местными законами
электроприборы,
бывщие в
эксплуатации, должны
утилизовываться
отдельно безопасным
для окружающей среды
способом.

13
English
(Original instructions)
GENERAL POWER TOOL SAFETY WARNINGS
WARNING
Read all safety warnings and all instructions.
Failure to follow the warnings and instructions may result in
electric shock, fi re and/or serious injury.
Save all warnings and instructions for future
reference.
The term “power tool” in the warnings refers to your mains-
operated (corded) power tool or battery-operated (cordless)
power tool.
1) Work area safety
a) Keep work area clean and well lit.
Cluttered or dark areas invite accidents.
b) Do not operate power tools in explosive
atmospheres, such as in the presence of
fl ammable liquids, gases or dust.
Power tools create sparks which may ignite the dust
or fumes.
c) Keep
children and bystanders away while
operating a power tool.
Distractions can cause you to lose control.
2) Electrical safety
a) Power tool plugs must match the outlet.
Never modify the plug in any way.
Do not use any adapter plugs with earthed
(grounded) power tools.
Unmodifi ed plugs and matching outlets will reduce
risk of electric shock.
b) Avoid body contact with earthed or grounded
surfaces, such as
pipes, radiators, ranges and
refrigerators.
There is an increased risk of electric shock if your
body is earthed or grounded.
c) Do not expose power tools to rain or wet
conditions.
Water entering a power tool will increase the risk of
electric shock.
d) Do not abuse the cord. Never use the cord for
carrying, pulling or unplugging the power tool.
Keep cord away from heat, oil, sharp edges or
moving parts.
Damaged or entangled cords increase the risk of
electric shock.
e) When operating a
power tool outdoors, use an
extension cord suitable for outdoor use.
Use of a cord suitable for outdoor use reduces the
risk of electric shock.
f) If operating a power tool in a damp location
is unavoidable, use a residual current device
(RCD) protected supply.
Use of an RCD reduces the risk of electric shock.
3) Personal safety
a) Stay alert, watch what you are doing and use
common sense when operating a power tool.
Do not use a power tool while you are tired
or under the infl uence of drugs, alcohol or
medication.
A moment of inattention while operating power tools
may result in serious personal injury.
b) Use personal protective equipment. Always
wear eye protection.
Protective equipment such as dust mask, non-skid
safety shoes, hard hat, or hearing protection used
for appropriate conditions will reduce personal
injuries.
c) Prevent unintentional starting. Ensure the
switch is in the off position before connecting
to power source and/or
battery pack, picking
up or carrying the tool.
Carrying power tools with your fi nger on the switch
or energising power tools that have the switch on
invites accidents.
d) Remove any adjusting key or wrench before
turning the power tool on.
A wrench or a key left attached to a rotating part of
the power tool may result in personal injury.
e) Do not overreach. Keep proper footing and
balance at all times.
This enables better control of the power tool in
unexpected situations.
f) Dress properly. Do not wear loose clothing or
jewellery. Keep your hair, clothing and
gloves
away from moving parts.
Loose clothes, jewellery or long hair can be caught
in moving parts.
g) If devices are provided for the connection of
dust extraction and collection facilities, ensure
these are connected and properly used.
Use of dust collection can reduce dust related
hazards.
4) Power tool use and care
a) Do not force the power tool. Use the correct
power tool for your application.
The correct power tool will do the job better and
safer at the rate for which it was designed.
b) Do
not use the power tool if the switch does not
turn it on and off .
Any power tool that cannot be controlled with the
switch is dangerous and must be repaired.
c) Disconnect the plug from the power source
and/or the battery pack from the power tool
before making any adjustments, changing
accessories, or storing power tools.
Such preventive safety measures reduce the risk of
starting the power tool accidentally.
d) Store idle power tools out
of the reach of
children and do not allow persons unfamiliar
with the power tool or these instructions to
operate the power tool.
Power tools are dangerous in the hands of untrained
users.
e) Maintain power tools. Check for misalignment
or binding of moving parts, breakage of parts
and any other condition that may aff ect the
power toolsʼ
operation.
If damaged, have the power tool repaired
before use.
Many accidents are caused by poorly maintained
power tools.
f) Keep cutting tools sharp and clean.
Properly maintained cutting tools with sharp cutting
edges are less likely to bind and are easier to
control.
g) Use the power tool, accessories and tool bits
etc. in accordance with these instructions,
taking into account the working conditions and
the work to be performed.
Use of the power tool for operations diff erent
from those intended could result in a hazardous
situation.

14
English
5) Battery tool use and care
a) Recharge only with the charger specifi ed by
the manufacturer.
A charger that is suitable for one type of battery pack
may create a risk of fi re when used with another
battery pack.
b) Use power tools only with specifi cally
designated battery packs.
Use of any other battery packs may create a risk of
injury and fi re.
c) When battery pack is not in use, keep it away
from other metal objects like paper clips,
coins,
keys, nails, screws, or other small metal
objects that can make a connection from one
terminal to another.
Shorting the battery terminals together may cause
burns or a fi re.
d) Under abusive conditions, liquid may be ejected
from the battery; avoid contact. If contact
accidentally occurs, fl ush with water. If liquid
contacts eyes, additionally seek medical help.
Liquid ejected from the battery may cause irritation
or burns.
6) Service
a) Have your power tool serviced by a qualifi ed
repair person using only identical replacement
parts.
This will ensure that the safety of the power tool is
maintained.
PRECAUTION
Keep children and infi rm persons away.
When not in use, tools should be stored out of reach
of children and infi rm persons.
GRASS TRIMMER SAFETY WARNINGS
IMPORTANT
READ CAREFULLY BEFORE USE
KEEP FOR FUTURE REFERENCE
Safe operation practices
● Training
a) Read the instructions carefully. Be familiar with the
controls and the proper use of the machine.
b) Never allow people unfamiliar with these instructions
or children to use the machine. Local regulations can
restrict the age of the operator.
c) Keep in mind that the operator or user is responsible for
accidents or hazards occurring to other people or their
property.
● Preparation
a) Never operate the machine while people, especially
children, or pets are nearby.
b) Wear eye protection and stout shoes at all times while
operating the machine.
● Operation
a) Use the machine only in daylight or good artifi cial light.
b) Never operate the machine with damaged cover or
without cover in place.
c) Switch on the motor only when the hands and feet are
away from the cutting means.
d) Always disconnect the machine from the power supply
(i.e. remove the plug from the mains or remove the
disabling device)
– whenever leaving the machine unattended;
– before clearing a blockage;
– before checking, cleaning or working on the
machine;
– after striking a foreign object;
– whenever the machine starts vibrating abnormally.
e) Take care against injury to feet and hands from the
cutting means.
f) Always ensure that the ventilation openings are kept
clear of debris.
● Maintenance and storage
a) Disconnect the machine from the power supply (i.e.
remove the plug from the mains or remove the disabling
device) before carrying out maintenance or cleaning
work.
b) Use only the manufacturer’s recommended
replacement parts and accessories.
c) Inspect and maintain the machine regularly. Have the
machine repaired only by an authorized repairer.
d) When not in use, store the machine out of the reach of
children.
PRECAUTIONS FOR CORDLESS GRASS
TRIMMER
WARNING
1. Exercise patience in all work with the tool. And dress
properly to keep warm.
2. Plan all work ahead to prevent accidents.
3. Do not operate the tool at night or under bad weather
conditions when visibility is poor. And do not operate
the tool when it is raining or right after it has been
raining.
Working on slippery ground could lead to an accident if
you lose your balance.
4. Inspect the nylon head before starting work.
Do not use the tool if the nylon head is cracked, scarred
or bent.
Make sure the nylon head is properly attached. A nylon
head that falls apart or comes loose during operation
could cause an accident.
5. Be sure to attach the cover before starting work.
Operating the tool without this parts could lead to injury.
6. Be sure to attach the loop handle before starting work.
Make sure it is not loose but properly attached before
starting work. Hold the loop handle fi rmly during work
and do not swing the tool around, but use the correct
posture and maintain your balance.
Losing your balance during work could lead to an
injury.
7. Take care when starting the motor.
Place the tool on level ground.
Do not operate the tool within 15 m of people or
animals.
Make sure that the nylon head does not come into
contact with the ground or trees and plants.
A careless start could lead to injury.
8. Do not secure the lock lever.
Accidentally pulling back the lever could lead to
unexpected injury.
9. Before leaving the tool, press the power button to turn it
off .
10. Operate the tool with care near electric cables, gas
pipes and similar installations.
11. Look out for and remove empty cans, wire, stones or
other obstacles before starting work. And do not work
near tree roots or rocks.
Working in such areas could damage the nylon head or
lead to injury.
12. Never touch the nylon head during operation.
Also make sure it does not come into contact with your
hair, clothes, etc.
13. In the following situations, turn off the motor and check
that the nylon head has stopped rotating.
To move to another work area.
To remove rubbish or grass that has become stuck in
the tool.

15
English
To remove from the work area obstacles or the rubbish,
grass and chips generated by trimming.
To lay down the tool.
Doing this with the nylon head still rotating could lead to
unexpected accidents.
14. Do not use the tool within 15 m of another person.
When you work with someone else, maintain a distance
of more than 15 m.
Flying chips could lead to unexpected accidents.
When working on unstable surfaces like slopes, make
sure that your co-worker is not exposed to any hazards.
Use whistles or other means for calling the attention of
your co-workers.
15. When grass and other objects become entangled in the
nylon head, turn off the motor and make sure the nylon
head has stopped rotating before removing them.
Removing objects from the nylon head when it is still
rotating will lead to injury.
Continuing operation when foreign matter is stuck in the
nylon head may lead to damage.
16. If the tool is operating poorly and produces strange
noise or vibrations, turn off the motor immediately and
ask your dealer to have it inspected and repaired.
Continued use under these conditions could lead to
injury or tool damage.
17. If you drop or bump the tool, inspect it carefully to check
there is no damage, cracks or deformation.
Using a tool that is damaged, cracked or deformed
could result in injury.
18. Secure the tool during vehicle transport to ensure that it
lies still.
Failure to heed this warning may result in an accident.
19. This product contains a strong permanent magnet in
the motor.
Observe the following precautions regarding adhering
of chips to the tool and the eff ect of the permanent
magnet on electronic devices.
CAUTION
◯ Do not place the tool on a workbench or work area
where metal chips are present.
The chips may adhere to the tool, resulting in injury or
malfunction.
◯ If chips have adhered to the tool, do not touch it.
Remove the chips with a brush.
Failure to do so may result in injury.
◯ If you use a pacemaker or other electronic medical
device, do not operate or approach the tool.
Operation of the electronic device may be aff ected.
◯ Do not use the tool in the vicinity of precision devices
such as cell phones, magnetic cards or electronic
memory media.
Doing so may lead to misoperation, malfunction or loss
of data.
CAUTION
1. Do not turn on the nylon head for cutting objects other
than grass. Do not operate the tool in water puddles and
make sure that soil does not come into contact with the
nylon head.
2. The tool contains precision parts and should not be
dropped, exposed to strong impact or water.
The tool could be damaged or malfunction.
3. When the tool is to be stored after use or be transported,
remove the nylon head.
4. Do not expose the tool to insecticide and other
chemicals.
Such chemicals could cause cracking and other
damage.
5. Replace warning labels with new labels when they
become diffi cult to recognize or illegible and when they
start to peel.
Ask your dealer to provide the warning labels.
6. Do not touch the motor immediately after use since it
may be very hot.
PRECAUTIONS FOR BATTERY AND CHARGER
1. Always charge the battery at a temperature of 0°C –
40°C. A temperature of less than 0°C will result in over
charging which is dangerous. The battery cannot be
charged at a temperature higher than 40°C.
The most suitable temperature for charging is that of
20°C – 25°C.
2. When one charging is completed, leave the charger for
about 15 minutes before the next charging of battery.
Do not charge more than two batteries consecutively.
3. Do not allow foreign matter to enter the hole for
connecting the rechargeable battery.
4. Do not insert object into the air ventilation slots of the
charger.
Inserting metal objects or infl ammables into the charger
air ventilation slots will result in electrical shock hazard
or damaged charger.
5. Using an exhausted battery will damage the charger.
6. Bring the battery to the shop from which it was
purchased as soon as the post-charging battery life
becomes too short for practical use. Do not dispose of
the exhausted battery.
7. Never disassemble the rechargeable battery and
charger.
8. Never short-circuit the rechargeable battery. Short-
circuiting the battery will cause a great electric current
and overheat. It results in burn or damage to the battery.
9. Do not dispose of the battery in fi re. If the battery is
burnt, it may explode.
CAUTION ON LITHIUM-ION BATTERY
To extend the lifetime, the lithium-ion battery equips with
the protection function to stop the output.
In the cases of 1 to 3 described below, when using this
product, even if you are pulling the switch, the motor may
stop. This is not the trouble but the result of protection
function.
1. When the battery power remaining runs out, the motor
stops.
In such case, charge it up immediately.
2. If the tool is overloaded, the motor may stop. In this
case, release the switch of tool and eliminate causes of
overloading. After that, you can use it again.
3. If the battery is overheated under overload work, the
battery power may stop.
In this case, stop using the battery and let the battery
cool. After that, you can use it again. (BSL1430,
BSL1830, BSL1440, BSL1840)
Furthermore, please heed the following warning and
caution.
WARNING
In order to prevent any battery leakage, heat generation,
smoke emission, explosion and ignition beforehand,
please be sure to heed the following precautions.
1. Make sure that swarf and dust do not collect on the
battery.
◯ During work make sure that swarf and dust do not fall on
the battery.
◯ Make sure that any swarf and dust falling on the power
tool during work do not collect on the battery.
◯ Do not store an unused battery in a location exposed to
swarf and dust.
◯ Before storing a battery, remove any swarf and dust that
may adhere to it and do not store it together with metal
parts (screws, nails, etc.).

16
English
2. Do not pierce battery with a sharp object such as a
nail, strike with a hammer, step on, throw or subject the
battery to severe physical shock.
3. Do not use an apparently damaged or deformed
battery.
4. Do not use the battery in reverse polarity.
5. Do not connect directly to an electrical outlets or car
cigarette lighter sockets.
6. Do not use the battery for a purpose other than those
specifi ed.
7. If the battery charging fails to complete even when a
specifi ed recharging time has elapsed, immediately
stop further recharging.
8. Do not put or subject the battery to high temperatures or
high pressure such as into a microwave oven, dryer, or
high pressure container.
9. Keep away from fi re immediately when leakage or foul
odor are detected.
10. Do not use in a location where strong static electricity
generates.
11. If there is battery leakage, foul odor, heat generated,
discolored or deformed, or in any way appears abnormal
during use, recharging or storage, immediately remove
it from the equipment or battery charger, and stop use.
CAUTION
1. If liquid leaking from the battery gets into your eyes,
do not rub your eyes and wash them well with fresh
clean water such as tap water and contact a doctor
immediately.
If left untreated, the liquid may cause eye-problems.
2. If liquid leaks onto your skin or clothes, wash well with
clean water such as tap water immediately.
There is a possibility that this can cause skin irritation.
3. If you fi nd rust, foul odor, overheating, discolor,
deformation, and/or other irregularities when using the
battery for the fi rst time, do not use and return it to your
supplier or vendor.
WARNING
If an electrically conductive foreign object enters the
terminals of the lithium ion battery, a short-circuit may
occur resulting in the risk of fi re. Please observe the
following matters when storing the battery.
◯ Do not place electrically conductive cuttings,
nails, steel wire, copper wire or other wire in the
storage case.
◯ Either install the battery in the power tool or store
by
securely pressing into the battery cover until
the ventilation holes are concealed to prevent
short-circuits (See Fig. 1).
SPECIFICATIONS
POWER TOOL
Model CG14DSDL CG18DSDL
Pole type Straight type
Cutting capacity diameter 310 mm
Rotation direction Counterclockwise as seen from above
No-load speed 5000 min
-1
Operating time on one charge *
1
(When supplied rechargeable battery is fully charged)
17 – 22 min*
2
(BSL1430)
23 – 32 min*
2
(BSL1830)
Battery
BSL1430:
Li-ion 14.4 V
(3.0 Ah
8 cells)
BSL1440:
Li-ion 14.4 V
(4.0 Ah
8 cells)
BSL1830:
Li-ion 18 V
(3.0 Ah
10 cells)
BSL1840:
Li-ion 18 V
(4.0 Ah
10 cells)
Weight (with nylon head, rechargeble battery and
cover)
4.1 kg 4.3 kg
*1 The data in the above table is provided only as an example. Since type of grass, ambient temperature, rechargeable
battery characteristics, work methods, etc. can vary widely the above should only be used as a rough guideline.
*2 Conditions: Outer diameter of nylon head 310 mm, switch set to full speed. (switch left ON all the time)
CHARGER
Model UC18YGSL UC18YRSL
Charging voltage 14.4 V – 18 V
Battery
BSL1430, BSL1830,
BSL1440, BSL1840
Weight 0.4 kg 0.6 kg

17
English
STANDARD ACCESSORIES
CG14DSDL
(LSC)
1 Battery (BSL1430) ................................1
2 Charger (UC18YGSL) ...........................1
3 Nylon head ............................................1
4 Cover ....................................................1
5 Hex. bar wrench 4 mm ..........................1
6 17×19 Combi box wrench .....................1
7 Protective glass ....................................1
CG14DSDL
(2LSC)
1 Battery (BSL1430) ................................2
2 Charger (UC18YGSL) ...........................1
3 Nylon head ............................................1
4 Cover ....................................................1
5 Hex. bar wrench 4 mm ..........................1
6 17×19 Combi box wrench .....................1
7 Protective glass ....................................1
8 Battery cover ........................................1
CG18DSDL
(NN)
1 Nylon head ............................................1
2 Cover ....................................................1
3 Hex. bar wrench 4 mm ..........................1
4 17×19 Combi box wrench .....................1
5 Protective glass ....................................1
CG18DSDL
(LSC)
1 Battery (BSL1830) ................................1
2 Charger (UC18YGSL) ...........................1
3 Nylon head ............................................1
4 Cover ....................................................1
5 Hex. bar wrench 4 mm ..........................1
6 17×19 Combi box wrench .....................1
7 Protective glass ....................................1
CG18DSDL
(2LSC)
1 Battery (BSL1830) ................................2
2 Charger (UC18YGSL) ...........................1
3 Nylon head ............................................1
4 Cover ....................................................1
5 Hex. bar wrench 4 mm ..........................1
6 17×19 Combi box wrench .....................1
7 Protective glass ....................................1
8 Battery cover ........................................1
CG18DSDL
(LSR)
1 Battery (BSL1830) ................................1
2 Charger (UC18YRSL) ...........................1
3 Nylon head ............................................1
4 Cover ....................................................1
5 Hex. bar wrench 4 mm ..........................1
6 17×19 Combi box wrench .....................1
7 Protective glass ....................................1
CG18DSDL
(2LSR)
1 Battery (BSL1830) ................................2
2 Charger (UC18YRSL) ...........................1
3 Nylon head ............................................1
4 Cover ....................................................1
5 Hex. bar wrench 4 mm ..........................1
6 17×19 Combi box wrench .....................1
7 Protective glass ....................................1
8 Battery cover ........................................1
CG14DSDL
(LLR)
1 Battery (BSL1440) ................................1
2 Charger (UC18YRSL) ...........................1
3 Nylon head ............................................1
4 Cover ....................................................1
5 Hex. bar wrench 4 mm ..........................1
6 17×19 Combi box wrench .....................1
7 Protective glass ....................................1
CG14DSDL
(2LLR)
1 Battery (BSL1440) ................................2
2 Charger (UC18YRSL) ...........................1
3 Nylon head ............................................1
4 Cover ....................................................1
5 Hex. bar wrench 4 mm ..........................1
6 17×19 Combi box wrench .....................1
7 Protective glass ....................................1
8 Battery cover ........................................1
CG18DSDL
(LLR)
1 Battery (BSL1840) ................................1
2 Charger (UC18YRSL) ...........................1
3 Nylon head ............................................1
4 Cover ....................................................1
5 Hex. bar wrench 4 mm ..........................1
6 17×19 Combi box wrench .....................1
7 Protective glass ....................................1

18
English
CG18DSDL
(2LLR)
1 Battery (BSL1840) ................................2
2 Charger (UC18YRSL) ...........................1
3 Nylon head ............................................1
4 Cover ....................................................1
5 Hex. bar wrench 4 mm ..........................1
6 17×19 Combi box wrench .....................1
7 Protective glass ....................................1
8 Battery cover ........................................1
CG18DSDL
(NN)
1 Nylon head ............................................1
2 Cover ....................................................1
3 Hex. bar wrench 4 mm ..........................1
4 17×19 Combi box wrench .....................1
5 Protective glass ....................................1
Standard accessories are subject to change without notice.
[Included items]: Loop handle
The following items are supplied with the product (used for
assembly of each part).
1 Cover holder ................................................................. 1
2 M6 × 25 hex. socket button bolt ................................... 2
3 M6 spring washer ......................................................... 2
4 Knife ............................................................................. 1
5 D5 tapping screw ......................................................... 1
6 Loop handle ................................................................. 1
7 Handle fi xture ............................................................... 1
8 M6 × 43 bolt .................................................................. 2
9 M6 nut ........................................................................... 2
0 Flange ass'y ................................................................. 1
[Included items]: Bicycle-style handle bar
The following items are supplied with the product (used for
assembly of each part).
1 Cover holder ................................................................. 1
2 M6 × 25 hex. socket button bolt ................................... 2
3 M6 spring washer ......................................................... 2
4 Knife ............................................................................. 1
5 D5 tapping screw ......................................................... 1
6 Handle left .................................................................... 1
7 Flange ass'y ................................................................. 1
OPTIONAL ACCESSORIES (sold separately)
1. Battery
(BSL1430) (BSL1830)
(BSL1440) (BSL1840)
2. Battery cover
Optional accessories are subject to change without notice.
APPLICATIONS
Trimming, scaling and mowing of weed.
BATTERY REMOVAL/INSTALLATION
1. Battery removal
Hold the housing tightly and push the battery latches to
remove the battery (see Fig. 2).
CAUTION
Never short-circuit the battery.
2. Battery installation
Insert the battery while observing its polarities (see Fig.
2).
CHARGING
Before using the power tool, charge the battery as follows.
1. Connect the charger’s power cord to a receptacle.
When connecting the plug of the charger to
a receptacle, the pilot lamp will blink in red
(At 1-second intervals).
2. Insert the battery into the charger.
Firmly insert the battery into the charger as shown in
Fig. 3 and 4 (UC18YGSL), Fig. 5 and 6 (UC18YRSL).
3. Charging
When inserting a battery in the charger, the pilot lamp
will light up continuously in red.
When the battery becomes fully recharged, the
pilot lamp will blink in red (At 1-second intervals).
(See Table 1)
(1) Pilot lamp indication
The indications of the pilot lamp will be as shown in
Table 1, according to the condition of the charger or the
rechargeable battery.

19
English
Table 1
Indications of the pilot lamp (UC18YGSL)
Pilot lamp
(red)
Before
charging
Blinks
Lights for 0.5 seconds. Does not light for 0.5
seconds. (off for 0.5 seconds)
While
charging
Lights
Lights continuously
Charging
complete
Blinks
Lights for 0.5 seconds. Does not light for 0.5
seconds. (off for 0.5 seconds)
Overheat
standby
Blinks
Lights for 1 second. Does not light for 0.5
seconds. (off for 0.5 seconds)
Battery overheated.
Unable to charge
(Charging will commence
when battery cools).
Charging
impossible
Flickers
Lights for 0.1 seconds. Does not light for 0.1
seconds. (off for 0.1 seconds)
Malfunction in the
battery or the charger
Indications of the pilot lamp (UC18YRSL)
Pilot lamp
(red)
Before
charging
Blinks
Lights for 0.5 seconds. Does not light for 0.5
seconds. (off for 0.5 seconds)
While
charging
Lights
Lights continuously
Charging
complete
Blinks
Lights for 0.5 seconds. Does not light for 0.5
seconds. (off for 0.5 seconds)
Charging
impossible
Flickers
Lights for 0.1 seconds. Does not light for 0.1
seconds. (off for 0.1 seconds)
Malfunction in the
battery or the charger
Pilot lamp
(green)
Overheat
standby
Lights
Lights continuously
Battery overheated.
Unable to charge
(Charging will commence
when battery cools).
(2) Regarding the temperatures of the rechargeable
battery
The temperatures for rechargeable batteries are as
shown in the Table 2, and batteries that have become
hot should be cooled for a while before being recharged.
Table 2 Recharging ranges of batteries
Temperatures at which the battery can be recharged
0°C – 50°C
(3) Regarding recharging time
Table 3 shows the recharging time required according
to the type of battery.
Table 3 Charging time (At 20°C)
Charger
Battery
UC18YGSL UC18YRSL
BSL1430 Approx. 90 min. Approx. 45 min.
BSL1830 Approx. 90 min. Approx. 45 min.
BSL1440 Approx. 120 min. Approx. 60 min.
BSL1840 Approx. 120 min. Approx. 60 min.
NOTE
The recharging time may vary according to the ambient
temperature.
4. Disconnect the charger’s power cord from the
receptacle.
5. Hold the charger fi rmly and pull out the battery.
NOTE
Be sure to pull out the battery from the charger after
use, and then keep it.
Regarding electric discharge in case of new
batteries, etc.
As the internal chemical substance of new batteries
and batteries that have not been used for an extended
period is not activated, the electric discharge might be
low when using them the fi rst and second time. This is
a temporary phenomenon, and normal time required for
recharging will be restored by recharging the batteries
2 – 3 times.
How to make the batteries perform longer
(1) Recharge the batteries before they become completely
exhausted.
When you feel that the power of the tool becomes
weaker, stop using the tool and recharge its battery.
If you continue to use the tool and exhaust the electric
current, the battery may be damaged and its life will
become shorter.

20
English
(2) Avoid recharging at high temperatures.
A rechargeable battery will be hot immediately after
use. If such a battery is recharged immediately after
use, its internal chemical substance will deteriorate,
and the battery life will be shortened. Leave the battery
and recharge it after it has cooled for a while.
CAUTION
○ If the battery is charged while it is heated because it has
been left for a long time in a location subject to direct
sunlight or because the battery has just been used,
the pilot lamp of the charger lights for 1 second, does
not light for 0.5 seconds (off for 0.5 seconds). In such a
case, fi rst let the battery cool, then start charging.
○ When the pilot lamp fl ickers (at 0.2-second intervals),
check for and take out any foreign objects in the
charger’s battery connector. If there are no foreign
objects, it is probable that the battery or charger is
malfunctioning. Take it to your authorized Service
Center.
○ Since the built-in micro computer takes about 3
seconds to confi rm that the battery being charged
with UC18YGSL is taken out, wait for a minimum of 3
seconds before reinserting it to continue charging. If
the battery is reinserted within 3 seconds, the battery
may not be properly charged.
ABOUT POWER LAMP
The power lamp indicates various statuses for the tool.
(Fig. 7)
Table 4 shows the various statuses indicated by the power
lamp.
Table 4
State of lamp Status of Tool
Off Power OFF
Red Power ON
Blinking red
The over-heat protection circuit
of the tool is operating.
The lever is being pressed while
the overload protection circuit of
the tool is operating.
Quickly blinking red The tool is operating abnormally.
ABOUT REMAINING BATTERY INDICATOR
The remaining battery lamp blinks when the remaining
battery power is low.
Please charge the tool as soon as possible. The Table 5
shows the state of remaining battery indicator lamp and the
battery remaining power.
Table 5
State of lamp Battery Remaining Power
The battery remaining power is
enough.
The battery remaining power is nearly
empty.
Re-charge the battery soonest
possible.
As the remaining battery indicator shows somewhat
diff erently depending on ambient temperature and battery
characteristics, read it as a reference.
NOTE
Do not give a strong shock to the switch panel or break
it. It may lead to a trouble.
PRIOR TO OPERATION
CAUTION
Pull out battery before doing any assembly.
1. Installing the loop handle (Fig. 8)
(1) Remove the M6 × 43 bolts (2 pcs.).
(2) Install the loop handle on the main pipe so that it leans
against the housing.
(3) Place the handle fi xture at the lower end of the main
pipe and secure it fi rmly using M6 × 43 bolts (2 pcs.)
and M6 nuts (2 pcs.).
NOTE
Secure the loop handle in a location that provides a
good grip.
CAUTION
Install the loop handle properly and securely as
instructed in the handling instructions.
If not attached properly or securely, it may come off and
cause injury.
2. Installing the bicycle-style handlebars (Fig. 9)
(1) Using the 4 mm hex wrench that is included, remove
the four bolts that have been temporarily secured to the
handle brace (A).
(2) Attach the right-hand side handgrip that has the lever
and the left-hand side handgrip, and then carefully
secure the handle brace (A) using the four bolts.
NOTE
Secure the left and right handgrips in a position that
provides a good grip.
CAUTION
Install the left and right handgrips properly and securely
as instructed in the handling instructions.
If not attached properly or securely, it may come off and
cause injury.
3. Installing cover (See Fig. 10 and 11)
WARNING
Be sure to install the cover in its designated location.
Failure to heed this warning may result in injury from
fl ying stones.
NOTE
Use the supplied hex. bar wrench 4 mm for installation.
(1) Use the supplied D5 tapping screw to install the knife in
the cover. (Fig. 10)
(2) Align the two holes in the cover bracket and the cover
and insert two M6 × 25 hex. socket button bolts passed
through a M6 spring washer respectively. (The cover
bracket is installed in the motor case.)
(3) Place the cover holder on the underside of the cover and
use the supplied hex. bar wrench 4 mm to alternately
tighten the two M6 × 25 hex. socket button bolts until
they are properly tightened.
CAUTION
○ Take care to avoid cutting yourself on the knife inside
the cover.
○ Install the cover and knife properly and securely as
instructed in the handling instructions.
If not attached properly or securely, they may come off
and cause injury.
NYLON HEAD
Installation of semi-auto nylon head
1. Function
Automatically feeds more nylon cutting line when it is
tapped.
Strona jest ładowana ...
Strona jest ładowana ...
Strona jest ładowana ...
Strona jest ładowana ...
Strona jest ładowana ...
Strona jest ładowana ...
Strona jest ładowana ...
Strona jest ładowana ...
Strona jest ładowana ...
Strona jest ładowana ...
Strona jest ładowana ...
Strona jest ładowana ...
Strona jest ładowana ...
Strona jest ładowana ...
Strona jest ładowana ...
Strona jest ładowana ...
Strona jest ładowana ...
Strona jest ładowana ...
Strona jest ładowana ...
Strona jest ładowana ...
Strona jest ładowana ...
Strona jest ładowana ...
Strona jest ładowana ...
Strona jest ładowana ...
Strona jest ładowana ...
Strona jest ładowana ...
Strona jest ładowana ...
Strona jest ładowana ...
Strona jest ładowana ...
Strona jest ładowana ...
Strona jest ładowana ...
Strona jest ładowana ...
Strona jest ładowana ...
Strona jest ładowana ...
Strona jest ładowana ...
Strona jest ładowana ...
Strona jest ładowana ...
Strona jest ładowana ...
Strona jest ładowana ...
Strona jest ładowana ...
Strona jest ładowana ...
Strona jest ładowana ...
Strona jest ładowana ...
Strona jest ładowana ...
Strona jest ładowana ...
Strona jest ładowana ...
Strona jest ładowana ...
Strona jest ładowana ...
Strona jest ładowana ...
Strona jest ładowana ...
Strona jest ładowana ...
Strona jest ładowana ...
Strona jest ładowana ...
Strona jest ładowana ...
Strona jest ładowana ...
Strona jest ładowana ...
Strona jest ładowana ...
Strona jest ładowana ...
Strona jest ładowana ...
Strona jest ładowana ...
Strona jest ładowana ...
Strona jest ładowana ...
Strona jest ładowana ...
Strona jest ładowana ...
Strona jest ładowana ...
Strona jest ładowana ...
Strona jest ładowana ...
Strona jest ładowana ...
Strona jest ładowana ...
Strona jest ładowana ...
Strona jest ładowana ...
Strona jest ładowana ...
Strona jest ładowana ...
Strona jest ładowana ...
Strona jest ładowana ...
Strona jest ładowana ...
Strona jest ładowana ...
Strona jest ładowana ...
Strona jest ładowana ...
Strona jest ładowana ...
Strona jest ładowana ...
Strona jest ładowana ...
Strona jest ładowana ...
Strona jest ładowana ...
Strona jest ładowana ...
Strona jest ładowana ...
Strona jest ładowana ...
Strona jest ładowana ...
Strona jest ładowana ...
Strona jest ładowana ...
Strona jest ładowana ...
Strona jest ładowana ...
Strona jest ładowana ...
Strona jest ładowana ...
Strona jest ładowana ...
Strona jest ładowana ...
Strona jest ładowana ...
Strona jest ładowana ...
Strona jest ładowana ...
Strona jest ładowana ...
Strona jest ładowana ...
Strona jest ładowana ...
Strona jest ładowana ...
Strona jest ładowana ...
Strona jest ładowana ...
Strona jest ładowana ...
Strona jest ładowana ...
Strona jest ładowana ...
Strona jest ładowana ...
Strona jest ładowana ...
Strona jest ładowana ...
Strona jest ładowana ...
Strona jest ładowana ...
Strona jest ładowana ...
Strona jest ładowana ...
Strona jest ładowana ...
Strona jest ładowana ...
Strona jest ładowana ...
Strona jest ładowana ...
Strona jest ładowana ...
Strona jest ładowana ...
Strona jest ładowana ...
Strona jest ładowana ...
Strona jest ładowana ...
Strona jest ładowana ...
Strona jest ładowana ...
Strona jest ładowana ...
Strona jest ładowana ...
Strona jest ładowana ...
Strona jest ładowana ...
Strona jest ładowana ...
Strona jest ładowana ...
Strona jest ładowana ...
Strona jest ładowana ...
Strona jest ładowana ...
Strona jest ładowana ...
Strona jest ładowana ...
Strona jest ładowana ...
Strona jest ładowana ...
Strona jest ładowana ...
Strona jest ładowana ...
Strona jest ładowana ...
Strona jest ładowana ...
Strona jest ładowana ...
-
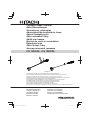 1
1
-
 2
2
-
 3
3
-
 4
4
-
 5
5
-
 6
6
-
 7
7
-
 8
8
-
 9
9
-
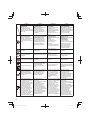 10
10
-
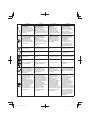 11
11
-
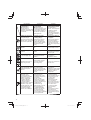 12
12
-
 13
13
-
 14
14
-
 15
15
-
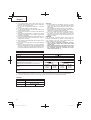 16
16
-
 17
17
-
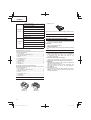 18
18
-
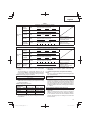 19
19
-
 20
20
-
 21
21
-
 22
22
-
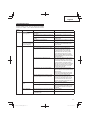 23
23
-
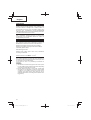 24
24
-
 25
25
-
 26
26
-
 27
27
-
 28
28
-
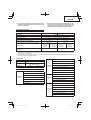 29
29
-
 30
30
-
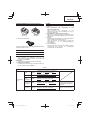 31
31
-
 32
32
-
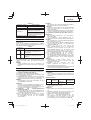 33
33
-
 34
34
-
 35
35
-
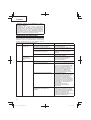 36
36
-
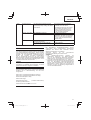 37
37
-
 38
38
-
 39
39
-
 40
40
-
 41
41
-
 42
42
-
 43
43
-
 44
44
-
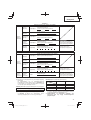 45
45
-
 46
46
-
 47
47
-
 48
48
-
 49
49
-
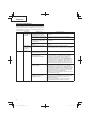 50
50
-
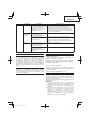 51
51
-
 52
52
-
 53
53
-
 54
54
-
 55
55
-
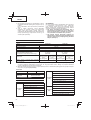 56
56
-
 57
57
-
 58
58
-
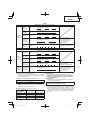 59
59
-
 60
60
-
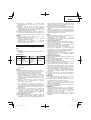 61
61
-
 62
62
-
 63
63
-
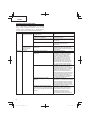 64
64
-
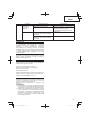 65
65
-
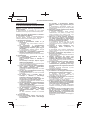 66
66
-
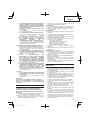 67
67
-
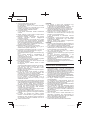 68
68
-
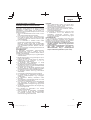 69
69
-
 70
70
-
 71
71
-
 72
72
-
 73
73
-
 74
74
-
 75
75
-
 76
76
-
 77
77
-
 78
78
-
 79
79
-
 80
80
-
 81
81
-
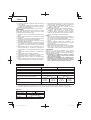 82
82
-
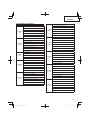 83
83
-
 84
84
-
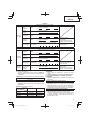 85
85
-
 86
86
-
 87
87
-
 88
88
-
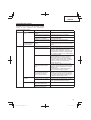 89
89
-
 90
90
-
 91
91
-
 92
92
-
 93
93
-
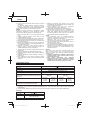 94
94
-
 95
95
-
 96
96
-
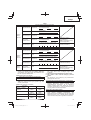 97
97
-
 98
98
-
 99
99
-
 100
100
-
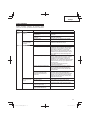 101
101
-
 102
102
-
 103
103
-
 104
104
-
 105
105
-
 106
106
-
 107
107
-
 108
108
-
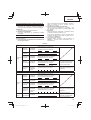 109
109
-
 110
110
-
 111
111
-
 112
112
-
 113
113
-
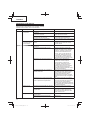 114
114
-
 115
115
-
 116
116
-
 117
117
-
 118
118
-
 119
119
-
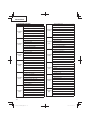 120
120
-
 121
121
-
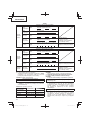 122
122
-
 123
123
-
 124
124
-
 125
125
-
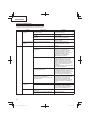 126
126
-
 127
127
-
 128
128
-
 129
129
-
 130
130
-
 131
131
-
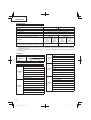 132
132
-
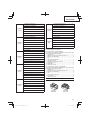 133
133
-
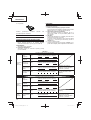 134
134
-
 135
135
-
 136
136
-
 137
137
-
 138
138
-
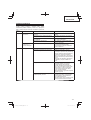 139
139
-
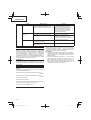 140
140
-
 141
141
-
 142
142
-
 143
143
-
 144
144
-
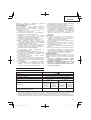 145
145
-
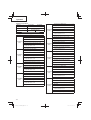 146
146
-
 147
147
-
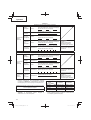 148
148
-
 149
149
-
 150
150
-
 151
151
-
 152
152
-
 153
153
-
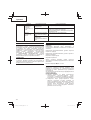 154
154
-
 155
155
-
 156
156
-
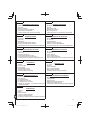 157
157
-
 158
158
-
 159
159
-
 160
160
-
 161
161
-
 162
162
-
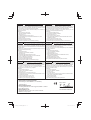 163
163
-
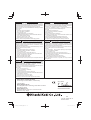 164
164


Hitachi CG 14DSDL Handling Instructions Manual
- Kategoria
- Elektronarzędzia
- Typ
- Handling Instructions Manual
- Ten podręcznik jest również odpowiedni dla
w innych językach
- slovenčina: Hitachi CG 14DSDL
- Türkçe: Hitachi CG 14DSDL
- română: Hitachi CG 14DSDL
Powiązane dokumenty
-
Hitachi WH 14DSAL Instrukcja obsługi
-
-
-
Hitachi WH18DBEL Instrukcja obsługi
-
-
-
-
-
-
Hitachi DH 36DL Instrukcja obsługi