Silvercrest SDB 2200 C1 Operating Instructions Manual
- Kategoria
- Okowy
- Typ
- Operating Instructions Manual

IAN 85032
STEAM IRON SDB 2200 C1
DAMPFBÜGELEISEN
Bedienungsanleitung
STEAM IRON
Operating instructions
PARNI LIKALNIK
Navodila za uporabo
NAPAROVACIA ŽEHLIČKA
Návod na obsluhu
ŻELAZKO NA PARĘ
Instrukcja obsługi
NAPAŘOVACÍ ŽEHLIČKA
Návod k obsluze

GB Operating instructions Page 1
PL Instrukcja obsługi Strona 11
SI Navodila za uporabo Stran 21
CZ Návod k obsluze Strana 31
SK Návod na obsluhu Strana 41
DE / AT / CH Bedienungsanleitung Seite 51
Before reading, unfold the page containing the illustrations and familiarise yourself with all functions of
the device.
Przed przeczytaniem proszę rozłożyć stronę z ilustracjami, a następnie proszę zapoznać się z wszystkimi
funkcjami urządzenia.
Pred branjem odprite stran s slikami in se nato seznanite z vsemi funkcijami naprave.
Před čtením si otevřete stranu s obrázky a potom se seznamte se všemi funkcemi přístroje.
Pred čítaním si odklopte stranu s obrázkami a potom sa oboznámte so všetkými funkciami prístroja.
Klappen Sie vor dem Lesen die Seite mit den Abbildungen aus und machen Sie sich anschließend mit allen
Funktionen des Gerätes vertraut.


- 1 -
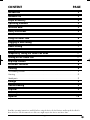
CONTENT PAGE
Introduction 2
Intended use 2
Scope of delivery 2
Operating elements 2
Technical data 2
Safety instructions 3
Before initial use 6
Filling the water tank 6
Plugging in and ironing 7
Steam ironing 7
Ironing with steam blast 7
Temporarily setting the steam iron aside 7
Turning off the steam iron 7
Drip-stop function 8
Automatic switch-off 8
Cleaning 8
Self-cleaning function . . . . . . . . . . . . . . . . . . . . . . . . . . . . . . . . . . . . . . . . . . . . . . . . . . . . . . . . .8
Housing . . . . . . . . . . . . . . . . . . . . . . . . . . . . . . . . . . . . . . . . . . . . . . . . . . . . . . . . . . . . . . . . . . .9
Metal parts . . . . . . . . . . . . . . . . . . . . . . . . . . . . . . . . . . . . . . . . . . . . . . . . . . . . . . . . . . . . . . . .9
Storage 9
Troubleshooting 9
Disposal 9
Warranty and service 10
Importer 10
Read the operating instructions carefully before using the device for the first time and keep this booklet for
later reference. Pass this manual on to whoever might acquire the device at a future date.

- 2 -
STEAM IRON
Introduction
Congratulations on the purchase of your new appli-
ance.
You have clearly decided in favour of a quality
product. These operating instructions are a consti-
tuent of this product. They contain important infor-
mation with regard to safety, use and disposal.
Before using the product, familiarise yourself with all
of these operating and safety instructions. Use the
product only as described and only for the specified
areas of application. Please also pass these docu-
ments on to any future owner, together with the pro-
duct.
Intended use
The steam iron is exclusively intended for ironing
textiles. The iron may only be used indoors and in
private households. Any other use is deemed
improper. The apparatus is not intended for com-
mercial use!
Scope of delivery
Steam Iron
Measuring beaker
Operating instructions
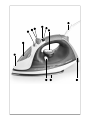
Operating elements
1 Water jet
2 Filler opening for the water tank
3 Steam regulator
4 Button for steam blast
5 Button
for fine water spray
6 Automatic switch-off indicator lamp
7 Temperature control lamp
8 Thermostat
9 Power cable with anti-kink protection
0 Appliance base
q Ironing sole
w Self-clean button
Technical data
Power supply voltage: 220 - 240 V
~
/ 50 Hz
max. power consumption: 2200 W

- 3 -
Safety instructions
Risk of Burns!
•Always hold the steam iron by the handle when it is hot.
•Children should be supervised to ensure that they do not
play with the appliance.
•Never hold your hand over the steam spray or touch hot
metal parts.
•The filler opening of the water reservoir must not be opened
while the iron is in use. First allow the steam iron to cool
down and remove the plug from the power socket.
•The iron and its connecting cable must be kept out of the
reach of children younger than 8 years old when it is
switched on or cooling down.
Risk of Injury! Risk of fire!
•Never leave a steam iron that is hot, switched on or
connected to the mains power supply unattended.
•Do not put the steam iron into storage until it has cooled
down completely.
•This steam iron must be used and placed on a stable surface.
•When ironing, only use the temperatures detailed in the
garment care instructions, or those suitable for the material.
Otherwise, you could damage the textiles. Should care
instructions not be given or known, start with the lowest
temperature setting.

- 4 -
•NEVER allow children to use the steam iron.
•Always put the iron on a level, heat-resistant surface.
The iron must be in a stable position.
•Should you wish to put the steam iron down, always put it
on the appliance base.
Risk of electric shock!
•The rating of the local power supply must correspond with
the details given on the rating plate of the appliance.
•To avoid potential risks, arrange for defective appliances
to be checked and possibly repaired by a qualified specia-
list workshop, or contact our Customer Service Department.
•Arrange for defective power plugs and/or cables to be
replaced immediately by qualified technicians or our
Customer Service Department.
•To disconnect from the power source, only pull the plug
itself, not the cable.
•Never bend (kink) or crush the power cable. Arrange it
in such a way that it cannot come into contact with hot
surfaces and so that no-one can step on it or trip over it.
•Remove the plug from the power socket after every use,
and before cleaning or filling with tap water.
•Always unwind the power cable fully before switching on,
and do not use an extension cable.
•Never touch the power cable or the plug with wet hands.

- 5 -
•Never use the steam iron near a bath, shower, wash basin
or other vessel containing water. The proximity of moisture
presents a danger, even when the appliance is switched off.
•Under no circumstances should you submerge the steam
iron in liquid or permit liquids to penetrate the casing of the
steam iron. Do not expose the appliance to humidity and
do not use outdoors. Should liquids enter the casing, unplug
the appliance from the socket immediately and arrange for
it to be repaired by a qualified technician.
•You may not open the casing of the steam iron. Should re-
pairs be necessary, only allow authorised technicians to
repair a defective appliance.
•Under NO circumstance should you use the appliance if it
shows visible signs of damage, has fallen, or is leaking.
Arrange for it to be repaired by qualified specialists.
•Do not use the appliance if the anti-kink protection on the
power cable is damaged!
•This appliance may be used by children aged 8 years or
over and by individuals with reduced physical, sensory or
mental capabilities, or lack of experience and/or knowledge
if they are supervised or have been instructed in the safe
use of the appliance and have understood the poten-tial
risks. Children may not play with the appliance.
Cleaning and user maintenance should not be carried out
by children without supervision.

- 6 -
Attention!
• Should the clothing care instructions forbid iro-
ning, (symbol ), the clothing item may not be
ironed. If you do so, the clothing item could be
permanently damaged.
• The water tank is to be filled exclusively with tap
water or distilled water. Otherwise, you will da-
mage the steam iron.
• Do not clean the steam iron with solvents, alcohol
or abrasive cleaning agents, since these could
cause damage.
Before initial use
• Remove the steam iron from the packaging.
• Remove all stickers and protective film from the
steam iron and the ironing sole q.
Risk of asphyxiation!
Plastic bags can be dangerous. To avoid the risk of
asphyxiation, keep plastic bags out of the reach of
toddlers and small children.
• Pour water into the water tank (see chapter
"Filling the water tank").
• Insert the plug into a wall power socket supply-
ing an electrical current as detailed on the rating
plate.
• Move the thermostat 8 to the "MAX" position.
• Heat the steam iron up for several minutes at the
highest setting.
• Press the button for the steam blast 4 a few
times until steam exits from the ironing sole q.
• Then iron a scrap piece of material to remove
possible contamination from the ironing sole q.
Filling the water tank
• Hold the iron at an angle.
• Open the cover of the filler opening for the
water tank 2.
• Using the measuring beaker, fill the water tank to
the "MAX" marking.
• Slide the cover of the filler opening for the water
tank 2 back to close it.
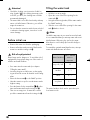
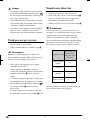
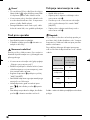
Note:
Should the tap water in your area be rated as hard,
it is recommended that you mix tap water with some
distilled water. Otherwise, the jets for the steam
blast function could calcify (become blocked) pre-
maturely.
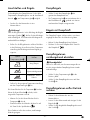
To extend the optimal steam blast function, mix tap
water with distilled water as follows.
The water hardness level can be queried at your
local water works.
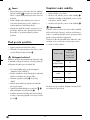
Water hardness
Ratios - distilled
water to
tap water
very soft / soft 0
medium 1 : 1
hard 2 : 1
very hard 3 : 1

- 7 -
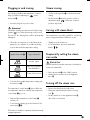
Plugging in and ironing
Dry ironing is possible at all temperatures, steam iro-
ning is possible by adjusting to on the
thermostat 8.
• Insert the plug into a power socket.
Attention!
Should the clothing care instructions forbid ironing,
(symbol ), the clothing item may not be ironed.
If you do so, the clothing item could be permanently
damaged.
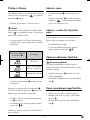
• Check the care instructions on the labels in the
garment to see whether it is suitable for being
ironed, and at which temperature setting.
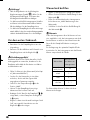
• Select the best suitable temperature setting with
the thermostat 8.
The temperature control lamp 7 glows. When the
set temperature has been reached, the temperature
control lamp 7 goes out.
• Wait until the temperature control lamp 7
switches off.
• To moisten the laundry, press the button for fine
water spray 5.
This function is suitable for extremely dry and extremely
crumpled garments.
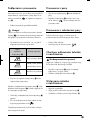
Symbol thermostat 8
Type of material
Acrylic, rayon
Silk, wool, polyester
blended fabrics
Cotton, linen, viscose
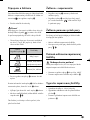
Steam ironing
• Set the steam regulator 3 to the desired steam
setting.
• The thermostat 8 must be moved to at least
adjustment range . Otherwise it cannot
produce any steam.
Ironing with steam blast
The steam blast is especially suitable for smoothing
parts of a garment that are difficult to reach.
• Slightly raise the steam iron.
• For a steam blast, press the steam blast
button 4.
Temporarily setting the steam
iron aside
Risk of fire!
NEVER leave the hot, mains-connected or switched-on
steam iron unattended.
• Set the thermostat 8 to the "MIN" position.
• Always put the steam iron on the appliance
base 0.
Turning off the steam iron
• Remove the plug from the wall socket.
• Empty the water tank and clean the ironing
sole q.
• Put the steam iron on the appliance base 0
after it has cooled down.

- 8 -
Drip-stop function
With conventional steam irons it can occur that water
drips from the ironing sole q at low temperatures.
However, this iron possesses a new equipment cha-
racteristic, the DRIP-STOP function. At low tempera-
tures the iron automatically switches off the steam-
blast function. When this happens, a "CLICK" is
heard. You must then select a suitable temperature
using the thermostat 8. As soon as this is reached,
steam production continues.
Automatic switch-off
The iron is equipped with an automatic switch-off.
This stops the iron from heating up.
If the iron is standing on its ironing sole q and has
not been moved for approx. 30 seconds, acoustic
warning signals are heard and the automatic switch-
off indicator lamp 6 flashes. The iron will no longer
be heated. To deactivate the automatic switch-off,
pick up the iron and move it around a little. The
automatic switch-off indicator lamp 6 will go off
and the iron will heat up again.
If the iron is standing on its base 0 and has not
been moved for approx. 8 minutes, acoustic warning
signals are heard and the automatic switch-off indi-
cator lamp 6 flashes. The iron is no longer heated.
To deactivate the automatic switch-off, pick up the
iron and move it around a little. The automatic
switch-off indicator lamp 6 will go off and the iron
will heat up again.
Note:
The automatic switch-off is not a substitute for un-
plugging the apparatus from the power supply! It is
only intended for reducing the risk of fire if the iron
is accidentally left on!
Cleaning
Self-cleaning function
• Fill the water tank to the "MAX" marking.
• Insert the plug into a wall socket.
• Move the thermostat 8 to the "MAX" position.
• Adjust the steam regulator 3 to maximum steam
power.
• Allow the steam iron to heat up until the tempera-
ture control lamp 7 switches off and once
again glows.
• Hold the steam iron horizontally over a catchment
receptacle.
• Position the steam regulator 3 at the maximum
steam power level. Press and hold down the
self-clean button w. Thereby, steam and boiling
water flows from the steam exit holes in the ironing
sole q. Impurities that may be present are was-
hed out.
• Release the self-clean button w as soon as all
of the water has exited.
• Thoroughly dry the ironing sole q. For this, slide
the ironing sole q back and forth over a hand
towel or an old piece of material several times.
• Allow the steam iron to cool down before placing
it in storage.

- 9 -
Housing
Potentially fatal danger!
Disconnect the plug before cleaning. Otherwise
there is a risk of receiving a potentially fatal electric
shock!
Risk of physical injury!
Allow the appliance to cool before cleaning it.
If you do not, there is a risk of receiving burn
injuries!
• Clean the casing with a soft, dry cloth only.
Attention!
Do not use aggressive, abrasive or chemical cleaning
agents. These could attack the surfaces and cause
irreparable damage to the appliance.
Metal parts
• Clean the metal components with a lightly damp
cloth and a mild, non-abrasive cleaning agent.
Storage
Store the appliance in a clean, dust-free, and dry
location after it has cooled down.
Troubleshooting
Steam iron producing little or no steam:
The reserves of water in the steam iron are depleted.
Fill the water tank with tap water (See "Filling the
water tank").
The steam iron does not get hot:
• The steam iron is not plugged in or is not switched
on. Insert the plug into a wall power socket and
adjust the thermostat 8 to the desired ironing
temperature.
• The steam iron is defective. Arrange for the steam
iron to be repaired by qualified specialists.
Disposal
Do not dispose of the appliance in your
normal domestic waste. This appliance
is subject to the provisions of European
Directive 2002/96/EC.
Dispose of the appliance through an approved dis-
posal centre or at your community waste facility.
Observe the currently applicable regulations.
In case of doubt, please contact your waste disposal
centre.
Dispose of all packaging materials in an
environmentally friendly manner.

- 10 -
Warranty and service
The warranty for this appliance is for 3 years from
the date of purchase. The appliance has been ma-
nufactured with care and meticulously examined
before delivery.
Please retain your receipt as proof of purchase. In the
event of a warranty claim, please telephone our
Service Department. This is the only way to ensure
that your goods are dispatched free of charge.
The warranty only covers claims for material and
manufacturing defects, but not for transport damage,
wearing parts or damage to fragile components
such as buttons or batteries. This product is for private
use only and is not intended for commercial use.
The warranty is void in the case of incorrect and im-
proper handling, use of force and internal manipula-
tion that is not carried out by our authorised service
branch. Your statutory rights are not restricted in any
way by this warranty.
The warranty period will not be extended by repairs
made under warranty. This also applies to replaced
and repaired parts. Any damage and defects that
are discovered immediately after purchase must be
reported immediately after unpacking the applian-
ce, no more than two days after the purchase date.
Repairs made after the expiration of the warranty
period are subject to payment.
Service Great Britain
Tel.: 0871 5000 720 (£ 0.10/Min.)
E-Mail: k[email protected]
Importer
KOMPERNASS GMBH
BURGSTRASSE 21
44867 BOCHUM, GERMANY
www.kompernass.com
IAN 85032

- 11 -
SPIS TREŚCI STRONA
Wstęp 12
Zastosowanie zgodnez przeznaczeniem 12
Zakres dostawy 12
Elementy obsługowe 12
Dane techniczne 12
Wskazówki dotyczące bezpieczeństwa 13
Przed pierwszym użyciem 16
Napełnianie zbiornika 16
Podłączanie i prasowanie 17
Prasowanie z parą 17
Prasowanie z uderzeniem pary 17
Chwilowe odstawianie żelazka z nawilżaczem 17
Wyłączanie żelazka z nawilżaczem 17
Funkcja zapobiegająca kapaniu 18
Automatyczne wyłączanie 18
Czyszczenie 18
Funkcja samoczyszczenia . . . . . . . . . . . . . . . . . . . . . . . . . . . . . . . . . . . . . . . . . . . . . . . . . . . .18
Obudowa . . . . . . . . . . . . . . . . . . . . . . . . . . . . . . . . . . . . . . . . . . . . . . . . . . . . . . . . . . . . . . . .19
Elementy metalowe . . . . . . . . . . . . . . . . . . . . . . . . . . . . . . . . . . . . . . . . . . . . . . . . . . . . . . . . .19
Przechowywanie 19
Usuwanie zakłóceń działania 19
Utylizacja 19
Gwarancja i obsługa posprzedażna 20
Importer 20
Przed pierwszym użyciem urządzenia należy uważnie przeczytać niniejszą instrukcję obsługi i zachować ją,
by móc z niej skorzystać w późniejszym czasie. W przypadku przekazania urządzenia osobom trzecim
należy przekazać im także instrukcję.

- 12 -
ŻELAZKO NA PARĘ
Wstęp
Gratulujemy zakupu naszego urządzenia.
Jest to produkt wysokiej jakości. Instrukcja obsługi
stanowi część tego produktu. Zawiera ona ważne
wskazówki dotyczące bezpieczeństwa, użytkowa-
nia i utylizacji urządzenia. Przed przystąpieniem do
użytkowania produktu, zapoznaj się z wszystkimi
dotyczącymi obsługi i bezpieczeństwa. Używaj
produkt zgodnie z opisem i w podanych obszarach
zastosowania. W razie przekazania produktu osobom
trzecim, nie zapomnij dołączyć również instrukcji
obsługi.
Zastosowanie zgodne
z przeznaczeniem
Żelazko z nawilżaczem jest przeznaczone wyłącznie
do prasowania ubrań. Można go używać wyłącznie
w pomieszczeniach zamkniętych w gospodarstwach
domowych. Jakiegokolwiek inne zastosowania
uważane są za niezgodne z i przemysłowych.
Wykorzystywanie do celów komercyjnych i
przemysłowych jest zabronione!
Zakres dostawy
Żelazko na parę
Miarka
Instrukcja obsługi
Elementy obsługowe
1 Dysza
2 Otwór do wlewania wody
3 Regulator pary
4 Przycisk uderzenia pary
5 Przycisk spryskiwacza
6 Kontrolka automatycznego wyłączania
7 Lampka kontrolna temperatury
8 Regulator temperatury
9 Przewód sieciowy
0 Podstawa
q Stopa żelazka
w Przycisk funkcji samoczyszczenia (Selfclean)
Dane techniczne
Napięcie zasilania: 220 - 240 V
~
/ 50 Hz
Maksymalna moc: 2200 W

- 13 -
Wskazówki dotyczące bezpieczeństwa
Niebezpieczeństwo poparzenia!
•Gdy żelazko jest gorące, chwytać je tylko za uchwyt.
•Należy zwracać uwagę na to, aby dzieci nie bawiły się
urządzeniem.
•Nigdy nie wkładać rąk w obłok pary ani nie dotykać nimi
gorących części metalowych.
•Podczas używania nie wolno otwierać otworu do napełnia-
nia zbiornika na wodę. Najpierw odczekaj do ostygnięcia
żelazka, a następnie wyjmij wtyczkę z gniazdka.
•W czasie włączenia lub stygnięcia żelazko, w tym również
jego przewód zasilający, nie może znajdować się w zasięgu
dzieci w wieku poniżej 8 lat.
Niebezpieczeństwo odniesienia obrażeń!
Niebezpieczeństwo pożaru!
•Nigdy nie zostawiaj gorącego, podłączonego do zasila-
nia lub włączonego żelazka bez nadzoru.
•Żelazko z nawilżaczem należy chować tylko po całkowi-
tym ostygnięciu.
•Używaj i odstawiaj żelazko na stabilnej powierzchni.
•Prasuj zawsze przy ustawieniu temperatury zgodnie ze
wskazówkami podanymi na ubraniu i odpowiednio do
prasowanego materiału. W przeciwnym wypadku możesz
doprowadzić do uszkodzenia prasowanego materiału.
W przypadku braku wyraźnych instrukcji dotyczących
temperatury prasowania, zacznij od najniższego ustawie-
nia, a następnie stopniowo zwiększaj temperaturę.

- 14 -
•Nie pozwalaj na używanie żelazka dzieciom.
•Urządzenie postaw na płaskiej i odpornej na wysoką tem-
peraturę podstawie. Żelazko musi stać stabilnie.
•Gdy chcesz odstawić żelazko, stawiaj je tylko na podstawie.
Niebezpieczeństwo porażenia prądem
elektrycznym!
•Napięcie źródła zasilania musi być zgodne z danymi
podanymi na tabliczce znamionowej urządzenia.
•Aby nie doszło do niebezpiecznych sytuacji, uszkodzone
urządzenie przekaż niezwłocznie do naprawy wykwalifi-
kowanemu serwisowi lub zwróć się do autoryzowanego
serwisu klienta.
•Wymianę uszkodzonej wtyczki lub przewodu sieciowego
należy niezwłocznie zlecić wykwalifikowanemu perso-
nelowi lub serwisowi.
•Ciągnij zawsze za wtyczkę, nigdy za kabel.
•Nie załamywać ani nie zgniatać przewodu sieciowego.
Układać go w taki sposób, aby nie stykał się z gorącymi
powierzchniami, i aby nikt nie mógł na niego wejść albo
się na nim potknąć.
•Przed przystąpieniem do czyszczenia, podczas nalewania
wody i po każdym użyciu urządzenia odłączaj wtyczkę z
gniazdka.
•Przed włączeniem należy zawsze całkowicie rozwinąć
kabel sieciowy. Nie należy używać przedłużaczy.
•Nigdy nie chwytać ani nie dotykać kabla lub wtyczki
sieciowej wilgotnymi rękami.

- 15 -
•Nigdy nie używaj żelazka w pobliżu wody, znajdującej
się na przykład w wannie, brodziku prysznica, umywalce
lub w innych naczyniach. Bliskość wody stanowi poważne
zagrożenie nawet przy wyłączonym urządzeniu.
•Nie wolno zanurzać żelazka z nawilżaczem w żadnych
cieczach ani pozwolić na dostanie się cieczy do wnętrza
obudowy żelazka z nawilżaczem. Nie wolno również do-
puścić do sytuacji, w której ciecz dostałaby się do obudowy.
Nie należy użytkować urządzenia w warunkach podwyżs-
zonej wilgotności ani na wolnym powietrzu. Jeśli zdarzyło
by się, że jakaś ciecz dostała się do wnętrza obu-dowy, na-
leży natychmiast wyciągnąć wtyczkę z gniazdka sieciowe-
go i oddać urządzenie do naprawy w ręce
wykwalifikowanego specjalisty.
•Nie należy samemu otwierać obudowy żelazka. Uszko-
dzone żelazko oddawaj zawsze do naprawy wykwalifiko-
wanemu specjaliście.
•Nie należy używać żelazka, gdy ma widoczne ślady
uszkodzenia, gdy spadło lub gdy cieknie z niego woda.
Najpierw oddaj je wykwalifikowanemu specjaliście do
naprawy.
•Nie używaj urządzenia, w którym doszło do uszkodzenia
zabezpieczenia przed zginaniem kabla sieciowego!
•Urządzenie może być użytkowane przez dzieci w wieku
powyżej 8 lat, a także przez osoby o ograniczonej spraw-
ności fizycznej, czuciowej bądź umysłowej lub osoby o
braku doświadczenia lub znajomości sprzętu, gdy będą
one przebywały pod nadzorem lub zostaną im przekazane
wskazówki dotyczące właściwego używania urządzenia
i zrozumieją one, jakie zagrożenia wiążą się z użytkowa-
niem urządzenia. Nie pozwól dzieciom na zabawę urzą-
dzeniem. Czyszczeniem i konserwacją nie mogą zajmować
się dzieci bez nadzoru osoby dorosłej.

- 16 -
Uwaga!
• W przypadku, gdy wskazówki na metce dane-
go materiału zabraniają prasowania (symbol ),
nie należy prasować materiału ponieważ groził-
oby to jego uszkodzeniem.
• Do zbiornika na wodę można nalewać wyłącznie
wodę z kranu/wodę destylowaną. Inaczej nastąpi
uszkodzenie żelazka z nawilżaczem.
• Nie można czyścić żelazka rozpuszczalnikami,
alkoholem lub środkami do szorowania.
W przeciwnym razie można uszkodzić urządzenie.
Przed pierwszym użyciem
• Wyjmij żelazko z opakowania.
• Odklej wszystkie naklejki z żelazka i stopy q.
Ostrzeżenie!
Plastikowe torebki mogą stanowić zagrożenie.
Worki plastikowe trzymaj z dala od dzieci, które w
zabawie workiem mogłyby się nim udusić.
• Wlej wodę do zbiornika (zobacz rozdział
„Napełnianie zbiornika”).
• Podłącz wtyczkę do gniazdka zgodnego
z napięciem podanym na tabliczce znamionowej.
• Regulator temperatury 8 ustaw w pozycji
„MAX“.
• Po ustawieniu najwyższego zakresu temperatury
odczekaj kilka minut do nagrzania się żelazka.
• Naciśnij kilka razy przycisk uderzenia pary 4,
aż ze stopy żelazka q zacznie wydoby-
wać się para.
• Przeprasuj fragment nieużywanego materiału,
by ewentualnie usunąć ze stopy żelazka q brud.
Napełnianie zbiornika
• Trzymaj żelazko poprzecznie za uchwyt.
• Otwórz zatyczkę otworu do wlewania wody 2.
• Za pomocą miarki nalej wodę do zbiornika
maksymalnie do zaznaczenia „MAX”.
• Zamknij zatyczkę otworu do wlewania wody 2.
Wskazówka:
Jeśli woda z kranu jest za twarda, zaleca się
mieszanie jej z wodą destylowaną. W przeciwnym
wypadku dysze funkcji uderzenia pary mogą
przedwcześnie zatkać się osadem z kamienia.
W celu przedłużenia prawidłowego działania funkcji
uderzenia pary zmieszaj wodę z kranu z wodą
destylowaną w proporcjach podanych w tabeli.
Informacje dotyczące twardości wody można uzy-
skać w lokalnej firmie wodociągowej.
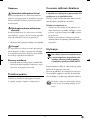
Twardość wody
Stosunek ilości
wody destylo-
wanej do wody
kranowej
bardzo miękka/
miękka
0
średnia 1 : 1
twarda 2 : 1
bardzo twarda 3 : 1

- 17 -
Podłączanie i prasowanie
Prasowanie na sucho jest możliwe przy wszystkich
temperaturach, a prasowanie z parą dopiero od
zakresu ustawienia w regulatorze tempera-
tury 8.
• Podłącz wtyczkę do gniazdka zasilania.
Uwaga!
Gdy nie pozwala na to informacja na metce ubrania
(symbol ), nie można prasować danego materiału.
Mogłoby to spowodować uszkodzenie ubrania.
• Sprawdź na metce ubrania, czy i w jakich
temperaturach można je prasować.
• Za pomocą regulatora temperatury 8 ustaw
odpowiednią temperaturę.
Zapala się lampka kontrolna temperatury 7. Gdy
lampka kontrolna zgaśnie 7, żelazko nagrzało się
do wymaganej temperatury.
• Odczekaj, aż lampka kontrolna temperatury 7
zgaśnie.
• W celu zwilżenia prasowanych ubrań naciśnij
przycisk spryskiwania wodą 5.
Ta funkcja przeznaczona jest do bardzo suchych,
silnie mnących się ubrań.
Symbol
regulatora
temperatury 8
Rodzaj materiału
Akryl, sztuczny jedwab
Jedwab, wełna, tkanina
z domieszką poliestru
Bawełna, len, wiskoza
Prasowanie z parą
• Za pomocą regulatora pary 3 ustaw żądaną siłę
pary.
• Regulator temperatury 8 musi być obrócony
aż do zakresu . W przeciwnym razie nie
powstanie para.
Prasowanie z uderzeniem pary
Funkcja uderzenia pary jest skuteczna do
przeprasowania trudnodostępnych miejsc ubrań.
• Podnieś lekko żelazko.
• Naciśnij przycisk uderzenia pary 4.
Chwilowe odstawianie żelazka
z nawilżaczem
Niebezpieczeństwo pożaru!
Nigdy nie oddalaj się od gorącego, podłączonego
do zasilania lub włączonego żelazka.
• Regulator temperatury 8 ustaw na żądaną
temperaturę - pozycja „MIN”.
• Żelazko stawiaj tylko na podstawie 0.
Wyłączanie żelazka
z nawilżaczem
• Wtyczkę z gniazdka.
• Wylej wodę ze zbiornika i wyczyść stopę q.
• Schłodzone żelazko postaw na podstawie 0.
Strona się ładuje...
Strona się ładuje...
Strona się ładuje...
Strona się ładuje...
Strona się ładuje...
Strona się ładuje...
Strona się ładuje...
Strona się ładuje...
Strona się ładuje...
Strona się ładuje...
Strona się ładuje...
Strona się ładuje...
Strona się ładuje...
Strona się ładuje...
Strona się ładuje...
Strona się ładuje...
Strona się ładuje...
Strona się ładuje...
Strona się ładuje...
Strona się ładuje...
Strona się ładuje...
Strona się ładuje...
Strona się ładuje...
Strona się ładuje...
Strona się ładuje...
Strona się ładuje...
Strona się ładuje...
Strona się ładuje...
Strona się ładuje...
Strona się ładuje...
Strona się ładuje...
Strona się ładuje...
Strona się ładuje...
Strona się ładuje...
Strona się ładuje...
Strona się ładuje...
Strona się ładuje...
Strona się ładuje...
Strona się ładuje...
Strona się ładuje...
Strona się ładuje...
Strona się ładuje...
Strona się ładuje...
Strona się ładuje...
-
 1
1
-
 2
2
-
 3
3
-
 4
4
-
 5
5
-
 6
6
-
 7
7
-
 8
8
-
 9
9
-
 10
10
-
 11
11
-
 12
12
-
 13
13
-
 14
14
-
 15
15
-
 16
16
-
 17
17
-
 18
18
-
 19
19
-
 20
20
-
 21
21
-
 22
22
-
 23
23
-
 24
24
-
 25
25
-
 26
26
-
 27
27
-
 28
28
-
 29
29
-
 30
30
-
 31
31
-
 32
32
-
 33
33
-
 34
34
-
 35
35
-
 36
36
-
 37
37
-
 38
38
-
 39
39
-
 40
40
-
 41
41
-
 42
42
-
 43
43
-
 44
44
-
 45
45
-
 46
46
-
 47
47
-
 48
48
-
 49
49
-
 50
50
-
 51
51
-
 52
52
-
 53
53
-
 54
54
-
 55
55
-
 56
56
-
 57
57
-
 58
58
-
 59
59
-
 60
60
-
 61
61
-
 62
62
-
 63
63
-
 64
64


Silvercrest SDB 2200 C1 Operating Instructions Manual
- Kategoria
- Okowy
- Typ
- Operating Instructions Manual
w innych językach
- Deutsch: Silvercrest SDB 2200 C1
- slovenčina: Silvercrest SDB 2200 C1
Powiązane artykuły
-
Silvercrest SDBK 2200 A1 Operating Instructions Manual
-
Silvercrest 93488 Operating Instructions Manual
-
Silvercrest SDB 2400 F4 Operating Instructions Manual
-
-
Silvercrest SDBE 2600 A1 Operating Instructions Manual
-
-
Silvercrest SDRB 1000 A1 Operating Instructions Manual
-
-
Silvercrest SDBK 2400 F5 Operating Instructions Manual
-
Silvercrest SDM 1500 D2 Instrukcja obsługi
Inne dokumenty
-
ECG NZ 322 Auto-Off Instrukcja obsługi
-
-
Kompernass Iron KH 1282 Instrukcja obsługi
-
Teesa TSA2012 Instrukcja obsługi
-
Hyundai SI 258 Instrukcja obsługi
-
-
Teesa TSA2011 Instrukcja obsługi
-
Hyundai Si 160 Instrukcja obsługi
-
SEVERIN BA 3253 Instrukcja obsługi
-
SEVERIN BA 3252 Instrukcja obsługi