Philips GC4910/10 Instrukcja obsługi
- Kategoria
- Okowy
- Typ
- Instrukcja obsługi

Register your product and get support at
www.philips.com/welcome
User manual
GC4900 series
4239_000_8858_1_Luxury booklet_A5_V3.indd 1 5/30/13 11:46 AM

4239_000_8858_1_Luxury booklet_A5_V3.indd 2 5/30/13 11:46 AM

2
4239_000_8858_1_Luxury booklet_A5_V3.indd 3 5/30/13 11:46 AM

4239_000_8858_1_Luxury booklet_A5_V3.indd 4 5/30/13 11:46 AM

GC4900 series
ENGLISH 6
14
22
31
POLSKI 39
4239_000_8858_1_Luxury booklet_A5_V3.indd 5 5/30/13 11:46 AM

6
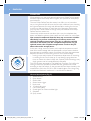
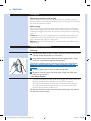
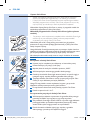
Introduction
Congratulations on your purchase and welcome to Philips! To fully benet
from the support that Philips offers, register your product at www.philips.
com/welcome.
The new Philips PerfectCare Azur steam iron offers you an innovative
way to iron garments. We all know the fuss with traditional irons: choosing
the right temperature for tough and delicate fabrics, waiting for the iron
to warm up and cool down to avoid the risk of damaging clothes with
a too hot iron. Those hassles are things of the past with the new Philips
PerfectCare Azur steam iron.
Historically, wrinkle removal was done with a very hot soleplate, then
steam was added to enhance heat transfer and we could iron much faster.
In the past, a large amount of steam at this optimal temperature would
have led to water leakage. We have developed a unique steam chamber
that generates a consistent output of moisture-rich steam that penetrates
deep into the fabric for fast ironing with no risk of water leakage.
- Ironing is now really simple: no temperature adjustment, no scorching,
no waiting for the iron to heat up or cool down. Ironing takes less
time, no matter who does it. With this OptimalTEMP technology, every
single garment can be ironed effectively and safely.
This iron has been approved by The Woolmark Company Pty Ltd for the
ironing of wool-only products, provided that the garments are ironed
according to the instructions on the garment label and those issued by the
manufacturer of this iron, R1101. In the United Kingdom, Eire, Hong Kong
and India, the Woolmark trademark is a certication trademark.
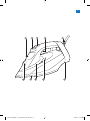
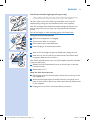
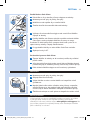
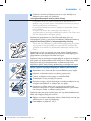
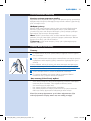
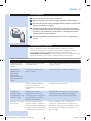
1 Water tank lid
2 Spray button
3 Steam slider
4 Steam boost trigger
5 Mains cord
6 Cord winding area
7 Calc-Clean button
8 SmartLight/Calc-Clean reminder light
9 Soleplate
10 Spray nozzle
ENGLISH
4239_000_8858_1_Luxury booklet_A5_V3.indd 6 5/30/13 11:46 AM

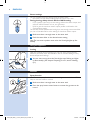
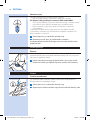
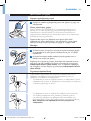
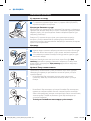
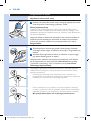
1 Flipopenthewatertanklid,thenllthewatertankuptotheMAX
indication.
This appliance has been designed to be used with tap water. If you live
in an area with hard water, fast scale build-up may occur. Therefore, it is
recommended to use distilled or de-mineralized water to prolong the
lifetime of the appliance.
Note: Do not put perfume, vinegar, starch, descaling agents, ironing aids or
other chemicals in the water tank, as your appliance is not designed to work
with these chemicals.
1 Insert the plug into an earthed wall socket. The SmartLight starts
ashingbluetoindicatethattheironisheatingup.
2 TheSmartLightlightsupbluesteadilywhentheironisreadyforuse.
Note: If the colour of the SmartLight is amber instead of blue, this is a
reminder that you should perform function. See chapter
‘Cleaning and maintenance, section ‘Using the function’.
The OptimalTemp technology enables you to iron all types of ironable
fabrics, in any order, without the need to adjust any temperature setting.
- Fabrics with these symbols are ironable, for example linen, cotton,
polyester, silk, wool, viscose and rayon.
- Fabrics with this symbol are not ironable. These fabrics include synthetic
fabrics such as Spandex or elastane, Spandex-mixed fabrics and
polyolens (e.g. polypropylene), but also prints on garments.
-
ENGLISH 7
4239_000_8858_1_Luxury booklet_A5_V3.indd 7 5/30/13 11:46 AM

You can set different steam settings with the steam slider:
- No steam: to stop steam output when the iron is not in use.
.
- ECO: (specic types only) to save energy, reduce the steam output, and
still have sufcient steam to iron your garments.
- MAX: to set the maximum steam output, perfect combination with
OptimalTemp setting.
For the best results and shortest ironing time, we strongly recommend that
you iron all ironable fabrics at the setting for maximum steam output.
1 Makesurethereisenoughwaterinthewatertank.
2 Push the steam slider to the desired steam setting.
Note: The iron starts to produce steam when the SmartLight lights up blue
steadily.
With the OptimalTemp technology, you can iron every single garment
effectively and safely, even delicate fabrics like silk without having to worry
about temperature settings.
1 YoucanstartironingwhentheSmartLightstopsashingandlights
upbluesteadily.(Seechapter‘Preparingforuse’,section‘Heating
up’).
You can use the spray function to moisten the garment to be ironed. This
helps to remove stubborn creases.
1 Makesurethereisenoughwaterinthewatertank.
2 Pressthespraybuttonseveraltimestomoistenthegarmenttobe
ironed.
ENGLISH8
4239_000_8858_1_Luxury booklet_A5_V3.indd 8 5/30/13 11:46 AM

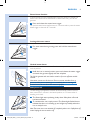
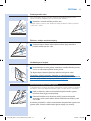
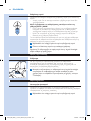
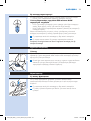
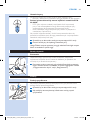
A steam boost from the soleplate helps removing stubborn creases. The
steam boost enhances the distribution of steam into every part of the
garment.
1 Pressandreleasethesteamboosttrigger.
For optimal steam boost performance, it is recommend to press the steam
boost trigger at intervals of 5 seconds.
1 Forextrasteamduringironing,pressandholdthesteamboost
trigger.
You can also use the steam boost function when you hold the iron in
vertical position.
1 Holdtheironinverticalposition,pressandreleasethesteamtrigger
and touch the garment lightly with the soleplate.
Tip: Pull the garment with one hand to stretch it for more effective wrinkle
removal.
Hotsteamcomesoutoftheiron.Donotremovewrinklesfroma
garmentwhileyouarewearingitorsomebodyelseiswearingit.To
preventburns,donotdirectthesteamatpeople.
To save energy, the appliance switches off automatically when it has not
been moved for 2 minutes in horizontal position, or 3 minutes when is
standing on its heel.
1 TheSmartLightstartspulsatingslowlywhenSafetyAutooffmode
hasbeenactivated.
2 Toreactivatetheiron,simplymoveit.TheSmartLightashesblueto
indicate that the iron is heating up, and it lights up steadily when the
ironisreadyforuse.
Note: The steam iron is not switched off completely when it is in Safety Auto off
mode. Unplug the iron to switch it off.
ENGLISH 9
4239_000_8858_1_Luxury booklet_A5_V3.indd 9 5/30/13 11:46 AM

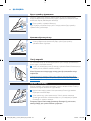
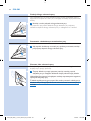
Start wrinkle removal early in the drying process by spreading out the
laundry properly after washing. Put the garments on hangers to make them
dry naturally with less wrinkles.
Start with the time-consuming parts such as collar, cuff links and sleeves.
Next, iron the bigger parts like front and back. By doing this, you prevent
wrinkling the bigger parts when you are busy ironing the time-consuming
ones.
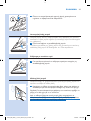
: When you iron a collar, start on its underside and iron from the
outside (the pointy end) inwards. Turn over and repeat. Fold down the
collar and press the edge for a crisp nish.
Buttons: Iron on the reverse side of the buttons for more effective and
faster ironing.
1 Setthesteamslidertothe‘nosteam’position,removetheplugfrom
the wall socket and let the iron cool down.
2 Wipeakesandanyotherdepositsoffthesoleplatewithadamp
clothandanon-abrasive(liquid)cleaningagent.
Tokeepthesoleplatesmooth,avoidhardcontactwithmetalobjects.
Neveruseascouringpad,vinegarorotherchemicalstocleanthe
soleplate.
3 Cleantheupperpartoftheironwithadampcloth.
4 Regularly rinse the water tank with water. Empty the water tank
afteryouhaverinsedit.
- The Anti-Calc tablet prevents scale from clogging the steam vents. This
tablet is constantly active and does not need to be replaced.
- The Calc-Clean function removes the scale particles from the iron.
- The Calc-Clean reminder light reminds you to use the Calc-Clean
function after a certain period of use.
Tip: Use the Calc-Clean function every month (for specic types only, without
the Calc-Clean reminder light).
ENGLISH10
4239_000_8858_1_Luxury booklet_A5_V3.indd 10 5/30/13 11:46 AM

- After a certain period of use, the colour of the SmartLight changes
to amber. Then you need to perform the Calc-Clean process.
Tip: If the water in your area is hard (e.g. when akes come out of the
soleplate during ironing), use the Calc-Clean function more frequently.
Note: The SmartLight resets itself automatically and lights up blue the next
time you plug in the iron, even if you have not performed the Calc-Clean
process.
Donotputvinegarorotherdescalingagentsinthewatertank.
1 Makesuretheapplianceisunplugged.
2 Setthesteamsliderto‘nosteam’.
3 FillthewatertanktotheMAXlevel.
4 Insert the plug in an earthed wall socket.
5 WaitfortheSmartLighttolightupsteadily,thenunplugtheiron.
6 Holdtheironoverthesink,pressandholdtheCalc-Cleanbutton
andgentlyshaketheirontoandfro.
Note: Steam and boiling water come out of the soleplate. Impurities and akes
(if any) are ushed out.
7 ReleasetheCalc-Cleanbuttonassoonasallthewaterinthetank
hasbeenusedup.
8 Repeat steps 1 to 7.
1 Puttheplugbackintothewallsocket,andlettheironheatuptolet
the soleplate dry.
2 WhentheSmartLightlightsupsteadily,movetheirongentlyovera
pieceofusedclothtoremoveanywaterstainsthatmayhaveformed
on the soleplate.
3 Unplugtheironandletitcooldownbeforeyoustoreit.
ENGLISH 11
4239_000_8858_1_Luxury booklet_A5_V3.indd 11 5/30/13 11:46 AM

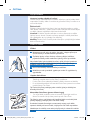
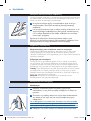
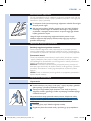
1 Slidethesteamsliderto‘nosteam’.
2 Removetheplugfromthewallsocket.
3 Emptythewatertankandlettheironcooldowninasafeplace.
4 Windthemainscordaroundthecordwindingareaandxitwith
thecordclip.PutthemainscordbelowtheCordFixindicationto
ensure the mains cord does not touch the hot soleplate during
storage.
5 Storetheirononitsheelinasafeanddryplace.
This chapter summarises the most common problems you could have with
the appliance. If you are unable to solve the problem with the information
below, visit for a list of frequently asked
questions or contact the Consumer Care Centre in your country.
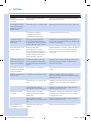
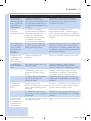
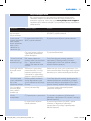
Problem Possiblecause Solution
The iron cannot
remove wrinkles from
the garment.
There is no steam during ironing. Put water inside the water tank. Set the
steam slider to MAX.
Water drips from the
soleplate after the iron
has been unplugged or
has been stored.
The steam slider is set to MAX. Set the steam slider to ‘no steam’.
You have put the iron in
horizontal position with water
still left in the water tank.
Empty the water tank.
The light on the iron is
amber instead of blue,
and keeps ashing.
The Calc-Clean reminder light
has been activated. This is a
regular reminder for you to
descale the appliance.
Perform the Calc-Clean process (see
chapter ‘Cleaning and maintenance’, section
‘Calc-Clean System’).
The SmartLight
pulsates slowly.
The Safety Auto-off mode is
active. The iron has switched
to standby mode (see chapter
‘Safety Auto-off’).
Move the iron to reactivate it. The iron
starts heating up again. Start ironing again
only when the SmartLight lights up steadily.
Dirty water and
impurities come out
of the soleplate during
ironing.
Hard water with impurities or
chemicals has formed akes
inside the soleplate.
Use the Calc-Clean function one or
more times (see chapter ‘Cleaning and
maintenance’, section ‘Calc-Clean System’).
The iron is plugged
in, but the soleplate is
cold.
There is a connection problem. Check the mains cord, the plug and the
wall socket.
ENGLISH12
4239_000_8858_1_Luxury booklet_A5_V3.indd 12 5/30/13 11:46 AM

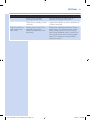
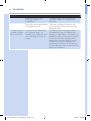
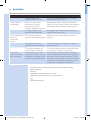
Problem Possiblecause Solution
The iron does not
produce any steam.
There is not enough water in
the water tank.
Fill the water tank (see chapter ‘Preparing
for use’, section ‘Filling the water tank’.
The steam slider is set to ‘no
steam’.
Set the steam slider to MAX (see chapter
‘Preparing for use’, section ‘Steam settings’).
The iron is not hot enough yet
to produce steam.
Wait until the SmartLight has stopped
ashing and lights up steadily.
The iron does not
produce a steam boost.
You have used the steam boost
function too often within a very
short period.
Continue ironing in horizontal position
and wait a while before you use the steam
boost function again.
The iron is not hot enough yet
to produce a steam boost.
Wait until the SmartLight has stopped
ashing and lights up steadily.
Water droplets drip
onto the fabric during
ironing.
You have not closed the water
tank lid properly.
Press the lid until you hear a click.
You are ironing while the
SmartLight is blinking.
Wait until the SmartLight lights up steadily
before ironing.
You have put a chemical into the
water tank.
Rinse the water tank and do not put any
perfume or chemical into the water tank.
The iron leaves a shine
or an imprint on the
garment.
The surface to be ironed was
uneven, for instance because
you ironed over a seam or a
fold in the garment.
The iron is safe to use on all ironable
garments. The shine or imprint is not
permanent and disappears when you wash
the garment. Avoid ironing over seams or
folds. You can also place a cotton cloth over
the area to be ironed to avoid imprints.
ENGLISH 13
4239_000_8858_1_Luxury booklet_A5_V3.indd 13 5/30/13 11:46 AM

14
Gratulujeme vám k zakoupení výrobku a vítáme vás ve světě výrobků
Philips. Abyste mohli plně využít podpory, kterou Philips poskytuje,
zaregistrujte svůj výrobek na adrese www.philips.com/welcome.
Nová napařovací žehlička Philips PerfectCare Azur vám nabízí zcela nový
způsob žehlení oděvů. Všichni dobře víme, co všechno musíme u tradičních
žehliček řešit: vybrat správnou teplotu pro silné i jemné látky, čekat, až
se žehlička zahřeje a až vychladne, aby se oděv nezničil příliš horkou
teplotou. Tyto nepříjemnosti jsou s novou napařovací žehličkou Philips
PerfectCare Azur minulostí.
Dříve se záhyby odstraňovaly prostřednictvím velmi horké žehlicí plochy.
Poté se na podporu přenosu tepla začala navíc používat pára, čímž
se žehlení velmi zrychlilo.
Dříve se stávalo, že velké množství páry při této optimální teplotě vedlo
k úniku vody. Vytvořili jsme jedinečnou patentovanou parní komoru, která
udržuje pod vysokým tlakem páru procházející hluboko do látky a zajišťuje
tak rychlé žehlení bez nebezpečí prosakování vody.
- Žehlení je nyní opravdu jednoduché – žádné nastavování teploty,
žádné seškvaření látky, žádné čekání na zahřátí a vychladnutí žehličky. Je
rychlejší, bez ohledu na to, kdo žehlí. Díky technologii OptimalTEMP lze
každý kousek oděvu vyžehlit efektivně a bezpečně.
Tuto žehličku schválila společnost The Woolmark Company Pty Ltd pro
žehlení produktů vyrobených pouze z vlny pod podmínkou, že se tyto
produkty žehlí podle pokynů na cedulce a pokynů, které uvádí výrobce
žehličky. R1101. Ve Velké Británii, Irsku, Hongkongu a v Indii představuje
ochranná známka Woolmark certikační ochrannou známku.
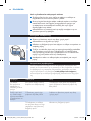
1 Víko nádržky na vodu
2 Tlačítko rozprašovače
3 Posuvník nastavení páry
4 Spoušť parního rázu
5 Napájecí kabel
6 Místo pro navíjení kabelu
7 Tlačítko Calc-Clean
8 Kontrolka SmartLight/Calc-Clean
9 Žehlicí plocha
10 Tryska rozprašovače
4239_000_8858_1_Luxury booklet_A5_V3.indd 14 5/30/13 11:46 AM

1 OtevřetevíkonádržkynavoduanaplňtenádržkupoznačkuMAX.
Přístroj je určen pro použití s vodou z kohoutku. Pokud žijete v oblasti
s velmi tvrdou vodou, může docházet k rychlé tvorbě vodního kamene.
Doporučujeme proto používat destilovanou nebo demineralizovanou vodu,
aby se prodloužila životnost přístroje.
Poznámka: Do nádržky na vodu nenalévejte parfém, ocet, škrob, prostředky na
odstranění vodního kamene, prostředky usnadňující žehlení ani jiné chemické
látky, protože jim přístroj není přizpůsoben.
1 Zasuňtezástrčkudouzemněnézásuvkyvezdi.KontrolkaSmartLight
začnemodřeblikatnaznamení,žesežehličkazahřívá.
2 Kdyžježehličkapřipravenakpoužití,kontrolkaSmartLightmodře
svítí.
Poznámka: Pokud kontrolka SmartLight namísto modře svítí žlutě, znamená
to, že je třeba provést funkci . Podrobnější informace naleznete
v kapitole Čištění a údržba v části Použití funkce .
Technologie OptimalTemp umožňuje žehlit všechny typy látek vhodných
k žehlení, v jakémkoli pořadí, bez nutnosti nastavovat teplotu.
- Žehlit lze látky označené těmito symboly; jedná se například o lněnou
tkaninu, bavlnu, polyester, hedvábí, vlnu, viskózu a umělé hedvábí.
- Látky označené tímto symbolem žehlit nelze. Kromě syntetických
látek – jako je spandex nebo elastan, látky s podílem spandexu nebo
polyoleny (například polypropylen) – sem patří také oděvy s potiskem.
-
15
4239_000_8858_1_Luxury booklet_A5_V3.indd 15 5/30/13 11:46 AM

Posuvník nastavení páry umožňuje různá nastavení:
- Bez páry: když žehličku nepoužíváte, výstup páry vypněte.
- ECO (pouze některé typy): tento režim šetří energii a omezuje výstup
páry, stále je však k dispozici dostatek páry na žehlení oděvů.
- MAX: maximální výstup páry, ideální v kombinaci s nastavením
OptimalTemp.
Doporučujeme žehlit všechny látky, které jsou pro žehlení vhodné,
s maximálním výstupem páry. Dosáhnete tak nejlepších výsledků a čas
žehlení zkrátíte na minimum.
1 Zkontrolujte,žejevzásobníkudostatekvody.
2 Nastavteposuvníkpárydopožadovanéhonastavení.
Poznámka: Jakmile kontrolka SmartLight trvale svítí modře, žehlička začne
produkovat páru.
Díky technologii OptimalTemp lze každý kousek oděvu vyžehlit efektivně
a bezpečně, aniž byste museli hlídat nastavení teploty. Platí to i pro jemné
látky, jako je například hedvábí.
1 JakmilekontrolkaSmartLightpřestaneblikatasvítítrvalemodře,
můžetezačítžehlit(vizkapitolaPřípravakpoužití,částZahřívání).
Pro navlhčení oděvu k žehlení můžete použít funkci rozprašovače. Ta
pomáhá odstranit nepoddajné záhyby.
1 Zkontrolujte,žejevzásobníkudostatekvody.
2 Opakovanýmstlačenímtlačítkarozprašovačenavlhčetežehlenýoděv.
16
4239_000_8858_1_Luxury booklet_A5_V3.indd 16 5/30/13 11:46 AM

Parní ráz z žehlicí plochy pomáhá odstranit nepoddajné záhyby. Tento
impuls umožňuje rozložení páry do všech částí oblečení.
1 Stiskněteauvolnětetlačítkoparníhorázu.
Nejlepší funkce parního rázu dosáhnete tehdy, budete-li tlačítko používat
v intervalu 5 vteřin.
1 Chcete-liběhemžehlenízískatvelkémnožstvípáry,stisknětea
podržtetlačítkoparníhorázu.
Funkci parního rázu lze též použít, držíte-li žehličku v horizontální poloze.
1 Držtežehličkuvesvislépoloze,stiskněteauvolnětetlačítkoparního
rázuanaoděvzlehkapřiložtežehlicíplochu.
Tip: Abyste záhyby odstranili efektivněji, vytáhněte oděv jednou rukou.
Zežehličkyvycházíhorkápára.Nesnažteseodstraňovatzáhyby
zoděvu,kterýmátenasoběnebokterýmánasobějinýčlověk.Nemiřte
proudempárynažádnéosoby,abynedošlokpopálení.
Z důvodu úspory energie se přístroj automaticky vypne, pokud se nepohne
po dobu 2 minut (ve vodorovné pozici) nebo 3 minut (stojí-li vertikálně).
1 Kdyžjeaktivovánrežimautomatickéhobezpečnostníhovypnutí,
kontrolkaSmartLightpomalupulzuje.
2 Chcete-ližehličkuznovuaktivovat,stačíjípohnout.Kontrolka
SmartLightzačnemodřeblikat,dokudsežehličkanenahřeje,apoté
svítítrvale.
Poznámka: Je-li žehlička v režimu automatického bezpečnostního vypnutí, není
vypnuta úplně. Chcete-li žehličku úplně vypnout, odpojte ji ze zásuvky.
17
4239_000_8858_1_Luxury booklet_A5_V3.indd 17 5/30/13 11:46 AM

Začněte záhyby odstraňovat již na začátku sušení: po vyprání prádlo řádně
rozprostřete a oděvy věšte na ramínka, aby přirozeně uschly a tvořilo se na
nich méně záhybů.
Začněte s časově náročnými částmi, jako jsou límeček, manžety a rukávy.
Poté žehlete větší části – přední stranu a záda. Zabráníte tak tvorbě záhybů
na větších částech, když žehlíte části časově náročnější.
: Při žehlení límečku začínejte na rubu a postupujte z vnějšku
(špičatý konec) dovnitř. Obraťte a postup opakujte. Límeček přehněte a
okraj přežehlete, aby byl výsledný tvar dokonalý.
: Žehlení partií s knoíky bude účinnější a rychlejší, když je budete
žehlit z rubové strany.
1 Nastavteposuvníkpárydopolohy‚bezpáry‘,odpojtepřístrojze
síťovézásuvkyanechtežehličkuvychladnout.
2 Zežehlicíplochyotřetevšechnynečistotyvlhkýmhadříkem,
případněmůžetepoužítneabrazivní(tekutý)čisticíprostředek.
Abyzůstalažehlicíplochahladká,chraňtejipředpřímýmkontaktem
skovovýmipředměty.Kčištěnížehlicíplochynikdynepoužívejte
drátěnku,ocetanijinéchemikálie.
3 Horníčástžehličkyotřetenavlhčenýmhadříkem.
4 Nádržkunavodupravidelněvyplachujtevodou.Povypláchnutíji
vyprázdněte.
- Odvápňovací tableta zabraňuje ucpání parních otvorů usazeninami.
Tableta je neustále aktivní a není třeba ji vyměňovat.
- Funkce Calc-Clean odstraňuje částečky vodního kamene ze žehličky.
- Po určité době používání vás kontrolka Calc-Clean upozorní na nutnost
použití funkce Calc-Clean.
Tip: Funkci Calc-Clean používejte jednou měsíčně (platí pro žehličky bez
kontrolky Calc-Clean).
- Po určité době používání se barva kontrolky SmartLight změní na
žlutou. To znamená, že je třeba provést proces Calc-Clean.
Tip: Pokud je voda ve vaší oblasti tvrdá (například když se na žehlicí ploše
vytvářejí šupinky), používejte funkci Calc-Clean častěji.
Poznámka: Kontrolka SmartLight se automaticky resetuje a při dalším
zapnutím žehličky svítí znovu modře, i když proces Calc-Clean neproběhne.
Nenalévejtedonádržkyocetnebojinépřípravkykodstraněnívodního
kamene.
18
4239_000_8858_1_Luxury booklet_A5_V3.indd 18 5/30/13 11:46 AM

1 Přesvědčtese,žejezástrčkapřístrojeodpojenazezásuvky.
2 Nastavteposuvníkpárydopolohy‚bezpáry‘.
3 NádržkunavodunaplňteažpooznačeníMAX.
4 Zasuňtezástrčkudouzemněnéelektrickézásuvky.
5 Vyčkejte,ažsekontrolkaSmartLighttrvalerozsvítí.Potéžehličku
odpojtezezásuvky.
6 Podržtežehličkunaddřezem,stiskněteapodržtestisknutétlačítko
Calc-Cleanazvolnapohybujtežehličkouzestranynastranu.
Poznámka: Ze žehlicí plochy začne vystupovat horká voda a pára. Tím se
odplaví všechny nečistoty a šupinky vodního kamene.
7 PovyprázdněnínádržkynavodutlačítkoCalc-Cleanuvolněte.
8 Opakujtekroky1až7.
1 Zapojtežehličkudozásuvkyvezdianechtejizahřát,abysežehlicí
plochausušila.
2 AžsekontrolkaSmartLighttrvalerozsvítí,lehcepřežehletekousek
použitélátky,abyseodstranilyvšechnyvodnískvrnyzžehlicíplochy.
3 Předuloženímžehličkuodpojtezesítěanechtejivychladnout.
1 Nastavteposuvníkpárydopolohy‚bezpáry‘.
2 Odpojtezástrčkuzezásuvky.
3 Vylijtenádržkunavoduanechtežehličkunabezpečnémmístě
vychladnout.
4 Napájecíkabeloviňteokolourčenéhomístapřístrojeaupevněte
sponou.Dbejtenato,abynapájecíkabelnepřesáhlpřesoznačení
CordFix,abyseběhemskladovánínedotýkalhorkéžehlicíplochy.
5 Žehličkuuchovávejtevesvislépolozenabezpečnémsuchémmístě.
V této kapitole jsou shrnuty nejběžnější problémy, se kterými se můžete
u přístroje setkat. Pokud se vám nepodaří problém vyřešit podle
následujících informací, navštivte adresu , kde
jsou uvedeny odpovědi na nejčastější dotazy, nebo kontaktujte Středisko
péče o zákazníky ve své zemi.
19
4239_000_8858_1_Luxury booklet_A5_V3.indd 19 5/30/13 11:46 AM

Problém Možnápříčina Řešení
Žehlička
neodstraňuje záhyby
na oděvu.
Během žehlení nedochází ke
tvorbě páry.
Nalijte do nádržky vodu. Nastavte posuvník
páry do polohy MAX.
Po odpojení žehličky
nebo při skladování
odkapává z žehlicí
plochy voda.
Posuvník páry je v poloze MAX. Nastavte posuvník páry do polohy ‚bez páry‘.
Žehlička byla uložena
ve vodorovné poloze a
v zásobníku zůstala voda.
Vyprázdněte nádržku na vodu.
Kontrolka nesvítí
modře, ale žlutě, a
stále bliká.
Byla aktivována kontrolka
funkce Calc-Clean. Jedná se
o upozornění, že je z přístroje
nutné odstranit vodní kámen.
Použijte funkci odstranění vodního kamene
Calc-Clean (viz kapitola Čištění a údržba, část
Systém Calc-Clean).
Kontrolka SmartLight
pomalu pulzuje.
Bezpečnostní režim
automatického vypnutí je
aktivní. Žehlička se přepnula
do pohotovostního režimu (viz
kapitola Bezpečnostní režim
automatického vypnutí).
Pohněte žehličkou. Dojde k opětovné aktivaci
a přístroj se začne znovu zahřívat. Vyčkejte
s žehlením, až bude kontrolka SmartLight
svítit trvale.
Při žehlení vytéká ze
žehlicí plochy špinavá
voda a jiné nečistoty.
Používáním příliš tvrdé vody
nebo chemických látek došlo
ke vzniku šupinek uvnitř žehlicí
plochy.
Použijte jednou nebo několikrát funkci Calc-
Clean (viz kapitola Čištění a údržba, část
Funkce Calc-Clean).
Žehlička je zapojená
do zásuvky, ale žehlicí
plocha je studená.
Jde o problém s připojením. Zkontrolujte napájecí kabel, zástrčku i zásuvku
ve zdi.
Žehlička neprodukuje
žádnou páru.
V nádržce není dostatek vody. Naplňte nádržku vodou (viz kapitola
Příprava k použití, část Plnění odnímatelného
zásobníku vodou).
Posuvník páry je v poloze ‚bez
páry‘.
Nastavte posuvník páry do polohy MAX (viz
kapitola Příprava k použití, část Nastavení
páry).
Teplota žehličky dosud
nepostačuje k vytvoření páry.
Počkejte, až kontrolka SmartLight přestane
blikat a rozsvítí se trvale.
Žehlička nevytváří
parní ráz.
Funkci parního rázu jste
používali příliš často během
krátké doby.
Pokračujte v žehlení ve vodorovné poloze a
určitou dobu počkejte, než znovu použijete
funkci parního rázu.
Teplota žehličky dosud
nepostačuje k vytvoření parního
rázu.
Počkejte, až kontrolka SmartLight přestane
blikat a rozsvítí se trvale.
Během žehlení na
tkaninu kape voda.
Nezavřeli jste řádně víko
nádržky.
Stlačte víčko, dokud neuslyšíte zaklapnutí.
20
4239_000_8858_1_Luxury booklet_A5_V3.indd 20 5/30/13 11:46 AM
Strona jest ładowana ...
Strona jest ładowana ...
Strona jest ładowana ...
Strona jest ładowana ...
Strona jest ładowana ...
Strona jest ładowana ...
Strona jest ładowana ...
Strona jest ładowana ...
Strona jest ładowana ...
Strona jest ładowana ...
Strona jest ładowana ...
Strona jest ładowana ...
Strona jest ładowana ...
Strona jest ładowana ...
Strona jest ładowana ...
Strona jest ładowana ...
Strona jest ładowana ...
Strona jest ładowana ...
Strona jest ładowana ...
Strona jest ładowana ...
Strona jest ładowana ...
Strona jest ładowana ...
Strona jest ładowana ...
Strona jest ładowana ...
Strona jest ładowana ...
Strona jest ładowana ...
Strona jest ładowana ...
Strona jest ładowana ...
Strona jest ładowana ...
Strona jest ładowana ...
-
 1
1
-
 2
2
-
 3
3
-
 4
4
-
 5
5
-
 6
6
-
 7
7
-
 8
8
-
 9
9
-
 10
10
-
 11
11
-
 12
12
-
 13
13
-
 14
14
-
 15
15
-
 16
16
-
 17
17
-
 18
18
-
 19
19
-
 20
20
-
 21
21
-
 22
22
-
 23
23
-
 24
24
-
 25
25
-
 26
26
-
 27
27
-
 28
28
-
 29
29
-
 30
30
-
 31
31
-
 32
32
-
 33
33
-
 34
34
-
 35
35
-
 36
36
-
 37
37
-
 38
38
-
 39
39
-
 40
40
-
 41
41
-
 42
42
-
 43
43
-
 44
44
-
 45
45
-
 46
46
-
 47
47
-
 48
48
-
 49
49
-
 50
50


Philips GC4910/10 Instrukcja obsługi
- Kategoria
- Okowy
- Typ
- Instrukcja obsługi
w innych językach
- slovenčina: Philips GC4910/10 Používateľská príručka
Powiązane dokumenty
-
Philips GC4881/20 Instrukcja obsługi
-
Philips GC4320/02 Instrukcja obsługi
-
Philips GC4564/20R1 Instrukcja obsługi
-
Philips GC4512/20 Instrukcja obsługi
-
Philips GC4880/20 Instrukcja obsługi
-
Philips GC1022 Instrukcja obsługi
-
-
Philips GC9222/02 Instrukcja obsługi
-
-