GEV FlammEx FMG 4313 Instrukcja obsługi
- Kategoria
- Budziki
- Typ
- Instrukcja obsługi

FMG 4313
04313

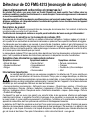
1
2
3
4
+50°C
-20°C

9 10
5 6
7 8
3 4 5
21
xx.xx.
52 mm
Ø 5 mm

Bitte sorgfältig durchlesen und aufbewahren!
Mit dem Kauf dieses Artikels haben Sie sich für ein qualitativ hochwertiges FlammEx Produkt entschieden.
Bitte lesen Sie diese Bedienungsanleitung sorgfältig durch, um ein einwandfreies Funktionieren zu
gewährleisten. Bewahren Sie diese Anleitung sorgfältig auf, um gegebenenfalls später nachlesen zu können.
Das Produkt ist nur für den sachgemäßen Gebrauch (wie in der Bedienungsanleitung beschrieben)
bestimmt. Änderungen, Modifikationen oder Lackierungen dürfen nicht vorgenommen werden, da sonst
jeglicher Gewährleistungsanspruch entfällt. Die ordnungsgemäße Funktion ist in diesem Fall nicht
gewährleistet.
Produktbeschreibung
Ein CO-Melder ist ein Melder, der die Konzentration von Kohlenmonoxid in der Raumluft nachweist und Alarm
auslöst, sobald diese zu hoch ist.
Dieser Kohlenmonoxid-Melder ist nicht als Rauchwarnmelder oder als Detektor für brennbare Gase geeignet!
Was Sie über Kohlenmonoxid (CO) wissen sollten
Kohlenmonoxid (CO) ist ein gefährliches Gift. Es ist ein farb-, geruch- und geschmackloses Gas. CO-Gas
entsteht bei der Verbrennung von kohlenstohaltigen Materialien und zwar dann, wenn nicht genügend
Sauersto zur Verfügung steht.
Diese Gefahr kann z. B. bei Heizkesseln, Kaminöfen und Autoabgasen auftreten. Dieses Gift wird im Blut
gebunden und verhindert dort den Transport von Sauersto, was zum Tod durch Ersticken führen kann.
Selbst kleine Konzentrationen von CO-Gas können Hirn- oder andere Organschäden bei Ungeborenen
hervorrufen, ohne dass die Mutter davon betroen ist.
Kohlenmonoxid (CO) hat annähernd die gleiche Dichte wie Luft und verteilt sich daher gleichmäßig im
Raum. Es ist nicht möglich, genaue Anleitungen zur richtigen Anordnung eines Detektors zu geben.
Symptome bei einer Kohlenmonoxid-Vergiftung:
Schwache Anzeichen Mittelstarke Anzeichen Extreme Anzeichen
• Leichter Kopfschmerz • Starker Kopfschmerz • Bewusstlosigkeit
• Übelkeit/Erbrechen • Einschläfernd • Verkrampfungen
• Ermüdung • Verwirrung • Herzrhythmusstörungen
• Hoher Pulsschlag • Tod
Wichtige Informationen
Die Montage sollte durch eine sachkundige Person erfolgen. Ein CO-Melder ist kein Ersatz für
Rauchwarn-, Feuer- oder andere Brandmelder! Dieser Melder ist für die Nutzung innerhalb von privatem
Wohnraum vorgesehen. Er ist nicht für gewerbliche oder industrielle Anwendungen, für den Einsatz
auf Sportbooten oder für die Berufsschifffahrt geeignet. Folgende Stoffe können die ordnungsgemäße
Funktion des Gerätes nachhaltig beeinträchtigen. Halten Sie daher das Gerät stets fern von:
• Ammoniak/Salmiakgeist • Pinselreiniger • Farbverdünnung • Nitroverdünnung • Propan • Butan • Isobutan •
Isopropanol • Ethylen • Benzene • Toluene • Ethylacetat • Schwefelwasserstoff • Schwefeldioxide •
alkoholische Substanzen • Haarspray • After Shaves • Parfume • Reinigungsmittel
Es kann Personen mit besonderen medizinischen Eigenschaften keine vollständige Sicherheit bieten und nicht
die chronische Wirkung einer Kohlenmonoxidexposition auf den menschlichen Körper verhindern. Es ist kein
Ersatz für die ordnungsgemäße Installation, Benutzung und Instandhaltung brennstoffbetriebener Geräte ein-
schließlich zugehöriger Lüftungs- und Abgassysteme.
Der CO-Melder muss spätestens 7 Jahre nach erster Inbetriebnahme ausgetauscht werden. Beachten Sie,
dass es noch andere Gefahren gibt, bei denen Ihnen die CO-Detektion dieses Melders nicht hilft, so z. B.
Gaslecks, Feuer oder Explosionen. Wir empfehlen hierfür unsere Gas-, Rauchwarn- und Wärmemelder.
Mehr Informationen erhalten Sie im Internet: www.gev.de
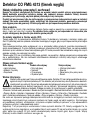
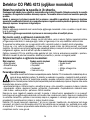
CO-Melder FMG 4313 (Kohlenmonoxid)
4

4
Verhalten bei Alarm
1. Gehen Sie sofort an die frische Luft, ins Freie oder zu einem geöneten Fenster/Tür.
2. Rufen Sie die Feuerwehr.
3. Betreten Sie nicht wieder den betroenen Bereich bzw. entfernen Sie sich nicht von dem
oenen Fenster/Tür.
4. Warten Sie das Eintreen der Feuerwehr ab.
5. Lüften Sie alle Räume gründlich.
6. Wenn keine Gefahr mehr besteht, setzt der CO-Melder seinen Alarm selbsttätig zurück
und geht in den Normalzustand über.
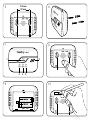
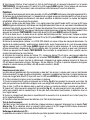
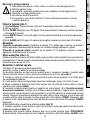
Anzeigen und Funktionen (Abb. 7)
1. Test/Silence-Taste. Diese Taste dient zum Testen der Funktion und zum Stummschalten eines Alarms.
2. Laustsprecherönung
3. POWER-Anzeige (grünes LED-Signal). Signalisiert die Betriebesbereitschaft durch ein konstantes
Blinken in Abständen von 30 s. an.
4. ERROR-Anzeige (gelbes LED-Signal). Die Error-Anzeige zeigt Störungen oder Warnungen im Sinne
einer CO-Detektion an.
5. ALARM-Anzeige (rotes LED-Signal). Im Falle eine CO Detektion leuchtet die rote LED auf.
Installation
Empfehlung für optimale Sicherheit: Installieren Sie je einen CO-Melder in Kinder- und Schlafzimmern, in allen
Räumen mit Gasheizungen, Herden/Öfen oder Kaminen sowie in den Fluren jeder Etage und in der Garage.
Empfehlung für Mindestschutz: Installieren Sie je einen CO-Melder in Fluren und in Räumen mit
Gasheizungen, Herden/Öfen oder Kaminen.
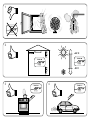
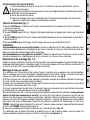
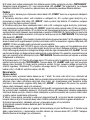
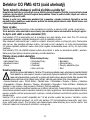
Montageort (Abb. 1-4)
Montieren oder stellen Sie den Melder möglichst zentral auf einer freien Fläche und in der Nähe von
potentiellen Gefahrenquellen (z. B. Gasthermen) auf. Bei der Wandmontage sollte der Mindestabstand
mehr als 1,5 m vom Boden und mehr als 0,2 m von der Decke betragen.
Montage und Inbetriebnahme
1. Der Betrieb des CO- Melders ist in den folgenden zwei Varianten möglich:
Wandmontage oder stehend auf einem geeignetem Untergrund.
Führen Sie die folgenden Schritte in der gegebenen Reihenfolge aus, um den Melder an der Wand zu
montieren. Verwenden Sie eine Wasserwaage zum Markieren der Bohrlöcher in waagrechter Position.
(Abstand 52 mm- siehe Abb. 5)
2. Bohren Sie die Löcher mit einem geeigneten Bohrer an der vorher markierten Position. (Bohrdurchmesser
Ø 5 mm) Achten Sie darauf, keine Leitungen zu beschädigen!
3. Drücken Sie die Dübel in die Bohrlöcher und drehen Sie die zwei mitgelieferten Schrauben ein, bis die
Schraubenköpfe noch ca. 5 mm hervorstehen.
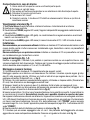
4. Önen Sie das Batteriefach auf der Geräterückseite, indem Sie auf die schraerte Pfeilfläche drücken
und den Deckel in Pfeilrichtung schieben (Abb. 8).
5. Legen Sie die beiden 1,5 AA Batterien polrichtig in das Batteriefach ein. Das Batteriefach hat einen
Sicherungsmechanismus: Ohne eingelegte Batterien läßt sich die Batteriefachabdeckung nicht schließen.
Sobald die Batterien richtig eingelegt wurden quittiert das Gerät dieses durch einen Signalton und alle
drei frontseitigen LEDs leuchten kurz auf. Das Gerät ist betriebsbereit und befindet sich zunächst in einer
Kalibrierungsphase. Während der ersten 30 s. der Kalibrierung blinkt ca. alle 3 s. die grüne „POWER“ LED kurz
auf. Danach geht das Gerät in die Betriebsphase über (alle 30 s. 1x Aufleuchten der grünen „POWER“ LED).
6. Tragen Sie umgehend das Installationsdatum auf dem mitgeliefertem Aufkleber (Abb. 10) ein.
7. Der Melder kann nun mit der Gehäuserückseite auf die Schrauben aufgesetzt und eingerastet werden
bzw. an der gewünschten Position aufgestellt werden. Beachten Sie hierzu die Anweisungen auf Abb. 1-4.
5
GBFRITPL DESKSLCZ

8. Sie können jederzeit einen Funktionstest durch kurzen Druck auf die „TEST/SILENCE“ Taste durchführen. Es
ertönt der CO-Warnton und die rote „ALARM“ LED blinkt. Dies signalisiert nicht, dass ein überhöhter CO-Gehalt
in der Raumluft vorhanden ist, sondern bestätigt die korrekte Funktion des Melders.
Funktionen
1. Im normalen, störungsfreien Betrieb leuchtet die grüne „POWER“ LED in regelmäßigen Abständen von 30 s. auf.
2. Störungswarnung. Falls das Gerät in Abständen von ca. 30 s. ein akkustisches Signal bei gleichzeitigem Blinken
der gelben „ERROR“ LED abgibt ersetzen Sie den gesamten Melder. Das Gerät hat einen Sensorfehler. Der
Sensor kann nicht getauscht werden.
3. Batteriestandswarnung Ertönt alle 30 s. ein akustisches Signal (Piepen), bei gleichzeitigem Blinken der gelben
„ERROR“ LED ist die Batteriespannung niedrig. In diesem Fall müssen Sie sofort die Batterien wechseln. In diesem
Zustand ist eine CO-Alarmierung nicht mehr gegeben! Folgen Sie zum Wechseln der Batterien den Angaben unter
Punkt WARTUNG. Sie können die akustische Batteriestandswarnung durch Drücken der TEST/SILENCE-Taste für
9h unterdrücken. Während dieser Phase blinkt weiterhin die gelbe „ERROR“ LED.
4. Ende der Lebensdauer: Die Lebensdauer des elektrochemischen Sensors beträgt etwa 7 Jahre. Ist das Ende der
Lebensdauer erreicht, wird dies mit einem dreimaligen Piepen alle 30 s. in Verbindung mit einem Blinken der gelben
„ERROR“ LED signalisiert. In diesem, Fall, muss der Melder sofort ersetzt werden.
5. Kohlenmonoxid Alarm. Detektiert der FMG 4313 eine kritischen Konzentration Kohlemonoxids wird dies durch
folgendes Alarmmuster signalisiert: Vier kurze akustische Signale, gefolgt von 5 s. Pause und wieder vier kurzen
akustischen Signalen. Analog zu diesem Muster blinkt die rote „ALARM“ LED. Dieser Rhythmus wiederholt sich
so lange, wie eine gefährlich hohe CO-Konzentration in der Raumluft vorhanden ist oder der Alarm durch Druck auf
die TEST/SILENCE-Taste unterdrückt wird. Zum Verhalten im Alarmfall siehe Punkt Verhalten bei Alarm.
6. CO-Alarm stumm schalten: Während eines aktiven CO-Alarms können Sie die akustische Signalisation durch
betätigen der TEST/SILCENCE-Taste für 5 min. stumm schalten. Die rote „ALARM“ LED blinkt in dieser Zeit
weiterhin. Falls nach Ablauf der Zeit der CO-Gehalt immer noch über 45 ppm liegt, ertönt auch das akustische
Signalmuster wieder. Hinweis: Im Falle eines aktiven CO-Alarms ist das erste Signalmuster etwas leiser (<85 dB),
als alle nachfolgenden (>85 dB).
Wartung
Batterieaustausch:
Die Batterien müssen im Regelfall erst nach ca. 7 Jahren getauscht werden. Dieser Zeitraum kann je nach
Umwelteinflüssen variieren. Es gilt: Tauschen Sie die Batterien sofort wenn die Batteriestandswarnung ertönt
(Batteriestandswarnung wird signalisiert durch 2x kurzes Piepen begleitet von gleichzeitigem Blinken der gelben
„ERROR“ LED - jeweils alle 30 Sekunden. Um die Batterien zu tauschen, folgen Sie diesen Anweisungen:
1. Önen Sie das Batteriefach durch Drücken auf den Pfeil (Abb. 8) und Herunterziehen des Batteriefachdeckels.
Entsorgen Sie die Batterien nicht im Hausmüll. Der Endverbraucher ist gesetzlich dazu verpflichtet, Batterien
nach Gebrauch zurückzugeben. Dies ist unentgeltlich bei der Verkaufsstelle oder bei einer Sammelstelle in Ihrer
Nähe möglich.
2. Legen Sie die 2 neuen Batterien polrichtig (Abb. 9) ein und drücken dabei die Stifte mit der jeweiligen Batterie
herunter. Der Melder quittiert mit einem kurzen Piepton.
3. Schließen Sie das Batteriefach indem Sie den Deckel aufsetzen und nach oben schieben bis er einrastet.
4. Prüfen Sie sofort die Funktion des Melders (siehe Funktionstest).
Funktionstest:
Überprüfen Sie die ordnungsgemäße Funktion 1x pro Woche, indem Sie die Test/Silence-Taste (Abb. 7) kurz
drücken. Der Melder piept laut und die rote „ALARM“ LED leuchten gleichzeitig kurz auf. Danach geht der
Melder in den normalen Betrieb zurück.
Reinigen des CO-Melders:
Loser Staub im Inneren des Melders kann von außen mit Hilfe eines Staubsaugers durch die Lüftungsschlitze
abgesaugt werden. Das Gehäuse kann von außen mit einem leicht angefeuchteten Tuch gereinigt werden.
Verwenden Sie auf keinen Fall Haushaltsreiniger mit Ammoniak (Salmiakgeist) oder andere Chemikalien (wie
6

Reinigungs- oder Lösungsmittel) am Melder oder in der Nähe des Melders. Der Melder darf nicht gestrichen
oder lackiert werden! Achten Sie darauf, daß keine Feuchtigkeit ins Geräteinnere gelangt.
Lebensdauer
Der elektrochemische Sensor ist einem Alterungsprozesse unterworfen. Die Sensorlebensdauer ist deshalb
auf ca. 7 Jahre begrenzt. Der Sensor kann nicht ausgetauscht werden. Ersetzen Sie den gesamten Melder
deshalb spätestens 7 Jahre nach der ersten Inbetriebnahme. Bitte notieren Sie sich das Datum der
Erstinbetriebnahme auf dem beiliegendem Aufkleber (Abb. 10) mit einem nicht abwaschbarem Stift.
Batterie- und Akkuhinweise
Altbatterien dürfen nicht mit dem unsortierten Hausmüll entsorgt werden. Besitzer von Altbatterien
sind gesetzlich zur Rückgabe verpflichtet und können diese unentgeltlich bei den Verkaufsstellen
zurückgeben. Batterien enthalten umwelt- und gesundheitsschädliche Stoe und müssen daher
fachgerecht entsorgt werden.
Recycling-Hinweise
Dieses Gerät darf nicht mit dem unsortierten Hausmüll entsorgt werden. Besitzer von Altgeräten sind
gesetzlich dazu verpflichtet, dieses Gerät fachgerecht zu entsorgen. Informationen erhalten Sie von
Ihrer Stadt- bzw. Gemeindeverwaltung.
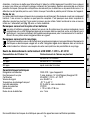
Auslöseschwelle gemäß EN 50291-1: 2010 + A1: 2012
6 7
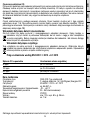
Technische Daten
Typbezeichnung FMG 4313: Gerätetyp B
Batteriebetrieb 2x 1,5 V Alkaline (AA/Mignon) Energizer E91
Zertifizierung EN 50291-1: 2010 + A1: 2012
Signallautstärke Ca. 85 dB/1 m
Lagerungs-/Transporttemperatur -20°C... +50°C
Zulässige Luftfeuchtigkeit 30 %... 95 % nicht kondensierend
Schutzart IP X20D
Abmessungen B 120 x H 80 x T 38 mm
Lebensdauer Melder Ca. 7 Jahre
Technische und optische Änderungen ohne Ankündigung vorbehalten.
CO-Konzentration in der Luft Alarmauslösung spätestens
30 ppm nach 120 Minuten
100 ppm nach 10 - 40 Minuten
300 ppm nach weniger als 3 Minuten
GBFRITPL DESKSLCZ

Please carefully read these operating instructions and keep them for use
at a later date!
By purchasing this device you have opted for a high-quality FlammEx product. Please read through these
operating instructions carefully in order to ensure that the device functions correctly. Keep these instructions
in a safe place so that you can refer to them later if necessary. Use this product only as intended (as described
in the user instructions). Do not alter, modify or paint the device, as this will render any warranties null and
void. Proper functioning cannot be guaranteed in this case.
Product description
A CO detector is an alarm that detects the concentration of carbon monoxide in the ambient air and activates an
alarm as soon as the concentration is too high.
This carbon monoxide alarm is not suitable for use as a smoke detector or as a flammable gas detector!
What you should know about carbon monoxide (CO)
Carbon monoxide (CO) is an insidious poison. It is a gas that has no colour, smell or taste. CO gas is formed
from the incomplete combustion of materials containing carbon, namely when there is insucient oxygen for
such materials to burn properly.
This danger can arise with central-heating boilers, open fireplaces and car exhausts. The poison accumulates
in the blood and obstructs the passage of oxygen, which can lead to death from suocation. Even small
concentrations of CO gas can cause damage to the brain or other organs of unborn babies without the mother
being aected.
Carbon monoxide (CO) has almost the same density as air and therefore disperses evenly around the room. It is
not possible to give precise instructions for the correct positioning of a detector.
Symptoms of carbon monoxide poisoning:
Minor indicators Moderate indicators Extreme indicators
• Mild headache • Severe headache • Unconsciousness
• Nausea/vomiting • Drowsiness • Cramping
• Fatigue • Confusion • Irregular heart beat
• High pulse rate • Death
Important information
The alarm should be installed by a competent and qualified person. A CO detector is no substitute
for smoke alarms, fire alarms or other flame alarms! This alarm is intended for use within a private
living space. It is not suitable for commercial or industrial applications, for use on motorboats or for
commercial vessels. The following materials can impair the proper function of the device on an ongoing
basis. Therefore, always keep the device away from: • Ammonia/liquid ammonia • Brush cleaner • Paint thinner
• Cellulose thinner • Propane • Butane • Isobutane • Isopropanol • Ethylene • Benzene • Toluene • Ethyl
acetate • Hydrosulphuric acid • Sulphur dioxide • Alcoholic substances • Hairspray • Aftershave • Perfume
• Cleaning agents
It cannot offer complete safety to people with special medical needs and cannot prevent the chronic effects
of carbon monoxide exposure to the human body. It is no substitute for the proper installation, utilisation
and maintenance of fuel-burning devices with ventilation and flue gas systems.
The CO detector must be replaced no later than seven years after first being commissioned. Please note
that there are other dangers where this alarm‘s ability to detect carbon monoxide will not help you, e.g. in
the event of gas leaks, fire or explosions. For such dangers we recommend our gas, smoke and heat alarms.
You can find more information about these on our website: www.gev.de
CO detector FMG 4313 (carbon monoxide)
8

8
Actions in the event of an alarm
1. Proceed immediately to fresh air, outdoors or to an open window or door.
2. Call the fire brigade.
3. Do not re-enter the aected area, or remain at the open window/door.
4. Await the arrival of the fire brigade.
5. Fully ventilate all rooms.
6. If the danger is no longer present, the CO detector automatically resets and returns to
its normal state.
Displays and functions (fig. 7)
1. Test/Silence button. This button is used to check the functionality or to silence the alarm.
2. Speaker opening.
3. POWER display (green LED signal). Signals that the device is ready for use with constant flashing at
30-second intervals.
4. ERROR display (yellow LED signal). The error display shows malfunctions or warnings regarding
CO detection.
5. ALARM display (red LED signal). If CO is detected, the red LED lights up.
Installation
Recommendation for maximum safety: Install one CO detector in each child‘s room and bedroom, in all
rooms with gas heating, stoves/ovens or fireplaces as well as in the hallways on each floor and in the garage.
Minimum recommended level of protection: Install one CO detector in each hallway and in rooms with
gas heating, stoves/ovens or fireplaces.
Installation position (figs. 1-4)
Install or place the alarm as centrally as possible on a clear surface and near to potential sources of danger
(e.g. gas heaters). If installing on a wall, the minimum distance from the floor should be no less than 1.5 m,
and the minimum distance from the ceiling should be no less than 0.2 m.
Installation and commissioning
1. The CO alarm can be operated in the following two varying manners:
Wall installation, or standing on a suitable base.
Follow the steps below in the specified order to install the alarm on the wall. Use a spirit level to mark the
drill holes in a horizontal position. (Distance 52 mm — see fig. 5)
2. Drill the holes in the previously marked position using a suitable drill. (Drill diameter Ø 5 mm) Ensure that
you do not damage any wires.
3. Push the wall plugs into the drill holes and screw in the two supplied screws until the screw heads are
only protruding by approximately 5 mm.
4. Open the battery compartment on the rear of the device by pressing on the hatched arrow marking and
pushing the cover in the direction of the arrow (fig. 8).
5. Insert the two 1.5 AA batteries into the battery compartment, ensuring that the polarity is correct. The
battery compartment has a safety mechanism: If batteries are not inserted, the battery compartment
cover cannot be closed. As soon as the batteries are inserted correctly the device confirms this with a
signal tone, and all three front LEDs briefly light up. The device is ready to use and initially switches to a
calibration phase. During the first 30 seconds of the calibration phase, the green „POWER“ LED flashes
briefly approximately every three seconds. After this, the device moves into the operating phase (the green
„POWER“ LED lights up once every 30 seconds).
6. Enter the installation date on the supplied sticker as soon as possible (fig. 10).
7. The back case of the alarm can now be placed on the screws and clicked into place or set down in the
desired position. Note the instructions in figs. 1-4.
9
GBFRITPL DESKSLCZ

8. You can test the functionality at any time by pressing briefly on the „TEST/SILENCE“ button. The CO warning
signal sounds and the red „ALARM“ LED flashes. This does not signal that there is excessive level of CO in the
ambient air. Instead, it confirms that the alarm is functioning correctly.
Functions
1. In normal, error-free operation, the green „POWER“ LED lights up at regular intervals of 30 seconds.
2. Error alert: If the device gives an acoustic signal at intervals of 30 seconds and the yellow „ERROR“ LED
flashes simultaneously, replace the entire alarm. The device has a sensor error. The sensor cannot be replaced.
3. Battery power warning: If an acoustic signal (beeping) sounds every 30 seconds and the yellow „ERROR“ LED
is flashing simultaneously, battery power is low. In this case, you must change the batteries immediately. The CO
alarm is no longer functional in this state. To change the batteries, follow the steps under the MAINTENANCE
heading. You can suppress the acoustic battery power warning by pressing the TEST/SILENCE button for nine
seconds. During this phase, the yellow „ERROR“ LED flashes continuously.
4. End of service life: The service life of the electrochemical sensor is approximately seven years. The end of
the service life is signalled with three beeps every 30 seconds, as well as a flashing yellow „ERROR“ LED. This
indicates that the detector needs to be replaced immediately.
5. Carbon monoxide alarm: If the FMG 4313 detects a critical concentration of carbon monoxide, the alarm
gives the following signal: Four short acoustic signals, followed by a five-second pause and four more short
acoustic signals. Alongside this alarm pattern, the red „ALARM“ LED flashes. This rhythm repeats for as long as
a dangerously high concentration of CO is present in the ambient air or until the alarm is suppressed by pressing
the TEST/SILENCE button. For information on the procedure to follow in the event of an alarm, see the chapter
entitled „Actions in the event of alarm“.
6. Mute CO alarm: While the CO alarm is active, you can mute the acoustic signals by pressing the TEST/SILENCE
button for five minutes. The red „ALARM“ LED continues to flash during this time. If the CO content is still above
45 ppm after the time has elapsed, the acoustic signal pattern sounds again. Note: In the event of an active CO
alarm, the first signal pattern is somewhat quieter (<85 dB) than those that follow (>85 dB).
Maintenance
Changing the battery:
The batteries will not usually need to be changed until after around seven years. This timeframe can vary
depending on environmental influences. Important: Change the batteries immediately if the battery power
warning sounds (battery power warning is signalled by two short beeps accompanied simultaneously by the
yellow „ERROR“ LED flashing every 30 seconds). To change the batteries, please follow these instructions:
1. Open the battery compartment by pressing on the arrow (fig. 8) and sliding the compartment cover
downwards. Do not dispose of the batteries with your household waste. The end user must recycle all used
batteries. Batteries may be returned free-of-charge to the place of sale or to your local collection point.
2. Insert two new batteries, ensuring that the polarity is correct (fig. 9), and make sure that the pins located in
the battery compartment are pressed down by the relevant batteries. The alarm confirms that the batteries are
in place with a short beep.
3. Close the battery compartment by placing the cover on the alarm and sliding it upwards until it clicks into
position.
4. Test the alarm immediately (see Function test).
Function test:
Check once a week that the alarm is working properly by briefly pressing the Test/Silence button (fig. 7). The
alarm beeps loudly and the red „ALARM“ LED simultaneously flashes. The alarm then returns to its normal
operating mode.
Cleaning the CO alarm:
Loose dust on the inside of the alarm can be drawn out from the outside by using a vacuum cleaner to suck
through the air vents. The casing can be cleaned from the outside with a slightly damp cloth. Under no
circumstances should a household cleaner containing ammonia (liquid ammonia) or other chemicals (such as
10

cleaning agents or solvents) be used on the alarm or near to the alarm. The alarm must not be painted or
varnished! Take care to ensure than no moisture penetrates the device.
Service life
The electrochemical sensor is subject to an ageing process. The service life of the sensor is therefore
limited to approximately seven years. The sensor cannot be replaced. Therefore, please replace the entire
alarm no later than 7 years after it is first commissioned. Please note the date when the alarm was first
commissioned on the enclosed sticker (fig. 10) with a permanent marker.
Notes regarding batteries and battery packs
Used batteries must not be disposed of with unsorted household waste. Used batteries must be
recycled and may be returned free-of-charge to the place of sale. Batteries contain substances which
are harmful to the environment and to human health and must therefore be disposed of correctly.
Recycling instructions
This device must not be disposed of with unsorted household waste. Owners are required by law to
correctly dispose of used devices. Contact your local town council for more information.
Trigger threshold in accordance with EN 50291-1: 2010 + A1: 2012
10 11
Technical data
Model name FMG 4313: Device type B
Battery operation 2x 1.5-V alkaline (AA/Mignon) Energizer E91
Certification EN 50291-1: 2010 + A1: 2012
Alarm volume approx. 85 dB/1 m
Storage/transport temperature -20°C... +50°C
Permissible humidity 30 %... 95 %, non-condensing
Protection type IP X20D
Dimensions W 120 x H 80 x D 38 mm
Alarm service life approx. 7 years
Technical and design features may be subject to change.
CO concentration in the air Alarm triggered no later than
30 ppm after 120 minutes
100 ppm after 10–40 minutes
300 ppm after less than 3 minutes
GBFRITPL DESKSLCZ

Lisez soigneusement cette notice et conservez-la !
En achetant cet article, vous avez choisi un Produit FlammEx de haute qualité. Pour l‘utiliser dans les
meilleures conditions, veuillez lire attentivement ce mode d‘emploi. Conservez soigneusement ce document
en vue d‘une consultation future.
Ce produit ne doit être utilisé que dans les conditions prévues par le présent mode d‘emploi. Toute modification
(physique, esthétique, etc.) du produit entraîne l‘annulation de la garantie. Le bon fonctionnement de l‘appareil
n‘est pas garanti dans ce cas.
Description du produit
Un détecteur de CO analyse la concentration de monoxyde de carbone dans l‘air ambiant et déclenche
une alarme dès que celle-ci est trop élevée.
Ce détecteur de monoxyde de carbone ne se prête pas à la détection de fumée ou de gaz inflammables !
Informations à connaître sur le monoxyde de carbone (CO)
Le monoxyde de carbone (CO) constitue un poison extrêmement dangereux. Incolore, inodore et insipide, il
est le produit d‘une combustion de substances carbonées en présence d‘une quantité insusante d‘oxygène.
Ce phénomène peut se produire, par exemple, à proximité des chaudières, poêles et gaz d‘échappement. Le
monoxyde de carbone pénètre dans le sang et entrave le transport de l‘oxygène, pouvant entraîner le décès par
asphyxie. Même en très petite quantité, il peut endommager le cerveau ou d‘autres organes d‘un enfant à naître,
et ce, sans que la mère ressente quoi que ce soit.
Le monoxyde de carbone (CO) a à peu près la même densité que l‘air et se disperse donc uniformément dans la
pièce. Il est impossible de donner des instructions précises sur la disposition correcte d‘un détecteur.
Symptôme d‘une intoxication au monoxyde de carbone :
Symptômes mineurs Symptômes modérés Symptômes extrêmes
• Mal de tête léger • Mal de tête fort • Perte de connaissance
• Nausée/vomissement • Engourdissement • Crampes
• Fatigue • Confusion • Troubles du rythme cardiaque
• Pouls accéléré • Mort
Informations importantes
Le montage doit être réalisé par une personne compétente. Un détecteur de CO ne se substitue en
aucun cas à un détecteur de fumée ou d‘incendie ! Conçu pour un usage domestique, ce détecteur
n‘est pas adapté aux applications commerciales ou industrielles, ni à une utilisation sur des bateaux de
plaisance ou dans la navigation professionnelle. Il convient de tenir l‘appareil à l‘écart des substances
suivantes, qui sont susceptibles d‘entraver son bon fonctionnement :
• Ammoniac/solution ammoniacale • Nettoyants pour pinceaux • Diluants pour peinture • Diluants pour
laque cellulosique • Propane • Butane • Isobutane • Isopropanol • Éthylène • Benzène • Toluène • Acétate
d‘éthyle • Hydrogène sulfuré • Dioxyde de soufre • Substances alcoolisées • Laque • Après-rasage • Parfums
• Produits de nettoyage
Ce dispositif ne peut en aucun cas garantir une sécurité totale à des personnes atteintes de pathologies
médicales particulières, ni empêcher les effets chroniques d‘une exposition au monoxyde de carbone sur
le corps humain. Il ne se substitue aucunement à l‘installation, l‘utilisation et la maintenance conformes des
appareils à combustible, dont les systèmes de ventilation et d‘échappement associés.
Le détecteur de CO doit être remplacé au plus tard 7 ans après la mise en service initiale. N‘oubliez pas que ce
détecteur de monoxyde de carbone ne vous protège pas de tous les dangers ! Par exemple, il ne détecte ni les
fuites de gaz, ni les risques d‘incendie, ni les risques d‘explosion. Nous proposons pour cela des détecteurs de
gaz, de fumée et de chaleur. Pour plus d‘informations, visitez notre site Internet : www.gev.de
Détecteur de CO FMG 4313 (monoxyde de carbone)
12

12
Comportement en cas d‘alarme
1. Allez immédiatement respirer de l‘air frais, à l‘extérieur ou par une fenêtre/porte ouverte.
2. Appelez les pompiers.
3. Ne pénétrez plus dans la zone concernée, ou ne vous éloignez pas de la fenêtre/porte ouverte.
4. Attendez l‘arrivée des pompiers.
5. Aérez bien toutes les pièces.
6. Quand tout danger est écarté, le détecteur de CO cesse automatiquement de faire sonner
l‘alarme et retrouve son mode de fonctionnement normal.
Témoins et fonctions (fig. 7)
1. Bouton Test/Silence. Ce bouton sert à tester le fonctionnement de l‘appareil et à activer la fonction
silence d‘une alarme.
2. Ouverture du haut-parleur
3. Témoin POWER (signal LED vert). Signale l‘état opérationnel par un clignotement continu par intervalles
de 30 s.
4. Témoin ERROR (signal LED jaune). Indique des dysfonctionnements ou des alertes dans le cadre de la
détection de CO
5. Témoin ALARM (signal LED rouge). La LED rouge s‘allume en cas de détection de CO.
Installation
Recommandation pour une sécurité optimale : placez un détecteur de CO dans chaque chambre, dans
toutes les pièces équipées d‘un chauage au gaz, d‘une cuisinière, d‘un four ou d‘une cheminée, ainsi que
dans les couloirs de chaque étage et dans les garages.
Recommandation pour une protection minimale : installez un détecteur de CO dans les couloirs et dans
les pièces équipées d‘un chauage au gaz, d‘une cuisinière, d‘un four ou d‘une cheminée.
Emplacement de montage (fig. 1-4)
Montez ou placez le détecteur le plus au centre possible d‘une surface dégagée et à proximité des sources
de danger potentielles (par ex. chaudières à gaz). En cas de montage au mur, une distance minimale de 1,5
m avec le sol et de 0,20 m avec le plafond doit être respectée.
Montage et mise en service
1. Le détecteur de CO peut être utilisé de deux façons : monté au mur ou posé sur une surface adaptée.
Pour un montage mural, suivez les étapes ci-dessous dans l‘ordre indiqué. Utilisez un niveau à bulle pour
marquer les trous de perçage en position horizontale (distance 52 mm - voir fig. 5).
2. Percez les trous avec une perceuse adaptée à la position marquée au préalable (diamètre de perçage
Ø 5 mm). Veillez à ne pas endommager de câbles !
3. Insérez les chevilles dans les trous de perçage et tournez les deux vis fournies jusqu‘à ce que les têtes
de vis fassent encore saillie de 5 mm environ.
4. Ouvrez le compartiment à piles situé à l‘arrière de l‘appareil en appuyant sur la zone fléchée hachurée et
en faisant glisser le couvercle dans le sens de la flèche (fig. 8).
5. Insérez les deux piles AA 1,5 V dans le compartiment à piles en respectant les polarités. Le compartiment
à piles est doté d‘un mécanisme de sécurité : si aucune pile n‘est insérée, le couvercle ne peut pas être
refermé. Une fois les piles correctement positionnées, l‘appareil confirme l‘opération en émettant un signal
sonore et les trois LED situées en façade s‘allument brièvement. L‘appareil est opérationnel et est d‘abord
placé dans une phase d‘étalonnage. Durant les 30 premières secondes de l‘étalonnage, la LED verte
POWER clignote brièvement toutes les 3 s environ. L‘appareil passe ensuite en phase de fonctionnement
(la LED verte POWER s‘allume toutes les 30 s).
6. Inscrivez immédiatement la date d‘installation sur l‘autocollant fourni (fig. 10).
7. Le détecteur peut à présent être posé et emboîté sur les vis par le dos du boîtier, puis être placé à la
position souhaitée. Reportez-vous à cet eet aux instructions des figures 1-4.
13
GBFRITPL DESKSLCZ

8. Vous pouvez eectuer à tout moment un test de fonctionnement en appuyant brièvement sur le bouton
TEST/SILENCE. Un signal sonore CO retentit et la LED rouge ALARM clignote. Cela n‘indique pas une teneur
excessive en CO dans l‘air ambiant, mais cela confirme le fonctionnement correct du détecteur.
Fonctions
1. En mode de fonctionnement normal sans anomalie, la LED verte POWER s‘allume par intervalles réguliers de 30 s.
2. Alerte en cas de dysfonctionnement : si l‘appareil émet un signal sonore par intervalles de 30 s environ et que la
LED jaune ERROR clignote simultanément, vous devez remplacer le détecteur complet. Le capteur de l‘appareil
est défaillant. Mais il ne peut pas être remplacé.
3. Alerte en cas de niveau de charge faible : si un signal sonore (bip) retentit toutes les 30 s et que la LED jaune
ERROR clignote simultanément, cela indique une charge faible des piles. Dans ce cas, vous devez immédiatement les
remplacer. Dans cet état, aucune alerte au CO ne peut plus être émise ! Pour remplacer les piles, suivez les instructions
de la section MAINTENANCE. Vous pouvez interrompre le signal sonore pour niveau de charge faible pendant 9 h en
appuyant sur le bouton TEST/SILENCE. Durant cette phase, la LED jaune ERROR continue à clignoter.
4. Fin de la durée de vie : la durée de vie du capteur électrochimique est de 7 ans environ. Lorsque le capteur
arrive en fin de vie, trois bips retentissent toutes les 30 s et la LED jaune ERROR clignote. Dans ce cas, vous devez
immédiatement remplacer le détecteur.
5. Alarme de monoxyde de carbone : si le FMG 4313 détecte un niveau critique de monoxyde de carbone, il le
signale de la manière suivante : quatre signaux sonores brefs, suivis d‘une pause de 5 s, puis à nouveau quatre
signaux sonores brefs. La LED rouge ALARM clignote en suivant la même séquence. Ce cycle se répète tant
qu‘une concentration dangereuse de CO est présente dans l‘air ambiant ou jusqu‘à ce que vous interrompiez
l‘alarme en appuyant sur le bouton TEST/SILENCE. Pour connaître le comportement à tenir, reportez-vous au
chapitre Comportement en cas d‘alarme.
6. Activation de la fonction silence de l‘alarme CO : lorsqu‘une alarme CO est active, vous pouvez désactiver
le signal sonore pendant 5 min en appuyant sur le bouton TEST/SILENCE. La LED rouge ALARM continue de
clignoter pendant ce temps. Une fois ce délai écoulé, la séquence de signaux sonores reprend si la teneur en
CO est toujours supérieure à 45 ppm. Remarque : En cas d‘alarme CO active, la première séquence de signaux
présente un volume sonore plus faible (< 85 dB) que les suivantes (> 85 dB).
Maintenance
Remplacement des piles :
Les piles doivent généralement être remplacées au bout de 7 ans environ. La durée peut varier en fonction des
facteurs ambiants. La règle suivante est applicable : remplacez immédiatement les piles si le signal sonore pour
niveau de charge faible retentit (2 bips brefs avec la LED jaune ERROR qui clignote simultanément, toutes les
30 s). Pour remplacer les piles, suivez la procédure ci-dessous :
1. Ouvrez le compartiment à piles en appuyant sur la flèche (fig. 8) et en poussant le couvercle vers le bas. Ne
jetez pas les piles avec les déchets ménagers. la loi vous oblige à les remettre à l‘organisme les éliminer dûment.
Pour ce faire, il sut de les déposer dans un point de vente ou un centre de collecte. La reprise est gratuite.
2. Insérez les 2 piles neuves en respectant les polarités (fig. 9) ; les piles exercent ainsi une pression sur les
petits axes présents dans le compartiment. Si les piles sont correctement positionnées, le détecteur émet un
court signal sonore.
3. Fermez le compartiment des piles en repositionnant le couvercle et en le poussant vers le haut jusqu‘à ce
qu‘il s‘emboîte parfaitement.
4. Contrôlez le bon fonctionnement du détecteur (voir Test de fonctionnement.
Test de fonctionnement :
Contrôlez le bon fonctionnement du détecteur chaque semaine en appuyant brièvement sur le bouton Test/
Silence (fig. 7). Le détecteur émet un puissant signal sonore et la LED rouge ALARM s‘allume brièvement.
Ensuite, le détecteur retourne au mode de fonctionnement normal.
Nettoyage du détecteur de CO :
La poussière accumulée à l‘intérieur du détecteur peut être aspirée à l‘aide d‘un aspirateur, au travers des fentes
14

d‘aération. L‘extérieur du boîtier peut être nettoyé à l‘aide d‘un chion légèrement humidifié. Vous ne devez
en aucun cas utiliser un nettoyant ménager contenant de l‘ammoniac (solution ammoniacale) ou d‘autres
produits chimiques (tels que des nettoyants ou des solvants) sur le détecteur ou à proximité de celui-ci. Le
détecteur ne doit pas être peint ou verni. Veillez à ce que l‘humidité ne pénètre pas à l‘intérieur de l‘appareil.
Durée de vie
Le capteur électrochimique est soumis à un processus de vieillissement. Sa durée de vie est par conséquent
limitée à 7 ans environ. Le capteur ne peut pas être remplacé. C‘est pourquoi vous devez remplacer le
détecteur complet au plus tard 7 ans après la mise en service initiale. Notez la date de la mise en service
initiale sur l‘autocollant joint (fig. 10) avec un feutre indélébile.
Remarques concernant les piles et les batteries
Les piles et batteries usagées ne doivent en aucun cas être jetées avec les ordures ménagères. Leurs
propriétaires ont en eet l‘obligation légale de les ramener dans leur point de vente, où ils seront repris
gratuitement. Les piles contiennent des substances dangereuses pour l‘environnement et la santé et
doivent être recyclées selon la réglementation en vigueur.
Remarques concernant le recyclage
Cet appareil ne doit en aucun cas être jeté avec les ordures ménagères. Les propriétaires d‘équipements
électriques ou électroniques usagés ont en eet l‘obligation légale de les déposer dans un centre de
collecte sélective. Informez-vous auprès de votre municipalité sur les possibilités de recyclage.
Seuils de déclenchement conformément à EN 50291-1: 2010 + A1: 2012
14 15
Caractéristiques techniques
Désignation du détecteur FMG 4313 : type d‘appareil B
Fonctionnement sur pile 2 piles alcalines 1,5 V (AA/Mignon) Energizer E91
Certification EN 50291-1: 2010 + A1: 2012
Volume du signal env. 85 dB/1 m
Température de stockage/transport -20 °C à +50 °C
Humidité admissible 30 % à 95 % sans condensation
Indice de protection IP X20D
Dimensions L 120 x H 80 x P 38 mm
Durée de vie du détecteur env. 7 ans
Des modifications techniques et esthétiques peuvent être apportées sans notification préalable.
Concentration de CO dans l'air Déclenchement de l'alarme au plus tard
30 ppm au bout de 120 minutes
100 ppm au bout de 10 - 40 minutes
300 ppm après moins de 3 minutes
GBFRITPL DESKSLCZ

Leggere e conservare con cura!
Con l‘acquisto del presente articolo è stato scelto un prodotto FlammEx di alta qualità. Leggere attentamente
le istruzioni d‘uso per garantire un funzionamento impeccabile. Conservare con cura le istruzioni per
un‘eventuale consultazione successiva.
Il prodotto è destinato solo all‘utilizzo previsto (come descritto nelle istruzioni per l‘uso). Non è consentito
eseguire variazioni, modifiche o verniciature, pena l‘annullamento della garanzia. In questo caso non è
garantito il perfetto funzionamento.
Descrizione del prodotto
Un rilevatore di CO è un dispositivo di rilevamento che segnala la concentrazione di monossido di carbonio
nell’aria e fa scattare un allarme non appena questa è troppo alta.
Questo rilevatore di monossido di carbonio non è adatto come rivelatore di fumo o di gas infiammabili!
Cosa dovete sapere sul monossido di carbonio (CO)
Il monossido di carbonio (CO) è un veleno pericoloso. Si tratta di un gas incolore, inodore e insapore. Il gas
CO si forma durante la combustione di materiali contenenti carbonio, quando non c’è abbastanza ossigeno.
Questo pericolo può verificarsi ad es. in caldaie, camini e gas di scarico delle auto. Questo veleno viene
associato nel sangue e impedisce il trasporto di ossigeno provocando la morte per soocamento. Anche
piccole concentrazioni di gas CO possono provocare danni al cervello o ad altri organi nei nascituri.
Il monossido di carbonio (CO) ha praticamente la stessa densità dell’aria, si distribuisce quindi uniformemente
nell’aria. Non è possibile dare istruzioni precise per una corretta sistemazione di un rilevatore.
I sintomi in caso di avvelenamento da monossido di carbonio:
Segni leggeri Segni medi Segni estremi
• Mal di testa leggero • Mal di testa forte • Perdita di conoscenza
• Malore/vomito • Sonnolenza • Contrazioni
• Aaticamento • Senso di smarrimento • Disturbi nel ritmo cardiaco
• Battito accelerato • Morte
Informazioni importanti
Il montaggio dovrebbe essere eseguito da una persona esperta. Un rilevatore di CO non sostituisce un
rilevatore di fumo, fuoco o altri rilevatori di incendio! Questo rilevatore è previsto per essere utilizzato
in abitazioni private. Non è adatto per usi o applicazioni industriali, né per l’utilizzo su barche sportive
o per il trasporto di persone. Nel lungo periodo le seguenti sostanze possono danneggiare il corretto
funzionamento dell’apparecchio. Tenere pertanto l’apparecchio lontano da:
• ammoniaca/idrossido d‘ammonio• solventi per la pulizia • diluenti per vernici • diluenti nitro • propano • butano
• isobutano • isopropanolo • etilene • benzene • toluene • etilacetato • solfuro di idrogeno • biossido di zolfo
• sostanze alcoliche • spray per capelli • after shave • profumo • detergenti
Per le persone con particolari problemi medici non può offrire una completa sicurezza né impedire un
effetto cronico su un corpo esposto al monossido di carbonio. Non può sostituire installazione, utilizzo e
manutenzione corretti per apparecchi a combustibile, inclusi i sistemi di areazione e di scarico.
Il rilevatore di CO deve essere sostituito al più tardi entro 7 anni dalla prima messa in funzione. Tenere
presente che ci sono anche altri pericoli per i quali il rilevamento di CO da parte di questo rilevatore non
è di aiuto, ad es. perdite di gas, incendio o esplosioni. Vi consigliamo in questi casi i nostri rilevatori di
gas, fumo e calore. Maggiori informazioni in internet: www.gev.de
Rilevatore di CO FMG 4313 (monossido di carbonio)
16

Comportamento in caso di allarme
1. Uscire subito all’aria aperta o verso una finestra/porta aperte.
2. Telefonare ai vigili del fuoco.
3. Non entrare più nell’area interessata e/o non allontanarsi dalla finestra/porta aperta.
4. Attendere l’arrivo dei vigili del fuoco.
5. Aerare bene tutti i locali.
6. Cessato il pericolo, il rilevatore di CO disattiva autonomamente l’allarme e ripristina la
condizione normale.
Visualizzazioni e funzioni (fig. 7)
1. Test/Tasto Silence Questo tasto serve a testare la funzione e il silenziamento di un allarme.
2. Apertura per casse acustiche
3. Visualizzazione POWER (segnale LED verde). Segnala la disponibilità lampeggiando costantemente a
intervalli di 30 s.
4. Visualizzazione ERROR (segnale LED giallo). La visualizzazione Error segnala anomalie o avvertimenti
inerenti a un rilevamento di CO.
5. Visualizzazione ALARM (segnale LED rosso). In caso di rilevamento di CO, il LED si illumina di rosso.
Installazione
Raccomandazione per una sicurezza ottimale: Installare un rilevatore di CO nella camera dei bambini e nella
camera da letto nonché in tutte le camere con: riscaldamento a gas, focolari/forni o camini, nei pianerottoli di
ogni piano e in garage.
Raccomandazione per una protezione minima: Installare un rilevatore di CO nei pianerottoli e nei locali
con riscaldamento a gas, focolari/forni o camini.
Luogo di montaggio (fig. 1-4)
Montare o appoggiare il rilevatore il più possibile in posizione centrale su una superficie libera e nelle
vicinanze di potenziali fonti di pericolo (es. Caldaie a gas). In caso di montaggio a parete la distanza minima
da terra dovrebbe essere superiore a 1,5 m e 0,2 m dal sotto.
Montaggio e messa in funzione
1. Il funzionamento del rilevatore di CO è possibile nelle due seguenti varianti:
Montaggio a parete o a sé stante su una base idonea. Per montare il rilevatore a parete seguire gli step
descritti nella sequenza indicata. Utilizzare una livella a bolla d’aria per segnare dove praticare i fori in
posizione orizzontale. (Distanza 52 mm - v. fig. 5)
2. Praticare i fori nelle posizioni precedentemente segnate, utilizzando un trapano adatto. (Diametro foro
Ø 5 mm) Fare attenzione a non danneggiare eventuali linee!
3. Spingere i tasselli nei fori e serrare le due viti in dotazione finché le teste non sporgono di 5 mm.
4. Aprire il vano batteria sul lato posteriore dell‘apparecchio premendo sulla superficie tratteggiata della
freccia e spingere il coperchio in direzione della freccia (fig. 8).
5. Inserire le due batterie 1,5 AA nel vano, facendo attenzione che la polarità sia corretta. Il vano batterie ha
un meccanismo di sicurezza: Senza batterie inserite non è possibile chiudere la copertura del vano:
Non appena le batterie sono collocate correttamente, l’apparecchio lo conferma con un segnale acustico e
tutti i LED disposti frontalmente si illuminano brevemente. L’apparecchio è ora pronto per il funzionamento
e si trova in una fase di calibrazione. Nei primi 30 s. della calibrazione il LED “POWER” verde si accende
brevemente ogni 3 s. circa. Quindi l’apparecchio passa alla fase operativa (ogni 30 s. 1x attivazione del LED
verde “POWER”).
6. Riportare subito la data d’installazione sull’adesivo in dotazione (fig. 10).
7. Il rilevatore può ora essere appoggiato sulle viti con il lato posteriore dell’alloggiamento ed essere
agganciato e/o messo nella posizione desiderata. Osservare al riguardo le istruzioni nella fig. 1-4.
GBFRITPL DESKSLCZ
16 17

8. È possibile eseguire un test del funzionamento in qualsiasi momento, premendo brevemente il tasto “TEST/
SILENCE”. Si sente un suono di avvertimento e il LED rosso “ALARM” lampeggia. Esso non segnala un contenuto
eccessivo di CO nell’aria del locale, bensì conferma il corretto funzionamento del rilevatore.
Funzioni
1. Se il funzionamento è normale, senza anomalie, si accende il LED verde “POWER” ad intervalli regolari di 30 s.
2. Avvertimento di un’anomalia: Se l’apparecchio emette un segnale acustico ad intervalli di 30 s. circa e
contemporaneamente lampeggia il LED giallo „ERROR”, sostituire il rilevatore. L’apparecchio ha infatti un sensore
guasto. Il sensore non può essere sostituito.
3. Avvertimento per il livello batteria: Se ogni 30 s. viene emesso un segnale acustico (bip) e contemporaneamente
lampeggia il LED giallo “ERROR”, la tensione della batteria è bassa. In tal caso è necessario sostituire
immediatamente le batterie. In questa condizione non è più assicurato che l’allarme CO funzioni!! Per sostituire
le batterie seguire le indicazioni riportate al punto WARNUNG (Avvertenza). L’avvertimento acustico per il livello
batteria basso può essere disattivato per 9h premendo il tasto TEST/SILENCE. In questa fase il LED giallo
„ERROR“ continua a lampeggiare.
4. ine della durata di vita: La durata del sensore elettrochimico è di circa 7 anni. La fine della durata di vita viene
segnalata da un bip che risuona tre volte per 30 s. congiuntamente al lampeggio del LED giallo „ERROR“. In tal
caso il rilevatore deve essere subito sostituito.
5. Allarme monossido di carbonio: Se l’FMG 4313 rileva una concentrazione critica di monossido di carbonio, la
segnala con i seguenti tipi di allarme: Quattro brevi segnali acustici seguiti da una pausa di 5 s. e di nuovo quattro
brevi segnali acustici. Analogamente a questo tipo lampeggia il LED rosso “ALARM”. Questo ritmo si ripete finché
la concentrazione pericolosa di CO persiste nell’aria del locale o l’allarme non viene disattivato premendo il tasto
TEST/SILENCE. Per come comportarsi in caso di allarme consultare il capitolo Comportamento in caso di allarme.
6. Silenziare l’allarme CO: Durante un allarme CO attivo è possibile silenziare il segnale acustico per 5 minuti
premendo il tasto TEST/SILENCE. Il LED “ALARM” rosso continua a lampeggiare per tutto il periodo. Se al
termine di questo periodo, il contenuto di CO è ancora sopra i 45 ppm, anche il segnale acustico riprende. Nota: In
caso di allarme CO attivo, il primo tipo di segnale è un po’ più basso (< 85 dB), rispetto a tutti i successivi (>85 dB).
Manutenzione
Sostituzione della batteria:
Di norma le batterie devono essere sostituite solo dopo circa 7 anni. Questo periodo può variare a seguito di
influssi ambientali. Considerare: Sostituire le batterie quando risuona l’avvertimento acustico per il livello batteria
basso (viene segnalato con 2 brevi bip accompagnati da un lampeggio del LED giallo “ERROR” - ogni 30
secondi. Per sostituire le batterie seguire queste istruzioni:
1. Aprire il vano batteria premendo sulla freccia (fig. 8) ed estraendo il coperchio del vano. Non smaltire le batterie
come rifiuto domestico. L’utente finale ha l’obbligo per legge di restituire le batterie dopo l’uso. È possibile farlo
gratuitamente presso il punto vendita o consegnandole nel più vicino centro di raccolta.
2. Inserire le 2 batterie nuove rispettando la corretta polarità (fig. 9) e con ciascuna di esse premere verso il
basso i perni che si trovano nel vano. Il rilevatore conferma con un breve bip.
3. Chiudere il vano batterie appoggiandovi sopra il coperchio e spingendolo verso l’alto finché non si aggancia.
4. Verificare subito il funzionamento del rilevatore (v. Test funzionale).
Test funzionale:
Verificare il corretto funzionamento 1 volta per settimana premendo brevemente il tasto Test/Silence (fig. 7).
Il rilevatore emette un bip elevato e i LED rossi “ALARM” si accendono contemporaneamente per un breve
momento. Quindi il rilevatore torna al funzionamento normale.
Pulizia del rilevatore di CO:
La polvere all’interno del rilevatore può essere rimossa dall’esterno attraverso le fessure di aerazione per
mezzo di aspirapolvere. L’alloggiamento può essere pulito dall’esterno con un panno leggermente inumidito.
Non utilizzare mai sul rilevatore o nelle sue vicinanze un detergente domestico con ammoniaca (idrossido
d‘ammonio) o altre sostanze chimiche (es. detergenti o solventi). Il rilevatore non deve essere verniciato! Fare
18

attenzione che dell’umidità non penetri all’interno dell‘apparecchio.
Durata
Il sensore elettrochimico è soggetto ad invecchiamento. La durata di vita del sensore è pertanto limitata
a circa 7 anni. Il sensore non può essere sostituito. Quindi cambiare l’intero rilevatore almeno ogni 7 anni
dopo la prima messa in funzione. Segnarsi la data della prima messa in funzione sull’apposita etichetta
(fig.10) con un pennarello indelebile.
Note su batterie e accumulatori
Le batterie usate non possono essere smaltite come rifiuti urbani indierenziati. Chi possiede batterie
usate è tenuto per legge a restituirle al punto di vendita. Le batterie contengono sostanze nocive per
l‘ambiente e per la salute e devono pertanto essere smaltite conformemente alle normative in vigore.
Istruzioni per il riciclaggio
Il presente dispositivo non deve essere smaltito come rifiuto domestico indierenziato. Chi possiede
un vecchio dispositivo è vincolato per legge allo smaltimento conformemente alle normative in vigore.
Per ulteriori informazioni rivolgersi all‘amministrazione comunale.
Soglia di attivazione ai sensi della EN 50291-1: 2010 + A1: 2012
Dati tecnici
Denominazione del tipo FMG 4313: Tipo di apparecchio B
Funzionamento a batteria 2x 1,5 V alcalina (AA/Mignon) Energizer E91
Certificazione EN 50291-1: 2010 + A1: 2012
Volume del segnale ca. 85 dB/1 m
Temperatura di stoccaggio/trasporto -20°C... +50°C
Umidità dell‘aria ammessa 30 %... 95 % non condensante
Tipo di protezione IP X20D
Dimensioni LA 120 x H 80 x P 38 mm
Durata di vita del rilevatore ca. 7 anni
L‘azienda si riserva il diritto di apportare modifiche tecniche ed estetiche senza preavviso.
Concentrazione di CO nell’aria Intervento allarme al più tardi
30 ppm dopo 120 minuti
100 ppm dopo 10 - 40 minuti
300 ppm dopo meno di 3 minuti
GBFRITPL DESKSLCZ
18 19

Należy dokładnie przeczytać i zachować!
Kupując ten artykuł, zdecydowali się Państwo na wysokiej jakości produkt ochrony przeciwpożarowej.
Należy dokładnie przeczytać instrukcję obsługi, aby zapewnić sprawne działanie. Należy starannie
przechowywać tę instrukcję, aby także później można było z niej skorzystać.
Produkt jest przeznaczony tylko do użytku zgodnie z przeznaczeniem (odpowiednio do opisu w instrukcji
obsługi). Nie wolno wprowadzać zmian, modyfikacji lub lakierować produktu, ponieważ w przeciwnym
razie wygasa prawo do gwarancji. W takim przypadku nie jest zapewnione prawidłowe działanie.
Opis produktu
Detektor CO to czujnik, który kontroluje stężenie tlenku węgla w powietrzu w pomieszczeniu i generuje
alarm, kiedy jest ono zbyt wysokie.Ten detektor tlenku węgla nie jest odpowiedni do stosowania jako
czujnik ostrzegawczy do dymu lub jako detektor gazów palnych!
Co należy wiedzieć o tlenku węgla (CO)
Tlenek węgla (CO) to niebezpieczna substancja trująca. To bezbarwny, bezwonny i niemający smaku gaz.
Gaz CO powstaje podczas spalania materiałów zawierających węgiel, gdy nie jest zapewniona wystarczająca
ilość tlenu.
Takie niebezpieczeństwo może występować, np. w przypadku kotłów grzejnych, piecyków kominkowych i
spalin samochodowych. Trucizna trafia do krwiobiegu i uniemożliwia tam transport tlenu, co może prowadzić
do śmierci przez uduszenie. Nawet małe stężenie gazu CO może prowadzić do uszkodzenia mózgu lub innych
organów u płodu, nie wpływając na matkę.
Tlenek węgla (CO) ma w przybliżeniu taką samą gęstość, co powietrze i dlatego równomiernie rozprowadza
się w pomieszczeniu. Nie ma możliwości sformułowania dokładnych instrukcji dotyczących właściwego
umieszczenia detektora.
Objawy zatrucia tlenkiem węgla:
Słabe objawy Średnio silne objawy Skrajne objawy
• Lekki ból głowy • Silny ból głowy • Utrata przytomności
• Mdłości / wymioty • Senność • Skurcze
• Zmęczenie • Otumanienie • Zaburzenia rytmu pracy serca
• Wysokie tętno • Śmierć
Ważne informacje
Montaż może wykonywać tylko wykwalifikowana osoba. Detektor CO nie zastępuje detektorów dymu,
ognia lub innych czujników pożarowych! Ten detektor jest przeznaczony do użytkowania w domach i
mieszkaniach prywatnych. Nie jest on odpowiedni do zastosowań komercyjnych lub przemysłowych,
do zastosowania na łodziach sportowych lub na statkach. Wymienione substancje mogą trwale
ograniczać prawidłowe działanie urządzenia. Dlatego nie należy ich przechowywać w pobliżu urządzenia:
• Amoniak / roztwór wodny amoniaku • Środek do czyszczenia pędzli • Rozcieńczalnik do farb • Nitrorozcieńczalnik
• Propan • Butan • Izobutan • Izopropanol • Etylen • Benzeny • Tolueny • Octan etylu • Siarkowodór • Dwutlenki
siarki • Substancje alkoholowe • Spray do włosów • Płyny po goleniu • Perfumy • Środki czyszczące
Nie może on zapewniać pełnego zabezpieczenia dla osób ze szczególnymi cechami medycznymi i nie
zapobiega przed chronicznym wpływem narażenia na tlenek węgla na ludzki organizm. Nie zastępuje
on prawidłowej instalacji, użytkowania i utrzymania urządzeń zasilanych paliwem, w tym odpowiednich
systemów wentylacji i odprowadzania spalin.
Najpóźniej 7 lat po pierwszym uruchomieniu trzeba wymienić detektor CO. Należy uwzględnić to, że
występują także inne zagrożenia, w przypadku których wykrywanie CO nie jest wystarczające, np. wyciek
gazu, pożar lub wybuch. W tych celach rekomendujemy nasze czujniki gazu, dymu i ciepła. Więcej
informacji można znaleźć na stronie: www.gev.de
Detektor CO FMG 4313 (tlenek węgla)
20
Strona się ładuje...
Strona się ładuje...
Strona się ładuje...
Strona się ładuje...
Strona się ładuje...
Strona się ładuje...
Strona się ładuje...
Strona się ładuje...
Strona się ładuje...
Strona się ładuje...
Strona się ładuje...
Strona się ładuje...
Strona się ładuje...
Strona się ładuje...
Strona się ładuje...
Strona się ładuje...
Strona się ładuje...
Strona się ładuje...
-
 1
1
-
 2
2
-
 3
3
-
 4
4
-
 5
5
-
 6
6
-
 7
7
-
 8
8
-
 9
9
-
 10
10
-
 11
11
-
 12
12
-
 13
13
-
 14
14
-
 15
15
-
 16
16
-
 17
17
-
 18
18
-
 19
19
-
 20
20
-
 21
21
-
 22
22
-
 23
23
-
 24
24
-
 25
25
-
 26
26
-
 27
27
-
 28
28
-
 29
29
-
 30
30
-
 31
31
-
 32
32
-
 33
33
-
 34
34
-
 35
35
-
 36
36
-
 37
37
-
 38
38


GEV FlammEx FMG 4313 Instrukcja obsługi
- Kategoria
- Budziki
- Typ
- Instrukcja obsługi
w innych językach
- čeština: GEV FlammEx FMG 4313 Uživatelský manuál
- italiano: GEV FlammEx FMG 4313 Manuale utente
- Deutsch: GEV FlammEx FMG 4313 Benutzerhandbuch
- slovenčina: GEV FlammEx FMG 4313 Používateľská príručka
- français: GEV FlammEx FMG 4313 Manuel utilisateur
- English: GEV FlammEx FMG 4313 User manual
Inne dokumenty
-
Smartwares FGA-1304 Battery Standalone Carbon Monoxide Alarm Instrukcja obsługi
-
Smartwares FGA-1304 Instrukcja obsługi
-
-
Smartwares FGA-13051 Instrukcja obsługi
-
Abus FURM50000 Instrukcja obsługi
-
Otio 520045 Instrukcja obsługi
-
Abus FU8370 Instrukcja obsługi
-
 MALTEC Czujnik Czadu Tlenku Węgla Certyfikowany SafeSensor1000 Instrukcja obsługi
-
Abus FUBW50020 Instrukcja obsługi
-
